Android file system
In Android, each application is an independent user. The permission of a file or folder is represented by 10 letters
First letter:
- d stands for folder
- -Representation file
The first group rwx represents the permission of the file owner to the file
- r:read
- w:write
- x:execute
The second group rwx refers to the permission of users whose file owners belong to the same user group
The third group rwx represents the permissions of other users on files
rwx represents the value 421 respectively
Access rights for Android files
Files in Android have many permissions, and files created by ourselves also have permissions. Permission related API s
FileInputStream openFileOutput(String name);	//read file
FileOutputStream openFileOutput(String name,int mode);	//pattern
The directory accessed by this API is data/data package name / files. Open the name file under the data folder of the application, and the corresponding output streams are as follows
| pattern | explain |
|---|---|
| Context.MODE_PRIVATE | Private mode, the second reading and writing will overwrite the file |
| Context.MODE_APPEND | Append method: judge the existence of the file and append it to the end of the file |
| Context.MODE_WORLD_READABLE | Other programs can be read (not recommended) |
| Context.MODE_WORLD_WRITEABLE | Other programs can be written (not recommended) |
File access instance
The interface code is as follows:
<?xml version="1.0" encoding="utf-8"?>
<LinearLayout xmlns:android="http://schemas.android.com/apk/res/android"
    android:orientation="vertical"
    xmlns:tools="http://schemas.android.com/tools"
    android:layout_width="match_parent"
    android:layout_height="match_parent"
    tools:context=".MainActivity">

    <Button
        android:id="@+id/btn_private"
        android:onClick="onClick"
        android:text="Private mode"
        android:textSize="20sp"
        android:layout_width="match_parent"
        android:layout_height="wrap_content" />

    <Button
        android:id="@+id/btn_append"
        android:onClick="onClick"
        android:text="Add"
        android:textSize="20sp"
        android:layout_width="match_parent"
        android:layout_height="wrap_content" />


    <Button
        android:id="@+id/btn_global_read"
        android:onClick="onClick"
        android:text="Global readability"
        android:textSize="20sp"
        android:layout_width="match_parent"
        android:layout_height="wrap_content" />


    <Button
        android:id="@+id/btn_global_write"
        android:onClick="onClick"
        android:text="Global writable"
        android:textSize="20sp"
        android:layout_width="match_parent"
        android:layout_height="wrap_content" />


    <Button
        android:id="@+id/btn_global_rw"
        android:onClick="onClick"
        android:text="Globally readable and writable"
        android:textSize="20sp"
        android:layout_width="match_parent"
        android:layout_height="wrap_content" />


    <Button
        android:id="@+id/btn_private"
        android:onClick="onClick"
        android:text="Private mode"
        android:textSize="20sp"
        android:layout_width="match_parent"
        android:layout_height="wrap_content" />

</LinearLayout>
Set five buttons to correspond to different file permissions, and then write response events
public void onClick(View view) {
        int id=view.getId();
        String name=null;
        int mode=0;
        switch (id)
        {
            case R.id.btn_private:
                name="private.txt";
                mode=Context.MODE_PRIVATE;
                break;
            case R.id.btn_append:
                name="append.txt";
                mode=Context.MODE_APPEND;
                break;
            case R.id.btn_global_read:
                name="global_read.txt";
                mode=Context.MODE_WORLD_READABLE;
                break;
            case R.id.btn_global_write:
                name="global_write.txt";
                mode=Context.MODE_WORLD_WRITEABLE;
                break;
            case R.id.btn_global_rw:
                name="global_rw.txt";
                mode=Context.MODE_WORLD_READABLE|Context.MODE_WORLD_WRITEABLE;
                break;
        }


       try {
            FileOutputStream outputStream=openFileOutput(name,mode);
            String content="Here is the content";
            outputStream.write(content.getBytes());
            outputStream.close();

        } catch (FileNotFoundException e) {
            e.printStackTrace();
        } catch (IOException e) {
            e.printStackTrace();
        }
        }
    }
When you click the button
Different files will be generated in the files directory
Data storage mode
In the Android SDK, there are the following types of data storage:
- Internal storage: it is stored in the memory of the mobile phone, which is suitable for saving some temporary data that is not too large
- External storage (stored in SD card): basically, any data can be saved
- Sqlite database: suitable for storing data with certain rules
- Shared Preferences: stored in the APP installation directory, an xml file will be generated, which can only be accessed by this program. It is suitable for storing simple and scattered data
- Networked storage: getting data from the server
- Application content shared with provider
Internal storage
Internal storage can only be stored in the data area of its own app
Directory: data/data / package name / xxx txt

The following classes are required for writing and reading:
- File information class: file class
- Save file using: FileOutputStream class
- Read file using: FileInputStream class
- Converting byte stream to character stream: BufferedReader class
Internal storage instance
Example: user login program
Function: after logging in, check to remember the user name, and you can fill it directly next time
Analysis ideas:
- Design layout
- Handle button events and complete the operation of saving code
- When initializing the interface, read the file and load the user name
The layout code is as follows:
<?xml version="1.0" encoding="utf-8"?>
<LinearLayout xmlns:android="http://schemas.android.com/apk/res/android"
    android:orientation="vertical"
    xmlns:tools="http://schemas.android.com/tools"
    android:layout_width="match_parent"
    android:layout_height="match_parent"
    tools:context=".MainActivity">

    <EditText
        android:id="@+id/edit_user"
        android:hint="Please enter your user name here"
        android:layout_width="match_parent"
        android:layout_height="wrap_content" />

    <EditText
        android:id="@+id/edit_pass"
        android:hint="Please enter your password here"
        android:layout_width="match_parent"
        android:layout_height="wrap_content" />

    <CheckBox
        android:id="@+id/checkbox"
        android:text="Remember user name"
        android:layout_width="match_parent"
        android:layout_height="wrap_content" />

    <Button
        android:id="@+id/btnclick"
        android:onClick="btnClick"
        android:text="land"
        android:layout_width="wrap_content"
        android:layout_height="wrap_content" />
</LinearLayout>
Then write the button response event to save the user name and password
 public void btnClick(View view) {
        //Get user name
        EditText editText=findViewById(R.id.edit_user);
        String user=editText.getText().toString();

        //Get password
        EditText editText2=findViewById(R.id.edit_pass);
        String pass=editText.getText().toString();

        //Simulate and judge the login situation
        if (!user.equals(pass))
        {
            return;
        }
        Toast.makeText(this,"Successful login",Toast.LENGTH_LONG).show();
        //Get interface object
        CheckBox checkBox=findViewById(R.id.checkbox);

        //Judge whether it is selected
        if (checkBox.isChecked())
        {
            //Save user name
            String path="/data/data/com.example.a87321.login/config.txt";
            File file=new File(path);
            try {
                FileOutputStream outputStream=new FileOutputStream(file);
                byte bytes[]=user.getBytes();
                outputStream.write(bytes);
            } catch (FileNotFoundException e) {
                e.printStackTrace();
            } catch (IOException e) {
                e.printStackTrace();
            }


        }
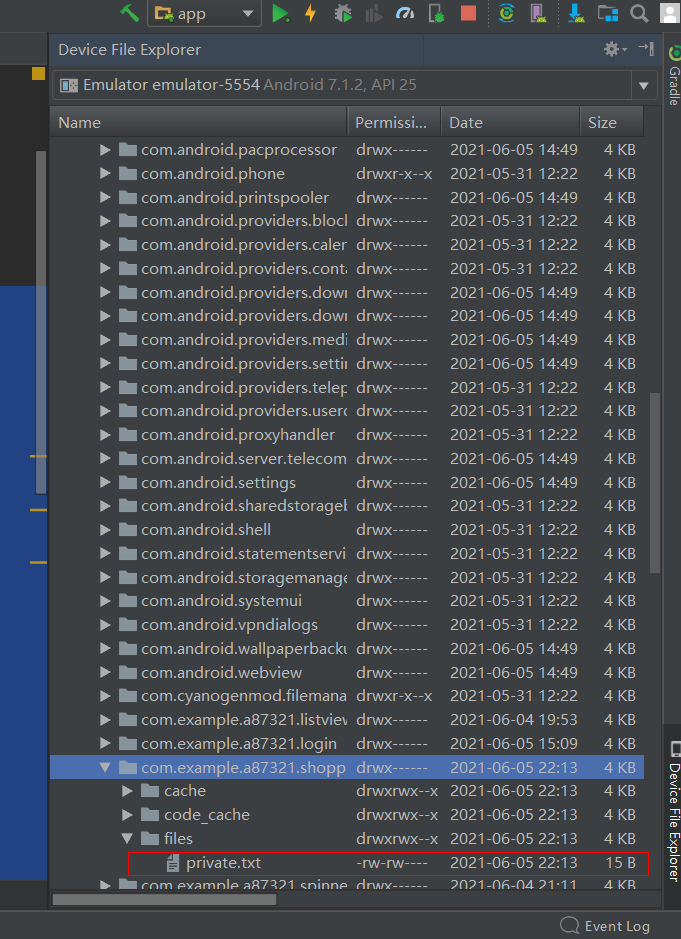
Run program
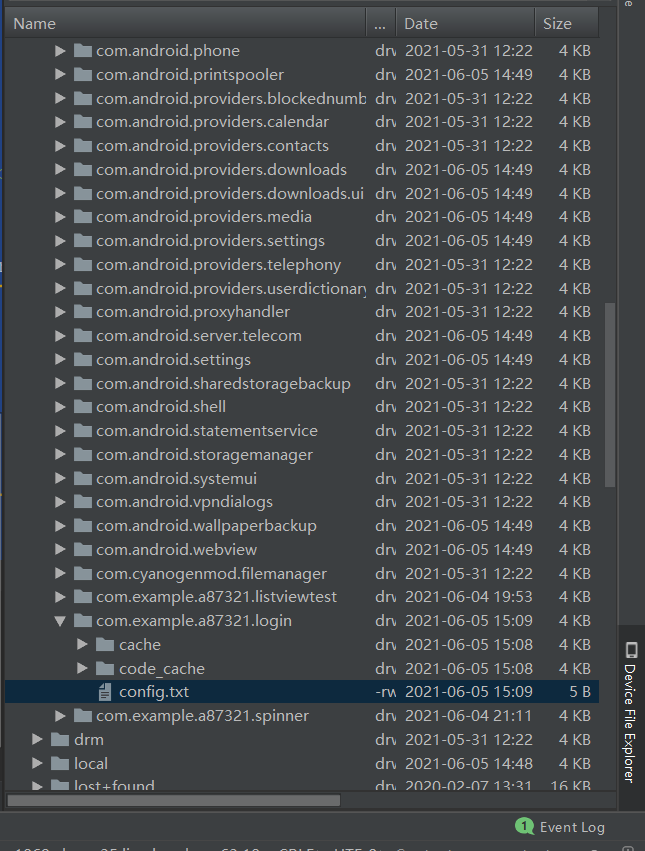
Under the path of / data/data / package name / you can see the saved config file; Then write code to read the account password of the configuration file at the main function entry
private void InitData() {
       //Get control object
       EditText editText=findViewById(R.id.edit_user);

       //Read the user name of the configuration file and set the object
        String packageName=getPackageName();
       String path="/data/data/"+packageName+"/config.txt";
       File file=new File(path);
       try {
           FileInputStream inputStream=new FileInputStream(file);
           byte bytes[]=new byte[(int)file.length()];
           inputStream.read(bytes);
           String s=new String(bytes);
           editText.setText(s);

       } catch (FileNotFoundException e) {
           e.printStackTrace();
       } catch (IOException e) {
           e.printStackTrace();
       }
   }
Then, when the interface is loaded, the user name will be automatically read and displayed on the interface. The effect is shown in the figure:

External storage
External storage is stored in SD card
Path of SD card
- Sdcard: SD card path before 2.3
- MNT / sdcard: SD card path before 4.3
- Storage / sdcard: SD card path after 4.3

The use method is similar to that of internal storage, but the write path is different. There are no more examples here
Shared Preferences
Shared Preferences is the most used data storage method. The information saved in this data storage method can only be basic data types and strings. It is suitable for saving unlocking passwords, user names and some configuration information.
Core principle: the operation of reading and writing is / data / data / < package name > / shared under the app installation directory_ In the prefs directory, the saved files are in xml format

Write data using Shared Preferences
Shared Preferences is an interface that only provides the function of reading data; The internal interface of Shared Preferences is the edit() method of Editor class, which provides write function. The steps are as follows:
- Get input value
- Create a shared preferences Editor interface object
- Put the obtained value into the file
- Submit
- Other processing, prompt information, etc
Shared Preferences instance
The interface code is as follows:
<?xml version="1.0" encoding="utf-8"?>
<LinearLayout xmlns:android="http://schemas.android.com/apk/res/android"
    android:orientation="vertical" android:layout_width="match_parent"
    android:layout_height="match_parent">

    <EditText
        android:id="@+id/edit1"
        android:hint="Please enter your password here"
        android:layout_width="match_parent"
        android:layout_height="wrap_content" />

    <Button
        android:id="@+id/btn_set"
        android:text="Save password"
        android:textSize="20sp"
        android:onClick="btnClick"
        android:layout_width="match_parent"
        android:layout_height="wrap_content" />

    <Button
        android:id="@+id/btn_get"
        android:text="Get password"
        android:textSize="20sp"
        android:onClick="btnClick"
        android:layout_width="match_parent"
        android:layout_height="wrap_content" />

</LinearLayout>
Then write a response event to save pass
 private void setPass() {
        //Get password
        EditText editText=findViewById(R.id.edit1);
        String pass=editText.getText().toString();
        //Get SharedPreferences object
        SharedPreferences sp=getSharedPreferences("lock",Context.MODE_PRIVATE);
        //Get Editor object
        SharedPreferences.Editor editor=sp.edit();
        //Press in data
        editor.putString("pass",pass);
        //Submit and save
        editor.commit();
        //Prompt information
        Toast.makeText(this,"Save complete",Toast.LENGTH_LONG).show();
The actual effect is shown in the figure:
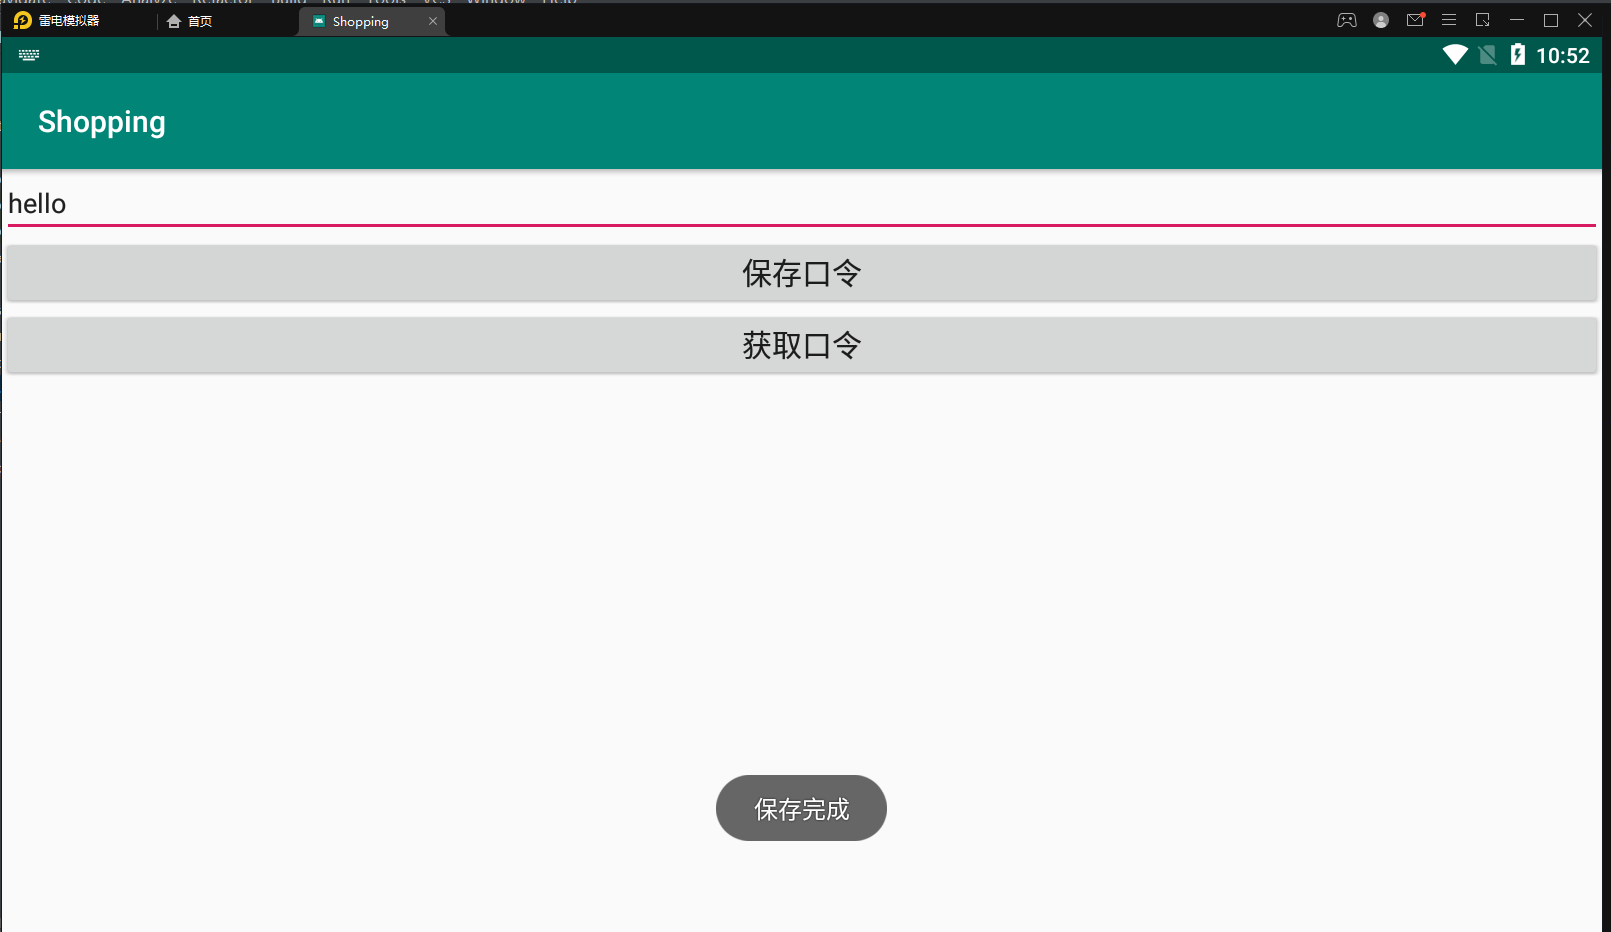
After clicking save password
[the external link image transfer fails. The source station may have an anti-theft chain mechanism. It is recommended to save the image and upload it directly (img-0cvKULbO-1623032601181)(005 Android data storage. assets/1622904828683.png)]
Shared will be generated_ Prefs folder and generate an xml file, which stores the saved pass data. Next, complete the read operation of pass
private void getPass() {
        //Get SharedPreferences object
        SharedPreferences sp=getSharedPreferences("lock",Context.MODE_PRIVATE);
        //get data
        String pass=sp.getString("pass","none");

        if (pass.equals("none")==false)
        {
            //Prompt information
            Toast.makeText(this,"Password:"+pass,Toast.LENGTH_LONG).show();
        }
    }
Reading is relatively simpler than writing. You can directly call the getString method to obtain data. The effect is as follows:

sqlite database
sqlite overview
Sqlite is a very excellent and widely used database in embedded software. Its main features are compact and free and open source. Based on these two points, Google's android system has built-in Sqlite, which is suitable for some regular data, such as telephone information; Like all databases, it has the function of adding, deleting, modifying and querying
Class for accessing Sqlite database in Android
There are two classes in Android for accessing sqlite database
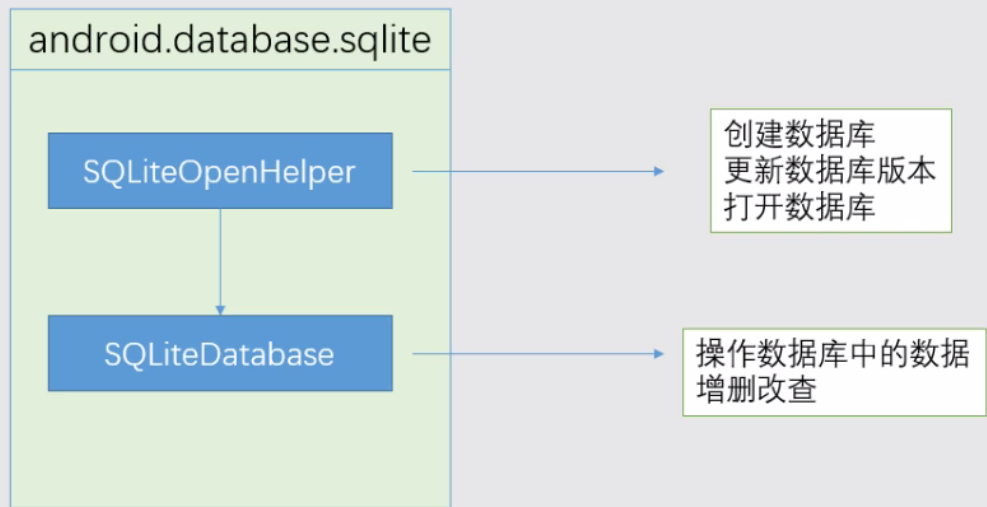
SQLiteOpenHelper is a help class of SQLiteDatabase, which is used to manage the creation and version update of database. Generally, a class is established to inherit it and implement onCreate and onUpgrade methods
| Method name | explain |
|---|---|
| SQLiteOpenHelper | Construction method |
| onCreate | Called the first time the database is created |
| onUpgrade | Called on version update |
| getWritableDatabase | Create a database and open it in read-write mode. An error will occur when the disk is full and cannot be written |
| getReadableDatabase | To create a database, first open the database in read-write mode, and then open it in read-only mode when the disk is full |
SQLiteDatabase is a database access class. This class encapsulates a series of API s for database operations, which can add, delete, modify and query the database
| Method name | explain |
|---|---|
| delete | Delete data row |
| insert | Add data row |
| update | Update data row |
| execSQL | Execute an sql statement |
| close | close database |
| query | Query the specified data table and return a data set with cursor |
| rawQuery | Run a preset SQL statement and return a data set with cursor |
Use of SQLiteOpenHelper class
First, write the interface code and set 6 buttons to correspond to different database functions
<?xml version="1.0" encoding="utf-8"?>
<LinearLayout xmlns:android="http://schemas.android.com/apk/res/android"
    android:orientation="vertical"
    xmlns:tools="http://schemas.android.com/tools"
    android:layout_width="match_parent"
    android:layout_height="match_parent"
    tools:context=".MainActivity">

    <Button
        android:id="@+id/btn1"
        android:onClick="btnCreate"
        android:text="Create database"
        android:textSize="20sp"
        android:layout_width="match_parent"
        android:layout_height="wrap_content" />

    <Button
        android:id="@+id/btn2"
        android:onClick="btnUpdate"
        android:text="Update database"
        android:textSize="20sp"
        android:layout_width="match_parent"
        android:layout_height="wrap_content" />


    <Button
        android:id="@+id/btn3"
        android:onClick="btnInsert"
        android:text="insert data"
        android:textSize="20sp"
        android:layout_width="match_parent"
        android:layout_height="wrap_content" />


    <Button
        android:id="@+id/btn4"
        android:onClick="btnUpdateData"
        android:text="Update data"
        android:textSize="20sp"
        android:layout_width="match_parent"
        android:layout_height="wrap_content" />


    <Button
        android:id="@+id/btn5"
        android:onClick="btnSelectData"
        android:text="Query data"
        android:textSize="20sp"
        android:layout_width="match_parent"
        android:layout_height="wrap_content" />


    <Button
        android:id="@+id/btn6"
        android:onClick="btnDelData"
        android:text="Delete data"
        android:textSize="20sp"
        android:layout_width="match_parent"
        android:layout_height="wrap_content" />

</LinearLayout>
[the external link image transfer fails. The source station may have an anti-theft chain mechanism. It is recommended to save the image and upload it directly (img-nIVwT87i-1623032601186)(005 Android data storage. assets/1622955011480.png)]
Then create a new class and inherit SQLiteOpenHelper
[the external link image transfer fails. The source station may have an anti-theft chain mechanism. It is recommended to save the image and upload it directly (img-bS4rce2R-1623032601191)(005 Android data storage. Assets / 162295507781. PNG)]
Then override the onCreate and onUpgrade methods
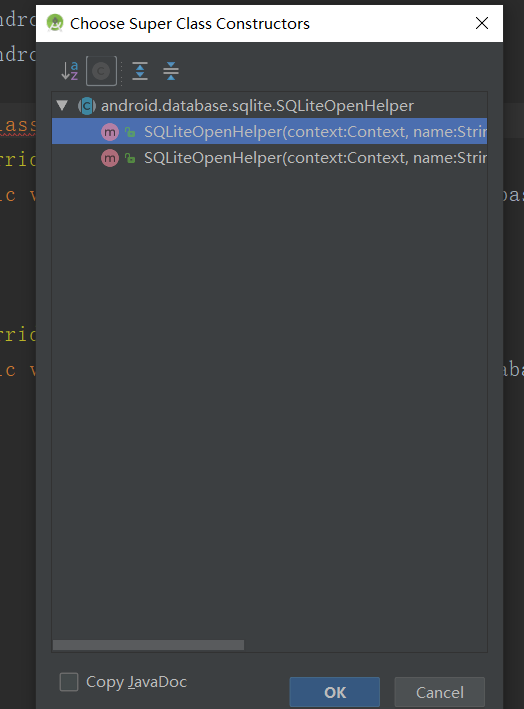
Then implement the construction method
Override the onCreate method to create a database
    @Override
    public void onCreate(SQLiteDatabase sqLiteDatabase) {
        //Output log
        Log.i("DBHelper","Create a database");
        //sql statement for creating database
        String sql="create table user(id int,name varchar(20))";

        //Perform the create database operation
        sqLiteDatabase.execSQL(sql);
    }
Override the upgrade method
 @Override
    public void onUpgrade(SQLiteDatabase sqLiteDatabase, int i, int i1) {
        //Output log
        Log.i("DBHelper","update a database");
    }
Then write the response event of the create database button
   public void btnCreate(View view) {
        //Create a DatabaseHelper object
        DBHelper dbHelper=new DBHelper(MainActivity.this,"test.db",null,1);
        //Gets a read-only database object
        SQLiteDatabase db1=dbHelper.getReadableDatabase();
        db1.close();
    }
Click create database

You can generate database files in the database directory
Write update database response events
    public void btnUpdate(View view) {
        DBHelper dbHelper2=new DBHelper(MainActivity.this,"test.db",null,2);
        //Updated version
        SQLiteDatabase db2=dbHelper2.getReadableDatabase();
        db2.close();
    }

After clicking update data, the onUpgrade method will be called automatically to print the log
Use of SQLiteDatabase
insert data
 public void btnInsert(View view) {
        //Get the ContentValues object that stores the data
        ContentValues values=new ContentValues();
        //Store data in ContentValues
        values.put("id",1);
        values.put("name","zhangsan");
        //Get database object
        DBHelper dbhelper3=new DBHelper(this,"test.db",null,2);
        SQLiteDatabase db3=dbhelper3.getWritableDatabase();
        //Database execution insert command
        db3.insert("user",null,values);
        db3.close();

    }
Update data
  public void btnUpdateData(View view) {
        //Prepare data objects to update
        ContentValues values2=new ContentValues();
        values2.put("name","lisi");

        //Get database object
        DBHelper dbhelper4=new DBHelper(this,"test.db",null,2);
        SQLiteDatabase db4=dbhelper4.getWritableDatabase();

        //Execute sql statement
        db4.update("user",values2,"id=?",new String[]{"1"});
        db4.close();
    }
Query data
public void btnSelectData(View view) {
        //Get database object
        DBHelper dbhelper5=new DBHelper(this,"test.db",null,2);
        SQLiteDatabase db5=dbhelper5.getWritableDatabase();
        //Create cursor object
        Cursor cursor=db5.query("user",new String[]{"id","name"},"id=?",new String[]{"1"},null,null,null,null);
        //Traversing all data objects with cursors
        while (cursor.moveToNext())
        {
            String name=cursor.getString(cursor.getColumnIndex("name"));
            Log.i("MainActivity","query-->"+name);
        }
        db5.close();
    }
Delete data
public void btnDelData(View view) {
        //Get database object
        DBHelper dbhelper6=new DBHelper(this,"test.db",null,2);
        SQLiteDatabase db6=dbhelper6.getWritableDatabase();
        //Delete data
        db6.delete("user","id=?",new String[]{"1"});
        db6.close();
    }