Network configuration under Linux
What is IP ADDRESS
Full name: internet protocol address
ipv4----------internet protocol version 4
ip is composed of 32 01s
11111110.11111110.11111110.11111110 = 254.254.254.254
Subnet mask
Used to divide the network area
The number on the ip corresponding to the non-0 bit of the subnet mask represents the network bit of this ip
The number corresponding to bit 0 of the subnet mask is the host bit of the ip
The network bit represents the network area
The host bit represents a host in the network area
ip communication decision
Can two IP S with the same network bit and inconsistent host bit communicate directly
For example: host 1: 172.25.254.1 / 24 = 255.255.255.0
Host 2: 172.25.254.2/24
The two hosts can communicate directly
Network settings tool
ping										#Check whether the network is unobstructed
ping -c 1									#Ping once 	 c means count
ping -w 1									#Wait 1 second 	 w stands for wait
ping -c1 -w1 ip								#ping1 time, wait 1 second
ifconfig	#View or set network interface
ifconfig									#see
ifconfig device ip/24						#set up
ifconfig device down						#close
ifconfig device up							#open
ip addr		#Detect or this network interface
ip addr show								#testing
ip addr add ip/24 dev device				#set up
ip addr del dev ens160 ip/24				#delete
Graphic mode setting ip
-
nm-connection-editor
Make the setting effective after setting
nmcli connection show
nmcli connection reload
nmcli connection down song
nmcli connection up song
It is not recommended to use systemctl to control the network, as follows:
systemctl restart NetworkManager
-
nmtui
Command mode setting network
nmcli		#The NetworkManager service must be turned on
nmcli device connect ens4					#Enable ens4 network card
nmcli device disconnect ens4				#Turn off the ens4 network card
nmcli device show ens4						#View network card information
nmcli device show ens4						#View network card service interface information
nmcli connection show						#View connections
nmcli connection down song					#Close connection
nmcli connection up song					#Open connection
nmcli connection delete song				#Delete connection
nmcli connection reload						#Restart connection
add connections
nmcli connetion add type ethernet ifname ens4 con-name song ipv4.method manual ipv4.addresses 172.25.254.170/24
change
nmcli connetion modify song ipv4.addresses 172.25.254.270/24
Manage network profiles
Network configuration file path: / etc / sysconfig / network scripts/
Configuration file naming format ifcfg-****
Profile configuration rules
vim ifcfg-****
************************************************************************
DEVICE=*** 										#Equipment name
BOOTPROTO=dhcp|static|none 						#Equipment working mode
ONBOOT=yes 										#Automatically activate the network card when the network service is turned on
IPADDR= 										#IP address
PREFIX=24 										#Subnet mask
NETMASK=255.255.255.0 							#Subnet mask
NAME= 											#Interface name
************************************************************************
#If you want to configure mult ip le IPS on a network card, then:
IPADDR0= 										#IP address
NETMASK0=255.255.255.0 							#Subnet mask
IPADDR1= 										#IP address
NETMASK1=255.255.255.0 							#Subnet mask
************************************************************************
Set dhcp
vim ifcfg-ens4
************************************************************************
DEVICE=ens4 									#Equipment name
BOOTPROTO=dhcp									#Equipment working mode
ONBOOT=yes 										#Automatically activate the network card when the network service is turned on
************************************************************************
systemctl restart network
lo loop interface
The loopback interface is equivalent to the human nerve and is used for internal signal transmission. The ip is 127.0.0.1, which is generally called localhost
gateway
There are two ways to set the gateway:
-
Enable global gateway ---- it takes effect for all network cards without a gateway
Edit the system configuration file / etc/sysconfig/network
Add gateway GATEWAY=172.25.254.70 in the configuration file
-
Modify the network configuration file / etc / sysconfig / network scripts / ifcfg-****
vim /etc/sysconfig/network-scripts/ifcfg-****
************************************************************************
#Add gateway configuration information under the configuration file
GATEWAY=172.25.254.70
************************************************************************
#If there are multiple IPS in the network card settings, specify which ip is effective
GATEWAY0=172.25.254.70
GATEWAY1=172.25.254.70
View gateway information
route -n #View gateway information
Set DNS
DNS(Domain Name Server) = = domain name resolution service
Users are sensitive to characters and computers are sensitive to numbers. When the user enters the website Baidu COM, this web address is not an IP address that can communicate
Address, and need to put Baidu in the system Com becomes the ip address of Baidu server. This process is called address resolution
-
Address resolution is directly provided in the local resolution file / etc/hosts, but it needs to be manually edited one by one, which is time-consuming and laborious
vim /etc/hosts
************************************************************************
220.181.111.188		baidu.com
-
DNS points to the file / etc / resolv Conf, which takes effect immediately without restarting the network
echo nameserver=114.114.114.114 >/etc/resolv.conf
-
To configure DNS in the network configuration file, restart the network to take effect. When the network restarts, this parameter will modify / etc / resolv conf
vim /etc/sysconfig/network-scripts/ifcfg-xxxx
************************************************************************
#Add DNS to profile
DNS1=114.114.114.114
Note: when the network working mode is dhcp, the system will automatically obtain ip, gateway and dns, mostly in / etc / resolv Conf will be modified by the obtained dns information. If you do not need to obtain dns information, you need to add PEERDNS=no in the network card configuration file / etc / sysconfig / network scripts / ifcfg - * * * *
Set resolution priority
The system defaults to: / etc / hosts > / etc / resolv conf
Edit the configuration file / etc / nsswitch Conf modify priority
vim /etc/nsswitch.conf
************************************************************************
59 hosts:      files dns myhostname 			#/etc/hosts priority
************************************************************************
59 hosts:      dns files myhostname 			#/etc/resolv.conf priority

Build remote software warehouse
Install httpd
dnf install -y httpd #Download remote call
Turn on the httpd service and turn off the firewall
systemctl enable --now httpd
systemctl disable --now firewalld
Mount the image file to the network path:
mkdir /var/www/html/song
umount /songdir
mount /iso/rhel-8.2-x82_64-dvd.iso /var/www/html/song
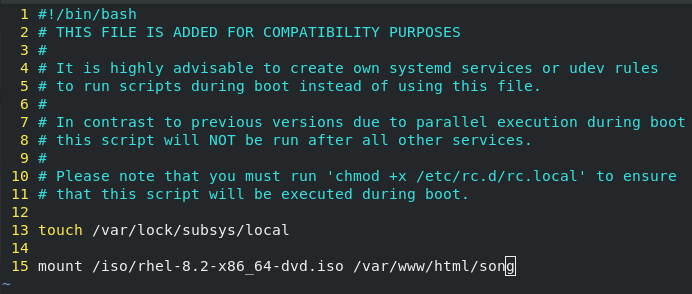
Edit system files, set boot auto mount
vim /etc/rc.d/rc.local
************************************************************************
#Add mount command
mount /iso/rhel-8.2-x82_64-dvd.iso /var/www/html/song

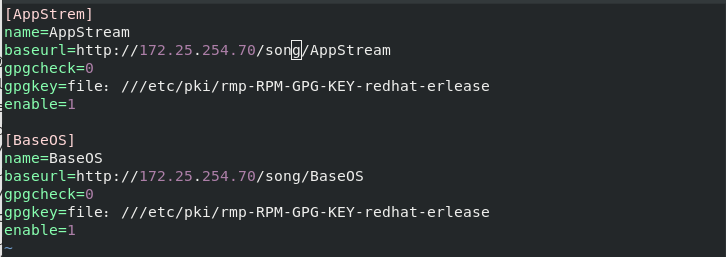
Configure software warehouse
vim /etc/yum.repos.d/song.repo

Finished!
DHCP service configuration
Install DHCP
dnf install dhcp-server -y
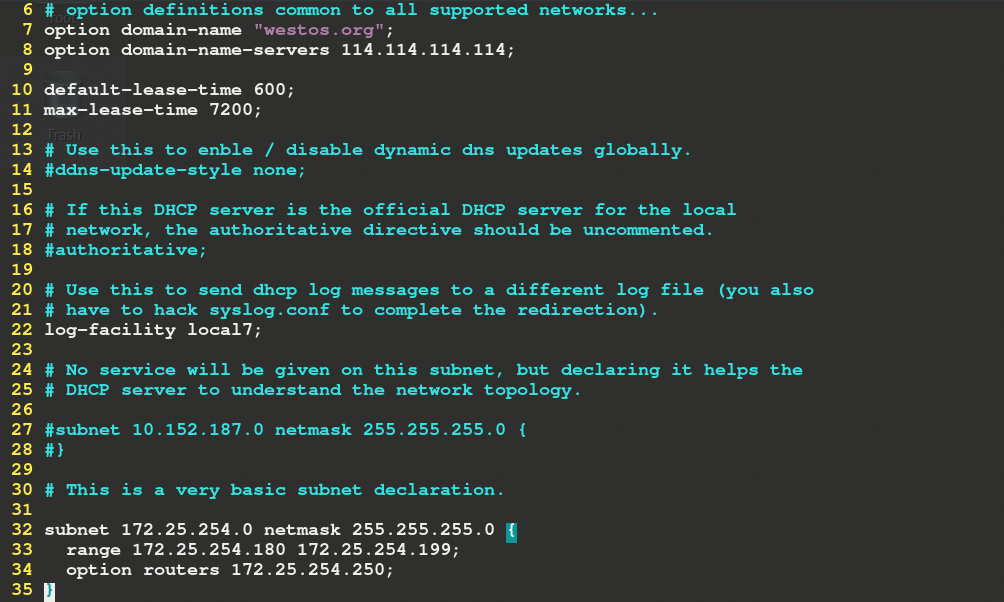
Configure DHCP
cp /usr/share/doc/dhcp-server/dhcpd.conf.example /etc/dhcp/dhcpd.conf
vim /etc/dhcp/dhcpd.conf

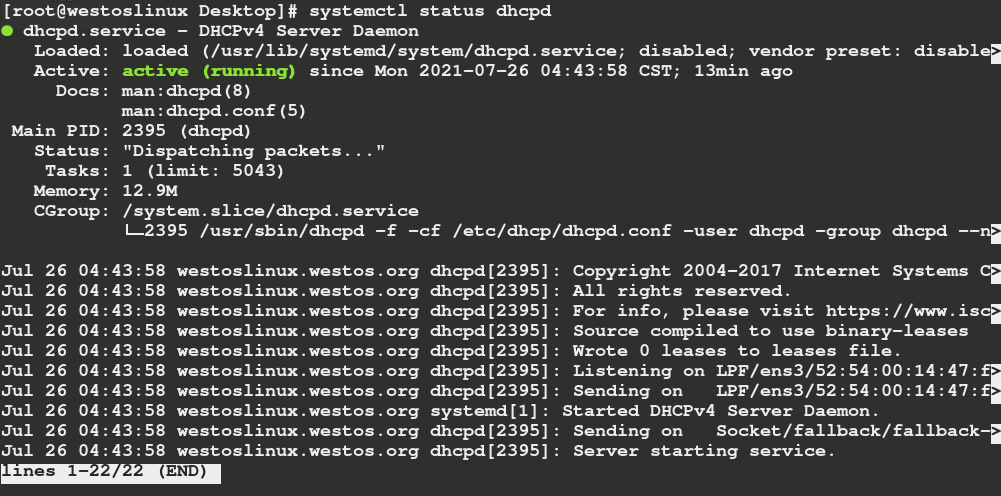
Restart dhcpd service after configuration:
systemctl restart dhcpd

When another device obtains network information through this dhcp service, this opportunity is at / var / lib / dhcpd / dhcpd The leaves file records the information and device information obtained by other devices through local dhcp.
Construction of bridge
Edit network card configuration:
vim ifcfg-ens4
************************************************************************
DEVICE=ens4
BOOTPROTO=none
ONBOOT=yes
BRIDGE=br0
NAME=ens4
Tag bridge configuration:
vim ifcfg-br0
************************************************************************
DEVICE=br0
BOOTPROTO=none
IPADDR=172.25.254.70
NETMASK=255.255.255.0
PREFIX=24
ONBOOT=yes
TYPE=Bridge
NAME=br0
Restart the network for the configuration to take effect
nmcli connection reload
nmcli connection up br0
nmcli connection up ens4
Check whether the bridge is successful

After the bridge is built, the virtual machine has no network solution
After the bridge is built, execute the following command to complete the address camouflage:
firewall-cmd --add-masquerade
After the camouflage, the virtual machine can use the network normally