In the previous part, we can build a RocketMQ cluster, and then use the command line to write messages to RocketMQ and consume them. In this part, let's look at how to use RocketMQ in the project.
1, RocketMQ native API usage
Using RocketMQ's native API development is the simplest and most reliable way at present. Here, we use SpringBoot to build a series of message producers and message consumers to access the RocketMQ cluster we built earlier.
1. Test environment construction
First, create a Maven based SpringBoot project and introduce the following dependencies:
<dependency>
        <groupId>org.apache.rocketmq</groupId>
        <artifactId>rocketmq-client</artifactId>
        <version>4.7.1</version>
</dependency>
In addition, some dependencies, such as openmessage, acl and other extension functions, need to be added. See the example module in the RocketMQ source code for details. The example module in the RocketMQ source package provides very detailed test code, which can also be used for direct debugging. Here we will use the examples in the source package to connect our own RocketMQ cluster for demonstration.
There are many classic test codes on the official website of RocketMQ. Although these codes rely on older versions, they can still run. So we still study in the order on the official website.
However, when debugging these codes, we should pay attention to one problem: producers and consumers in these test codes need to rely on NameServer to run. They only need to point the NameServer to our own RocketMQ cluster, and they can connect to our own RocketMQ cluster regardless of where the Broker is. RocketMQ provides two ways for producers and consumers to find NameServer:
1. Specify the namesrvAddr attribute in your code. For example: consumer.setNamesrvAddr("127.0.0.1:9876");
2. Via NAMESRV_ADDR environment variable. Multiple nameservers are connected by semicolons.
2. Programming model of RocketMQ
Then, the programming models of RocketMQ producers and consumers have a relatively fixed step. Mastering this fixed step is very helpful for us to learn the source code and use it in the future.
- Fixed steps for message sender:
- Create a message producer and specify the producer group name
- Specify Nameserver address
- Start producer
- Create a message object and specify the Topic, Tag and message body
- send message
- Close producer
- Fixed steps for message consumers:
- Create a Consumer and make a Consumer group name
- Specify Nameserver address
- Subscribe to Topic and Tag
- Set callback function to process messages
- Start consumer
3. Example message for RocketMQ
Let's connect the types of messages supported by RocketMQ one by one:
3.1 basic example
In the basic sample part, we use the message producer to send messages in three ways: synchronous sending, asynchronous sending and one-way sending.
Consumers are then used to consume these messages.
1. See org.apache.rocketmq.example.simple.Producer for an example of sending messages synchronously
Wait for the message to return before continuing with the following operations.
2. See org.apache.rocketmq.example.simple.AsyncProducer for an example of sending messages asynchronously
An interesting aspect of this example is the introduction of a countDownLatch to ensure that all message callback methods are executed and then close the Producer. Therefore, it can be seen from here that the Producer of RocketMQ is also a server, which also provides services as a server when sending messages to the Broker.
3. Example of sending a message in one direction:
public class OnewayProducer {
    public static void main(String[] args) throws Exception{
        //Instantiate with a producer group name.
        DefaultMQProducer producer = new DefaultMQProducer("please_rename_unique_group_name");
        // Specify name server addresses.
        producer.setNamesrvAddr("localhost:9876");
        //Launch the instance.
        producer.start();
        for (int i = 0; i < 100; i++) {
            //Create a message instance, specifying topic, tag and message body.
            Message msg = new Message("TopicTest" /* Topic */,
                "TagA" /* Tag */,
                ("Hello RocketMQ " +
                    i).getBytes(RemotingHelper.DEFAULT_CHARSET) /* Message body */
            );
            //Call send message to deliver message to one of brokers.
            producer.sendOneway(msg);
        }
        //Wait for sending to complete
        Thread.sleep(5000);
        producer.shutdown();
    }
}
The key point is to use producer.sendOneWay to send messages. This method has no return value and no callback. Just send the message.
4. Use consumer consumption messages.
There are two modes for consumers to consume messages. One is that consumers take the initiative to pull messages from the Broker, and the other is that consumers wait for the Broker to push messages.
See org.apache.rocketmq.example.simple.PullConsumer for an example of pull mode
See org.apache.rocketmq.example.simple.PushConsumer for an example of push mode
Generally, the push mode is relatively simple.
In fact, the push mode of RocketMQ is also encapsulated by the pull mode.
In version 4.7.1, the consumer class DefaultMQPullConsumerImpl has been marked as expired, but it can still be used. The replaced class is DefaultLitePullConsumerImpl.
3.2 sequential messages
See org.apache.rocketmq.example.order.Producer for an example of a sequential message producer
See org.apache.rocketmq.example.order.Consumer for an example of a sequential message consumer
During validation, you can start multiple Consumer instances to observe the message allocation of each order and the consumption order of multiple steps under each order. No matter how the order is allocated before multiple Consumer instances, the order of multiple messages under each order is fixed from 0 to 5. RocketMQ guarantees the local order of messages, not the global order.
First, see what list < messagequeue > MQS is from the console. Looking back at our example, in fact, RocketMQ only ensures that all messages of each OrderID are in order (sent to the same queue), but not all messages are in order. Therefore, this involves the principle of RocketMQ message ordering. To ensure that the final consumed messages are orderly, you need to ensure that the messages are orderly in three steps: Producer, Broker and Consumer.
First, on the sender side: by default, the message sender will send messages to different messagequeues (partition queues) by Round Robin polling, and consumers will also pull messages from multiple messagequeues when consuming. In this case, the order of messages cannot be guaranteed. Only when a group of ordered messages are sent to the same MessageQueue can the first in first out feature of MessageQueue be used to ensure the order of this group of messages. Messages in a queue in the Broker can be ordered.
Then on the consumer side: consumers will get messages from multiple Message queues. At this time, although the messages on each Message queue are orderly, the messages between multiple queues are still out of order. To ensure the order of messages, the consumer needs to get messages one by one, that is, after getting the messages of a queue, it can get the messages of the next queue. For the MessageListenerOrderly object injected into the consumer, RocketMQ will ensure that messages are retrieved one queue by one by locking the queue. Messagelistenercurrently, the Message listener does not lock the queue. Each time, it fetches a batch of data from multiple messages (no more than 32 by default). Therefore, the order of messages cannot be guaranteed.
3.3 broadcast message
See org.apache.rocketmq.example.broadcast.PushConsumer for an example of the message producer of broadcast messages
There is no specific example for broadcast messages because it involves the cluster consumption mode of consumers. In the cluster state (MessageModel.CLUSTERING), each message will only be consumed by one instance in the same consumer group (the same as the cluster mode of kafka and rabbitMQ). The broadcast mode sends the message to all consumers who subscribe to the corresponding topic, regardless of whether the consumers are the same consumer group or not.
3.4 delayed messages
Producer case of delayed messages
 public class ScheduledMessageProducer {

     public static void main(String[] args) throws Exception {
         // Instantiate a producer to send scheduled messages
         DefaultMQProducer producer = new DefaultMQProducer("ExampleProducerGroup");
         // Launch producer
         producer.start();
         int totalMessagesToSend = 100;
         for (int i = 0; i < totalMessagesToSend; i++) {
             Message message = new Message("TestTopic", ("Hello scheduled message " + i).getBytes());
             // This message will be delivered to consumer 10 seconds later.
             message.setDelayTimeLevel(3);
             // Send the message
             producer.send(message);
         }

         // Shutdown producer after use.
         producer.shutdown();
     }

 }
The effect of delayed message implementation is that after calling the producer.send method, the message will not be sent immediately, but will be sent after a period of time. This is a unique feature of RocketMQ.
How long will it be delayed? Setting the delay time is to set a delay level message.setDelayTimeLevel(3) on the Message object;
In the open source version of RocketMQ, the delay setting at any time is not supported for delay messages (supported in the commercial version), but only 18 fixed delay levels are supported. 1 to 18 correspond to messagedelaylevel = 1s 5S 10s 30s 1m 2m 4m 7m 8m 9m 10m 20m 30m 1H 2H respectively. Where did you see that? In fact, it can be seen from the RocketMQ console. These 18 delay levels also support self-definition, but generally it is best not to customize and modify them.
How is such an easy-to-use delay message implemented? What else are these 18 delay levels used in addition to delay messages? Don't worry, we'll explain it in detail later.
3.5 batch messages
Batch message refers to combining multiple messages into one batch message and sending it at one time. This has the advantage of reducing network IO and improving throughput.
See org.apache.rocketmq.example.batch.SimpleBatchProducer and org.apache.rocketmq.example.batch.SplitBatchProducer for sample message producers of batch messages
I believe you have seen the key comments on the official website and the test code: if the batch message is greater than 1MB, do not send it in one batch, but split it into multiple batches. That is, the size of a batch message should not exceed 1MB.
In actual use, the 1MB limit can be slightly expanded. The actual maximum limit is 4194304 bytes, about 4MB. However, when using batch messages, this message length is indeed a problem that must be considered. Moreover, there are certain restrictions on the use of batch messages. These messages should have the same Topic and the same waitStoreMsgOK. And it cannot be delay message, transaction message, etc.
3.6 filtering messages
In most cases, you can use the Tag attribute of Message to filter information simply and quickly.
See org.apache.rocketmq.example.filter.TagFilterProducer for examples of message producers using Tag to filter messages
See org.apache.rocketmq.example.filter.TagFilterConsumer for a message consumer case that uses Tag to filter messages
Mainly to see the news consumers. consumer.subscribe("TagFilterTest", "TagA || TagC"); This sentence only subscribes to taga and TAGC messages.
TAG is a unique message attribute in RocketMQ. In the best practice of RocketMQ, it is suggested that when using RocketMQ, an application can use one Topic, and different businesses in the application can be distinguished by TAG.
However, this method has a great limitation, that is, a message can only have one TAG, which is a little insufficient in some complex scenarios. At this time, you can use SQL expressions to filter messages.
See org.apache.rocketmq.example.filter.SqlFilterProducer for the message producer case of SQL filtering
See org.apache.rocketmq.example.filter.SqlFilterConsumer for the message consumer case of SQL filtering
The key to this pattern is to use a MessageSelector returned by MessageSelector.bySql(String sql) on the consumer side. The sql statements are executed according to the SQL92 standard. The parameters that can be used in sql include the default TAGS and an a attribute added to the producer.
SQL92 syntax:
RocketMQ only defines some basic syntax to support this feature. You can also easily expand it.
- Numerical comparison, such as: >, > =, <, < =, BETWEEN, =;
- Character comparison, such as: =, < >, IN;
- IS NULL or IS NOT NULL;
- Logical symbols AND, OR, NOT;
Constant support types are:
- Value, such as 123, 3.1415;
- Characters, such as' abc ', must be enclosed in single quotation marks;
- NULL, special constant
- Boolean, TRUE or FALSE
Note: only consumers in push mode can use SQL filtering. Pull mode is useless.
Let's think about it. Is this message filtering done on the Broker side or on the Consumer side?
3.7 transaction messages
This transaction message is a very distinctive function provided by RocketMQ, which needs to be understood.
First, let's understand what transaction messages are. The introduction of the official website is: transaction message is a two-stage submitted message implementation to ensure final consistency in distributed systems. It can ensure the atomicity of local transaction execution and message sending, that is, the two operations succeed or fail together.
Secondly, let's understand the programming model of transaction messages. The transaction message only guarantees the atomicity of the two operations of the message sender's local transaction and message sending. Therefore, the example of transaction message only involves the message sender, and there is nothing special for the message consumer.
See org.apache.rocketmq.example.transaction.TransactionProducer for the case of transaction message producer
The key to transaction messages is to specify a TransactionListener transaction listener in TransactionMQProducer, which is the key controller of transaction messages. The case in the source code is a little complex. I have prepared a clearer example of transaction listener here
public class TransactionListenerImpl implements TransactionListener {
	//Execute after submitting the transaction message.
	//Return to commit_ Messages with message status will be consumed by consumers immediately.
	//Return to rollback_ Messages with message status are discarded.
	//For the message that returns the UNKNOWN status, the Broker will check the status of the transaction again after a period of time.
    @Override
    public LocalTransactionState executeLocalTransaction(Message msg, Object arg) {
        String tags = msg.getTags();
        //TagA messages will be consumed by consumers immediately
        if(StringUtils.contains(tags,"TagA")){
            return LocalTransactionState.COMMIT_MESSAGE;
        //TagB messages are discarded
        }else if(StringUtils.contains(tags,"TagB")){
            return LocalTransactionState.ROLLBACK_MESSAGE;
        //Other messages will wait for the Broker to check the transaction status.
        }else{
            return LocalTransactionState.UNKNOW;
        }
    }
	//It is executed when the status check is performed on the UNKNOWN status message. The results returned are the same.
    @Override
    public LocalTransactionState checkLocalTransaction(MessageExt msg) {
		String tags = msg.getTags();
        //TagC messages will be consumed by consumers over time
        if(StringUtils.contains(tags,"TagC")){
            return LocalTransactionState.COMMIT_MESSAGE;
        //TagD messages will also be discarded during status lookback
        }else if(StringUtils.contains(tags,"TagD")){
            return LocalTransactionState.ROLLBACK_MESSAGE;
        //The remaining tag messages will be discarded after multiple status lookbacks
        }else{
            return LocalTransactionState.UNKNOW;
        }
    }
}
Then, we want to understand the usage restrictions of the following transaction messages:
1. Delayed messages and bulk messages are not supported for transaction messages.
2. In order to avoid the accumulation of semi queue messages caused by too many times of single message checking, we limit the number of times of single message checking to 15 by default, but users can modify this limit through the transactionCheckMax parameter of the Broker configuration file. If a message has been checked more than N times (N = transactionCheckMax), the Broker will discard the message and print the error log at the same time by default. Users can modify this behavior by overriding the AbstractTransactionCheckListener class.
The number of backchecks is configured by the parameter BrokerConfig.transactionCheckMax. It is 15 by default and can be overwritten in broker.conf. Then, the actual number of checks will save a user attribute messageconst.property in message_ TRANSACTION_ CHECK_ TIMES. If the value of this attribute is greater than transactionCheckMax, it will be discarded. The value of this user attribute will be incremented by the number of lookbacks. You can also override this attribute in Producer.
3. The transaction message will be checked after a specific length of time such as the parameter transactionMsgTimeout in the Broker configuration file. When sending a transaction message, the user can also set the user attribute CHECK_IMMUNITY_TIME_IN_SECONDS to change this limit. This parameter takes precedence over the transactionMsgTimeout parameter.
Configured by the parameter BrokerConfig.transactionTimeOut. The default is 6 seconds, which can be modified in broker.conf. In addition, you can configure a messageconst.property for the message_ CHECK_ IMMUNITY_ TIME_ IN_ The seconds property to specify a specific message callback time for the message. msg.putUserProperty(MessageConst.PROPERTY_CHECK_IMMUNITY_TIME_IN_SECONDS, "10000"); That's 10 seconds.
4. Transactional messages may be checked or consumed more than once.
5. The target topic message submitted to the user may fail. At present, this depends on the log record. Its high availability is guaranteed by RocketMQ's own high availability mechanism. If you want to ensure that transaction messages are not lost and transaction integrity is guaranteed, it is recommended to use synchronous dual write mechanism.
6. The producer ID of a transaction message cannot be shared with the producer ID of other types of messages. Unlike other types of messages, transaction messages allow reverse queries, and MQ servers can query consumers through their producer ID.
Next, we also need to understand the implementation mechanism of the following transaction message, as shown in the figure below:
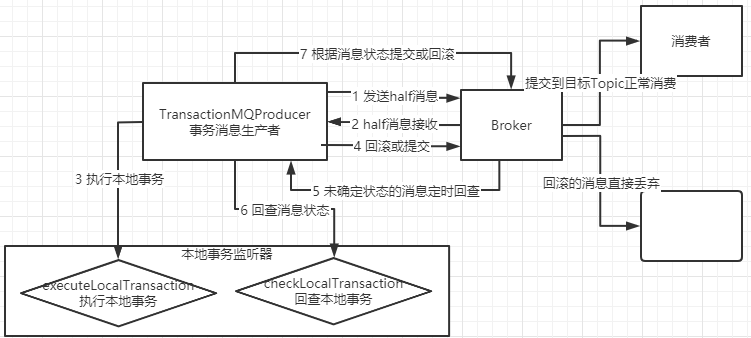
The key of the transaction message mechanism is that when sending a message, it will be converted into a half message and stored in an RMQ inside RocketMQ_ SYS_ TRANS_ HALF_ Topic is a topic that is invisible to consumers. After passing a series of transaction checks, the message is transferred to the target topic, which is visible to consumers.
Finally, we need to think about the role of transaction messages.
Let's think about the relationship between this transaction message and distributed transactions? Why does it involve two-phase commit related to distributed transactions? The transaction message only guarantees the atomicity of the sender's local transaction and the sending message, but does not guarantee the atomicity of the consumer's local transaction. Therefore, the transaction message only guarantees half of the distributed transaction. However, even so, for complex distributed transactions, the transaction message provided by RocketMQ is also the best degradation scheme in the industry.
3.8 ACL permission control
Permission control (ACL) mainly provides Topic resource level user access control for RocketMQ. When using RocketMQ permission control, users can inject AccessKey and SecretKey signatures into the Client through RPCHook; At the same time, set the corresponding permission control attributes (including Topic access permission, IP white list, AccessKey and secret key signature, etc.) in $RocketMQ_ HOME/conf/plain_ In the configuration file of acl.yml. The Broker side verifies the permissions of the AccessKey, but throws an exception; For ACL Client, please refer to the AclClient code under the org.apache.rocketmq.example.simple package.
Note that if you want to use the ACL function of RocketMQ in your own client, you also need to introduce a separate dependency package
 <dependency>
	<groupId>org.apache.rocketmq</groupId>
 	<artifactId>rocketmq-acl</artifactId>
 	<version>4.7.1</version>
 </dependency>
See docs / CN / ACL / user under the source package for the specific configuration information of the Broker side_ guide.md. This is mainly the flag to open ACL in broker.conf: aclEnable=true. Then you can use plain_acl.yml for permission configuration. Moreover, the configuration file is hot loaded, that is, when you want to modify the configuration, you only need to modify the configuration file without restarting the Broker service. Let's briefly analyze the plan in the source code_ Configuration of acl.yml:
#Global whitelist, not controlled by ACL
#It is usually necessary to add all nodes in the master-slave architecture
globalWhiteRemoteAddresses:
- 10.10.103.*
- 192.168.0.*

accounts:
#First account
- accessKey: RocketMQ
  secretKey: 12345678
  whiteRemoteAddress:
  admin: false
  defaultTopicPerm: DENY #The default Topic access policy is deny
  defaultGroupPerm: SUB #The default Group access policy is to allow subscriptions only
  topicPerms:
  - topicA=DENY #topicA reject
  - topicB=PUB|SUB #topicB allows you to publish and subscribe to messages
  - topicC=SUB #topicC only allows subscriptions
  groupPerms:
  # the group should convert to retry topic
  - groupA=DENY
  - groupB=PUB|SUB
  - groupC=SUB
#The second account can access all resources as long as it is an IP from 192.168.1. *
- accessKey: rocketmq2
  secretKey: 12345678
  whiteRemoteAddress: 192.168.1.*
  # if it is admin, it could access all resources
  admin: true
2, SpringBoot integrates RocketMQ
1. Rapid actual combat
In this section, let's take a look at how SpringBoot can quickly integrate RocketMQ.
When using the starter integration package of SpringBoot, pay special attention to the version. Because SpringBoot integrates RocketMQ, the starter dependency is provided by the Spring community. At present, it is in the process of rapid iteration. The gap between different versions is very large, and even the basic underlying objects are often changed. For example, if you use the code developed by RocketMQ Spring boot starter: version 2.0.4, you can't use it after upgrading to the latest RocketMQ Spring boot starter: 2.1.1.
We create a maven project and introduce key dependencies:
<dependencies>
        <dependency>
            <groupId>org.apache.rocketmq</groupId>
            <artifactId>rocketmq-spring-boot-starter</artifactId>
            <version>2.1.1</version>
            <exclusions>
                <exclusion>
                    <groupId>org.springframework.boot</groupId>
                    <artifactId>spring-boot-starter</artifactId>
                </exclusion>
                <exclusion>
                    <groupId>org.springframework</groupId>
                    <artifactId>spring-core</artifactId>
                </exclusion>
                <exclusion>
                    <groupId>org.springframework</groupId>
                    <artifactId>spring-webmvc</artifactId>
                </exclusion>
            </exclusions>
        </dependency>
        <dependency>
            <groupId>org.springframework.boot</groupId>
            <artifactId>spring-boot-starter-web</artifactId>
            <version>2.1.6.RELEASE</version>
        </dependency>
        <dependency>
            <groupId>io.springfox</groupId>
            <artifactId>springfox-swagger-ui</artifactId>
            <version>2.9.2</version>
        </dependency>
        <dependency>
            <groupId>io.springfox</groupId>
            <artifactId>springfox-swagger2</artifactId>
            <version>2.9.2</version>
        </dependency>
    </dependencies>
Rocketmq spring boot starter: the version of the SpringBoot package introduced in 2.1.1 is 2.0.5.RELEASE. Here, the dependent package of SpringBoot is upgraded.
Then we quickly create a simple Demo in the way of SpringBoot
Startup class:
@SpringBootApplication
public class RocketMQScApplication {

    public static void main(String[] args) {
        SpringApplication.run(RocketMQScApplication.class,args);
    }
}
Configuration file application.properties
#NameServer address
rocketmq.name-server=192.168.232.128:9876
#Default message producer group
rocketmq.producer.group=springBootGroup
Message producer
package com.roy.rocket.basic;

import org.apache.rocketmq.client.exception.MQClientException;
import org.apache.rocketmq.client.producer.SendResult;
import org.apache.rocketmq.spring.annotation.RocketMQTransactionListener;
import org.apache.rocketmq.spring.core.RocketMQTemplate;
import org.springframework.messaging.Message;
import org.springframework.messaging.support.MessageBuilder;
import org.springframework.stereotype.Component;

import javax.annotation.Resource;
import java.io.UnsupportedEncodingException;

@Component
public class SpringProducer {

    @Resource
    private RocketMQTemplate rocketMQTemplate;
	//Example of sending a normal message
    public void sendMessage(String topic,String msg){
        this.rocketMQTemplate.convertAndSend(topic,msg);
    }
	//Example of sending a transaction message
    public void sendMessageInTransaction(String topic,String msg) throws InterruptedException {
        String[] tags = new String[] {"TagA", "TagB", "TagC", "TagD", "TagE"};
        for (int i = 0; i < 10; i++) {
            Message<String> message = MessageBuilder.withPayload(msg).build();
            String destination =topic+":"+tags[i % tags.length];
            SendResult sendResult = rocketMQTemplate.sendMessageInTransaction(destination, message,destination);
            System.out.printf("%s%n", sendResult);

            Thread.sleep(10);
        }
    }
}
Message consumer
package com.roy.rocket.basic;

import org.apache.rocketmq.spring.annotation.RocketMQMessageListener;
import org.apache.rocketmq.spring.core.RocketMQListener;
import org.springframework.stereotype.Component;

@Component
@RocketMQMessageListener(consumerGroup = "MyConsumerGroup", topic = "TestTopic")
public class SpringConsumer implements RocketMQListener<String> {
    @Override
    public void onMessage(String message) {
        System.out.println("Received message : "+ message);
    }
}
SpringBoot integrates RocketMQ, and the core of the consumer part is on this @ RocketMQMessageListener annotation. The core functions of all consumers will also be integrated into this annotation. Therefore, we should also pay attention to the attributes in this annotation:
For example, message filtering can be customized by the selectorType attribute and selectorExpression
Whether messages are consumed orderly or concurrently is customized by the consumeMode attribute.
Whether the consumer is a cluster deployment or a broadcast deployment is customized by the messageModel attribute.
Then, for transaction messages, you also need to configure a transaction message listener:
package com.roy.rocket.config;

import org.apache.commons.lang3.StringUtils;
import org.apache.rocketmq.client.producer.LocalTransactionState;
import org.apache.rocketmq.spring.annotation.RocketMQTransactionListener;
import org.apache.rocketmq.spring.core.RocketMQLocalTransactionListener;
import org.apache.rocketmq.spring.core.RocketMQLocalTransactionState;
import org.apache.rocketmq.spring.support.RocketMQUtil;
import org.springframework.messaging.Message;
import org.springframework.messaging.converter.StringMessageConverter;

import java.util.concurrent.ConcurrentHashMap;

@RocketMQTransactionListener(rocketMQTemplateBeanName = "rocketMQTemplate")
public class MyTransactionImpl implements RocketMQLocalTransactionListener {

    private ConcurrentHashMap<Object, String> localTrans = new ConcurrentHashMap<>();
    @Override
    public RocketMQLocalTransactionState executeLocalTransaction(Message msg, Object arg) {
        Object id = msg.getHeaders().get("id");
        String destination = arg.toString();
        localTrans.put(id,destination);
        org.apache.rocketmq.common.message.Message message = RocketMQUtil.convertToRocketMessage(new StringMessageConverter(),"UTF-8",destination, msg);
        String tags = message.getTags();
        if(StringUtils.contains(tags,"TagA")){
            return RocketMQLocalTransactionState.COMMIT;
        }else if(StringUtils.contains(tags,"TagB")){
            return RocketMQLocalTransactionState.ROLLBACK;
        }else{
            return RocketMQLocalTransactionState.UNKNOWN;
        }
    }

    @Override
    public RocketMQLocalTransactionState checkLocalTransaction(Message msg) {
        //There is no transactionId attribute in the message object of SpringBoot. Unlike the native API.
//        String destination = localTrans.get(msg.getTransactionId());
        return RocketMQLocalTransactionState.COMMIT;
    }
}
In this way, after we start the application, we can access http://localhost:8080/MQTest/sendMessage?message=123 Interface to send a simple message. And consume it in spring consumer. You can also access http://localhost:8080/MQTest/sendTransactionMessage?message=123 To send a transaction message.
It can be seen here that the transactionId is missing when the transaction message is encapsulated by SpringBoot, which is very important in transaction control.
2. More message types:
For other message types, they are not recorded one by one in the document. See the junit test case in the source code for details.
3. Summary:
- After SpringBoot introduces the org.apache.RocketMQ: RocketMQ spring boot starter dependency, you can interact with RocketMQ through the built-in RocketMQTemplate. Related properties begin with rockmq. See org.apache.rocketmq.spring.autoconfigure.RocketMQProperties for all configuration information.
- The Message object in SpringBoot dependency and the Message object in rocketmq client are two different objects, which are easy to make mistakes when using. For example, the tag attribute in Message in rocketmq client does not exist in Message in SpringBoot dependency. The tag attribute is moved to the sending destination and specified in the form of Topic:Tag together with Topic.
- Finally, be sure to pay attention to the version. The update progress of RocketMQ spring boot starter is generally slightly slower than the version update of RocketMQ, and different versions will cause many strange problems. Apache has an official RocketMQ spring example, address: https://github.com/apache/rocketmq-spring.git If the version is updated in the future, you can refer to this sample code.
3, SpringCloudStream integrates RocketMQ
Spring cloudstream is a unified message driven framework provided by the spring community. The purpose is to connect all MQ message middleware products with a unified programming model. Let's take a look at how spring cloudstream integrates RocketMQ.
1. Rapid actual combat
Create Maven project and introduce dependencies:
<dependencies>
		<dependency>
			<groupId>org.apache.rocketmq</groupId>
			<artifactId>rocketmq-client</artifactId>
			<version>4.7.1</version>
		</dependency>
		<dependency>
			<groupId>org.apache.rocketmq</groupId>
			<artifactId>rocketmq-acl</artifactId>
			<version>4.7.1</version>
		</dependency>
		<dependency>
			<groupId>com.alibaba.cloud</groupId>
			<artifactId>spring-cloud-starter-stream-rocketmq</artifactId>
			<version>2.2.3.RELEASE</version>
			<exclusions>
				<exclusion>
					<groupId>org.apache.rocketmq</groupId>
					<artifactId>rocketmq-client</artifactId>
				</exclusion>
				<exclusion>
					<groupId>org.apache.rocketmq</groupId>
					<artifactId>rocketmq-acl</artifactId>
				</exclusion>
			</exclusions>
		</dependency>
		<dependency>
			<groupId>org.springframework.boot</groupId>
			<artifactId>spring-boot-starter-web</artifactId>
			<version>2.3.3.RELEASE</version>
		</dependency>
	</dependencies>
Application startup class:
import org.springframework.boot.SpringApplication;
import org.springframework.boot.autoconfigure.SpringBootApplication;
import org.springframework.cloud.stream.annotation.EnableBinding;
import org.springframework.cloud.stream.messaging.Sink;
import org.springframework.cloud.stream.messaging.Source;

@EnableBinding({Source.class, Sink.class})
@SpringBootApplication
public class ScRocketMQApplication {

    public static void main(String[] args) {
        SpringApplication.run(ScRocketMQApplication.class,args);
    }
}
Note the @ EnableBinding({Source.class, Sink.class}) annotation, which is the Binder configuration introduced by spring cloudstream.
Then add the configuration file application.properties
#The common configuration of ScStream starts with spring.cloud.stream
spring.cloud.stream.bindings.input.destination=TestTopic
spring.cloud.stream.bindings.input.group=scGroup
spring.cloud.stream.bindings.output.destination=TestTopic
#The personalized configuration of rocketMQ starts with spring.cloud.stream.rocketmq
#spring.cloud.stream.rocketmq.binder.name-server=192.168.232.128:9876;192.168.232.129:9876;192.168.232.130:9876
spring.cloud.stream.rocketmq.binder.name-server=192.168.232.128:9876
In spring cloudstream, a binding corresponds to a message channel. The configured input is defined in Sink.class and corresponds to a message consumer. output is defined in Source.class and corresponds to a message producer.
Then you can add message consumers:
package com.roy.scrocket.basic;

import org.springframework.cloud.stream.annotation.StreamListener;
import org.springframework.cloud.stream.messaging.Sink;
import org.springframework.stereotype.Component;

@Component
public class ScConsumer {

    @StreamListener(Sink.INPUT)
    public void onMessage(String messsage){
        System.out.println("received message:"+messsage+" from binding:"+ Sink.INPUT);
    }
}
Message producer:
package com.roy.scrocket.basic;

import org.apache.rocketmq.common.message.MessageConst;
import org.springframework.cloud.stream.messaging.Source;
import org.springframework.messaging.Message;
import org.springframework.messaging.MessageHeaders;
import org.springframework.messaging.support.MessageBuilder;
import org.springframework.stereotype.Component;

import javax.annotation.Resource;
import java.util.HashMap;
import java.util.Map;

@Component
public class ScProducer {

    @Resource
    private Source source;

    public void sendMessage(String msg){
        Map<String, Object> headers = new HashMap<>();
        headers.put(MessageConst.PROPERTY_TAGS, "testTag");
        MessageHeaders messageHeaders = new MessageHeaders(headers);
        Message<String> message = MessageBuilder.createMessage(msg, messageHeaders);
        this.source.output().send(message);
    }
}
Finally, add a Controller class to test:
package com.roy.scrocket.controller;

import com.roy.scrocket.basic.ScProducer;
import org.springframework.web.bind.annotation.RequestMapping;
import org.springframework.web.bind.annotation.RestController;

import javax.annotation.Resource;

@RestController
@RequestMapping("/MQTest")
public class MQTestController {

    @Resource
    private ScProducer producer;
    @RequestMapping("/sendMessage")
    public String sendMessage(String message){
        producer.sendMessage(message);
        return "Message sending completed";
    }
}
After starting the application, you can access http://localhost:8080/MQTest/sendMessage?message=123 , send a message to RocketMQ to TestTopic and consume it in ScConsumer.
2. Summary
- About spring cloudstream. This is a set of almost universal message oriented middleware programming framework. For example, when you switch from RocketMQ to Kafka, the business code hardly needs to be changed. You only need to change the pom dependency and modify the configuration file. However, because each MQ product has its own business model, the gap is very large, so pay attention to business model transformation when using spring cloudstream. In practical use, we should pay great attention to the personalized configuration properties of each MQ. For example, RocketMQ's personalization attributes start with spring.cloud.stream.rocketmq. Only through these attributes can RocketMQ's personalization functions such as delay messages, sorting messages and transaction messages be used.
- Spring cloudstream is a unified framework provided by the spring community, but the official only encapsulates the specific dependencies of kafka, kafka Stream and RabbitMQ. The dependence of RocketMQ is maintained by the manufacturer itself, that is, Alibaba itself. There is obviously a big gap in this maintenance effort. Therefore, on the one hand, we can see that the version problem emphasized before using SpringBoot has been greatly enlarged in using spring cloudstream. The latest version of spring cloud starter stream RocketMQ, 2.2.3.RELEASE, contains the RocketMQ client version of 4.4.0. This gap is very large. On the other hand, RocketMQ's disdain for writing documents is also particularly serious. It is almost difficult to find complete documents about RocketMQ's personalized configuration in spring cloudstream.
- In short, spring cloudstream is not a very good integration solution for RocketMQ at present. It's not comparable to kafka and Rabbit. So be careful when using.