1. Establishing a maven project
Note: The pom file settings need to set up resource filtering, otherwise there will be a problem of unsuccessful packaging of resource files, resulting in the project can not run;
<build>
   <resources>
     <resource>
       <directory>src/main/java</directory>
       <includes>
         <include>**/*.properties</include>
         <include>**/*.xml</include>
       </includes>
       <filtering>false</filtering>
     </resource>
     <resource>
       <directory>src/main/resources</directory>
       <includes>
         <include>**/*.properties</include>
         <include>**/*.xml</include>
       </includes>
       <filtering>false</filtering>
     </resource>
   </resources>
</build>
Introducing dependencies into pom.xml files: Spring Framework Core Library, Spring MVC, servlet, JSTL, etc.
 <dependencies>
    <!--unit testing-->
    <dependency>
      <groupId>junit</groupId>
      <artifactId>junit</artifactId>
      <version>4.11</version>
    </dependency>
    <!-- Spring MVC and Spring Series Package -->
    <dependency>
      <groupId>org.springframework</groupId>
      <artifactId>spring-webmvc</artifactId>
      <version>4.3.24.RELEASE</version>
    </dependency>
    <!--Servlet core-->
    <dependency>
      <groupId>javax.servlet</groupId>
      <artifactId>javax.servlet-api</artifactId>
      <version>4.0.1</version>
    </dependency>
    <!-- JSTL -->
    <dependency>
      <groupId>javax.servlet</groupId>
      <artifactId>jstl</artifactId>
      <version>1.2</version>
    </dependency>
  </dependencies>
2. Modify Web.xml
- Pay attention to the web.xml version. For the latest version, the header file is as follows
<?xml version="1.0" encoding="UTF-8"?>
<web-app xmlns:xsi="http://www.w3.org/2001/XMLSchema-instance"
        xmlns="http://java.sun.com/xml/ns/javaee"
        xsi:schemaLocation="http://java.sun.com/xml/ns/javaee
        http://java.sun.com/xml/ns/javaee/web-app_3_0.xsd"
        id="WebApp_ID" version="3.0">
- Register Dispatcher Servlet
- Configuration files associated with Spring MVC
- Startup level 1
- The mapping path is /[Do not use /*, 404]
<?xml version="1.0" encoding="UTF-8"?>
<web-app xmlns:xsi="http://www.w3.org/2001/XMLSchema-instance"
        xmlns="http://java.sun.com/xml/ns/javaee"
        xsi:schemaLocation="http://java.sun.com/xml/ns/javaee
        http://java.sun.com/xml/ns/javaee/web-app_3_0.xsd"
        id="WebApp_ID" version="3.0">

 <!--1.register DispatcherServlet-->
 <servlet>
   <servlet-name>springmvc</servlet-name>
   <servlet-class>org.springframework.web.servlet.DispatcherServlet</servlet-class>
   <!--Associate one springmvc Configuration file:[servlet-name]-servlet.xml-->
   <init-param>
     <param-name>contextConfigLocation</param-name>
     <param-value>classpath:springmvc-servlet.xml</param-value>
   </init-param>
   <!--Startup level-1-->
   <load-on-startup>1</load-on-startup>
 </servlet>

 <!-- / Match all requests(Barring.jsp)-->
 <!-- /* Match all requests(Include.jsp)-->
 <servlet-mapping>
   <servlet-name>springmvc</servlet-name>
   <url-pattern>/</url-pattern>
 </servlet-mapping>

</web-app>
/ The difference between /* and /*:
< url-pattern > /</ url-pattern > does not match. jsp, only for requests we write;
That is, jsp does not enter spring's Dispatcher Servlet class.
< url-pattern > /* < / url-pattern > matches *. jsp,
When you return to the jsp view, you re-enter spring's Dispatcher Servlet class, which causes you to report 404 errors because you can't find the corresponding controller.
3. Add Spring MVC configuration file
- Let IOC's annotations take effect
- Static resource filtering: HTML. JS. CSS. Pictures, videos...
- Annotation Driver for MVC
- Configuration view parser
Spring mvc-servlet.xml configuration file is added to the resource directory. The configuration is similar to Spring container configuration. In order to support annotation-based IOC, the function of automatic scanning package is set up. The specific configuration information is as follows:
<?xml version="1.0" encoding="UTF-8"?>
<beans xmlns="http://www.springframework.org/schema/beans"
       xmlns:xsi="http://www.w3.org/2001/XMLSchema-instance"
       xmlns:context="http://www.springframework.org/schema/context"
       xmlns:mvc="http://www.springframework.org/schema/mvc"
       xsi:schemaLocation="http://www.springframework.org/schema/beans
        http://www.springframework.org/schema/beans/spring-beans.xsd
        http://www.springframework.org/schema/context
        http://www.springframework.org/schema/context/spring-context.xsd
        http://www.springframework.org/schema/mvc
        http://www.springframework.org/schema/mvc/spring-mvc.xsd">


    <! - Automatically scans the annotations under the specified package and places them in the IOC container of the spring package - >.
    <context:component-scan base-package="com.chao.controller"/>

    <! - Static Resource Fi lt ering Processing - >
    <mvc:default-servlet-handler/>

    <! - Annotation driven
        In spring, the @RequestMapping annotation is usually used to complete mapping relations.
        To make the @RequestMapping annotation effective
        Default Annotation Handler Mapping must be registered in the context
        An example of Annotation Method Handler Adapter
        These two instances are processed at the class level and the method level, respectively.
        The annotation-driver configuration helps us to automatically complete the injection of these two instances.
    -->
    <! - Annotation Driven - >
    <mvc:annotation-driven/>

    <! - View parser: Dispatcher Servlet gives his Model AndView - >
    <bean class="org.springframework.web.servlet.view.InternalResourceViewResolver" id="InternalResourceViewResolver">
        <! - prefix - >
        <property name="prefix" value="/WEB-INF/jsp/"/>
        <! - Suffix - >
        <property name="suffix" value=".jsp"/>
    </bean>
</beans>
In view parser, we store all views in / WEB-INF / directory, which ensures view security, because the files in this directory can not be accessed directly by the client.
4. Create Controller
Write a Java control class: com.chao.controller.AnnoController, pay attention to coding specifications
import org.springframework.stereotype.Controller;
import org.springframework.ui.Model;
import org.springframework.web.bind.annotation.RequestMapping;

@Controller
@RequestMapping("AnnoController")
public class AnnoController {
    //        Request mapping: url
    //     Real Access Address: Virtual Address / AnnoController/hello2
    @RequestMapping("/hello2")
    public String hello(Model model){

    //Adding attributes msg and values to the model allows you to extract and render them in JSP pages
        model.addAttribute("msg","hello,springmvc!");
        return "hello";   ///WEB-INF/jsp/hello.jsp

    }

}
The annotation @Controller is to automatically scan the Spring IOC container when it is initialized.
@ Request Mapping is for mapping request paths. Because there are mappings on classes and methods, it should be / AoonController/hello2 when accessing.
The parameter of Model type is declared in the method to bring the data in the Action into the view.
The result returned by the method is the name Hello of the view, with the prefix and suffix in the configuration file becoming WEB-INF/jsp/hello.jsp.
5. Creating View Layer
Create hello.jsp in the WEB-INF/ jsp directory. Views can directly extract and display the information brought back from Controller.
EL can be used to represent the value or object stored in the Model.
<%@ page contentType="text/html;charset=UTF-8" language="java" %>
<html>
<head>
    <title>chaowenli</title>
</head>
<body>

${msg}

</body>
</html>
6. Configure Tomcat to run
Configure Tomcat, set the project name, open the server, access the corresponding request path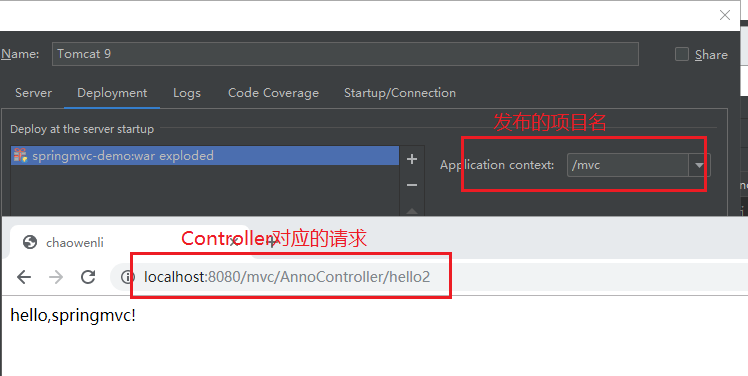
OK, run successfully!
Summary of steps
- Create a new web project
- Import related jar packages
- Write web.xml, register Dispatcher Servlet
- Writing Spring MVC configuration file
- The next step is to create the corresponding control class, controller.
- Finally, improve the correspondence between front-end view and controller
- Test, run and debug.