March 30, 2020 Monday
# How to restore JSON data after it is transferred to Blob
When axios requests to download the file interface, the responseType: 'blob' is generally set. If the file returns normally, there is no problem, but if there is a problem in the background file processing or authentication, the interface returns JSON format data containing error information, so the JSON data will also be converted into blob objects, and it is necessary for the front end to display the error information. How can the BLOB data be converted into JSON? Let's take a look
let fileType = res.headers['content-type']
if (fileType.startsWith('application/json')) {
  let reader = new FileReader();
  reader.addEventListener("loadend", function() {
    let data = JSON.parse(reader.result)
    console.log(data);
  });
  reader.readAsText(res.data, "UTF-8") // Add UTF-8 to prevent Chinese garbled code
  return
}
# Saturday, March 28, 2020
# Web page dark mode adaptation
Wechat recently launched the dark mode. I tried it. When the mobile phone switches, the page effect style is refreshed in real time. So I think about how the web can listen to dark patterns and set styles. After checking the information, I found the answer on Stack Overflow
You can adapt the dark mode through the media query in css. First, let's see how to use js to obtain whether it is the current dark mode
// Gets whether the current is dark mode
// window.matchMedia('(prefers-color-scheme: dark)').matches
window.matchMedia && console.log('Is dark mode: ', window.matchMedia('(prefers-color-scheme: dark)').matches)

// Use js to listen for dark mode switching events
window.matchMedia && window.matchMedia('(prefers-color-scheme: dark)').addEventListener('change', (event) => {
  console.log('dark mode change,already' + (event.matches ? 'get into': 'sign out') + 'dark mode')
})
window. What exactly is matchmedia used for? I checked mdn and found such an example
let mql = window.matchMedia('(max-width: 600px)');

document.querySelector(".mq-value").innerText = mql.matches;
From this example, you probably know how to use css to support dark mode. It is to add a media query style similar to small screen adaptation. Let's take an example
/* dark mode support */
@media (prefers-color-scheme: dark) {
  body {
    background-color: black;
    color: #aaa;
  }

  body .content article, header, aside > div, footer  {
    border-color: #333;
    color: #aaa;
    background-color: black;
    box-shadow: 0 0 10px #333;
  }
}
In dark mode, the background is generally dimmed and the font is set to white. zuo11.com has adapted the dark mode with the above method, and you can experience it. The website is open source, zuo11.com dark mode support code - github(opens new window)
reference resources:
- How do I detect dark mode using JavaScript? - Stack Overflow(opens new window)
- window.matchMedia | MDN(opens new window)
- Supporting Dark Mode in Your Interface | Apple Developer Documentation(opens new window)
# Friday, March 27, 2020
# The fuzzy problem of canvas drawing
Today, I found that the same code was drawn clearly and vaguely on two computers. Later, I checked the data and found that there was this problem
Because canvas is not a vector image, the high dpi screen has more pixels per square inch, that is, twice the screen. The browser will render one pixel with the width of two pixels, so the pictures and text will be blurred on the Retina screen. How to solve it?
Get device pixel ratio: window devicePixelRatio || 1
If the actual area size drawn is 750 * 40, assuming that the device pixel ratio is 2, then the width and height of the canvas need to be set to 1500 * 80, and then set the width to 750 and the height to 40 with the inline style, which is equivalent to twice the size drawn by the canvas, and then zoom to make it clear.
To sum up, when drawing canvas, various lengths must be multiplied by devicePixelRatio, otherwise the display may not be clear
reference resources: Solve the problem of canvas drawing blur in high-definition screen (opens new window)
# Thursday, March 26, 2020
# canvas does not support text wrapping. How to deal with it
Today, search for CTX in stackoveflow I found a lot about canvas CTX Filltext() does not support line feed when drawing text, and found a better answer
I'm afraid it is a limitation of Canvas' fillText. There is no multi-line support. Whats worse, there's no built-in way to measure line height, only width, making doing it yourself even harder!
The general solution is based on CTX measureText(‘Hello’). width to see if the text to be displayed needs to wrap, and write a for loop to process it
reference resources:
- canvas draw text content auto wrap (opens new window)
- javascript - HTML5 canvas ctx.fillText won't do line breaks? - Stack Overflow(opens new window)
# canvas draw irregular shape fill gradient
In JS elevation 3, there is a chapter dedicated to canvas drawing, which is finally used today. The effect is good. From the effect, the original JS is less than 70 lines

<canvas id="drawing1" width="720" height="45" >A draw of something.</canvas>
<script>
  drawStatus('drawing1', 2)
  function drawStatus(domId, position) {
    let str = ['① Status one', '② State II', '③ State III', '④ State four', '⑤ Status five', '⑥ Status six']
    let config = {
      width: 100,
      height: 40,
      extendLength: 20,
      radius: 4
    }
    let config2 = { ...config, width: 110 }
    let cur = str.length - position

    str.reverse().forEach((item, index) => {
      let pos = str.length - index - 1
      let x = 0 + (str.length - 1) * config.radius
      if (pos !== 0) {
        x = (pos * 100) + (pos -1) * 10 + (str.length - 1 - pos) * config.radius
      }
      console.log(pos,x)
      let curConfig = pos === 0 ? config : config2
      if (pos < (str.length - cur)) {
        curConfig.isFocus = true
      }
      drawUnnormalShape(domId, x , 0, str[index], curConfig)
    })
  }

  function drawUnnormalShape(domId, x, y, text, config) {
    let drawing = document.getElementById(domId);
    let ctx = drawing.getContext('2d');
    let { width, height, extendLength, radius, isFocus } = config
    ctx.beginPath(); // If you need to reset the beginPath, otherwise, the subsequent fill will overwrite the previous fill

    // Irregular rectangle
    ctx.moveTo(x + radius, y) // Start at the upper left corner (x + radius, y)
    ctx.arcTo(x, y, x, y + radius, radius) // Upper left fillet
    ctx.lineTo(x, y + height - 2 * radius) // Draw left
    ctx.arcTo(x, y + height, x + radius, y + height, radius) // Lower left fillet
    ctx.lineTo(x + width - radius, y + height) // Below
    // ctx.arcTo(x + width - radius, y + height, x + width - radius, y + height - 1, 1) / / fillet

    let extendEndX = x + width + extendLength
    let middleHeight = y + height / 2
    ctx.arcTo(extendEndX, middleHeight, extendEndX - radius, middleHeight - radius, radius) // Line + fillet
    ctx.lineTo(x + width - radius, y)
    ctx.lineTo(x + radius, y)

    var gradient = ctx.createLinearGradient(x, y + height / 2, x + width + extendLength, y + height / 2); // Gradient from (130130) to (160160)
    gradient.addColorStop(0, isFocus ? '#62ccff' : '#fff'); //  Start color of gradient
    gradient.addColorStop(1, isFocus ? '#0486fe' : '#fff'); //  End color of gradient

    ctx.shadowOffsetX = 6;
    ctx.shadowOffsetY = 2;
    ctx.shadowBlur = 16; // Blurred pixel
    ctx.shadowColor = "rgba(58, 86, 111, 0.15)";

    ctx.fillStyle = gradient
    ctx.fill() // ctx.stroke()

    let textArr = text.split(' ')
    ctx.font = "15px arial"
    ctx.fillStyle = isFocus ? '#fff' : '#ccc'
    ctx.fillText(textArr[0], x + width / 2 - 20, y + height / 2 + 5)
    ctx.font = "11px arial"
    ctx.fillText(textArr[1], x + width / 2, y + height / 2 + 4)
  }
</script>
Refer to previous notes: Drawing with canvas - JS elevation 3 Notes (opens new window)
Full demo: canvas draw irregular shape fill gradient background - github(opens new window)
# canvas fill multiple times will overwrite the previous fill
When drawing with canvas, it encapsulates a drawing function, which will be filled with color CTX every time fill(), if executed multiple times, it will only be filled once as a whole at the last time?
At first, I thought that the later fill covered the previous fill. Later, I checked online. After the first fill, I need to call CTX again Beginpath(), otherwise it will only be filled at the last time.
Reference: Why does the canvas tag of HTML5 cover the color of the previously drawn object (opens new window)
# Wednesday, March 25, 2020
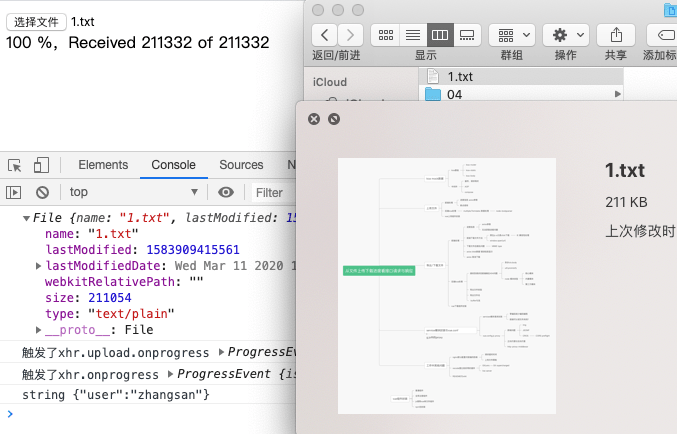
# It is not accurate to judge the file type according to the suffix of the file name
For example, I have a 1 PNG file, I modify the suffix 1 Txt, it is obviously impossible for the front end to judge the corresponding file type only by the suffix of the file name. We need to judge the corresponding file type according to the binary data mark of the file type, so as to be more accurate and safer
# How to judge two as like as two peas?
md5 of general files may be duplicated. How to reduce this probability? The verification is divided into three parts
- Compare md5 of the entire file
- Select several fragments in the fixed position of the file and calculate md5 respectively for comparison
- Compare whether the file names are the same
# Is md5 encryption reversible?
Theoretically, after md5 encryption, without knowing the original message, it is impossible to restore the original message with 16 byte Message Digest
But why can some websites crack md5 encrypted passwords? Mainly used for collision detection. It will calculate the md5 values of some commonly used weak passwords in advance and compare them one by one. Will give people the illusion of md5 reversibility. Generally, in addition to md5 encryption, we can do more processing (adding salt) to interfere and improve the difficulty of cracking
reference resources: Why is MD5 irreversible? (opens new window)
# Can two different files md5 be the same?
What is md5? md5 is messge digest [da ɪˈ d ʒ The abbreviation of est] 5, which means information summarization algorithm
Under linux, execute man md5 in terminal to view the corresponding documents
md5 – calculate a message-digest fingerprint (checksum) for a file
md5 – calculate the information summary fingerprint ('checksum 'or' check code ') for a file
md5 -s '123456'
# MD5 ("123456") = e10adc3949ba59abbe56e057f20f883e

md5 1.txt
# MD5 (1.txt) = 6f74626e0749e5353cc7e11767418d43
From the above example, we can see that md5 verification of files or strings will generate a 32-bit verification code. The problem is that md5 encryption is generally 128 bits on the Internet, but there are only 32 bits here. Why? We need to distinguish between hexadecimal and binary. The standard saying is that the encrypted character of md5 is 128bit(16 bytes), while the 32 bits we see are hexadecimal, and each bit can be converted to 4bit, that is, 4 binary bits. 1 - f corresponds to 0000 - 1111 respectively, so 128bit
A binary bit can only represent 0 or 1, and 128bit can represent math The 128 power of pow (2, 128) 2 is dead. It can only represent so many situations at most. There are too many documents with different contents. Theoretically, it will definitely exceed the 128 power of 2.
To sum up: two different files md5 may be the same, because md5 can only represent the 128 power of 2 at most, and different files are definitely greater than this number
Although the md5 of two files may be the same, given the md5 value of one file, it is relatively difficult to forge the md5 value of another file, which is the same as this value, so it can be used to judge the integrity of the file
Reference: Are there two completely different files, but their md5 values are the same? (opens new window)
# Sunday, March 22, 2020
# Logical difference between KOA multer and @ koa/multer
I have learned about the scope package starting with @ before. This time, when using the KOA multer module, I found that the logic of @ koa/multer is different from that of KOA multer. There are some differences in the source code. Let's take a specific look
// When using KOA multer
const multer = require('koa-multer')
router.post('/test', multer().none(), ctx => {
  let isFormData = ctx.headers['content-type'].startsWith('multipart/form-data')
  // ctx. Request object of req node, CTX Request object of request KOA
  ctx.body = isFormData ? ctx.req.body : ctx.request.body
})
The KOA multer package adds a layer of encapsulation from the multer package of express, but KOA multer does not mount the files field to CTX request. On the body, only the request object attached to the node like the original express, that is, CTX req. Body, let's take a look at the source code of KOA multer
// https://github.com/koa-modules/multer/blob/master/index.js
multer[name] = function () {
    const middleware = fn.apply(this, arguments)

    return (ctx, next) => {
      return new Promise((resolve, reject) => {
        middleware(ctx.req, ctx.res, (err) => {
          err ? reject(err) : resolve(ctx)
        })
      }).then(next)
    }
  }
The @ koa/multer is processed, which can be compared with the above example
// https://github.com/koajs/multer/blob/master/index.js
multer[name] = function() {
    const middleware = Reflect.apply(fn, this, arguments);

    return (ctx, next) => {
      return new Promise((resolve, reject) => {
        middleware(ctx.req, ctx.res, err => {
          if (err) return reject(err);
          if ('request' in ctx) {
            if (ctx.req.body) {
              ctx.request.body = ctx.req.body;
              delete ctx.req.body;
            }

            if (ctx.req.file) {
              ctx.request.file = ctx.req.file;
              ctx.file = ctx.req.file;
              delete ctx.req.file;
            }

            if (ctx.req.files) {
              ctx.request.files = ctx.req.files;
              ctx.files = ctx.req.files;
              delete ctx.req.files;
            }
          }

          resolve(ctx);
        });
      }).then(next);
    };
  };
Let's take another look at the use of @ koa/multer. It's more convenient to mount it to CTX like other data request. body
const multer = require('@koa/multer')
router.post('/test', multer().none(), ctx => {
  ctx.body = ctx.request.body
})
To sum up, if a module has two package names, it is recommended to consider the scope package starting with @ first. Generally, this function will be new. The maintenance of later iterations should be based on this
# Friday, March 20, 2020
# What does @ in front of npm package mean (Vue CLI and @ vue/cli)
Vue CLI package name changed from Vue CLI to @ vue/cli. If you have globally installed the old version of Vue CLI (1. X or 2.x), you need to uninstall it through NPM uninstall Vue CLI - g or yarn global remove Vue CLI.
Looking at the Vue cli document today, I found that the above paragraph Vue cli is changed to @ vue/cli. What is the difference between the two NPMS? What does @ mean in front of npm package? Check the official website
npm package is preceded by @, which represents the packages related to scopes, which can be understood as scope package. Scope enables us to create packages with the same name as those created by other users or organizations without conflict.
A scope allows you to create a package with the same name as a package created by another user or Org without conflict.
Scope name is everything between @ and slash:
The scope name is everything between the @ and the slash:
// "npm" scope:
@npm/package-name
// "npmcorp" scope:
@npmcorp/package-name
One criticism of npm package is that the package name is easy to be occupied. After being occupied, others can't use it. The scope package is similar to creating a namespace. Different namespaces can use the same package name
The naming of the scope can not be used by anyone. There are only two kinds of names that can be used: your own user name and your own organization name
Note: you must register an npm user account before you can publish npm packages for user scope. In addition, to publish a package for an organization scope, you must create an npm user account and then an npm org (Organization).
In vue cli, @ vue/cli can be used to indicate that the npm account vue is used or that the organization has published the package.
reference resources:
- npm learning (10) how to create, publish and use scope packages (opens new window)
- About scopes - Packages and modules | npm(opens new window)
- Creating and publishing scoped public packages | npm(opens new window)
# Wednesday, March 18, 2020
# How to add reference notes and footnotes in md
Here is a footnote[^1],There are other meanings in this passage[^2]on the inside

[^1]:Here are the footnotes
[^2]:Here are footnotes to other meanings

It's OK to put the footnote in the middle
Here is a footnote ^1 , there are other meanings in this passage ^2 on the inside
It's OK to put the footnote in the middle
# Another way to write links in md
I'm a text,[baidu][1],[qq][2]There are links in it

[1]: http://baidu.com "baidu"
[2]: http://qq.com "qq"
I'm a text, baidu (opens new window),qq (opens new window) There are links in it
# Tuesday, March 17, 2020
# Node.js core uses and application scenarios
-
Packaging, construction and engineering mainly rely on the basic fs module, file reading and writing, such as XXX cli (scaffold), webpack, parcel and hexo. Node's packaging, construction and front-end engineering basically affect the development process of the whole front-end. Each framework basically has node based cli to quickly generate scaffold, making the development more efficient and standardized.
-
Writing background interface mainly relies on the basic http module to process requests and responses, such as express js,koa.js, which is generally used to simulate fake data interface, adjust UI, interaction effect and do some self-test in request response
-
Comprehensive application: data acquisition + page rendering (high concurrency and high performance), KOA JS is still relatively thin for developing commercial applications, eg JS has made some enhancements based on koa, so that node can also be used as enterprise applications. Alibaba's usage scenario is a good example. Most of the infrastructure is implemented in java with few changes. Business Services with transaction requirements usually use Java. Node is mainly used to replace the past use scenarios of php and jsp. It is used on the user side that needs rapid iteration and rapid demand change. Node has withstood the test of Alibaba double 11 and is technically feasible.
Digression: I think it's OK to play with the comprehensive application by myself. Small teams or technical teams that are not very strong in node should try not to try. Ali can do this well because the top node talents in China are basically in Ali. After years of practice, Ali has a relatively perfect node infrastructure and ecology. At present, there are few strong nodes in the front-end on the market. Are you hungry? In order to recruit node server development, I also specially wrote a node related interview tutorial. It is conceivable how many talents there are in this field.
Reasons why node supports high concurrency:
- node.js is based on asynchronous I/O. after receiving the request, directly open an I/O thread to execute, and then ignore it. Immediately continue to execute the main thread. After the I/O thread is executed, directly execute the corresponding callback function. It saves a lot of time waiting for requests
- Transaction driven. The main thread runs the program by triggering the event loop event loop. This is not well understood for the time being. Write it first~
reference resources:
- How to evaluate Alibaba's open source enterprise node JS framework EggJS? (opens new window)
- Node.js: analysis of high concurrency and distributed cluster (opens new window)
- Tmall double 11 front end sharing series (IV): large scale node JS application (opens new window)
- egg.js(opens new window)
- node-interview | ElemeFE(opens new window)
# The difference between webpack and parcel
Both webpack and parcel are packaging tools. Webpack has powerful functions, but it is heavy. There are many configuration items, which is a little cumbersome. The purpose of parcel is to solve the problem of too many configuration items. By default, it integrates general general functions and zero configuration. If there are many customizations, webpack is recommended
If you don't want to worry about configuring everything and your needs are common needs, you should go directly with parcel. Parcel provides defaults (for babel-preset-env, post-css, html, etc) that fits most scenarios and works for everybody. You don't have to worry about configuring anything.
From the other hand, if you need a more customization, you should go with webpack. Keep in mind that you will have to setup everything that you need, explicitly set those things.
reference resources: Webpack vs Parcel - Stack Overflow(opens new window)
# mac uses the touchpad to drag, copy and move windows
Today, I realized that every time I want to copy a paragraph of text or move an application window, I click the touchpad and drag. Moreover, the sound of pressing on the touch pad of Mac Air is relatively loud, so I found out whether there are gestures to support.
It is found that you can set to use three finger drag to copy text and drag the window. Just put three fingers on it and drag it.
Setting method: Open System Preferences = > click "auxiliary functions" = > click "mouse and touchpad" = > click "touchpad options" = > first tick enable drag and drop, then select "three finger drag" and click "OK"
Graphic details refer to: MacBook touchpad select / copy (opens new window)
# Thursday, March 12, 2020
# Thoughts on vue and react
I personally understand that vue components are designed to be super friendly to novices and have a low threshold for use. Although I have never used react, I can guess that react should also sacrifice a certain user threshold to achieve more flexible js control. vue reduces the user's threshold by sacrificing the flexibility of js control. The emphasis is different, but the underlying implementation is basically the same, such as virtual dom and hooks, but the calling methods open to users are different.
No matter how the front-end framework changes, even if it produces a flower, it is only a modification to the dom, and eventually it will return to the part of the dom chapter mentioned in js elevation 3.
# How to modify the wrong information submitted by git commit
If you accidentally submit but do not push, you can use the following command to modify the last commit information
git commit --amend -m 'xxx'
# Others submitted package lock The update of JSON leads to the conflict between pull and local
Generally, package lock is modified during npm install JSON file. I usually don't submit this update, but I found someone submitting it today. When I try to pull down the file that should be updated, I will drop the prompt that I don't want to use it. Therefore, when I try to pull down the file that should be updated, it will lead to a conflict
git checkout -- package-lock.json
After successful pulling, npm run serve has little impact
# Wednesday, March 11, 2020
# Thoughts on the way of vue packaging components
When packaging components, the general method we use is
Put the components separately into a XX Vue, and then use lazy loading in components to import and then use when importing
I was thinking that every time I introduce components, I need three steps
- Introduce components through components
- Write the corresponding code in the template
- Write the corresponding data in data and the bound events in methods
Will it be too troublesome? I hope to pass this. Like the component of element$ message. Error (e.message) to call a component directly
So I tried to use js to call the single file component (. vue). I wrote the method on 02 / 20 before. In addition to directly mounting to the body, it can also be mounted anywhere. As long as you can get the corresponding DOM, you can use the ref attribute and use this$ Refs ['xx'] to get its DOM elements and component instances.
// Introduce this component
import ShowInfo from 'showInfo.vue'

// Call through js
clickShow() {
  // Create a vue component
  const Component = Vue.extend(ShowInfo)

  // Render outside the document and then mount, returning the corresponding Vue instance (vm)
  let showInfoVue = new Component().$mount()

  // append the dom of the component instance to the body of the current page
  this.$el.appendChild(showInfoVue.$el)
}
In fact, have you found that it is possible to call vue components directly with js, but it also needs to write more code than normal, such as
- The method of calling vue by js needs to be encapsulated as a class
- Take the above example as an example. When calling a component through js, we need a successful callback and pass parameters to the component. When we get ShowInfo, we need to know that we only introduce a 'js object'. We can inject methods into the methods of the object to obtain the incoming value or the callback after successful mounting. This is equivalent to mixin, but When using these injected events in vue component implementation, it will be difficult to understand. There is a doubt that the default is more wonderful than the global function
- Components written in js method cannot be compatible with the default reference method. If you want to support it, you need to write some additional code
- You will find that the logic will become difficult to understand, not simple enough and unfriendly to novices. If it needs to be maintained by others, it may be difficult to understand why to do so
To sum up: the default way of encapsulating and calling components is very good, simple and clear. If you want to make it easy when calling, the corresponding workload will be increased when encapsulating components, and the overall workload is about the same.
Let's look at the element component again. For less content, such as notification class, element provides js calling methods instead of ordinary component calling methods. It is generally mounted on the body. Why is the dialog component not encapsulated in js? My understanding is that the content in dialog is highly extensible. If it is called by js, a lot of code may be written in js, or the render method of VNode needs to be written. It doesn't look elegant enough.
Conclusion: when encapsulating components, when to use encapsulation as js calling mode and when to use ordinary encapsulation? My understanding is that it can be evaluated through the following aspects
- Whether the requirements of the encapsulated components are stable, and whether they may be changed frequently or enhanced gradually in the future. If they are unstable, it is not recommended to encapsulate them into js call mode. For those with strong scalability, it is recommended to use ordinary component encapsulation mode, which is more conducive to maintenance
- Is it attached to the body or needs to be placed in any div? General components are better placed. If it is attached to the body, it can be encapsulated into js calling mode
- Is the function relatively single and simple? If the component function is single and simple, it is recommended to package it as js call mode
- Whether the component is called in a large number in the page means a large amount of repeated code. It can be encapsulated into js calling mode to increase the complexity of component implementation and reduce the complexity of calling
Anyway, when someone asks you why you are so encapsulated, you should be able to give your own reasons.
# Tuesday, March 10, 2020
# vue custom component v-model attribute realizes the secondary encapsulation of dialog component
When a component is the dialog component of element, we need to hide and display the dialog. When the dialog in the child component is closed, we need to modify the value passed in by the parent component. Although it is not a form component, we can also use v-model to solve it. Let's see how to call it first
<template>
  <div>
    <user-selection v-model="showUserSelection" @confirm="confirm"/>
    <el-button type="primary" @click="showUserSelection = true">Open pop-up window</el-button>
  <div>
<template>
<script>
export default {
  components: {
    UserSelection: () => import("../src/components/user-selection/src/main")
  },
  data() {
    return {
      showUserSelection: false
    }
  },
  methods: {
    confirm(value) {
      console.log(value)
    }
  }
}
</script>
Let's look at component implementation
<template>
  <div>
    <el-dialog title="Tips" :visible.sync="dialogVisible">
      content
      <span slot="footer" class="dialog-footer">
        <el-button @click="dialogVisible = false">Cancel</el-button>
        <el-button type="primary" @click="dialogVisible = false">determine</el-button>
      </span>
    </el-dialog>
  </div>
</template>
<script>
export default {
  model: {
    prop: 'show', // Set the attribute field of the corresponding v-model
    event: 'close' // If you do not specify the default value of input, when $emit this event, you can automatically modify the value of the parent component's v-model parameter
  },
  props: ['show'], // Receive the value transmitted by v-model
  computed: {
    dialogVisible: {
      get() {
        return this.show
      },
      set(newVal) {
        console.log(newVal)
        this.$emit('close', newVal)
      }
    }
  },
  data() {
    return {}
  }
}
</script>
# The vue plug-in entry is reserved when packaging components for global introduction
In the element component, when we use element elements such as El input, we do not need to introduce them in the components. Why? When introducing element, we have in Mian JS, we use vue Use (elemnt component). In this way, the global injection component is equivalent to making the component into a vue plug-in. If we encapsulate the component ourselves, how can it be in vue Can I call it globally directly after use?
So I went to see the source code of the element component. For the time being, we don't require it to be encapsulated as npm package. We just need to make an enhancement on the basis of ordinary custom components. You can use Vue Use global import.
In the element UI source code, take the alert component as an example to see the directory structure
alert
├── src
│   └── main.vue  # Component implementation
└── index.js # install method for global import
import Alert from './src/main';

/* istanbul ignore next */
Alert.install = function(Vue) {
  Vue.component(Alert.name, Alert);
};

export default Alert;
To sum up: when developing components, we can add the interface introduced globally, and the level can also follow the of element. We can study the source code more, so that the code can be written more robust.
# Change the style of other elements after css hover
After an element hover s in css, you can set styles for other elements, but note: it is limited to changing its child elements and the elements behind it
<style>
  /* hover After that, change the style of a child element separately */
  .cur-element:hover .child-1 {
    color: red;
  }
  /* Set the style of the next adjacent sibling node */
  .cur-element:hover + div {
    background: blue;
  }
  /* Set all the corresponding sibling node styles in the back. You don't need to be adjacent, but you need to follow them */
  .cur-element:hover ~ div {
    background: red;
  }
</style>
<div class="parent">
  <div>Another brother element</div>
  <div>Previous sibling element</div>
  <div class="cur-element">
    test hover
    <span class="child-1">child-1</span>
    <span class="child-2">child-2</span>
  </div>
  <div>The latter sibling element</div>
  <div>Another brother element</div>
  <div>Another brother element</div>
</div>
reference resources:
- Previous css notes: css + ~ selector (opens new window)
- css:hover state changes the use of another element style (opens new window)
- Change style of all other elements when one element is hovered - stackoverflow(opens new window)
# Usage scenario of css vw
In the solution of carousel map pure css:
- Set the picture area width to the number of pictures * 100%
- When hover switches the button, move the picture area to the left by 100%: transform: translateX(100%)
There will be a problem here. Move 100% to the left and the width is the number of pictures * 100%, not the window width. It can be well solved with 100vw.
Refer to the previous css notes: CSS length unit relative length - CSS part of HTML authoritative guide (opens new window)
# Sunday, March 8, 2020
# widnows nginx deploy https service
Today I'm going to use zuo11 Com's secondary domain name api to write the interface to play, and plans to use https.
- Assign the domain name free ssl certificate to api.com in alicloud zuo11. com
- In domain name resolution, add API zuo11. Com parsing, parsing to the server
- Initialize a koa project, listen to a port, such as port 9000, and write some test interfaces
- Deploy to server
- Nginx adds support for https: ① Download the certificate from the ssl certificate location and there will be two files XXX pem, xxx. Key, create a new cert directory in the conf directory under the server nignx directory, copy the two files, and modify nginx under conf Conf configuration
# HTTPS server
server {
    listen       443 ssl;
    server_name  api.zuo11.com;

    ssl_certificate     cert\3391782_api.zuo11.com.pem;
    ssl_certificate_key cert\3391782_api.zuo11.com.key;

    ssl_session_cache    shared:SSL:1m;
    ssl_session_timeout  5m;

    # Comment out the default encryption method
    # ssl_ciphers  HIGH:!aNULL:!MD5;
    # ssl_prefer_server_ciphers  on;

    ssl_ciphers ECDHE-RSA-AES128-GCM-SHA256:ECDHE:ECDH:AES:HIGH:!NULL:!aNULL:!MD5:!ADH:!RC4;  #Use this encryption suite.
    ssl_protocols TLSv1 TLSv1.1 TLSv1.2;   #Use this protocol for configuration.
    ssl_prefer_server_ciphers on;

    location / {
        # root   html;
        # index  index.html index.htm;
        proxy_pass http://127.0.0.1:9000;
    }
}
# Saturday, March 7, 2020
# The problem of nginx Chinese path 404
When the mac is debugged locally, it is ok. When it is deployed to the windows server, it is found that there is a 404 problem in an image. At first, it is thought that it is a cache problem. After clearing the cache, it is still 404. This picture is a Chinese path. Before, it was all in English. I didn't find this problem. Try the English picture link is ok. Baidu found that there was such a problem. The problem is that the code set by nginx is inconsistent with the code of the operating system.
# linux view computer default code
echo  $LANG
# zh_CN.UTF-8

# View default character encoding under windows
chcp
# If the active code page 936 is displayed, it indicates the GBK code, which is the code of my server. nginx charset utf-8 is modified; No effect
# 65001 indicates utf-8

# Set the character encoding, but it is found that it only takes effect in the current console. Reopen it and it's gone.
chcp 65001

# There is a way to modify the registry: I don't know whether it is feasible, but I'm afraid it will affect other services of the server. It's better to change the English name....
# https://blog.csdn.net/yangzhong0808/article/details/79012628?depth_1-utm_source=distribute.pc_relevant.none-task&utm_source=distribute.pc_relevant.none-task
reference resources: cmd command line under windows displays UTF8 character setting (CHCP command) (opens new window)
#Invalid character in header content ["Content-Disposition"]
In koa, if the file name set in content disposition is in Chinese, an error will be prompted. It needs to be transcoded with a function similar to encodeURIComponent transcoding
const fileName = encodeURIComponent('This is a file') // You need to transcode first
ctx.set({
  'Content-Type': 'application/x-tar',
  'Content-Disposition': `attachment; filename="${fileName}.tar"`
})
# Tuesday, March 3, 2020
# github Badge and npm badge image generation
When writing readme, some badge pictures are usually pasted at the beginning, such as build passing, license MIT, etc., which are introduced pictures
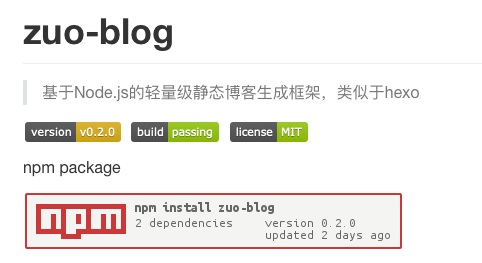
// Three badge pictures corresponding to the above figure    // If the rule is not found, you can generate different pictures by changing the following parameters // such as https://img.shields.io/badge/JAVA-1.8+-green.svg
npm badge picture is mainly applicable to npm package and displays some information of npm package
// file https://www.npmjs.com/package/npm-badge // Zu blog npm package usage example, you only need to modify the corresponding npm package name [](https://npmjs.org/package/zuo-blog)
# What can individual applet subjects do
At present, the name of the applet has become very strict. As long as it contains a slightly generic keyword, such as "management", it will be required to upload photos of handheld ID cards and have corresponding trademark certificates. But it seems that the trademark application needs 1000, and the approval time needs more than one year... It's too difficult. And personal applets can do less and less.
reference resources: Open service category of personal subject applet - wechat open new window
# The web acquisition time of front-end PC is inaccurate
When we are on new Date(), if it is on the pc side, the computer time is wrong, and the time obtained will also be wrong. If you need to record the time, you should send a request to the back end to let the back end calculate the time. Server dependent time
After modifying the local time, use new Date() to get the time. The following figure will be the wrong time

# 2020 / 03 / 02 Monday
# Change the title during browser tab page switching
When the user clicks other tab pages of the browser to leave the page, or enters the current page from other tab pages, the visibility change event will be triggered. According to docuemnt Hidden can judge whether to leave or come back. We can modify the title to achieve a visual effect
// When switching between tab s, hide the page title change function
// JS elevation 3 page visibility API
// reference resources: https://www.yuque.com/guoqzuo/js_es6/nocthb#0cf7a8b7
var title = document.title;
document.addEventListener('visibilitychange', function (event) {
  document.title =  document.hidden ? '~ Come back as soon as possible. ~ ' : title
  if (document.hidden) {
    // Do some pause operations
  } else {
    // Start operation
  }
}, false)
# Dynamic prompt when the network in the web page is abnormal or the network is normal
Monitor the online and offline events of the page, and display or hide the corresponding information
// When the network status changes (with network = > without network, without network = > with network), prompt information
// JS elevation 3 offline detection
// reference resources: https://www.yuque.com/guoqzuo/js_es6/sp2k81#244d3090
let errorMsgNode // Used to remove the error message node
window.ononline = function(event) {
  errorMsgNode && document.body.removeChild(errorMsgNode)
  message('success', 'Network connected', 3000)
}
window.onoffline = function(event) {
  message('error', 'Network disconnected')
}
/**
 * In order to display network information, a small tips prompt function is specially written to display information at the top
 * @param {}} type The text color error is red and others are green
 * @param {*} msg display information
 * @param {*} sec If there is an incoming time, the prompt will be turned off after sec seconds
 */
function message(type, msg, sec) {
  let color = type === 'error' ? 'red' : 'green'
  let cssArr = [
    'position:fixed;top:8px;left:50%;z-index:9999999;',
    'transform:translateX(-50%);padding:5px 10px;background:#fff;'
  ]
  let htmlStr = `
    <div style="${cssArr.join('')}color:${color}">${msg}</di>
  `
  let node = document.createElement('div')
  node.innerHTML = htmlStr
  document.body.appendChild(node)
  if (Number.isInteger(sec) && sec > 0) {
    setTimeout(() => {
      document.body.removeChild(node)
    }, sec)
  } else {
    // The error message is always prompted. It needs to be set in the variable and removed when the network is connected
    errorMsgNode = node
  }
}
# Implementation of page scrolling ratio monitoring
Listen to the scroll event of the page. The whole scrolling distance is document documentElement. scrollHeight - window. Innerheight: divide the current scrollTop by the whole scrolling distance, which is the percentage of the page. Mount two divs to the body to display the progress information
// Page scrolling ratio monitoring
// The top of the posTop is similar to the scroll progress bar of Ruan Yifeng ES6 web page
// pos lower right scroll percentage
// JS elevation 3 - UI event scroll event
// https://www.yuque.com/guoqzuo/js_es6/elgng1#e38771e5
let htmlStr = `
  <div id="posTop" style="position: fixed;top:0;height:2px;background: #25b864;z-index:999999;"></div>
  <div id="pos" style="display:none;position:fixed;bottom: 100px;right:20px;padding:10px;background: #25b864;color:white;width:40px;text-align: center;border-radius:5px;"></div>
`
let eleNode = document.createElement('div')
eleNode.innerHTML = htmlStr
document.body.appendChild(eleNode)

window.addEventListener('scroll', function(e) {
  let scrollTop = document.documentElement.scrollTop;
  let total = document.documentElement.scrollHeight - window.innerHeight;
  let persentage = parseInt(scrollTop/total*100);
  // console.log(scrollTop);

  document.getElementById('pos').style.display = scrollTop === 0 ? 'none' : 'block';
  document.getElementById('pos').innerHTML = `${persentage}%`;
  document.getElementById('posTop').style.width = `${persentage}%`;
}, false)
# After copying the content, insert the author and current article information into the content
Listen to the copy event in the body, and then use document Getselection() gets the content, appends the content, and then uses event clipboardData. SetData writes content like a pasteboard
// Operating the pasteboard
// JS elevation 3 form script operation paste board
// https://www.yuque.com/guoqzuo/js_es6/ubpn7k#8482e7c5
document.body.oncopy = function(event) {
  console.log('copy', event);
  // Get the contents of copy
  // console.log(document.getSelection().toString());
  // Add information to the copy content
  var msg = `
-----------------------------
title: ${document.title}
Link: ${location.href}
Author: guoqzuo (http://github/zuoxiaobai)
  `
  event.clipboardData.setData('text/plain', `${document.getSelection().toString()} ${msg}`);
  event.preventDefault();
};