Project Name: dual vip high availability web Cluster Based on keepalived
Architecture diagram
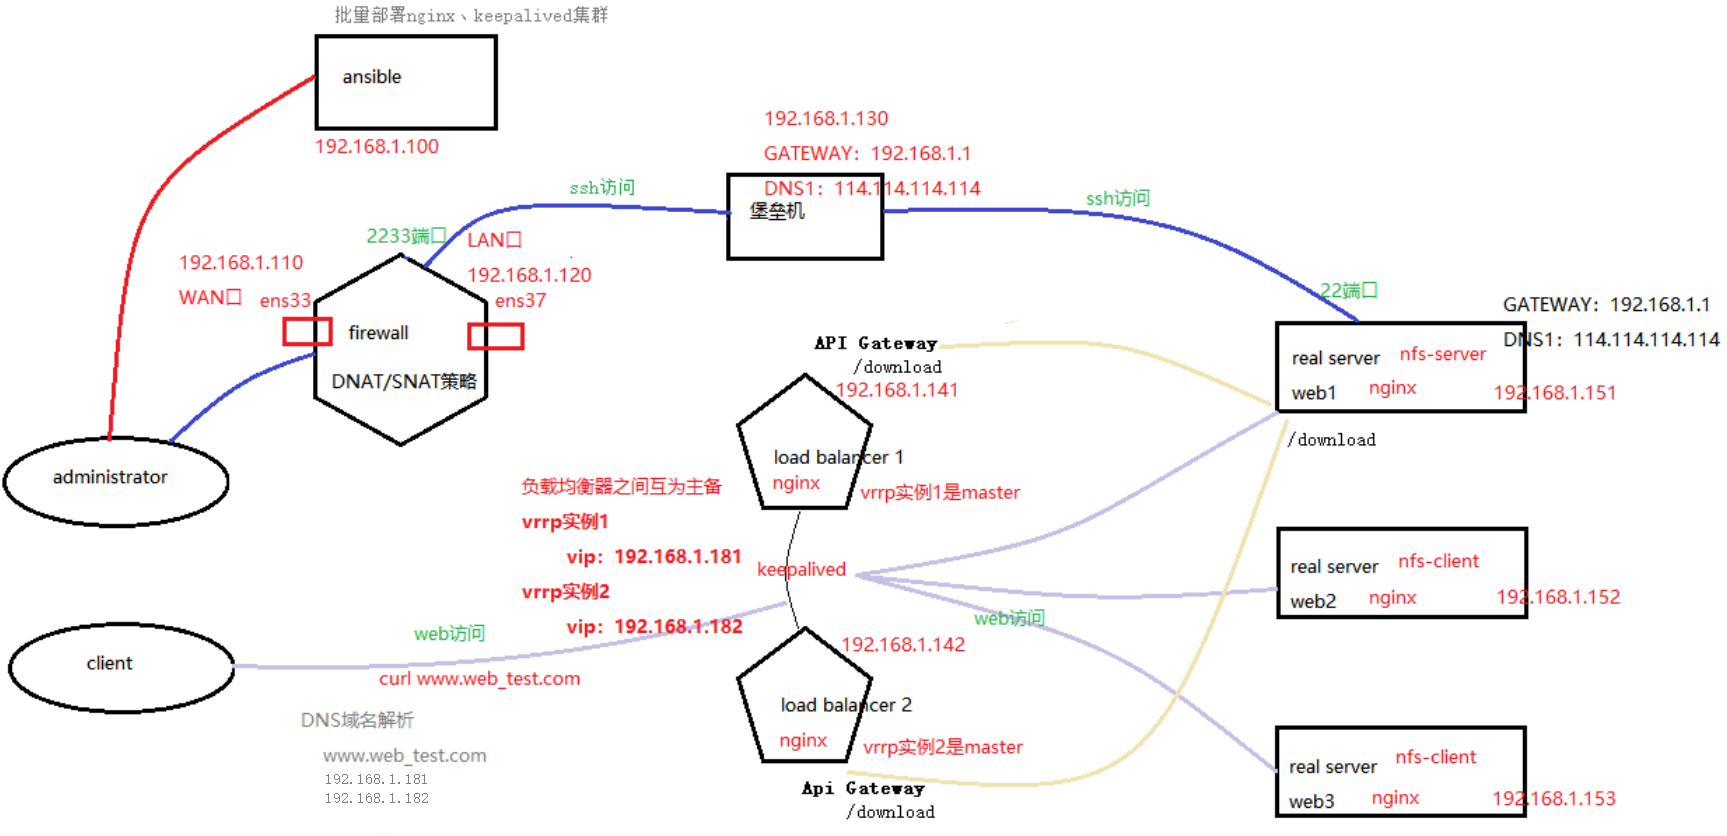
Project environment: CentOS 8.2 (8 sets, 1-core 1G), ansible 2.9.17, keepalived 2.0.10, Nginx 1.19.7, NFS
Project Description:
Build a Web Cluster project with high concurrency and high availability, integrate ansible to realize automatic operation and maintenance, use Nginx as load balancer, and keep alive to achieve high availability. Ansible server (1), firewall server (1), fortress machine (1), load balancer (2), web server (3, of which 1 is NFS+web server);
Project steps:
1. Install 8 CentOS 8.2 systems, deploy ansible servers, and configure ssh secret free channels between all machines;
# ansible server
[root@ansible ~]# ssh-keygen -t ecdsa					#Note: generate key pair
[root@ansible ~]# ssh-copy-id -i ~/.ssh/id_ecdsa.pub 192.168.1.110	#Note: firewall
[root@ansible ~]# ssh-copy-id -i ~/.ssh/id_ecdsa.pub 192.168.1.130	#Note: Fortress machine
[root@ansible ~]# ssh-copy-id -i ~/.ssh/id_ecdsa.pub 192.168.1.141	#Note: load_balancer-1
[root@ansible ~]# ssh-copy-id -i ~/.ssh/id_ecdsa.pub 192.168.1.142	#Note: load_balancer-2
[root@ansible ~]# ssh-copy-id -i ~/.ssh/id_ecdsa.pub 192.168.1.151	#Note: web-1
[root@ansible ~]# ssh-copy-id -i ~/.ssh/id_ecdsa.pub 192.168.1.152	#Note: web-2
[root@ansible ~]# ssh-copy-id -i ~/.ssh/id_ecdsa.pub 192.168.1.153	#Note: web-3
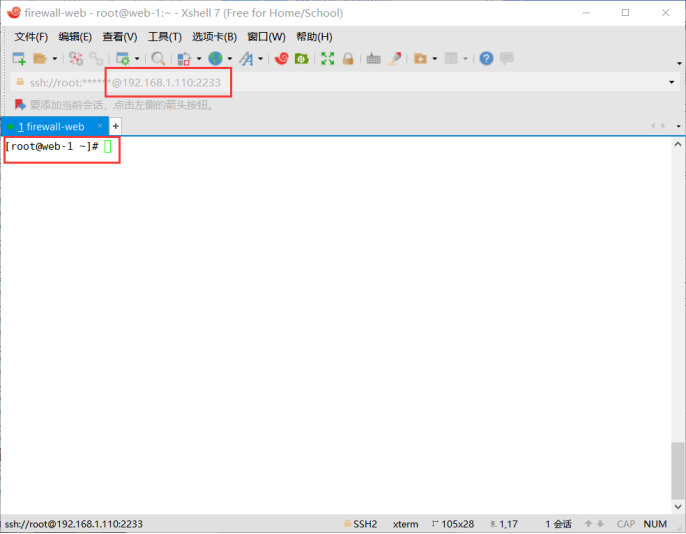
2. Deploy the fortress machine and configure the NAT policy of firewall server to publish the ssh service of Intranet NFS server;
# Configure the NAT policy of firewall server to publish the ssh server of intranet (i.e. web-1 server)
[root@firewall ~]# cat iptables_open_ssh-server.sh
#!/bin/bash

#Stop firewalld service
service firewalld stop
#Clear the rules in iptables
iptables -t nat -F
iptables -F
#disabled selinux
setenforce 0
sed -i '/^SELINUX=/ s/enforcing/disabled/' /etc/sysconfig/selinux

#Enable routing function
echo 1 >/proc/sys/net/ipv4/ip_forward

#Configure the SNAT policy, realize the SNAT function, and modify the source ip of all ip packets in the network segment 192.168.1.0/24 to 192.168.1.110
iptables -t nat -A POSTROUTING -s 192.168.1.0/24 -o ens33 -j SNAT --to-source 192.168.1.110
#Configure DNAT policy, publish ssh server 192.168.1.151 (i.e. web-1 server) of Intranet, access port 2233 of firewall server and forward to port 22 of 192.158.1.151 of intranet
iptables -t nat -A PREROUTING -d 192.168.1.110 -p tcp --dport 2233 -i ens33 -j DNAT --to-destination 192.168.1.151:22

[root@firewall ~]# bash iptables_open_ssh-server.sh
Effect: 192.168.1.110:2233 ssh can be connected to web1 192.168.1.151:22
design sketch
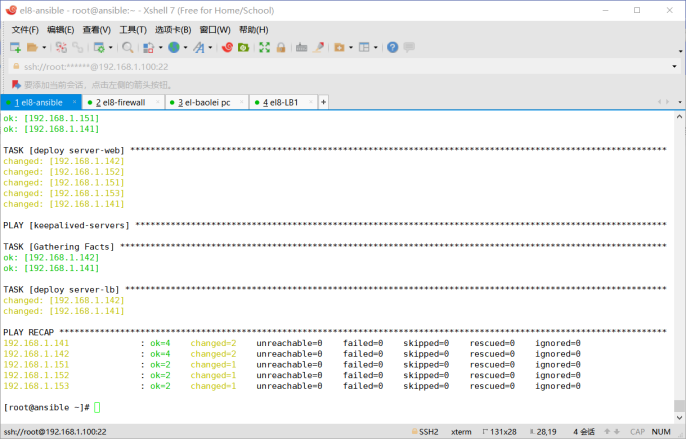
3. Write the script for deploying Nginx and keepalived, and write an ansible playbook to realize batch deployment;
# ansible server
[root@ansible ~]# yum install epel-release -y
[root@ansible ~]# yum install ansible -y

[root@ansible ~]# cat /etc/ansible/hosts
[nginx-servers]
192.168.1.141
192.168.1.142
192.168.1.151
192.168.1.152
192.168.1.153

[keepalived-servers]
192.168.1.141
192.168.1.142

[root@ansible ~]# cat ansible_playbook.yaml
- hosts: nginx-servers
  remote_user: root
  tasks:
  - name: deploy server-web
    script: ~/onekey_install_nginx.sh
- hosts: keepalived-servers
  remote_user: root
  tasks:
  - name: deploy server-lb
    script: ~/onekey_install_keepalived.sh

[root@ansible ~]# ansible-playbook ansible_playbook.yaml
design sketch
Nginx compile installation script
[root@ansible ~]# cat onekey_install_nginx.sh
#!/bin/bash

#To solve the software dependency, install the software package
yum -y install zlib zlib-devel openssl openssl-devel pcre pcre-devel gcc gcc-c++ autoconf automake make
#useradd cPen
id cPen || useradd -s /sbin/nologin cPen
#download nginx
mkdir -p /nginx
cd /nginx
curl -O http://nginx.org/download/nginx-1.19.7.tar.gz
#Unzip the downloaded nginx source package
tar xf nginx-1.19.7.tar.gz
cd nginx-1.19.7
#Generate pre compilation configuration -- > makefile
./configure --prefix=/usr/local/nginx  --user=cPen  --group=cPen --with-threads --with-http_ssl_module  --with-http_realip_module  --with-http_v2_module --with-file-aio  --with-http_stub_status_module --with-stream
#compile
make -j 2
#Compile and install -- > install the compiled binary program into the specified directory / usr/local/nginx1
make install

#Modify PATH variable
echo "PATH=$PATH:/usr/local/nginx/sbin" >>/root/.bashrc
#Execute a script that modifies the environment variables
source /root/.bashrc

#start nginx
/usr/local/nginx/sbin/nginx

#firewalld and selinux

#stop firewalld and set not to start firewalld next time
service firewalld stop
systemctl disable firewalld

#Temporarily stop selinux and permanently stop selinux
setenforce 0
sed -i '/^SELINUX=/ s/enforcing/disabled/' /etc/sysconfig/selinux

#Startup and self start
echo "/usr/local/nginx/sbin/nginx" >>/etc/rc.local
chmod +x /etc/rc.d/rc.local
Keepalived deployment script
[root@ansible ~]# cat onekey_install_keepalived.sh
#!/bin/bash

#Install keepalived
yum install keepalived -y

#Turn off firewall
service firewalld stop
systemctl disable firewalld
4. Deploy three back-end web servers, one of which is equipped with NFS service to access the same content;
web-1: 192.168.1.151 nfs+web server
web-2: 192.168.1.152 Web server
web-3: 192.168.1.153 Web server
1. Installation
[root@web-1 ~]# yum install nfs-utils -y
[root@web-2 ~]# yum install nfs-utils -y
[root@web-3 ~]# yum install nfs-utils -y
2. Add the exports configuration
[root@web-1 ~]# vim /etc/exports
/usr/local/nginx/html 192.168.1.0/24(rw)
3. Restart the nfs service
[root@web-1 ~]# service nfs-server restart
4. Configure the nfs service on web-1, start the nfs service, and then mount network files on web-2 and web-3
[root@web-2 ~]# mount -t nfs 192.168.1.151:/usr/local/nginx/html /usr/local/nginx/html
[root@web-3 /]# mount -t nfs 192.168.1.151:/usr/local/nginx/html /usr/local/nginx/html
[root@web-1 ~]# echo "this is the nfs_test; from web-1 index" >/usr/local/nginx/html/index.html
design sketch


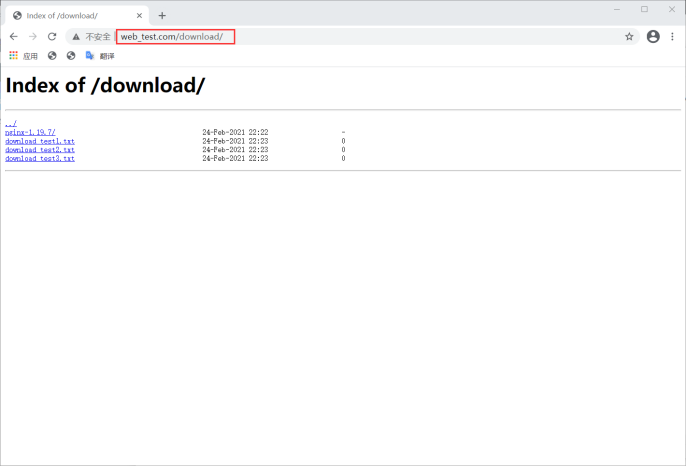
5. Simulate the middle console system, realize url based load balancing by modifying the Nginx configuration files of two load balancers, and forward different URLs, such as / download to realize the download function;
# Load balancer load balancing configuration
[root@load_balancer-1 ~]# vim /usr/local/nginx/conf/nginx.conf
    upstream myweb {
        server 192.168.1.151;
        server 192.168.1.152;
        server 192.168.1.153;
    }
    server {
        listen       80;
        server_name  www.web_test.com;

        location / {
            proxy_pass  http://myweb;
        }

        location /download {
            proxy_pass  http://192.168.1.151;
        }
    }

# The configuration of load balancer is the same as that of load balancer-2
# Configuration of middle station system (load balancer)
[root@load_balancer-1 ~]# vim /usr/local/nginx/conf/nginx.conf
    server {
        listen       80;
        server_name  www.web_test.com;

        location /download {
            proxy_pass  http://192.168.1.151;
        }

[root@load_balancer-1 ~]# nginx -s reload

# The load balancer-2 configuration of the middle console system is the same
# Configuration of web-1 server
# The autoindex on command is placed under location / to realize the download function
[root@web-1 download]# cat /usr/local/nginx/conf/nginx.conf
......
        location / {
            root   html;
            index  index.html index.htm;
            autoindex on;
        }
......

[root@web-1 ~]# nginx -s reload

[root@web-1 ~]# mkdir /usr/local/nginx/html/download
[root@web-1 ~]# cd /usr/local/nginx/html/download/
[root@web-1 download]# cp /nginx/nginx-1.19.7 . -r
[root@web-1 download]# touch download_test1.txt
[root@web-1 download]# touch download_test2.txt
[root@web-1 download]# touch download_test3.txt
design sketch
6. Configure the load balancer to achieve high availability based on keepalived dual vip, so as to make full use of MASTER and BACKUP resources and not idle;
How to achieve the effect of double vip?
dns domain name cluster resolution record + Dual vip implementation, master and backup are not idle
C:\Windows\System32\drivers\etc\hosts
192.168.1.181  www.web_test.com
192.168.1.182  www.web_test.com
Insert the code slice here
Load balancer load balancing configuration
[root@load_balancer-1 ~]# vim /usr/local/nginx/conf/nginx.conf
    upstream myweb {
        server 192.168.1.151;
        server 192.168.1.152;
        server 192.168.1.153;
    }
    server {
        listen       80;
        server_name  www.web_test.com;

        location / {
            proxy_pass  http://myweb;
        }

        location /download {
            proxy_pass  http://192.168.1.151;
        }
    }

# The same is true for load balancer-2 configuration
Load balancer keepalived high availability dual master mode configuration
# Configuration on load balancer-1 server
[root@load_balancer-1 ~]# cd /etc/keepalived/
[root@load_balancer-1 keepalived]# cat keepalived.conf
! Configuration File for keepalived

global_defs {
   notification_email {
     acassen@firewall.loc
     failover@firewall.loc
     sysadmin@firewall.loc
   }
   notification_email_from Alexandre.Cassen@firewall.loc
   smtp_server 192.168.200.1
   smtp_connect_timeout 30
   router_id LVS_DEVEL
   vrrp_skip_check_adv_addr
   #vrrp_strict
   vrrp_garp_interval 0
   vrrp_gna_interval 0
}

vrrp_instance VI_1 {
    state MASTER
    interface ens33
    virtual_router_id 199
    priority 110
    advert_int 1
    authentication {
        auth_type PASS
        auth_pass 123456
    }
    virtual_ipaddress {
        192.168.1.181
    }
}

vrrp_instance VI_2 {
    state BACKUP
    interface ens33
    virtual_router_id 200
    priority 100
    advert_int 1
    authentication {
        auth_type PASS
        auth_pass 123456
    }
    virtual_ipaddress {
        192.168.1.182
    }
}
# Configuration on load balancer-2 server
[root@load_balancer-2 ~]# cd /etc/keepalived/
[root@load_balancer-2 keepalived]# cat keepalived.conf
! Configuration File for keepalived

global_defs {
   notification_email {
     acassen@firewall.loc
     failover@firewall.loc
     sysadmin@firewall.loc
   }
   notification_email_from Alexandre.Cassen@firewall.loc
   smtp_server 192.168.200.1
   smtp_connect_timeout 30
   router_id LVS_DEVEL
   vrrp_skip_check_adv_addr
   #vrrp_strict
   vrrp_garp_interval 0
   vrrp_gna_interval 0
}

vrrp_instance VI_1 {
    state BACKUP
    interface ens33
    virtual_router_id 199
    priority 100
    advert_int 1
    authentication {
        auth_type PASS
        auth_pass 123456
    }
    virtual_ipaddress {
        192.168.1.181
    }
}

vrrp_instance VI_2 {
    state MASTER
    interface ens33
    virtual_router_id 200
    priority 110
    advert_int 1
    authentication {
        auth_type PASS
        auth_pass 123456
    }
    virtual_ipaddress {
        192.168.1.182
    }
}
Restart the keepalived service
[root@load_balancer-1 keepalived]# service keepalived restart
[root@load_balancer-2 keepalived]# service keepalived restart
effect
# Load balancer_ balancer-1
[root@load_balancer-1 ~]# ip add
1: lo: <LOOPBACK,UP,LOWER_UP> mtu 65536 qdisc noqueue state UNKNOWN group default qlen 1000
    link/loopback 00:00:00:00:00:00 brd 00:00:00:00:00:00
    inet 127.0.0.1/8 scope host lo
       valid_lft forever preferred_lft forever
    inet6 ::1/128 scope host
       valid_lft forever preferred_lft forever
2: ens33: <BROADCAST,MULTICAST,UP,LOWER_UP> mtu 1500 qdisc fq_codel state UP group default qlen 1000
    link/ether 00:0c:29:38:10:f7 brd ff:ff:ff:ff:ff:ff
    inet 192.168.1.141/24 brd 192.168.1.255 scope global noprefixroute ens33
       valid_lft forever preferred_lft forever
    inet 192.168.1.181/32 scope global ens33
       valid_lft forever preferred_lft forever
    inet6 2409:8a20:b86f:aac0:20c:29ff:fe38:10f7/64 scope global dynamic mngtmpaddr
       valid_lft 259016sec preferred_lft 172616sec
    inet6 fe80::20c:29ff:fe38:10f7/64 scope link
       valid_lft forever preferred_lft forever
# Load balancer_ balancer-2
[root@load_balancer-2 ~]# ip add
1: lo: <LOOPBACK,UP,LOWER_UP> mtu 65536 qdisc noqueue state UNKNOWN group default qlen 1000
    link/loopback 00:00:00:00:00:00 brd 00:00:00:00:00:00
    inet 127.0.0.1/8 scope host lo
       valid_lft forever preferred_lft forever
    inet6 ::1/128 scope host
       valid_lft forever preferred_lft forever
2: ens33: <BROADCAST,MULTICAST,UP,LOWER_UP> mtu 1500 qdisc fq_codel state UP group default qlen 1000
    link/ether 00:0c:29:33:ee:80 brd ff:ff:ff:ff:ff:ff
    inet 192.168.1.142/24 brd 192.168.1.255 scope global noprefixroute ens33
       valid_lft forever preferred_lft forever
    inet 192.168.1.182/32 scope global ens33
       valid_lft forever preferred_lft forever
    inet6 2409:8a20:b86f:aac0:20c:29ff:fe33:ee80/64 scope global dynamic mngtmpaddr
       valid_lft 258985sec preferred_lft 172585sec
    inet6 fe80::20c:29ff:fe33:ee80/64 scope link
       valid_lft forever preferred_lft forever
design sketch

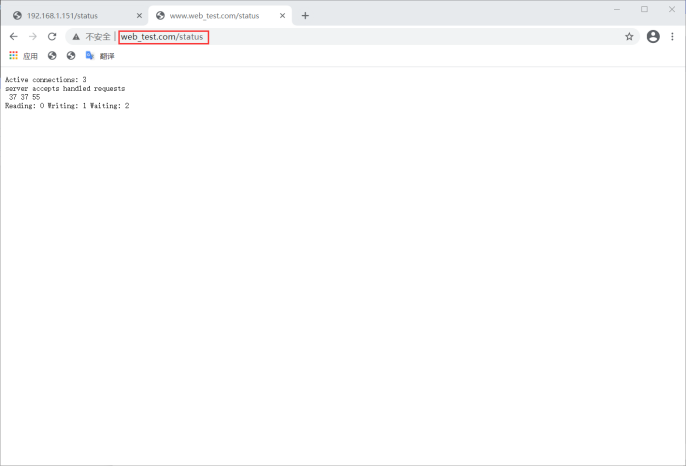
7. Optimize the relevant parameters of Linux and Nginx to achieve user-defined purposes: such as file descriptor, number of concurrent connections, status statistics function, traffic speed limit, etc;
# Example 1: status statistics function
[root@web-1 ~]# vim /usr/local/nginx/conf/nginx.conf
        location = /status {
            stub_status;
        }

[root@web-1 ~]# nginx -s reload
design sketch
# Example 2: speed limit
[root@web-1 ~]# vim /usr/local/nginx/conf/nginx.conf
    server {
        listen       80;
        limit_rate_after 10k;
        limit_rate 5k;
......

[root@web-1 ~]# nginx -s reload
design sketch
After refreshing the website several times in a short time

# Example: file descriptor + number of concurrent connections
[root@web-1 ~]# vim /usr/local/nginx/conf/nginx.conf
    limit_conn_zone $binary_remote_addr zone=perip:10m;
    server {
        listen       80;
        limit_conn perip 1;
......

[root@web-1 ~]# nginx -s reload

[root@web-1 ~]# ulimit -n 1000000