Read the Spring Boot + Vue full stack development written by brother song to learn systematically SpringBoot, the following is a simple shorthand, which can quickly locate the knowledge points according to the use scenario:
Demo Scaffold project address:
https://github.com/Vip-Augus/springboot-note
- SpringBoot shorthand
- 1, Introduce dependency
- 2, Configure Swagger parameters
- 1, Introduce dependency
- 2, Configure mailbox parameters
- 3, Write template and send content
- 1, Reference Redis dependency
- 2, Parameter configuration
- 3, Code use
- 1, Add mybatis and druid dependencies
- 2, Configure database and connection pool parameters
- 3, Other mybatis configurations
- @Exception handler error handling
- @ModelAttribute view properties
- conventional arrangement
- HTTPS configuration
- Build project
- SpringBoot basic configuration
- Spring Boot Starters
- @SpringBootApplication
- Web container configuration
- @ConfigurationProperties
- Profile
- @Controller advice is used to process global data
- CORS supports cross domain resource sharing
- Register MVC interceptor
- Turn on AOP section control
- Integrate Mybatis and Druid
- Integrate Redis
- Send HTML style messages
- Integrate Swagger (API documentation)
- summary
- reference material
SpringBoot basic configuration
Spring Boot Starters
Description cited from reference 1:
| Concept of starter: starter will include all the dependencies used, avoiding the trouble caused by developers introducing dependencies themselves. It should be noted that different starters are used to solve different dependencies, so their internal implementations may be very different. For example, jpa starters and Redis starters may have different implementations. This is because the essence of starters lies in synthesize, which is an abstraction at the logical level. Perhaps this concept is a bit similar to Docker, Because they are all doing a "packaging" operation, if you know what problem Docker is to solve, maybe you can make an analogy between Docker and starter. |
We know where SpringBoot A very important concept in is that "Convention is better than configuration". Through specific configuration, many steps can be reduced to achieve the desired function.
For example, if we want to use caching Redis may need to go through the following steps in the previous:
- stay pom File introduces a specific version of redis
- stay . properties Configuration parameters in file
- Create one after another according to the parameters jedis connect
- Define a tool class to manually create a connection pool to manage
After the above steps, we can officially use it Redis
But in Spring Boot Everything because Starter Become simple
- stay pom Import from file spring-boot-starter-data-redis
- stay . properties Configuration parameters in file
Through the above two steps, the configuration takes effect automatically. The specific effective steps are as follows: bean yes RedisAutoConfiguration, the name of the autoconfiguration class, has a feature called xxxAutoConfiguration.
Let's take a brief look at this class:
@Configuration
@ConditionalOnClass(RedisOperations.class)
@EnableConfigurationProperties(RedisProperties.class)
@Import({ LettuceConnectionConfiguration.class, JedisConnectionConfiguration.class })
public class RedisAutoConfiguration {

 @Bean
 @ConditionalOnMissingBean(name = "redisTemplate")
 public RedisTemplate<Object, Object> redisTemplate(RedisConnectionFactory redisConnectionFactory)
   throws UnknownHostException {
  RedisTemplate<Object, Object> template = new RedisTemplate<>();
  template.setConnectionFactory(redisConnectionFactory);
  return template;
 }

 @Bean
 @ConditionalOnMissingBean
 public StringRedisTemplate stringRedisTemplate(RedisConnectionFactory redisConnectionFactory)
   throws UnknownHostException {
  StringRedisTemplate template = new StringRedisTemplate();
  template.setConnectionFactory(redisConnectionFactory);
  return template;
 }

}

@ConfigurationProperties(prefix = "spring.redis")
public class RedisProperties {...}
As you can see, Redis Auto configuration class, read with spring.redis The configuration for the prefix is then loaded redisTemplate Into the container, and then we can use it in our application RedisTemplate To operate the cache, there are many details not detailed, such as @ ConditionalOnMissingBean Leave a pit first (●´∀′●)
@Autowired
private RedisTemplate redisTemplate;

ValueOperations ops2 = redisTemplate.opsForValue();
Book book = (Book) ops2.get("b1");
@SpringBootApplication
This annotation is on the startup class of the loading project, and it is a combined annotation:
@SpringBootConfiguration
@EnableAutoConfiguration
@ComponentScan(excludeFilters = { @Filter(type = FilterType.CUSTOM, classes = TypeExcludeFilter.class),
  @Filter(type = FilterType.CUSTOM, classes = AutoConfigurationExcludeFilter.class) })
public @interface SpringBootApplication {...}
The following is the explanation of these three core notes:
| Annotation name | explain |
|---|---|
| @SpringBootConfiguration | This indicates that this is a configuration class in which developers can configure beans |
| @EnableAutoConfiguration | Indicates that automatic configuration is turned on |
| @ComponentScan | Complete the package scanning. The default scanned class is located under the package where the current class is located |
With this annotation, we execute mian Method: you can start one SpringApplicaiton Applied.
SpringApplication.run(SpringBootLearnApplication.class, args);
Web container configuration
conventional arrangement
| Configuration name | explain |
|---|---|
| server.port=8081 | The port number of the container is configured. The default is 8080 |
| server.error.path=/error | Configured the page to jump when an item goes wrong |
| server.servlet.session.timeout=30m | session expiration time, m indicates minutes. If the unit is not written, the default is seconds and seconds |
| server.servlet.context-path=/ | Project name. If not configured, it defaults to /. After configuration, you need to add a prefix when accessing |
| server.tomcat.uri-encoding=utf-8 | Tomcat request encoding format |
| server.tomcat.max-threads=500 | Tomcat maximum threads |
| server.tomcat.basedir=/home/tmp | The directory of Tomcat operation logs and temporary files. If not configured, the temporary directory of the system is used by default |
HTTPS configuration
| Configuration name | explain |
|---|---|
| server.ssl.key-store=xxx | Secret key file name |
| server.ssl.key-alias=xxx | Secret key alias |
| server.ssl.key-store-password=123456 | Secret key password |
@ConfigurationProperties
This annotation can be placed on a class or @ Bean The annotation is on the method, so SpringBoot You can read the configuration of a specific prefix from the configuration file and inject the attribute value into the corresponding attribute.
@Configuration
@ConfigurationProperties(prefix = "spring.datasource")
public class DruidConfigBean {

    private Integer initialSize;

    private Integer minIdle;

    private Integer maxActive;

    private List<String> customs;

    ...
}
application.properties
spring.datasource.initialSize=5
spring.datasource.minIdle=5
spring.datasource.maxActive=20
spring.datasource.customs=test1,test2,test3
If the object is a list structure, it can be separated by commas in the configuration file, and then injected into the corresponding attributes.
Profile
Using this attribute, you can quickly switch profiles in SpringBoot In the default contract, the rule of profile name in different environments is application-{profile}.propertie,profile A placeholder represents the name of the current environment.
1. Disposition application.properties
spring.profiles.active=dev
2. Configure the in the startup class in the code main Add on method setAdditionalProfiles("{profile}");
SpringApplicationBuilder builder = new SpringApplicationBuilder(SpringBootLearnApplication.class);
builder.application().setAdditionalProfiles("prod");
builder.run(args);
3. Start parameter configuration
java -jar demo.jar --spring.active.profile=dev
@Controller advice is used to process global data
@ControllerAdvice yes @ Controller Enhanced version of. It is mainly used to process global data, which is generally matched @ ExceptionHandler ,@ ModelAttribute as well as @ InitBinder use.
@Exception handler error handling
/**
 * Enhanced controller to intercept custom exception handling
 *
 */
@ControllerAdvice
public class CustomExceptionHandler {

    // Specify the exception types to be intercepted globally and handle them uniformly
    @ExceptionHandler(MaxUploadSizeExceededException.class)
    public void uploadException(MaxUploadSizeExceededException e, HttpServletResponse response) throws IOException {
        response.setContentType("text/html;charset=utf-8");
        PrintWriter out = response.getWriter();
        out.write("Upload file size exceeds limit");
        out.flush();
        out.close();
    }
}
@ModelAttribute view properties
@ControllerAdvice
public class CustomModelAttribute {

    //
    @ModelAttribute(value = "info")
    public Map<String, String> userInfo() throws IOException {
        Map<String, String> map = new HashMap<>();
        map.put("test", "testInfo");
        return map;
    }
}


@GetMapping("/hello")
public String hello(Model model) {
    Map<String, Object> map = model.asMap();
    Map<String, String> infoMap = (Map<String, String>) map.get("info");
    return infoMap.get("test");
}
- key : @ModelAttribute In annotation value attribute
- Usage scenario: any request controller Class, through the Model Can be obtained value Corresponding attribute
CORS supports cross domain resource sharing
Cross origin resource sharing (CORS), a cross domain resource sharing technology, aims to solve the cross domain requests of the front end.
| Reference: when a resource requests a resource from a domain or port different from the server where the resource itself is located, the resource will initiate a cross domain HTTP request |
For details, please refer to this article - Implementation of cross domain request (CORS) in the spring boot series. Here is just a record of how to use it:
For example, at my front and rear ends demo If it fails to pass Nginx Forward, the following information will be prompted:
Access to fetch at 'http://localhost:8888/login' from origin 'http://localhost:3000' has been blocked by CORS policy: Response to preflight request doesn't pass access control check: The value of the 'Access-Control-Allow-Credentials' header in the response is '' which must be 'true' when the request's credentials mode is 'include'
To solve this problem, you need to add the following two lines of code to the back end without modifying the front end:
// First line, supported domains
@CrossOrigin(origins = "http://localhost:3000")
@RequestMapping(value = "/login", method = RequestMethod.GET)
@ResponseBody
public String login(HttpServletResponse response) {
    // In the second line, add header information to the response body (this line is to solve the above prompt)
    response.setHeader("Access-Control-Allow-Credentials", "true");
    return HttpRequestUtils.login();
}
Register MVC interceptor
stay MVC In the module, similar functions are also provided AOP With the extension of aspect management, it can have more fine interception processing capability.
The core lies in the interface: HandlerInterceptor, which is used as follows:
/**
 * Custom MVC interceptor
 */
public class MyInterceptor implements HandlerInterceptor {
    @Override
    public boolean preHandle(HttpServletRequest request, HttpServletResponse response, Object handler) throws Exception {
        // stay controller Call before method
        return true;
    }

    @Override
    public void postHandle(HttpServletRequest request, HttpServletResponse response, Object handler, ModelAndView modelAndView) throws Exception {
        // stay controller Call after method
    }

    @Override
    public void afterCompletion(HttpServletRequest request, HttpServletResponse response, Object handler, Exception ex) throws Exception {
        // stay postHandle Call after method
    }
}
Registration code:
/**
 * mvc configuration for global control
 */
@Configuration
public class MyWebMvcConfig implements WebMvcConfigurer {
    @Override
    public void addInterceptors(InterceptorRegistry registry) {
        registry.addInterceptor(new MyInterceptor())
                // Indicates intercepted URL
                .addPathPatterns("/**")
                // Indicates the path to exclude
                .excludePathPatterns("/hello");
    }
}
Interceptor execution order: prehandle -> controller -> postHandle -> After completion. At the same time, it should be noted that only preHandle Method return true, the later methods will continue to execute.
Turn on AOP section control
Facet injection is an old-fashioned technology, which has been learned before Spring You can refer to the article I wrote before:
Implementing AOP with Spring custom annotations
Spring source code learning (VIII) AOP use and implementation principle
stay SpringBoot In, it is easier to use. You only need to add the dependency. The use method is the same as above.
<dependency>
    <groupId>org.springframework.boot</groupId>
    <artifactId>spring-boot-starter-aop</artifactId>
</dependency>
Integrate Mybatis and Druid
SpringBoot Integrating database operations, the mainstream use is Druid Connection pool and Mybatis Persistence layer, similarly, starter Provides a simple integration solution
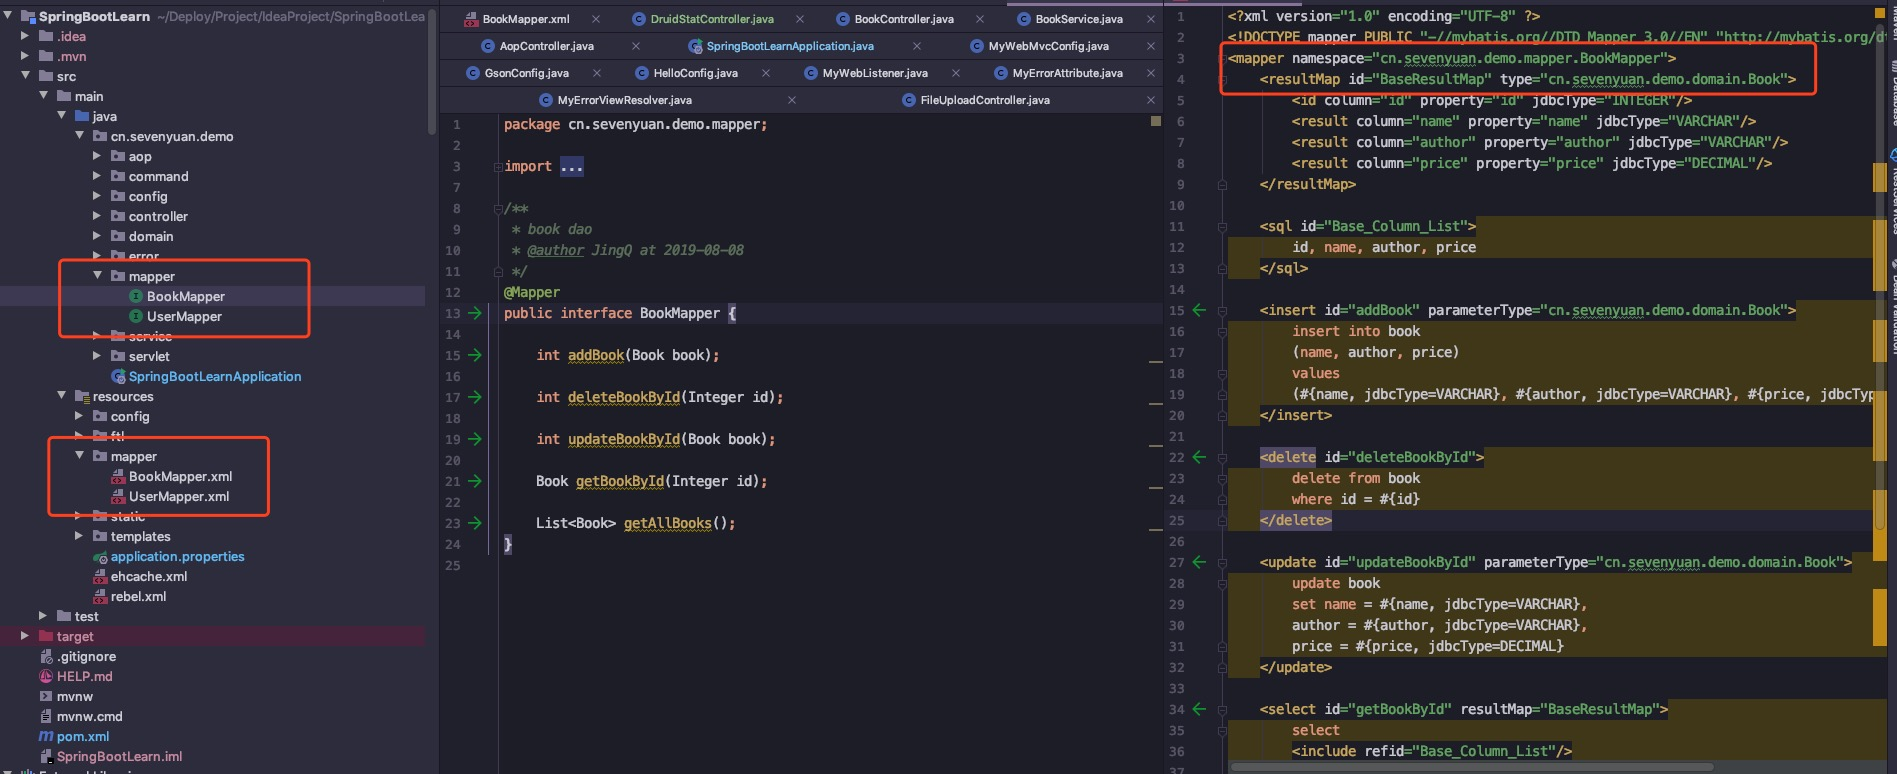
The project structure is as follows:
1, Add mybatis and druid dependencies
<dependency>
    <groupId>org.mybatis.spring.boot</groupId>
    <artifactId>mybatis-spring-boot-starter</artifactId>
    <version>1.3.2</version>
</dependency>
<dependency>
    <groupId>com.alibaba</groupId>
    <artifactId>druid-spring-boot-starter</artifactId>
    <version>1.1.18</version>
</dependency>
2, Configure database and connection pool parameters
# Database configuration
spring.datasource.type=com.alibaba.druid.pool.DruidDataSource
spring.datasource.driver-class-name=com.mysql.cj.jdbc.Driver
spring.datasource.url=jdbc:mysql://127.0.0.1:3306/test?useUnicode=true&characterEncoding=utf8&allowMultiQueries=true
spring.datasource.username=root
spring.datasource.password=12345678
# druid configuration
spring.datasource.druid.initial-size=5
spring.datasource.druid.max-active=20
spring.datasource.druid.min-idle=5
spring.datasource.druid.max-wait=60000
spring.datasource.druid.pool-prepared-statements=true
spring.datasource.druid.max-pool-prepared-statement-per-connection-size=20
spring.datasource.druid.max-open-prepared-statements=20
spring.datasource.druid.validation-query=SELECT 1
spring.datasource.druid.validation-query-timeout=30000
spring.datasource.druid.test-on-borrow=true
spring.datasource.druid.test-on-return=false
spring.datasource.druid.test-while-idle=false
#spring.datasource.druid.time-between-eviction-runs-millis=
#spring.datasource.druid.min-evictable-idle-time-millis=
#spring.datasource.druid.max-evictable-idle-time-millis=10000
# Druid stat filter config
spring.datasource.druid.filters=stat,wall
spring.datasource.druid.web-stat-filter.enabled=true
spring.datasource.druid.web-stat-filter.url-pattern=/*
# session monitoring
spring.datasource.druid.web-stat-filter.session-stat-enable=true
spring.datasource.druid.web-stat-filter.session-stat-max-count=10
spring.datasource.druid.web-stat-filter.principal-session-name=admin
spring.datasource.druid.web-stat-filter.principal-cookie-name=admin
spring.datasource.druid.web-stat-filter.profile-enable=true
# stat monitoring
spring.datasource.druid.web-stat-filter.exclusions=*.js,*.gif,*.jpg,*.bmp,*.png,*.css,*.ico,/druid/*
spring.datasource.druid.filter.stat.db-type=mysql
spring.datasource.druid.filter.stat.log-slow-sql=true
spring.datasource.druid.filter.stat.slow-sql-millis=1000
spring.datasource.druid.filter.stat.merge-sql=true
spring.datasource.druid.filter.wall.enabled=true
spring.datasource.druid.filter.wall.db-type=mysql
spring.datasource.druid.filter.wall.config.delete-allow=true
spring.datasource.druid.filter.wall.config.drop-table-allow=false
# Druid manage page config
spring.datasource.druid.stat-view-servlet.enabled=true
spring.datasource.druid.stat-view-servlet.url-pattern=/druid/*
spring.datasource.druid.stat-view-servlet.reset-enable=true
spring.datasource.druid.stat-view-servlet.login-username=admin
spring.datasource.druid.stat-view-servlet.login-password=admin
#spring.datasource.druid.stat-view-servlet.allow=
#spring.datasource.druid.stat-view-servlet.deny=
spring.datasource.druid.aop-patterns=cn.sevenyuan.demo.*
3, Other mybatis configurations
Local works, will xml File put resources Under the resource folder, the following configuration needs to be added for the application to identify:
 <build>
    <resources>
        <resource>
            <directory>src/main/resources</directory>
            <includes>
                <include>**/*</include>
            </includes>
        </resource>
    </resources>
    ...
</build>
Through the above configuration, I have started the monitoring of three pages locally: SQL , URL and Sprint Monitoring, as shown in the following figure:
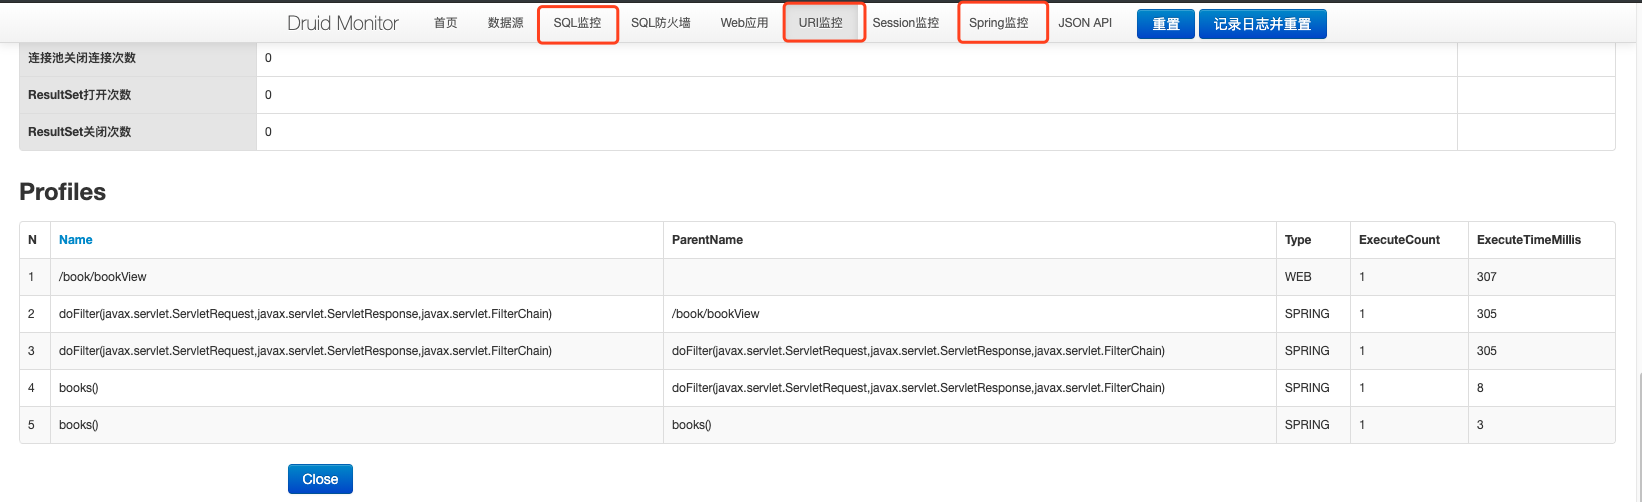
Through the above configuration, spring boot easily integrates druid and mybatis. At the same time, according to the properties The parameters configured in the file are enabled Druid Monitoring.
But according to the above configuration, I can't open it all the time session Monitoring, so if you need to configure session To monitor or adjust the specific configuration of parameters, you can view the official website
Integrate Redis
I used it Redis and NoSQL, but the most familiar and commonly used is Redis , So here's how to integrate
1, Reference Redis dependency
<dependency>
    <groupId>org.springframework.boot</groupId>
    <artifactId>spring-boot-starter-data-redis</artifactId>
    <exclusions>
        <exclusion>
            <artifactId>lettuce-core</artifactId>
            <groupId>io.lettuce</groupId>
        </exclusion>
    </exclusions>
</dependency>
<dependency>
    <groupId>redis.clients</groupId>
    <artifactId>jedis</artifactId>
</dependency>
2, Parameter configuration
# redis configuration
spring.redis.database=0
spring.redis.host=localhost
spring.redis.port=6379
spring.redis.password=
spring.redis.jedis.pool.max-active=8
spring.redis.jedis.pool.max-idle=8
spring.redis.jedis.pool.max-wait=-1ms
spring.redis.jedis.pool.min-idle=0
3, Code use
@Autowired
private RedisTemplate redisTemplate;
@Autowired
private StringRedisTemplate stringRedisTemplate;
@GetMapping("/testRedis")
public Book getForRedis() {
    ValueOperations<String, String> ops1 = stringRedisTemplate.opsForValue();
    ops1.set("name", "Go Language practice");
    String name = ops1.get("name");
    System.out.println(name);
    ValueOperations ops2 = redisTemplate.opsForValue();
    Book book = (Book) ops2.get("b1");
    if (book == null) {
        book = new Book("Go Language practice", 2, "none name", BigDecimal.ONE);
        ops2.set("b1", book);
    }
    return book;
}
Here is a simple record of reference and usage. See here for more functions: Spring Data Redis (I) – parsing RedisTemplate
Send HTML style messages
It has also been used before, so you can refer to this article: Java integrates Spring to send mail
1, Introduce dependency
 <!-- mail -->
<dependency>
    <groupId>org.springframework.boot</groupId>
    <artifactId>spring-boot-starter-mail</artifactId>
</dependency>
<dependency>
    <groupId>org.springframework.boot</groupId>
    <artifactId>spring-boot-starter-thymeleaf</artifactId>
</dependency>
2, Configure mailbox parameters
# mail
spring.mail.host=smtp.qq.com
spring.mail.port=465
spring.mail.username=xxxxxxxx
spring.mail.password=xxxxxxxx
spring.mail.default-encoding=UTF-8
spring.mail.properties.mail.smtp.socketFactory.class=javax.net.ssl.SSLSocketFactory
spring.mail.properties.mail.debug=true
If using QQ For mailbox, you need to obtain the authorization code in the mailbox settings and fill in the above password in
3, Write template and send content
MailServiceImpl.java
@Autowired
private JavaMailSender javaMailSender;
@Override
public void sendHtmlMail(String from, String to, String subject, String content) {
    try {
        MimeMessage message = javaMailSender.createMimeMessage();
        MimeMessageHelper helper = new MimeMessageHelper(message, true);
        helper.setFrom(from);
        helper.setTo(to);
        helper.setSubject(subject);
        helper.setText(content, true);
        javaMailSender.send(message);
    } catch (MessagingException e) {
        System.out.println("Failed to send mail");
        log.error("Failed to send mail", e);
    }
}
mailtemplate.html
<!DOCTYPE html>
<html lang="en" xmlns:th="http://www.thymeleaf.org">
<head>
    <meta charset="UTF-8">
    <title>mail</title>
</head>
<body>
<div th:text="${subject}"></div>
<div>List of books
    <table border="1">
        <tr>
            <td>Book number</td>
            <td>Book name</td>
            <td>Book author</td>
        </tr>
        <tr th:each="book:${books}">
            <td th:text="${book.id}"></td>
            <td th:text="${book.name}"></td>
            <td th:text="${book.author}"></td>
        </tr>
    </table>
</div>
</body>
</html>
test.java
@Autowired
private MailService mailService;
@Autowired
private TemplateEngine templateEngine;

@Test
public void sendThymeleafMail() {
    Context context = new Context();
    context.setVariable("subject", "Book list");
    List<Book> books = Lists.newArrayList();
    books.add(new Book("Go Language foundation", 1, "nonename", BigDecimal.TEN));
    books.add(new Book("Go Language practice", 2, "nonename", BigDecimal.TEN));
    books.add(new Book("Go Advanced language", 3, "nonename", BigDecimal.TEN));
    context.setVariable("books", books);
    String mail = templateEngine.process("mailtemplate.html", context);
    mailService.sendHtmlMail("xxxx@qq.com", "xxxxxxxx@qq.com", "Book list", mail);
}
Through the above simple steps, we can send mail in the code. For example, we should write weekly reports every week, count the system operation status, set scheduled tasks, count data, and then send mail automatically.