3-Use databases in Django
Posted by Sinikka on Sun, 16 Feb 2020 21:48:32 +0100
Database Settings
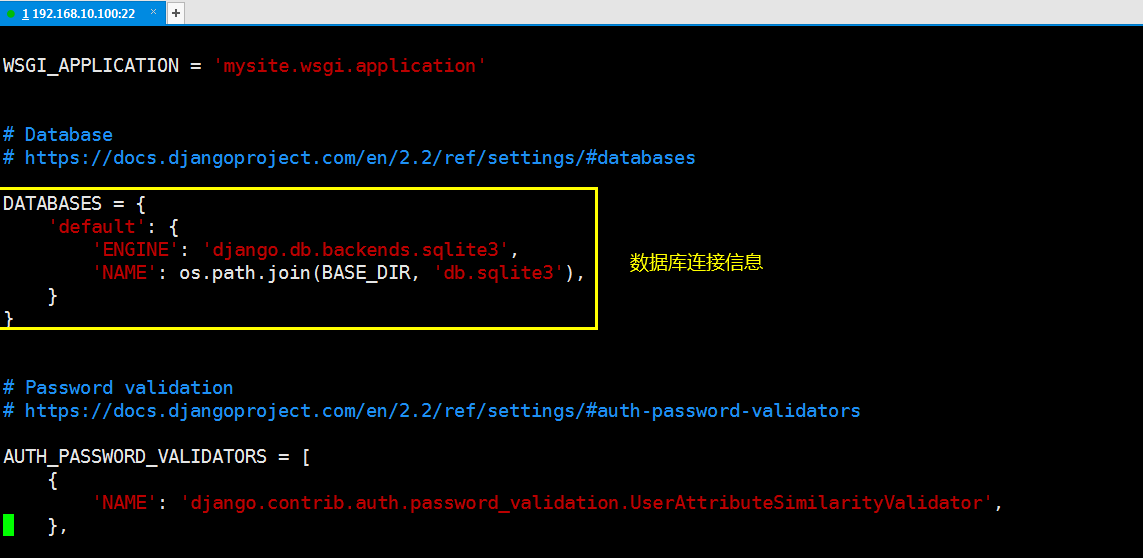
In the previous section, you learned how to create a Django project, create a web application in a Django project, and reference the URL of a web application in the URL of a Django main program.Here's how to use databases in Django.To use a database in Django, you first need to understand the settings for the database connection information options in mysite/mysite/settings.py.
Django uses the sqlite3 database by default, which is a lightweight file-based database, so data migration is very convenient.Used for single-machine programs, embedded, development and testing demo, etc.However, it does not support database user management, only one write operation is allowed at the same time, so sqlite is not what we want when concurrent operations are performed on the database, like some permission settings that require data users on the database. We can use large databases such as MySQL, postgresqlm, Oracle and so on.Since we're writing a voting system and theoretically many users will be able to vote (haha), here we use the MariaDB database, which is an open source database based on MySQL and is fully compatible with MySQL.About mariadb, please Baidu yourself.
1. Set up mariadb database
Here I use the yum method for installation, which is quick and easy. Django requires more than MySQL version 5.6, so mariadb10.2.31 is used here.This version includes MySQL 5.6, MySQL 5.7, and some new features of its own.
1.1 Set the official yum source for mariadb
[root@localhost mysite]# vi /etc/yum.repos.d/MariaDB.repo  # Add source for official mariadb10.2.31
[mariadb]
name = MariaDB
baseurl = http://yum.mariadb.org/10.2.31/centos7-amd64/
gpgkey=https://yum.mariadb.org/RPM-GPG-KEY-MariaDB
gpgcheck=1
If you want to use another version, please go to the official website https://downloads.mariadb.org/ Download the corresponding version yourself.
1.2 Install mariadb10.2.31
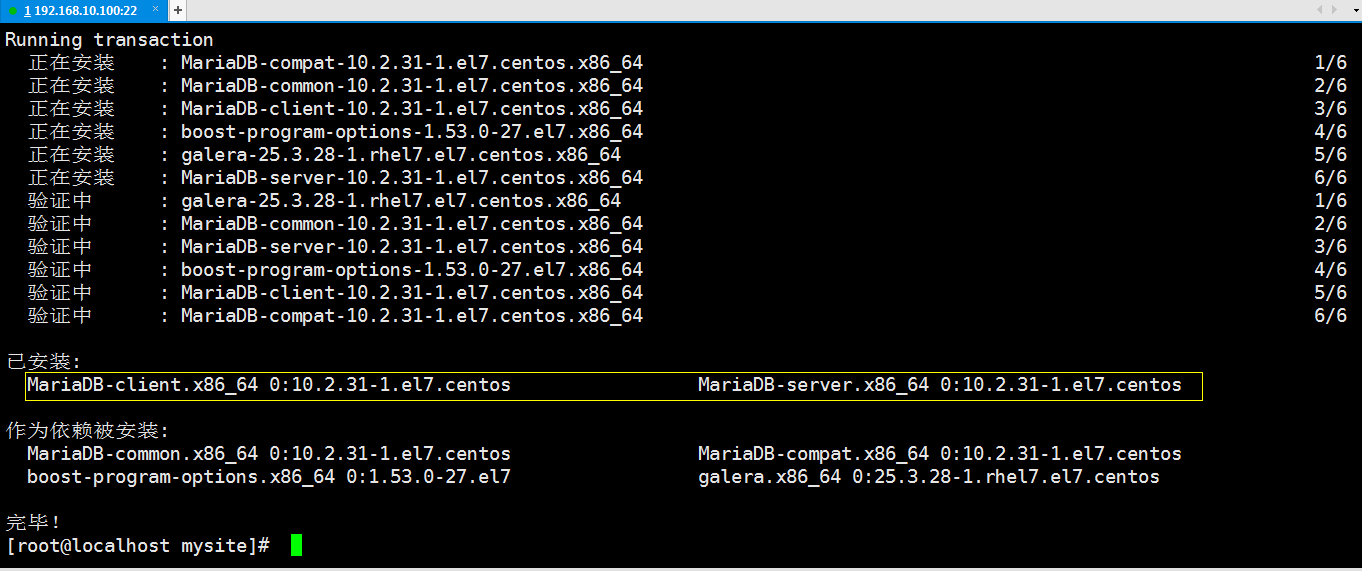
[root@localhost mysite]# yum install MariaDB-server MariaDB-client -y
After installation, you should see the following interface:
1.3 mariadb Service Management
Programs installed through yum in centos 7 can all use the systemctl tool to manage their services
[root@localhost ~]# systemctl start mariadb     // Open mysql service
[root@localhost ~]# systemctl stop mariadb      // Stop mysql service
[root@localhost ~]# systemctl restart mariadb   // Restart mysql service
[root@localhost ~]# systemctl enable mariadb    // Set up boot-up
[root@localhost ~]# systemctl disable mariadb   // Prevent startup
1.4 Initialize mariadb database
After MariaDB is installed and started successfully, the database program needs to be initialized in order to ensure the security and normal operation of the database.


 1 [root@localhost ~]# systemctl start mariadb     // service mysql start
 2 [root@localhost ~]# mysql_secure_installation   // Initialize mysql database
 3
 4 // Get into mariadb Initialization configuration mode
 5 NOTE: RUNNING ALL PARTS OF THIS SCRIPT IS RECOMMENDED FOR ALL MariaDB
 6       SERVERS IN PRODUCTION USE!  PLEASE READ EACH STEP CAREFULLY!
 7
 8 In order to log into MariaDB to secure it, we'll need the current
 9 password for the root user.  If you've just installed MariaDB, and
10 you haven't set the root password yet, the password will be blank,
11 so you should just press enter here.
12
13 ERROR 1045 (28000): Access denied for user 'root'@'localhost' (using password: YES)
14 Enter current password for root (enter for none):    // Enter here mysql data base root Password, no password by default
15 OK, successfully used password, moving on...
16
17 Setting the root password ensures that nobody can log into the MariaDB
18 root user without the proper authorisation.
19
20 Set root password? [Y/n] y     //  Is it mysql data base root User sets password, here we set password
21 New password:    // Enter the password to set
22 Re-enter new password:   // Confirm the password you entered
23 Password updated successfully!
24 Reloading privilege tables..
25  ... Success!
26
27
28 By default, a MariaDB installation has an anonymous user, allowing anyone
29 to log into MariaDB without having to have a user account created for
30 them.  This is intended only for testing, and to make the installation
31 go a bit smoother.  You should remove them before moving into a
32 production environment.
33
34 Remove anonymous users? [Y/n] y   //  Do you want to delete anonymous users? Delete them here.Otherwise, you can log on to the database without entering a user name and password
35  ... Success!
36
37 Normally, root should only be allowed to connect from 'localhost'.  This
38 ensures that someone cannot guess at the root password from the network.
39
40 Disallow root login remotely? [Y/n] n   // Reject or not root Users log on to the database remotely, which allows root User Remote Logon Database
41  ... skipping.
42
43 By default, MariaDB comes with a database named 'test' that anyone can
44 access.  This is also intended only for testing, and should be removed
45 before moving into a production environment.
46
47 Remove test database and access to it? [Y/n] y   // Delete or not mysql Incoming test Test database, delete it if it's no use here
48  - Dropping test database...
49  ... Success!
50  - Removing privileges on test database...
51  ... Success!
52
53 Reloading the privilege tables will ensure that all changes made so far
54 will take effect immediately.
55
56 Reload privilege tables now? [Y/n] y   // Will it take effect immediately here
57  ... Success!
58
59 Cleaning up...
60
61 All done!  If you've completed all of the above steps, your MariaDB
62 installation should now be secure.
63
64 Thanks for using MariaDB!
65
66 mariadb Initialization of the database
Initialize mariadb
1.5 Configure encoding for mariadb database
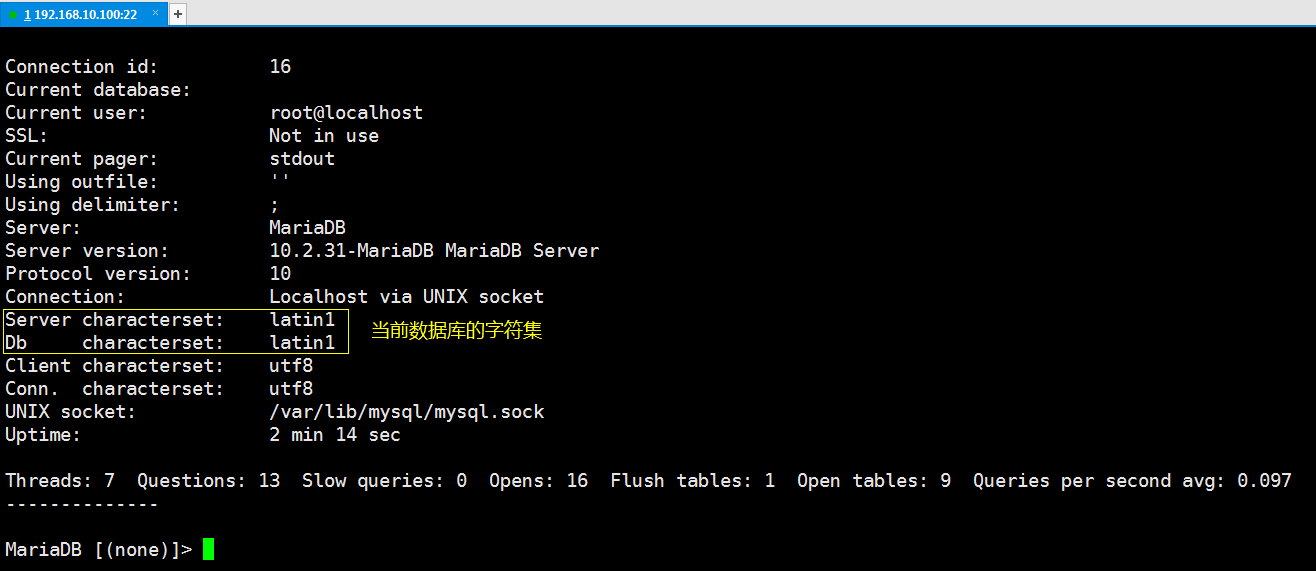
mariadb's default database code is Latin. If you're not sure, let's log in to the database and see:
[root@localhost mysite]# mysql -uroot -p  # Log on to the database
MariaDB [(none)]> \s     # Enter\s to view mariadb service status information after logging into the database
We need to adjust my.cnf configuration file
[root@localhost bin]# vim /etc/my.cnf
[mysqld]

character-set-server=utf8           // Set the character set on the server side
collation-server=utf8_general_ci    // Set the character set on the server side

datadir=/var/lib/mysql
socket=/var/lib/mysql/mysql.sock
# Disabling symbolic-links is recommended to prevent assorted security risks
symbolic-links=0
# Settings user and group are ignored when systemd is used.
# If you need to run mysqld under a different user or group,
# customize your systemd unit file for mariadb according to the
# instructions in http://fedoraproject.org/wiki/Systemd

[mysqld_safe]
log-error=/var/log/mariadb/mariadb.log
pid-file=/var/run/mariadb/mariadb.pid

[client]                //  Set the client's character set
default-character-set=utf8
[mysql]                //  Set the client's character set
default-character-set=utf8
#
# include all files from the config directory
#
!includedir /etc/my.cnf.d
my.cnf
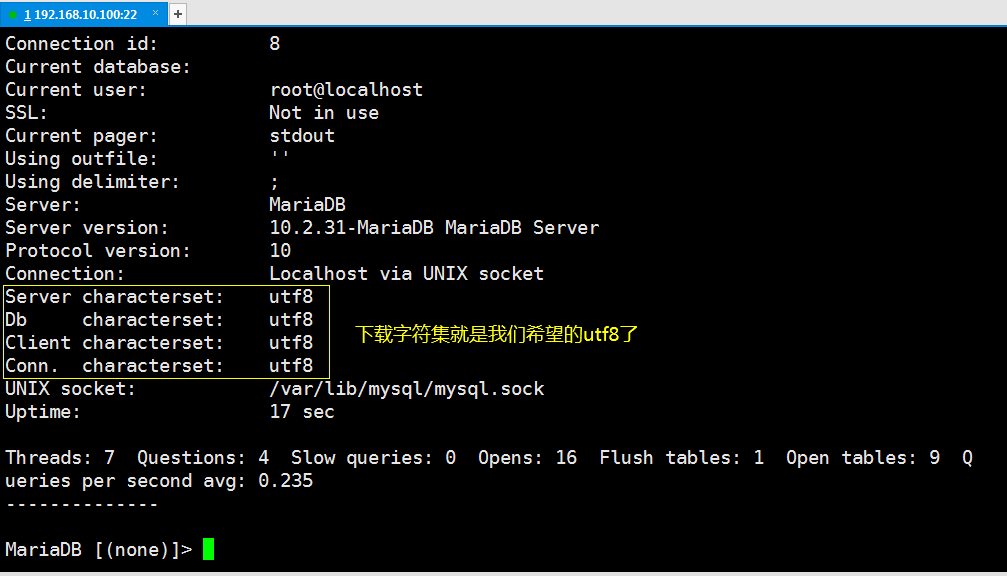
Once the character set is set, restart mariadb and log in to the database to verify the character set
[root@localhost mysite]# systemctl restart mariadb
[root@localhost mysite]# mysql -uroot -p  # Log on to the database
MariaDB [(none)]> \s     # Enter\s to view mariadb service status information after logging into the database
It's a while to set up the database here, but it's not over yet. We need to create a database for our Django program and the users who operate it.
1.6 The database mysqite was created and no users were assigned to the database.
MariaDB [(none)]> create database mysite;  # For our Django Program Creation mysite data base

# by mysite Create a database mysite_user User who has all permissions to the database and can access it on any host
# It's not safe to do this, but it's a beginner's day and that's it
MariaDB [(none)]> grant all on mysite.* to mysite_user@'%' identified by 'User Password';  # Assign users to the database
MariaDB [(none)]> flush privileges;   # Update permissions for settings to take effect
Okay, we've created the database: mysite, database user: mysite_user and allowed that user to access the database on any host.
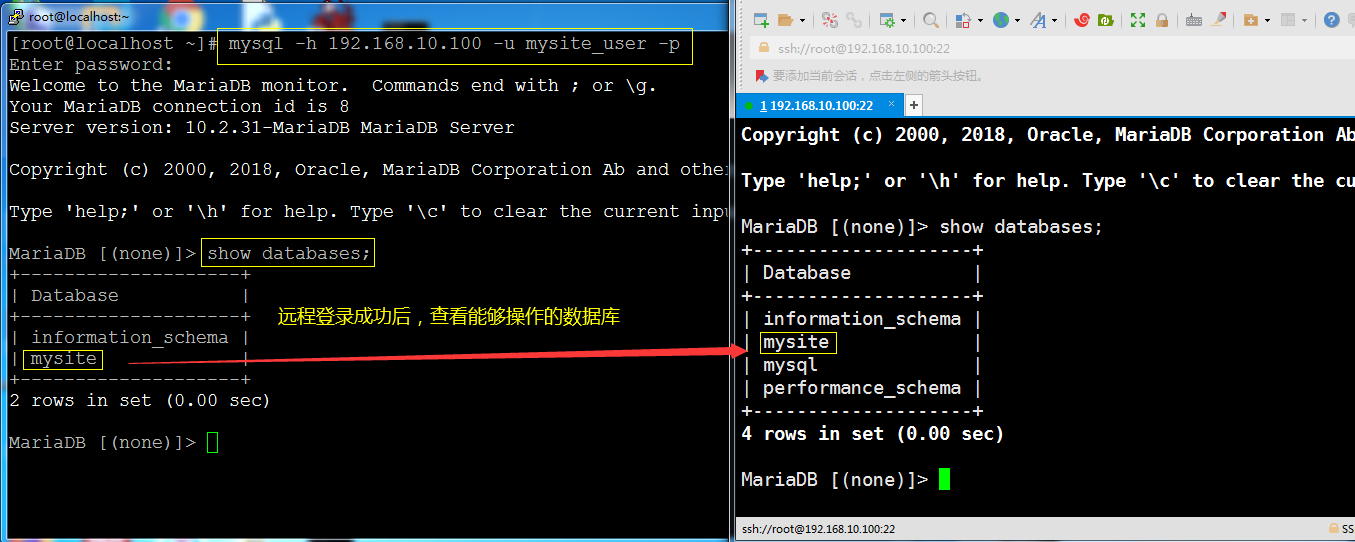
1.7 Verify remote connection to database mysite
Try to log in to the database remotely while running a host to see if you can log in. To make sure you can log in, it is recommended to close the firewall. If everything goes well, you will see:
So far, that's where database operations come in.Set up below in settings.py
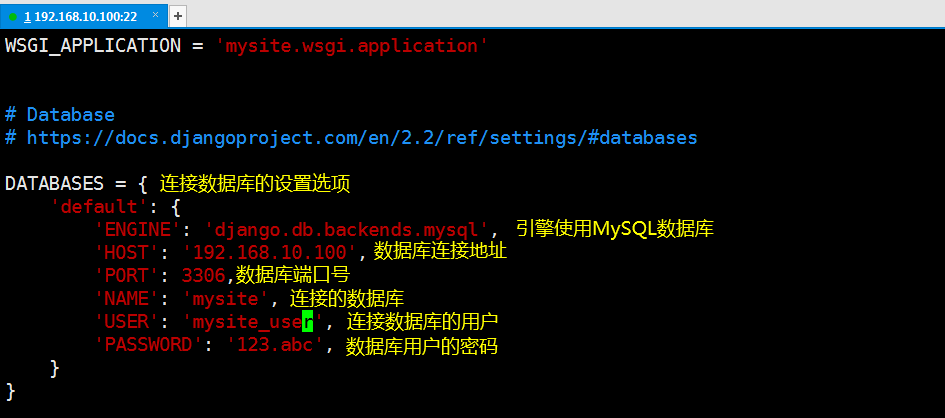
2. Set mysite/mysite/settings.py
[root@localhost mysite]# vim mysite/settings.py
If we're using a sqlite3 database, we don't need to set up the database as above and modify settings.py to use the database directly, but we're using mariadb, so we need to modify this configuration as well.
 1 [root@localhost mysite]# vim mysite/settings.py
 2 DATABASES = {
 3     'default': {
 4         'ENGINE': 'django.db.backends.mysql',
 5         'HOST': '192.168.10.100',
 6         'PORT': 3306,
 7         'NAME': 'mysite',
 8         'USER': 'mysite_user',
 9         'PASSWORD': '123.abc',
10     }
11 }
settings.py Database Section Settings
The modified settings.py looks like this:
[root@localhost mysite]# vim mysite/settings.py # Set database connection options
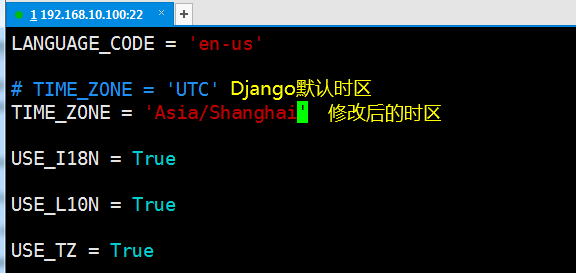
Once the database connection is set, one more thing you need to do is set the time zone for Django. The default time zone for Django is UTC. We need to change the time zone to China, so you need to find the TIME_ZONE option in settings.py and correct it.The modified version looks like the following:
This settings.py configuration is complete.We create tables in the database by using Django as an ORM.
3. Create models (create tables in the database)
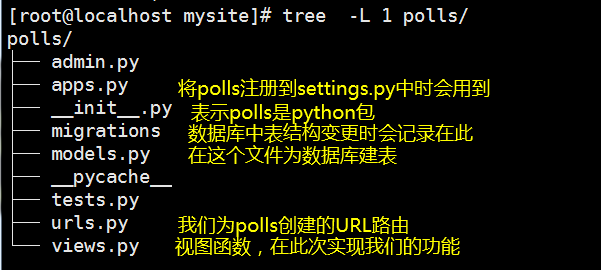
Let's look at the structure of the mysite project:
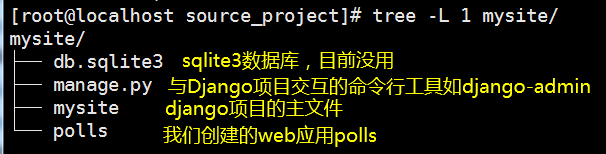
Take another look at the structure of polls for web applications:
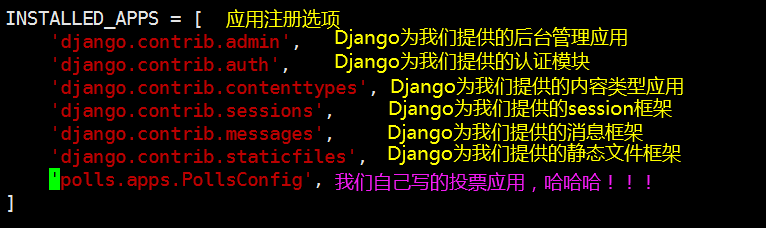
In the previous section, we simply created and accessed the application polls. If we want polls to be able to create tables in the database, we also need to register our polls in the main program settings.py.
Because Django creates tables through Python management.py migrate, this command combines the applications registered in INSTALLED_APPS in settings.py with the database connection information in DATABASES, and migrates data based on models.py registered in INSTALLED_APPS (that is, creates tables).So we need to register the polls application with the INSTALLED_APPS option of settings.py.
[root@localhost mysite]# vim mysite/settings.py # Like registering polls applications in a profile
The registered file looks like this:
Okay, now we can go to polls/models.py to create tables.
Before creating the table, simply design our voting program.We will create two models: problem and choice.
There are two fields in the problem model: the problem field and the issue date field.
There are three fields in the selection model: the foreign key of an associated problem model (one question corresponds to one right to choose votes), the selected text, and the voting count.
Once we have designed the table structure, we can start creating tables in models. If we have not touched ORM, we may be confused about how to create tables. However, as we continue to learn, I believe we will get used to it.
My models.py looks like this
[root@localhost mysite]# vim polls/models.py   # Create tables here

from django.db import models

# Create your models here.
class Question(models.Model):  # Question table
    question_text = models.CharField(max_length=200)
    pub_data = models.DateTimeField('date published')

class Choice(models.Model):   # Selection table
    question = models.ForeignKey(Question,on_delete=models.CASCADE)
    choice_text = models.CharField(max_length=200)
    votes = models.IntegerField(default=0)
This is one more step before we stop. Although we are configuring database connection information and registering applications, we are still unable to connect to the database because python needs some third-party modules to assist with using the mariadb database. Here we use the mysqlclient module.There may be a lot of problems during installation, but I've solved them all here, so I won't take you into the pit one step at a time.Fill the hole directly:
[root@localhost ~]# pip3 install --upgrade pip  # Upgrade pip first
[root@localhost ~]# yum install MariaDB-shared MariaDB-devel python3-devel -y  # Install mariadb's dynamic and static libraries and python3's corresponding Libraries
[root@localhost ~]# pip3 install mysqlclient
Now that everything is ready, create tables in the database mysite (perform data migration)
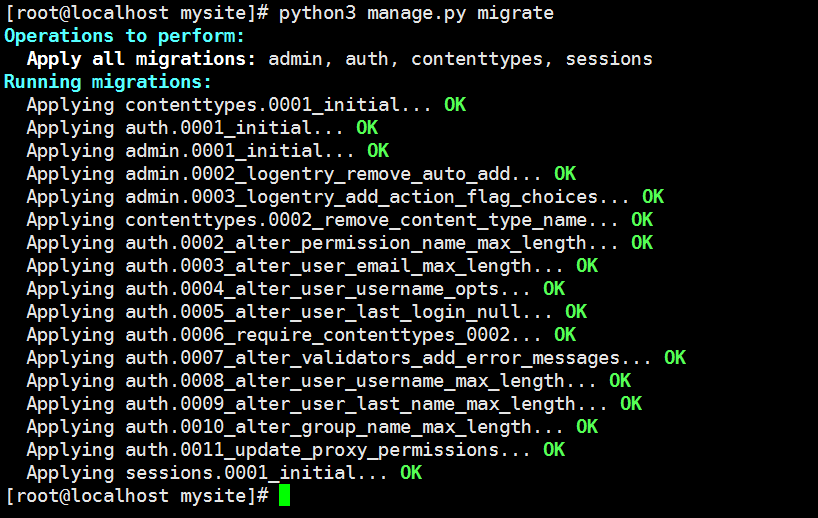
[root@localhost mysite]# python3 manage.py migrate # Perform data migration (create tables needed by Django, not in our models.py)
If everything goes well, you will see the following:
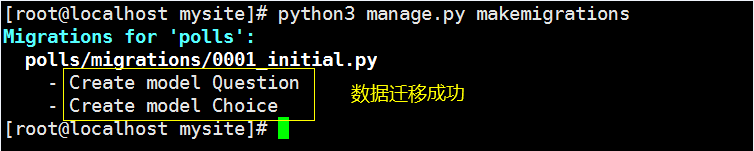
[root@localhost mysite]# python3 manage.py makemigrations # Write updated data from models.py into polls/migrations/xxx_initial.py)
We can execute the following commands to see what Django has just done for us:
[root@localhost mysite]# python3 manage.py sqlmigrate polls 0001
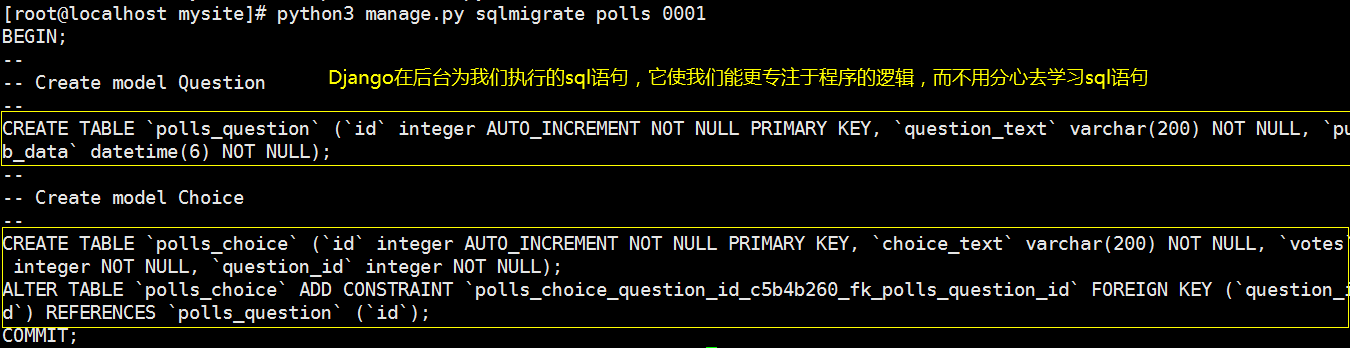
Perform data migration (create tables in the database)
[root@localhost mysite]# python3 manage.py migrate #This command reads the contents of polls/migrations/xxxx_initial.py, connects to the database, and executes the updated sql statement inside
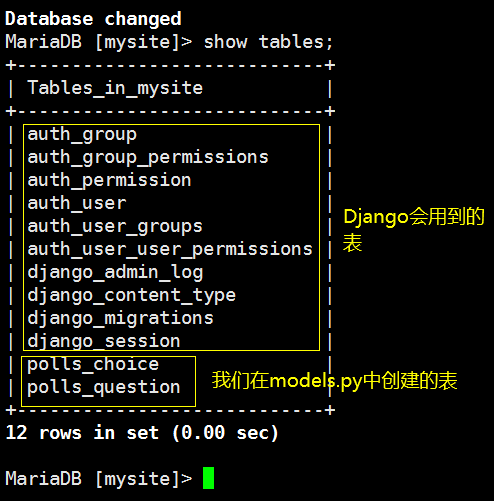
Verify: Verify that a table was created in the database
[root@localhost mysite]# mysql -uroot -p   # Log on to the database
MariaDB [(none)]> use mysite;
MariaDB [mysite]> show tables;
You will see the following table:
Okay, let's get started with databases. The next chapter will look at the admin backstage that Django provides us.
Reference documentation for this article: https://docs.djangoproject.com/en/2.2/intro/tutorial02/
Topics:
Python
Database
MariaDB
MySQL
Django