(4.1.8.8) Fragment Life Cycle Explanation

Posted by drewbee on Sun, 30 Jun 2019 22:55:54 +0200

Copyright Statement: This article is the original article of the blogger. It can not be reproduced without the permission of the blogger. Reproduced at http://blog.csdn.net/htq__

The blogger wrote about Fragment's life cycle Activity and Fragment Life Cycle Explanation Fragment's life cycle is basically described in detail, but that's just the life cycle of creating a Fragmnet. In fact, Fragment appears to show different interfaces for dynamic switching, so our understanding of Fragment's life cycle can't just stay in creating a Fragment. Instead, you should be able to know what the life cycle is like when calling different API s to switch Fragments, such as add(),hide(),show(), and replace(), which bloggers were asked during yesterday's 360 video interview.

One is the life cycle when using static mode:

As we are Activity and Fragment Life Cycle Explanation In this case, Fragment's life cycle is

onAttach, onCreate, onCreateView, onActivityCreated, onStart, onResume, onPause, onStop, onDestroyView, onDestroy, onDetach.

See Activity and Fragment Life Cycle Explanation Understanding the official pictures of the relevant content in the text.

When a Fragment is created to show its layout interface for the first time:

onAttach, onCreate, onCreateView, onActivityCreated, onStart, onResume, and Fragment are running

2 When the screen of the mobile phone is turned off or darkened or the home key is pressed directly to return to the desktop, the order of life cycle method calls is

onPause, onStop

3 When the mobile screen is unlocked again or the mobile screen brightens, the order of the life cycle method calls is as follows:

onStart, onResume

4 When pressing the return key on Fragment:

onPause, onStop, onDestroyView, onDestroy, onDetach.


Second, use Fragment Manager to dynamically add Fragments

This is the focus of this blog, because dynamic addition involves Fragment switching, so we first define two fragments. The code is as follows:

  1. public class FragOne extends Fragment {  
  2.     private static final String TAG = FragOne.class.getSimpleName();  
  3.   
  4.     @Override  
  5.     public void onAttach(Activity activity) {  
  6.         super.onAttach(activity);  
  7.         Log.i(TAG, "onAttach");  
  8.     }  
  9.   
  10.     @Override  
  11.     public void onCreate(Bundle savedInstanceState) {  
  12.         super.onCreate(savedInstanceState);  
  13.         Log.i(TAG, "onCreate");  
  14.     }  
  15.   
  16.     @Override  
  17.     public View onCreateView(LayoutInflater inflater, ViewGroup container, Bundle savedInstanceState) {  
  18.         Log.i(TAG, "onCreateView");  
  19.         return inflater.inflate(R.layout.fragment_test_a, nullfalse);  
  20.     }  
  21.   
  22.     @Override  
  23.     public void onViewCreated(View view, Bundle savedInstanceState) {  
  24.         Log.i(TAG, "onViewCreated");  
  25.         super.onViewCreated(view, savedInstanceState);  
  26.     }  
  27.   
  28.     @Override  
  29.     public void onDestroy() {  
  30.         Log.i(TAG, "onDestroy");  
  31.         super.onDestroy();  
  32.     }  
  33.   
  34.     @Override  
  35.     public void onDetach() {  
  36.         Log.i(TAG, "onDetach");  
  37.         super.onDetach();  
  38.     }  
  39.   
  40.     @Override  
  41.     public void onDestroyView() {  
  42.         Log.i(TAG, "onDestroyView");  
  43.         super.onDestroyView();  
  44.     }  
  45.   
  46.     @Override  
  47.     public void onStart() {  
  48.         Log.i(TAG, "onStart");  
  49.         super.onStart();  
  50.     }  
  51.   
  52.     @Override  
  53.     public void onStop() {  
  54.         Log.i(TAG, "onStop");  
  55.         super.onStop();  
  56.     }  
  57.   
  58.     @Override  
  59.     public void onResume() {  
  60.         Log.i(TAG, "onResume");  
  61.         super.onResume();  
  62.     }  
  63.   
  64.     @Override  
  65.     public void onPause() {  
  66.         Log.i(TAG, "onPause");  
  67.         super.onPause();  
  68.     }  
  69.   
  70.     @Override  
  71.     public void onActivityCreated(Bundle savedInstanceState) {  
  72.         Log.i(TAG, "onActivityCreated");  
  73.         super.onActivityCreated(savedInstanceState);  
  74.     }  
  75. }  
Second Fragment

  1. public class FragTwo extends Fragment {  
  2.     private static final String TAG = FragTwo.class.getSimpleName();  
  3.   
  4.     @Override  
  5.     public void onAttach(Activity activity) {  
  6.         super.onAttach(activity);  
  7.         Log.i(TAG, "onAttach");  
  8.     }  
  9.   
  10.     @Override  
  11.     public void onCreate(Bundle savedInstanceState) {  
  12.         super.onCreate(savedInstanceState);  
  13.         Log.i(TAG, "onCreate");  
  14.     }  
  15.   
  16.     @Override  
  17.     public View onCreateView(LayoutInflater inflater, ViewGroup container, Bundle savedInstanceState) {  
  18.         Log.i(TAG, "onCreateView");  
  19.         return inflater.inflate(R.layout.fragment_test_b, nullfalse);  
  20.     }  
  21.   
  22.     @Override  
  23.     public void onViewCreated(View view, Bundle savedInstanceState) {  
  24.         Log.i(TAG, "onViewCreated");  
  25.         super.onViewCreated(view, savedInstanceState);  
  26.     }  
  27.   
  28.     @Override  
  29.     public void onDestroy() {  
  30.         Log.i(TAG, "onDestroy");  
  31.         super.onDestroy();  
  32.     }  
  33.   
  34.     @Override  
  35.     public void onDetach() {  
  36.         Log.i(TAG, "onDetach");  
  37.         super.onDetach();  
  38.     }  
  39.   
  40.     @Override  
  41.     public void onDestroyView() {  
  42.         Log.i(TAG, "onDestroyView");  
  43.         super.onDestroyView();  
  44.     }  
  45.   
  46.     @Override  
  47.     public void onStart() {  
  48.         Log.i(TAG, "onStart");  
  49.         super.onStart();  
  50.     }  
  51.   
  52.     @Override  
  53.     public void onStop() {  
  54.         Log.i(TAG, "onStop");  
  55.         super.onStop();  
  56.     }  
  57.   
  58.     @Override  
  59.     public void onResume() {  
  60.         Log.i(TAG, "onResume");  
  61.         super.onResume();  
  62.     }  
  63.   
  64.     @Override  
  65.     public void onPause() {  
  66.         Log.i(TAG, "onPause");  
  67.         super.onPause();  
  68.     }  
  69.   
  70.     @Override  
  71.     public void onActivityCreated(Bundle savedInstanceState) {  
  72.         Log.i(TAG, "onActivityCreated");  
  73.         super.onActivityCreated(savedInstanceState);  
  74.     }  
  75. }  
You can see that the code for these two Fragments is basically the same, rewriting the life cycle functions associated with Fragments.


When the addToBackStack function is not used.

1 When using the replace() function:

When we first display a Fragment using replace, the code is as follows:

  1. FragmentTransaction fragmentTransaction = fragmentManager.beginTransaction();  
  2.  fragOne = new FragOne();  
  3.  fragmentTransaction.replace(R.id.frag_container, fragOne, fragNames[0]);  
  4.  fragmentTransaction.commit();  
The life cycle at this point is exactly the same as that described above, that is, onAttach, onCreate, onCreateView, onActivityCreated, onStart, onResume and Fragment are running.


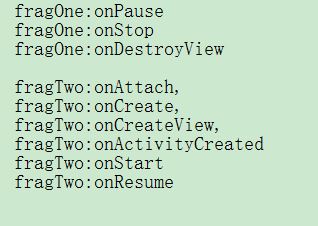
When we use replace() to replace an existing Fragment (e.g. when we click on different bottom buttons in Tencent QQ, we replace the previous Fragment), the code is as follows:

  1. public void onClick(View v) {  
  2.         FragmentTransaction fragmentTransaction = fragmentManager.beginTransaction();  
  3.         switch (v.getId()) {  
  4.             case R.id.button1:  
  5.                 if (fragOne == null) {  
  6.                     fragOne = new FragOne();  
  7.                     fragmentTransaction.replace(R.id.frag_container, fragOne, fragNames[0]);  
  8. //                    fragmentTransaction.addToBackStack(fragNames[0]);  
  9.                 } else {  
  10.                     Fragment fragment = fragmentManager.findFragmentByTag(fragNames[0]);  
  11.                     fragmentTransaction.replace(R.id.frag_container, fragment, fragNames[0]);  
  12.                 }  
  13.                 break;  
  14.             case R.id.button2:  
  15.                 if (fragTwo == null) {  
  16.                     fragTwo = new FragTwo();  
  17.                     fragmentTransaction.replace(R.id.frag_container, fragTwo, fragNames[1]);  
  18. //                    fragmentTransaction.addToBackStack(fragNames[1]);  
  19.                 } else {  
  20.                     Fragment fragment = fragmentManager.findFragmentByTag(fragNames[1]);  
  21.                     fragmentTransaction.replace(R.id.frag_container, fragment, fragNames[1]);  
  22.                 }  
  23.                 break;  
  24.             default:  
  25.                 break;  
  26.         }  
  27.         fragmentTransaction.commit();  
  28.     }  
As you can see in the above code, we annotate the call to the addToBackStack function to indicate that it is not applicable at this time. The order of operation at this time is:


You can see that the first fragment is called in the order of onPause, onStop, onDestroyView, onDestroy, onDetach, which indicates that fragOne has been destroyed by Fragment Manager and replaced by the second fragment, which also corresponds to the name of the replace() function and the inapplicability of addToBackStack (that is, to replace and not add to Fragment Manager). Back on the stack, since the replacement of course has to remove the previous, add the second Fragment.

This means that if the addToBackStack mode is not invoked when adding Fragments with replace, the status of Fragments is not saved when the FragmentManager replaces Fragments, and the second Fragment will directly replace the previous Fragment.

Second, when using the addToBackStack function.

When we use the replace function and set the addToBackStack function to display for the first time a Fragment runs as: onAttach, onCreate, onCreateView, onActivityCreated, onStart, onResume, and Fragment is running. That is to say, the result is the same when the addToBackStack function is not used.

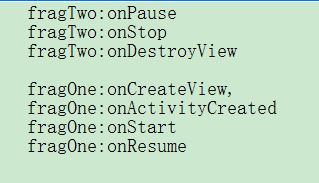
When we use the replace function and set the addToBackStack function to replace the previously displayed Fragmen't, the result is as follows:


It can be seen that the life cycle of fragTwo is unaffected compared with the previous one without addToBackStack, while the life cycle of fragOne has only three switching states compared with the one without addBackToStack: onPause

onStop, onDestroyView. The former is well understood, because the addToBackStack function, as its name implies, is added to the fallback stack, i.e. when one Fragment is replaced by another Fragment, it adds the previous Fragment to the fallback stack. Therefore, it is also well understood that the life cycle of fragTwo is not affected, because the replaced fragTwo is added to the fallback stack, so it is better to add the replaced fragTwo to the fallback stack. The replacement is unaffected. In addition, the fragOne state only reaches onDestroyView, but not onDestroy.

OnDetach. This shows that fragOne is only the onDestroyView whose interface is destroyed, and the instance of the fragOne object is still stored in the Fragment Manager (because there is no onDestroy, onDetach), and part of its state is still stored in the Fragment Manager. We can verify that:


We click the button to switch and let fragOne replace the fragTwo currently displayed. The results are as follows:


You can see that the running result at this point is very similar to the order of fragOne life cycle calls when fragTwo replaces fragOne, and you can see that fragOne's life cycle starts directly from onCreateView, which corresponds to the life cycle arriving at onDestroyView when fragOne is replaced by fragTwo, that is, fragOne just destroyed before. The view is created, and the instance of the fragOne object is still stored in the Fragment Manager, so all you need to do is create the view, which starts directly from the onCreateView.


Third, when using the show()/hide() function: first of all, we need to understand that addToBackStack is usually used when using show()/hide(), because to use show()/hide() is based on the premise that the Fragment instance already exists, but whether we display its interface or not, so we need to use the addToBackStack function to make a Fragment real. The example object is saved in Fragment's fallback stack. The code is as follows:

  1. FragmentTransaction fragmentTransaction = fragmentManager.beginTransaction();  
  2.         switch (v.getId()) {  
  3.             case R.id.button1:  
  4.                 hideAllFrags(fragmentTransaction);  
  5.                 if (fragA == null) {  
  6.                     fragOne = new FragOne();  
  7.                     fragmentTransaction.add(R.id.frag_container, fragOne, fragNames[0]);  
  8.                     fragmentTransaction.addToBackStack(fragNames[0]);  
  9.                 } else {  
  10.                     fragmentTransaction.show(fragOne);  
  11.                 }  
  12.                 break;  
  13.             case R.id.button2:  
  14.                 hideAllFrags(fragmentTransaction);  
  15.                 if (fragTwo == null) {  
  16.                     fragTwo = new FragTwo();  
  17.                     fragmentTransaction.add(R.id.frag_container, fragTwo, fragNames[1]);  
  18.                     fragmentTransaction.addToBackStack(fragNames[1]);  
  19.                 } else {  
  20.                     fragmentTransaction.show(fragTwo);  
  21.                 }  
  22.                 break;  
  23.             default:  
  24.                 break;  
  25.         }  
  26. fragmentTransaction.commit();  

When we use the add()/show() function to display a Fragment for the first time, the results are: onAttach, onCreate, onCreateView, onActivityCreated, onStart, onResume, and Fragment are running. This is very understandable. I will not repeat it any more.

When we click the button to switch to display the second Fragment, the result is as follows:


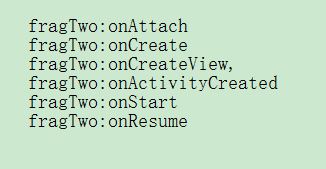
You can see that fragOne has no output at this time, which means that the life cycle of fragOne is not affected, while the output of fragTwo is the same as that of fragTwo when it is first displayed directly. This is also well understood because add()/show()/hide() as its name implies, adds the meaning of hiding, and it does not work on the life cycle of another Fragment.


Topics: Fragment Mobile