Here we use the WorkerMan framework, the server is CentOS, the Web server is Apache, and the development language is PHP.
Because WSS is a combination of WebSocket and SSL, it is necessary to prepare the SSL certificate for the corresponding domain name in advance. Generally, there are three certificate files, such as the following:
SSLCertificateFile "/www/wwwroot/test.crt"
SSLCertificateKeyFile "/www/wwwroot/test.key"
SSLCertificateChainFile "/www/wwwroot/test-ca-bundle.crt"
Okay, let's get started.
Building a Portable Long Connection Environment for WSS Protocol
I take port number 39001 (must access firewall whitelist) as an example, the code is as follows:
<?php
require_once __DIR__ . '/Workerman/Autoloader.php';
use Workerman\Worker;

// Certificate is the best certificate to apply for.
$context = array(

    'ssl' => array(
        // Use absolute paths
        'local_cert'                 => '/www/wwwroot/test.pem', // It can also be a crt file
        'local_pk'                   => '/www/wwwroot/test.key',
        'verify_peer'                => false,
        // 'allow_self_signed'=> true, //If it is a self-signed certificate, this option needs to be turned on
    )
);
// The websocket protocol is set up here (ports are arbitrary, but you need to ensure that they are not occupied by other programs)
$worker = new Worker('websocket://0.0.0.0:39001', $context);
// Set up transport to open ssl, websocket+ssl is wss
$worker->transport = 'ssl';
$worker->onMessage = function($con, $msg) {
    $con->send('ok');
};

Worker::runAll();
After that, Workerman listens to the wss protocol with port 39001, and the client can connect to workerman through the wss protocol to achieve secure instant messaging.
The client's test connection code is as follows. You can open the chrome browser, press F12 to open the debugging console, enter in the Console column, or put the following code into the html page and run with js.
1 ws = new WebSocket("wss://www.bojuwang.net:39001");
2 ws.onopen = function() {
3     alert("WSS Successful connection");
4     ws.send('Boju network');
5     alert("Send a string to the server: Boju Network");
6 };
7 ws.onmessage = function(e) {
8     alert("Receive the message from the server:" + e.data);
9 };
If there are 404 or 503 errors in the handshake connection process, it is generally a program problem, please check it yourself. Return 200 to indicate that the overall connection was successful.
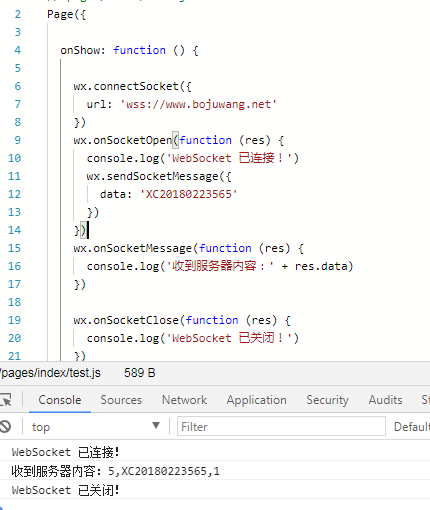
In this way, we have built a complete WSS environment, which can be used. But the WSS of the applet is special because it does not allow ports other than 443 (default port of the SSL service), that is, we can only use such wss://www.bojuwang.net to connect to the web site, but can not use such ported wss://www.bojuwang.net:39001. This requires us to use Apache's proxy service to solve this problem.
Build a Widget WSS Protocol Long Connection Environment (without Ports)
First, we create a WebSocket that listens to 39001, and then convert the ws protocol to the wss protocol through Apache proxy.
Use Workerman to create listeners
<?php

require_once __DIR__ . '/workerman/Autoloader.php';
use Workerman\Worker;
use Workerman\Lib\Timer;

$ws_worker = new Worker("websocket://0.0.0.0:39001");

$ws_worker->count = 4;

// When receiving the data $data from the client, it is processed and sent to the client.
$ws_worker->onMessage = function($connection, $data)
{
   // Send messages to clients
    $connection->send('5,'.$data.',1');
};


// Run worker
Worker::runAll();
At this time, we can use the above test method to connect the web address of ws protocol successfully, and then convert ws into wss. The first step is to enable Apache's SSL connection configuration and proxy module. This step is very important. If it is not enabled, the proxy will not take effect.
The specific enabling method is to find apache's httpd.conf and to enable the proxy module. The methods are as follows:
LoadModule proxy_module modules/mod_proxy.so
LoadModule proxy_wstunnel_module modules/mod_proxy_wstunnel.so
Then enable the SSL secure connection:
# Secure (SSL/TLS) connections
Include conf/extra/httpd-ssl.conf
The specific connection configuration is in this httpd-ssl.conf file. Then we find the httpd-ssl.conf file and configure it as follows:
Listen 443
<VirtualHost *:443>

 # Proxy Config
 SSLProxyEngine on
 ProxyRequests Off

 DocumentRoot "/www/wwwroot/"
 ServerName www.bojuwang.net:443
 SSLEngine on
 SSLProtocol all -SSLv2 -SSLv3
 SSLCipherSuite HIGH:!RC4:!MD5:!aNULL:!eNULL:!NULL:!DH:!EDH:!EXP:+MEDIUM
 SSLHonorCipherOrder on
 SSLCertificateFile "/www/wwwroot/test.crt"
 SSLCertificateKeyFile "/www/wwwroot/test.key"
 SSLCertificateChainFile "/www/wwwroot/test-ca-bundle.crt"

 <Directory "/www/wwwroot/">
    AllowOverride All
    Require all granted
 </Directory>


 ProxyPass / ws://0.0.0.0:39001
 ProxyPassReverse / ws://0.0.0.0:39001
</VirtualHost>
Do not duplicate the listening ports during configuration, otherwise an error will be reported when apache is restarted.

Attention should also be paid to each proxy path certificate path, otherwise error will be reported.

So far, great success has been achieved!
At this time, when the server listens to 443 SSL requests, it will proxy to 39001 long connection ports and implement the WSS protocol.
