1. Linux Operating and Maintenance Experience Sharing and Troubleshooting
1.1 Basic Strategy and Experience of Online Server Installation
Streamlined installation strategy:
- Installation only required, on-demand installation, no need not not install
- Development package, basic network package, basic application package
1.1.1 CentOS-6.x
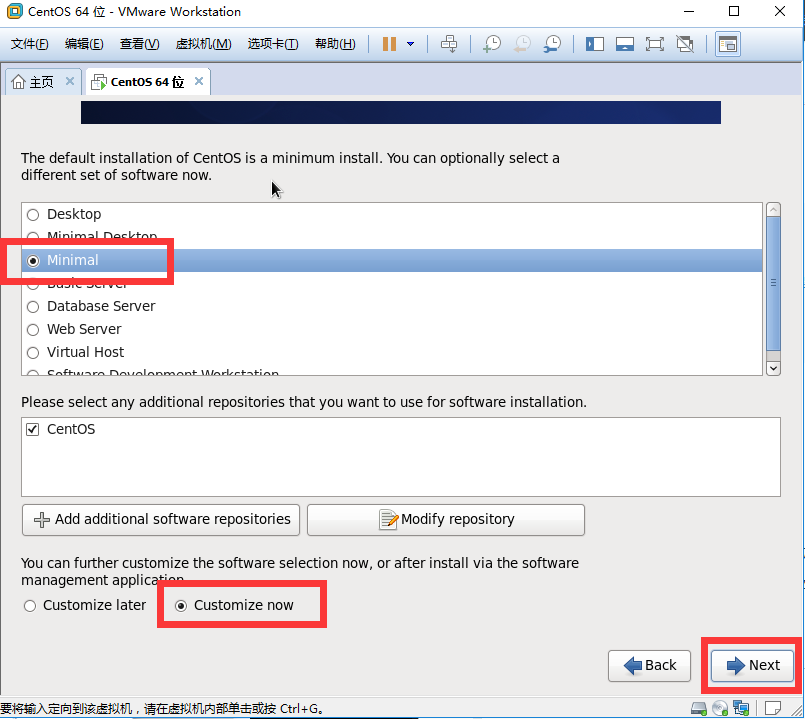
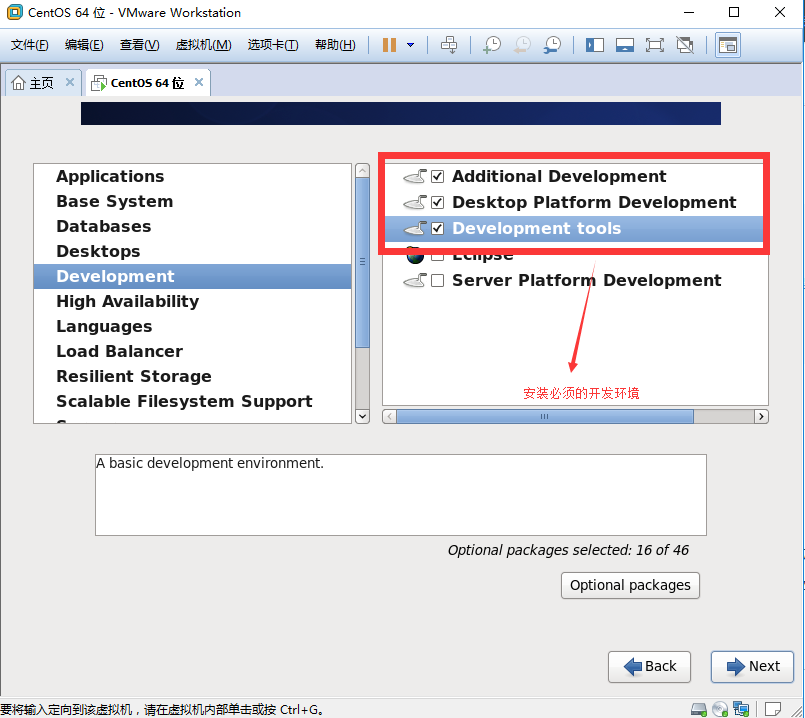
1.1.2 CentOS-7.x
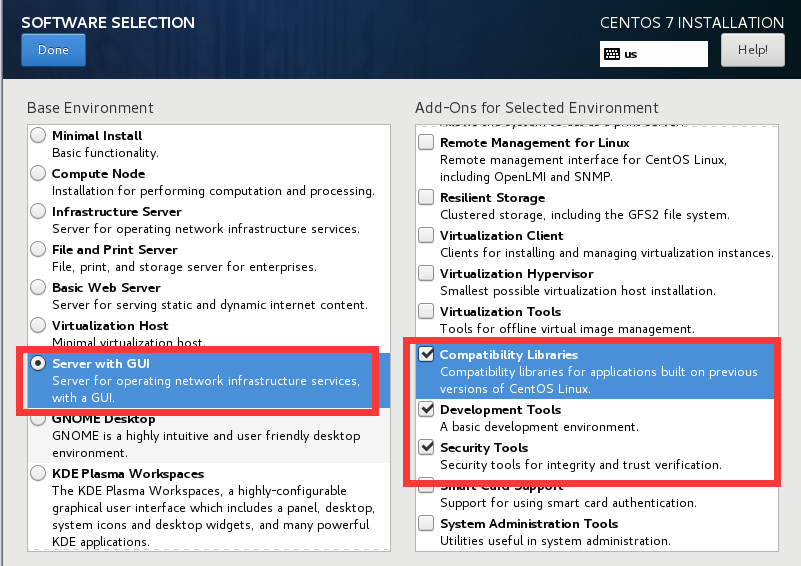
Disk system - default partitioning
Data Disk Mounted Separately
1.2 Online Server Network Setup Experience and Skills
Services Best Closed under 1.2.1 Centos7.x
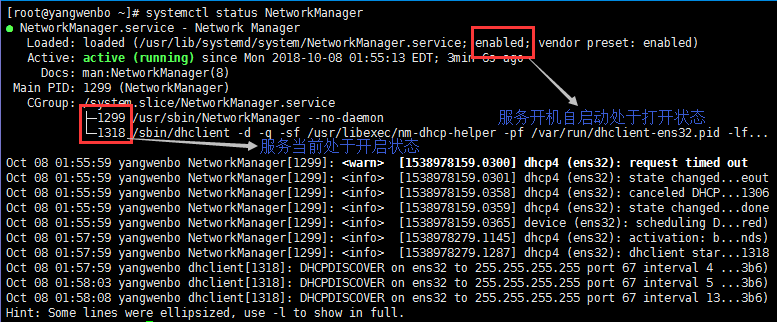
#Close the Network Manager service and turn off boot-up
[root@yangwenbo ~]# systemctl stop NetworkManager
[root@yangwenbo ~]# systemctl disable NetworkManager
Removed symlink /etc/systemd/system/multi-user.target.wants/NetworkManager.service.
Removed symlink /etc/systemd/system/dbus-org.freedesktop.NetworkManager.service.
Removed symlink /etc/systemd/system/dbus-org.freedesktop.nm-dispatcher.service.

[root@yangwenbo ~]# systemctl status NetworkManager
● NetworkManager.service - Network Manager
   Loaded: loaded (/usr/lib/systemd/system/NetworkManager.service; disabled; vendor preset: enabled)
   Active: inactive (dead) since Mon 2018-10-08 02:01:14 EDT; 18s ago
     Docs: man:NetworkManager(8)
 Main PID: 1299 (code=exited, status=0/SUCCESS)
   CGroup: /system.slice/NetworkManager.service
           └─1344 /sbin/dhclient -d -q -sf /usr/libexec/nm-dhcp-helper -pf /var/run/dhclient-ens32.pid -lf...
If this service is not turned off, it will take over the Linux network settings. Sometimes it results in the modification of the network card configuration file IP, but the IP of the network card remains unchanged.
Open the Network Manager service and turn on the boot-up self-start command
[root@yangwenbo ~]# systemctl start NetworkManager
[root@yangwenbo ~]# systemctl enable NetworkManager
1.2.2 Settings for DNS
(1) Temporarily modify DNS settings, the modification will take effect immediately, restart the server or restart the network after recovery.
[root@yangwenbo ~]# cat /etc/resolv.conf
; generated by /usr/sbin/dhclient-script
search localdomain
nameserver 192.168.200.2         #By modifying this configuration, DNS can be modified. Effective immediately
The domain name server in the modified / etc/resolv.conf file can be modified immediately after the DNS takes effect.
However, the domain name server settings in / etc/resolv.conf for restarting the network or restarting the server will be overwritten by the settings of the network card configuration file.
[root@yangwenbo ~]# vim /etc/resolv.conf
[root@yangwenbo ~]# cat /etc/resolv.conf
; generated by /usr/sbin/dhclient-script
search localdomain
nameserver 192.168.200.3      #Modified the line configuration
[root@yangwenbo ~]# systemctl restart network
#There may be a drop in the middle.

[root@yangwenbo ~]# cat /etc/resolv.conf
; generated by /usr/sbin/dhclient-script
search localdomain
nameserver 192.168.200.2      #Configuration restored
(2) Permanent modification of DNS settings
[root@yangwenbo ~]# cat /etc/sysconfig/network-scripts/ifcfg-ens32
TYPE=Ethernet
BOOTPROTO=static
DEVICE=ens32
ONBOOT=yes
NM_CONTROLLED=yes
IPADDR=192.168.200.141
NETMASK=255.255.255.0
GATEWAY=192.168.200.2
DNS1=192.168.200.2     #Permanent modification requires modification of the network card configuration file line
DNS2=202.106.0.20
1.2.3 Modification of Server Host Name
Centos7.x
#Permanent modification of host name
[root@yangwenbo ~]# cat /etc/hostname
localhost.localdomain
[root@yangwenbo ~]# vim /etc/hostname
[root@yangwenbo ~]# cat /etc/hostname
Centos7.5
[root@yangwenbo ~]# hostname Centos7.5
[root@yangwenbo ~]# bash
[root@Centos7 ~]#
1.2.4 Mapping of Servers to Their Host Names
#The host name of the mapping server itself
[root@Centos7 ~]# echo "127.0.0.1 Centos7" >> /etc/hosts
[root@Centos7 ~]# tail -1 /etc/hosts
127.0.0.1 Centos7
Note that the server maps its own host name. Make sure that it maps to 127.0.0.1 and not to the IP of the network card. This is because many services run to verify that their host name is mapped, otherwise it will lead to unknown failures.
1.3 Online Server Selinux, iptables Policy Settings
1.3.1 selinux configuration (how to close selinux)
[root@Centos7 ~]# sestatus
SELinux status:                 enabled
#The following is omitted...

#Permanent shutdown selinux boot-up self-start
[root@Centos7 ~]# cat /etc/selinux/config

# This file controls the state of SELinux on the system.
# SELINUX= can take one of these three values:
#     enforcing - SELinux security policy is enforced.
#     permissive - SELinux prints warnings instead of enforcing.
#     disabled - No SELinux policy is loaded.
SELINUX=disabled   #Of course, selinux can't be turned on and started (enforcing can't be turned on; disabled can't be turned off)
# SELINUXTYPE= can take one of three two values:
#     targeted - Targeted processes are protected,
#     minimum - Modification of targeted policy. Only selected processes are protected.
#     mls - Multi Level Security protection.
SELINUXTYPE=targeted

#Temporarily close selinux
[root@Centos7 ~]# setenforce 0
1.3.2 iptables configuration
If our computer room does not have a hardware firewall, then we must use iptables to secure servers with public network cards.
#Firewall Profile/etc/sysconfig/iptables
#Recommended configuration
iptables -P INPUT ACCEPT
iptables -F
iptables -A INPUT -p tcp -m tcp --dport 80 -j ACCEPT
iptables -A INPUT -s 1.1.1.0/24 -p tcp -m tcp --dport 22 -j ACCEPT
iptables -A INPUT -s 2.2.2.2/32 -p tcp -m tcp --dport 22 -j ACCEPT
iptables -A INPUT -i eth1 -j ACCEPT
iptables -A INPUT -i lo -j ACCEPT
iptables -A INPUT -m state --state RELATED,ESTABLISHED -j ACCEPT
iptables -A INPUT -p tcp -m tcp --tcp-flags FIN,SYN,RST,PSH,ACK,URG NONE -j DROP
iptables -A INPUT -p tcp -m tcp --tcp-flags FIN,SYN FIN,SYN -j DROP
iptables -A INPUT -p tcp -m tcp --tcp-flags SYN,RST SYN,RST -j DROP
iptables -A INPUT -p tcp -m tcp --tcp-flags FIN,RST FIN,RST -j DROP
iptables -A INPUT -p tcp -m tcp --tcp-flags FIN,ACK FIN -j DROP
iptables -A INPUT -p tcp -m tcp --tcp-flags PSH,ACK PSH -j DROP
iptables -A INPUT -p tcp -m tcp --tcp-flags ACK,URG URG -j DROP
iptables -P INPUT DROP
iptables -P OUTPUT ACCEPT
iptables -P FORWARD DROP
1.4 online server ssh login security policy
1.4.1 ssh landing strategy
(1) Landing Strategy
[root@Centos7 ~]# cp /etc/ssh/sshd_config{,.bak}   #backups

#Before revision
[root@Centos7 ~]# cat -n /etc/ssh/sshd_config | sed -n '17p;38p;43p;47p;65p;79p;115p'
    17  #Port 22                       #Modify ssh connection port
    38  #PermitRootLogin yes           #Whether to allow remote login of root account
    43  #PubkeyAuthentication yes      #Whether to Open Public Key Connection Authentication
    47  AuthorizedKeysFile  .ssh/authorized_keys    #Placement of public key files
    65  PasswordAuthentication yes     #Whether to open password authentication login
    79  GSSAPIAuthentication yes       #Whether to close GSSAPI authentication
   115  #UseDNS yes                    #Whether to turn off DNS reverse parsing

#Revised
[root@Centos7 ~]# cat -n /etc/ssh/sshd_config | sed -n '17p;38p;43p;47p;65p;79p;115p'
    17  Port 22221                  #Work needs to be set to more than 10,000 ports to avoid being scanned out.
    38  PermitRootLogin yes         #If it's not a very large server, we can temporarily open root remote login for convenience.
    43  PubkeyAuthentication yes    #Open Public Key Authentication Mode
    47  AuthorizedKeysFile  .ssh/authorized_keys    #Public Key Placement Location
    65  PasswordAuthentication no   #Because we turned on root remote login, we turned off password authentication for security.
    79  GSSAPIAuthentication no     #Turn off GSSAPI authentication, greatly improve ssh connection speed
   115  UseDNS no                   #Turn off DNS reverse parsing, greatly improve ssh connection speed
(2) Setting XSHELL Private Key to Log on to Linux
#View server-side IP
[root@Centos7 ~]# hostname -I
192.168.200.141

#Generating rsa key pairs on the Linux server side
[root@Centos7 ~]# ssh-keygen
Generating public/private rsa key pair.
Enter file in which to save the key (/root/.ssh/id_rsa):
Created directory '/root/.ssh'.
Enter passphrase (empty for no passphrase):
Enter same passphrase again:
Your identification has been saved in /root/.ssh/id_rsa.
Your public key has been saved in /root/.ssh/id_rsa.pub.
The key fingerprint is:
SHA256:niDwzrv1Xq4er0zH0FqfHpvRiCJfPUcnL3vT89ZEt0M root@Centos7.5
The key's randomart image is:
+---[RSA 2048]----+
|                 |
|                 |
|  .              |
|   o     .     Eo|
|    o . S o   +.+|
|   o . o * + = *.|
|    o o B * O +.=|
|     o * O . B ==|
|    o. oOoo + .o=|
+----[SHA256]-----+
#Import the generated public key into the ~/.ssh/authorized_keys file on the server side
[root@Centos7 ~]# cd .ssh/
[root@Centos7 .ssh]# ls
id_rsa  id_rsa.pub
[root@Centos7 .ssh]# cat id_rsa.pub > authorized_keys
[root@Centos7 .ssh]# ls
authorized_keys  id_rsa  id_rsa.pub
[root@Centos7 .ssh]# cat authorized_keys
ssh-rsa AAAAB3NzaC1yc2EAAAADAQABAAABAQDmNGBvYnNojir7tfB9l7N2DplsoRHeUB4747xT2q5Z3g9CvM/D5AsyFogcCPFyfXIZuNFiH2IEQOS8ZXjpNU/1jy6sUxpwld2sMXHYiP+PtQJimS568ASVS1pzhXksHcPk8yXenPId73vQX8p8H9nD5/y94UwMksC8YsnoDSW7tOUUG9vdtjZw06lUwXfAkUapT6tEb3Mq6mA2LZMDUck1NicrdbmpAdcdsFaL3mzCHqxTvt3sNIruTiE8DhtLGpYCEBpWVOJuoZ8hRQTzaMHJaF7XHf4Yw5d0m937KY16RQnTziJOEVfHEJaUmV875SUsEacHjggj5PJfxJhq6d/P root@Centos7.5
#Rename the private key file id_rsa to rd_rsa_root and export it to the host desktop
[root@Centos7 .ssh]# ls
authorized_keys  id_rsa  id_rsa.pub
[root@Centos7 .ssh]# mv id_rsa id_rsa_root
[root@Centos7 .ssh]# ls
authorized_keys  id_rsa.pub  id_rsa_root
View the private key file imported to the desktop

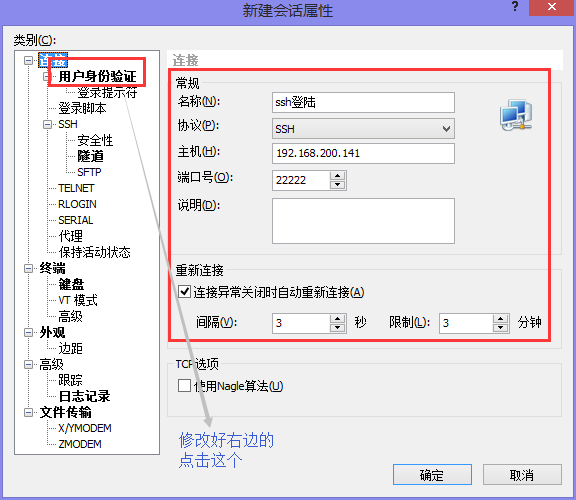
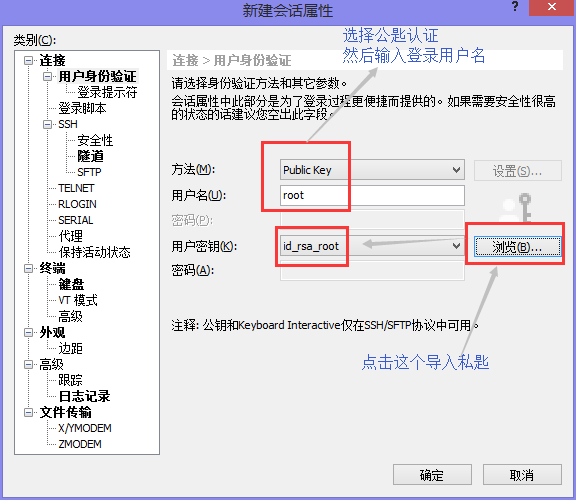
Then XSHELL shows successful landing!
In fact, this private key id_rsa_root, other people sent as keys can be landed on the server side.
Also. Can be sent to other Linux servers so that they can SSH login keys to 192.168.200.141 server-side
The specific operation process is as follows.
#Copy id_rsa_root private key file on desktop to any Linux server
[root@yangwenbo .ssh]# ls
id_rsa_root

#You can't change your name on a Linux server at will. Rename id_rsa_root id_rsa
[root@yangwenbo .ssh]# mv id_rsa_root id_rsa

#Authorization 600 privileges
[root@yangwenbo .ssh]# chmod 600 id_rsa

#Launch landing tests
[root@yangwenbo .ssh]# ssh root@192.168.200.141 -p 22222
Last login: Mon Oct  8 04:52:42 2018 from 192.168.200.143
[root@Centos7 ~]# hostname -I
192.168.200.141
[root@Centos7 ~]# exit
logout
Connection to 192.168.200.141 closed.
[root@yangwenbo .ssh]# hostname -I
192.168.200.143
XSHELL key login server-side common user yunjisuan
#Creating Users
[root@Centos7 ~]# useradd yunjisuan

#Creating. ssh Key Catalogue for Ordinary Users in Cloud Computing
[root@Centos7 ~]# mkdir -p /home/yunjisuan/.ssh

#Authorized ordinary users belong to master group
[root@Centos7 ~]# chown yunjisuan.yunjisuan /home/yunjisuan/.ssh

#The. ssh directory must have 700 permissions
[root@Centos7 ~]# chmod 700 /home/yunjisuan/.ssh
[root@Centos7 .ssh]# pwd
/root/.ssh
[root@Centos7 .ssh]# ll
total 12
-rw-r--r--. 1 root root  396 Oct  8 03:09 authorized_keys
-rw-r--r--. 1 root root  396 Oct  8 03:07 id_rsa.pub
-rw-------. 1 root root 1679 Oct  8 03:07 id_rsa_root

#Copy the authorized_keys file under the previous root and modify the ownership group
[root@Centos7 .ssh]# cp -p authorized_keys /home/yunjisuan/.ssh/
[root@Centos7 .ssh]# chown yunjisuan.yunjisuan /home/yunjisuan/.ssh/authorized_keys
[root@Centos7 .ssh]# ll /home/yunjisuan/.ssh/authorized_keys
-rw-r--r-- 1 yunjisuan yunjisuan 396 Oct  8 03:09 /home/yunjisuan/.ssh/authorized_keys
Finally, the user of yunjisuan can choose the key authentication mode by using the same method in XSHELL.
(3) User Rights Policy
The root user is prohibited to log on remotely, and only ordinary users are authorized to log on to the system. Administrator privileges are needed to execute Xuteng to avoid logon between root users.
#Authorize ordinary user yunjisuan with root account and exempt from entering password
[root@Centos7 ~]# sed -n '93p' /etc/sudoers
yunjisuan   ALL=(ALL)   NOPASSWD: ALL
#Testing rights with yunjisuan users
[yunjisuan@Centos7 ~]$ sudo -l
Matching Defaults entries for yunjisuan on Centos7:
    !visiblepw, always_set_home, match_group_by_gid, env_reset, env_keep="COLORS DISPLAY HOSTNAME HISTSIZE
    KDEDIR LS_COLORS", env_keep+="MAIL PS1 PS2 QTDIR USERNAME LANG LC_ADDRESS LC_CTYPE",
    env_keep+="LC_COLLATE LC_IDENTIFICATION LC_MEASUREMENT LC_MESSAGES", env_keep+="LC_MONETARY LC_NAME
    LC_NUMERIC LC_PAPER LC_TELEPHONE", env_keep+="LC_TIME LC_ALL LANGUAGE LINGUAS _XKB_CHARSET XAUTHORITY",
    secure_path=/sbin\:/bin\:/usr/sbin\:/usr/bin

User yunjisuan may run the following commands on Centos7:
    (ALL) NOPASSWD: ALL
[yunjisuan@Centos7 ~]$ ls /root/ #insufficient privilege ls: cannot open directory /root/: Permission denied [yunjisuan@Centos7 ~]$ sudo ls /root/ anaconda-ks.cfg #If ssh sets the configuration of remote login for otherwise root users #Then we can switch to root account by using this ordinary user face password. [yunjisuan@Centos7 ~]$ sudo su - Last login: Mon Oct 8 04:54:17 EDT 2018 from 192.168.200.143 on pts/1 [root@Centos7 ~]# ls anaconda-ks.cfg [root@Centos7 ~]# exit logout [yunjisuan@Centos7 ~]$ ls [yunjisuan@Centos7 ~]$
1.5 Online Server Update yum Source and Necessary Software Installation and NTP Clock Service Settings
1.5.1 Update common yum sources and installation of necessary software packages
CentOS 7.x Server
#On the CentOS 7.x server
#Test whether the computer can access the Internet.
[root@Centos7 ~]# ping -c 1 www.baidu.com
PING www.a.shifen.com (119.75.213.61) 56(84) bytes of data.
64 bytes from 127.0.0.1 (119.75.213.61): icmp_seq=1 ttl=128 time=7.47 ms

--- www.a.shifen.com ping statistics ---
1 packets transmitted, 1 received, 0% packet loss, time 0ms
rtt min/avg/max/mdev = 7.475/7.475/7.475/0.000 ms
#Delete the original yum local source
[root@Centos7 ~]# cd /etc/yum.repos.d/
[root@Centos7 yum.repos.d]# ls
CentOS-Base.repo  CentOS-Debuginfo.repo  CentOS-Media.repo    CentOS-Vault.repo
CentOS-CR.repo    CentOS-fasttrack.repo  CentOS-Sources.repo
[root@Centos7 yum.repos.d]# rm -rf *
#Install epel source
[root@Centos7 yum.repos.d]# yum -y install https://dl.fedoraproject.org/pub/epel/epel-release-latest-7.noarch.rpm
[root@Centos7 yum.repos.d]# ls
epel.repo  epel-testing.repo
#Download and install repoforge source
[root@Centos7 yum.repos.d]# yum -y install http://repository.it4i.cz/mirrors/repoforge/redhat/el7/en/x86_64/rpmforge/RPMS/rpmforge-release-0.5.3-1.el7.rf.x86_64.rpm
[root@Centos7 yum.repos.d]# ls
epel.repo          mirrors-rpmforge         mirrors-rpmforge-testing
epel-testing.repo  mirrors-rpmforge-extras  rpmforge.repo
#Clear the old yum cache and create a new yum cache
[root@Centos7 yum.repos.d]# yum -y clean all
[root@Centos7 yum.repos.d]# yum makecache

#Update packages installed in the system
[root@Centos7 yum.repos.d]# yum -y update
CentOS 6.x Server
#On the CentOS 6.x server
[root@Centos6 ~]# ls /etc/yum.repos.d/
bak  CentOS-Media.repo

#Test whether the server can access the Internet
[root@Centos6 ~]# ping -c 1 www.baidu.com
PING www.a.shifen.com (119.75.213.61) 56(84) bytes of data.
64 bytes from 127.0.0.1 (119.75.213.61): icmp_seq=1 ttl=128 time=15.2 ms

--- www.a.shifen.com ping statistics ---
1 packets transmitted, 1 received, 0% packet loss, time 1463ms
rtt min/avg/max/mdev = 15.251/15.251/15.251/0.000 ms
#Install epel source
[root@Centos6 ~]# cd /etc/yum.repos.d/
[root@Centos6 yum.repos.d]# yum -y install https://dl.fedoraproject.org/pub/epel/epel-release-latest-6.noarch.rpm

[root@Centos6 yum.repos.d]# ls
bak  CentOS-Media.repo  epel.repo  epel-testing.repo
#Download and install repoforge source
[root@Centos6 yum.repos.d]# yum -y install http://repository.it4i.cz/mirrors/repoforge/redhat/el6/en/x86_64/rpmforge/RPMS/rpmforge-release-0.5.3-1.el6.rf.x86_64.rpm

[root@Centos6 yum.repos.d]# ls
bak                epel.repo          mirrors-rpmforge         mirrors-rpmforge-testing
CentOS-Media.repo  epel-testing.repo  mirrors-rpmforge-extras  rpmforge.repo
#Clear the old yum cache and create a new yum cache
[root@Centos6 yum.repos.d]# yum -y clean all
[root@Centos6 yum.repos.d]# yum makecache

#Update packages installed in the system
[root@Centos6 yum.repos.d]# yum -y update
1.5.2 Modifying Time Zone and Timing Automatic Update Server Time
Recommended time server: ntp.sjtu.edu.cn ntp1.aliyun.com
#Install ntpdate time synchronization client
[root@Centos6 ~]# yum -y install ntpdate
[root@Centos6 ~]# rpm -qa ntpdate
ntpdate-4.2.6p5-1.el6.centos.x86_64

#Modify the time zone
[root@Centos6 ~]# cp /usr/share/zoneinfo/Asia/Shanghai /etc/localtime

#Time synchronization
[root@Centos6 ~]# ntpdate ntp1.aliyun.com
 8 Oct 17:45:36 ntpdate[1573]: adjust time server 120.25.115.20 offset -0.000011 sec

#Add time synchronization to timed tasks
[root@Centos6 ~]# echo '*/5 * * * * /usr/sbin/ntpdate ntp.sjtu.edu.cn >> /var/log/ntp.log 2>&1;/sbin/hwclock -w' >> /var/spool/cron/root
[root@Centos6 ~]# crontab -l
*/5 * * * * /usr/sbin/ntpdate ntp.sjtu.edu.cn >> /var/log/ntp.log 2>&1;/sbin/hwclock -w

#Explanation: / sbin/hwclock -w: refresh clock information to bios
1.6 Streamlining boot-up services, deleting unrelated users, cleaning up junk files, important file security policies
1.6.1 Five Services Online Servers Must Open
crond, Network, System Log, sshd, SYSSTAT
1.6.2 Delete unrelated users
slightly
1.6.3 Timing Automatic Cleaning of Garbage Files
(1) Ways to Find Large Documents
[root@Centos7 /]# du -sh ./*
0   ./bin
97M ./boot
0   ./dev
31M ./etc
16K ./home
0   ./lib
0   ./lib64
4.2G    ./media
0   ./mnt
0   ./opt
du: cannot access './proc/1486/task/1486/fd/4': No such file or directory
du: cannot access './proc/1486/task/1486/fdinfo/4': No such file or directory
du: cannot access './proc/1486/fd/4': No such file or directory
du: cannot access './proc/1486/fdinfo/4': No such file or directory
0   ./proc
48K ./root
7.6M    ./run
0   ./sbin
0   ./srv
0   ./sys
0   ./tmp
998M    ./usr
759M    ./var
[root@Centos7 /]# cd /usr/
[root@Centos7 usr]# du -sh ./*
65M ./bin
0   ./etc
0   ./games
36K ./include
437M    ./lib
168M    ./lib64
12M ./libexec
0   ./local
42M ./sbin
276M    ./share
0   ./src
0   ./tmp
(2) Key directory paths for timed task cleaning
/ var/spool/mail/* mail path
 / var/spool/postfix/maildrop_Small Fragment Path
1.6.4 Important File Security Policy
- chattr + i / etc / sudoers
- chattr + i / etc / shadow
- chattr + i / etc / passwd
- chattr + i /etc/grub.conf
1.7 Online Server System Kernel Parameter Optimization Strategy
1.7.1 Displays current restrictions on the use of all system resources
[root@Centos7 ~]# ulimit -a
core file size          (blocks, -c) 0    #The maximum value of core file is 100 blocks
data seg size           (kbytes, -d) unlimited   #The data segment of a process can be arbitrarily large
scheduling priority             (-e) 0           #Scheduling priority
file size               (blocks, -f) unlimited   #Files can be arbitrarily large
pending signals                 (-i) 3802        #Up to 382 signals to be processed
max locked memory       (kbytes, -l) 64          #The maximum physical memory locked by a task is 64KB
max memory size         (kbytes, -m) unlimited   #Maximum Permanent Physical Memory of a Task
open files                      (-n) 1024        #A task can open up to 1024 files at the same time
pipe size            (512 bytes, -p) 8           #The maximum space of the pipe is 4096 (512*8) bytes.
POSIX message queues     (bytes, -q) 819200      #The maximum value of POSIX message queue is 819200 bytes
real-time priority              (-r) 0           #real-time scheduling priority
stack size              (kbytes, -s) 8192        #The maximum stack value of a process is 8192 bytes
cpu time               (seconds, -t) unlimited   #CPU time used by processes
max user processes              (-u) 3802        #The maximum number of processes (including threads) that the current user opens simultaneously is 3802
virtual memory          (kbytes, -v) unlimited   #There is no limit to the maximum address space of the process
file locks                      (-x) unlimited   #There is no limit on the maximum number of files that can be locked
Kernel parameters (1): ulimit-c
[root@Centos7~]# ulimit-c View the size of core file size, default 0 is closed, unlimited is unrestricted
0

Explain:
When debugging the system, when some processes of the system have problems, some core files will be generated internally. We can see what happened by looking at the core file. Specifically used in C and C++ programs, they use these files for debugging.
#Open the core file size unrestricted state
[root@Centos7 ~]# ulimit -c unlimited
[root@Centos7 ~]# ulimit -c
unlimited
Kernel parameters (2): ulimit-f
[root@Centos7~]# ulimit-f Maximum size of system files, default unlimited is unlimited
unlimited

Explain:
Controlling the size of text files in the operating system. Sometimes, some of our application's log files, if we want to control the maximum value of log files, we need to make some restrictions on this parameter. Whether this parameter is restricted or not should be considered in detail. Because if you limit the size of the file. Once the maximum size set by the file is reached, the application can no longer write to the log file.
Kernel parameters that need to be focused on (3): ulimit-n
[root@Centos7 ~]# ulimit -n
1024

Explain:
This parameter is the parameter that we have to adjust. In production, 1024 is not enough. 1024 represents the system's memory can only hold 1024 files at the same time handle (open files). Generally speaking, 65536 is enough.
[root@Centos7 ~]# ulimit -n 65536
[root@Centos7 ~]# ulimit -n
65536
Kernel parameters (4): ulimit-u
Maximum number of processes (threads) opened simultaneously by [root@Centos7~] ulimit-u system users
3802

Explain:
Many programs are run by ordinary users. The number of processes (threads) that users can launch concurrently represents the performance of our programs, many of which support high concurrency. Therefore, we need to modify this parameter. In general, 65536 is enough.
[root@Centos7 ~]# ulimit -u 65536
[root@Centos7 ~]# ulimit -u
65536
1.7.2 Several Modification Methods of Kernel Parameters
- / etc / profile: All users are valid and permanent;
- In / bash_profile: The current user is valid and permanent;
- Direct input in the console, the current user is valid, temporary validity;
- In/etc/security/limits.conf: The specified user or user group is valid and permanent;
# Set changes to the kernel in / etc/security/limits.conf to take effect permanently
[root@Centos7 ~]# tail -12 /etc/security/limits.conf
#<domain>      <type>  <item>         <value>
#

#*               soft    core            0
#*               hard    rss             10000
#@student        hard    nproc           20
#@faculty        soft    nproc           20
#@faculty        hard    nproc           50
#ftp             hard    nproc           0
#@student        -       maxlogins       4

# End of file

Explain:
<domain> specifies the users and user groups whose matching parameters are modified,* representing all users;
The type of < type > restriction is soft restriction and hard restriction.
<item> nproc stands for the maximum number of processes; nofile stands for the maximum number of file openings; core stands for limiting the size of the kernel file; maxlogins stands for the maximum number of logons allowed by this user
 < value > specific restricted values
 Hard hard limit: The maximum number of processes that users can activate at any time, which is the upper limit. No non-root process can add hard ulimit;
soft Soft Limits: Limits the actual execution of a session or process, but any process can increase it to the maximum value of hard ulimit
#Increase the restrictions on system kernel parameters. After modification, exit and login will take effect on entry.
[root@Centos7 ~]# tail -4 /etc/security/limits.conf
* soft nofile 65536
* hard nofile 65536
* soft nproc 65536
* hard nproc 65536
#After logout, validate again
[root@Centos7 ~]# ulimit -a
core file size          (blocks, -c) unlimited
data seg size           (kbytes, -d) unlimited
scheduling priority             (-e) 0
file size               (blocks, -f) unlimited
pending signals                 (-i) 3802
max locked memory       (kbytes, -l) 64
max memory size         (kbytes, -m) unlimited
open files                      (-n) 65536        #Already changed
pipe size            (512 bytes, -p) 8
POSIX message queues     (bytes, -q) 819200
real-time priority              (-r) 0
stack size              (kbytes, -s) 8192
cpu time               (seconds, -t) unlimited
max user processes              (-u) 65536        #Already changed
virtual memory          (kbytes, -v) unlimited
file locks                      (-x) unlimited
Ideas and Concerns of 1.8 Online Server System Fault Detection
(1) tail-f/usr/local/nginx/logs/error.log# service application log query
(2) tail-f/var/log/messages system application log query
(3) tail-f/var/log/secure log query
(4) dmesg # system log query
(5) / var / tmp, / tmp # vulnerable point query
(6) crontab-l, / etc / crontab # scheduled task query (frequently attacked objects)
[root@Centos7 ~]# tail -1000 /var/log/secure | grep Accepted
Oct  8 01:48:27 localhost sshd[1235]: Accepted password for root from 192.168.200.1 port 50704 ssh2
Oct  8 02:19:58 localhost sshd[1832]: Accepted password for root from 192.168.200.1 port 50882 ssh2
Oct  8 03:12:44 localhost sshd[11788]: Accepted password for root from 192.168.200.1 port 51149 ssh2
Oct  8 03:18:29 Centos7 sshd[907]: Accepted password for root from 192.168.200.1 port 51185 ssh2
Oct  8 03:32:35 Centos7 sshd[1103]: Accepted publickey for root from 192.168.200.1 port 51258 ssh2: RSA SHA256:niDwzrv1Xq4er0zH0FqfHpvRiCJfPUcnL3vT89ZEt0M
Oct  8 03:41:10 Centos7 sshd[905]: Accepted publickey for root from 192.168.200.1 port 51326 ssh2: RSA SHA256:niDwzrv1Xq4er0zH0FqfHpvRiCJfPUcnL3vT89ZEt0M
Oct  8 03:41:46 Centos7 sshd[1107]: Accepted publickey for root from 192.168.200.1 port 51331 ssh2: RSA SHA256:niDwzrv1Xq4er0zH0FqfHpvRiCJfPUcnL3vT89ZEt0M
Oct  8 03:42:38 Centos7 sshd[1127]: Accepted publickey for root from 192.168.200.1 port 51341 ssh2: RSA SHA256:niDwzrv1Xq4er0zH0FqfHpvRiCJfPUcnL3vT89ZEt0M
Oct  8 03:42:59 Centos7 sshd[1146]: Accepted publickey for root from 192.168.200.1 port 51352 ssh2: RSA SHA256:niDwzrv1Xq4er0zH0FqfHpvRiCJfPUcnL3vT89ZEt0M
Oct  8 03:44:46 Centos7 sshd[1166]: Accepted publickey for root from 192.168.200.1 port 51355 ssh2: RSA SHA256:niDwzrv1Xq4er0zH0FqfHpvRiCJfPUcnL3vT89ZEt0M
Oct  8 04:52:42 Centos7 sshd[1239]: Accepted publickey for root from 192.168.200.143 port 49638 ssh2: RSA SHA256:niDwzrv1Xq4er0zH0FqfHpvRiCJfPUcnL3vT89ZEt0M
Oct  8 04:54:17 Centos7 sshd[1257]: Accepted publickey for root from 192.168.200.143 port 49640 ssh2: RSA SHA256:niDwzrv1Xq4er0zH0FqfHpvRiCJfPUcnL3vT89ZEt0M
Oct  8 05:09:39 Centos7 sshd[1318]: Accepted publickey for yunjisuan from 192.168.200.1 port 51755 ssh2: RSA SHA256:niDwzrv1Xq4er0zH0FqfHpvRiCJfPUcnL3vT89ZEt0M
2. Ideas and methods of Linux system performance optimization
2.1 Analysis of CPU, memory, disk, network and other factors affecting Linux performance
2.1.1 CPU
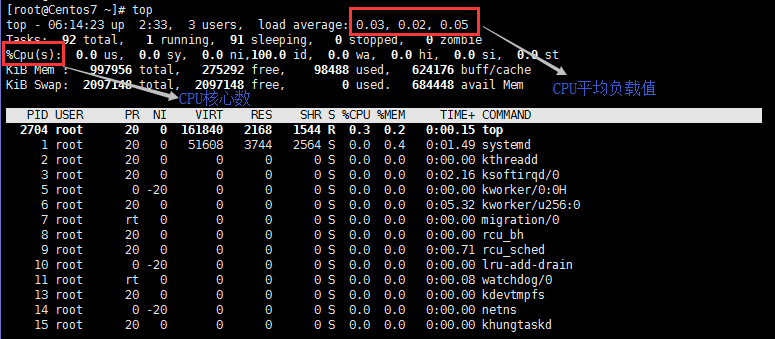
How to Judge Multi-Core CPU and Hyperthreading
- At the top command, press the number 1 to see how many cores the CPU has.
- View and filter in / PROC / cpuinfo
#View some information in / proc/cpuinfo
[root@Centos7 ~]# cat /proc/cpuinfo
processor   : 0         #CPU thread number, filter the total number of threads that get the server
vendor_id   : GenuineIntel
cpu family  : 6
model       : 61
model name  : Intel(R) Core(TM) i5-5200U CPU @ 2.20GHz
stepping    : 4
microcode   : 0x11
cpu MHz     : 2194.917
cache size  : 3072 KB
physical id : 0     #Physical ID number of CPU. Filter this to get the physical CPU number of the server
siblings    : 1
core id     : 0     #Represents that the current information comes from the first core on the CPU with physical id 0
cpu cores   : 1     #There are four cores on the CPU that represent the current physical id of 0
apicid      : 0
initial apicid  : 0
fpu     : yes
fpu_exception   : yes
cpuid level : 20
wp      : yes
flags       : fpu vme de pse tsc msr pae mce cx8 apic sep mtrr pge mca cmov pat pse36 clflush dts mmx fxsr sse sse2 ss syscall nx pdpe1gb rdtscp lm constant_tsc arch_perfmon pebs bts nopl xtopology tsc_reliable nonstop_tsc aperfmperf eagerfpu pni pclmulqdq ssse3 fma cx16 pcid sse4_1 sse4_2 x2apic movbe popcnt tsc_deadline_timer aes xsave avx f16c rdrand hypervisor lahf_lm abm 3dnowprefetch epb fsgsbase tsc_adjust bmi1 avx2 smep bmi2 invpcid rdseed adx smap xsaveopt dtherm ida arat pln pts
bogomips    : 4389.83
clflush size    : 64
cache_alignment : 64
address sizes   : 42 bits physical, 48 bits virtual
power management:
#Viewing the physical server has several physical CPU s
[root@Centos7 ~]# cat /proc/cpuinfo | grep "physical id"
physical id : 0    #Physical id number

[root@Centos7 ~]# cat /proc/cpuinfo | grep "physical id" | uniq
physical id : 0
[root@Centos7 ~]# cat /proc/cpuinfo | grep "physical id" | uniq  | wc -l     #The server has a physical CPU in common
1

#View the total number of threads in the CPU of the physical server
[root@Centos7 ~]# cat /proc/cpuinfo | grep "processor" | uniq  | wc -l
1

#View the total number of CPU s on the physical server
[root@Centos7 ~]# cat /proc/cpuinfo | grep "core id" | wc -l
1
Business that consumes CPU: Dynamic Web Services, Mail Services
2.1.2 memory
- Physical memory and swap trade-offs
- Select 64-bit Linux operating system
If the physical memory is larger than 16G, swapping is equal to or twice the physical memory.
If the physical memory is less than 16G, the swap and memory sizes are the same.
Memory-consuming business: Memory database (redis / HBase / mongodb)
2.1.3 Disk I/O.
- RAID Technology (RAID 0/1/5/10)
- SSD Disk
Disk-consuming business: database server
2.1.4 Network Bandwidth
- Network Card/Switch Selection: Minimum Gigabit Network Card/Gigabit General Switch/Gigabit Core Switch
- Operating System Dual Network Card Binding: Improving Network Card Bandwidth Throughput by Binding
Bandwidth-consuming Services: Distributed File System, Video Service Platform
2.2 Analysis of Operating System Related Resources Affecting Linux Performance
2.2.1 System Installation Optimization
Disk partition, RAID settings, switching settings
2.2.2 Kernel Parameter Optimization
- Ulimit-n (maximum number of open files)
- Ulimit-u (number of processes with the largest user)
2.2.3 File System Optimization
- EXT4: The Original Eco-File Format of Linux
- XFS: Centos7 starts default support
Application recommendations:
Read frequently, and many small files applications: preferred EXT4 system - files
Write frequent applications, preferred xfs.
2.2.4 Procedural issues
Such problems require developers to look at the code and intervene. But as an operation and maintenance personnel, they need to give strong proof of procedural problems.
2.3 CPU Performance Assessment Tools and Optimization Experience for System Performance Tuning
2.3.1 vmstat
The command of vmstat can monitor the memory information, process status, CPU activity of the operating system.
[root@Centos7 ~]# which vmstat
/usr/bin/vmstat

[root@Centos7 ~]# vmstat 3 5          #Refresh every 3 seconds, output 5 times data
procs -----------memory---------- ---swap-- -----io---- -system-- ------cpu-----
 r  b   swpd   free   buff  cache   si   so    bi    bo   in   cs us sy id wa st
 2  0      0 810276   2124 108028    0    0    13     1   41   63  0  0 99  0  0
 1  0      0 810276   2124 108060    0    0     0     0   66   82  0  0 100  0  0
 0  0      0 810276   2124 108060    0    0     0     0   65   78  0  0 100  0  0
 0  0      0 810276   2124 108060    0    0     0     0   64   78  0  0 100  0  0
 0  0      0 810276   2124 108060    0    0     0     0   65   76  0  0 100  0  0
Special effects:
- The r column shows the number of processes running and waiting for CPU time slices. If this value is longer than the number of CPUs in the system, it indicates that the CPU is insufficient and needs to be increased.
- List b shows the number of processes waiting for resources, such as I/O or memory swap. If the CPU is longer than 0, then the CPU is insufficient.
Memory:
- The swpd list shows the number of memory (in k) switched to the memory swap area. If the value of swpd is not 0, or relatively large, as long as the value of si and so is 0 for a long time, there is no need to worry about this situation, which will not affect the system performance.
- The free list shows the current amount of free physical memory (in k)
- Buffer lists indicate the amount of memory cached, and generally read and write to block devices need to be buff ered.
- Cache list shows the amount of memory cached by pages. It is generally used as a file system cache. Frequently accessed files will be cached. If the cached value is large, the number of cached files is large. If bi in IO is small at this time, the file system efficiency is better.
exchange
- The si list represents the amount of memory transferred from disk to memory, that is, the amount of memory entered into the memory swap area.
- So the list shows the amount of memory transferred to disk by memory, that is, the amount of memory entered by the memory swap area.
Generally, the values of SI and SO are all 0. If the values of SI and SO are not 0 for a long time, the system memory is insufficient. System memory needs to be increased.
IO Item Displays Disk Read and Write Status
- Double lists represent the total amount of data read from a block device (i.e., read disks) (KB per second)
- Playlist represents the weight of data written to a block device (i.e., write disk) (KB per second)
Here we set a double + blog reference value of 1000, if more than 1000, and the value of WA is large, then it means that the system disk IO has problems, we should consider improving disk read and write performance.
system Displays the Number of Interrupts Occurring in the Acquisition Interval
- List the number of device interrupts per second observed at a given time interval
- cs list shows the number of context switching times per second
The larger the upper two values, the more CPU time consumed by the kernel will be seen.
The CPU item shows the state of CPU usage. This column is the focus of our attention.
- We show that when the percentage of CPU time consumed by user processes is high. us, it means that user processes consume more CPU time, but if the CPU time is longer than 50%, we need to consider optimizing programs or algorithms.
- The sy column shows the percentage of CPU time consumed by the kernel process. When the value of Sy is high, it indicates that the kernel consumes a lot of CPU resources.
- The reference value of US + SY is 80%. If we + SY is more than 80%, there may be insufficient CPU resources.
- Column d shows the percentage of time the CPU is idle.
- The wa column shows the percentage of CPU time taken by IO waiting.
- The higher the value of WA, the more serious the IO wait. According to experience, when the reference value of WA is 20%, if the WA is more than 20%, the IO wait is serious. The cause of IO wait may be caused by a large number of random reads and writes of disks, or by bandwidth bottlenecks of disks or disk controllers (mainly block operations).
In summary:
In the evaluation of CPU, we should pay attention to the special effects [the value of R column and the value of our, SY and ID columns in CPU item].
2.3.2 iostat
[root@Centos7 ~]# iostat -c 3 5
Linux 3.10.0-862.3.3.el7.x86_64 (Centos7.5)     2018 01 September 2000     _x86_64_    (8 CPU)
avg-cpu:  %user   %nice %system %iowait  %steal   %idle
           0.03    0.00    0.02    0.00    0.00   99.95
avg-cpu:  %user   %nice %system %iowait  %steal   %idle
           0.00    0.00    0.00    0.00    0.00  100.00
avg-cpu:  %user   %nice %system %iowait  %steal   %idle
           0.00    0.00    0.00    0.00    0.00  100.00
avg-cpu:  %user   %nice %system %iowait  %steal   %idle
           0.00    0.00    0.04    0.00    0.00   99.96
avg-cpu:  %user   %nice %system %iowait  %steal   %idle
           0.00    0.00    0.00    0.00    0.00  100.00
2.3.3 uptime and w
[root@Centos7 ~]# uptime
 00:40:01 up  2:01,  2 users,  load average: 0.03, 0.05, 0.05

[root@Centos7 ~]# w
 00:40:03 up  2:01,  2 users,  load average: 0.03, 0.05, 0.05
USER     TTY      FROM             LOGIN@   IDLE   JCPU   PCPU WHAT
root     tty1                      00:22   16:11   0.03s  0.03s -bash
root     pts/0    192.168.200.1    00:25    3.00s  0.03s  0.00s w
2.4 Memory Performance, Disk Performance Assessment Tools and Optimizing Experience for System Performance Tuning
2.4.1 free-m (evaluation memory)
# View the memory of Centos6.x
[root@Centos6 ~]# free -m
             total       used       free     shared    buffers     cached
Mem:           980        300        680          0         17        187
-/+ buffers/cache:         96        884
Swap:         1983          0       1983

Explain:
System Available Remaining Memory Capacity: 884M ==> System Remaining Memory 680M + buffers 17M + cached 187M
 It can be seen from swap that the swap partition usage is 0, indicating that the system memory resources are very sufficient.
# View the memory of Centos7.x
[root@Centos7 ~]# free -m
total used free shared buff/cache available
Mem: 974 76 710 7 187 737
Swap: 2047 0 2047
Explain:
System Remaining Memory Capacity: 710M
buffers+cache capacity: 187M
The available residual memory capacity of the system is available 737MIn general, we can judge memory in this way:
- When the total amount of available memory / system physical memory weight > 70%, it means that the system has sufficient memory resources and does not affect the system performance.
- When the total amount of available memory / the weight of physical memory is less than 20%, it means that the system is short of memory resources and needs to increase the system memory.
- When the total amount of available memory/the weight of physical memory of the system is less than 70%, it means that the system memory resources can basically meet the application requirements without affecting the system performance for the time being.
2.4.2 sar (main evaluation memory)
These two commands are mainly used to monitor all or specified processes occupying system resources, such as CPU, memory, device I/O.
Three common parameters: - u (get CPU status), - R (get memory status), - d (get disk)
[root@Centos7 ~]# sar-u 3 # Gets CPU status information every 3 seconds
 Linux 3.10.0-862.3.3.el7.x86_64 (Centos 7.5) September 02, 2018 _x86_64_ (8 CPU)
15:46:38 CPU%user%nice%system%iowait%steal%idle
 15:46:41 seconds all 0.00 0.00 0.04 0.00 0.00 99.96
 At 15:46:44 all 0.00 0.00 0.00 0.00 0.00 100.00

[root@Centos7 ~]# sar-r 3 # Gets MEM status information every 3 seconds
 Linux 3.10.0-862.3.3.el7.x86_64 (Centos 7.5) September 02, 2018 _x86_64_ (8 CPU)
15:47:57 kbmem free kbmemused% memused kbbuffers kbcached kbcommit% commit kbactive kbinact kbdirty
 586576 411396 41.22 2684 256608 193496.25 191660 1033240
 15:48:03 seconds 586584 411388 41.22 2684 256608 193496.25 191660 1033240

Explain:
kbmemfree: Represents the size of free physical memory
 kbmemused: Represents the physical memory size that has been used
 % memused: Represents the percentage of total memory used
 kbbuffers and kbcached: Represents the size of buffers and cache occupancies
 kbcommit and% commit represent the size and percentage of memory currently used by the application, respectively
2.4.3 iostat-d combination (main evaluation disk)
[root@Centos7 ~]# iostat -d 2 3
Linux 3.10.0-862.3.3.el7.x86_64 (Centos7.5)     2018 02 September 2000     _x86_64_    (8 CPU)
Device:            tps    kB_read/s    kB_wrtn/s    kB_read    kB_wrtn
sda               0.62        16.00         6.85     207832      89039
scd0              0.02         0.23         0.00       2978          0
dm-0              0.48        15.20         6.70     197510      86991
dm-1              0.01         0.17         0.00       2228          0
Device:            tps    kB_read/s    kB_wrtn/s    kB_read    kB_wrtn
sda               0.00         0.00         0.00          0          0
scd0              0.00         0.00         0.00          0          0
dm-0              0.00         0.00         0.00          0          0
dm-1              0.00         0.00         0.00          0          0
Device:            tps    kB_read/s    kB_wrtn/s    kB_read    kB_wrtn
sda               0.00         0.00         0.00          0          0
scd0              0.00         0.00         0.00          0          0
dm-0              0.00         0.00         0.00          0          0
dm-1              0.00         0.00         0.00          0          0

//Explain:
DEV: Represents the name of the disk device
tps: Represents the number of transfers per second to the physical disk, that is, per second. I/O Flow. One transmission is one I/O Requests, multiple logical requests can be merged into one physical I/O Request.
kB_read/s: Data blocks read per second
kB_wrtn/s: Blocks written per second
kB_read: Total number of blocks read
kB_wrtn: Total number of data blocks written
2.5 Network Performance Evaluation Tool for System Performance Tuning
2.5.1 ping command
[root@Centos7 ~]# ping 127.0.0.1
PING 127.0.0.1 (127.0.0.1) 56(84) bytes of data.
64 bytes from 127.0.0.1: icmp_seq=1 ttl=64 time=0.016 ms
64 bytes from 127.0.0.1: icmp_seq=2 ttl=64 time=0.049 ms
64 bytes from 127.0.0.1: icmp_seq=3 ttl=64 time=0.051 ms
^C
--- 127.0.0.1 ping statistics ---
3 packets transmitted, 3 received, 0% packet loss, time 1999ms
rtt min/avg/max/mdev = 0.016/0.038/0.051/0.017 ms

Explain:
     In this output, the time value represents the network delay between two hosts. If the value is large, the network delay is large, in milliseconds. At the end of this output, there is a statistical summary. packet loss denotes the network loss rate. The smaller the value, the higher the network quality.
2.5.2 netstat command
- Netstat-rn <====> route-n
- Netstat-i (View the status of the network interface)
[root@Centos7 ~]# netstat -rn
Kernel IP routing table
Destination     Gateway         Genmask         Flags   MSS Window  irtt Iface
0.0.0.0         192.168.200.2   0.0.0.0         UG        0 0          0 ens32
169.254.0.0     0.0.0.0         255.255.0.0     U         0 0          0 ens32
192.168.200.0   0.0.0.0         255.255.255.0   U         0 0          0 ens32

[root@Centos7 ~]# route -n
Kernel IP routing table
Destination     Gateway         Genmask         Flags Metric Ref    Use Iface
0.0.0.0         192.168.200.2   0.0.0.0         UG    0      0        0 ens32
169.254.0.0     0.0.0.0         255.255.0.0     U     1002   0        0 ens32
192.168.200.0   0.0.0.0         255.255.255.0   U     0      0        0 ens32

[root@Centos7 ~]# netstat -i
Kernel Interface table
Iface      MTU    RX-OK RX-ERR RX-DRP RX-OVR    TX-OK TX-ERR TX-DRP TX-OVR Flg
ens32     1500     1189      0      0 0           868      0      0      0 BMRU
lo       65536       70      0      0 0            70      0      0      0 LRU
2.5.3 mtr / traceroute command
Tracking network routing status, recommending the use of subway, dynamic tracking network routing, for eliminating network problems is very convenient.
#Installation command
[root@Centos6 ~]# yum -y install traceroute mtr
[root@Centos6 ~]# rpm -qa traceroute mtr
traceroute-2.0.14-2.el6.x86_64
mtr-0.75-5.el6.x86_64

#traceroute traces routers to www.baidu.com
[root@Centos6 ~]# traceroute www.baidu.com
traceroute to www.baidu.com (111.13.100.92), 30 hops max, 60 byte packets
 1  192.168.200.2 (192.168.200.2)  0.327 ms  0.206 ms  0.172 ms
 2  * * *
 3  * * *
 4  * * *
 5  * * *
 6  * * *
 7  * * *
#The middle is omitted...
29  * * *
30  * * *
traceroute can also track data packets, but it can't be seen intuitively.
The mtr command - n does not need the host to parse - c to send the number of packets - report results show that it is not dynamic

2.6 Performance Analysis Criteria for Linux Operating System
| Performance factors | Criteria | Criteria | Criteria |
|---|---|---|---|
| good | bad | Too bad | |
| A central processor | User%+SYS%<70% | User%+SYS%= 85% | User%+SYS%> = 90% |
| Memory | Exchange input (si) = 0; Exchange output (so) = 0 | 10 pages per second per CPU | More Exchange and Exchange |
| disk | Iowa%<20% | iowait%= 35% | iowait%> = 50% |
- % User: Percentage of time that the CPU is in user mode
- % SYS: Represents the percentage of time a CPU spends in system mode
- % IOWAIT: Percentage of CPU wait time for input and output to complete
- Swap: si, page import for virtual memory, swapping from SWAP DISK to RAM