This paper demonstrates user configuration, sudo privilege configuration, network configuration, firewall closure, JDK tool installation and so on with K-Master server infrastructure configuration as an example. Users need to complete the basic environment configuration of KVMSlave 1 ~ KVMSlave 3 servers by referring to the following steps.
development environment
Hardware environment: CentOS 6.5 Servers 4 (one Master node, three Slave nodes)Software environment: Java 1.7.0_45, Hadoop-1.2.1
1. Installation environment
Hardware environment: 4 CentOS 6.5 servers (one Master node and three Slave nodes)
Software environment: Java 1.7.0_45, hadoop-1.2.1
2. User Configuration
1) Add a user
[hadoop@K-Master hadoop]$ adduser hadoop                       #New hadoop users
[hadoop@K-Master hadoop]$ passwd hadoop                            #hadoop user set password
2) Construction Working Group
[hadoop@K-Master hadoop]$ groupadd hadoop #New hadoop Working Group
3) Adding working groups to existing users
[hadoop@K-Master hadoop]$ usermod -G hadoop hadoop
2. sudo permission configuration
1) Create a new user group admin
[hadoop@K-Master hadoop]# groupadd admin
2) Adding existing users to admin user groups
[hadoop@K-Master hadoop]# usermod -G admin,hadoop hadoop
3) Give write permission to modify / etc/sudoers files
[hadoop@K-Master hadoop]# chmod u+w /etc/sudoers
4) Editing/etc/sudoers files
[hadoop@K-Master hadoop]# vi /etc/sudoers
 There is only one configuration by default:
root    ALL=(ALL) ALL
Add another configuration below:
%admin    ALL=(ALL) ALL
So the admin user group has sudo privileges, and hadoop users belonging to the admin user group also have sudo privileges.
5) Reduce permission after editing
[hadoop@K-Master hadoop]$ chmod u-w /etc/sudoers
3. Network Configuration
1) Configure IP address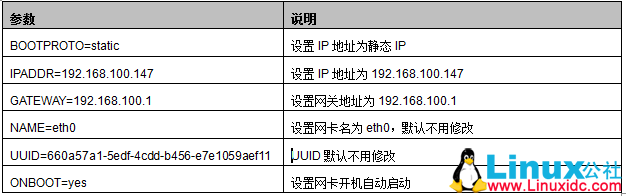
Detailed configuration information is as follows:
[hadoop@K-Master hadoop]$ su hadoop                #Switch to hadoop user
[hadoop@K-Master hadoop]$ sudo vi /etc/sysconfig/network-scripts/ifcfg-eth0
HWADDR=06:8D:30:00:00:27
TYPE=Ethernet
BOOTPROTO=static
IPADDR=192.168.100.147
PREFIX=24
GATEWAY=192.168.100.1
DNS1=192.168.100.1
DEFROUTE=yes
IPV4_FAILURE_FATAL=yes
IPV6INIT=no
NAME=eth0
UUID=660a57a1-5edf-4cdd-b456-e7e1059aef11
ONBOOT=yes
LAST_CONNECT=1411901185
2) Restart network services to make network settings effective
[hadoop@K-Master hadoop]$ sudo service network restart
Shutting down interface eth0:  Device state: 3 (disconnected)
                                                    [  OK  ]
Shutting down loopback interface:                   [  OK  ]
Bringing up loopback interface:                     [  OK  ]
Bringing up interface eth0:  Active connection state: activated
Active connection path: /org/freedesktop/NetworkManager/ActiveConnection/1
                                                    [  OK  ]
3) Testing IP Network Configuration
Look at the IP address of the network through ifconfig command. The following information shows that the IP address of eth0 wireless network card is 192.168.100.147, which is consistent with the IP address we configured above, indicating that the IP address configuration is successful.
[hadoop@K-Master ~]$ ifconfig
eth0  Link encap:Ethernet  HWaddr 06:8D:30:00:00:27
  inet addr:192.168.100.147  Bcast:192.168.100.255  Mask:255.255.255.0
  inet6 addr: fe80::48d:30ff:fe00:27/64 Scope:Link
  UP BROADCAST RUNNING MULTICAST  MTU:1500  Metric:1
  RX packets:59099169 errors:0 dropped:0 overruns:0 frame:0
  TX packets:30049168 errors:0 dropped:0 overruns:0 carrier:0
  collisions:0 txqueuelen:1000
  RX bytes:12477388443 (11.6 GiB)  TX bytes:8811418526 (8.2 GiB)

loLink encap:Local Loopback
  inet addr:127.0.0.1  Mask:255.0.0.0
  inet6 addr: ::1/128 Scope:Host
  UP LOOPBACK RUNNING  MTU:16436  Metric:1
  RX packets:2266013 errors:0 dropped:0 overruns:0 frame:0
  TX packets:2266013 errors:0 dropped:0 overruns:0 carrier:0
  collisions:0 txqueuelen:0
  RX bytes:666482169 (635.6 MiB)  TX bytes:666482169 (635.6 MiB)
4) Modify Host host name
[hadoop@K-Master hadoop]$ sudo vi /etc/sysconfig/network
NETWORKING=yes
NETWORKING_IPV6=no
HOSTNAME=Master
[hadoop@K-Master hadoop]$ sudo vi /etc/hosts
127.0.0.1               localhost.localdomain
::1                     hdirect30 hdirect30
192.168.100.201         K-Master
5) Restart the host to make the host name effective
[hadoop@K-Master hadoop]$ sudo reboot
4. Close the Firewall
Close the firewall of all the machines in the cluster before booting, otherwise the datanode will turn on and automatically close again.
1) View firewall status
[hadoop@K-Master ~]$ sudo service iptables status
iptables: Firewall is not running.
2) Close the firewall
[hadoop@K-Master hadoop]$ sudo service iptables stop
iptables: Setting chains to policy ACCEPT: filter   [  OK  ]
iptables: Flushing firewall rules:                  [  OK  ]
iptables: Unloading modules:                        [  OK  ]
3) Permanent closure of firewalls
[hadoop@K-Master hadoop]$ sudo chkconfig iptables off
4) Turn off SELINUX
[hadoop@K-Master hadoop]$ sudo vi /etc/selinux/config
SELINUX=disabled
5. Installing JDK Tools
1) decompression
[hadoop@K-Master ~]$ scp hadoop@192.168.0.201:/home/hadoop/jdk-7u65-linux-x64.rpm .
[hadoop@K-Master ~]$ sudo rpm -ivh jdk-7u65-linux-x64.rpm
2) Edit the "/ etc/profile" file and add Java's "JAVA_HOME", "CLASSPATH" and "PATH" content later.
[hadoop@K-Master ~]$ sudo vim /etc/profile
#JAVA
export JAVA_HOME=/usr/java/jdk1.7.0_65
export JRE_HOME=$JAVA_HOME/jre
export CLASSPATH=.:$CLASSPATH:$JAVA_HOME/lib:$JRE_HOME/lib
export PATH=$PATH:$JAVA_HOME/bin:$JRE_HOME/bin
#HADOOP
export HADOOP_HOME=/usr/hadoop-1.2.1
export PATH=$PATH:$HADOOP_HOME/bin
export HADOOP_HOME_WARN_SUPPRESS=1
3) Make the configuration file effective
[hadoop@K-Master ~]$ source /etc/profile