Summary:
This blog is the eighth in the "Java Second Kill System Practical Series Articles". In this article, we will integrate the message middleware RabbitMQ, including adding dependencies, adding configuration information and customizing injection of related operational components, such as Rabbit Template, etc. Finally, we will initially realize the sending and receiving of messages, and in the next article. Chapter integrates it with mail service to realize the function of "user secondkill successfully sending mail notification message"!
Contents:
RabbitMQ is a message middleware which has been widely used in the market. It can realize the functions of asynchronous message communication, decoupling of business service module, interface current limiting, message distribution and so on. It can be said in the framework of micro-service and distributed system. It's playing a great role! (Detailed introduction, Debug will not be repeated here, you can go to the official website to see more of its introduction and its typical application scenarios)!
In this blog post, we will use RabbitMQ as the component of message sending, and combine it with the "mail service" introduced in the following chapter to realize "Asynchronous sending mail notification message after the success of the second killing, informing the user that the second killing has been successful!" Now let's get into the code war.
(1) To use RabbitMQ, you need to install RabbitMQ service in your local development environment or server. As shown in the following figure, Debug accesses the home page of its back-end console application after successfully installing RabbitMQ service locally: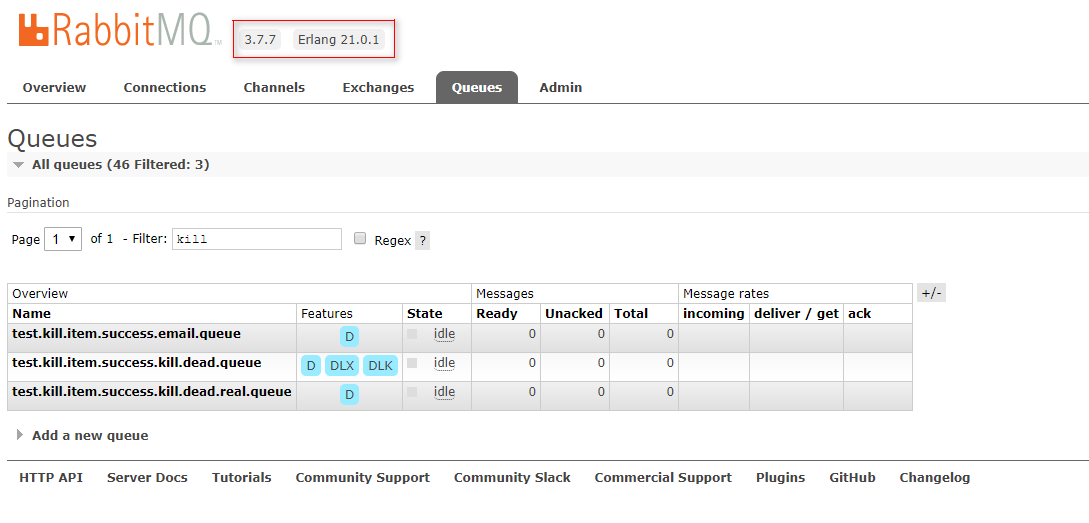
Then we started integrating it with SpringBook. First, you need to add its dependencies. The version number is the same as that of SpringBoot. The version number is 1.5.7.RELEASE:
<dependency>
    <groupId>org.springframework.boot</groupId>
    <artifactId>spring-boot-starter-amqp</artifactId>
    <version>${spring-boot.version}</version>
</dependency>
Then you need to add RabbitMQ service-related configurations in the configuration file application.properties, such as Host, Port, etc. where the service is located:
#rabbitmq
spring.rabbitmq.virtual-host=/
spring.rabbitmq.host=127.0.0.1
spring.rabbitmq.port=5672
spring.rabbitmq.username=guest
spring.rabbitmq.password=guest

spring.rabbitmq.listener.simple.concurrency=5
spring.rabbitmq.listener.simple.max-concurrency=15
spring.rabbitmq.listener.simple.prefetch=10
(2) Next, we use SpringBoot's natural features to automatically inject the configuration of RabbitMQ components, including its "single instance consumer" configuration, the "multi-instance consumer" configuration and the operation component instance "RabbitTemplate" configuration for sending messages:
//Universal Rabbitmq configuration

@Configuration
public class RabbitmqConfig {
  private final static Logger log = LoggerFactory.getLogger(RabbitmqConfig.class);

  @Autowired
  private Environment env;

  @Autowired
  private CachingConnectionFactory connectionFactory;

  @Autowired
  private SimpleRabbitListenerContainerFactoryConfigurer factoryConfigurer;

  //Single consumer
  @Bean(name = "singleListenerContainer")
  public SimpleRabbitListenerContainerFactory listenerContainer(){
      SimpleRabbitListenerContainerFactory factory = new SimpleRabbitListenerContainerFactory();
      factory.setConnectionFactory(connectionFactory);
      factory.setMessageConverter(new Jackson2JsonMessageConverter());
      factory.setConcurrentConsumers(1);
      factory.setMaxConcurrentConsumers(1);
      factory.setPrefetchCount(1);
      factory.setTxSize(1);
      return factory;
  }

  //Multiple consumers
  @Bean(name = "multiListenerContainer")
  public SimpleRabbitListenerContainerFactory multiListenerContainer(){
      SimpleRabbitListenerContainerFactory factory = new SimpleRabbitListenerContainerFactory();
      factoryConfigurer.configure(factory,connectionFactory);
      factory.setMessageConverter(new Jackson2JsonMessageConverter());
      //Confirmation of consumption patterns - NONE
      factory.setAcknowledgeMode(AcknowledgeMode.NONE);
      factory.setConcurrentConsumers(env.getProperty("spring.rabbitmq.listener.simple.concurrency",int.class));
      factory.setMaxConcurrentConsumers(env.getProperty("spring.rabbitmq.listener.simple.max-concurrency",int.class));
      factory.setPrefetchCount(env.getProperty("spring.rabbitmq.listener.simple.prefetch",int.class));
      return factory;
  }

  @Bean
  public RabbitTemplate rabbitTemplate(){
      connectionFactory.setPublisherConfirms(true);
      connectionFactory.setPublisherReturns(true);
      RabbitTemplate rabbitTemplate = new RabbitTemplate(connectionFactory);
      rabbitTemplate.setMandatory(true);
      rabbitTemplate.setConfirmCallback(new RabbitTemplate.ConfirmCallback() {
          @Override
          public void confirm(CorrelationData correlationData, boolean ack, String cause) {
              log.info("Message sent successfully:correlationData({}),ack({}),cause({})",correlationData,ack,cause);
          }
      });
      rabbitTemplate.setReturnCallback(new RabbitTemplate.ReturnCallback() {
          @Override
          public void returnedMessage(Message message, int replyCode, String replyText, String exchange, String routingKey) {
              log.warn("Message Loss:exchange({}),route({}),replyCode({}),replyText({}),message:{}",exchange,routingKey,replyCode,replyText,message);
          }
      });
      return rabbitTemplate;
  }
}
In the configuration of RabbitTemplate, the message sending component of RabbitMQ, we also specially add the output configuration of "message sending confirmation" and "message loss callback", that is, when the message enters the queue correctly, it represents the success of message sending; when the message cannot find the corresponding queue (to some extent, it is actually a search). Output messages will be lost before switching and routing.
(3) After that, we are ready to start using RabbitMQ to send and receive messages. First, we need to create Bean components such as queues, switches, routing, and bindings in the RabbitmqConfig configuration class, as follows:
//Constructing a Message Model for Asynchronous Sending Mailbox Notification
    @Bean
    public Queue successEmailQueue(){
        return new Queue(env.getProperty("mq.kill.item.success.email.queue"),true);
    }

    @Bean
    public TopicExchange successEmailExchange(){
        return new TopicExchange(env.getProperty("mq.kill.item.success.email.exchange"),true,false);
    }

    @Bean
    public Binding successEmailBinding(){
        return BindingBuilder.bind(successEmailQueue()).to(successEmailExchange()).with(env.getProperty("mq.kill.item.success.email.routing.key"));
    }
Among them, the attributes read by env, the instance of environment variable, are configured in the application.properties file, as follows:
mq.env=test

#A Message Model for Successful Asynchronous Sending of Mail by Secondkill
mq.kill.item.success.email.queue=${mq.env}.kill.item.success.email.queue
mq.kill.item.success.email.exchange=${mq.env}.kill.item.success.email.exchange
mq.kill.item.success.email.routing.key=${mq.env}.kill.item.success.email.routing.key
Next, we need to write a method of sending a message in the general messaging service class RabbitSenderService. This method is used to receive the "order number" parameter, then query its corresponding detailed order record in the database, and send the record as a "message" to the queue of RabbitMQ, waiting to be monitored. Listen to consumption:
/**
* RabbitMQ Universal messaging service
* @Author:debug (SteadyJack)
* @Date: 2019/6/21 21:47
**/
@Service
public class RabbitSenderService {

  public static final Logger log= LoggerFactory.getLogger(RabbitSenderService.class);

  @Autowired
  private RabbitTemplate rabbitTemplate;

  @Autowired
  private Environment env;

  @Autowired
  private ItemKillSuccessMapper itemKillSuccessMapper;

  //Successful asynchronous email notification message
  public void sendKillSuccessEmailMsg(String orderNo){
      log.info("Successful asynchronous email notification message-Prepare to send a message:{}",orderNo);

      try {
          if (StringUtils.isNotBlank(orderNo)){
              KillSuccessUserInfo info=itemKillSuccessMapper.selectByCode(orderNo);
              if (info!=null){
                  //TODO:rabbitmq's logic for sending messages
                  rabbitTemplate.setMessageConverter(new Jackson2JsonMessageConverter());
                  rabbitTemplate.setExchange(env.getProperty("mq.kill.item.success.email.exchange"));
                  rabbitTemplate.setRoutingKey(env.getProperty("mq.kill.item.success.email.routing.key"));

                  //TODO: Send info as a message to the queue
                  rabbitTemplate.convertAndSend(info, new MessagePostProcessor() {
                      @Override
                      public Message postProcessMessage(Message message) throws AmqpException {
                          MessageProperties messageProperties=message.getMessageProperties();
                          messageProperties.setDeliveryMode(MessageDeliveryMode.PERSISTENT);
                          messageProperties.setHeader(AbstractJavaTypeMapper.DEFAULT_CONTENT_CLASSID_FIELD_NAME,KillSuccessUserInfo.class);
                          return message;
                      }
                  });
              }
          }
      }catch (Exception e){
          log.error("Successful asynchronous email notification message-An exception occurred with the message:{}",orderNo,e.fillInStackTrace());
      }
  }
}
(4) Finally, it implements message reception in the general message receiving service class RabbitReceiver Service. Its complete source code is as follows:
/**
 * RabbitMQ Universal Message Receiving Service
 * @Author:debug (SteadyJack)
 * @Date: 2019/6/21 21:47
 **/
@Service
public class RabbitReceiverService {

  public static final Logger log= LoggerFactory.getLogger(RabbitReceiverService.class);

  @Autowired
  private MailService mailService;

  @Autowired
  private Environment env;

  @Autowired
  private ItemKillSuccessMapper itemKillSuccessMapper;

  //Second Kill Asynchronous Mail Notification - Receive Messages
  @RabbitListener(queues = {"${mq.kill.item.success.email.queue}"},containerFactory = "singleListenerContainer")
  public void consumeEmailMsg(KillSuccessUserInfo info){
      try {
          log.info("Second Kill Asynchronous Mail Notification-receive messages:{}",info);
      //At that time, we will integrate the logic of mail service to send mail notification messages.

      }catch (Exception e){
          log.error("Second Kill Asynchronous Mail Notification-receive messages-Abnormal:",e.fillInStackTrace());
      }
  }
}
So far, this article has covered the code warfare of SpringBoot Integration Message Middleware RabbitMQ.
Finally, we need to test that RabbitMQ sends and receives a message after the user initiates a "snap-up" request operation on the interface, if the second kill succeeds, as follows: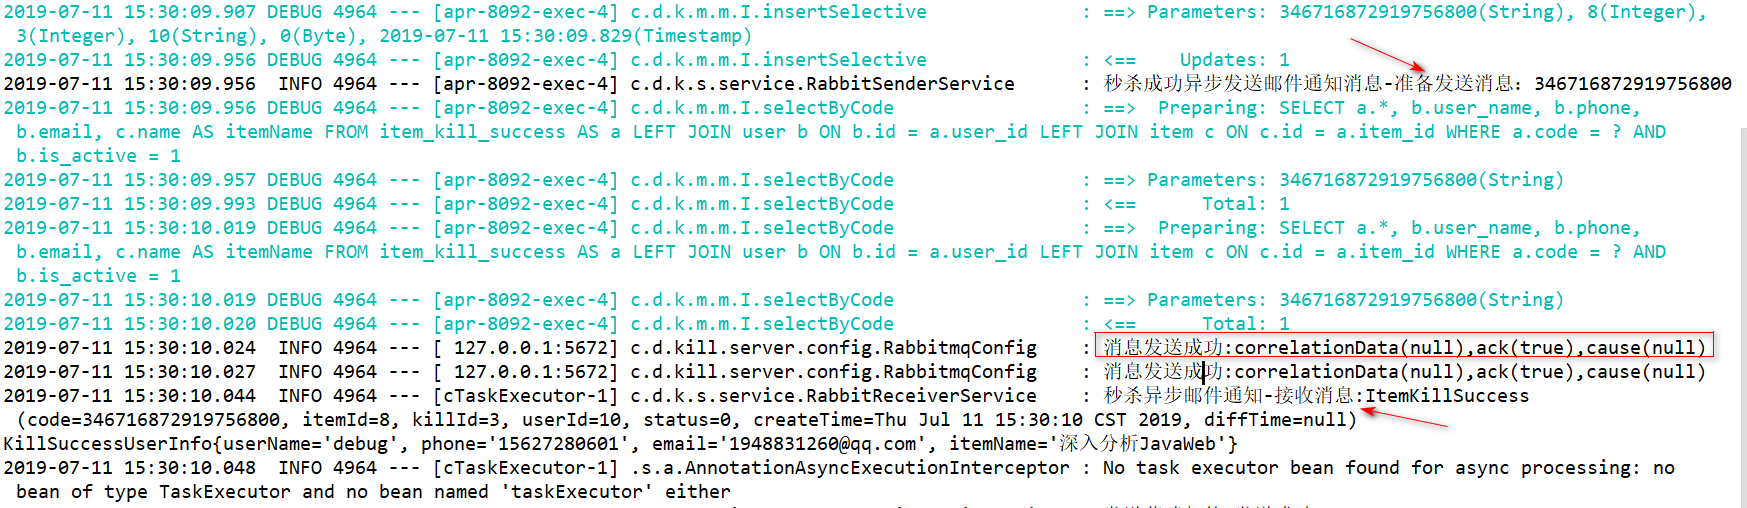
Okay, this article will be finished for the time being about the use of RabbitMQ. In the next article, we will integrate RabbitMQ with the mail service to realize the function of asynchronous sending email notification message to the user's mailbox after the success of the second kill. In addition, we will introduce in a later chapter "How to use RabbitMQ's Dead Letter Queue to process orders that have been successfully placed by users but have not been paid in time - where we will take invalid actions".
Supplement:
1. Since the updates of the corresponding blogs may not be very fast, you can read if you want to get a quick start and a real-world system. Design and Practical Video Tutorial of Java Mall Secondary Kill System (SpringBook Edition)
2. At present, the whole construction and code battle of this second kill system have been completed. The complete source code database address can be downloaded here: https://gitee.com/steadyjack/SpringBoot-SecondKill