I. Purpose
The traditional initial process for front-end projects is generally as follows:
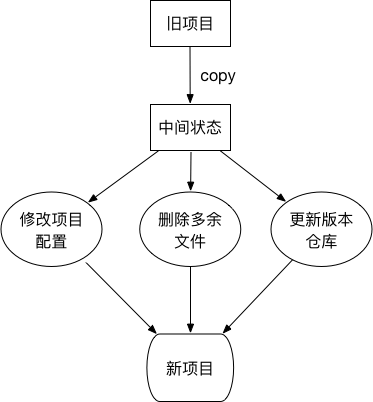
You can see that the traditional initialization steps take a lot of time.Moreover, in the case of manual operation, there is always a situation of omission correction.This disadvantage can sometimes be fatal.
Even in Madahara, it is embarrassing to submit code to an old warehouse without updating the project warehouse address.
In these cases, the purpose of writing a command line tool (CLI) is clear:
- Initialization for new project projects
- Initialization with tools saves preparation time at the beginning of the project
- Avoid leak correction
- Eliminate the problem of not updating the project version warehouse address
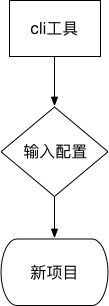
The following is a new flowchart:
2. Automation process analysis
The following is an automated flowchart:
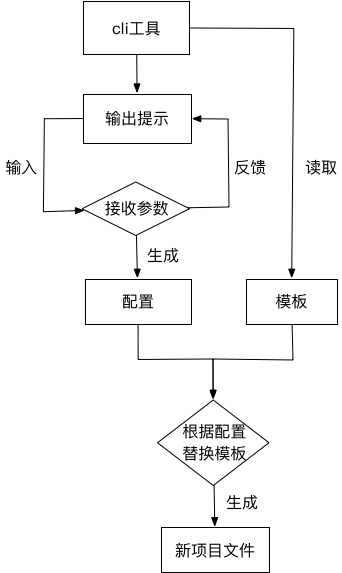
Two important pieces of information can be derived from a flowchart:
- configuration information
- template file
The role of command line tools is to fuse the two pieces of information and provide an interactive platform for users.
3. Tool preparation
3.1 Configuration Information Tool
Configuration information is obtained by interacting with users.Because programmers typically use terminal input commands for project operations.So here are two tools chosen for support.
- commander
Command Line Execution Completion Solution Implemented by the Idea of Ruby commander
commander can receive parameters passed in from the command line
Example:
npg-cli --help

♫ ♫♬♪♫  npm-package-cli ♫ ♫♬♪♫
Usage: npg-cli [options]

Options:
  -V, --version  output the version number
  -h, --help     output usage information
  run testcli and edit the setting.
- inquirer
A collection of commonly used interactive command line user interfaces.
inquirer uses interrogative statements to interact with users and receive parameters
Example:
npg-cli

♫ ♫♬♪♫  npm-package-cli ♫ ♫♬♪♫
Follow the prompts to complete the project configuration.

? project name test
? version 1.0.0
? description
3.2 Template Information Tool
Front-end JavaScript template engines, such as ejs, jade, and so on.Template tags can be replaced based on the parameters passed in, resulting in html.
If all project files, regardless of the file suffix name, are considered ejs templates, you can use ejs syntax in the file contents.
Replace it with the configuration information and generate a new file.
In fact, based on this idea, the industry has developed mature tools.
- mem-fs
mem-fs reads files and stores them in memory.
- mem-fs-editor
mem-fs-editor is the in-memory file information that is compiled using ejs syntax.Finally, the commit method is called to output the final file.
3.3 Prompt Information Tool
Tip information, in addition to console.log, you can also use a more colorful chalk.
In this way, you can output more intuitive and friendly tips.
3.4 File Operations
File operations, there are industry-mature shelljs.
With shelljs, you can simplify the following steps in your project:
- Some project files do not need to be modified, just use direct copy.It can be generated synchronously using shelljs.copySync.
- Some folders, which need to be built in advance, can be created using shelljs.mkdir
4. Realization
Following is a breakup and explanation of the creation process of npm-package-cli, an open source project I have done.
4.1 Initialization
Create a new project folder npm-package-cli and run npm init under it to generate package.json.
The project structure is as follows:
 npm-package-cli
        |-- package.json
4.2 Generate global instructions
The global directive to be generated here is npg-cli.
4.2.1 New Execution File
Create a new folder, bin, and create a new shell script file named cli under the folder (note: you cannot have a suffix name).
The clishell script file contains the following:
#!/usr/bin/env node

console.log('hello world');
Where #!/usr/bin/env node tells the compiler to run the code as a node.
And add the following to package.json:
"bin": {
    "npg-cli": "bin/cli"
}
At this point, the project structure is as follows:
 npm-package-cli
        |-- bin
            |-- cli
        |-- package.json
4.2.2 Link Instructions to Global
There are two ways to link instructions:
- npm link
- npm install -g
Both methods need to be run in the npm-package-cli folder to take effect.
The purpose is to implement the soft chain by pointing the npg-cli directive to the global bin file.
4.2.3 Run
Run commands under any folder:
npg-cli

# output
hello world
Here, once a basic instruction is completed, the next step is to refine the work of the instruction.
4.3 Initialization Action Class Creation
Creation integrates all operations and provides an interface to the command file cli.
Creation is structured as follows:
class Creation{
  constructor(){
    // code
  }
  do(){
      // code
  }
  // other function
}
Where the do method is exposed to script file cli calls.
The Creation class is placed in src/index.js.
At this point, the project structure is as follows:
 npm-package-cli
        |-- bin
            |-- cli
        |-- src
            |-- index.js
        |-- package.json
4.4 Modify cli file
#!/usr/bin/env node

const Creator = require('../src/index.js');

const project = new Creator();

project.do();
In this way, as long as the do method is implemented, the npg-cli directive can be completed.
4.5 Implement command line parameter reading
To implement npg-cli --help, you need to use the tool commander mentioned above.
Create a new src/command.js file with the following contents:
const commander = require('commander');
const chalk = require('chalk');

const packageJson = require('../package.json');
const log = console.log;

function initCommand(){
    commander.version(packageJson.version)
        .on('--help', ()=>{
            log(chalk.green('  run testcli and edit the setting.'));
        })
        .parse(process.argv);
}

module.exports = initCommand;
At this point, the project structure is as follows:
 npm-package-cli
        |-- bin
            |-- cli
        |-- src
            |-- command.js
            |-- index.js
        |-- package.json
Then initCommand() is executed within the Creation.do method to take effect.
// src/index.js Creation
const initCommand = require('./command');

class Creation{
    // other code
    do(){
        initCommand();
    }
}
At this point, run the npg-cli --help directive and you will see:
Usage: npg-cli [options]

Options:
  -V, --version  output the version number
  -h, --help     output usage information
  run testcli and edit the setting.
4.6 Get user input configuration information
To get the information entered by the user, you need to use the tool inquirer.
Create a new src/setting.js file with the following contents:
const inquirer = require('inquirer');
const fse = require('fs-extra');

function initSetting(){
    let prompt = [
        {
            type: 'input',
            name: 'projectName',
            message: 'project name',
            validate(input){
                if(!input){
                    return 'project name is required.'
                }
                if(fse.existsSync(input)){
                    return 'project name of folder is exist.'
                }
                return true;
            }
        },
        // other prompt
    ];

    return inquirer.prompt(prompt);
}

module.exports = initSetting;
At this point, the project structure is as follows:
 npm-package-cli
        |-- bin
            |-- cli
        |-- src
            |-- command.js
            |-- index.js
            |-- setting.js
        |-- package.json
Then initSetting() is executed within the Creation.do method to take effect.
// src/index.js Creation
const initCommand = require('./command');
const initSetting = require('./setting');

class Creation{
    // other code
    do(){
        initCommand();
        initSetting().then(setting => {
            // When user input is complete, json data set will get all input information
        });
    }
}
Here, the inquirer.prompt method loads the problem to be collected and returns a Promise object.Once the collection is complete, the configuration information is available within the then method for the next template replacement operation.
4.7 Template File Replacement Output
Template file replacement, using tools mem-fs and mem-fs-editor.
The tool shelljs is used for file operations.
Create a new src/output.js file with the following contents (deleted some code, following is an example, see the final shared link for the complete project):
const chalk = require('chalk');
const fse = require('fs-extra');
const path = require('path');
const log = console.log;

function output(creation){
    return new Promise((resolve, reject)=>{
        // Get configuration information
        const setting = creation._setting;
        const {
            projectName
        } = setting;
        // Gets the folder where the current command line execution environment is located
        const cwd = process.cwd();

        // Initialize folder path
        const projectPath = path.join(cwd, projectName);
        const projectResolve = getProjectResolve(projectPath);

        // New Project Folder
        fse.mkdirSync(projectPath);

        // copy folder
        creation.copy('src', projectResolve('src'));
        // Replace file contents based on configuration information
        creation.copyTpl('package.json', projectResolve('package.json'), setting);

        // Output files from memory to hard disk
        creation._mfs.commit(() => {
            resolve();
        });
    });
}

module.exports = output;
The effect of the output method:
- New Project Folder
- Read the template file and replace it with the configuration information (calling the copyTpl method of mem-fs-editor)
- Copy other files
- Output Final File to Hard Disk
The most important step here is to execute the commit method of mem-fs-editor after calling the method of mem-fs-editor and output the file in memory to the hard disk.
In the Creation.do method, the output method is called to output the new project file. Open the src/index.js file and add the following contents:
// src/index.js Creation
const initCommand = require('./command');
const initSetting = require('./setting');
const output = require('./output');

class Creation{
    // other code
    do(){
        initCommand();
        initSetting().then(setting => {
            // When user input is complete, json data set will get all input information
            this._setting = Object.assign({}, this._setting, setting);
            // output file
            output(this).then(res => {
                // Project Output Complete
            });
        });
    }
}
Stage 4.8 Summary
Automatically initializing a project involves three things:
- Read User Configuration
- Read Template File
- Compile template file and output final file according to configuration
Command-line tools are an effective integration of these three points into a canonical process.
5. Points for Attention in Publishing npm Packages
Third-party toolkits used in command-line tools all need to be installed in the--save way.
The representation reflected in package.json is the dependencies field:
"dependencies": {
    "chalk": "^2.4.2",
    "commander": "^3.0.0",
    "fs-extra": "^8.1.0",
    "inquirer": "^6.5.0",
    "mem-fs": "^1.1.3",
    "mem-fs-editor": "^6.0.0",
    "shelljs": "^0.8.3"
},
This way, other users will automatically install these dependencies when they install the CLI tools you publish.
6. Open Source Project
The npm-package-cli I created is a CLI tool specifically for generating individual npm package projects.
The resulting project encompasses the following functional points:
- Supports TypeScrpt
- mocha+chai automated test, supporting writing test cases using TypeScript
- Support for test coverage
- Supports eslint, including lint checking for TypeScript
- Git commit specification submission
- Git version auto-label (standard-version), update CHANGELOG.md
- The output npm package supports various module specifications (AMD, CMD, CommonJS, ESModule)
CLI tool installation method:
npm install -g npm-package-cli
Open source warehouse address: https://github.com/wall-wxk/npm-package-cli
If it helps you, give me a Star, you must be my motivation to move forward ~