Preface
To be honest, this chapter was not meant to talk about, because there are many similar tutorials on the Internet that configure multiple data sources. But recently, because the project uses sub-database and sub-table, let me study how to achieve it. I think about the last blog about multi-environment configuration, different environments call different databases, then I will use one environment to multiple libraries. That's why I have this article.
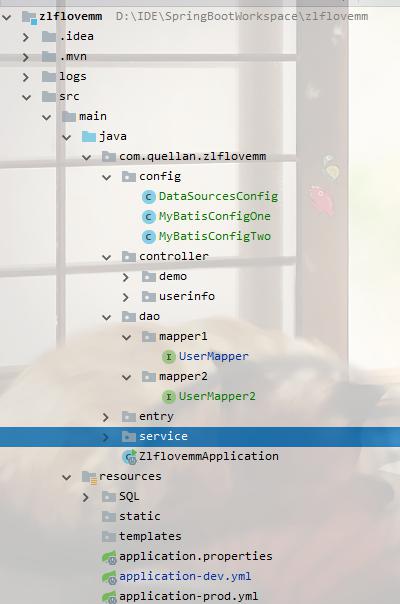
Let's first look at the project structure of today's project. We made some changes on the basis of the previous blog, mainly adding a config file. In dao, two subpackages mapper1 and mapper2 moved the original User Mapper into mapper1. Okay, let's start with the text.
Multiple Data Source Configuration
background
Before that, let's talk about why there are multiple data sources. If the project is small, of course, all data and logical processing operate on the same library. But when the volume of business is large, the sub-database will be considered. I will store the log data in a separate database. Or a separate inventory of user rights information. This multi-data source configuration is meaningful if only a simple sub-database is used in a project with 2 to 4 databases. Configure these data sources in the configuration file, and they all have unique identities. The project is initialized when it starts loading, and then when it is invoked, the connection instance of which data source is the library that you want to use.
If mybatis is not integrated, it is easier to configure multiple data sources and use jdbcTemplate with spring directly, but it is more complex to integrate mybatis. We will explain it step by step.
Modify configuration files
Open the application-dev.yml file and add the data source.
#development environment
spring:
  # Data source configuration
  datasource:
    one:
      driver-class-name: com.mysql.jdbc.Driver
      jdbc-url: jdbc:mysql://192.168.252.53:3306/zlflovemm?characterEncoding=utf-8&useSSL=false&zeroDateTimeBehavior=CONVERT_TO_NULL
      username: root
      password: 123456
      max-idle: 10
      max-wait: 10000
      min-idle: 5
      initial-size: 5
    two:
      driver-class-name: com.mysql.jdbc.Driver
      jdbc-url: jdbc:mysql://192.168.252.53:3306/zlfdb?characterEncoding=utf-8&useSSL=false&zeroDateTimeBehavior=CONVERT_TO_NULL
      username: root
      password: 123456
      max-idle: 10
      max-wait: 10000
      min-idle: 5
      initial-size: 5
Note here that if springboot 2.0 or more is used, then note driver-class-name and
jdbc-url instead of driverClassName and url. Here is a pit to remind you.
Configuring data sources
Next, we need to manually load what data sources, and we create the DataSourcesConfig class in config.
@Configuration
public class DataSourcesConfig {

    @Bean(name="dbOne")
    @ConfigurationProperties(prefix = "spring.datasource.one")
    @Primary
    DataSource dbOne(){
        return DataSourceBuilder.create().build();
    }

    @Bean(name="dbTwo")
    @ConfigurationProperties(prefix = "spring.datasource.two")
    DataSource dbTwo(){
        return DataSourceBuilder.create().build();
    }

}
Data Source for two data sources is defined here. We configure one and two in the configuration file, respectively. The annotation @Primary represents the default data source.
MyBatis ConfigOne class
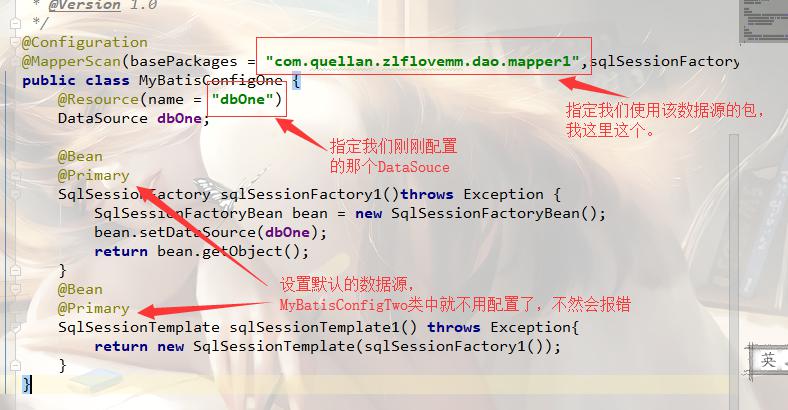
@Configuration
@MapperScan(basePackages = "com.quellan.zlflovemm.dao.mapper1",sqlSessionFactoryRef = "sqlSessionFactory1",sqlSessionTemplateRef = "sqlSessionTemplate1")
public class MyBatisConfigOne {
    @Resource(name = "dbOne")
    DataSource dbOne;

    @Bean
    @Primary
    SqlSessionFactory sqlSessionFactory1()throws Exception {
        SqlSessionFactoryBean bean = new SqlSessionFactoryBean();
        bean.setDataSource(dbOne);
        return bean.getObject();
    }
    @Bean
    @Primary
    SqlSessionTemplate sqlSessionTemplate1() throws Exception{
        return new SqlSessionTemplate(sqlSessionFactory1());
    }
}
MyBatis ConfigTwo class
@Configuration
@MapperScan(basePackages = "com.quellan.zlflovemm.dao.mapper2",sqlSessionFactoryRef = "sqlSessionFactory2",sqlSessionTemplateRef = "sqlSessionTemplate2")
public class MyBatisConfigTwo {
    @Resource(name = "dbTwo")
    DataSource dbTwo;

    @Bean
    SqlSessionFactory sqlSessionFactory2()throws Exception {
        SqlSessionFactoryBean bean = new SqlSessionFactoryBean();
        bean.setDataSource(dbTwo);
        return bean.getObject();
    }
    @Bean
    SqlSessionTemplate sqlSessionTemplate2()throws Exception {
        return new SqlSessionTemplate(sqlSessionFactory2());
    }
}
Note the difference between the two files:
dao level
Two packages mapper1 and mapper2 are created in the dao layer. The contents of UserMapper classes in the packages are exactly the same, and they are placed in different packages only to distinguish which data source to use. It's the same as yesterday.
public interface UserMapper {

    @Select("select id,username as userName,password,email,role_code as roleCode,gmt_create as gmtCreate,gmt_update as gmtUpdate,nickname as nickName,user_create as userCreate from sys_user")
    List<UserEntry> findUserList();


    @Insert({"insert into sys_user(username,password,email) values('${user.userName}','${user.password}','${user.email}')"})
    int add(@Param("user") UserEntry user);

    @Delete("delete from sys_user where id = #{id}")
    int delete(int id);
}
service level
UserService interface
public interface UserService {

    List<UserEntry> findUserList();

    int addUser(String userName,String password,String email);

    int deleteUser(int id);

    List<UserEntry> findUserList2();

    int addUser2(String userName,String password,String email);

    int deleteUser2(int id);
}
UserServiceImpl class:
@Service
public class UserServiceImpl implements UserService {

    @Autowired
    protected UserMapper userMapper;

    @Autowired
    protected UserMapper2 userMapper2;


    @Override
    public List<UserEntry> findUserList() {
        return userMapper.findUserList();
    }

    @Override
    public int addUser(String userName, String password, String email) {
        UserEntry user=new UserEntry();
        user.setUserName(userName);
        user.setPassword(password);
        user.setEmail(email);
        return userMapper.add(user);
    }

    @Override
    public int deleteUser(int id) {
        return userMapper.delete(id);
    }

    @Override
    public List<UserEntry> findUserList2() {
        return userMapper2.findUserList();
    }

    @Override
    public int addUser2(String userName, String password, String email) {
        UserEntry user=new UserEntry();
        user.setUserName(userName);
        user.setPassword(password);
        user.setEmail(email);
        return userMapper2.add(user);
    }

    @Override
    public int deleteUser2(int id) {
        return userMapper2.delete(id);
    }
}
controller layer
userController
@Slf4j
@RestController
@RequestMapping("/user")
public class UserController {

    @Autowired
    private UserService userService;

    @RequestMapping(value = "/list",method = RequestMethod.GET)
    public List<UserEntry> findUserList(){
        return userService.findUserList();
    }

    @RequestMapping(value = "/add",method = RequestMethod.GET)
    public String addUser(@RequestParam(value = "userName")String uaserName,@RequestParam(value = "password")String password,@RequestParam(value = "email")String email){
        int falg=userService.addUser(uaserName,password,email);
        if(falg>0){
            return "success";
        }
        return "error";
    }

    @RequestMapping(value = "/delete",method = RequestMethod.GET)
    public String deleteUser(@RequestParam(value = "id")int id){
        if(userService.deleteUser(id)>0){
            return "success";
        }
        return "error";
    }

    @RequestMapping(value = "/list2",method = RequestMethod.GET)
    public List<UserEntry> findUserList2(){
        return userService.findUserList2();
    }

    @RequestMapping(value = "/add2",method = RequestMethod.GET)
    public String addUser2(@RequestParam(value = "userName")String uaserName,@RequestParam(value = "password")String password,@RequestParam(value = "email")String email){
        int falg= userService.addUser2(uaserName,password,email);
        if(falg>0){
            return "success";
        }
        return "error";
    }

    @RequestMapping(value = "/delete2",method = RequestMethod.GET)
    public String deleteUser2(@RequestParam(value = "id")int id){
        if(userService.deleteUser2(id)>0){
            return "success";
        }
        return "error";
    }
}
test


You can see that it's pulled from different libraries. This shows that our springboot configuration has succeeded in integrating mybatis with multiple data sources. In fact, the three configuration classes under the config package are the most important ones. Others are common business logic, so I won't say much later. The code will be synchronized to github. If you want to practice, you can use the source code to practice.
At this point, we have configured springboot to integrate mybatis multiple data sources, but when we configure it, we can find that if we want to configure several data sources, we have to create several subpackages in the dao layer to distinguish them. So if we have enough data, how many libraries do we need to divide the database into tables instead of several libraries?
Sub library table
background
In fact, sub-database and sub-table are the same as multi-data sources, but there are more data sources, so configuring all connections in the configuration is bloated, so we have to find another way. The sub-database sub-table is to configure the connection to the main library in the project, read the connections from the main library, and then load the sub-library dynamically. If the interface wants to call that sub-library, it will load the connection to the sub-library.
What I'm doing now is not too cumbersome to implement because I don't need to integrate mybatis to use jdbcTemplate directly.
thinking
There are two main categories.
GetDynamicJdbcTemplate class: Create connections manually.
/**
 * @ClassName GetDynamicJdbcTemplate
 * @Description Get dynamic jdbcTemplate
 * @Author zhulinfeng
 * @Date 2019/9/20 14:35
 * @Version 1.0
 */
public class GetDynamicJdbcTemplate {

    private  String driverClassName;
    private  String url;
    private  String dbUsername;
    private  String dbPassword;
    private JdbcTemplate jdbcTemplate;

    public JdbcTemplate getJdbcTemplate() {
        return jdbcTemplate;
    }

    public GetDynamicJdbcTemplate(String driverClassName, String url, String dbUsername, String dbPassword){
        this.driverClassName=driverClassName;
        this.url=url;
        this.dbUsername=dbUsername;
        this.dbPassword=dbPassword;
        this.jdbcTemplate=new JdbcTemplate(getDataSource());
    }

    public DriverManagerDataSource getDataSource() {
        DriverManagerDataSource dataSource = new DriverManagerDataSource();
        dataSource.setDriverClassName(driverClassName);
        dataSource.setUrl(url);
        dataSource.setUsername(dbUsername);
        dataSource.setPassword(dbPassword);
        return dataSource;
    }
}
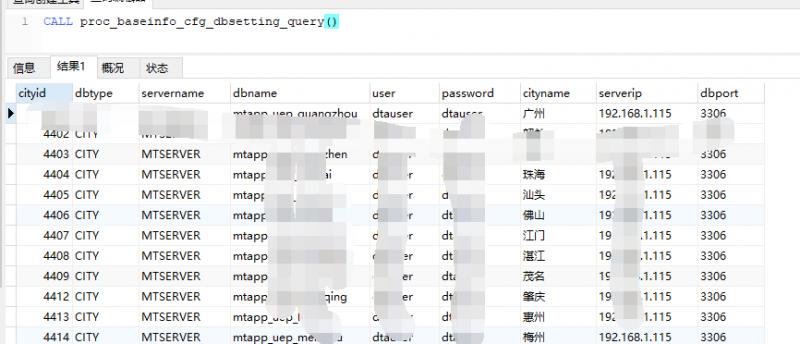
When the project starts, the GetJdbcTemplateMap class reads the configuration in the main library and creates all sublibrary connections into the map. We divide the database according to the city. When the interface is invoked, we can know which database connection to use according to the city passed from the front end.
@Component
@Slf4j
    public class GetJdbcTemplateMap implements ApplicationRunner {

    @Autowired
    @Qualifier("baseTemplate")
    private JdbcTemplate jdbcTemplate;

    public static Map<String,JdbcTemplate> JdbcTemplateMap=new HashMap<>();

    @Override
    public void run(ApplicationArguments args) throws Exception {
        String sql="CALL proc_baseinfo_cfg_dbsetting_query()";
        List<Map<String, Object>> list = jdbcTemplate.queryForList(sql);
        if(list!=null && !list.isEmpty()){
            insertMap(list);
        }
    }

    private void insertMap(List<Map<String, Object>> list){
        for(Map<String, Object> map :list){
            String url="jdbc:mysql://"+map.get("serverip")+":"+map.get("dbport")+"/"+map.get("dbname")+"?allowMultiQueries=true&useUnicode=true&characterEncoding=utf8&zeroDateTimeBehavior=convertToNull";
            log.info(url);
            String  dbUsername=  map.get("user").toString();
            String  dbPassword=  map.get("password").toString();
            GetDynamicJdbcTemplate getDynamicJdbcTemplate=new GetDynamicJdbcTemplate(ConstantClass.DRIVERCLASSNAME,url,dbUsername,dbPassword);
            JdbcTemplate jdbcTemplate=getDynamicJdbcTemplate.getJdbcTemplate();
            JdbcTemplateMap.put(map.get("cityid").toString(),jdbcTemplate);
        }
    }
}
It is also convenient to call in the interface.
But the above is only suitable for our own unique business, and there is no integration of mybatis, so I did not write in my own project, here is to provide you with a train of thought.
Off the coast
After writing this article, I feel that it is not very good, but I don't know how to modify it, so let's do it for the time being, and then revise it after thinking. Ask me why I didn't integrate Thymeleaf to get the page out first. The reason why I didn't do it is because I think the front and back end separation in the later stage is called in the form of interface. So I want to build the back-end part first, and then integrate the front-end.
All right, so much to say, the code of the project is synchronized to github today.
Github address: https://github.com/QuellanAn/zlflovemm
Follow-up refueling
Welcome to pay attention to the personal public number "programmers love yogurt"
Share various learning materials, including java, linux, big data, etc. The information includes video documents and source code, and shares my own and high-quality technical blog posts.
If you like to remember to pay attention to and share yo