In the previous article, we learned the use of route in React and created an import interface; this time, we learned the specific implementation of wallet and the development of login interface, and connected the three UI s of login interface, create wallet and import wallet through wallet.
1, Further application of Provider
In the previous study, we used provider to realize the global display of message bars and network switch selection. This time, we plan to use provider to achieve more functions. Provider is a very practical tool. In addition to providing global shared variables and methods, it can also use synchronous mode to write asynchronous operations, and does not need async/await.
In the previous content, due to the lack of content, we specially wrote a Network.js to use the Provider to handle the network switch selection. With the increase of development content, there will be more and more variables or methods that we need to share globally. Some of these variables are stored locally, such as private key, brief account information, etc.; some variables only need to be saved in memory, such as whether to log in, currently selected network, currently logged in wallet, etc. Therefore, we integrate the Provider, use a GlobalProvider.js to save the global variables that do not need local storage, and use StorageProvider.js to save the memory variables that need local storage.
First delete src/contexts/Network.js, and then create a new src/contexts/GlobalProvider.js. The code is as follows:
/**
*  This file is used to globally obtain and update global variables (in memory) that do not need local storage
*/
import React, { createContext, useContext, useReducer, useMemo, useCallback } from 'react'

const UPDATE='UPDATE'
const GlobalProvider = createContext()

function useGlobalContext() {
  return useContext(GlobalProvider)
}

//todo global variables increase with development
const global_init = {
    network:"homestead",
    isLogin:false,
    wallet:null
}

function reducer(state,{type,payload}) {
    switch (type) {
        case UPDATE:{
            return { ...state,...payload }
        }
        default:{
          throw Error(`Unexpected action type in GlobalContext reducer: '${type}'.`)
        }
    }
}

export default function Provider({children}) {
    const [state, dispatch] = useReducer(reducer, global_init)

    const update = useCallback( payload => {
        dispatch({ type: UPDATE, payload})
    }, [])

    return (
        <GlobalProvider.Provider value={useMemo(() => [state,{update}], [state, update])}>
          {children}
        </GlobalProvider.Provider>
     )
}

export function useGlobal() {
    const [state,] = useGlobalContext()
    return state
}

export function useUpdateGlobal() {
    const [,{update}] = useGlobalContext()
    return update
}
Then we will create src/contexts/StorageProvider.js. The code is as follows:
/**
*  This file is used to obtain and update local storage globally
*  Storage content increases with development
*/
import React, { useState,useEffect,createContext,useMemo,useContext, useCallback } from 'react'
import {reactLocalStorage} from 'reactjs-localstorage';

//You need to set react? APP? Appkey in. env.local and other files to represent the key or ID of this APP
const appKey = process.env.REACT_APP_APPKEY;

//Create context, fixed usage
const StorageContext = createContext()

function useStorageContext() {
    return useContext(StorageContext)
}

//Define a provider
export default function Provider({ children }) {
  //Keep a cache in memory without reading from local storage every time
  const [data, setData] = useState(null)
  //Update memory cache as well as storage update
  const update = useCallback( _data => {
      reactLocalStorage.setObject(appKey,_data)
      setData(_data)
  },[])

  //The provider returns the value. Note that update is wrapped in an object. Sometimes there is a problem when it is returned directly as an array element
  return (
    <StorageContext.Provider value={useMemo(() => [data,{update}], [data, update])}>
      {children}
    </StorageContext.Provider>
  )
}

/**
* Get the hook of local storage. Here, an undefined is returned. Read the local storage and then update the return value
*/
export function useStorage() {
    const [data,{update}] = useStorageContext();

    useEffect(()=>{
        if(!data) {
            let _data = reactLocalStorage.getObject(appKey);
            //When the data has not been saved is {} or []
            if( !_data.length) {
                update([])
            }else{
                update(_data)
            }
        }
    },[data,update])

    return data
}

//Update the stored hook
export function useUpdateStorage() {
    const [,{update}] = useStorageContext();
    return update
}
Take a look at the usage of this useStorage(), which is a hook. First, it returns an undefined value, and then it reads the value of the local storage and updates it. Generally, the update values are asynchronous (which happens to be synchronous here). After the value is updated, all sub elements that use the value will be re rendered to use the latest value, which is very useful for global shared values that need to be updated regularly. For example, in an exchange, we can use it to update the price of ETH regularly. After the update, all interfaces will automatically use the latest price.
So some people may ask why not use async/await to get the latest value directly, but return a value first and then update it. This is because it is a hook. Although Promise can be used inside hook, hook can only be used at the top level of function components, and it can only be called with synchronous methods, so async/await cannot be used here.
2, Local storage and custom environment variables in React
We use the React JS localstorage library to realize the local storage in React. Let's install it first:
npm install reactjs-localstorage
When it reads or sets the local storage, it needs to provide a string such as appId. Its usage is as follows:
import {reactLocalStorage} from 'reactjs-localstorage';

reactLocalStorage.set('var', true);
reactLocalStorage.get('var', true);
reactLocalStorage.setObject('var', {'test': 'test'});
reactLocalStorage.getObject('var');
reactLocalStorage.remove('var');
reactLocalStorage.clear();
In fact, it stores K/V pairs (key / value pairs). Here, 'var' is equivalent to a key. It should be noted that the data saved when setObject is used can also be an array, because in JavaScript, arrays are also objects. In addition, when using getObject, if the corresponding key does not exist, it returns an empty object {}. Note that empty objects return true when applied directly to logical judgments.
In addition, we will set the related custom environment variables in a centralized way, and create a new. env.local in the root directory of the project. The content is as follows:
REACT_APP_APPKEY = 'KHWallet2019'
REACT_APP_PASSWORD_LENGTH = 1
The first is the key stored locally. Change it to your own. The second is to limit the minimum password length. For simplicity, it is set to 1.
Note that in React, the custom environment variable must start with React app. There are several places to set custom environment variables:
.env                # Loaded in all environments
.env.local          # Loaded in all environments, but ignored by git
.env.[mode]         # Only loaded in the specified mode
.env.[mode].local   # Only loaded in the specified mode, but ignored by git
These environment variables are obtained in React through the code process.env.React? App? Not? Secret? Code. Be careful not to store the private key, password, etc.
3, Initialize new Provider
Let's modify src/index.js and add the initialization of the two new providers. The code snippet after modification is as follows:
function AllProvider() {
    return (
        <NotistackWrapper>
            <GlobalProvider>
                <StorageProvider>
                    <Main />
                </StorageProvider>
            </GlobalProvider>
        </NotistackWrapper>
    )
}

ReactDOM.render(<AllProvider />,document.getElementById('root'));
Because of the length, only code snippets are listed here. For the complete code, please look directly at the code cloud link at the end of the article.
4, Use AES encryption
Our wallet private key needs to be encrypted and saved in the client. AES encryption is used in this development. First, install it:
npm install crypto
Then create src/utils/index.js. The code snippet is as follows:
import crypto from 'crypto'

export function aesEncrypt(data,key) {
    let cipher = crypto.createCipher('aes192', key);
    let crypted = cipher.update(data, 'utf8', 'hex');
    crypted += cipher.final('hex');
    return crypted;
}

export function aesDecrypt(encrypted, key) {
    let decipher = crypto.createDecipher('aes192', key);
    let decrypted = decipher.update(encrypted, 'hex', 'utf8');
    decrypted += decipher.final('utf8');
    return decrypted;
}
The above two methods correspond to encryption and decryption respectively. key is the password.
5, New login page
Create src/views/SignIn.js with the following code:
import React, {useState} from 'react';
import {makeStyles} from '@material-ui/core/styles';
import { Link } from "react-router-dom";
import {useSimpleSnackbar} from 'contexts/SimpleSnackbar.jsx';
import TextField from '@material-ui/core/TextField';
import Avatar from '@material-ui/core/Avatar';
import Button from '@material-ui/core/Button';
import LockIcon from '@material-ui/icons/LockOutlined';
import Typography from '@material-ui/core/Typography';
import FormControl from '@material-ui/core/FormControl';
import {ethers} from 'ethers';
import {useStorage} from 'contexts/StorageProvider'
import {useUpdateGlobal} from 'contexts/GlobalProvider.js'
import { withRouter } from "react-router";
import {aesDecrypt} from 'utils'

const useStyles = makeStyles(theme => ({
    avatar: {
        margin: theme.spacing(1),
        backgroundColor: theme.palette.secondary.main
    },
    form: {
        width: '100%', // Fix IE 11 issue.
        marginTop: theme.spacing(3),
        textAlign: 'center'
    },
    submit: {
        fontSize: 20,
        width: "50%",
        marginTop: theme.spacing(6)
    },
    import: {
        fontSize: 18,
        textDecoration:"none",
        color:"#f44336",
        margin: theme.spacing(6),
    },
    wallet: {
        textAlign: "center",
        marginTop: theme.spacing(3),
        fontSize: 20
    },
    container: {
        display: 'flex',
        flexDirection: 'column',
        alignItems: 'center',
        margin: theme.spacing(3)
    }
}));

function SignIn({history}) {
    const classes = useStyles();
    const showSnackbar = useSimpleSnackbar()
    const [password, setPassword] = useState('')
    const storage = useStorage()
    const updateGlobal = useUpdateGlobal()

    const updatePassword = e => {
        let _password = e.target.value;
        setPassword(_password)
    };

    const onSubmit = e => {
        e.preventDefault();
        if(storage && storage.length > 0) {
            let _crypt = storage[0].crypt;
            try{
               let privateKey = aesDecrypt(_crypt,password)
               let wallet = new ethers.Wallet(privateKey)
               let options = {
                   isLogin:true,
                   wallet,
               }
               updateGlobal(options)
               history.push('/detail')
           }catch(err) {
               showSnackbar("Password error",'error')
           }
        }
    }

    return (
        <div className={classes.container}>
            <Avatar className={classes.avatar}>
                <LockIcon/>
            </Avatar>
            <Typography  color='secondary' className={classes.wallet}>
                KHWallet,Simple, safe and easy to use
            </Typography>
            <Typography  color='secondary' className={classes.wallet}>
                //Ethereum Wallet
            </Typography>
            <form className={classes.form} onSubmit={onSubmit}>
                <FormControl margin="normal"  fullWidth>
                    <TextField id="standard-password-input"
                        label="Password"
                        required
                        type="password"
                        autoComplete="current-password"
                        value={password}
                        onChange={updatePassword}/>
                </FormControl>
                <Button type='submit' variant="contained" color="primary" className={classes.submit}>
                    //Sign in
                </Button>
            </form>
            <Link to="/import" className={classes.import}>reset password/Import new account</Link>
        </div>
    )
}

export default withRouter(SignIn);
Let's focus on this Code:
const onSubmit = e => {
        e.preventDefault();
        if(storage && storage.length > 0) {
            let _crypt = storage[0].crypt;
            try{
               let privateKey = aesDecrypt(_crypt,password)
               let wallet = new ethers.Wallet(privateKey)
               let options = {
                   isLogin:true,
                   wallet,
               }
               updateGlobal(options)
               history.push('/detail')
           }catch(err) {
               showSnackbar("Password error",'error')
           }
        }
    }
As can be seen from the code, we use the ethers library to create a wallet through the decrypted private key and save it in memory. After the wallet is established, it will jump to the main wallet interface / detail. Let's install it first:
npm install ethers
ethers is a great library for wallet management and various interactions in Ethereum. With it, you don't need web3.js. It can almost meet all your needs about Ethereum, so I highly recommend it to you. Here is its documentation: https://docs.ethers.io/ethers.js/html/ Must read more times, more times, more times!
Let's create a simple wallet main page to complete this logic. This page only displays the wallet address. Create a new src/views/WalletDetail.jsx, and the code is as follows:
import React from 'react';
import {makeStyles} from '@material-ui/core/styles';
import {useGlobal} from 'contexts/GlobalProvider'

const useStyles = makeStyles(theme => ({
    container: {
        display: 'flex',
        flexDirection: 'column',
        alignItems: 'center',
        margin: theme.spacing(3)
    }
}));

function WalletDetail() {
    const classes = useStyles();
    let {wallet} = useGlobal();

    return (
        <div className={classes.container}>
            {wallet.address}
        </div>
    )
}

export default WalletDetail

6, Centralized routing
As the development content increases, we need to focus on routing. Because the route can be directly accessed by the user on the client side, the corresponding judgment needs to be made before the route navigation. For example, without an account, the login interface cannot be used, and only the creation or import interface can be used.
In fact, we can use a global variable to control which page to display without routing, but we mainly study React and Material UI, so we used a complex way to use routing to control.
Create a new src/layouts/Routes/index.js with the following code:
import React,{Suspense,lazy} from 'react';
import {useStorage} from 'contexts/StorageProvider';
import {useGlobal} from 'contexts/GlobalProvider';
import {withRouter} from "react-router";
import { Route, Switch,Redirect } from "react-router-dom";

const ImportWallet = lazy(() => import('views/ImportWallet'));
const CreateWallet = lazy(() => import('views/CreateWallet'));
const SignInWallet = lazy(() => import('views/SignIn'));
const WalletDetail = lazy(() => import('views/WalletDetail'));

function SwitchRoute({history,path}) {
    history.push(path)
    return null
}

function Admin({history}) {
    const storage = useStorage()
    const {isLogin} = useGlobal()
    const hasAccount = storage && storage.length !== 0 ;

    if(!storage) {
        return null
    }
    return (
        <Suspense fallback ={null}>
            <Switch>
                <Route path="/import" component={ImportWallet} />
                <Route path="/create" >
                    {hasAccount ? <SwitchRoute history={history} path='/sign' /> : <CreateWallet /> }
                </Route>
                <Route path='/sign' >
                    {hasAccount ? <SignInWallet /> : <SwitchRoute history={history} path='/create' />}
                </Route>
                <Route path='/detail'>
                    {hasAccount
                        ? (isLogin ? <WalletDetail /> : <SwitchRoute history={history} path='/sign' />)
                        : <SwitchRoute history={history} path='/create' />}
                </Route>
                <Redirect from='/' to='/detail' />
            </Switch>
        </Suspense >
    )
}

export default withRouter(Admin)
As you can see, we put the delay import and Route navigation of the page on this page for unified processing, and control the Route navigation through the two variables of hasAccout and isLogin. Note that we use a small function component, SwitchRoute, to do the actual jump. It may be asked why we don't write history.push(path) directly under Route, but also write a new function component. That's because only nodes can be found under Route, and rendering is required.
Then we modify / src/views/Main.jsx to import the above file:
import Routes from 'layouts/Routes';
Modify the code at route navigation:
<Router >
    <WalletBar/>
    <Switch>
        <Route path="/" component={Routes}/>
    </Switch>
</Router>
This code will transfer all access to Routes.js, which is the route processing file above us for processing.
7, Other modifications
There are other changes in this learning, such as the code changes in the network selection button (because there is no Network.js now), which will not be listed here. At the same time, we added a show / Hide button to the password input box of the import wallet and new wallet interface to show or hide the button, as shown in the following figure: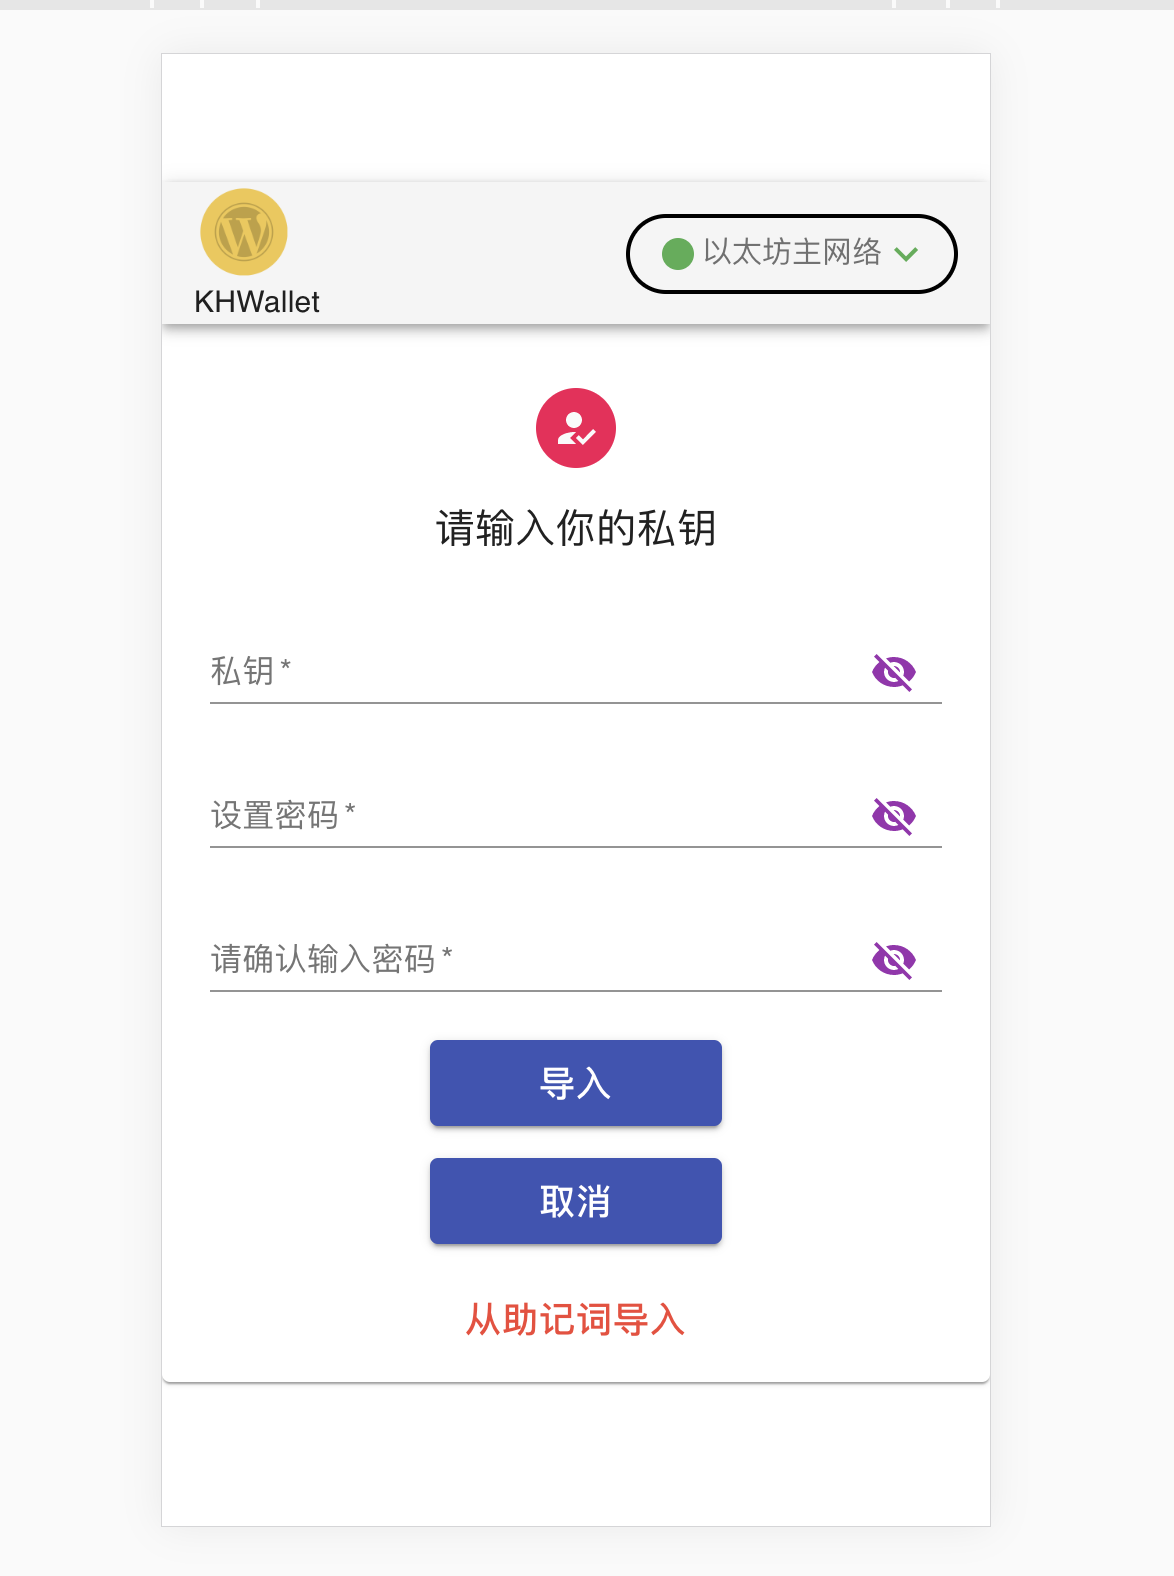
Be careful:
I have a little problem here. The color of the show / Hide button here is purple, which is the secondary color in my custom theme. However, in the Material UI standard theme, secondary should display red. I don't use custom theme here, and move the color definition up one level to display it correctly. In order to highlight the problem, it is still shown in purple here. This problem needs to be further studied. Interested readers can wait to see the complete code. Here is the code snippet.
<TextField id="key-password-input"
    label={isPrivateKey ? "Private key" : "Mnemonic word"}
    required
    type={showKey ? "text" : "password"}
    value={key}
    onChange={handleChange('key')}
    InputProps={{
        endAdornment:(
            <InputAdornment position="end">
                <IconButton
					//It's right to set the color here
					//color='secondary'
                    aria-label="toggle key visibility"
                    onClick={handleChangeShow('showKey')}
                    onMouseDown={handleMouseDownPassword}
                >
                	//The color is not set right here
                    {showKey ? <Visibility color='secondary'/> : <VisibilityOff color='secondary'/>}
                </IconButton>
             </InputAdornment>
         )
    }
/>
Which reader knows the problem? Please leave a message or private message.
Due to space limitation, all modified places are not listed here, such as the implementation of wallet import and wallet login logic. Please download the source code and study it yourself.
8, Create an Ethereum account
Well, the first phase of our Ethereum wallet is available. First, set the corresponding environment variable in / src/.env.local, and then run npm start. You will see an interface to create an account. If you are prompted that a library is missing, install it by npm install library name.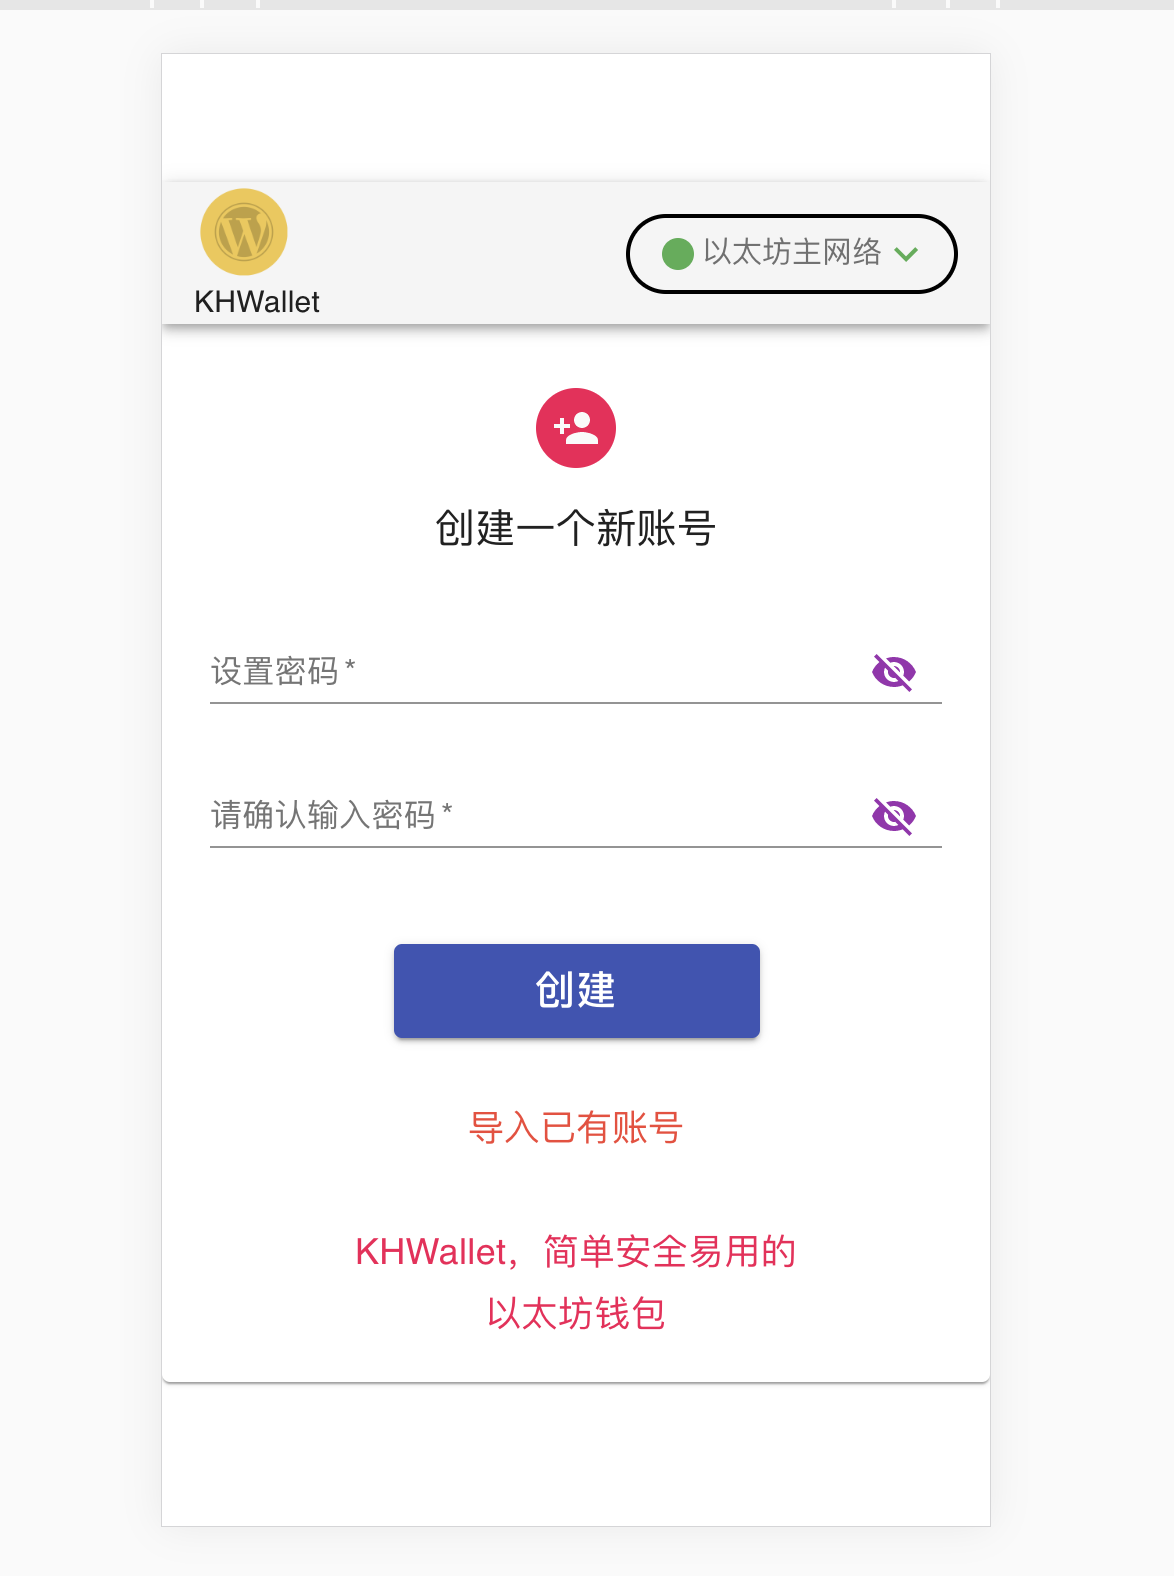
What are you waiting for? Enter your password to create one. After creation, it will jump to the undeveloped wallet main page -. After clicking refresh, you will see that the creation page becomes the login page: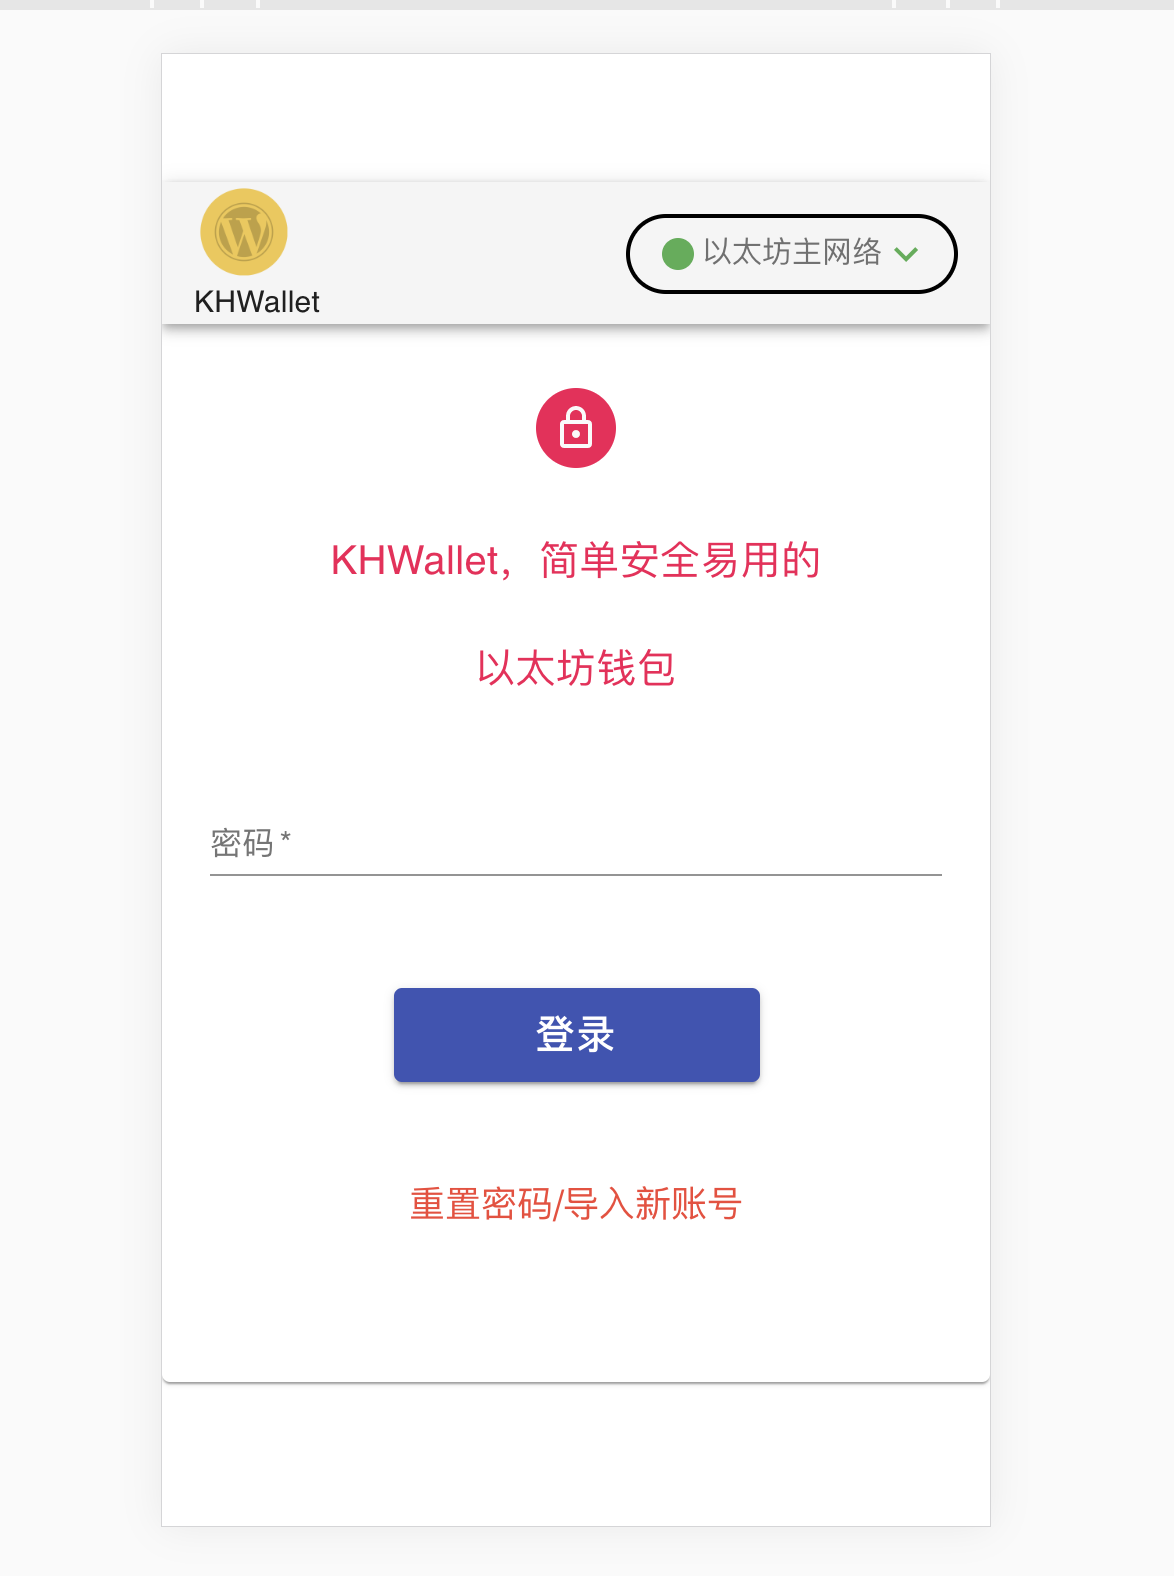
Enter the password when you create the wallet (import wallet) to log in.
Be careful:
It should be noted that the key encryption of this wallet is saved in the local storage. If you clear the local storage, you will also clear it, so your account will be lost and no one can find it. In the future, we will add the function of exporting account so that you can make a backup of the private key of wallet, but at present, it is better not to clear the local storage easily.
Tucao: CSDN will also save our login information in local storage. If you are writing the article, you will accidentally remove the local storage (or other reasons) for the test wallet. Sorry, it will think you are not logged in. It's not feasible for you to click Save Draft or publish article again, which means that the content you haven't saved before will be lost. However, it can still be saved. You can also click the Export button to export the whole article as a MarkDown file, so you can log in again and click Import to import the md file just now.
Next time, we plan to develop some functions of the main page of wallet.
Code cloud address after this learning: = > https://gitee.com/TianCaoJiangLin/khwallet
Please leave a message to point out the mistakes or put forward suggestions for improvement

