brief introduction
The function of RTMP Streamer in streaming media system can be shown in the following figure. First, the video data is sent to the streaming media Server (Server, such as FMS, Red5, Wowza, etc.) in the form of RTMP, and then the client (generally Flash Player) can watch the real-time streaming by accessing the streaming media Server.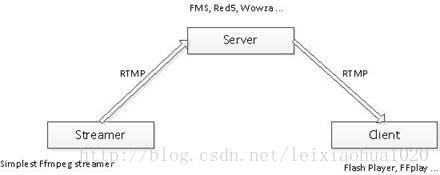
1. First of all: before running this program, you need to run RTMP streaming media server, and establish the corresponding Application on the streaming media server.
2. At the same time of streaming, the client (such as Flash Player, FFplay, etc.) pulls the streaming to watch the pushed live streaming (the server cannot save the video data for a long time)
For example:
1. Streaming: ffmpeg - re - I cuc_ischool.flv - f flv rtmp://192.168.126.128/live/camera
An example of ffmpeg RTMP push command
2. Streaming: VLC open network streaming: rtmp://192.168.126.128/live/camera
Encapsulation format
The RTMP is packaged in FLV format. Therefore, when specifying the output streaming media, you need to specify its encapsulation format as "flv".
For example, add the parameter command: - f flv during streaming
Similarly, other streaming media protocols need to specify their encapsulation format. For example, when using UDP streaming, specify the encapsulation format as "mpegts".
c code implements streaming - the simplest FFmpeg based streaming device (taking RTMP as an example) - with delay → → according to the actual frame rate of video
c code for stream collection -- the simplest FFMPEG based streamer accessory: the collector
The following is to use the ffmpeg instruction to implement streaming with vlc
1. Install the dependency package of nginx
# Check if zlib is installed
dpkg -l | grep zlib
# Resolve dependency package openssl installation
sudo apt-get install openssl libssl-dev
# Resolve dependency package pcre installation
sudo apt-get install libpcre3 libpcre3-dev
# Resolve the dependency package zlib installation
sudo apt-get install zlib1g-dev
1.5 add rtmp support for nginx
To increase support for rtmp, Download nginx rtmp module at: https://github.com/arut/nginx-rtmp-module#example-nginxconf , this is an open source project. After downloading, unzip it and put it in a directory (such as / home / user / nginx RTMP module). Later, configure nginx to use this location
2. Download nginx on the official website
//Download nginx
wget http://nginx.org/download/nginx-1.13.1.tar.gz

//Decompression nginx
tar -xzvf nginx-1.13.1.tar.gz   →Get folder nginx-1.13.1
3. Install nginx
//Configure nginx
cd nginx Unzip folder
./configure --prefix=/usr/local/nginx  --add-module=/home/user/nginx-rtmp-module(Added tmrp Decompression address)  --with-http_ssl_module

//Compile nginx
make
//Install nginx
make install
3.5 modify nginx configuration file nginx.conf for configuration (the configuration will take effect after restarting nginx)
gedit /usr/local/nginx/conf/nginx.conf
//The text editing interface pops up for modification, similar to the txt editing method
Here is the modified nginx.conf:
1. Add rtmp configuration
2. Enable nginx to have live state monitoring function
#user  nobody;
worker_processes  1;

#error_log  logs/error.log;
#error_log  logs/error.log  notice;
#error_log  logs/error.log  info;

#pid        logs/nginx.pid;


events {
    worker_connections  1024;
}

#Make nginx add rtmp function.
rtmp {  							#Protocol name
    server {  						#It indicates that the internal configuration is related to the server
        listen 1935;  				#rtmp service listening port

        application live {  		#Cast server
            live on;  				#live on means to enable rtmp live broadcast
            #allow play all;		#These four lines are for recording
            #record all;
            #record_path /opt/video/record;	#The storage path of the recorded video (remember to turn on write permission).
            #r after adding, restart nginx, and then push the stream again. If you look at the file in the path of / opt/video/record, you can see that there is an additional flv file named test + timestamp. This is the recorded video.
            #record_unique on;
            						#record off do not record data
        }
        application hls {  			#HLS(HTTP Live Streaming)
            live on;  				#live on enable rtmp live
            hls on;  				#hls on enable hls live broadcast
            hls_path /tmp/hls;  	#hls_path Slice save location   #Video streaming file directory(Create yourself)
            #hls_fragment 3s 		#Length of each slice
        }
        application vod{			#On demand server
            play /opt/video/vod; 	# Storage address of video files on demand
        }
        #Just the name of the video file on demand.mp4 put to/opt/video/vod Directory, open VLC,Select media->Open the network stream and enter the following link: rtmp://xx.xx.xx.xx/vod/name.mp4
    }
}

http {
    include       mime.types;
    default_type  application/octet-stream;

    #log_format  main  '$remote_addr - $remote_user [$time_local] "$request" '
    #                  '$status $body_bytes_sent "$http_referer" '
    #                  '"$http_user_agent" "$http_x_forwarded_for"';

    #access_log  logs/access.log  main;

    sendfile        on;
    #tcp_nopush     on;

    #keepalive_timeout  0;
    keepalive_timeout  65;

    #gzip  on;

	#New content added--send nginx Capable of monitoring live status
	server {
	    listen       8080;		#Monitor port->Determined to enter in the browser http://192.168.1.11.8080/stat The port number here is8080

	    location /stat{							#Configure view server status routing
	            rtmp_stat all;
	            rtmp_stat_stylesheet stat.xsl;
	    }
	    location /stat.xsl{						 #Configuration status information source
	    #location /stat and / stat.xsl are only used to monitor server and client conditions.
	           root /home/user/nginx-rtmp-module;#among/home/user/nginx-rtmp-module yes nginx-rtmp-module Absolute path to folder

	    }
	}

    server {
        listen       80;			#default80The port should be the same as the previous8080Time2Ports for various purposes
        server_name  localhost;
        #charset koi8-r;
        #access_log  logs/host.access.log  main;

        location / {
            root   html;
            index  index.html index.htm;
        }

        #error_page  404              /404.html;
        # redirect server error pages to the static page /50x.html
        error_page   500 502 503 504  /50x.html;
        location = /50x.html {
            root   html;
        }

		location /hls {
            types {
                application/vnd.apple.mpegurl m3u8;
                #Or application/x-mpegURL
                video/mp2t ts;
            }
           alias /usr/local/nginx/html/hls; #Video streaming file directory(Create yourself)
            expires -1;
            add_header Cache-Control no-cache;
       }

        # proxy the PHP scripts to Apache listening on 127.0.0.1:80
        #
        #location ~ \.php$ {
        #    proxy_pass   http://127.0.0.1;
        #}

        # pass the PHP scripts to FastCGI server listening on 127.0.0.1:9000
        #
        #location ~ \.php$ {
        #    root           html;
        #    fastcgi_pass   127.0.0.1:9000;
        #    fastcgi_index  index.php;
        #    fastcgi_param  SCRIPT_FILENAME  /scripts$fastcgi_script_name;
        #    include        fastcgi_params;
        #}

        # deny access to .htaccess files, if Apache's document root
        # concurs with nginx's one
        #
        #location ~ /\.ht {
        #    deny  all;
        #}
    }


    # another virtual host using mix of IP-, name-, and port-based configuration
    #
    #server {
    #    listen       8000;
    #    listen       somename:8080;
    #    server_name  somename  alias  another.alias;

    #    location / {
    #        root   html;
    #        index  index.html index.htm;
    #    }
    #}


    # HTTPS server
    #
    #server {
    #    listen       443 ssl;
    #    server_name  localhost;

    #    ssl_certificate      cert.pem;
    #    ssl_certificate_key  cert.key;

    #    ssl_session_cache    shared:SSL:1m;
    #    ssl_session_timeout  5m;

    #    ssl_ciphers  HIGH:!aNULL:!MD5;
    #    ssl_prefer_server_ciphers  on;

    #    location / {
    #        root   html;
    #        index  index.html index.htm;
    #    }
    #}

}
4. Check whether nginx is installed successfully
cd /usr/local/nginx/sbin
./nginx -t

//If the result shows:
nginx: the configuration file /usr/local/nginx/conf/nginx.conf syntax is ok
nginx: configuration file /usr/local/nginx/conf/nginx.conf test is successful
5. Configure users (it can also be used without setting)
# Add www group
groupadd www
# Create nginx operation account www and join the www group. www users are not allowed to log in to the system directly
useradd -g  www www -s /bin/false
6. Configure firewall (ubuntu does not open the firewall by default, not required)
7. Start nginx
# Method1
/usr/local/nginx/sbin/nginx -c /usr/local/nginx/conf/nginx.conf
# Method2
cd /usr/local/nginx/sbin
./nginx


//Close./nginx -s stop perhaps./nginx -s quit

//Common commands:
# cp /usr/local/nginx/sbin/nginx /usr/local/bin/    #Add nginx to the environment variable without entering the full path
# nginx            #First start
# nginx -t        #Check if the configuration file is correct
# nginx -s reload  #Restart smoothly. After modifying the configuration file, restart the service continuously
# nginx -s stop    #Out of Service
8. The port may be occupied
nginx: [emerg] bind() to 0.0.0.0:1935 failed (98: Address already in use)
nginx: [emerg] bind() to 0.0.0.0:80 failed (98: Address already in use)
nginx: [emerg] bind() to 0.0.0.0:1935 failed (98: Address already in use)
nginx: [emerg] bind() to 0.0.0.0:80 failed (98: Address already in use)
nginx: [emerg] bind() to 0.0.0.0:1935 failed (98: Address already in use)
nginx: [emerg] bind() to 0.0.0.0:80 failed (98: Address already in use)
nginx: [emerg] bind() to 0.0.0.0:1935 failed (98: Address already in use)
nginx: [emerg] bind() to 0.0.0.0:80 failed (98: Address already in use)
nginx: [emerg] bind() to 0.0.0.0:1935 failed (98: Address already in use)
nginx: [emerg] bind() to 0.0.0.0:80 failed (98: Address already in use)
nginx: [emerg] still could not bind()

Reason: 1 port 80 may be occupied by another process
			Query all ports netstat -tlnp
			Query specific ports such as 1935 netstat - tlnp|grep 1935
			Then shut down the process and release the port
			For example, TCP 0 0 0.0.0.0:1935 0.0.0.0: * listen 20211 / nginx.conf
			  kill -9 20211//1935 port occupied by process nginx.conf (its thread number 20211)
		2. It is also possible that nginx service is already running, so port 1935 and port 80 will occupy when restarting
			Close nginx service and open pkill -9 nginx
9. Then start the service. If the service starts successfully, enter http://localhost/ in the local browser, that is, http://127.0.0.1
Welcome to nginx!

If you see this page, the nginx web server is successfully installed and working. Further configuration is required.

For online documentation and support please refer to nginx.org.
Commercial support is available at nginx.com.

Thank you for using nginx.
If the above appears, the service starts successfully
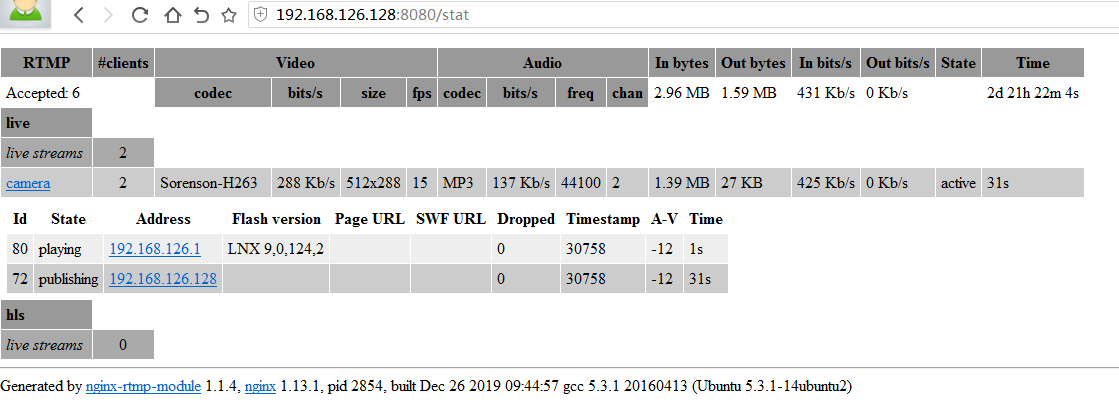
11. You can see the listening status of the port through the netstat -ltn command
activation Internet Connect (Server only)
Proto Recv-Q Send-Q Local Address           Foreign Address         State
tcp        0      0 0.0.0.0:1935            0.0.0.0:*               LISTEN
tcp        0      0 0.0.0.0:80              0.0.0.0:*               LISTEN
tcp        0      0 127.0.1.1:53            0.0.0.0:*               LISTEN
tcp        0      0 127.0.0.1:631           0.0.0.0:*               LISTEN
tcp6       0      0 ::1:631                 :::*                    LISTEN
80 is the default http listening port of nginx.
The principle of nginx cooperating with ffmpeg as streaming media server is: nginx provides rtmp service through rtmp module, ffmpeg pushes an rtmp stream to nginx, and then the client accesses nginx to watch real-time video stream. HLS is the same principle, but the client accesses it through HTTP protocol, but ffmpeg push stream is still rtmp

