There are many sub-systems in the distributed system, and these sub-systems are deployed in different servers, so it is impossible to use the traditional session mode, we need to use the related single sign on technology to solve it
1. What is single sign on
Single Sign On, or SSO for short, is one of the more popular solutions for enterprise business integration. SSO is defined as that in multiple application systems, users only need to log in once to access all mutually trusted application systems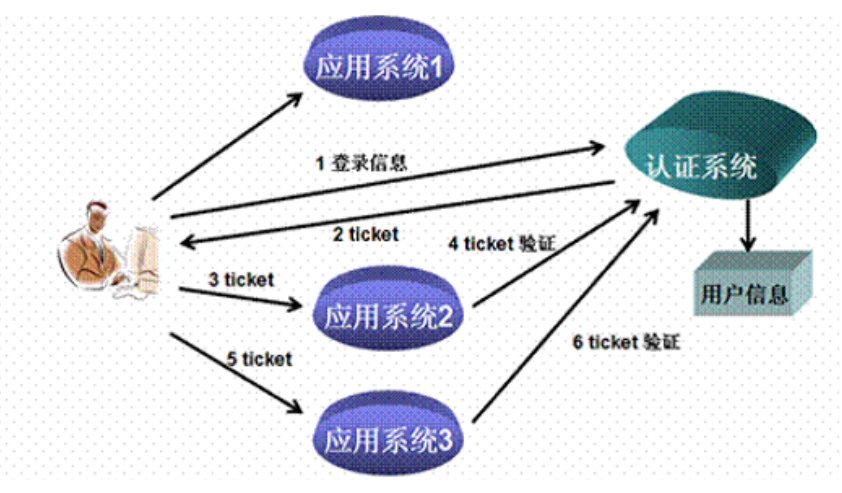
2. What is CAS
CAS is an open source project initiated by Yale University, aiming to provide a reliable single sign on method for Web application system. CAS officially became a JA-SIG project in December 2004
CAS has the following characteristics:
- Open source enterprise single sign on solution
- CAS Server is a Web application requiring independent deployment
- CAS Client supports many clients (in this case, all Web applications in single sign on system), including Java,. Net, PHP, Perl, Apache, uportal, ruby, etc
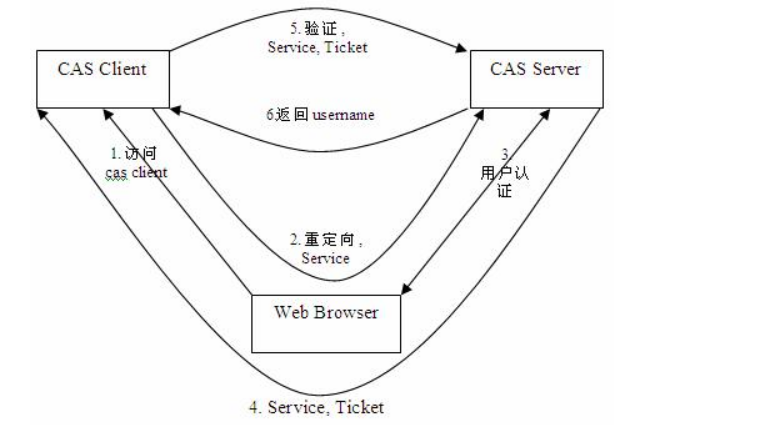
In terms of structure, CAS consists of two parts: CAS Server and CAS Client. CAS Server needs to be deployed independently and is mainly responsible for user authentication. CAS Client is responsible for processing access requests to client protected resources. When it needs to log in, it is redirected to CAS Server. The following figure is the basic protocol process of CAS
SSO single sign on access process mainly includes the following steps:
- Access service: SSO clients send requests to access the service resources provided by the application system
- Directed authentication: SSO clients redirect user requests to SSO servers
- User authentication: user identity authentication
- Issue Bill: SSO server will generate a random Service Ticket
- Verify Bill: SSO server verifies the validity of bill Service Ticket. After verification, clients are allowed to access the service
- Transfer user information: after the SSO server verifies that the bill passes, it transfers the user authentication result information to the client
3. CAS single point login Demo - the first system
-
First, Maven project CAS ﹣ Demo1 client system
-
Add a dependency in the CAS ABCD Demo1 POM file, and change the packaging mode of this project to war package
<packaging>war</packaging>

    <dependencies>
        <!-- cas -->
        <dependency>
            <groupId>org.jasig.cas.client</groupId>
            <artifactId>cas-client-core</artifactId>
            <version>3.3.3</version>
        </dependency>

        <dependency>
            <groupId>javax.servlet</groupId>
            <artifactId>servlet-api</artifactId>
            <version>2.5</version>
            <scope>provided</scope>
        </dependency>
    </dependencies>

    <build>
        <plugins>
            <plugin>
                <groupId>org.apache.tomcat.maven</groupId>
                <artifactId>tomcat7-maven-plugin</artifactId>
                <version>2.2</version>
                <configuration>
                    <port>9001</port>
                    <path>/</path>
                </configuration>

            </plugin>
        </plugins>
    </build>
- The web.xml configuration file adds the following
<?xml version="1.0" encoding="UTF-8"?>
<web-app xmlns:xsi="http://www.w3.org/2001/XMLSchema-instance"
         xmlns="http://java.sun.com/xml/ns/javaee"
         xsi:schemaLocation="http://java.sun.com/xml/ns/javaee http://java.sun.com/xml/ns/javaee/web-app_2_5.xsd"
         version="2.5">
    <!-- For single point exit, the filter is used to realize single point exit function, optional configuration -->
    <listener>
        <listener-class>org.jasig.cas.client.session.SingleSignOutHttpSessionListener</listener-class>
    </listener>
    <!-- This filter is used to realize the function of single sign out, with optional configuration. -->
    <filter>
        <filter-name>CAS Single Sign Out Filter</filter-name>
        <filter-class>org.jasig.cas.client.session.SingleSignOutFilter</filter-class>
    </filter>
    <filter-mapping>
        <filter-name>CAS Single Sign Out Filter</filter-name>
        <url-pattern>/*</url-pattern>
    </filter-mapping>
    <!-- The filter is responsible for user authentication and must be enabled -->
    <filter>
        <filter-name>CASFilter</filter-name>       <filter-class>org.jasig.cas.client.authentication.AuthenticationFilter</filter-class>
        <init-param>
            <param-name>casServerLoginUrl</param-name>
            <!-- Fill in your own here cas Server login address-->
            <param-value>http://192.168.25.120:9000/cas/login</param-value>
        </init-param>
        <init-param>
            <param-name>serverName</param-name>
            <!--There server It's server-side IP+Port number here is 9001 -->
            <param-value>http://localhost:9001</param-value>
        </init-param>
        <!-- First access the local server address,If you are not logged in, go to the above cas Login service realizes login-->
    </filter>
    <filter-mapping>
        <filter-name>CASFilter</filter-name>
        <url-pattern>/*</url-pattern>
    </filter-mapping>
    <!-- This filter is responsible for Ticket Must be enabled -->
    <filter>
        <filter-name>CAS Validation Filter</filter-name>
        <filter-class>     org.jasig.cas.client.validation.Cas20ProxyReceivingTicketValidationFilter</filter-class>
        <init-param>
            <param-name>casServerUrlPrefix</param-name>
            <param-value>http://192.168.25.120:9000/cas</param-value>
        </init-param>
        <init-param>
            <param-name>serverName</param-name>
            <param-value>http://localhost:9001</param-value>
        </init-param>
    </filter>

    <filter-mapping>
        <filter-name>CAS Validation Filter</filter-name>
        <url-pattern>/*</url-pattern>
    </filter-mapping>
    <!-- This filter is responsible for implementation HttpServletRequest Requested packages, such as allowing developers to pass HttpServletRequest Of getRemoteUser()Method acquisition SSO Login name of the login user, optional configuration. -->
    <filter>
        <filter-name>CAS HttpServletRequest Wrapper Filter</filter-name>
        <filter-class>
            org.jasig.cas.client.util.HttpServletRequestWrapperFilter</filter-class>
    </filter>
    <filter-mapping>
        <filter-name>CAS HttpServletRequest Wrapper Filter</filter-name>
        <url-pattern>/*</url-pattern>
    </filter-mapping>
    <!-- This filter allows developers to use org.jasig.cas.client.util.AssertionHolder To get the user's login name. such as AssertionHolder.getAssertion().getPrincipal().getName().  -->
    <filter>
        <filter-name>CAS Assertion Thread Local Filter</filter-name>       <filter-class>org.jasig.cas.client.util.AssertionThreadLocalFilter</filter-class>
    </filter>
    <filter-mapping>
        <filter-name>CAS Assertion Thread Local Filter</filter-name>
        <url-pattern>/*</url-pattern>
    </filter-mapping>
</web-app>
- Create index.jsp to write code
<%--
  Created by IntelliJ IDEA.
  User: jinsa
  Date: 2020/2/7
  Time: 13:58
  To change this template use File | Settings | File Templates.
--%>
<%@ page contentType="text/html;charset=UTF-8" language="java" %>
<html>
<head>
    <title>Welcome to single sign on CAS--ONE</title>
</head>
<body>
<h1>Welcome :  <%=request.getRemoteUser()%> Visit single point login system--ONE ONE</h1>
</body>
</html>
4. CAS single point login Demo - the second system
- Create CAS ﹣ demo2 system
- Just copy the coordinate dependency and change the local boot port
- Copy the webapp folder and change the start port of the web.xml configuration file
- jsp files can be distinguished
<%--
  Created by IntelliJ IDEA.
  User: jinsa
  Date: 2020/2/7
  Time: 13:58
  To change this template use File | Settings | File Templates.
--%>
<%@ page contentType="text/html;charset=UTF-8" language="java" %>
<html>
<head>
    <title>Welcome to single sign on CAS--TWO</title>
</head>
<body>
<h1>Welcome :  <%=request.getRemoteUser()%> Visit single point login system--TWO TWO</h1>
</body>
</html>
5. Test success
- Start both services and visit the local system: http://localhost:9001
- No login, so jump to CAS login system, enter user name and password here and access demo1 system

- Next, when accessing the second system 9002, you should not need to log in

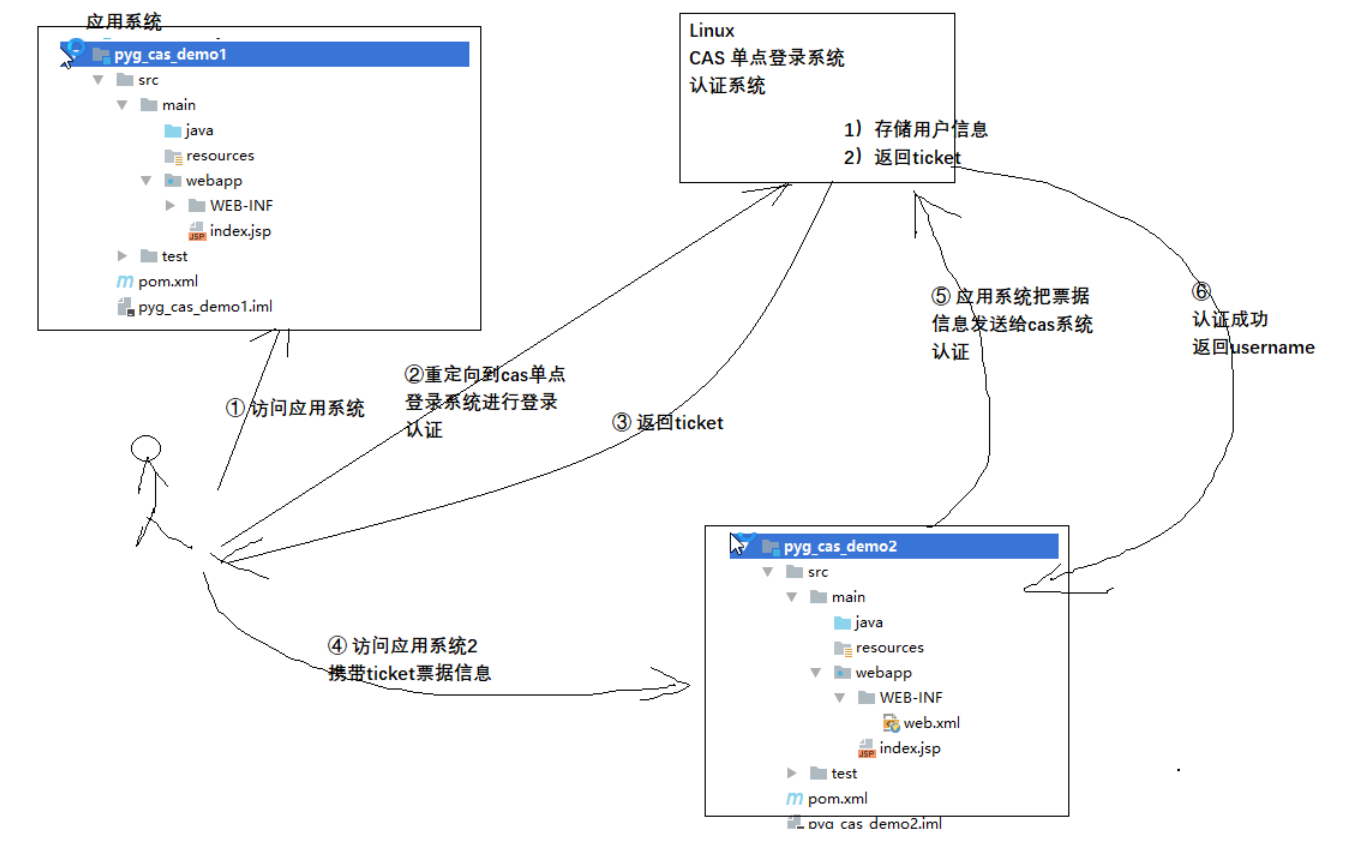
- Access flow chart
6. Single point exit
- Just access the server address + cas start port / cas/logout to exit
- http://192.168.25.120:9000/cas/logout

7. Configure single point exit to jump to other pages
- Modify the configuration file cas-servlet.xml of cas/WEB-INF system

- After modification, the test code is written, and jsp is OK
<a href="http://192.168.25.120:9000/cas/logout?service=http://www.baidu.com">Single point exit</a>

- Click to successfully jump to Baidu, indicating successful configuration

8. Configure data source - query database user information at login
- Modify deployerConfigContext.xml under Web inf in cas server, and add the following configuration
<bean id="dataSource" class="com.mchange.v2.c3p0.ComboPooledDataSource"
			  p:driverClass="com.mysql.jdbc.Driver"
			  p:jdbcUrl="jdbc:mysql://localhost:3306 / your database name? characterEncoding=utf8“
			  p:user="root"
			  p:password="root" />
	<bean id="passwordEncoder"
	class="org.jasig.cas.authentication.handler.DefaultPasswordEncoder"
		c:encodingAlgorithm="MD5"
		p:characterEncoding="UTF-8" />
	<bean id="dbAuthHandler"
		  class="org.jasig.cas.adaptors.jdbc.QueryDatabaseAuthenticationHandler"
		  p:dataSource-ref="dataSource"
		  p:sql="select password from tb_user where username = ?"
		  p:passwordEncoder-ref="passwordEncoder"/>
- Modify the 64 line key ref in the configuration file to its own data source. Here is dbauthandler

- Add three jar packages under - cas/webapps/cas/WEB-INF/lib /, and restart

9. Replace CAS default login page
- Add your html page to
- /Home / pyg / Passport CAS / Tomcat CAS / webapps / CAS / WEB-INF / view / JSP / default / UI /
- And replace casLoginView.jsp with your own html page. Note that the name should be the same. You can back up the previous one
- Copy the css js image required by your own page to the directory under the cas root directory
9.1 change page content
- I have changed the html page to CAS login page. Take html as an example to add the following content to your page
<%@ page pageEncoding="UTF-8" %>
<%@ page contentType="text/html; charset=UTF-8" %>
<%@ taglib prefix="c" uri="http://java.sun.com/jsp/jstl/core" %>
<%@ taglib prefix="spring" uri="http://www.springframework.org/tags" %>
<%@ taglib prefix="form" uri="http://www.springframework.org/tags/form" %>
<%@ taglib prefix="fn" uri="http://java.sun.com/jsp/jstl/functions" %>
- Modify the form label in your html page to the previous default page label style with your own
# Default tag add your ownclassJust go
<form:form method="post" id="fm1" commandName="${commandName}" htmlEscape="true">

<form:errors path="*" id="msg" cssClass="errors" element="div" htmlEscape="false" />

# End tag  </form:form>
- Modify user name input box
# This is CAS default add your ownclass
<form:input cssClass="required" cssErrorClass="error" id="username" size="25" tabindex="1" accesskey="${userNameAccessKey}" path="username" autocomplete="off" htmlEscape="true" />
- Modify password box
# Ditto
<form:password cssClass="required" cssErrorClass="error" id="password" size="25" tabindex="2" path="password"  accesskey="${passwordAccessKey}" htmlEscape="true" autocomplete="off" />
- Modify login button
# The variable here is to change your own content by default class
<input type="hidden" name="lt" value="${loginTicket}" />
<input type="hidden" name="execution" value="${flowExecutionKey}" />
<input type="hidden" name="_eventId" value="submit" />
<input class="sui-btn btn-block btn-xlarge btn-danger" accesskey="l" value="Land" type="submit" />
- Restart the tomcat test, and my display is normal, which proves that the modification is successful
10. CAS and spring security integration
- pom file add dependency
<dependency>
	   <groupId>org.springframework.security</groupId>
	   <artifactId>spring-security-cas</artifactId>
	   <version>4.1.0.RELEASE</version>
</dependency>
<dependency>
        <groupId>org.jasig.cas.client</groupId>
        <artifactId>cas-client-core</artifactId>
        <version>3.3.3</version>
        <exclusions>
            <exclusion>
                <groupId>org.slf4j</groupId>
                <artifactId>log4j-over-slf4j</artifactId>
            </exclusion>
        </exclusions>
</dependency>
- Create the spring-security.xml configuration file
<?xml version="1.0" encoding="UTF-8"?>
<beans:beans
	xmlns="http://www.springframework.org/schema/security"
	xmlns:beans="http://www.springframework.org/schema/beans"
	xmlns:xsi="http://www.w3.org/2001/XMLSchema-instance"
	xsi:schemaLocation="http://www.springframework.org/schema/beans
						http://www.springframework.org/schema/beans/spring-beans.xsd
						http://www.springframework.org/schema/security
						http://www.springframework.org/schema/security/spring-security.xsd">
	<!-- The following pages are not blocked -->
	<http pattern="/register.html" security="none"></http>
	<http pattern="/css/**" security="none"></http>
	<http pattern="/img/**" security="none"></http>
	<http pattern="/js/**" security="none"></http>
	<http pattern="/plugins/**" security="none"></http>
	<http pattern="/data/**" security="none"></http>
	<http pattern="/user/register/**" security="none"></http>
	<http pattern="/user/sendSms/**" security="none"></http>

	<!-- integration CAS -->
	<!--   entry-point-ref  Entry point reference -->
	<http use-expressions="false" entry-point-ref="casProcessingFilterEntryPoint">
		<intercept-url pattern="/**" access="ROLE_USER"/>
		<csrf disabled="true"/>
		<!-- custom-filter Is a filter, position Indicates that the filter is placed in the specified position, before Before the specified position, after After the specified position  -->
		<custom-filter ref="casAuthenticationFilter"  position="CAS_FILTER" />
		<custom-filter ref="requestSingleLogoutFilter" before="LOGOUT_FILTER"/>
		<custom-filter ref="singleLogoutFilter" before="CAS_FILTER"/>
	</http>

	<!-- CAS Entry point start -->
	<beans:bean id="casProcessingFilterEntryPoint" class="org.springframework.security.cas.web.CasAuthenticationEntryPoint">
		<!-- Single sign on server login URL   The address here is changed to CAS Service address of-->
		<beans:property name="loginUrl" value="http://192.168.25.120:9000/cas/login"/>
		<beans:property name="serviceProperties" ref="serviceProperties"/>
	</beans:bean>
	<beans:bean id="serviceProperties" class="org.springframework.security.cas.ServiceProperties">
		<!--service Configure the root address of your project+/login/cas   -->
		<beans:property name="service" value="http://localhost:8086/login/cas"/>
	</beans:bean>
	<!-- CAS End of entry point -->

	<!-- Start of certified filter -->
	<beans:bean id="casAuthenticationFilter" class="org.springframework.security.cas.web.CasAuthenticationFilter">
		<beans:property name="authenticationManager" ref="authenticationManager"/>
	</beans:bean>
	<!-- Authentication manager -->
	<authentication-manager alias="authenticationManager">
		<authentication-provider  ref="casAuthenticationProvider">
		</authentication-provider>
	</authentication-manager>
	<!-- Certification provider -->
	<beans:bean id="casAuthenticationProvider"     class="org.springframework.security.cas.authentication.CasAuthenticationProvider">
		<beans:property name="authenticationUserDetailsService">
			<beans:bean class="org.springframework.security.core.userdetails.UserDetailsByNameServiceWrapper">
				<beans:constructor-arg ref="userDetailsService" />
			</beans:bean>
		</beans:property>
		<beans:property name="serviceProperties" ref="serviceProperties"/>
		<!-- ticketValidator Change the address here to CAS Service address of-->
		<beans:property name="ticketValidator">
			<beans:bean class="org.jasig.cas.client.validation.Cas20ServiceTicketValidator">
				<beans:constructor-arg index="0" value="http://192.168.25.120:9000/cas"/>
			</beans:bean>
		</beans:property>
		<beans:property name="key" value="an_id_for_this_auth_provider_only"/>
	</beans:bean>

	<!-- Authentication class defined by itself-->
	<beans:bean id="userDetailsService" class="Self definition"/>

	<!-- End of certified filter -->
	<!-- Single sign out start address here changed to CAS Service address of -->
	<beans:bean id="singleLogoutFilter" class="org.jasig.cas.client.session.SingleSignOutFilter"/>
	<beans:bean id="requestSingleLogoutFilter" class="org.springframework.security.web.authentication.logout.LogoutFilter">
		<beans:constructor-arg value="http://192.168.25.120:9000/cas/logout?service=http://192.168.25.120:9000/cas/login"/>
		<beans:constructor-arg>
			<beans:bean class="org.springframework.security.web.authentication.logout.SecurityContextLogoutHandler"/>
		</beans:constructor-arg>
		<beans:property name="filterProcessesUrl" value="/logout/cas"/>
	</beans:bean>
	<!-- Single sign out end -->
</beans:beans>
- Create authentication class
package com.pyg.user.service;

import org.springframework.security.core.GrantedAuthority;
import org.springframework.security.core.authority.SimpleGrantedAuthority;
import org.springframework.security.core.userdetails.User;
import org.springframework.security.core.userdetails.UserDetails;
import org.springframework.security.core.userdetails.UserDetailsService;
import org.springframework.security.core.userdetails.UsernameNotFoundException;

import java.util.ArrayList;
import java.util.List;

/**
 * @ Description
 * @ auther          Ningning xiaocute
 * @ create          2020-02-07 16:20
 */
public class UserDetailServiceImpl implements UserDetailsService {
    @Override
    public UserDetails loadUserByUsername(String username) throws UsernameNotFoundException {
        // The task of creating a collection encapsulation role permission query database has been completed by CAS
        List<GrantedAuthority> list = new ArrayList<>();
        list.add(new SimpleGrantedAuthority("ROLE_USER"));
        return new User(username,null,list);
    }
}

