pod is the smallest unit of k8s management
There are multiple containers in a pod and only one in a real production environment
Characteristic:
1. Minimum Deployment Unit
2. A collection of containers
3. A container in a Pod shares a network command space
4.Pod is transient
Pod container classification:
1:infrastructure container base container (transparent process, user-insensitive)
Maintain the entire Pod network space
Node node operation
`View the container's network`
[root@node1 ~]# cat /opt/kubernetes/cfg/kubelet
KUBELET_OPTS="--logtostderr=true \
--v=4 \
--hostname-override=192.168.18.148 \
--kubeconfig=/opt/kubernetes/cfg/kubelet.kubeconfig \
--bootstrap-kubeconfig=/opt/kubernetes/cfg/bootstrap.kubeconfig \
--config=/opt/kubernetes/cfg/kubelet.config \
--cert-dir=/opt/kubernetes/ssl \
--pod-infra-container-image=registry.cn-hangzhou.aliyuncs.com/google-containers/pause-amd64:3.0"    #Prompt network component mirror to download from Ali cloud

`Create each time Pod When it's created, and Pod Correspondingly, transparent to the user`
[root@node1 ~]# docker ps
CONTAINER ID        IMAGE                                                                 COMMAND                  CREATED             STATUS              PORTS               NAMES
......Omit multiple lines here
54d9e6ec3c02        registry.cn-hangzhou.aliyuncs.com/google-containers/pause-amd64:3.0   "/pause"
#Network components are automatically loaded into one component and provided
`Conclusion: When the basic container is created, it must create a network container.`
2:initcontainers initialization container
The pod will be created with the initcontainers being initialized. In older versions, there will be no distinction between before and after execution (the smaller the number of PID numbers, the higher the priority, the more it will be started first). As the cloud platform improves, the startup mode changes to host mode, the separated initialization containers will be loaded first, and the initialization containers will be loaded after they are loaded.Business containers will not function until they are finished
3:container Business container (Start in Parallel)
Official website: https://kubernetes.io/docs/concepts/workloads/pods/init-containers/
Example:
Init containers in use
This example defines a simple Pod that has two init containers. The first waits for myservice, and the second waits for mydb. Once both init containers complete, the Pod runs the app container from its spec section.
apiVersion: v1
kind: Pod
metadata:
  name: myapp-pod
  labels:
    app: myapp
spec:
  containers:
  - name: myapp-container
    image: busybox:1.28
    command: ['sh', '-c', 'echo The app is running! && sleep 3600']
  initContainers:
  - name: init-myservice
    image: busybox:1.28
    command: ['sh', '-c', 'until nslookup myservice; do echo waiting for myservice; sleep 2; done;']
  - name: init-mydb
    image: busybox:1.28
    command: ['sh', '-c', 'until nslookup mydb; do echo waiting for mydb; sleep 2; done;']
image PullPolicy
IfNotPresent: Default value to pull images when they do not exist on the host
Always: Each time a Pod is created, the mirror is pulled back
Never:Pod will never actively pull this image
Official website: https://kubernetes.io/docs/concepts/containers/images
Example:
Verify by creating a pod that uses a private image, e.g.:
kubectl apply -f - <<EOF
apiVersion: v1
kind: Pod
metadata:
  name: private-image-test-1
spec:
  containers:
    - name: uses-private-image
      image: $PRIVATE_IMAGE_NAME
      imagePullPolicy: Always
      command: [ "echo", "SUCCESS" ]
EOF
Operation on master 1
[root@master1 ~]# kubectl get pods
NAME                                READY   STATUS    RESTARTS   AGE
my-nginx-d55b94fd-kc2gl             1/1     Running   0          40h
my-nginx-d55b94fd-tkr42             1/1     Running   0          40h
nginx-6c94d899fd-8pf48              1/1     Running   0          2d15h
nginx-deployment-5477945587-f5dsm   1/1     Running   0          2d14h
nginx-deployment-5477945587-hmgd2   1/1     Running   0          2d14h
nginx-deployment-5477945587-pl2hn   1/1     Running   0          2d14h

[root@master1 ~]# kubectl edit deployment/my-nginx
......Omit multiple lines here
    spec:
      containers:
      - image: nginx:1.15.4
        imagePullPolicy: IfNotPresent
        name: nginx
        ports:
        - containerPort: 80
          protocol: TCP
        resources: {}
        terminationMessagePath: /dev/termination-log
        terminationMessagePolicy: File
      dnsPolicy: ClusterFirst
      restartPolicy: Always
      schedulerName: default-scheduler
      securityContext: {}
      terminationGracePeriodSeconds: 30

[root@master1 ~]# cd demo/
[root@master1 demo]# vim pod1.yaml
apiVersion: v1
kind: Pod
metadata:
  name: mypod
spec:
  containers:
    - name: nginx
      image: nginx
      imagePullPolicy: Always
      command: [ "echo", "SUCCESS" ]
[root@master1 demo]# kubectl create -f pod1.yaml    #Create
pod/mypod created
A status prompt will appear that CrashLoopBackOff was created and then closed
`The reason for the failure is due to a command start conflict`
apiVersion: v1
kind: Pod
metadata:
  name: mypod
spec:
  containers:
    - name: nginx
      image: nginx:1.14     #Also change version nginx:1.14
      imagePullPolicy: Always
#Delete command from last line: ['echo','SUCCESS'] statement

`Delete old resources`
[root@master1 demo]# kubectl delete -f pod1.yaml
pod "mypod" deleted

`Update Resources`
[root@master1 demo]# kubectl apply -f pod1.yaml
pod/mypod created
[root@master1 demo]# kubectl get pods
NAME                                READY   STATUS    RESTARTS   AGE
mypod                               1/1     Running   0          3m26s

`View Assignment Nodes`
[root@master1 demo]# kubectl get pods -o wide
NAME          READY   STATUS    RESTARTS   AGE     IP            NODE           NOMINATED NODE
mypod         1/1     Running   0          4m45s   172.17.40.5   192.168.18.145   <none>
#At this point, section 172.17.40.5 corresponds to the 192.168.18.145 address of the node2 node

`reach node2 To see if the specified application is deployed to the specified node`
[root@node2 ~]# curl -I 172.17.40.5
HTTP/1.1 200 OK
Server: nginx/1.14.2
Date: Sat, 15 Feb 2020 04:11:53 GMT
Content-Type: text/html
Content-Length: 612
Last-Modified: Tue, 04 Dec 2018 14:44:49 GMT
Connection: keep-alive
ETag: "5c0692e1-264"
Accept-Ranges: bytes
Build Harbor Private Warehouse
Start a new virtual machine at this time: CentOS 7-2 192.168.18.134 (network card can be set to static IP)
`deploy docker engine`
[root@harbor ~]# yum install yum-utils device-mapper-persistent-data lvm2 -y
[root@harbor ~]# yum-config-manager --add-repo https://mirrors.aliyun.com/docker-ce/linux/centos/docker-ce.repo
[root@harbor ~]# yum install -y docker-ce
[root@harbor ~]# systemctl stop firewalld.service
[root@harbor ~]# setenforce 0
[root@harbor ~]# systemctl start docker.service
[root@harbor ~]# systemctl enable docker.service
`Check related process openings`
[root@harbor ~]# ps aux | grep docker
root 4913 0.8 3.6 565612 68884 ? Ssl 12:23 0:00 /usr/bin/dockerd -H fd:// --containerd=/run/containerd/containerd.sock
root 5095 0.0 0.0 112676 984 pts/1 R+ 12:23 0:00 grep --color=auto docker
`Mirror Acceleration Service`
[root@harbor ~]# tee /etc/docker/daemon.json <<-'EOF'
{
"registry-mirrors": ["https://w1ogxqvl.mirror.aliyuncs.com"]
}
EOF
[root@harbor ~]# systemctl daemon-reload
[root@harbor ~]# systemctl restart docker
`Network optimization section`
[root@harbor ~]# echo 'net.ipv4.ip_forward=1' >> /etc/sysctl.conf
[root@harbor ~]# service network restart
Restarting network (via systemctl): [ Determine ]
[root@harbor ~]# systemctl restart docker
----------
[root@harbor ~]# mkdir /aaa
[root@harbor ~]# mount.cifs //192.168.0.105/rpm /aaa
Password for root@//192.168.0.105/rpm:
[root@harbor ~]# cd /aaa/docker/
[root@harbor docker]# cp docker-compose /usr/local/bin/
[root@harbor docker]# cd /usr/local/bin/
[root@harbor bin]# ls
docker-compose
[root@harbor bin]# docker-compose -v
docker-compose version 1.21.1, build 5a3f1a3
[root@harbor bin]# cd /aaa/docker/
[root@harbor docker]# tar zxvf harbor-offline-installer-v1.2.2.tgz -C /usr/local/
[root@harbor docker]# cd /usr/local/harbor/
[root@harbor harbor]# ls
common docker-compose.yml harbor.v1.2.2.tar.gz NOTICE
docker-compose.clair.yml harbor_1_1_0_template install.sh prepare
docker-compose.notary.yml harbor.cfg LICENSE upgrade
`To configure Harbor Parameter file`
[root@harbor harbor]# vim harbor.cfg
5 hostname = 192.168.18.134 #Change 5 lines to your local IP address
59 harbor_admin_password = Harbor12345 #Do not forget the default account and password for this behavior. Use
#Press Esc to exit insert mode after modification is completed, enter: wq save to exit
[root@harbor harbor]# ./install.sh
......Omit multiple lines here
Creating harbor-log ... done
Creating harbor-adminserver ... done
Creating harbor-db ... done
Creating registry ... done
Creating harbor-ui ... done
Creating nginx ... done
Creating harbor-jobservice ... done
✔ ----Harbor has been installed and started successfully.----
Now you should be able to visit the admin portal at http://192.168.18.134.
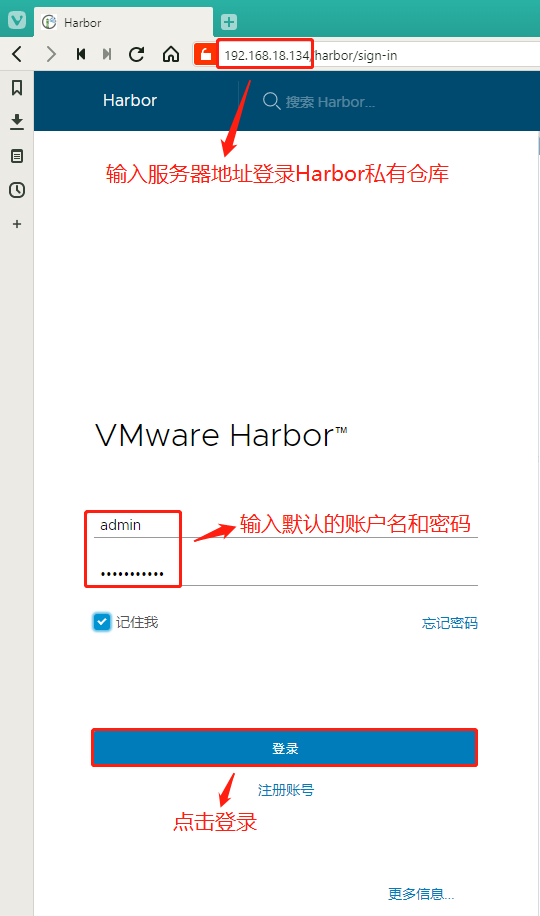
For more details, please visit https://github.com/vmware/harbor .Step 1: Log in to the Harbor private warehouse
In the host browser address bar, enter: 192.168.18.134, enter the default account admin, password Harbor12345, you can click to login
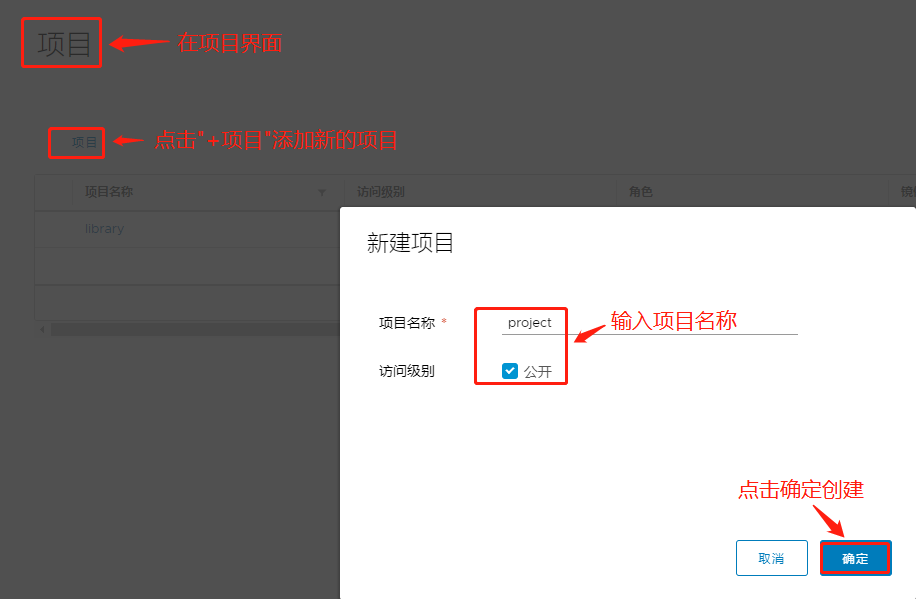
Step 2: Create a new project and make it private
In the project interface, click'+Project'to add a new project, enter the project name, click Create, and then click the three dots on the left side of the new project to make the project private

Two node nodes are configured to connect to the private repository (note the comma that follows to add)
`node2 node`
[root@node2 ~]# vim /etc/docker/daemon.json
{
  "registry-mirrors": ["https://w1ogxqvl.mirror.aliyuncs.com "], #at the end,
  "insecure-registries":["192.168.18.134"]                          #Add this line
}
[root@node2 ~]# systemctl restart docker

`node2 node`
[root@node1 ~]# vim /etc/docker/daemon.json
{
  "registry-mirrors": ["https://w1ogxqvl.mirror.aliyuncs.com "], #at the end,
  "insecure-registries":["192.168.18.134"]                          #Add this line
}
[root@node1 ~]# systemctl restart docker
Step 3: Log in to the harbor private repository on the node
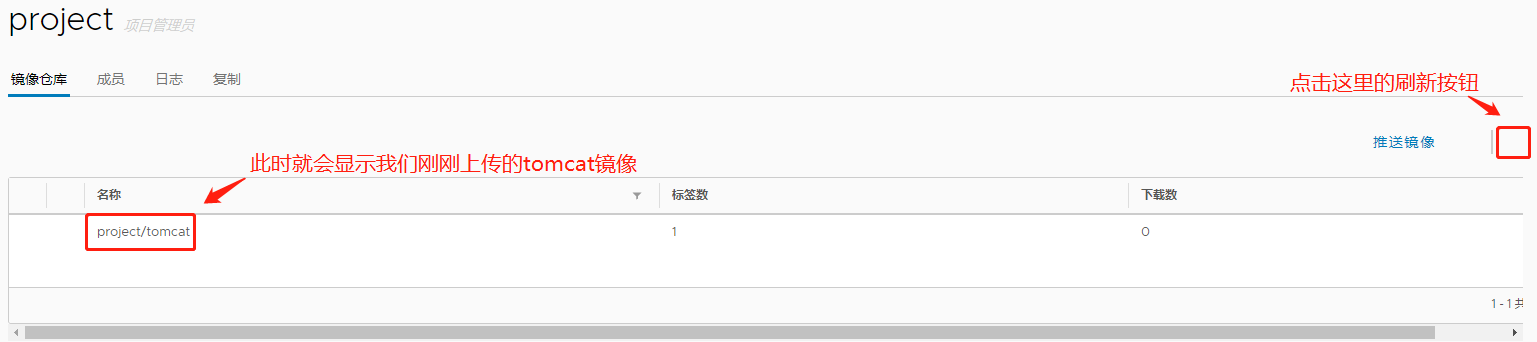
`node2 Node:`
[root@node2 ~]# docker login 192.168.18.134
Username: admin     #Enter account admin
Password:           #Enter password: Harbor12345
WARNING! Your password will be stored unencrypted in /root/.docker/config.json.
Configure a credential helper to remove this warning. See
https://docs.docker.com/engine/reference/commandline/login/#credentials-store
Login Succeeded     #Sign in successfully at this time

`download tomcat Mirror and label push:``
[root@node2 ~]# docker pull tomcat
......Omit multiple lines here
Status: Downloaded newer image for tomcat:latest
docker.io/library/tomcat:latest
[root@node2 ~]# docker images
REPOSITORY                                                        TAG                 IMAGE ID            CREATED             SIZE
tomcat                                                            latest              aeea3708743f        3 days ago          529MB
[root@node2 ~]# docker tag tomcat 192.168.18.134/project/tomcat     #Labeling process
[root@node2 ~]# docker push 192.168.18.134/project/tomcat           #Upload Mirror
The pushed tomcat image is now visible on the harbor private interface
Problem: If we want to use another node, node1, to retrieve the tomcar image from the private compartment, an error will occur indicating that it is rejected (i.e., that it needs to be logged on)
[root@node1 ~]# docker pull 192.168.18.134/project/tomcat
Using default tag: latest
Error response from daemon: pull access denied for 192.168.18.134/project/tomcat, repository does not exist or may require 'docker login': denied: requested access to the resource is denied       #Error prompted, missing warehouse credentials

`node1 Node Download tomcat image`
[root@node1 ~]# docker pull tomcat:8.0.52
[root@node1 ~]# docker images
REPOSITORY                                                        TAG                 IMAGE ID            CREATED             SIZE
tomcat                                                            8.0.52              b4b762737ed4        19 months ago       356MB
Step 4: Operation on master 1
[root@master1 demo]# vim tomcat01.yaml
apiVersion: extensions/v1beta1
kind: Deployment
metadata:
  name: my-tomcat
spec:
  replicas: 2
  template:
    metadata:
      labels:
        app: my-tomcat
    spec:
      containers:
      - name: my-tomcat
        image: docker.io/tomcat:8.0.52
        ports:
        - containerPort: 80
---
apiVersion: v1
kind: Service
metadata:
  name: my-tomcat
spec:
  type: NodePort
  ports:
  - port: 8080
    targetPort: 8080
  selector:
    app: my-tomcat

`Establish`
[root@master1 demo]# kubectl create -f tomcat01.yaml
deployment.extensions/my-tomcat created
service/my-tomcat created
`View Resources`
[root@master1 demo]# kubectl get pods,deploy,svc
NAME                                    READY   STATUS    RESTARTS   AGE
pod/my-nginx-d55b94fd-kc2gl             1/1     Running   1          2d
pod/my-nginx-d55b94fd-tkr42             1/1     Running   1          2d
`pod/my-tomcat-57667b9d9-8bkns`         1/1     Running   0          84s
`pod/my-tomcat-57667b9d9-kcddv`         1/1     Running   0          84s
pod/mypod                               1/1     Running   1          8h
pod/nginx-6c94d899fd-8pf48              1/1     Running   1          3d
pod/nginx-deployment-5477945587-f5dsm   1/1     Running   1          2d23h
pod/nginx-deployment-5477945587-hmgd2   1/1     Running   1          2d23h
pod/nginx-deployment-5477945587-pl2hn   1/1     Running   1          2d23h

NAME                                     DESIRED   CURRENT   UP-TO-DATE   AVAILABLE   AGE
deployment.extensions/my-nginx           2         2         2            2           2d
`deployment.extensions/my-tomcat`        2         2         2            2           84s
deployment.extensions/nginx              1         1         1            1           8d
deployment.extensions/nginx-deployment   3         3         3            3           2d23h

NAME                       TYPE        CLUSTER-IP   EXTERNAL-IP   PORT(S)          AGE
service/kubernetes         ClusterIP   10.0.0.1     <none>        443/TCP          10d
service/my-nginx-service   NodePort    10.0.0.210   <none>        80:40377/TCP     2d
`service/my-tomcat          NodePort    10.0.0.86    <none>        8080:41860/TCP   84s`
service/nginx-service      NodePort    10.0.0.242   <none>        80:40422/TCP     3d10h
#Internal port 8080, external port 41860

[root@master1 demo]# kubectl get ep
NAME               ENDPOINTS                                 AGE
kubernetes         192.168.18.128:6443,192.168.18.132:6443   10d
my-nginx-service   172.17.32.4:80,172.17.40.3:80             2d
`my-tomcat          172.17.32.6:8080,172.17.40.6:8080         5m29s`
nginx-service      172.17.40.5:80                            3d10h
#my-tomcat is now assigned to the next two nodes
Verify: Enter 192.168.18.148:41860 and 192.168.18.145:41860 node addresses plus exposed port numbers in the host browser to see if the tomcat home page can be accessed
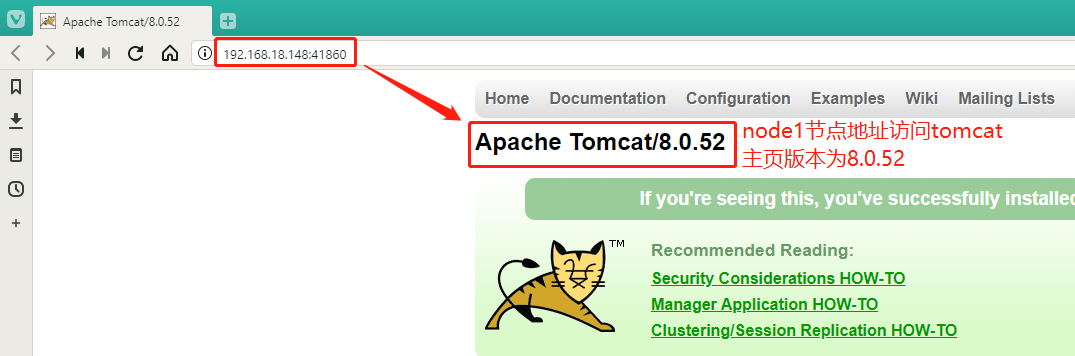
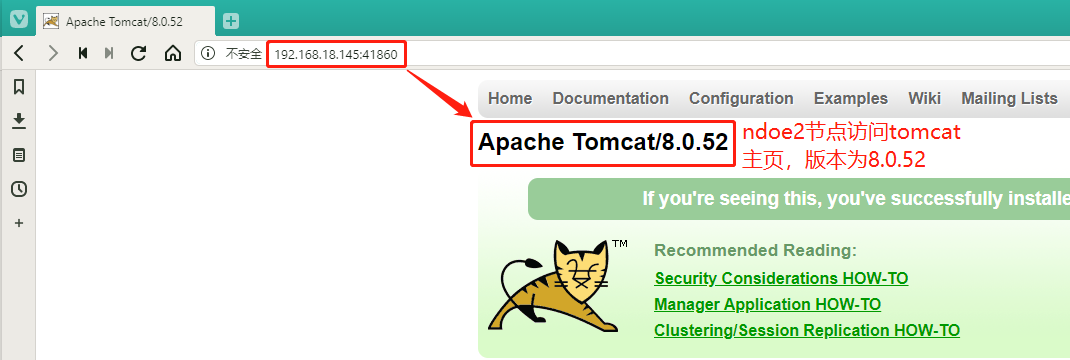
`After verifying that the access is successful, we delete the resource and create it later using a mirror in the private repository`
[root@master1 demo]# kubectl delete -f tomcat01.yaml
deployment.extensions "my-tomcat" deleted
service "my-tomcat" deleted
Problem handling:
`If you encounter a Terminating Status Undeletable Resources`
[root@localhost demo]# kubectl get pods
NAME                              READY   STATUS        RESTARTS   AGE
my-tomcat-57667b9d9-8bkns         1/1     `Terminating`   0          84s
my-tomcat-57667b9d9-kcddv         1/1     `Terminating`   0          84s

#In this case, you can use the Force Delete command
`Format: kubectl delete pod [pod name] --force --grace-period=0 -n [namespace]`

[root@localhost demo]# kubectl delete pod my-tomcat-57667b9d9-8bkns --force --grace-period=0 -n default
warning: Immediate deletion does not wait for confirmation that the running resource has been terminated. The resource may continue to run on the cluster indefinitely.
pod "my-tomcat-57667b9d9-8bkns" force deleted

[root@localhost demo]# kubectl delete pod my-tomcat-57667b9d9-kcddv --force --grace-period=0 -n default
warning: Immediate deletion does not wait for confirmation that the running resource has been terminated. The resource may continue to run on the cluster indefinitely.
pod "my-tomcat-57667b9d9-kcddv" force deleted

[root@localhost demo]# kubectl get pods
NAME                              READY   STATUS    RESTARTS   AGE
pod/mypod                               1/1     Running   1          8h
pod/nginx-6c94d899fd-8pf48              1/1     Running   1          3d
pod/nginx-deployment-5477945587-f5dsm   1/1     Running   1          2d23h
pod/nginx-deployment-5477945587-hmgd2   1/1     Running   1          2d23h
pod/nginx-deployment-5477945587-pl2hn   1/1     Running   1          2d23h
Step 5: Operation on node1 (previously logged on to the Harbor repository node)
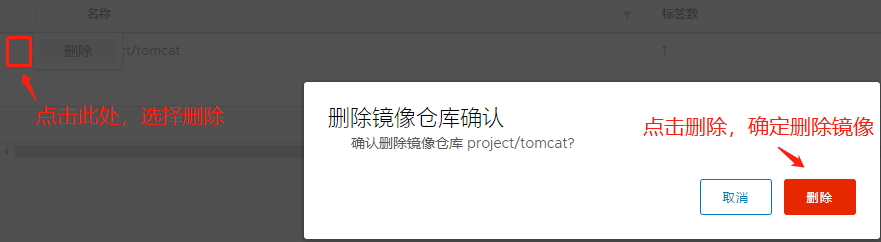
We need to delete the project/tomcat image we previously uploaded to the private repository
The previously labeled image in node2 also needs to be removed:
[root@node2 ~]# docker images
REPOSITORY                                                        TAG                 IMAGE ID            CREATED             SIZE
192.168.18.134/project/tomcat                                     latest              aeea3708743f        3 days ago          529MB

[root@node2 ~]# docker rmi 192.168.18.134/project/tomcat
Untagged: 192.168.18.134/project/tomcat:latest
Untagged: 192.168.18.134/project/tomcat@sha256:8ffa1b72bf611ac305523ed5bd6329afd051c7211fbe5f0b5c46ea5fb1adba46
`Mirror Labeling`
[root@node2 ~]# docker tag tomcat:8.0.52 192.168.18.134/project/tomcat
`Upload mirror to Harbor`
[root@node2 ~]# docker push 192.168.18.134/project/tomcat
#Now we can see the newly uploaded image in the private repository

`View login credentials`
[root@node2 ~]# cat .docker/config.json
{
        "auths": {
                "192.168.18.134": {     #Accessed IP Address
                        "auth": "YWRtaW46SGFyYm9yMTIzNDU="      #Verification
                }
        },
        "HttpHeaders": {                #Header Information
                "User-Agent": "Docker-Client/19.03.5 (linux)"
        }
`Generate validation codes in non-newline format`
[root@node2 ~]# cat .docker/config.json | base64 -w 0
ewoJImF1dGhzIjogewoJCSIxOTIuMTY4LjE4LjEzNCI6IHsKCQkJImF1dGgiOiAiWVdSdGFXNDZTR0Z5WW05eU1USXpORFU9IgoJCX0KCX0sCgkiSHR0cEhlYWRlcnMiOiB7CgkJIlVzZXItQWdlbnQiOiAiRG9ja2VyLUNsaWVudC8xOS4wMy41IChsaW51eCkiCgl9Cn0=
Special note: at this time the number of downloads is 0, we will use the mirror in the private warehouse to create resources later, then the process of pulling will certainly download the mirror, the value should change
Step 6: Create a yaml file for security components in master 1
[root@master1 demo]# vim registry-pull-secret.yaml
apiVersion: v1
kind: Secret
metadata:
  name: registry-pull-secret
data:
  .dockerconfigjson: ewoJImF1dGhzIjogewoJCSIxOTIuMTY4LjE4LjEzNCI6IHsKCQkJImF1dGgiOiAiWVdSdGFXNDZTR0Z5WW05eU1USXpORFU9IgoJCX0KCX0sCgkiSHR0cEhlYWRlcnMiOiB7CgkJIlVzZXItQWdlbnQiOiAiRG9ja2VyLUNsaWVudC8xOS4wMy41IChsaW51eCkiCgl9Cn0=
type: kubernetes.io/dockerconfigjson

`Establish secret Resources`
[root@master1 demo]# kubectl create -f registry-pull-secret.yaml
secret/registry-pull-secret created
`See secret Resources`
[root@master1 demo]# kubectl get secret
NAME                   TYPE                                  DATA   AGE
default-token-pbr9p    kubernetes.io/service-account-token   3      10d
`registry-pull-secret   kubernetes.io/dockerconfigjson        1      25s`

[root@master1 demo]# vim tomcat01.yaml
apiVersion: extensions/v1beta1
kind: Deployment
metadata:
  name: my-tomcat
spec:
  replicas: 2
  template:
    metadata:
      labels:
        app: my-tomcat
    spec:
      imagePullSecrets:             #Credentials for Certificate Retrieval
      - name: registry-pull-secret  #Name
      containers:
      - name: my-tomcat
        image: 192.168.18.134/project/tomcat    #Make this change to the download location of the mirror
        ports:
        - containerPort: 80
......Omit multiple lines below
#Press Esc to exit insert mode after modification is completed, enter: wq save to exit
`Establish tomcat01 Resources`
[root@master1 demo]# kubectl create -f tomcat01.yaml
deployment.extensions/my-tomcat created
service/my-tomcat created

[root@master1 demo]# kubectl get pods,deploy,svc,ep
NAME                                    READY   STATUS    RESTARTS   AGE
pod/my-nginx-d55b94fd-kc2gl             1/1     Running   1          2d1h
pod/my-nginx-d55b94fd-tkr42             1/1     Running   1          2d1h
`pod/my-tomcat-7c5b6db486-bzjlv`        1/1     Running   0          56s
`pod/my-tomcat-7c5b6db486-kw8m4`        1/1     Running   0          56s
pod/mypod                               1/1     Running   1          9h
pod/nginx-6c94d899fd-8pf48              1/1     Running   1          3d1h
pod/nginx-deployment-5477945587-f5dsm   1/1     Running   1          3d
pod/nginx-deployment-5477945587-hmgd2   1/1     Running   1          3d
pod/nginx-deployment-5477945587-pl2hn   1/1     Running   1          3d

NAME                                     DESIRED   CURRENT   UP-TO-DATE   AVAILABLE   AGE
deployment.extensions/my-nginx           2         2         2            2          2d1h
`deployment.extensions/my-tomcat`        2         2         2            2           56s
deployment.extensions/nginx              1         1         1            1           8d
deployment.extensions/nginx-deployment   3         3         3            3           3d

NAME                       TYPE        CLUSTER-IP   EXTERNAL-IP   PORT(S)          AGE
service/kubernetes         ClusterIP   10.0.0.1     <none>        443/TCP          10d
service/my-nginx-service   NodePort    10.0.0.210   <none>        80:40377/TCP     2d1h
`service/my-tomcat`        NodePort    10.0.0.235   <none>        8080:43654/TCP   56s
service/nginx-service      NodePort    10.0.0.242   <none>        80:40422/TCP     3d11h
#Outside port 43654
NAME                         ENDPOINTS                                 AGE
endpoints/kubernetes         192.168.18.128:6443,192.168.18.132:6443   10d
endpoints/my-nginx-service   172.17.32.4:80,172.17.40.3:80             2d1h
`endpoints/my-tomcat`        172.17.32.6:8080,172.17.40.6:8080         56s
endpoints/nginx-service      172.17.40.5:80                            3d11h
Next, what we need to verify is whether the mirrored resource comes from our Harbor private repository without any problems loading the resource?
Here's how many downloads are mirrored in our private repository

Result: The number of downloads displayed changed from 0 to 2, which means that the two resource images we created were downloaded from the private repository!
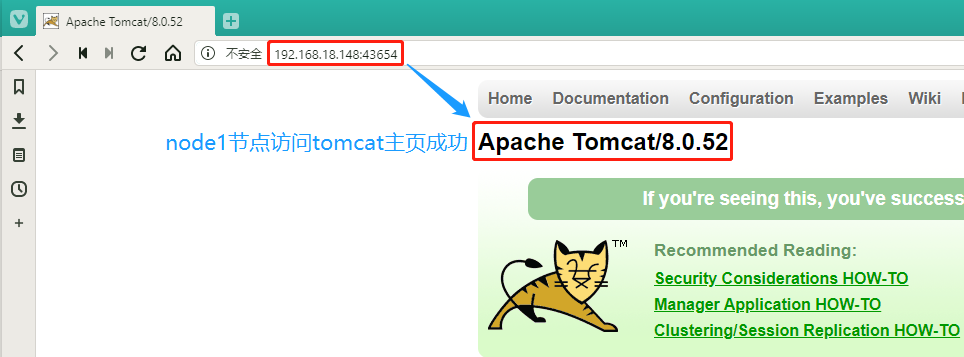
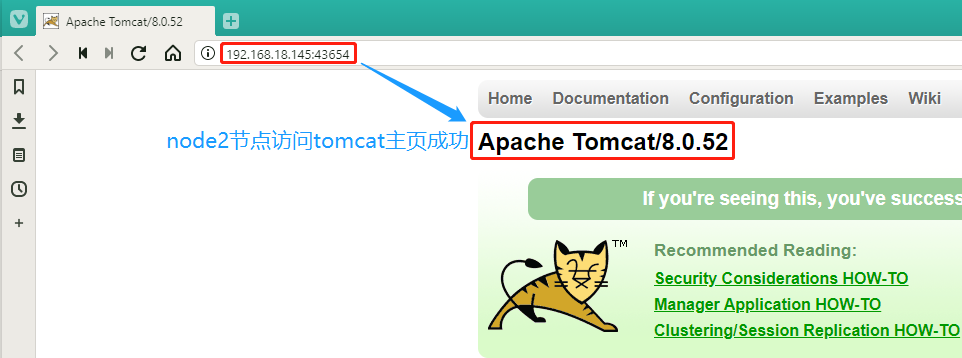
We then use the host's browser to verify that the two node addresses 192.168.18.148:43654 and 192.168.18.145:43654 still have access to the tomcat home page.