Note: I've built this several times recently. Take notes this time so that I don't forget. It won't be so troublesome next time
1, FastDFS introduction
FastDFS open source address: https://github.com/happyfish100
Set up FastDFS cluster: https://blog.csdn.net/u012453843/article/details/68957209
Reference resources: https://www.cnblogs.com/chiangchou/p/fastdfs.html#_label1_1
1, introduction
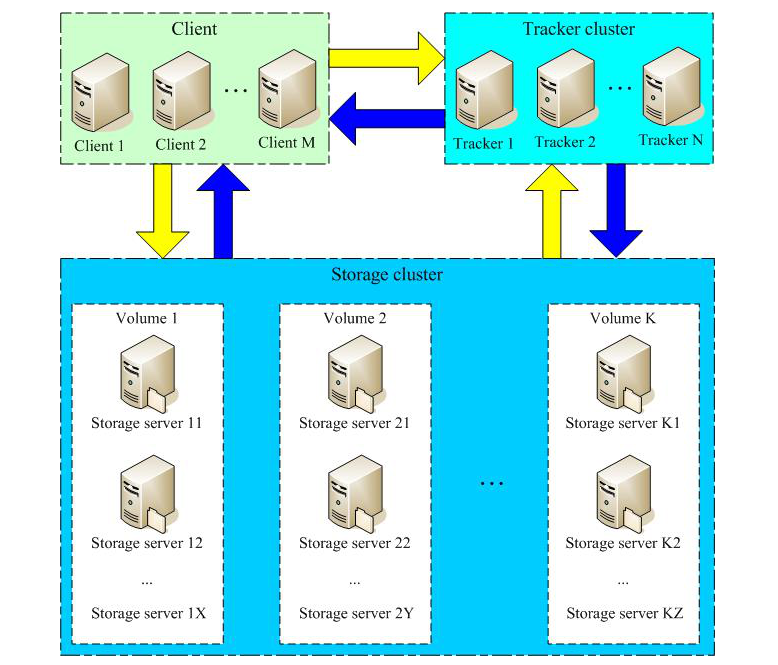
FastDFS is an open source high performance distributed file system (DFS). Its main functions include: file storage, file synchronization and file access, as well as high capacity and load balancing. It mainly solves the problem of massive data storage, especially suitable for online services with small and medium-sized files (recommended range: 4KB < file_size < 500MB). The FastDFS system has three roles: tracker server, storage server, and client.
Tracker Server: tracking server, which is mainly used for scheduling and plays a role of balance; it is responsible for managing all storage server s and groups. After each storage is started, it will connect to tracker, inform its own group and other information, and keep periodic heartbeat.
storage server: storage server, which mainly provides capacity and backup services; in groups, there can be multiple storage servers in each group, and data is backed up to each other.
Client: client, the server for uploading and downloading data, that is, the server where our own project is deployed.
2. Storage strategy of FastDFS
In order to support large capacity, storage nodes (servers) are organized in volumes (or groups). The storage system is composed of one or more volumes. The files between volumes are independent of each other. The file capacity of all volumes is the file capacity of the whole storage system. A volume can be composed of one or more storage servers. The files in the storage servers under a volume are the same. Multiple storage servers in a volume play the role of redundant backup and load balancing.
When a server is added to a volume, the system automatically synchronizes the existing files. After the synchronization, the system automatically switches the new server to online service. Volumes can be added dynamically when storage space is low or running out. Simply add one or more servers and configure them as a new volume, increasing the capacity of the storage system.
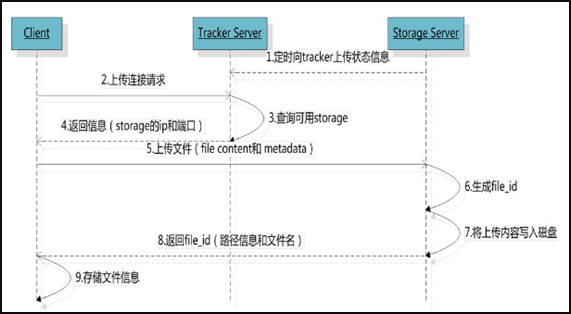
3. FastDFS upload process
FastDFS provides users with basic file access interfaces, such as upload, download, append, delete, etc., which are provided to users in the form of client library.
The Storage Server sends its own storage information to the Tracker Server on a regular basis. When there is more than one Tracker Server in the Tracker Server Cluster, the relationship between each Tracker is peer-to-peer, so any Tracker can be selected when the client uploads.
When the Tracker receives a request from the client to upload a file, it will assign a group to store the file. When the group is selected, it will decide which storage server in the group is assigned to the client. When the storage server is allocated, the client sends a write file request to the storage, and the storage will allocate a data storage directory for the file. Then assign a fileid to the file, and finally generate the file name storage file according to the above information.
4. File synchronization of FastDFS
When writing a file, the client writes the file to a storage server in the group, which means the file is written successfully. After the storage server finishes writing the file, the background thread will synchronize the file to other storage servers in the same group.
After each storage writes a file, a binlog will be written at the same time. The binlog does not contain file data, but only file name and other meta information. This binlog is used for background synchronization. The storage will record the progress of synchronization with other storage in the group, so that the last progress can continue to be synchronized after restart. The progress is recorded in a time stamp manner, so it is better to ensure that all server s in the cluster can be synchronized The clock of is in sync.
The synchronization progress of the storage will be reported to the tracker as part of the metadata. When the tracker selects to read the storage, it will use the synchronization progress as a reference.
5. File download of FastDFS
After the client uploadfile succeeds, it will get a file name generated by storage, and then the client can access the file according to the file name.
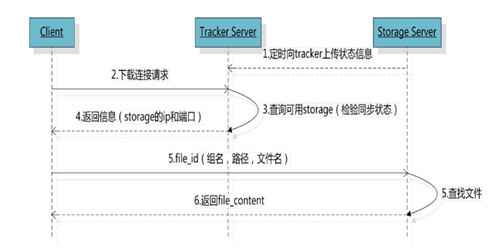
Like the upload file, the client can select any tracker server when downloading. When the tracker sends a download request to a tracker, it must bring the file name information. The tracker parses the group, size, creation time and other information of the file from the file name, and then selects a storage for the request to serve the read request.
2, Install FastDFS environment
Operating environment: CentOS7 X64, the following operations are all stand-alone environments.
1. Download and install libfastcommon
libfastcommon is a public C function library extracted from FastDFS and FastDHT. The basic environment can be installed.
- Download libfastcommon
wget https://github.com/happyfish100/libfastcommon/archive/V1.0.40.tar.gz
- Decompression
tar -zxvf V1.0.40.tar.gz -C /usr/local/fast
- Compile and install
cd /usr/local/fast/libfastcommon-1.0.40
./make.sh
./make.sh install
Libfastcommon.so is installed to / usr/lib64/libfastcommon.so, but the Lib directory set by FastDFS main program is / usr/local/lib, so soft link needs to be created.
  ln -s /usr/lib64/libfastcommon.so /usr/local/lib/libfastcommon.so
  ln -s /usr/lib64/libfastcommon.so /usr/lib/libfastcommon.so
  ln -s /usr/lib64/libfdfsclient.so /usr/local/lib/libfdfsclient.so
  ln -s /usr/lib64/libfdfsclient.so /usr/lib/libfdfsclient.so
2. Download and install FastDFS
- Download fastdfs
wget https://github.com/happyfish100/fastdfs/archive/V5.12.tar.gz
- Extract V5.12.tar.gz to get fastdfs-5.12
tar -zxvf V5.12.tar.gz -C /usr/local/fast
- Compile and install
mv /usr/local/fast/fastdfs-5.12 /usr/local/fast/fastdfs
cd /usr/local/fast/fastdfs
./make.sh
./make.sh install
- Configuration: because the bin directory set by FastDFS service script is under / usr/local/bin /, but we actually installed it under / usr/bin /.
Method A: modify the configuration file directly
There are two configuration files that need to be modified: Command: VIM / etc / init.d/fdfs'storaged enter a ":", then enter the global replacement command:% s+/usr/local/bin+/usr/bin and press enter to complete the replacement. After the replacement, save and exit the file, and then open it to see if / usr/local/bin has been replaced by / usr/bin. Another is similar to the following:
vim /etc/init.d/fdfs_trackerd
#Use the find and replace command to uniformly modify:% s+/usr/local/bin+/usr/bin
vim /etc/init.d/fdfs_storaged
#Use the find and replace command to uniformly modify:% s+/usr/local/bin+/usr/bin
Method B: use soft connection (recommended)
 ln -s /usr/bin/fdfs_trackerd   /usr/local/bin
 ln -s /usr/bin/fdfs_storaged   /usr/local/bin
 ln -s /usr/bin/stop.sh         /usr/local/bin
 ln -s /usr/bin/restart.sh      /usr/local/bin
- Configure FastDFS tracker
Profile details reference: FastDFS profile details
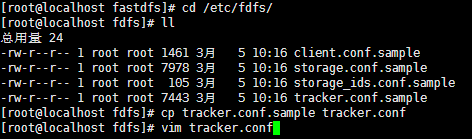
① enter / etc/fdfs, copy the FastDFS tracker sample configuration file tracker.conf.sample, and rename it to tracker.conf
cd /etc/fdfs/
ll
cp tracker.conf.sample tracker.conf
vim tracker.conf
② Edit tracker.conf. The parameters base path and http.server port need to be modified. Other defaults are OK.
# Whether the configuration file does not take effect. false means it takes effect
disabled=false

# Service port
port=22122

# Tracker data and log directory address (root directory must exist, subdirectory will be created automatically)
base_path=/home/fastdfs/tracker

# HTTP service port
http.server_port=80
③ Create the tracker basic data directory, that is, the directory corresponding to the base path
mkdir -p /home/fastdfs/tracker
④ Open trace port (default 22122) and 80 port in firewall
#Check the port list and execute the sentence if the port is not opened
firewall-cmd --permanent --list-port
#Open 22122 port
firewall-cmd --zone=public --add-port=22122/tcp --permanent
#Open port 80
firewall-cmd --zone=public --add-port=80/tcp --permanent
#Restart firewall command
firewall-cmd --reload
# Or service firewall restart
# Or systemctl restart firewalld
⑤ Start Tracker
For the first successful startup, two directories of data and logs will be created under / home/fdfsdfs/tracker / (configured base path).
#It can be started in this way
/etc/init.d/fdfs_trackerd start

#It can also be started in this way, provided that the soft link is created above and used later
service fdfs_trackerd start
Check whether FastDFS Tracker has been started successfully. If port 22122 is listening, it is considered that the Tracker service has been installed successfully.
netstat -unltp|grep fdfs

To turn off the Tracker command:
# service fdfs_trackerd stop
⑥ set the Tracker to start
chkconfig fdfs_trackerd on

#Or:
vim /etc/rc.d/rc.local
#Add configuration:
/etc/init.d/fdfs_trackerd start
⑦ tracker server directory and file structure
After the Tracker service is started successfully, two directories, data and logs, will be created under base path. The directory structure is as follows:
${base_path}
  |__data
  |   |__storage_groups.dat: Store group information
  |   |__storage_servers.dat: Storage server list
  |__logs
| |__trackerd.log: tracker server log file - Configure FastDFS storage
① enter the / etc/fdfs directory, copy the FastDFS storage sample configuration file storage.conf.sample, and rename it to storage.conf
cd /etc/fdfs
cp storage.conf.sample storage.conf
vim storage.conf
② Edit storage.conf
# Whether the configuration file does not take effect. false means it takes effect
disabled=false

# Specify the group (volume) of this storage server
group_name=group1

# storage server service port
port=23000

# Heartbeat interval time, in seconds (this refers to sending heartbeat to tracker server actively)
heart_beat_interval=30

# Storage data and log directory address (root directory must exist, subdirectory will be generated automatically)
base_path=/home/fastdfs/storage

# storage server supports multiple paths when storing files. The number of base paths for storing files is configured here. Usually only one directory is configured.
store_path_count=1


# Configure the store path count paths one by one. The index number is based on 0.
# If store? Path0 is not configured, it is the same as the path corresponding to base? Path.
store_path0=/home/fastdfs/file

# FastDFS uses two levels of directories when storing files. The number of directories where files are stored is configured here.
# If this parameter is only N (for example: 256), then the storage server will automatically create N * N subdirectories for storing files under the store path when it runs for the first time.
subdir_count_per_path=256

# The list of tracker server will be actively connected to the tracker server
# When there are multiple tracker servers, each tracker server writes a line
tracker_server=192.168.1.27:22122

# The period of time that the system is allowed to synchronize (the default is all day). It is generally used to avoid some problems caused by peak synchronization.
sync_start_time=00:00
sync_end_time=23:59
# Access port
http.server_port=80
③ create the Storage basic data directory, corresponding to the base path directory
mkdir -p /home/fastdfs/storage

# This is the configured store? Path0 path
mkdir -p /home/fastdfs/file
④ open the storage port in the firewall (23000 by default)
#Open 23000 port
firewall-cmd --zone=public --add-port=23000/tcp --permanent
#Restart firewall command
firewall-cmd --reload
# Or service firewall restart
# Or systemctl restart firewalld
⑤ Start Storage
Make sure that Tracker is started before starting Storage. If the initial startup is successful, data and logs will be created in the directory / ljzsg/fastdfs/storage.
#It can be started in this way
/etc/init.d/fdfs_storaged start

#It can also be used in this way. It's used in the back
service fdfs_storaged start
Check whether the Storage starts successfully. 23000 port is being monitored, even if the Storage starts successfully.
netstat -unltp|grep fdfs

Shutdown Storage command:
service fdfs_storaged stop
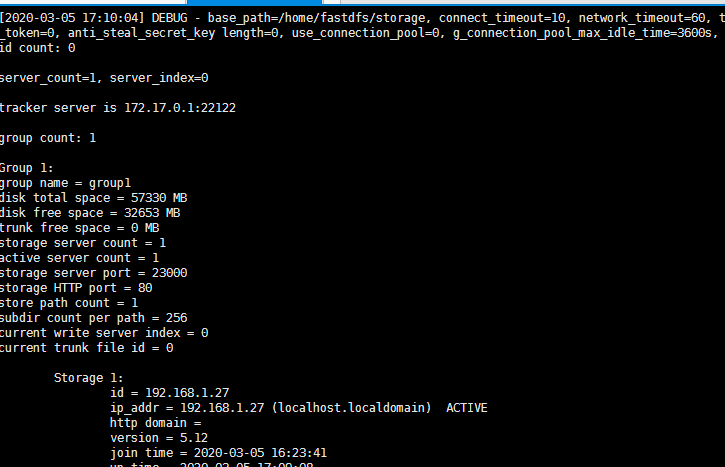
To see if Storage and Tracker are communicating:
/usr/bin/fdfs_monitor /etc/fdfs/storage.conf
⑥ Set Storage boot
chkconfig fdfs_storaged on

#Or:
vim /etc/rc.d/rc.local
#Add configuration:
/etc/init.d/fdfs_storaged start
⑦ Storage directory
The same as Tracker, after Storage is started successfully, data and logs directories are created under base path to record the information of Storage Server.
In the store? Path0 directory, create the N*N subdirectory:

-
File upload test
① Modify the client profile in the Tracker server
cd /etc/fdfs
cp client.conf.sample client.conf
vim client.conf
Modify the following configuration, other default.
# Data and log directory of Client
base_path=/home/fastdfs/client

# Tracker port
tracker_server=192.168.1.27:22122
② Upload test
Create the corresponding base path directory and upload the file
# Create the corresponding base path directory
mkdir -p /home/fastdfs/client

# Upload files
/usr/bin/fdfs_upload_file /etc/fdfs/client.conf /home/1583389701\(1\).jpg
After successful upload, the file ID number will be returned: group1/M00/00/00/rBEAAV5hoPOAMh2OAAAk-jRgPlI334.jpg

The returned file ID is composed of group, storage directory, two-level subdirectories, fileid and file suffix (specified by the client, mainly used to distinguish file types).


