1 General
1.1 INTRODUCTION
A simple small salary management system, JavaFX + front-end Spring Boot, has few functions. It focuses on the UI and some logic of the front-end. The back-end is very simple.
Main functions:
- User registration / login
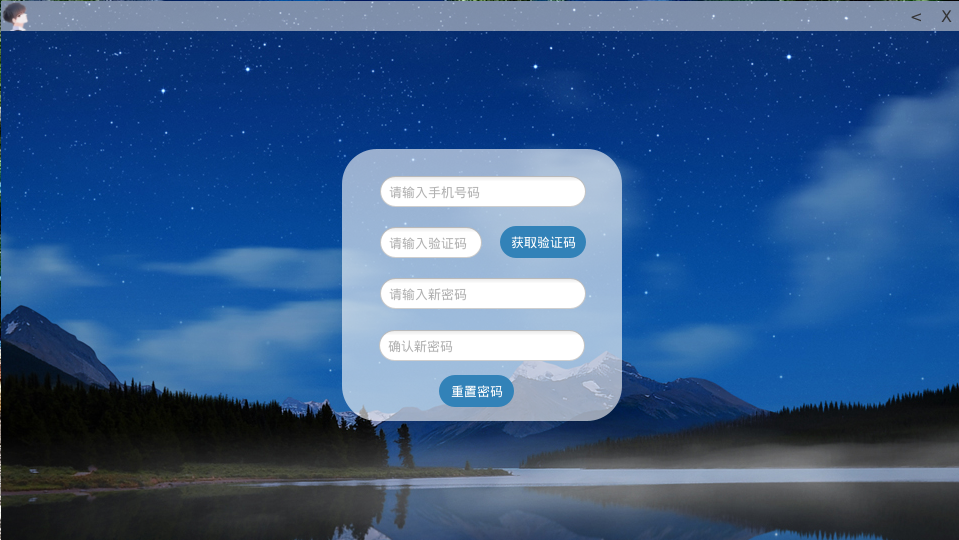
- Verification code retrieve password
- Users modify information, modify Avatar
- Display salary in bar chart form
- Administrator manages user and enters salary
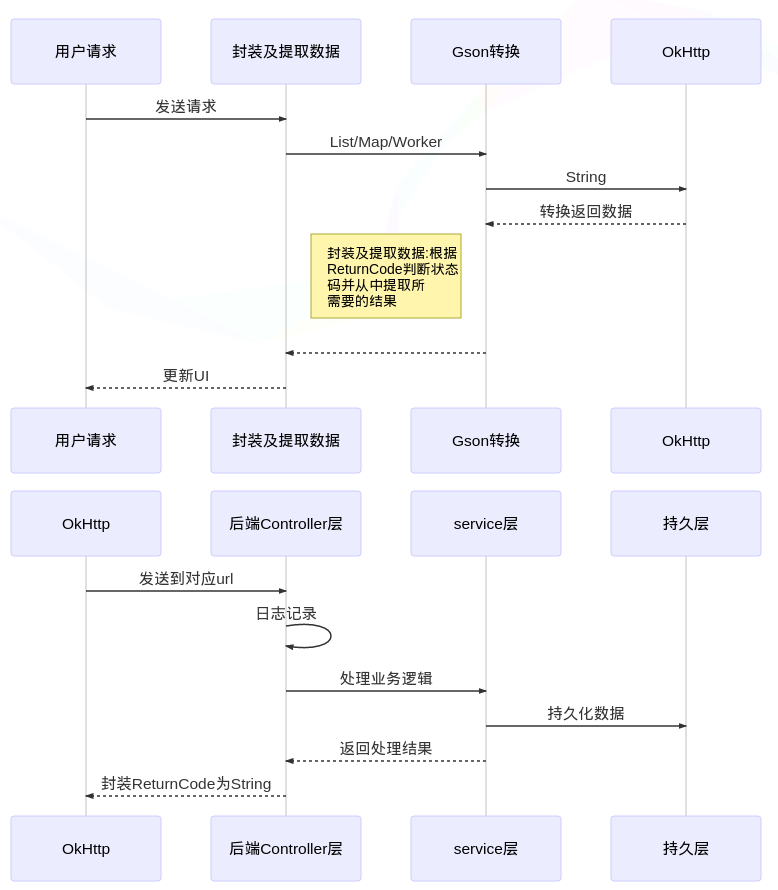
1.2 response process
1.3 demonstration
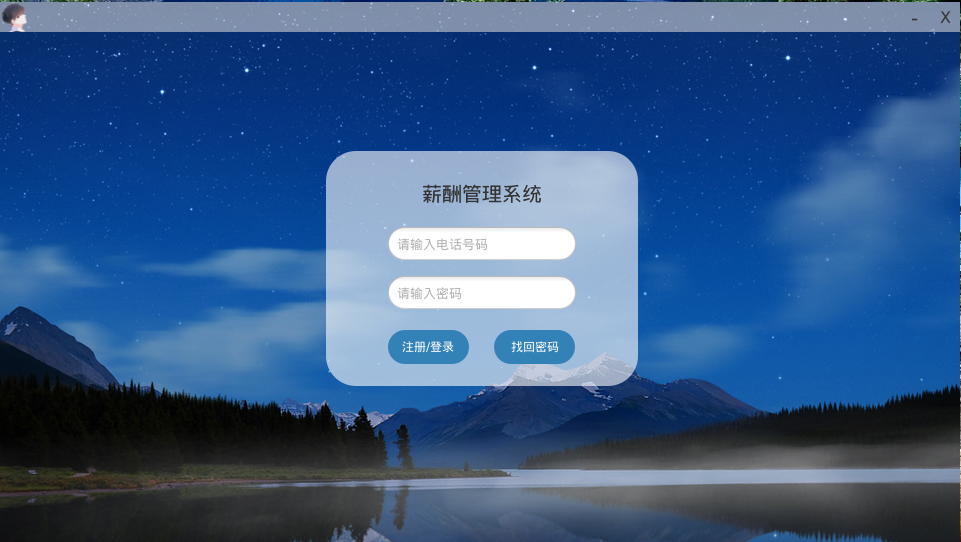
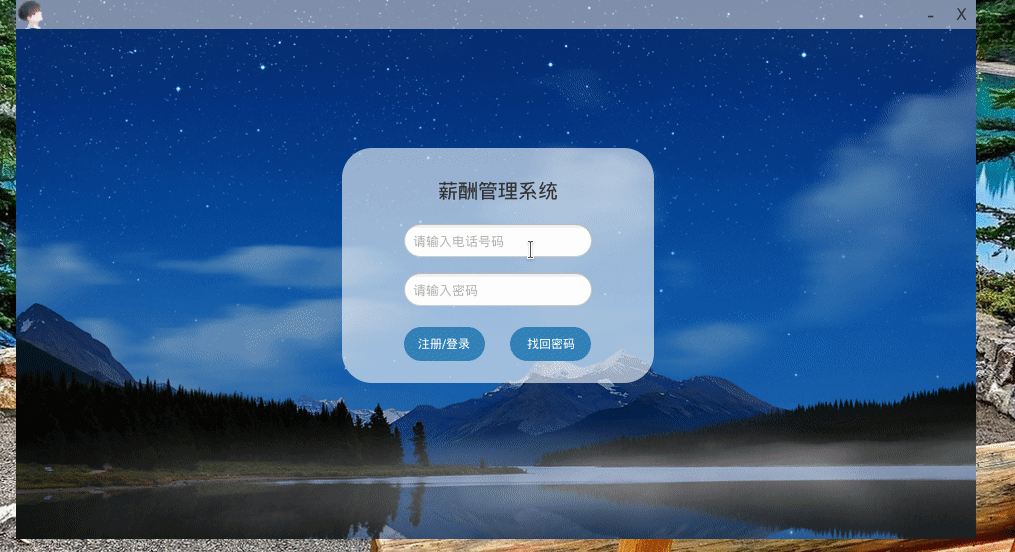
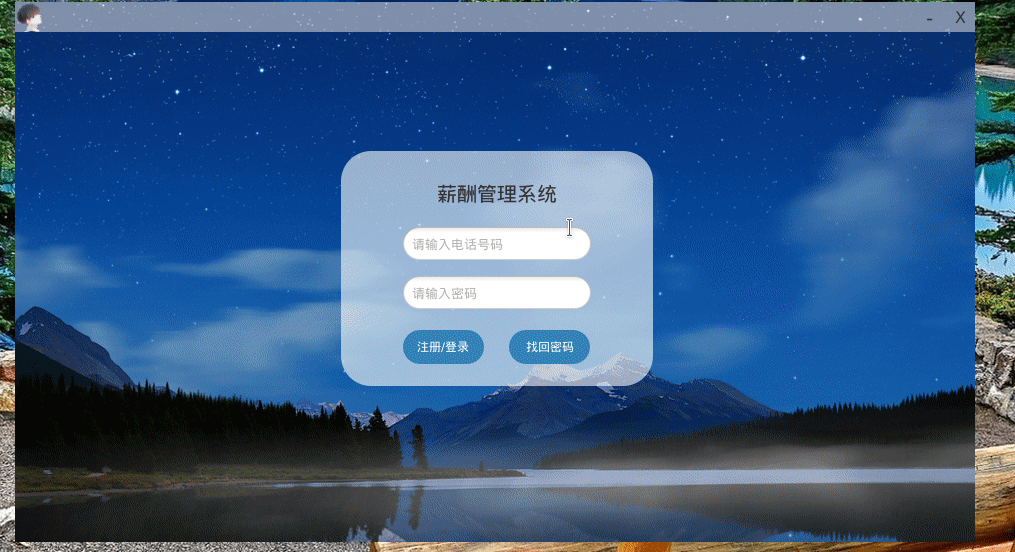
Login interface:
User interface:
Administrator interface:
2 Environment
- IDEA 2020.1
- Local JDK + server JDK: OpenJDK 11
- OepnJFX 11
- Spring Boot 2.3.0 (the update speed of Spring Boot is too fast)
- Tomcat 9.0.33
- MySQL 8.0.17
3 front end code part
3.1 front end overview
The front-end is mainly divided into five parts: controller module, view module, network module, animation module and tool module.
- Controller module: responsible for interactive events
- View module: responsible for updating UI
- Network module: send data request to background
- Animation module: move, scale, fade animation
- Tool modules: encryption, check network connectivity, center interface, etc
3.2 overview
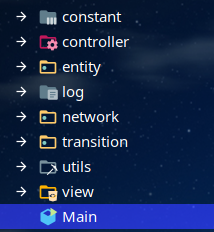
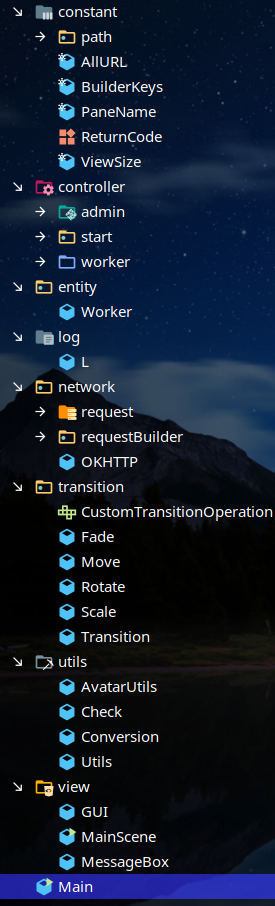
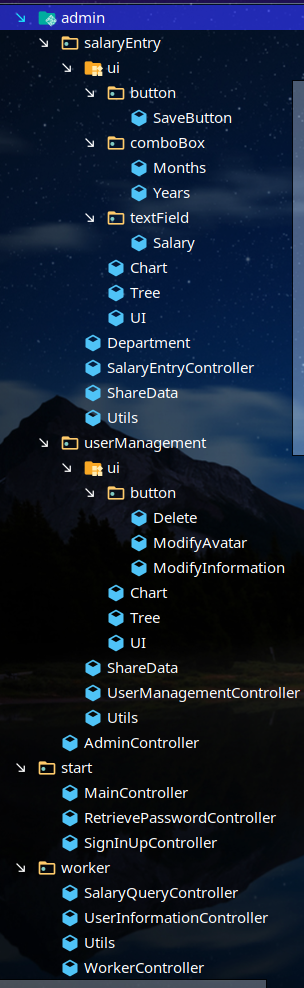
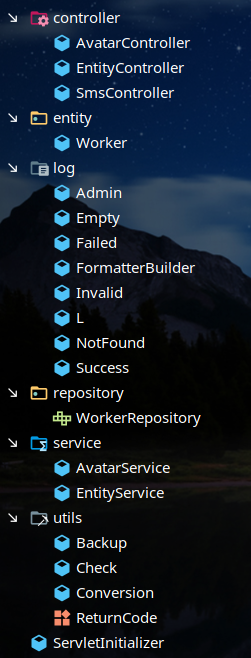
3.2.1. Code tree
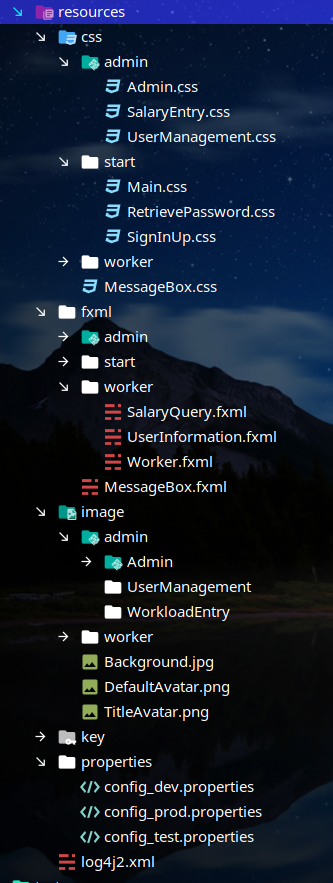
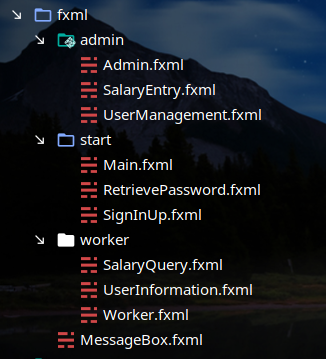
3.2.2 resource tree
It is divided into css, fxml, default picture, pem and project configuration file.
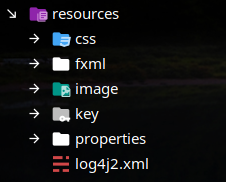
- css: the style used in the interface
- fxml: a special xml file used to define the interface and bind the functions in the Controller, that is, bind events
- Image: the default image used by the program
- key: certificate file for HTTPS in OkHttp
- Properties: some constant properties of the project
3.2.3 project dependence
The main dependence is as follows:
3.3 constant module
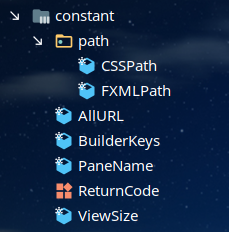
Constants required by the program:
- CSSPath: CSS path, for scene.getStylesheets.add(path)
- FXMLPath: FXML path for FXMLLoader.load(getClass.getResource(path).openStream())
- AllURL: path to send network request
- BuilderKeys: in OkHttp FormBody.Builder Constant key names used in
- PaneName: name of Pane, used to switch different panes in the same Scene
- ReturnCode: back end return code
- ViewSize: interface size
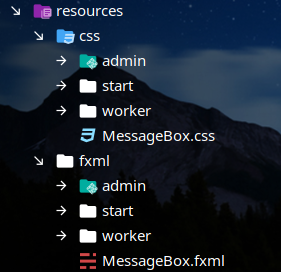
Focus on the path problem. My css and fxml files are under resources:
The usage of fxml path in the project is as follows:
URL url = getClass().getResource(FXMLPath.xxxx);
FXMLLoader loader = new FXMLLoader();
loader.setLocation(url);
loader.load(url.openStream());
The access path is obtained from the root path, as shown in the figure above MessageBox.fxml :
private static final String FXML_PREFIX = "/fxml/";
private static final String FXML_SUFFIX = ".fxml";
public static final String MESSAGE_BOX = FXML_PREFIX + "MessageBox" + FXML_SUFFIX;
If the fxml file is placed directly in the resources root directory, you can use:
getClass().getResource("/xxx.fxml");
Direct access.
The same with css:
private static final String CSS_PREFIX = "/css/";
private static final String CSS_SUFFIX = ".css";
public static final String MESSAGE_BOX = CSS_PREFIX + "MessageBox" + CSS_SUFFIX;
It is recommended to write the path to the configuration file for the URL of the network request. For example, read from the configuration file here:
Properties properties = Utils.getProperties();
if (properties != null)
{
    String baseUrl = properties.getProperty("baseurl") + properties.getProperty("port") + "/" + properties.getProperty("projectName");
    SIGN_IN_UP_URL = baseUrl + "signInUp";
    //...
}
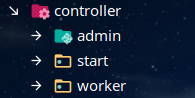
3.4 controller module
The controller module is used to handle user interaction events, which are divided into three categories in this project:
- Login registration interface controller
- User interface controller
- Administrator interface controller
3.4.1 login registration interface
This is the interface entered at the beginning of the program. Some basic close, minimize and drag events will be bound here:
public void onMousePressed(MouseEvent e)
{
    stageX = stage.getX();
    stageY = stage.getY();
    screexX = e.getScreenX();
    screenY = e.getScreenY();
}
public void onMouseDragged(MouseEvent e)
{
    stage.setX(e.getScreenX() - screexX + stageX);
    stage.setY(e.getScreenY() - screenY + stageY);
}
public void close()
{
    GUI.close();
}
public void minimize()
{
    GUI.minimize();
}
The controller of the login interface is also very simple. Add a login / registration function and jump to the password recovery interface, and the code will not be pasted.
As for the password retrieval interface, there are many things to do. First, it is necessary to determine whether the phone entered by the user exists in the back-end database. In addition, it is necessary to check whether the password entered twice is the same. In addition, it is also necessary to determine whether the SMS is successfully sent and whether the verification code entered by the user is the same as the verification code returned by the back-end (in fact, the verification code part of SMS does not need to be processed by the back-end because it is called Tencent cloud's API was originally put on the front end. When considering that some important information like appid may be leaked, it will be put on the back end for processing).
3.4.2 user interface
Then, the interface entered by the user after login is added with gradually hidden and mobile animation:
public void userEnter()
{
    new Transition()
    .add(new Move(userImage).x(-70))
    .add(new Fade(userLabel).fromTo(0,1)).add(new Move(userLabel).x(95))
    .add(new Scale(userPolygon).ratio(1.8)).add(new Move(userPolygon).x(180))
    .add(new Scale(queryPolygon).ratio(1.8)).add(new Move(queryPolygon).x(180))
    .play();
}

public void userExited()
{
    new Transition()
    .add(new Move(userImage).x(0))
    .add(new Fade(userLabel).fromTo(1,0)).add(new Move(userLabel).x(0))
    .add(new Scale(userPolygon).ratio(1)).add(new Move(userPolygon).x(0))
    .add(new Scale(queryPolygon).ratio(1)).add(new Move(queryPolygon).x(0))
    .play();
}
The effect is as follows:
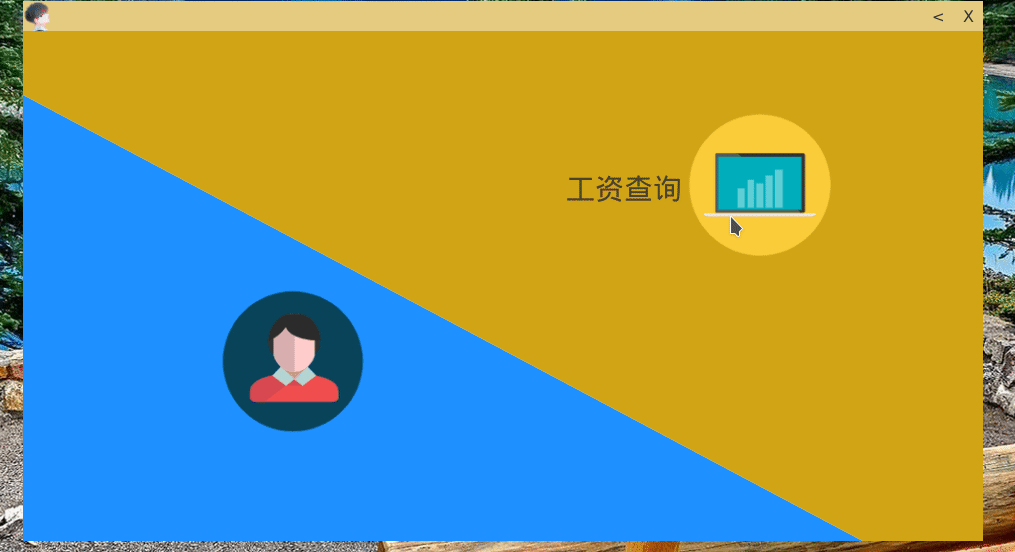
The actual process is to put < Image > and < label > into a < anchorpane > and then add mouse move in and move out events for the < anchorpane >. From the code, we can know that the image is animated with displacement, the text is animated with fade and displacement, and the polygon is animated with scale and displacement. Take the < anchorpane > event at the bottom left as an example. When the mouse moves in, first move the picture to the left:
.add(new Move(userImage).x(-70))
x is the lateral displacement.
Then fade in and shift text:
.add(new Fade(userLabel).fromTo(0,1)).add(new Move(userLabel).x(95))
fromTo represents the change from transparency, from 0 to 1, which is equivalent to fade in effect.
Finally, enlarge the polygon by 1.8 times and move the polygon to the right at the same time:
.add(new Scale(userPolygon).ratio(1.8)).add(new Move(userPolygon).x(180))
ratio is the magnification, which is 1.8 times the original magnification.
The upper right also needs to be zoomed in and moved:
.add(new Scale(queryPolygon).ratio(1.8)).add(new Move(queryPolygon).x(180))
Transition, Scale and Fade are user-defined animation processing classes. Please refer to "3.8 animation module" for details.
3.5 entity module
A simple Worker:
@Getter
@Setter
@NoArgsConstructor
public class Worker {
    private String cellphone;
    private String password;
    private String name = "No name";
    private String department = "No department";
    private String position = "No position";
    private String timeAndSalary;

    public Worker(String cellphone,String password)
    {
        this.cellphone = cellphone;
        this.password = password;
    }
}
The annotation uses Lombok. For Lombok introduction, please Poke here , complete usage Poke here. timeAndSalary is a Map converted from Gson to String. The key is the corresponding month and year, and the value is salary. Please refer to the tool module for specific conversion methods.
3.6 log module
The log module uses Log4j2. The log4j2.xml under resources is as follows:
<configuration status="OFF">
    <appenders>
        <Console name="Console" target="SYSTEM_OUT">
            <PatternLayout pattern="Time:%d{HH:mm:ss}     Level:%-5level %nMessage:%msg%n"/>
        </Console>
    </appenders>
    <loggers>
        <logger name="test" level="info" additivity="false">
            <appender-ref ref="Console"/>
        </logger>
        <root level="info">
            <appender-ref ref="Console"/>
        </root>
    </loggers>
</configuration>
This is the most general configuration. In the pattern, the output format is:
%d{HH:mm:ss}
It is a time format setting. Level indicates the log level, n indicates line breaking, and msg indicates log information. If you need more configurations, please search by yourself.
3.7 network module
The core of the network module is implemented by OkHttp, which is mainly divided into two packages:
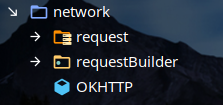
- request: encapsulate various requests sent to the back end
- requestBuilder: the Builder class that creates the request
- Okhttp: a tool class that encapsulates okhttp. There is only one send method, only one parameter, and only one class in the request package. Use requestBuilder to generate and return an Object. How to deal with the Object needs to correspond to the return method where okhttp is used
3.7.1 request package
Encapsulates various network requests:

All requests inherit from BaseRequest. The public methods of BaseRequest include:
- setUrl: set the url to send
- setCellphone: add cellphone parameter
- setPassword: add the password parameter. Note that the password is encrypted by SHA512 in the front end
- setWorker: add Worker parameter
- setWorkers: accept a list < Worker > and use it when the administrator saves all workers
- setAvatar: add avatar parameter
- setAvatars: accept a HashMap < String, String >, the key is phone, identify the unique Worker, and the value is the String converted by the picture through Base64
The only abstraction is:
public abstract Object handleResult(ReturnCode code):
According to the returned results of different request processing, the back-end returns a ReturnCode, which encapsulates the status code, error information and return value. It changes from Gson to String. The front-end obtains the String, and then it changes to ReturnCode after Gson, from which it obtains the status code and return value.
The rest of the request classes inherit from BaseRequest and implement different processing methods. Take Get request as an example:
public class GetOneRequest extends BaseRequest {
    @Override
    public Object handleResult(ReturnCode code)
    {
        switch (code)
        {
            case EMPTY_CELLPHONE:
                MessageBox.emptyCellphone();
                return false;
            case INVALID_CELLPHONE:
                MessageBox.invalidCellphone();
                return false;
            case CELLPHONE_NOT_MATCH:
                MessageBox.show("Get failed, phone number mismatch");
                return false;
            case EMPTY_WORKER:
                MessageBox.emptyWorker();
                return false;
            case GET_ONE_SUCCESS:
                return Conversion.JSONToWorker(code.body());
            default:
                MessageBox.unknownError(code.name());
                return false;
        }
    }
}
Get a Worker. The possible return values are (enumeration values, defined in ReturnCode, need to be unified at the front and back ends):
- EMPTY_CELLPHOE: indicates that the call in the sent get request is empty
- INVALID_CELLPHONE: illegal phone number. The judging code is: String reg = "^ [1] [358] [0-9] {9} $"; return( Pattern.compile (reg).matcher(cellphone).matches());
- CELLPHONE_NOT_MATCH: the phone number does not match, that is, there is no corresponding Worker in the database
- EMPTY_WORKER: this worker exists in the database, but the back-end processing fails when converting to String, and an empty worker is returned
- GET_ONE_SUCCESS: get success, use tool class to convert String to Worker
- Default: unknown error
3.7.2 requestBuilder package
The Builder corresponding to the request is included:
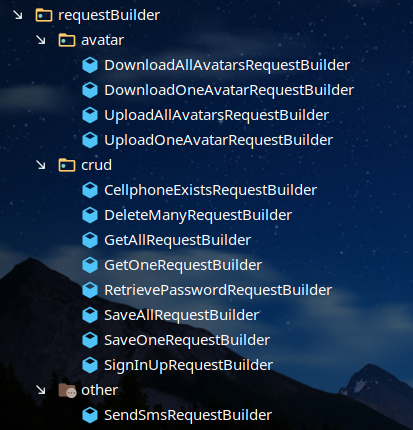
In addition to the default construction method and build method, there are only set methods, such as:
public class GetOneRequestBuilder {
    private final GetOneRequest request = new GetOneRequest();

    public GetOneRequestBuilder()
    {
        request.setUrl(AllURL.GET_ONE_URL);
    }

    public GetOneRequestBuilder cellphone(String cellphone)
    {
        if(Check.isEmpty(cellphone))
        {
            MessageBox.emptyCellphone();
            return null;
        }
        request.setCellphone(cellphone);
        return this;
    }

    public GetOneRequest build()
    {
        return request;
    }
}
The url is set in the default construction method, and only the phone is needed to get the Worker.
3.7.3 OKHTTP
This is a static tool class that encapsulates OkHttp. The only public static method is as follows:
public static Object send(BaseRequest content)
{
    Call call = client.newCall(new Request.Builder().url(content.getUrl()).post(content.getBody()).build());
    try
    {
        ResponseBody body = call.execute().body();
        if(body != null)
            return content.handleResult(Conversion.stringToReturnCode(body.string()));
    }
    catch (IOException e)
    {
        L.error("Reseponse body is null");
        MessageBox.show("Server cannot connect,Response is empty");
    }
    return null;
}
The method of synchronous post request is adopted, in which the url and body used in the call are exactly the reason of using BaseRequest as the base class. It is convenient to obtain the url and body. If the data volume is large, asynchronous request can be considered. It is also mentioned above that the backend returns the ReturnCode converted from Gson to String, so after getting the body, it will be converted to ReturnCode first and then processed.
3.7.4 HTTPS
As for HTTPS, war package deployment is adopted. Tomcat, the back-end server, needs to set certificates in Tomcat and three parts in OkHttp
- ssl socketfactory: ssl socket factory
- Hostname verifier: verify hostname
- X509TrustManager: Certificate truster management class
3.7.4.1 OkHttp configuration
As mentioned above, there are three parts to be set. Let's take a look at the simplest part of verifying the hostname, which uses the HostnameVerifier interface:
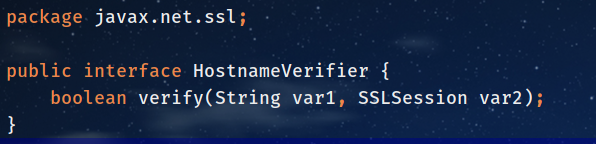
OkHttpClient client = new OkHttpClient.Builder()
.connectTimeout(1500, TimeUnit.MILLISECONDS)
.hostnameVerifier((hostname, sslSession) -> {
    if ("www.test.com".equals(hostname)) {
        return true;
    } else {
        HostnameVerifier verifier = HttpsURLConnection.getDefaultHostnameVerifier();
        return verifier.verify(hostname, sslSession);
    }
}).build();
Here, verify that the host name is www.test.com Return true (or use public ip authentication), otherwise use the default HostnameVerifier. If the business logic is complex, dynamic verification can be performed in combination with configuration center, black / white list, etc.
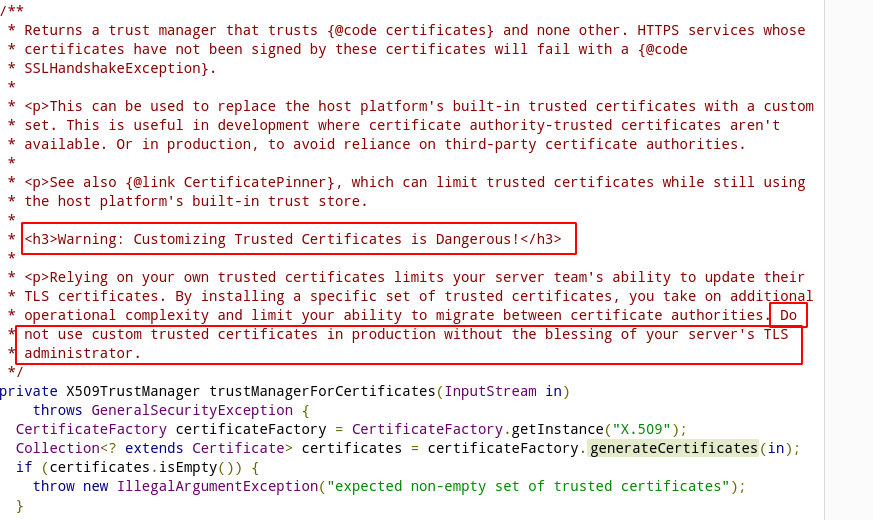
Next comes X509TrustManager processing (source Java Code Example):
private static X509TrustManager trustManagerForCertificates(InputStream in)
            throws GeneralSecurityException
{
    CertificateFactory certificateFactory = CertificateFactory.getInstance("X.509");
    Collection<? extends Certificate> certificates = certificateFactory.generateCertificates(in);
    if (certificates.isEmpty()) {
        throw new IllegalArgumentException("expected non-empty set of trusted certificates");
    }

    char[] password = "www.test.com".toCharArray(); // Any password will work.
    KeyStore keyStore = newEmptyKeyStore(password);
    int index = 0;
    for (Certificate certificate : certificates) {
        String certificateAlias = Integer.toString(index++);
        keyStore.setCertificateEntry(certificateAlias, certificate);
    }

    // Use it to build an X509 trust manager.
    KeyManagerFactory keyManagerFactory = KeyManagerFactory.getInstance(
            KeyManagerFactory.getDefaultAlgorithm());
    keyManagerFactory.init(keyStore, password);
    TrustManagerFactory trustManagerFactory = TrustManagerFactory.getInstance(
            TrustManagerFactory.getDefaultAlgorithm());
    trustManagerFactory.init(keyStore);
    TrustManager[] trustManagers = trustManagerFactory.getTrustManagers();
    if (trustManagers.length != 1 || !(trustManagers[0] instanceof X509TrustManager))
    {
        throw new IllegalStateException("Unexpected default trust managers:" + Arrays.toString(trustManagers));
    }
    return (X509TrustManager) trustManagers[0];
}
Returns a trust manager that trusts the certificate read by the input stream. If the certificate is not signed, an SSLHandsakeException is thrown. It is recommended that the certificate be signed by a third party rather than self signed (for example, generated by openssl). Especially in the production environment, the explanation of the example also mentions:
Finally, the processing of ssl socket factory:
private static SSLSocketFactory createSSLSocketFactory() {
    SSLSocketFactory ssfFactory = null;
    try {
        SSLContext sc = SSLContext.getInstance("TLS");
        sc.init(null, new TrustManager[]{trustManager}, new SecureRandom());
        ssfFactory = sc.getSocketFactory();
    } catch (Exception e) {
        e.printStackTrace();
    }
    return ssfFactory;
}
The complete OkHttpClient structure is as follows:
X509TrustManager trustManager = trustManagerForCertificates(OKHTTP.class.getResourceAsStream("/key/pem.pem"));
OkHttpClient client = new OkHttpClient.Builder()
.connectTimeout(1500, TimeUnit.MILLISECONDS)
.sslSocketFactory(createSSLSocketFactory(), trustManager)
.hostnameVerifier((hostname, sslSession) -> {
    if ("www.test.com".equals(hostname)) {
        return true;
    } else {
        HostnameVerifier verifier = HttpsURLConnection.getDefaultHostnameVerifier();
        return verifier.verify(hostname, sslSession);
    }
})
.readTimeout(10, TimeUnit.SECONDS).build();
Where / key/pem.pem Is the certificate file.
3.7.4.2 server setting certificate
Use war for deployment. Please search for jar deployment by yourself, server Tomcat, and other web servers by yourself.
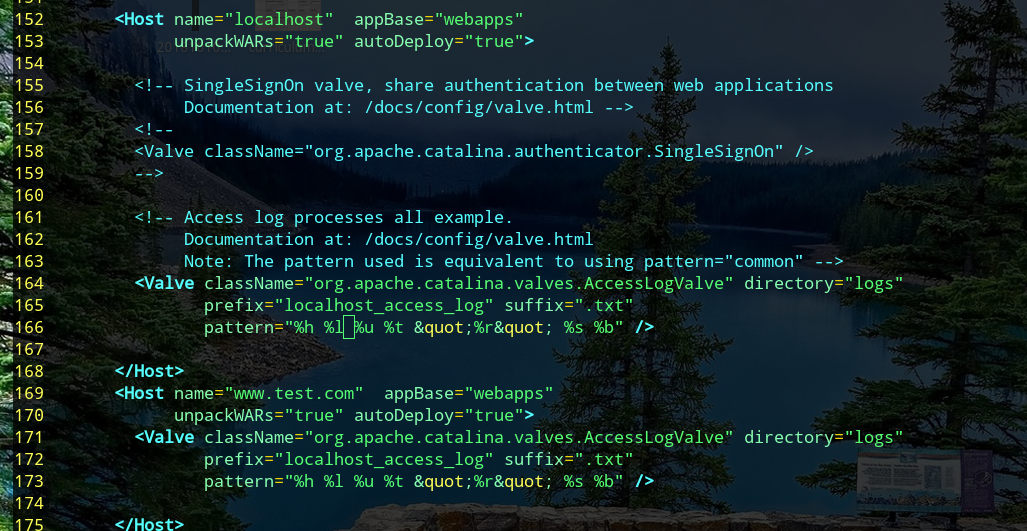
First, in the Tomcat configuration file, conf/server.xml Modify domain name:
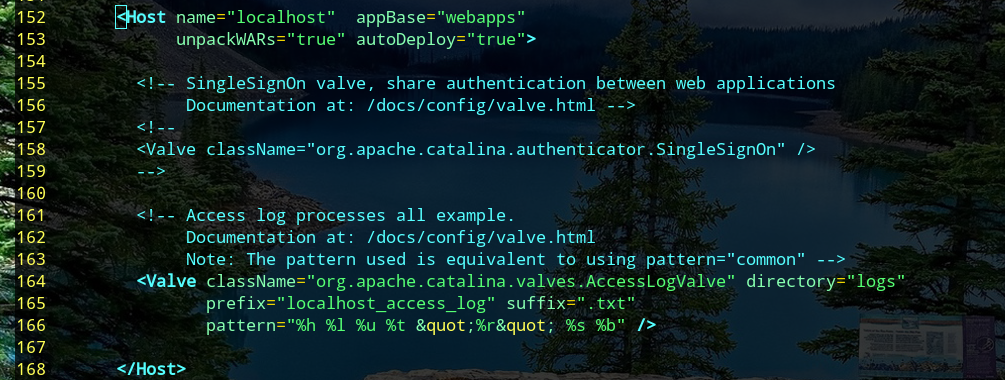
Find the < host > and copy it. Directly change the name to the corresponding domain name:
Then download the file from the certificate manufacturer (usually with the document, it is recommended to view the document). Tomcat has two files, one is pfx, the other is password file. Continue to modify server.xml , search 8443 for the following location:

Among them, the above < connector > is HTTP/1.1 protocol, which is based on Nio implementation, and the following < connector > is HTTP/2, which is based on Apr implementation. Using HTTP/1.1 will be simpler, just modified server.xml OK, using HTTP/2 will be a bit troublesome, because you need to install APR, APR util and Tomcat native. Please refer to here , take HTTP/1.1 as an example, and modify it as follows:
<Connector port="8123" protocol="org.apache.coyote.http11.Http11NioProtocol"
	maxThreads="200" SSLEnabled="true"
	scheme="https" secure="true"
	keystoreFile="/xxx/xxx/xxx/xxx.pfx" keystoreType="PKCS12"
	keystorePass="YOUR PASSWORD" clientAuth="false"
	sslProtocol="TLS">
</Connector>
Modify the certificate location and password. If you want to be more secure, you can specify a TLS version:
<Connector ...
sslProtocol="TLS" sslEnabledProtocols="TLSv1.2"
>
3.7.5 image processing
The image was originally intended to be processed by MultipartBody of OkHttp, but the processed image is not so much, seemingly unnecessary, and the data of entity class is transmitted in the form of String. Therefore, the author's idea is whether it can be uniformly transmitted by String, so he found the function of image and String conversion, slightly changed, the original function needs external dependence Change to Base64 provided by JDK:
public static String fileToString(String path)
{
    File file = new File(path);
    FileInputStream fis = null;
    StringBuilder content = new StringBuilder();
    try {
        fis = new FileInputStream(file);
        int length = 3 * 1024 * 1024;
        byte[] byteAttr = new byte[length];
        int byteLength;
        while ((byteLength = fis.read(byteAttr, 0, byteAttr.length)) != -1) {
            String encode;
            if (byteLength != byteAttr.length) {
                byte[] temp = new byte[byteLength];
                System.arraycopy(byteAttr, 0, temp, 0, byteLength);
                encode = Base64.getEncoder().encodeToString(temp);
                content.append(encode);
            } else {
                encode = Base64.getEncoder().encodeToString(byteAttr);
                content.append(encode);
            }
        }

    } catch (IOException e) {
        e.printStackTrace();
    } finally {
        try {
            assert fis != null;
            fis.close();
        } catch (IOException e) {
            e.printStackTrace();
        }
    }
    return content.toString();
}

public static void stirngToFile(String base64Code, String targetPath) {
    byte[] buffer;
    FileOutputStream out = null;
    try {
        buffer = Base64.getDecoder().decode(base64Code);
        out = new FileOutputStream(targetPath);
        out.write(buffer);
    } catch (IOException e) {
        e.printStackTrace();
    } finally {
        if (out != null) {
            try {
                out.close();
            } catch (IOException e) {
                e.printStackTrace();
            }
        }
    }
}
Base64 is a method of representing binary data based on 64 printable characters. It can convert binary data (picture / video, etc.) into characters, or decode corresponding characters into original binary data. The author has measured that the conversion speed of this method is not slow, as long as there is a correct conversion function, the server can easily convert, but the support for large files is not good:

This method is enough for general pictures, but MultipartBody is recommended for real files.
3.8 animation module
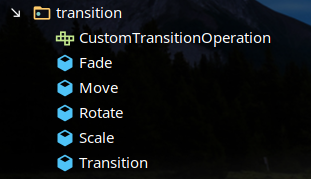
There are four types of animation: fade in / fade out, displacement, scaling, rotation. These four classes all implement the CustomTransitionOperation interface:
import javafx.animation.Animation;

public interface CustomTransitionOperation {
    double defaultSeconds = 0.4;
    Animation build();
    void play();
}
Among them, defaultSeconds is the default number of seconds. build is used to generate all animation classes in Transition, and the last play is used to play the animation. The four animation classes are similar. Take the rotation animation class as an example:
public class Rotate implements CustomTransitionOperation{
    private final RotateTransition transition = new RotateTransition(Duration.seconds(1));

    public Rotate(Node node)
    {
        transition.setNode(node);
    }

    public Rotate seconds(double seconds)
    {
        transition.setDuration(Duration.seconds(seconds));
        return this;
    }

    public Rotate to(double to)
    {
        transition.setToAngle(to);
        return this;
    }

    @Override
    public Animation build() {
        return transition;
    }

    @Override
    public void play() {
        transition.play();
    }
}
Seconds sets the number of seconds. to indicates the angle of rotation. All animation classes are controlled by Transition
public class Transition {
    private final ArrayList<Animation> animations = new ArrayList<>();

    public Transition add(CustomTransitionOperation animation)
    {
        animations.add(animation.build());
        return this;
    }

    public void play()
    {
        animations.forEach(Animation::play);
    }
}
There is a collection of animation classes. Each time you add an operation, you can add the corresponding animation into the array, and then play it uniformly. The example usage is as follows:
new Transition()
.add(new Move(userImage).x(-70))
.add(new Fade(userLabel).fromTo(0,1)).add(new Move(userLabel).x(95))
.add(new Scale(userPolygon).ratio(1.8)).add(new Move(userPolygon).x(180))
.add(new Scale(workloadPolygon).ratio(1.8)).add(new Move(workloadPolygon).x(180))
.play();
3.9 tool module
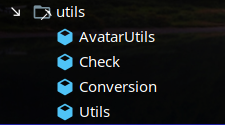
- AvatarUtils: used for local temporary image generation and image conversion
- Check: check whether it is empty, legal, etc
- Conversion: a conversion class. It can be converted between Worker/String, Map/String, List/String through Gson
- Utils: encryption, setting the running environment, centering Stage, checking network connectivity, etc
Let's talk about Utils and Conversion.
3.9.1 Conversion
Conversion class, using Gson to convert between String and List/Worker/Map, such as String to Map:
public static Map<String,Double> stringToMap(String str)
{
    if(Check.isEmpty(str))
        return null;
    Map<?,?> m = gson.fromJson(str,Map.class);
    Map<String,Double> map = new HashMap<>(m.size());
    m.forEach((k,v)->map.put((String)k,(Double)v));
    return map;
}
Most of the Conversion functions are similar. First, null is judged, and then the corresponding type Conversion is performed. Here, the Conversion is basically the same as the backend. The backend also needs to use the Conversion class for Conversion operations.
3.9.2 Utils
Get the property file as follows:
//Get property file
public static Properties getProperties()
{
    Properties properties = new Properties();
    //The project properties file is divided into config_dev.properties,config_test.properties,config_prod.properties
    String fileName = "properties/config_"+ getEnv() +".properties";
    ClassLoader loader = Thread.currentThread().getContextClassLoader();
    try(InputStream inputStream = loader.getResourceAsStream(fileName))
    {
        if(inputStream != null)
        {
        	//Prevent random code
            properties.load(new InputStreamReader(inputStream, StandardCharsets.UTF_8));
            return properties;
        }
        L.error("Can not load properties properly.InputStream is null.");
        return null;
    }
    catch (IOException e)
    {
        L.error("Can not load properties properly.Message:"+e.getMessage());
        return null;
    }
}
Another way is to check network connectivity:
public static boolean networkAvaliable()
{
    try(Socket socket = new Socket())
    {
        socket.connect(new InetSocketAddress("www.baidu.com",443));
        return true;
    }
    catch (IOException e)
    {
        L.error("Can not connect network.");
        e.printStackTrace();
    }
    return false;
}
Using socket to judge can be divided into two methods to check the network, one is to check the network connectivity, the other is to check whether the back-end is connected.
The last is the method of centering Stage. Although there is a centerOnScreen in the Stage, the effect is not good. The actual measurement of the author is horizontally centered but vertically up, not vertically horizontally centered.
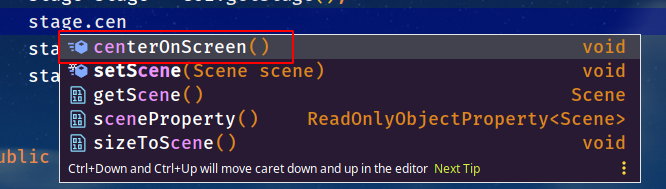
Therefore, set the x and y of Stage manually according to the height and width of screen and the size of Stage.
public static void centerMainStage()
{
    Rectangle2D screenRectangle = Screen.getPrimary().getBounds();
    double width = screenRectangle.getWidth();
	double height = screenRectangle.getHeight();

	Stage stage = GUI.getStage();
    stage.setX(width/2 - ViewSize.MAIN_WIDTH/2);
    stage.setY(height/2 - ViewSize.MAIN_HEIGHT/2);
}
3.10 view module

- GUI: global variable sharing and control Scene switching
- MainScene: global controller, responsible for initializing and binding keyboard events
- MessBox: prompt information box, which provides static methods such as show() to the public.
The methods in GUI are mainly switchToXxx, for example:
public static void switchToSignInUp()
{
    if(GUI.isUserInformation())
    {
        AvatarUtils.deletePathIfExists();
        GUI.getUserInformationController().reset();
    }
    mainParent.requestFocus();
    children.clear();
    children.add(signInUpParent.lookup(PaneName.SIGN_IN_UP));
    scene.getStylesheets().add(CSSPath.SIGN_IN_UP);
    Label minimize = (Label) (mainParent.lookup("#minimize"));
    minimize.setText("-");
    minimize.setFont(new Font("System", 20));
    minimize.setOnMouseClicked(v->minimize());
}
Jump to login registration, public static. First, judge whether it is a user information interface. If some cleaning operations are carried out, then let the Parent get the focus (in order to let the keyboard event respond), then add the corresponding AnchorPane to Children, add css, and finally modify the button text and event.
In addition, some keyboard event responses are added to the main scene, such as Enter:
ObservableMap<KeyCombination,Runnable> keyEvent = GUI.getScene().getAcclerators();
keyEvent.put(new KeyCodeCombination(KeyCode.ENTER),()->
{
    if (GUI.isSignInUp())
        GUI.getSignInUpController().signInUp();
    else if (GUI.isRetrievePassword())
        GUI.getRetrievePasswordController().reset();
    else if(GUI.isWorker())
        GUI.switchToUserInformation();
    else if(GUI.isAdmin())
        GUI.switchToUserManagement();
    else if(GUI.isUserInformation())
    {
        UserInformationController controller = GUI.getUserInformationController();
        if(controller.isModifying())
            controller.saveInformation();
        else
            controller.modifyInformation();
    }
    else if(GUI.isSalaryEntry())
    {
        GUI.getSalaryEntryController().save();
    }
});
4 front end UI
4.1 fxml
The interface is basically controlled by these fxml files. There is not much content in this part. It is basically designed by the Scene Builder provided by IDEA, and a small part is controlled by code. Here are some precautions:
- The root node is AnchorPane, and each fxml is set with an independent fxid for switching
- Events are bound to the corresponding controls. For example, when a Label is bound with a mouse to enter an event, set onmouseentered = ා XXX on the Label, and the method in it is the corresponding controller (FX: controller=“ xxx.xxx.xxx Method in. Xxxcontroller ")
- The URL attribute in < Image > needs to be accompanied by @, for example, < image url = "@.. / image/ xxx.png >
4.2 css
Some beautification functions of css are integrated in JFX, such as:
-fx-background-radius: 25px;
-fx-background-color:#e2ff1f;
The usage is to set the id in fxml first.
Notice the difference between the two IDS:
- fx:id
- id
fx:id refers to the control's fxid, which is usually used with @ FXML in the Controller. For example, a Label has fxid set to label1
<Label fx:id="label1" layoutX="450.0" layoutY="402.0" text="Label">
   <font>
       <Font size="18.0" />
   </font>
</Label>
You can use @ FXML in the corresponding Controller. The name is the same as that of fxid:
@FXML
private Label label1;
id refers to the id of css, which can be referenced in css. For example, the above Label also sets the id (it can be the same or different):
<Label fx:id="label1" id="label1" layoutX="450.0" layoutY="402.0" text="Label">
   <font>
       <Font size="18.0" />
   </font>
</Label>
Then reference in the css file as if it were a normal id:
#label1
{
    -fx-background-radius: 20px; /*fillet*/
}
At the same time, JFX also supports pseudo classes of css. For example, the following minimized and closed mouse move in effects are implemented using pseudo classes:

#minimize:hover
{
    -fx-opacity: 1;
    -fx-background-radius: 10px;
    -fx-background-color: #323232;
    -fx-text-fill: #ffffff;
}

#close:hover
{
    -fx-opacity: 1;
    -fx-background-radius: 10px;
    -fx-background-color: #dd2c00;
    -fx-text-fill: #ffffff;
}
Of course, some of the more complex ones are not supported. The author has tried to use transition and so on, which is not supported.
Finally, you need to introduce css into the corresponding Scene:
Scene scene = new Scene();
scene.getStylesheets().add("xxx/xxx/xxx/xxx.css");
The usage in the program is:
scene.getStylesheets().add(CSSPath.SIGN_IN_UP);
4.3 Stage construction process
Take the prompt box as an example to illustrate the Stage construction process.
try {
    Stage stage = new Stage();
    Parent root = FXMLLoader.load(getClass().getResource(FXMLPath.MESSAGE_BOX));
    Scene scene = new Scene(root, ViewSize.MESSAGE_BOX_WIDTH,ViewSize.MESSAGE_BOX_HEIGHT);
    scene.getStylesheets().add(CSSPath.MESSAGE_BOX);
    Button button = (Button)root.lookup("#button");
    button.setOnMouseClicked(v->stage.hide());
    Label label = (Label)root.lookup("#label");
    label.setText(message);
    stage.initStyle(StageStyle.TRANSPARENT);
    stage.setScene(scene);
    Utils.centerMessgeBoxStage(stage);
    stage.show();

    root.requestFocus();
    scene.getAccelerators().put(new KeyCodeCombination(KeyCode.ENTER), stage::close);
    scene.getAccelerators().put(new KeyCodeCombination(KeyCode.BACK_SPACE), stage::close);
} catch (IOException e) {
	//...
}
First, create a new Stage, and then use the FXMLLoader to load the fxml file on the corresponding path. After obtaining the Parent, use the Parent to generate a Scene, and then add a style for the Scene.
Next is the processing of the control. The lookup here is similar to the findViewById in Android. Get the corresponding control according to the id, and note that you need to add the ා. After handling the control, center and display the stage, and bind the keyboard event and let the Parent get the focus.
5 back end part
5.1 back end overview
The back end takes the Spring Boot framework as the core, and the deployment mode is war, which is divided into three layers as a whole:
- Controller layer: responsible for receiving requests from the front end and calling business layer methods
- Business layer: handle major businesses, such as CRUD, image processing, etc
- Persistence layer: data persistence, using Hibernate+Spring Data JPA
Generally speaking, it doesn't use anything tall, and the logic is relatively simple.
5.2 overview
5.2.1 code tree
5.2.2 dependence
The main dependence is as follows:
- Spring Boot Starter Data JPA
- Guava
- Lombok
- Gson
- Apache Commons
- TencentCloud SDK Java
- Jasypt Spring Boot Starter
5.3 controller layer
The controller is divided into three categories: one deals with pictures, one deals with CRUD requests, one deals with SMS sending requests, and accepts POST ignore GET requests. The general processing flow is to judge the parameters first after receiving them, for example, to judge whether they are empty or legal. Then, call the methods of business layer and encapsulate the returned results. At the same time, log them. Finally, use Gson to convert the returned results into strings. Most of the code is relatively simple, so don't POST it. Let's talk about the part of SMS verification code.
The verification code module uses Tencent cloud function, official website here , search SMS function.
New users will give 100 SMS messages by default:
Before sending, you need to create a signature and body template, which can be used after approval.
You can try the SMS function according to the quick start first. If you can receive the SMS successfully, you can Poke here Check out the API (Java version). The following example is given by Document example Simplify:
private void sendCode()
{
    try
    {
        SmsClient client = new SmsClient(new Credential(TencentSDK.id,TencentSDK.key),"");
        SendSmsRequest request = new SendSmsRequest();
        request.setSmsSdkAppid(TencentSDK.appId);
        request.setSign(TencentSDK.sign);
        request.setTemplateID(TencentSDK.templateId);

        randomCode = RandomStringUtils.randomNumeric(6);
        String [] templateParamSet = {randomCode};
        request.setTemplateParamSet(templateParamSet);

        String [] phoneNumbers = {"+86"+cellphone.getText()};
        request.setPhoneNumberSet(phoneNumbers);
        response = client.SendSms(request);
    } catch (Exception e) {
        L.error("Not send code or send code failed");
        AlertView.show("Verification code not sent or failed to send");
    }
}
among TencentSDK.appId,TencentSDK.sign,TencentSDK.templateID The app id, signature id and body template id of the reader respectively will be assigned after the application is passed, and then the verification code of six digits will be randomly generated.
next request.setPhoneNumberSet() is the String array of mobile phone numbers to be sent. Note that the area code needs to be added. If it is sent successfully, the phone will receive it. If it fails, please modify it according to the abnormal information.
The only thing to note is that data such as appid can get Value through configuration file with @ Value, such as:
@Controller
@RequestMapping("/")
public class SmsController {
    @Value("${tencent.secret.id}")
    private String secretId;
    ...
}
However, since the sign part contains Chinese, the code conversion is required:
@Value("${tencent.sign}")
private String sign;

@PostConstruct
public void init()
{
    sign = new String(sign.getBytes(StandardCharsets.ISO_8859_1),StandardCharsets.UTF_8);
}
5.4 business layer and persistence layer
Because the business layer and the persistence layer in the program are relatively simple, they can be combined together. For example, the saveOne method in the business layer saves a Worker. First, use the Gson to convert it into a Worker, and then directly use the save method provided by crudrespostory < T, ID >
public ReturnCode saveOne(String json) {
    ReturnCode s = ReturnCode.SAVE_ONE_SUCCESS;
    Worker worker = Conversion.JSONToWorker(json);
    if (Check.isEmpty(worker)) {
        L.emptyWorker();
        s = ReturnCode.EMPTY_WORKER;
    }
    else
        workerRepository.save(worker);
    return s;
}
In addition, because the parameter of saveAll method of curdrepository < T and ID > is iterative < s >, you can directly save list < s >, for example:
public ReturnCode saveAll(List<Worker> workers)
{
    workerRepository.saveAll(workers);
    return ReturnCode.SAVE_ALL_SUCCESS;
}
You need to convert the String sent by the front end to list < s > in the control layer.
5.5 log
The log uses Spring Boot's own log system, which simply configures the log path. In addition, the format of the log is customized (because the pursuit of clean output feels that the configuration file is not well implemented, so a tool class is customized).
For example, log interception is as follows:
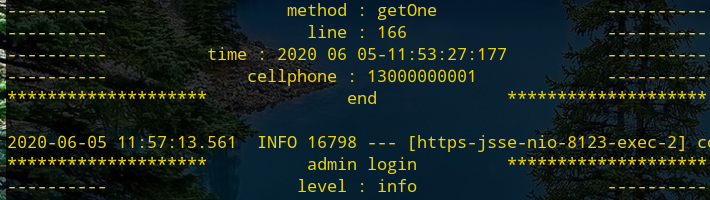
The title and fixed output of each line are customized, and the prompt is added before and after, including method, level, time and other information.
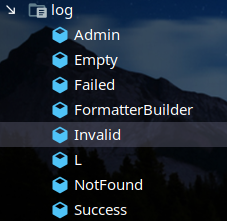
In general, there are 7 classes except formatter, in which l is the main class, external classes only need to call L's methods, all of which are static methods, and the rest 6 are l calling classes:
If the backup is successful, call:
public Success
{
	public static void backup()
	{
	    l.info(new FormatterBuilder().title(getTitle()).info().position().time().build());
	}
	//...
}
FormatterBuilder is the formatter, which is used to format the output string. The methods include time, location, level and other information:
public FormatterBuilder info()
{
    return level("info");
}
public FormatterBuilder time()
{
    content("time",getCurrentTime());
    return this;
}
private FormatterBuilder level(String level)
{
    content("level",level);
    return this;
}
public FormatterBuilder cellphone(String cellphone)
{
    content("cellphone",cellphone);
    return this;
}
public FormatterBuilder message(String message)
{
    content("message",message);
    return this;
}
5.6 tools

Four:
- Backup: scheduled database backup
- Check: check whether the validity is empty, etc
- Conversion: conversion class, which is almost the same as the front-end. It uses Gson to convert between String and List/Map/Worker
- ReturnCode: return code enumeration class
Focus on backup. The whole class will be pasted directly after the code is not long:
@Component
@EnableScheduling
public class Backup {
    private static final long INTERVAL = 1000 * 3600 * 12;
    @Value("${backup.command}")
    private String command;
    @Value("${backup.path}")
    private String strPath;
    @Value("${spring.datasource.username}")
    private String username;
    @Value("${spring.datasource.password}")
    private String password;
    @Value("${spring.datasource.url}")
    private String url;
    @Value("${backup.dataTimeFormat}")
    private String dateTimeFormat;

    @Scheduled(fixedRate = INTERVAL)
    public void startBackup()
    {
        try
        {
            String[] commands = command.split(",");
            String dbname = url.substring(url.lastIndexOf("/")+1);
            commands[2] = commands[2] + username + " --password=" + password + " " + dbname + " > " + strPath +
                    dbname + "_" + DateTimeFormatter.ofPattern(dateTimeFormat).format(LocalDateTime.now())+".sql";
            Path path = Paths.get(strPath);
            if(!Files.exists(path))
                Files.createDirectories(path);
            Process process = Runtime.getRuntime().exec(commands);
            process.waitFor();
            if(process.exitValue() != 0)
            {
                InputStream inputStream = process.getErrorStream();
                StringBuilder str = new StringBuilder();
                byte []b = new byte[2048];
                while(inputStream.read(b,0,2048) != -1)
                    str.append(new String(b));
                L.backupFailed(str.toString());
            }
            L.backupSuccess();
        }
        catch (IOException | InterruptedException e)
        {
            L.backupFailed(e.getMessage());
        }
    }
}
First use @ Value to get the Value in the configuration file, then add @ scheduled to the backup method. @Scheduled is a Spring Boot annotation used to provide a scheduled task. It is used to control the execution of a task at a specified time or every other time (in this case, once every half a day). There are three main ways to configure the execution time:
- cron
- fixedRate
- fixedDelay
It will not be expanded here. The detailed usage can Poke here.
In addition, @ EnableScheduling needs to be added to the class before use. The backup method first uses url to get the database name, and then merges the backup command. Note that if you use win to develop the backup command locally, it will be different from linux:
//win
command[0]=cmd
command[1]=/c
command[2]=mysqldump -u username --password=your_password dbname > backupPath+File.separator+dbname+datetimeFormmater+".sql"

//Linux (CentOS test of local Manjaro + server passed)
command[0]=/bin/sh
command[1]=-c
command[2]=/usr/bin/mysqldump -u username --password=your_password dbname > backupPath+File.separator+dbname+datetimeFormmater+".sql"
Then judge whether the backup path exists, and then use the Process of Java to backup. If there is an error, use getErrorStream() to get the error information and record the log.
5.7 configuration file
5.7.1 profile classification
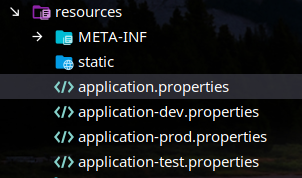
A total profile + three profiles for a specific environment (development, test, production), which can be used spring.profiles.active
Switch profiles, such as spring.profiles.active=dev , note that there are rules for naming, with a bar in the middle. In addition, the customized configuration needs to be in the additional spring configuration- metadata.json Add a field (not mandatory, but the IDE will prompt), such as:
"properties": [
    {
        "name": "backup.path",
        "type": "java.lang.String",
        "defaultValue": "null"
    },
]
5.7.2 encryption
In 2020, it's not good to use plaintext password in configuration file, right?
It's time to encrypt.
The Jasypt Spring Boot component is used. For the official github, please Poke here.
The usage is not detailed here. Please refer to another blog of the author for details, Poke here.
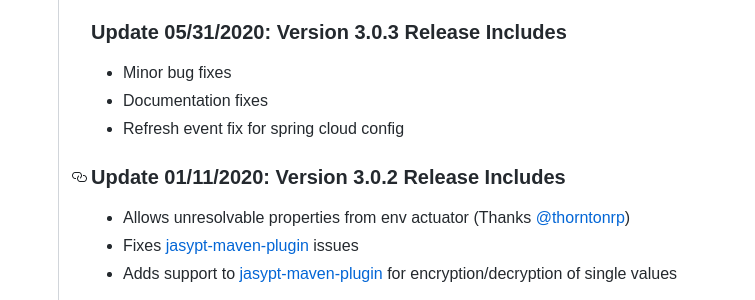
However, the latest version 3.0.2 measured by the author (the author has updated version 3.0.3 written on June 5, 2020.05.31, but the author has not tested it) has the following problems:
Description:

Failed to bind properties under 'spring.datasource.password' to java.lang.String:

    Reason: Failed to bind properties under 'spring.datasource.password' to java.lang.String

Action:

Update your application's configuration
Solution and detailed description of the problem Poke here.
6 deployment and packaging
6.1 front end packaging
First, let's talk about the front-end packaging process. Simply speaking, jar can run across platforms. But if it's a specific platform, such as win, it still needs some extra operations to build exe without additional JDK environment. Here's a brief introduction to the packaging process.
6.1.1 IDEA package once
Maven plug-ins are required for packaging. The commonly used Maven packaging plug-ins are as follows:
- Make jar plugin: the default package jar plug-in. The generated jar is very small, but the lib needs to be placed in the same directory as the jar to print ordinary jar packages
- Maven shade plugin: it provides two basic functions: packaging the dependent jar package into the current jar package, renaming and filtering the dependent jar package
- Maven assembly plugin: it supports customized packaging and more is the reassembly of project directory
This project is packaged with Maven shade plugin.
It needs to be introduced first (after the introduction, the original Maven plug-in can be removed). The latest version Poke here Official github view:
<build>
	<plugins>
		<plugin>
			<groupId>org.apache.maven.plugins</groupId>
			<artifactId>maven-shade-plugin</artifactId>
            <version>3.2.4</version>
	            <executions>
	            	<execution>
	                    <phase>package</phase>
	                    <goals>
	                        <goal>shade</goal>
	                    </goals>
	                    <configuration>
	                        <transformers>
	                            <transformer implementation="org.apache.maven.plugins.shade.resource.ManifestResourceTransformer">
	                                <mainClass>xxxx.xxx.xxx.Main</mainClass>
	                            </transformer>
	                        </transformers>
	                    </configuration>
	                </execution>
	            </executions>
          </plugin>
	</plugins>
</build>
Just modify the main class:
<mainClass>xxxx.xxx.xxx.Main</mainClass>
You can then click Maven in the right column of IDEA to package:

In this way, there will be jar packages under target, which can run across platforms and only need to provide a JDK environment.
java -jar xxx.jar
The next two steps are to use exe4j and Enigma Virtual Box to form a single exe method. For Win only, you can skip or search other methods by yourself using Linux/Mac.
6.1.2 exe4j secondary packaging
6.1.2.1 exe4j
Exe4j can integrate Java applications into Java executable generation tools under Win, whether it is for servers, GUI or command line applications. Simply put, this project uses it to convert jar s to exe. Exe4j needs jre. It starts from JDK9 and needs to generate jre by itself. Therefore, you need to build jre by yourself and then use exe4j for packaging.
6.1.2.2 generate jre
The function of each module can here see:
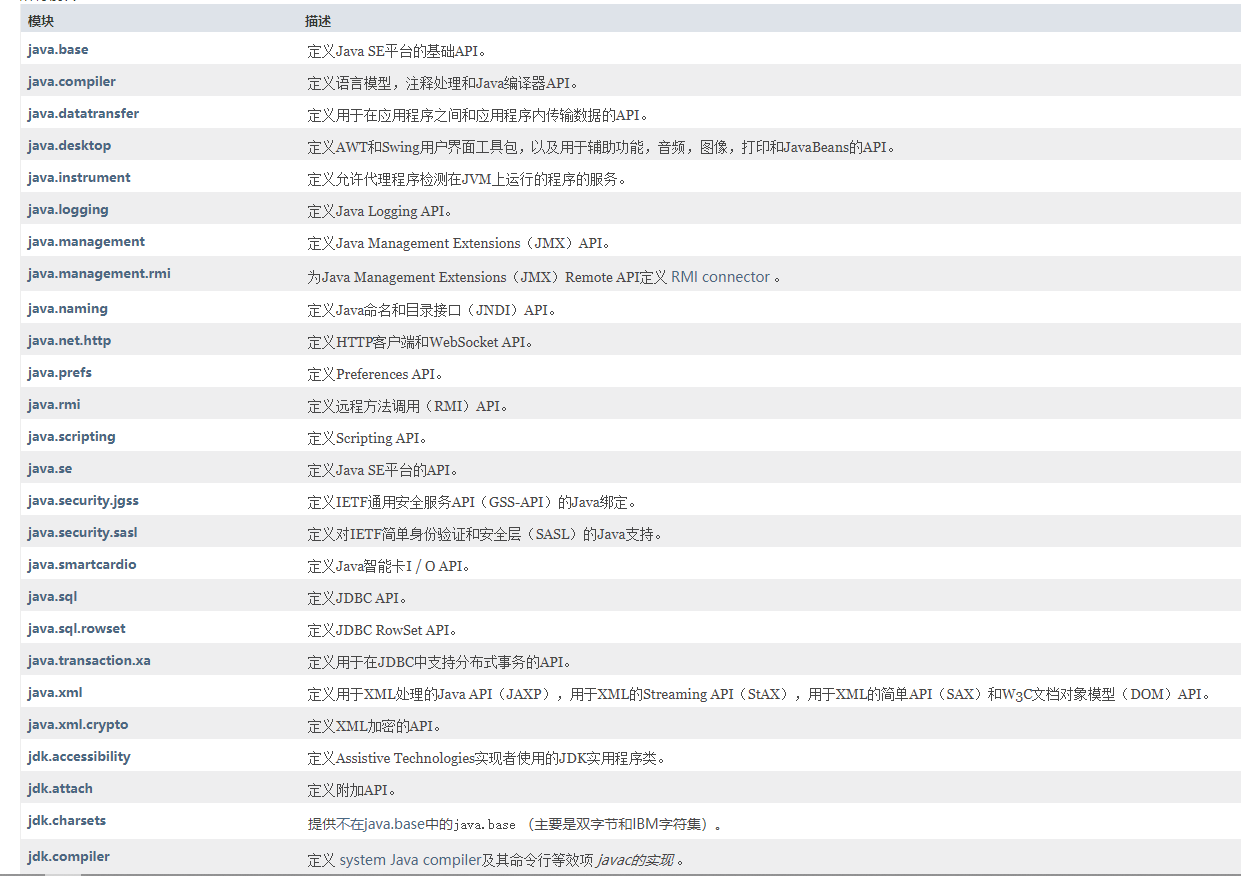
After testing, the modules required for this program are as follows:
java.base,java.logging,java.net.http,javafx.base,javafx.controls,javafx.fxml,javafx.graphics,java.sql,java.management
Switch to the JDK directory and use jlink to generate jre:
jlink --module-path jmods --add-modules
java.base,java.logging,java.net.http,javafx.base,javafx.controls,javafx.fxml,javafx.graphics,java.sql,java.management
--output jre
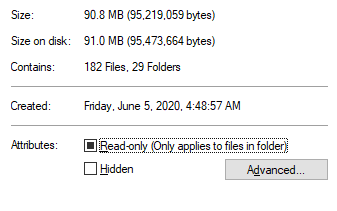
Because OpenJDK11 does not come with JavaFX, you need to Poke here Download JFX jmods of Win platform by yourself and move it to jmods directory of JDK. The generated jre size is 91M:
If it is not clear which modules can be used, but it is not recommended:
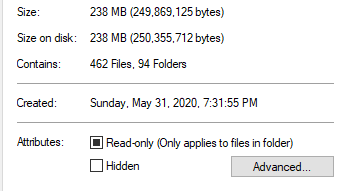
jlink --module-path jmods --add-modules
java.base,java.compiler,java.datatransfer,java.xml,java.prefs,java.desktop,java.instrument,java.logging,java.management,java.security.sasl,java.naming,java.rmi,java.management.rmi,java.net.http,java.scripting,java.security.jgss,java.transaction.xa,java.sql,java.sql.rowset,java.xml.crypto,java.se,java.smartcardio,jdk.accessibility,jdk.internal.vm.ci,jdk.management,jdk.unsupported,jdk.internal.vm.compiler,jdk.aot,jdk.internal.jvmstat,jdk.attach,jdk.charsets,jdk.compiler,jdk.crypto.ec,jdk.crypto.cryptoki,jdk.crypto.mscapi,jdk.dynalink,jdk.internal.ed,jdk.editpad,jdk.hotspot.agent,jdk.httpserver,jdk.internal.le,jdk.internal.opt,jdk.internal.vm.compiler.management,jdk.jartool,jdk.javadoc,jdk.jcmd,jdk.management.agent,jdk.jconsole,jdk.jdeps,jdk.jdwp.agent,jdk.jdi,jdk.jfr,jdk.jlink,jdk.jshell,jdk.jsobject,jdk.jstatd,jdk.localedata,jdk.management.jfr,jdk.naming.dns,jdk.naming.rmi,jdk.net,jdk.pack,jdk.rmic,jdk.scripting.nashorn,jdk.scripting.nashorn.shell,jdk.sctp,jdk.security.auth,jdk.security.jgss,jdk.unsupported.desktop,jdk.xml.dom,jdk.zipfs,javafx.web,javafx.swing,javafx.media,javafx.graphics,javafx.fxml,javafx.controls,javafx.base
--output jre
Size 238M:
6.1.2.3 exe4j packaging
exe4j use reference here The first interface should be as follows:
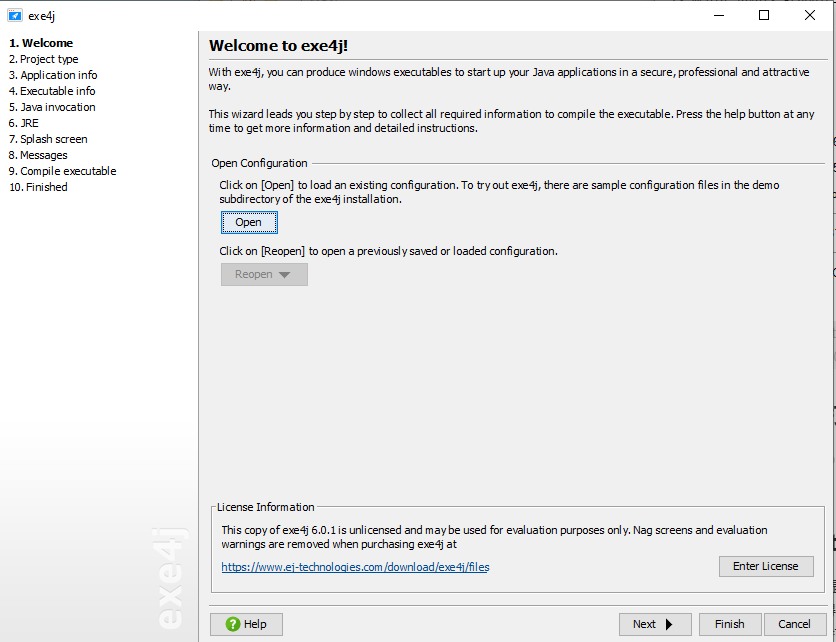
The configuration file does not exist for the first time. next is OK.
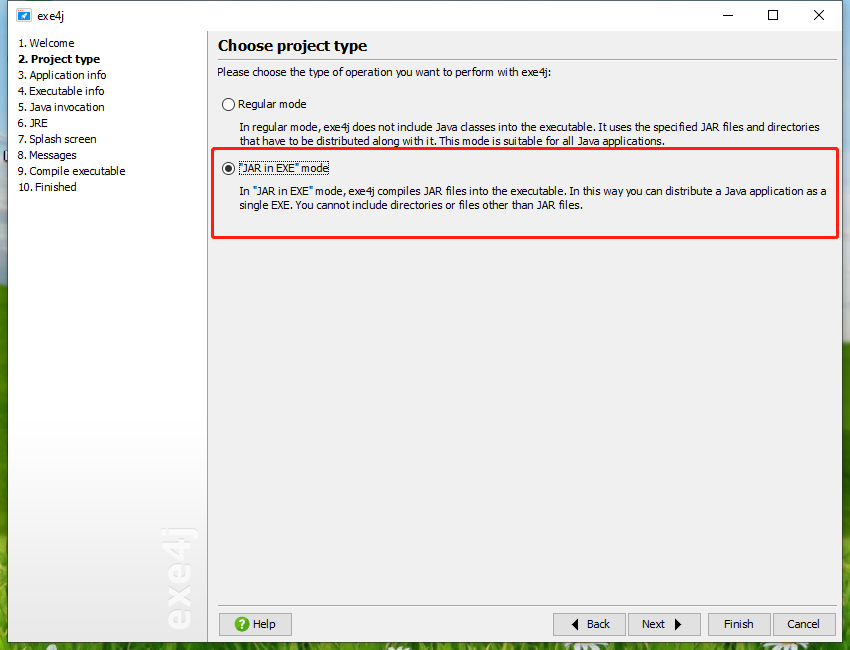
Select JAR in EXE mode:
Fill in name and output directory:
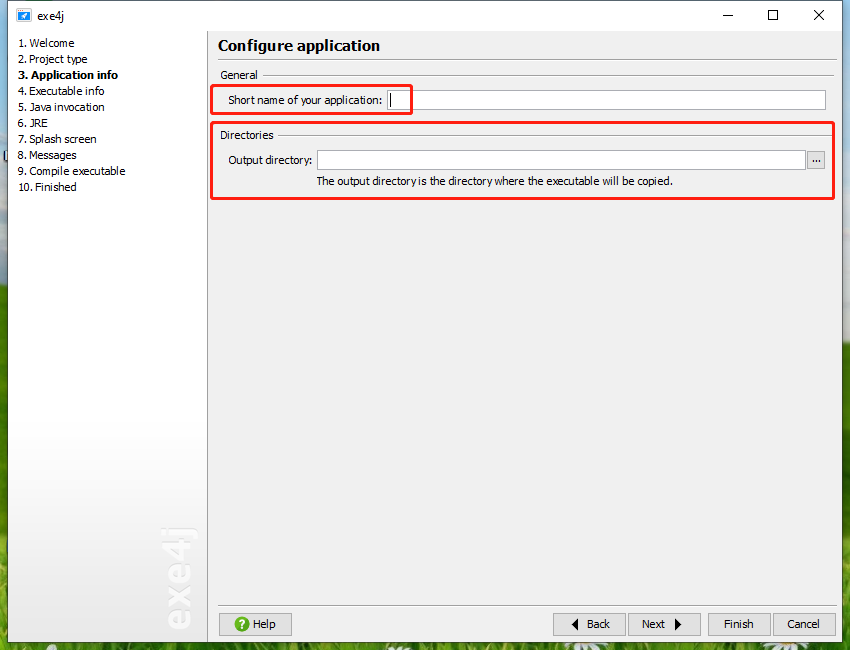
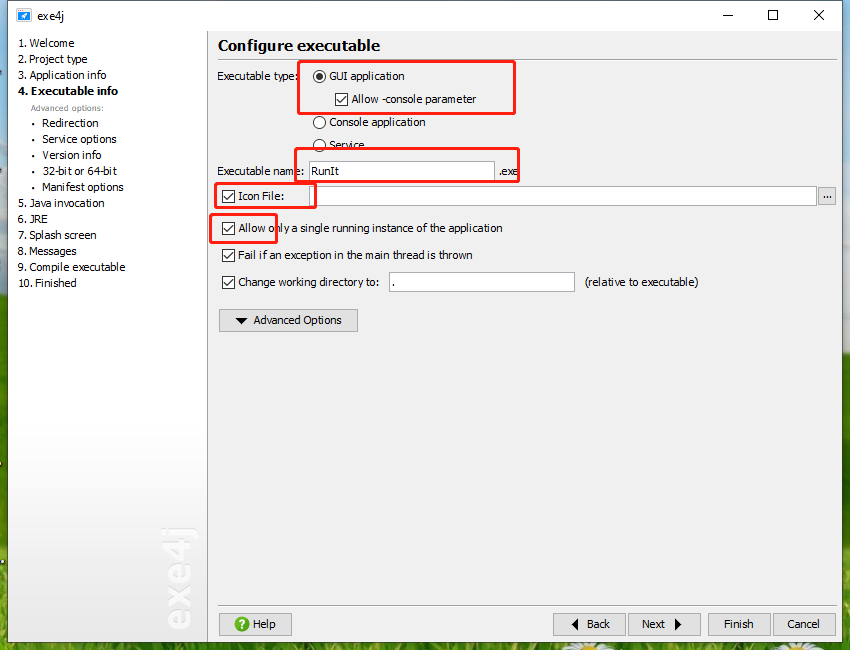
The type here is GUI application. Fill in the name of the executable file, select the icon path, and check allow a single application instance to run:
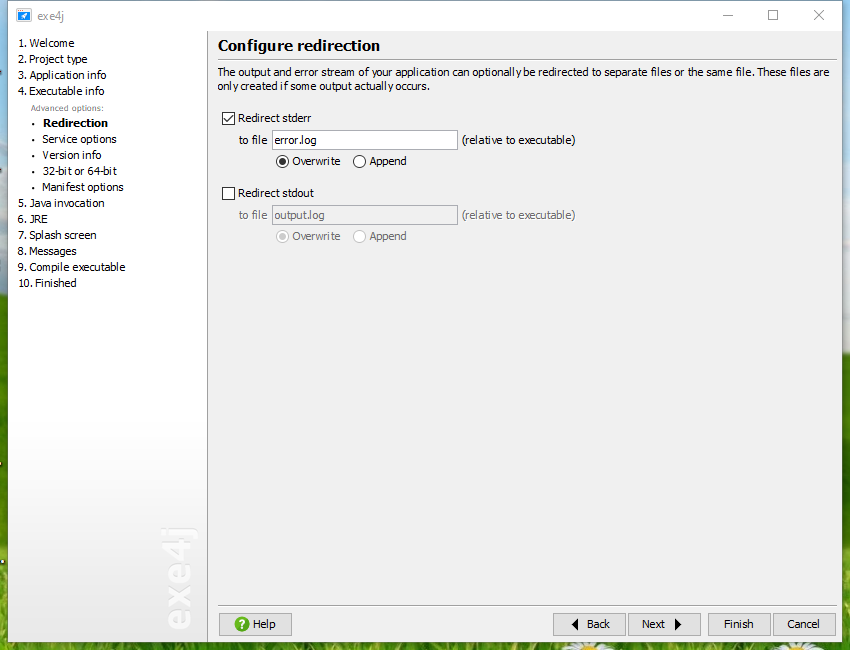
Redirection here you can select the output directory of standard output stream and standard error stream. If you don't need to, the default is:
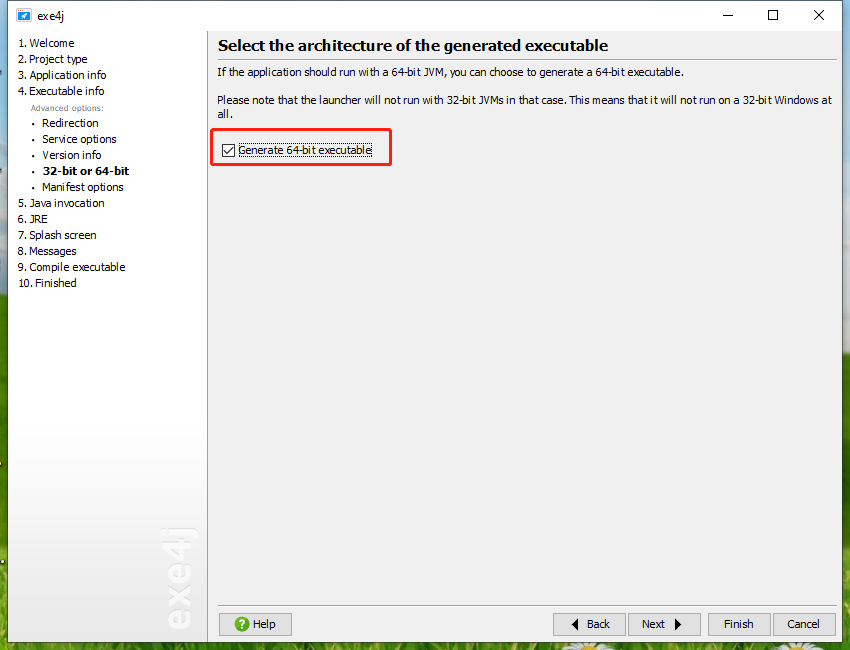
64 bit Win needs to check to generate 64 bit executable file:
Next, Java classes and JRE path settings:
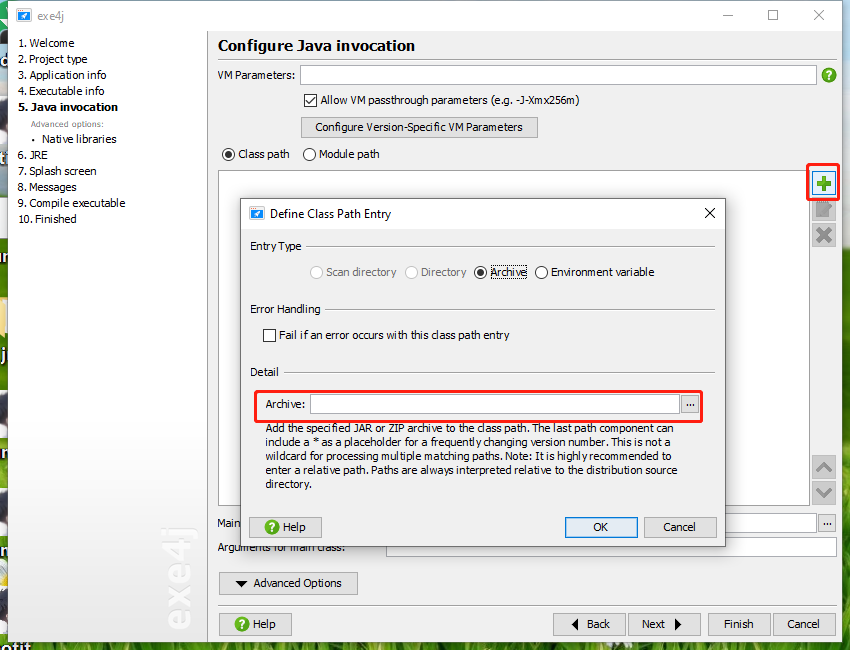
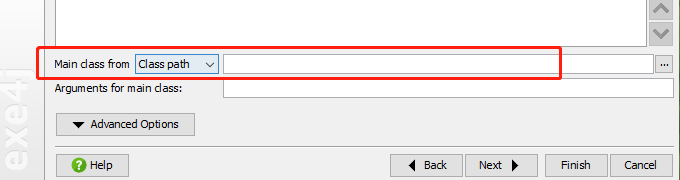
Select the jar generated by IDEA, and then fill in the main class path:
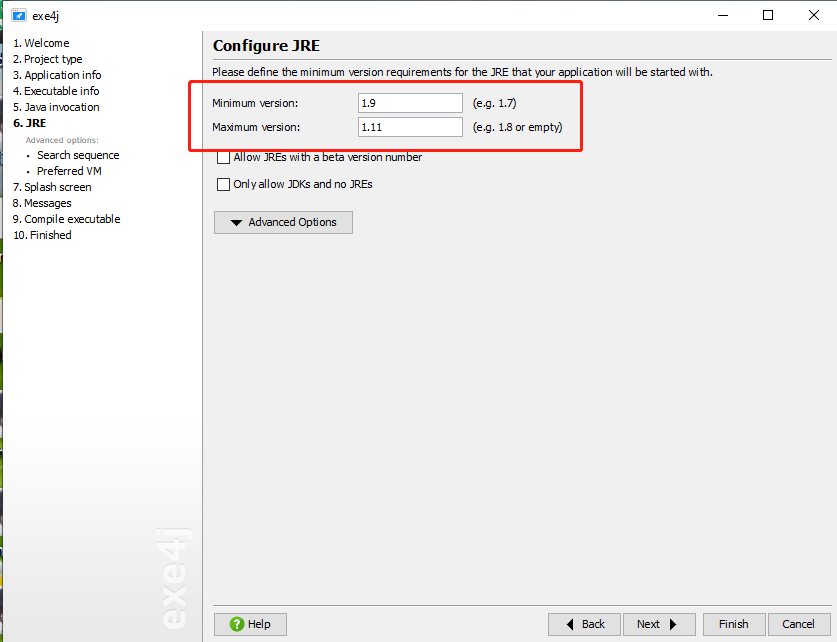
Set the minimum and maximum supported versions of jre:
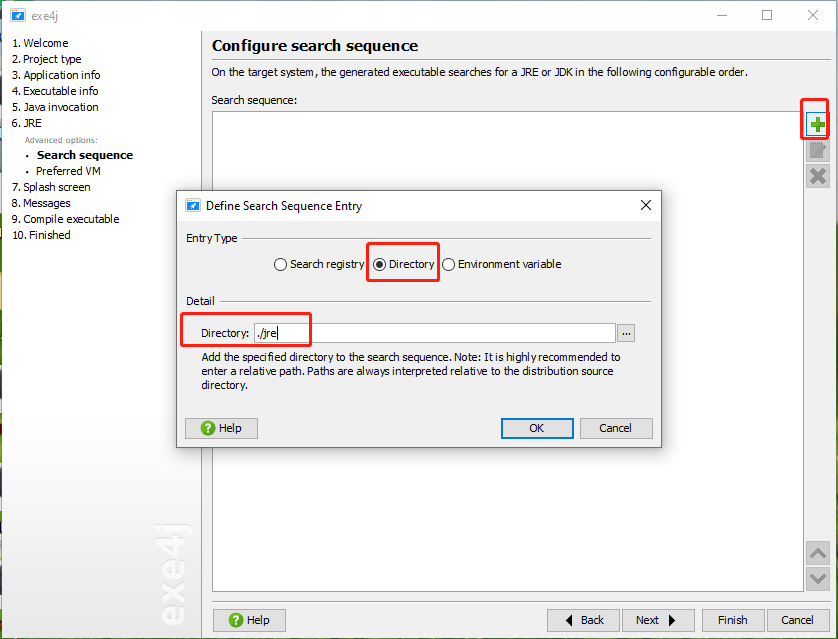
The next step is to specify the JRE search path. First, delete the default three locations:
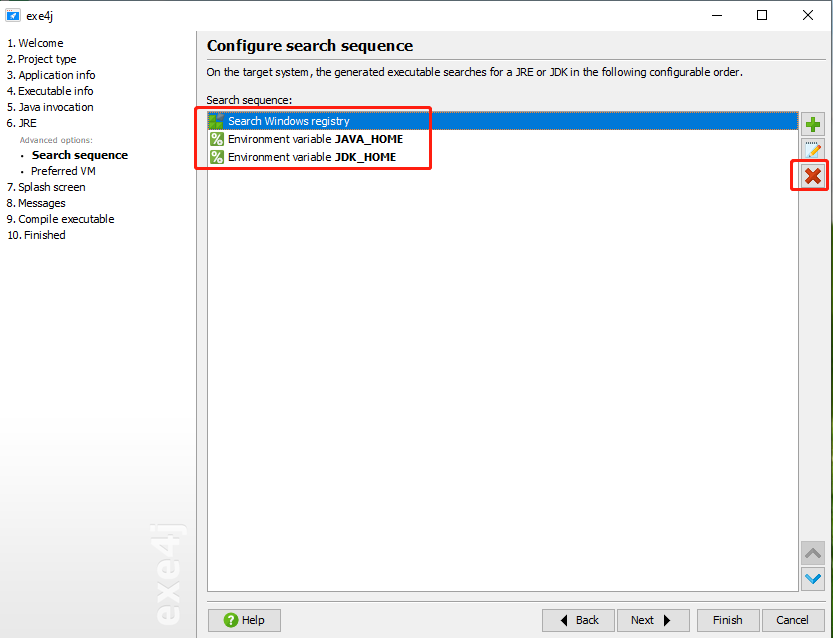
Then select the jre generated before, place the jre in the same directory as the jar, and fill in the path of the jre in the current directory:
Next, just click next. When finished, you will be prompted exe4j has finished. Run the test directly once:
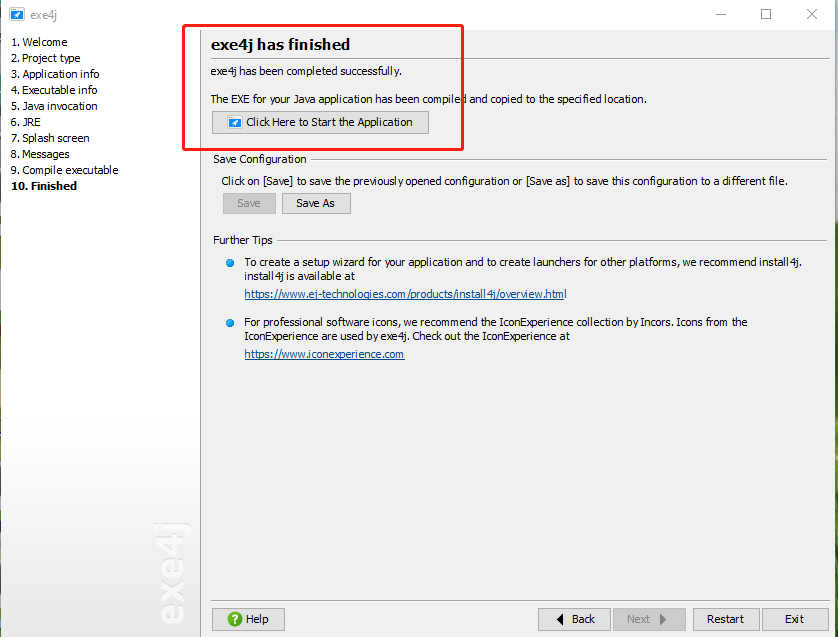
First, you will be prompted that this is generated with exe4j:

If there is no missing module, it can be started normally. If there is a missing module, it will generate one in the current exe path by default error.log , view and add the corresponding module and use jlink to generate jre again, and use exe4j to package again.
6.1.3 package enigma virtual box three times
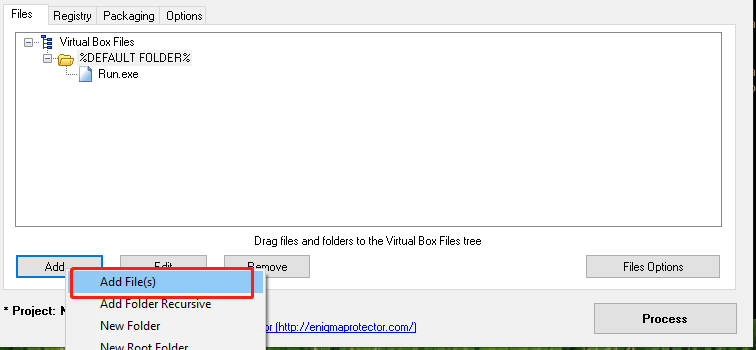
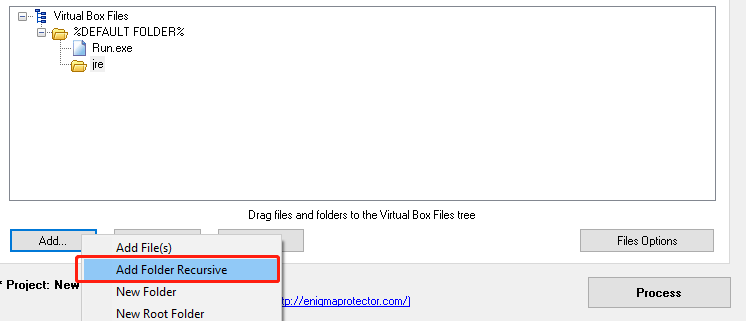
After using the exe4j package, although it can also run directly, jre is too large, and the author has to install an EXE for this obsessive-compulsive disorder. Fortunately, I have used Enigma Virtual Box as a packaging tool before, which can package all files into an independent exe.
It's easy to use. First, add the EXE packed by exe4j:
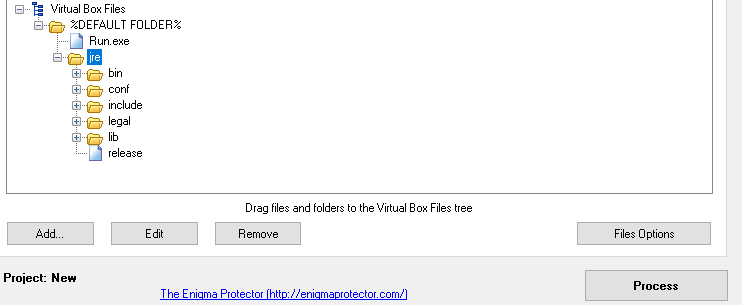
Then create a new jre directory and add the jre generated in the previous step:
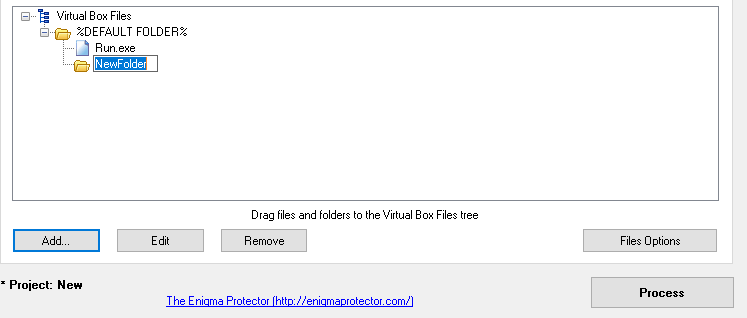
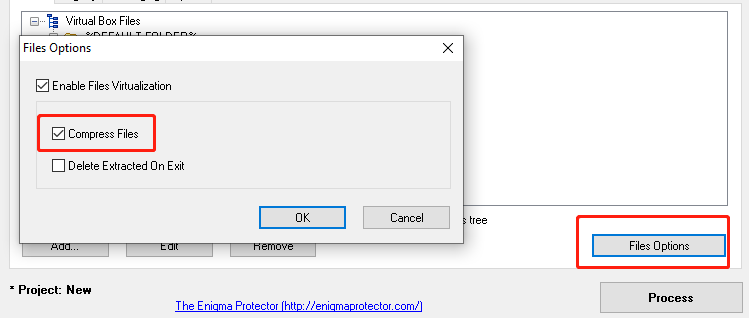
Finally, choose compressed file:
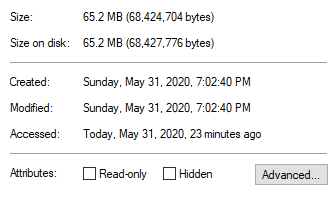
The size of the packaged individual exe is 65M, which saves space compared with the 89M jre that the exe4j also carries.
6.2 back end deployment
The way of back-end deployment is also simple. The way of War deployment is adopted. If the project is packaged with jar package, it can be converted into war package by itself. Please search for the specific conversion method by yourself. Because the Web server is Tomcat, you can directly put the war package under webapps, and other Web servers can search by themselves.
Of course, you can also use Docker deployment, but you need to use jar instead of war to search by yourself.
7 operation
This project has been packaged. The front end includes jar and exe, and the back end includes jar and war. First, run the back end (start the database service first): Using jar:
java -jar Backend.jar
Use war to directly put it under the webapps of Tomcat and then under bin:
./startup.sh
Then run the front-end. For Windows, you can run exe directly, or jar. For Linux, jar:
java -jar Frontend.jar
If the operation fails, you can open the project with IDEA to run directly in IDEA or package and run by yourself.
8 precautions
8.1 path problem
Never use any relative path or absolute path directly for resource files, such as:
String path1 = "/xxx/xxx/xxx/xx.png";
String path2 = "xxx/xx.jpg";
In this way, there will be many problems. For example, it is possible that the result of running directly in IDEA is inconsistent with that of running as jar package, and the path cannot be read. In addition, there may be platform problems. As we all know, the path separator of Linux is inconsistent with that of Windows. Therefore, for resource files, the following methods are used uniformly:
String path = getClass().getResource("/image/xx.png");
The image is directly under the Resources folder. Others are similar, that is to say, the / here is under resources.
8.2 HTTPS
HTTPS is not provided by default, and the certificate file is not put up. The default port is the local port 8080. There are many articles about how OkHttp uses HTTPS, but most of them only write about how to configure HTTPS on the front end, without mentioning how to deploy the back end. Please refer to the author's This article , including the Tomcat configuration tutorial.
8.3 profile encryption
The configuration file uses jasypt spring boot open source component for encryption. There are three ways to set the password:
- Command line arguments
- Application environment variable
- System environment variable
The latest version is 3.0.3 (2020.05.31 update 3.0.3 In the past, when using version 3.0.2 for encryption, the author had no problem with the local test, but when deploying to the server, he would always prompt that he could not find the password, so he had to use the older version of 2.x, but after the new version came out, the author tried to deploy to the local Tomcat without any problem but no deployment to the server). It is recommended to use the latest version for deployment:
After all, the front and back span is quite large. Although it's a small bug fix, it's still recommended to try. It's estimated that there won't be a 3.0.2 problem.
In addition, remember to code the fields containing Chinese:
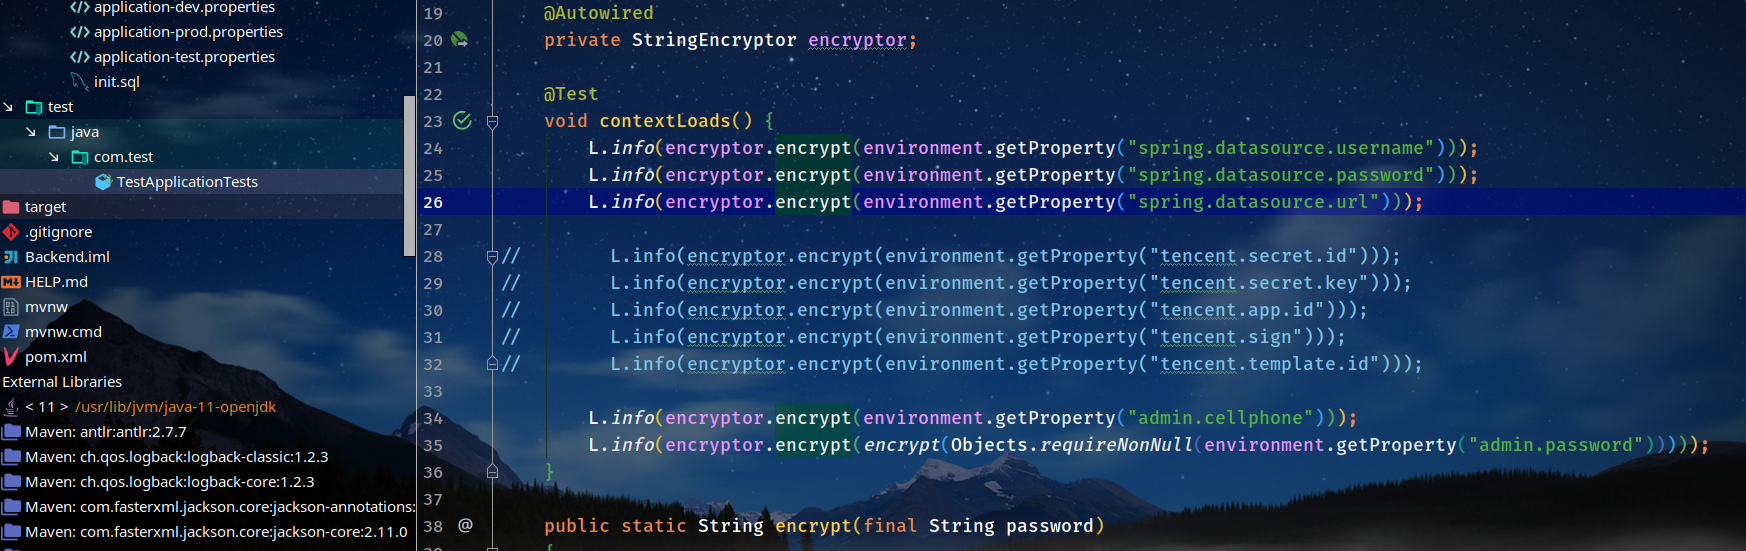
str = new String(str.getBytes(StandardCharsets.ISO_8859_1),StandardCharsets.UTF_8);)
In addition, the author has written the test file. First, replace the original ciphertext of the configuration file, fill in the plaintext and re encrypt:
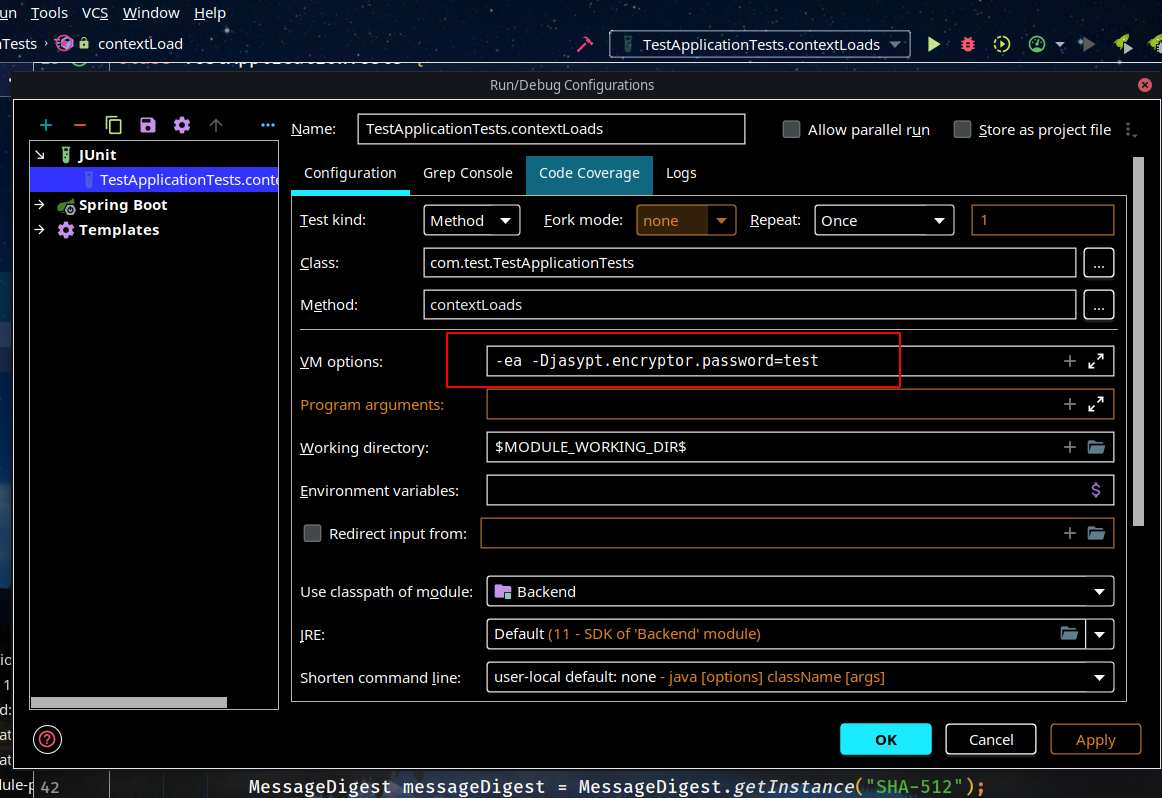
Note if not set in the configuration file jasypt.encryptor.password VM Options can be set in the running configuration (it is not recommended to write the password directly in the configuration file. Of course, PBE encryption is used by default, and asymmetric encryption can be used jasypt.encryptor.private -Key string or jasypt.encryptor.private-key-location):
8.4 keyboard events
To add a keyboard event, you can use the following code:
scene.getAccelerators().put(new KeyCodeCombination(KeyCode.ENTER), ()->{xxx});
//getAccelerators returns observablemap < key combination, runnable >
Before responding, you need to let the parent get the focus:
parent.requestFocus();
8.5 database
The default database name is app_test, user name test_user, password test_password, resources init.sql , just use MySQL import directly.

8.6 verification code
There is no self verification code function by default, and it is not open due to privacy issues. If necessary, you can refer to the Tencent cloud SMS API of the author or search other SMS verification APIs by yourself. Encryption is strongly recommended for information such as keys required by APIs written in configuration files.
9 source code
Front and rear complete code with README.md explain:
10 reference
1,Introduction and application of CSDN Maven shade plugin
2,Use of Maven assembly plugin, one of the three packaging methods of CSDN maven
3,Zhihu - making JRE with Java 11 and JavaFX
4,CSDN - use exe4j to type java file as EXE file to run detailed tutorial
5,Github-jasypt-spring-boot issue
7,Jianshu Linux Tomcat+Openssl one way / two way authentication
If you think the article is good-looking, please like it.
Meanwhile, welcome to WeChat official account: the Ling Ling Road.