[TOC]
Springboot integrates a lot of plug-ins. Compared with spring, springboot is a little bit
- Auto configuration: for many spring applications, springboot provides many auto configurations
- Start dependency: tell springboot what you need, and it will introduce the required Library
- Command line interface: optional features of springboot
- Autuator: monitor the operation of the springboot project
Basic construction of spring
- The configuration of springboot is simple. Inherit the pom of springboot in pom, and then rely on pom to inherit the required jar
<parent>
    <groupId>org.springframework.boot</groupId>
    <artifactId>spring-boot-starter-parent</artifactId>
    <version>2.0.3.RELEASE</version>
</parent>
<dependency>
    <groupId>org.springframework.boot</groupId>
    <artifactId>spring-boot-starter-web</artifactId>
</dependency>
<dependency>
    <groupId>org.springframework.boot</groupId>
    <artifactId>spring-boot-starter-test</artifactId>
    <scope>test</scope>
</dependency>
- Out of jar. We need to configure a plug-in in pom
<build>
    <plugins>
        <plugin>
            <groupId>org.springframework.boot</groupId>
            <artifactId>spring-boot-maven-plugin</artifactId>
        </plugin>
    </plugins>
</build>
Integrate mybatis
[see feature / 0002 / spring mybatis branch]
- We have combed the operation mechanism and points for attention of mybatis before. The development of Java Web is inseparable from spring. A complete framework is inseparable from sping. So it is imperative for spring to integrate mybatis. Let's implement how to integrate mybatis and some excellent plug-ins under spring to build the architecture
pom configuration
- We finished the first step by adding our mybatis jar in the pom of the springboot project.
- One is the integration jar of mybatis and spring. Open springboot to load mybatis project
- One is spring's AOP jar package. The main problem is to realize the transaction of mybatis
- One is mysql jar package. It depends on your own needs. If you use oracle in your project, just add oracle coordinates for a long time
- druid is the data source of management data
<dependency>
    <groupId>org.mybatis.spring.boot</groupId>
    <artifactId>mybatis-spring-boot-starter</artifactId>
    <version>1.3.1</version>
</dependency>
<dependency>
    <groupId>org.springframework.boot</groupId>
    <artifactId>spring-boot-starter-aop</artifactId>
</dependency>
<dependency>
    <groupId>mysql</groupId>
    <artifactId>mysql-connector-java</artifactId>
</dependency>
<dependency>
    <groupId>com.alibaba</groupId>
    <artifactId>druid</artifactId>
    <version>1.1.10</version>
</dependency>
mybatis configuration
- The pom settings above have prepared the basic jar for the mybatis development phase. With the above package, we can build mybatis. Normally, we configure a bean configuration class MybatisConfig in our springboot project
set up data sources
@Bean
@ConfigurationProperties("spring.datasource")
public DataSource primaryDataSource() {
    // For the sake of demonstration, it's temporarily written down. In fact, you can use autoConfigure to assemble parameters
    DruidDataSource dataSource = new DruidDataSource();
    dataSource.setUsername("root");
    dataSource.setPassword("123456");
    dataSource.setDriverClassName("com.mysql.jdbc.Driver");
    dataSource.setUrl("jdbc:mysql://192.168.44.130:3306/others?useUnicode=true&characterEncoding=utf8");
    return dataSource;
}
- In springboot, we just need to add bean annotation to the method, which is equivalent to the bean tag we configured in spring's xml. In java code we can do our business processing. Personal understanding feels more controllable. Because we use mysql. So here we simply use druid's data source
Set sqlsessionfactory
@Bean
public SqlSessionFactory primarySqlSessionFactory() {
    SqlSessionFactory factory = null;
    try {
        SqlSessionFactoryBean sqlSessionFactoryBean = new SqlSessionFactoryBean();
        sqlSessionFactoryBean.setDataSource(primaryDataSource());
        sqlSessionFactoryBean.setConfigLocation(new DefaultResourceLoader().getResource("classpath:mybatis-primary.xml"));
        sqlSessionFactoryBean.setMapperLocations(new PathMatchingResourcePatternResolver().getResources("classpath*:/com/github/zxhtom.**./*.xml"));
        factory = sqlSessionFactoryBean.getObject();
    } catch (Exception e) {
        e.printStackTrace();
    }
    return factory;
}
- In mybatis, sqlsesson is the most direct java class for us to operate the database. Managing sqlsession is the above SqlsessionFactory. So we have to configure it. Because of the integration with spring. The SqlsessionFactory of mybatis is managed by the sqlsessionfactorybean of spring. So let's build sqlsessionfactorybean first. Then configure the necessary data source, Configuration, the xml path of mybatis, etc
- SqlSessionFactoryBean set spring's FactoryBean property unexpectedly. Most importantly, you can set the sqlsessionfactory property of Mybatis. We just set it up. In the later stage, it can be continuously improved according to the requirements of the architecture.
- You can set the configuration of all mybatis, including plug-ins, caches, aliases, mapping processors, transactions, environments, etc
Set scan
@Bean
public MapperScannerConfigurer mapperScannerConfigurer() {
    MapperScannerConfigurer mapperScannerConfigurer = new MapperScannerConfigurer();
    mapperScannerConfigurer.setSqlSessionFactory(primarySqlSessionFactory());
    //The *. java,interface type java files corresponding to each table
    mapperScannerConfigurer.setBasePackage("com.github.zxhtom.**.mapper");
    return mapperScannerConfigurer;
}
- Our mapper interface in springboot is also scanned by spring. Before the mybatis program, we added it manually. Spring features can directly scan all java classes in the specified path. Here we set up the mapper path.
Set open transaction
- A good architecture can be used without transactions. It's also very simple for us to configure transactions. In spring boot, we recommend using java code to configure transactions. The following configuration is for easy reading. Configuration in TransactionConfig class
@Bean
public DataSourceTransactionManager primaryTransactionManager() {
    return new DataSourceTransactionManager(dataSource);
}
- The first is to configure the transaction manager. Transactions manage data sources. So here we need to load the DataSource in MybatisConfig. Not much here
- Then configure our notification point
@Bean
public TransactionInterceptor txAdvice() {
    DefaultTransactionAttribute txAttr_REQUIRED = new DefaultTransactionAttribute();
    txAttr_REQUIRED.setPropagationBehavior(TransactionDefinition.PROPAGATION_REQUIRED);

    DefaultTransactionAttribute txAttr_REQUIRED_READONLY = new DefaultTransactionAttribute();
    txAttr_REQUIRED_READONLY.setPropagationBehavior(TransactionDefinition.PROPAGATION_REQUIRED);
    txAttr_REQUIRED_READONLY.setReadOnly(true);

    NameMatchTransactionAttributeSource source = new NameMatchTransactionAttributeSource();
    source.addTransactionalMethod("add*", txAttr_REQUIRED);
    source.addTransactionalMethod("save*", txAttr_REQUIRED);
    source.addTransactionalMethod("delete*", txAttr_REQUIRED);
    source.addTransactionalMethod("update*", txAttr_REQUIRED);
    source.addTransactionalMethod("exec*", txAttr_REQUIRED);
    source.addTransactionalMethod("set*", txAttr_REQUIRED);
    source.addTransactionalMethod("get*", txAttr_REQUIRED_READONLY);
    source.addTransactionalMethod("query*", txAttr_REQUIRED_READONLY);
    source.addTransactionalMethod("find*", txAttr_REQUIRED_READONLY);
    source.addTransactionalMethod("list*", txAttr_REQUIRED_READONLY);
    source.addTransactionalMethod("count*", txAttr_REQUIRED_READONLY);
    source.addTransactionalMethod("is*", txAttr_REQUIRED_READONLY);
    return new TransactionInterceptor(primaryTransactionManager(), source);
}
- Finally, let's configure our cut-off point
@Bean
public Advisor txAdviceAdvisor() {
    AspectJExpressionPointcut pointcut = new AspectJExpressionPointcut();
    pointcut.setExpression(AOP_POINTCUT_EXPRESSION);
    return new DefaultPointcutAdvisor(pointcut, txAdvice());
}@Bean
public Advisor txAdviceAdvisor() {
    AspectJExpressionPointcut pointcut = new AspectJExpressionPointcut();
    pointcut.setExpression(AOP_POINTCUT_EXPRESSION);
    return new DefaultPointcutAdvisor(pointcut, txAdvice());
}
- Finally, it is explained. Because TransactionConfig is used to configure transactions and intercept, we need to add the following comments to deal with mine damage
@Configuration
@Aspect
@EnableTransactionManagement
Resource release
-
The above is a basic configuration of mybatis. But it can't be used at this time. Because the xml corresponding to our mapper is placed in the java directory. Normal src is java. xml files are not released at maven compilation time. We need special treatment
-
Add release configuration under pom build
<resources>
    <resource>
        <directory>src/main/java</directory>
        <includes>
            <include>**/*.xml</include>
            <include>**/*.properties</include>
            <include>**/*.yaml</include>
        </includes>
        <filtering>true</filtering>
    </resource>
    <resource>
        <directory>src/main/resources</directory>
        <includes>
            <include>**/*.*</include>
        </includes>
        <filtering>false</filtering>
    </resource>
</resources>
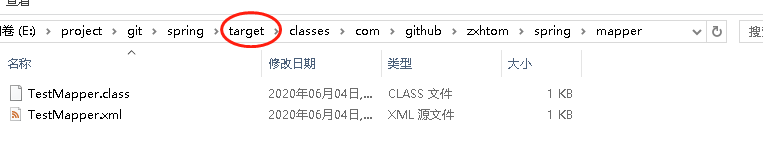
- After adding the following configuration, don't forget that clean is running. Prevent caching. After clean, look at the file under target
test
- To facilitate testing, we need to write test classes.
@SpringBootTest(classes = Application.class)
@RunWith(SpringJUnit4ClassRunner.class)
@WebAppConfiguration
public class TestDataSource {

    @Autowired
    private TestMapper testMapper;

    @Test
    public void test() {
        List<Map<String, Object>> test = testMapper.test();
        System.out.println(test);
    }
}
result

- Here is a piece of data in my query database. It mainly tests the process of integrating mybatis with springboot. Mybatis is integrated here.
Thinking & & question
- In the above configuration, we have access to mybatis. But it has been tested on other architectures of the author. When configuring data source in MybatisConfig class, you can directly new DruidDataSource. springboot will automatically obtain data source information through DataSourceProperties. But I haven't tried to succeed here. As for the principle, I didn't understand it. Here's an egg. I hope you can tell me what's going on
@Bean
@ConfigurationProperties(prefix = "spring.datasource")
public DataSource primaryDataSource() {
    return new DruidDataSource();
}
- The above code is much less configured than in this case. Although some friends say it can be done by mapping entities. But direct new objects are simpler for us. doubt
Using the universal mapper feature
[see feature / 0002 / spring mybatis TK page branch for details]
<dependency>
    <groupId>tk.mybatis</groupId>
    <artifactId>mapper</artifactId>
    <version>3.3.9</version>
</dependency>
-
These plug-ins are actually implemented by rewriting one of the four major components of myabtis that we learned before. So whether it's a general mapper or the later myabtis plus, we need to rewrite our myabtis configuration class.
-
First, when we want to access the general mapper, we need to use the scan configuration provided by tk instead
@Bean
public MapperScannerConfigurer mapperScannerConfigurer() {
    tk.mybatis.spring.mapper.MapperScannerConfigurer mapperScannerConfigurer = new tk.mybatis.spring.mapper.MapperScannerConfigurer();
    //MapperScannerConfigurer mapperScannerConfigurer = new MapperScannerConfigurer();
    mapperScannerConfigurer.setSqlSessionFactory(primarySqlSessionFactory());
    //The *. java,interface type java files corresponding to each table
    mapperScannerConfigurer.setBasePackage("com.github.zxhtom.**.mapper");
    return mapperScannerConfigurer;
}
- Then add a generic mapper configuration
@Bean()
public MapperHelper primaryMapperHelper() throws Exception {
    MapperHelper mapperHelper = new MapperHelper();

    Config config = mapperHelper.getConfig();
    //Table name field name is capitalized from hump to underline
    config.setStyle(Style.camelhumpAndUppercase);

    mapperHelper.registerMapper(Mapper.class);
    mapperHelper.processConfiguration(primarySqlSessionFactory().getConfiguration());
    return mapperHelper;
}
- The test code is simple.
User user = tkMapper.selectByPrimaryKey(1);
Using mybatis plus
[see feature / 0002 / spring mybatisplus branch for details]
- Mybatis plus is actually a universal mapper. It can be understood that there are different implementations. Accessing mybatis plus is very simple. First, we introduce coordinates
<dependency>
    <groupId>com.baomidou</groupId>
    <artifactId>mybatis-plus-boot-starter</artifactId>
    <version>2.2.0</version>
</dependency>
- Then we create the entity
@Data
@TableName(value = "person_info_large")
public class User {
    @TableId(value = "id",type = IdType.AUTO)
    private Integer id;
    private String account;
    private String name;
    private String area;
    private String title;
    private String motto;
}
- Then we write our Mapper. Need to inherit BaseMapper
public interface PlusMapper extends BaseMapper<User> {
}
- After the above preparation, you can basically query. But notice that we need to modify the class myaptisconfog above. Because after accessing mybatisplus, we need to use the sqlsession bean in mybatisplus.
@Bean
public SqlSessionFactory primarySqlSessionFactory() {
    SqlSessionFactory factory = null;
    try {
        MybatisSqlSessionFactoryBean sqlSessionFactoryBean = new MybatisSqlSessionFactoryBean();
        sqlSessionFactoryBean.setDataSource(primaryDataSource());
        sqlSessionFactoryBean.setConfigLocation(new DefaultResourceLoader().getResource("classpath:mybatis-primary.xml"));
        sqlSessionFactoryBean.setMapperLocations(new PathMatchingResourcePatternResolver().getResources("classpath*:com/github/zxhtom.**./*.xml"));
        sqlSessionFactoryBean.setTypeAliasesPackage("com.github.zxhtom.**.model");
        factory = sqlSessionFactoryBean.getObject();
    } catch (Exception e) {
        e.printStackTrace();
    }
    return factory;
}
- Same as general mapper. In this way, we can call the methods provided by BaseMapper to operate the database.
@Test
public void plusTest() {
    User user = plusMapper.selectById(1);
    System.out.println(user);
}
Using the paging plug-in
Inboard paging of mybatis plus
[see feature / 0002 / spring mybatisplus branch for details]
- First, we use the paging plug-in of mybatis plus to inject the plug-in class into the container
@Bean
public PaginationInterceptor paginationInterceptor() {
    return new PaginationInterceptor();
}
- Then we need to construct a Page object. Parameters are Page number and number of display items
return plusMapper.selectPage(page, null);
- It's that simple. Using the simple principle is the key point of our study. Like the principle of myabtis plug-in, you can leave a message. Take time to study
github paging plug-in
[see feature / 0002 / spring mybatis TK page branch for details]
-
Because myatis plus comes with a paging plug-in. It also shows how to use the myabtis plus plug-in. There is also an open paging plug-in on github. Here, it is combined with general mapper
-
The official update of pagehelper is very diligent. Two kinds of assembly are provided: pagehelper and springboot auto. I tested the pagehelper spring boot starter package here, which is not suitable for this case. Because the scanning mapper path in this case is registered through MapperScannerConfigurer. If you use pagehelper spring boot starter, the page blocker will fail. Let's look at the source code
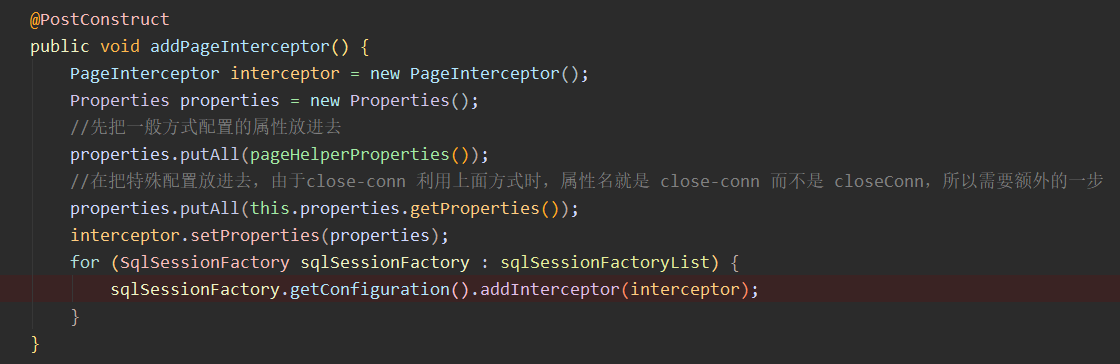
- This is because this version provides spring boot auto assembly. But when adding interceptors in the auto assembly code, sqlsessionfactory has not scanned mapper at this time. So the interceptor added at this time can't intercept our mapper. If you have to use this version. If we scan mapper, we can't pass MapperScannerConfigurer. The scan annotation @ mapperscan (basepackages ={“ com.github.zxhtom .**.mapper"}, sqlSessionFactoryRef = "primarySqlSessionFactory")
Use regular version
- For the purpose of this edition. Here we use the following coordinates
<dependency>
    <groupId>com.github.pagehelper</groupId>
    <artifactId>pagehelper</artifactId>
    <version>5.1.7</version>
</dependency>
- Use this version of pagehelper. There is no spring boot auto assembly. We can add our own plug-ins. There are two ways to add plug-ins. Like auto assembly version, it is added through Configuration, but we choose the time of adding through Condition condition Condition.
- Another simple way is to set s through SqlSessionFactoryBean qlSessionFactoryBean.setPlugins (new Interceptor[]{new PageInterceptor()});.
- Because the plug-ins added through sqlsessionFactoryBean are the same as those added in the settings file. Passing XmlFactory.build The configuration object will automatically install the plug-in on. mapper has also been scanned at this time.
@Bean
public SqlSessionFactory primarySqlSessionFactory() {
    SqlSessionFactory factory = null;
    try {
        SqlSessionFactoryBean sqlSessionFactoryBean = new SqlSessionFactoryBean();
        sqlSessionFactoryBean.setDataSource(primaryDataSource());
        sqlSessionFactoryBean.setConfigLocation(new DefaultResourceLoader().getResource("classpath:mybatis-primary.xml"));
        sqlSessionFactoryBean.setMapperLocations(new PathMatchingResourcePatternResolver().getResources("classpath*:com/github/zxhtom.**./*.xml"));
        sqlSessionFactoryBean.setTypeAliasesPackage("com.github.zxhtom.**.model");
        sqlSessionFactoryBean.setPlugins(new Interceptor[]{new PageInterceptor()});
        factory = sqlSessionFactoryBean.getObject();
    } catch (Exception e) {
        e.printStackTrace();
    }
    return factory;
}
summary
-
Here is a brief explanation of why the annotation scanning mapper is not applicable or the package scanning path is not configured in the configuration file. Because we can dynamically control the path through MapperScannerConfigurer. This seems to be more aggressive. In the actual development, the author recommends using annotation scanning. Because it can avoid unnecessary pits.
-
We have sorted out the four modules of [springboot integration mybaits], [mybatis plus], [general mapper] and [pagehelper plug-in integration], and found that the four components of myabtis are indispensable. In fact, we haven't touched the deep content of springboot. This article mainly focuses on myabtis. In the future, we will continue to derive and explore [myabtis+druid] monitoring data information.
-
You are welcome to pay attention to me if you like to study the source code and Kaiyuan framework
Code warehouse: https://gitee.com/zxhTom/spring/tree/feature/0002/spring-mybatisplus
#< span id = "addme" > join the team</span>
WeChat official account

theme

Non xml configuration springboot+mybatis transaction management