catalog
1. Display online map and positioning
2. Acquisition and display of base station information
3. Acquisition and analysis of geographic information
4. Display grid offline map (. tpk)
5. Display vector offline map (. vtpk)
3, Main problems and Solutions
Write at the beginning
The development of this APP is the final assignment of a course in this semester. There are three main requirements: display grid offline map slice (. tpk), display vector offline map slice (. vtpk), and realize mobile location based on base station.
As the first time I got in touch with Android development Xiaobai, I had a hard time in every step from the installation of Android Studio to the final realization of its functions. In the week of making APP, I have encountered many problems, big and small, and I have rewritten the code many times. I want to give up countless times, but I always tell myself to stick to it again to see if it can be solved. Finally, I successfully made this APP. Congratulations. In fact, this APP is not perfect, but for the first time, I'm satisfied with doing so without foundation. This is mainly to record the implementation process of APP, as well as various problems and solutions encountered by itself, hoping to help small partners in need.
text
This paper mainly shows the core code, but not the details of the code and some principles.
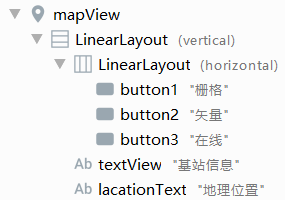
1, Interface layout
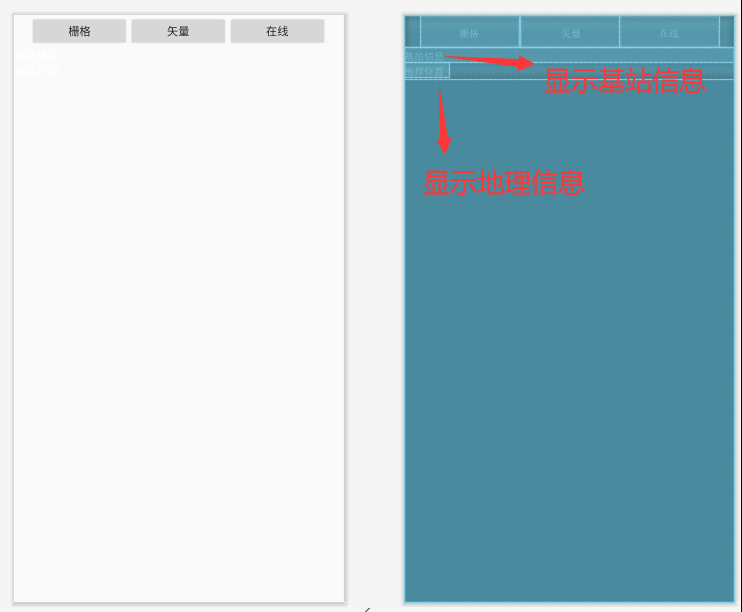
According to the function design, first of all, my interface needs a MapView in ArcGIS to display the map; three buttons are needed to switch and display the local grid, local vector and online map respectively; in addition, two textviews are needed to display the base station information and geographic information respectively.
My interface looks like this:
The structure of the whole interface is MapView at the outermost layer, as follows:
The above interface is directly implemented by code. I don't know how to implement it if I need to adjust it manually instead of using code. Here are the steps:
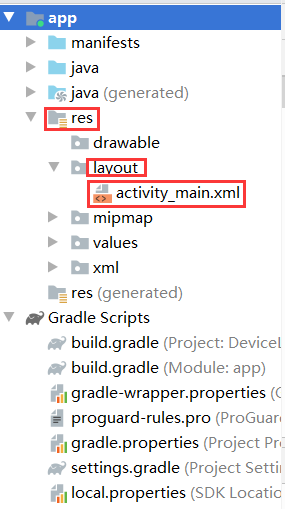
1. Find "activity" in the "layout" folder under the "res" folder in the location as shown below_ main.xml ”Documents for:
2. Open the above xml file. For the first time, you should first look at the design interface. Click Code in the upper right corner to switch to the Code interface:

3. Write the design code of our entire interface in the "RelativeLayout" tab, as follows:
<com.esri.arcgisruntime.mapping.view.MapView
        android:id="@+id/mapView"
        android:layout_width="match_parent"
        android:layout_height="match_parent" >

        <LinearLayout
            android:layout_width="match_parent"
            android:layout_height="wrap_content"
            android:layout_weight="1"
            android:orientation="vertical">
            <LinearLayout
                android:layout_width="match_parent"
                android:layout_height="40dp"
                android:orientation="horizontal"
                android:paddingLeft="20dp"
                android:paddingRight="20dp">

                <Button
                    android:id="@+id/button1"
                    android:layout_width="20dp"
                    android:layout_height="wrap_content"
                    android:layout_weight="1"
                    android:text="grid" />

                <Button
                    android:id="@+id/button2"
                    android:layout_width="20dp"
                    android:layout_height="wrap_content"
                    android:layout_weight="1"
                    android:text="vector" />
                <Button
                    android:id="@+id/button3"
                    android:layout_width="20dp"
                    android:layout_height="wrap_content"
                    android:layout_weight="1"
                    android:text="on-line" />
            </LinearLayout>

        <TextView
            android:id="@+id/textView"
            android:layout_width="match_parent"
            android:layout_height="wrap_content"
            android:textColor="#FFFFFF"
            android:text="Base station information" />
        <TextView
            android:id="@+id/lacationText"
            android:layout_width="wrap_content"
            android:layout_height="wrap_content"
            android:textColor="#FFFFFF"
            android:text="geographical position" />
        </LinearLayout>
</com.esri.arcgisruntime.mapping.view.MapView>
4. Return to the design interface to check whether the interface is the above layout.
5. In MainActivity.java Click events for the above three buttons are added to "onCreate" of. The code is as follows:
btngrid.setOnClickListener(new View.OnClickListener() {//Grid button
            @Override
            public void onClick(View view) {
                btngrid.setText("grid(now)");
                btnvector.setText("vector");
                btnonline.setText("on-line");
            }
        });
        btnvector.setOnClickListener(new View.OnClickListener() {//Vector button
            @Override
            public void onClick(View view) {
                btnvector.setText("vector(now)");
                btngrid.setText("grid");
                btnonline.setText("on-line");
            }
        });
        btnonline.setOnClickListener(new View.OnClickListener() {//Online button
            @Override
            public void onClick(View view) {
                btnonline.setText("on-line(now)");
                btnvector.setText("vector");
                btngrid.setText("grid");
            }
        });
2, Function realization
1. Display online map and positioning
For online map and location display, please refer to the Android development tutorial of ArcGIS.
Online map display: https://developers.arcgis.com/labs/android/create-a-starter-app/
Positioning display: https://developers.arcgis.com/labs/android/display-and-track-your-location/
Next, paste the code in your program.
The first is the online map display function. The Type of Basemap can be changed. Here is the grid map. You can also set it to vector map, street view map and so on. The code is as follows:
//Show online map
    private void setupMap() {
        if (mMapView != null) {
            Basemap.Type basemapType = Basemap.Type.IMAGERY_WITH_LABELS;
            double latitude = 34.09042;
            double longitude = -118.71511;
            int levelOfDetail = 6;
            map = new ArcGISMap(basemapType, latitude, longitude, levelOfDetail);
            mMapView.setMap(map);
        }
    }
Rewrite the three functions to display the online map correctly, directly in the "MainActivity" class. The code is as follows:
 @Override
    protected void onPause() {
        if (mMapView != null) {
            mMapView.pause();
        }
        super.onPause();
    }

    @Override
    protected void onResume() {
        super.onResume();
        if (mMapView != null) {
            mMapView.resume();
        }
    }

    @Override
    protected void onDestroy() {
        if (mMapView != null) {
            mMapView.dispose();
        }
        super.onDestroy();
    }
Location display (function implementation function + navigation permission to open the permission function):
//Location navigation
    private void setupLocationDisplay() {
        mLocationDisplay = mMapView.getLocationDisplay();
        mLocationDisplay.addDataSourceStatusChangedListener(dataSourceStatusChangedEvent -> {

            // If LocationDisplay started OK or no error is reported, then continue.
            if (dataSourceStatusChangedEvent.isStarted() || dataSourceStatusChangedEvent.getError() == null) {
                return;
            }

            int requestPermissionsCode = 2;
            String[] requestPermissions = new String[]{Manifest.permission.ACCESS_FINE_LOCATION, Manifest.permission.ACCESS_COARSE_LOCATION};

            // If an error is found, handle the failure to start.
            // Check permissions to see if failure may be due to lack of permissions.
            if (!(ContextCompat.checkSelfPermission(MainActivity.this, requestPermissions[0]) == PackageManager.PERMISSION_GRANTED
                    && ContextCompat.checkSelfPermission(MainActivity.this, requestPermissions[1]) == PackageManager.PERMISSION_GRANTED)) {

                // If permissions are not already granted, request permission from the user.
                ActivityCompat.requestPermissions(MainActivity.this, requestPermissions, requestPermissionsCode);
            } else {

                // Report other unknown failure types to the user - for example, location services may not
                // be enabled on the device.
                String message = String.format("Error in DataSourceStatusChangedListener: %s", dataSourceStatusChangedEvent
                        .getSource().getLocationDataSource().getError().getMessage());
                Toast.makeText(MainActivity.this, message, Toast.LENGTH_LONG).show();
            }
        });
        mLocationDisplay.setAutoPanMode(LocationDisplay.AutoPanMode.COMPASS_NAVIGATION);
        mLocationDisplay.startAsync();
    }

    @Override
    public void onRequestPermissionsResult(int requestCode, @NonNull String[] permissions, @NonNull int[] grantResults) {

        // If request is cancelled, the result arrays are empty.
        if (grantResults.length > 0 && grantResults[0] == PackageManager.PERMISSION_GRANTED) {

            // Location permission was granted. This would have been triggered in response to failing to start the
            // LocationDisplay, so try starting this again.
            mLocationDisplay.startAsync();
        } else {

            // If permission was denied, show toast to inform user what was chosen. If LocationDisplay is started again,
            // request permission UX will be shown again, option should be shown to allow never showing the UX again.
            // Alternative would be to disable functionality so request is not shown again.
            Toast.makeText(MainActivity.this, getResources().getString(R.string.location_permission_denied), Toast.LENGTH_SHORT).show();
        }
    }
Call methods: online map display and location display MainActivity.java Call "oncreate" in "oncreate" to ensure that the interface can be displayed when it is opened; in addition, call "online map display" again in "online button" to switch maps. Calling code in oncreate:
mMapView = findViewById(R.id.mapView);
setupMap();
setupLocationDisplay();
Finally, you need to check the AndroidManifest.xml Open permission in.
Online map display permission (network access + OpenGL rendering):
<uses-permission android:name="android.permission.INTERNET" />
<uses-feature android:glEsVersion="0x00020000" android:required="true" />
Navigation display authority (GPS location):
<uses-permission android:name="android.permission.ACCESS_COARSE_LOCATION" />
<uses-permission android:name="android.permission.ACCESS_FINE_LOCATION" />
Note: the function of onRequestPermissionsResult and the three Override functions do not need to be called. Just perform the above operations.
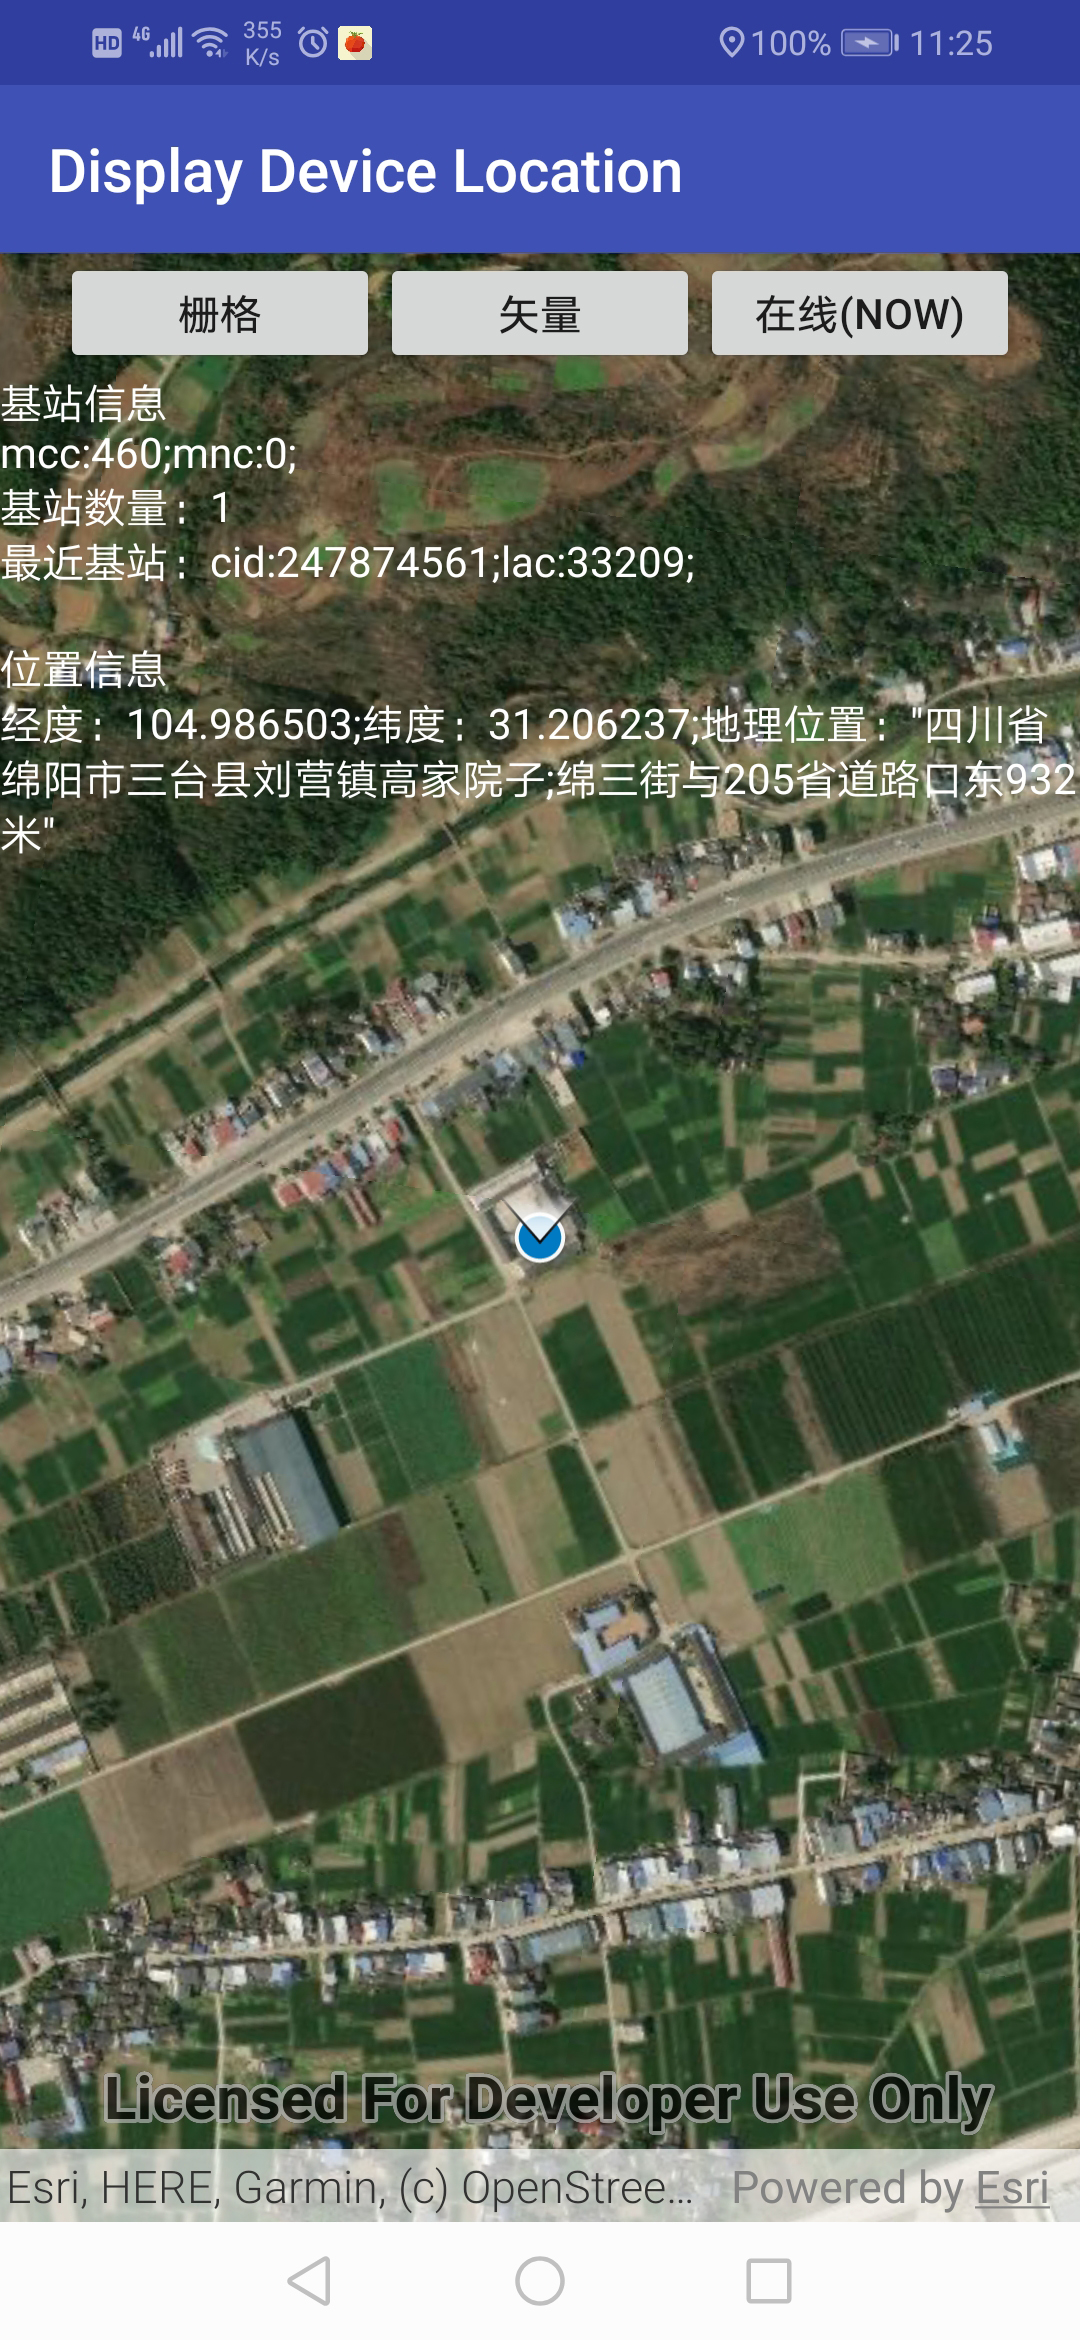
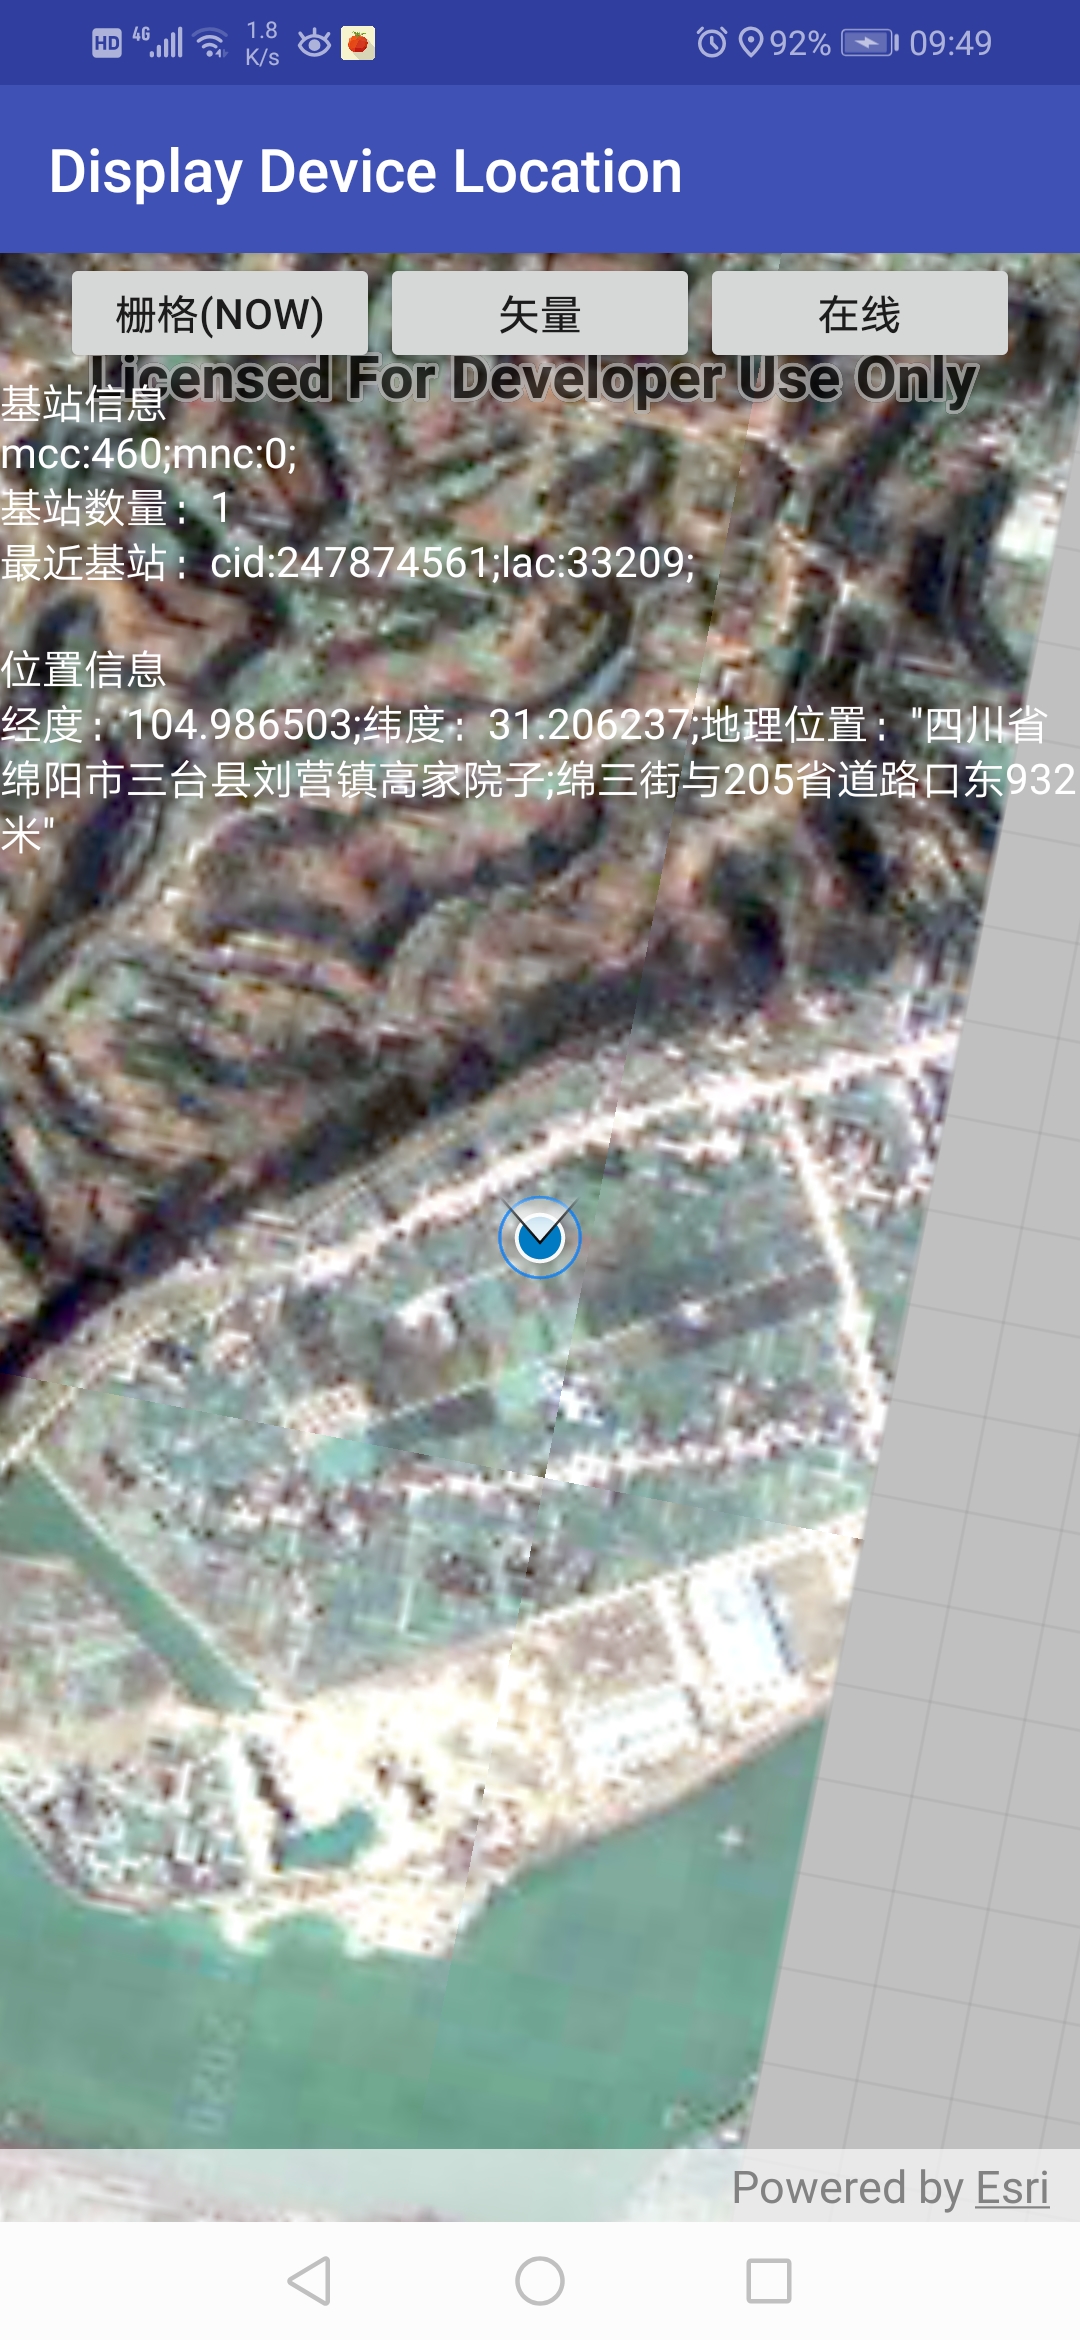
The rendering (online map + navigation) is shown below. This is the final result chart, so there are base station information and location information. I mosaic it first.

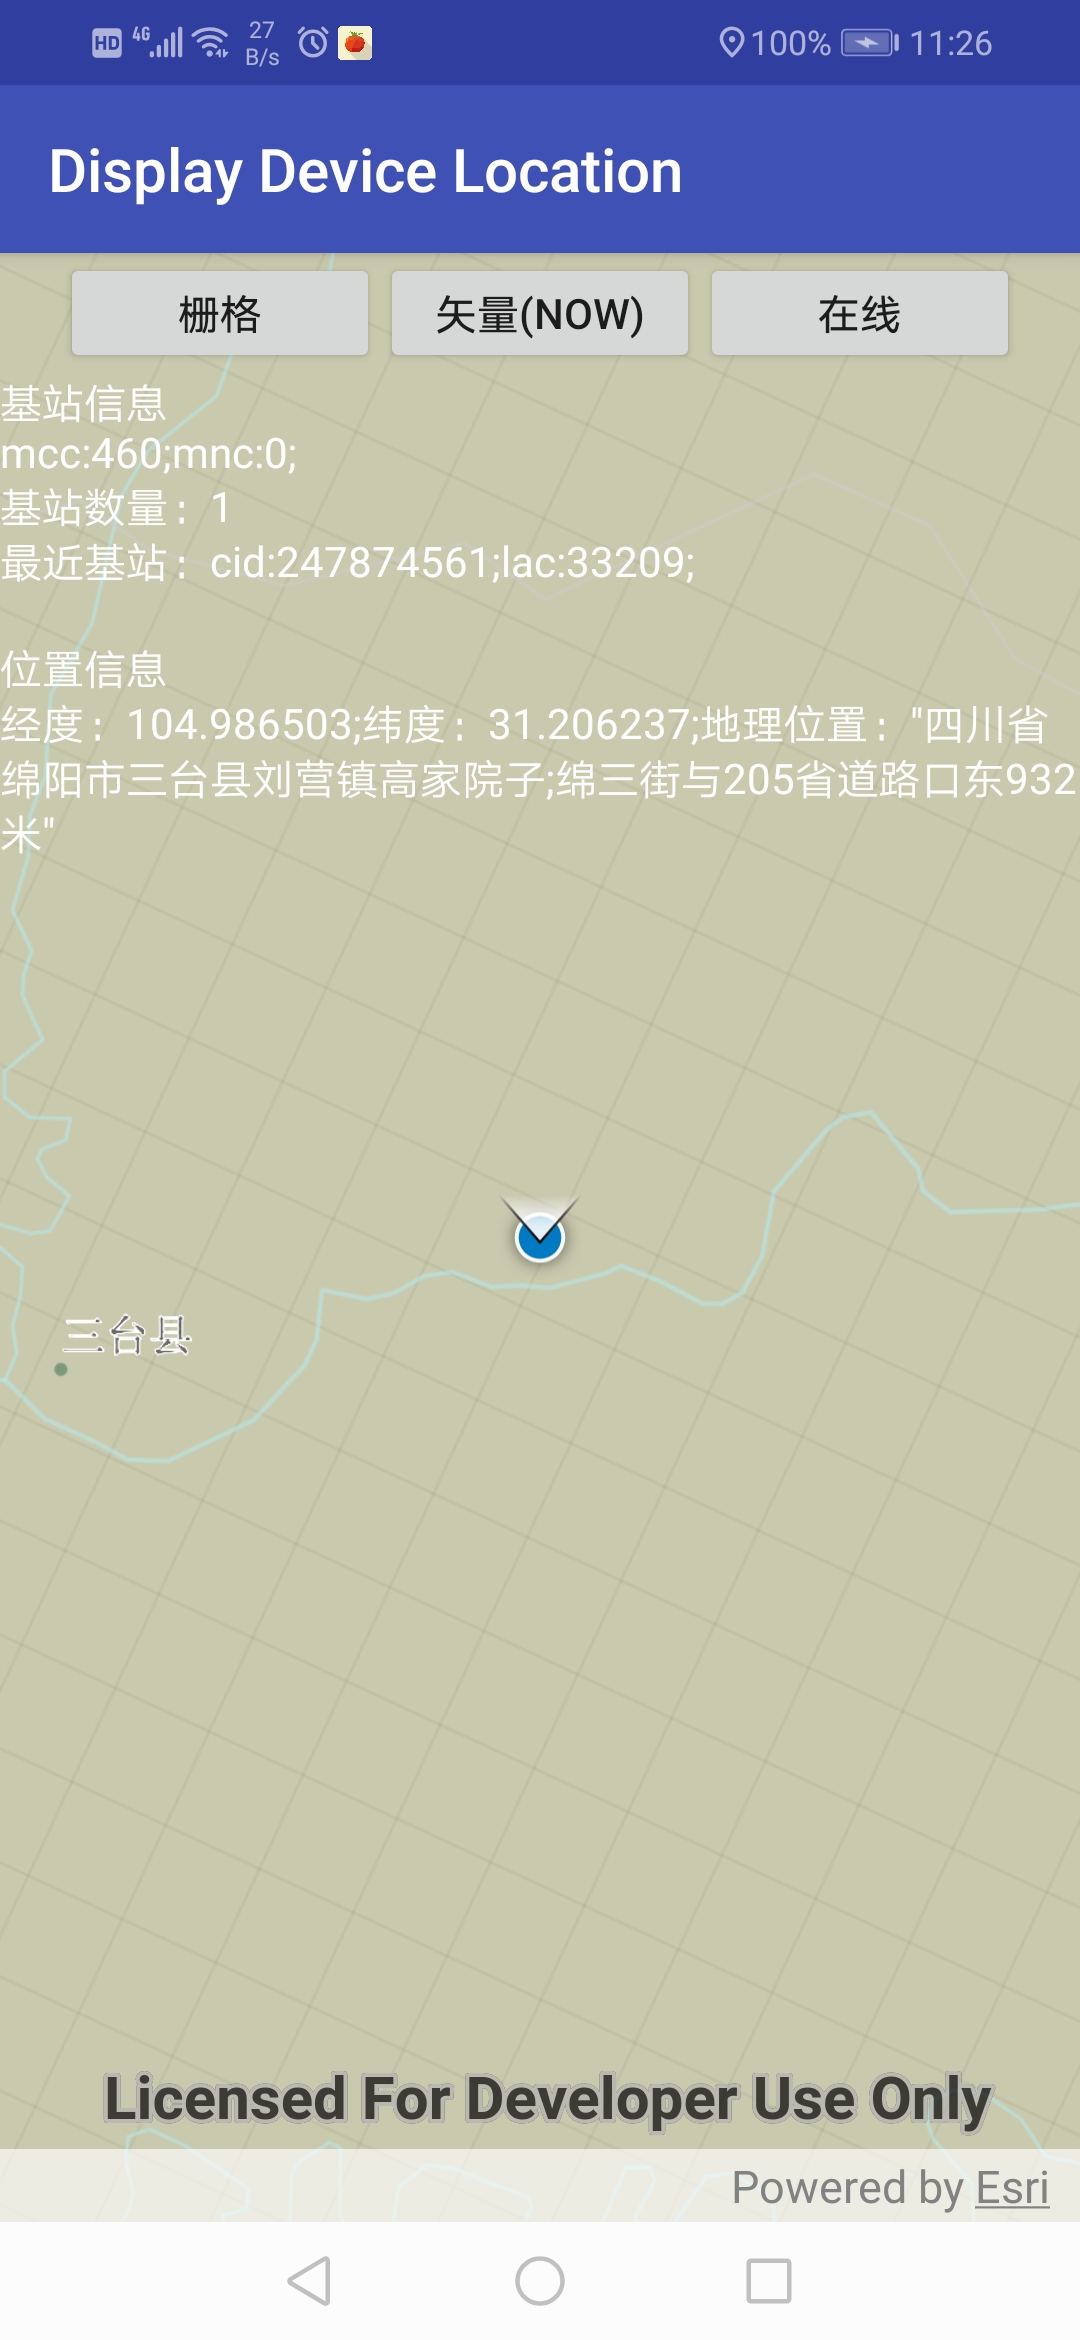
2. Acquisition and display of base station information
First, let's understand what base station information is. Base station information mainly refers to the following four parameters:
mcc: country code (460 in China)
mnc: network type (0 for mobile, 1 for Unicom and sid for Telecom)
lac: location area code
cid: base station number
The above base station information is stored in the database. We only need to call the function, which can query the required information in the database according to the mobile address. There are a lot of ready-made relevant codes on the Internet. My code references Android base station positioning One article.
First, a structure is used to store the base station information. The structure is as follows:
 /** Base station information structure */
    public class SCell {
        public int MCC;
        public int MNC;
        public int LAC;
        public int CID;
    }
Here is the code to obtain the base station information:
//Get base station information
    private String getBaseStationInformation(){
        StringBuffer sbtv = new StringBuffer();
        cell = new SCell();//Base station information
        List<CellInfo> all_cell_info;//All base station information
        sbtv.append("Base station information"+"\r\n");
        if (mTelephonyManager == null) {
            mTelephonyManager = (TelephonyManager) getApplicationContext().getSystemService(Context.TELEPHONY_SERVICE);
        }
        // Return value MCC + MNC
        String operator = mTelephonyManager.getNetworkOperator();
        if (operator != null && operator.length() > 3) {
            cell.MCC = Integer.parseInt(operator.substring(0, 3));
            cell.MNC = Integer.parseInt(operator.substring(3));
            sbtv.append("mcc:" + cell.MCC + ";mnc:" + cell.MNC + ";\r\n");
        }
        // Get the information of neighbor base station
        if (ActivityCompat.checkSelfPermission(this, Manifest.permission.ACCESS_COARSE_LOCATION) == PackageManager.PERMISSION_GRANTED
                && ActivityCompat.checkSelfPermission(this, Manifest.permission.ACCESS_FINE_LOCATION) == PackageManager.PERMISSION_GRANTED) {
            all_cell_info = mTelephonyManager.getAllCellInfo();

            sbtv.append("Number of base stations:" + all_cell_info.size() + "\r\n");
            CellInfo cellInfo = all_cell_info.get(0);
            GsmCellLocation location = (GsmCellLocation) mTelephonyManager.getCellLocation();
            if (location == null)
                Toast.makeText(getApplicationContext(), "Failed to get base station information", Toast.LENGTH_SHORT).show();
            cell.CID = location.getCid();
            cell.LAC = location.getLac();
            sbtv.append("Nearest base station:"+"cid:" + cell.CID + ";lac:" + cell.LAC + ";\r\n");
        } else {
            Toast.makeText(getApplicationContext(), "Please check whether the positioning is on", Toast.LENGTH_SHORT).show();
        }
        return sbtv.toString();
    }
The above function will return a string text containing four base station information. Call the function in OnCreate method to display the result in TextView. The calling code is as follows:
text1 = findViewById(R.id.textView);
text1.setText(getBaseStationInformation());
Rendering:

3. Acquisition and analysis of geographic information
This step is the most difficult and time-consuming step for me, because it uses some HTTP interfaces and sub threads. In addition, there is a big problem in this step: getting geographic information and online map display can't be realized at the same time! The specific reasons and solutions are discussed in the third part - "problems and solutions". Here mainly talk about how to achieve the acquisition of geographic information.
The obtained geographic information includes longitude, latitude and address.
The idea of getting geographic information: through GET request, four base station information Interface address Query, the format of the returned data is CSV/JSON/XML. For specific interface description and parameter description, please visit this website: Interface description document
Here is an example of a provider: http://api.cellocation.com:81/cell/?mcc=460&mnc=1&lac=4301&ci=20986&output=csv . The data returned is as follows:
0,40.008899116.483642903, "pingcui East Road, Wangjing development street, Chaoyang District, Beijing; 189m east of the intersection of Lize East Street and pingcui East Road"
This is a string, we only need to display longitude and latitude and geographical location, the rest of the information will not matter.
Now that you know the idea, let's talk about how to use code to get information. The code mainly includes two functions: the function getStringInfo is used to access the interface and return the above strings; the function getLocaionInfo is used to parse the above strings, from which the longitude, latitude and address are removed and stored in the structure.
The construction of geographic information storage structure is as follows:
/** Longitude and latitude and geographic location information structure */
    public class SLocationInfo {
        public String latitude;
        public String longitude;
        public String address;
    }
Function getStringInfo:
/** get Website longitude and latitude and geographic location information */
    private String getStringInfo(String domain) throws Exception {
        String resultString = "";

        /** Adopt Android default HttpClient */
        HttpClient client = new DefaultHttpClient();
        /** GET method */
        HttpGet get = new HttpGet(domain);
        try {
            /** Initiate GET request and GET return data */
            HttpResponse response = client.execute(get);
            HttpEntity entity = response.getEntity();
            BufferedReader buffReader = new BufferedReader(new InputStreamReader(entity.getContent()));
            StringBuffer strBuff = new StringBuffer();
            String result = null;
            while ((result = buffReader.readLine()) != null) {
                strBuff.append(result);
            }
            resultString = strBuff.toString();
        } catch (Exception e) {
            Log.e(e.getMessage(), e.toString());
            throw new Exception("Error getting latitude and longitude and geographic location:"+e.getMessage());
        } finally{
            get.abort();
            client = null;
        }

        return resultString;
    }
Function getLocaionInfo (call the above function getStringInfo here):
//Analysis of acquired longitude and latitude and geographic location information
private String getLocaionInfo(String url) throws Exception {
    locationinfo = new SLocationInfo();
    StringBuffer sblocationinfo = new StringBuffer();
    String resultString = "";
    resultString = getStringInfo(url);
    sblocationinfo.append("position information"+"\r\n");
    /** Resolve base station location */
    try{
        String errcode = "";
        String[] arr = resultString.split(",");
        errcode = arr[0];
        if (errcode.equals("0")){
            locationinfo.latitude = arr[1];
            locationinfo.longitude = arr[2];
            locationinfo.address = arr[4];
            sblocationinfo.append("Longitude:"+locationinfo.longitude+";Latitude:"+locationinfo.latitude+";Location:"+locationinfo.address+"\r\n");
        }
    } catch (Exception e) {
        Log.e(e.getMessage(), e.toString());
        throw new Exception("An error occurred while getting the resolved geographic location:"+e.getMessage());
    }
    return sblocationinfo.toString();
}
The getLocaionInfo function needs to be called by a separate sub thread, because it takes a lot of time to visit the website, and the sub thread can greatly reduce the burden of the main thread. However, the UI cannot be processed in the sub thread processing website access, that is, the operation of displaying geographic information in TextView cannot be implemented in the sub thread, so a UI sub thread is also needed. The above may be a little convoluted. In short, the website access sub thread is used to process website access operations. When the returned data is successfully obtained, it sends a success signal to the UI sub thread, and then the UI sub thread is used to refresh the interface and display the acquired data. The code is as follows:
Define success and failure signals to notify the UI child threads:
private static final int MSG_SUCCESS = 0;// Get successful ID
private static final int MSG_FAILURE = 1;// Get failed identity
Website access sub thread runnable:
private Runnable runnable = new Runnable() {
        // Override the run() method, which runs in a new thread and is used to access the web site for latitude, longitude, and geographic location
        @Override
        public void run() {
            try {
                locationText = getLocaionInfo(url);
            } catch (Exception e) {
                e.printStackTrace();
                handler.obtainMessage(MSG_FAILURE).sendToTarget();//Send failure information to UI sub thread
            } finally {
                handler.obtainMessage(MSG_SUCCESS).sendToTarget();//Send success message to UI sub thread
            }
        }
    };
UI sub thread handler:
private Handler handler = new Handler() {
        //UI sub thread, used to display longitude and latitude and geographic location information
        @Override
        public void handleMessage(Message msg) {
            try{
                switch (msg.what){
                    case MSG_SUCCESS:
                        text2.setText(locationText);
                        Log.e("Success", "Base station location resolution succeeded");
                        break;
                    case MSG_FAILURE:
                        Log.e("Failure", "Failed to resolve base station location");
                        break;
                }
            }catch (Exception e) {
                e.printStackTrace();
            }
        }
    };
To run a child thread in OnCreate:
url = "http://api.cellocation.com:81/cell/?mcc=" + cell.MCC + "&mnc=" + cell.MNC + "&lac=" + cell.LAC + "&ci=" + cell.CID + "&output=csv";
text2 = findViewById(R.id.lacationText);
try {
        mThread = new Thread(runnable);
        mThread.start();
     } catch (Exception e) {
        Toast.makeText(MainActivity.this, e.getMessage(), Toast.LENGTH_SHORT).show();
}
Rendering:
4. Display grid offline map (. tpk)
tpk data source: it is made of image map through ArcGIS. There are many specific tutorials online, and you can search by yourself.
There are two points for attention in the display of local grid: one is the data storage location, the other is the data range. First of all, the data storage location, the absolute location I use, so only the real machine test can open the data. If I use the simulator, I need to read the data storage location in other ways. The data range must include the GPS position of the mobile phone you are testing. If not, the map cannot be displayed. The specific code is relatively simple, as follows:
Define absolute path and grid map:
private String dirpath = Environment.getExternalStorageDirectory().getAbsolutePath();//Local data path
private ArcGISTiledLayer localTiledLayer;//Local grid map
Local grid display function:
//Turn on local grid
    private void openMyTPK(){
        Toast.makeText(getApplicationContext(), dirpath + "/ArcGIS" + "/santai.tpk", Toast.LENGTH_SHORT).show();
        String fileLayer = dirpath+"/ArcGIS"+"/santai.tpk";
        localTiledLayer = new ArcGISTiledLayer(fileLayer);
        baseMap = new Basemap(localTiledLayer);
        map = new ArcGISMap(baseMap);
        mMapView.setMap(map);
    }
Call the above functions in the "grid" button, and the rendering is shown as follows:
5. Display vector offline map (. vtpk)
vtpk data source: download online.
The code of vector offline map is almost the same as that of grid map, the only difference is that the format of definition layer is different. The grid is ArcGISTiledLayer, and the vector is ArcGISVectorTiledLayer. Here is the code:
//Open local vector map
    private void openMyVTPK() {
        try {
            Toast.makeText(getApplicationContext(), dirpath+"/ArcGIS"+"/china.vtpk", Toast.LENGTH_SHORT).show();
            String fileLayer = dirpath+"/ArcGIS"+"/china.vtpk";
            vTiledLayer = new ArcGISVectorTiledLayer(fileLayer);
            baseMap = new Basemap(vTiledLayer);
            map = new ArcGISMap(baseMap);
            mMapView.setMap(map);
        } catch (Exception e)
        {
            String eResult = e.getMessage();
            Toast.makeText(MainActivity.this, eResult, Toast.LENGTH_SHORT).show();
        }
    }
Rendering:
3, Main problems and Solutions
1. An error occurred that the device could not be found when running app with Android simulator
This is because the virtual technology in the computer BIOS is not turned on. Restart the computer and press F2 (depending on the computer, my name is Lenovo) to turn on the BIOS. It's just a matter of time to enter the BIOS interface after the computer is turned on. I can't enter the BIOS interface until I restart it four times...
2. Local map cannot be displayed
According to my code, if you want to display the local map correctly, you must test it on the real machine, because it is an absolute path. The path is: Benji SD card - > ArcGIS (self built folder) - > xxx.tpk/xxx .vtpk. Two points should also be noted: 1. Ensure that you have your mobile phone's current location on the offline map; 2. Enable read-write permission, and AndroidManifest.xml The write code of the manifest tag of is as follows:
<uses-permission android:name="android.permission.WRITE_EXTERNAL_STORAGE" />
3. The code in the get request cannot find the corresponding method, for example: DefaultHttpClient
This is related to the SDK version of Android. My compiled version is 28, and the minimum version is 19. In the version I used, Android abandoned some of the above methods. It's said on the Internet that the version should be changed, but it's troublesome not to say that it will cause other code conflicts. Actually build.gradle Just add the required package in (APP), and write in the Android block:
useLibrary'org.apache.http.legacy'
Then click "Sync Now" in the upper right corner to use Get method normally.
4. Click the button and the app will flash back
The reason is not clear, but the solution is: in AndroidManifest.xml Add the following code under the application tab of:
<uses-library android:name="org.apache.http.legacy" android:required="false"/>
5. Getting geographic information and online map display cannot be realized at the same time
Reason: the website for obtaining geographic information is Http protocol, i.e. plaintext protocol, while online map is Https protocol. Android Studio defaults to Https protocol. Without any settings, online map can be displayed, but geographic information cannot be obtained.
Solution: add an xml file as a security protocol setting to ensure that Http and Https can be accessed.
Specific steps: create a new XML folder under the res folder, and then create a new one named "network" under the XML folder_ security_ config.xml ”Write the following code in the file:
<?xml version="1.0" encoding="utf-8"?>
<network-security-config>
    <base-config cleartextTrafficPermitted="true">
        <trust-anchors>
            <certificates src="system" />
            <certificates src="user" />
        </trust-anchors>
    </base-config>
</network-security-config>
6. Flash back when running app
There are many possible reasons for this. I didn't turn on GPS in advance before running the app. The solution is to remember to turn on GPS in advance.