Introduction: when you open the wechat home page, but there are a lot of news, can you slide down or up? Then how does the function be realized? In fact, most of them use ListView or RecyclerView
Topic: basic usage and differences between ListView and RecyclerView
1, The basic usage of ListView,
1. Add ListView control in the required layout file
2. Create a new layout file to fill the layout for the ListView
3. Create a new Bean class and fill in the required layout data, such as image resource id.
4. Create a new adapter (the data of ListView depends on the adapter), inherit BaseAdapter or arraysadapter (there are many adapters), and then add a constructor for the adapter, preferably context, list data, to facilitate the transfer of data and context environment to the adapter
5. Rewrite the method in the Adapter and then adapt the data
6. Set the above adapter for ListView
The code is as follows:
1: XML file:
1. Add ListView control to the main page:
<?xml version="1.0" encoding="utf-8"?>
<LinearLayout xmlns:android="http://schemas.android.com/apk/res/android"
    android:layout_width="match_parent"
    android:layout_height="match_parent"
    android:orientation="vertical" >
    <ListView
        android:id="@+id/lv"
        android:layout_width="match_parent"
        android:layout_height="match_parent"/>

</LinearLayout>
2. Configure the layout file of ListView:
<?xml version="1.0" encoding="utf-8"?>
<LinearLayout xmlns:android="http://schemas.android.com/apk/res/android"
    android:orientation="vertical"
    android:layout_width="match_parent"
    android:layout_height="match_parent">
    <ImageView
        android:id="@+id/iv"
        android:layout_width="300dp"
        android:layout_gravity="center"
        android:layout_height="300dp"
        />
    <TextView
        android:id="@+id/tv"
        android:textSize="30dp"
        android:layout_width="match_parent"
        android:layout_gravity="center"
        android:gravity="center"
        android:layout_height="50dp" />
</LinearLayout>
2, java code:
1.Bean class - provides data
public class Bean {
    public Bean(String name, int id){
        this.name = name;
        this.id = id;
    }

    public String getName() {
        return name;
    }

    public void setName(String name) {
        this.name = name;
    }

    public int getId() {
        return id;
    }

    public void setId(int id) {
        this.id = id;
    }

    private String name;
     private int id;

}
2. Adapter to configure the listview function class
import android.content.Context;
import android.view.LayoutInflater;
import android.view.View;
import android.view.ViewGroup;
import android.widget.BaseAdapter;
import android.widget.ImageView;
import android.widget.TextView;

import java.util.List;
import java.util.logging.Handler;

public class MyListViewAdapter extends BaseAdapter {

    List<Bean> data;
    Context context;


    MyListViewAdapter(Context context,List<Bean> data){
        this.data = data;
        this.context = context;
    }

    @Override
    public int getCount() {
        //Number of item s to be displayed for the whole Activity
        return data.size();
    }

    @Override
    public Object getItem(int position) {
        //Gets the layout item of the location
        return data.get(position);
    }

    @Override
    public long getItemId(int position) {
        //Gets the id of the layout item of the location
        return position;
    }

    @Override
    public View getView(int position, View convertView, ViewGroup parent) {
        //Called where the layout appears on the screen
        ViewHolder viewHolder;
        if(convertView == null){
            viewHolder = new ViewHolder();
            convertView = LayoutInflater.from(context).inflate(R.layout.listview_item, parent, false);
            viewHolder.imageView = convertView.findViewById(R.id.iv);
            viewHolder.textView = convertView.findViewById(R.id.tv);
            convertView.setTag(viewHolder);
        }
        else viewHolder = (ViewHolder) convertView.getTag();
        viewHolder.textView.setText(data.get(position).getName());
        viewHolder.imageView.setImageResource(data.get(position).getId());

        return convertView;
        //convertView is used to place the cache layout
    }
    public class ViewHolder{
        TextView textView;
        ImageView imageView;
    }
}
There are comments in the function code of each method,
Note: ViewHolder is to solve the time and performance consumption when dynamically loading pages and calling findViewbyId. convertView is used to store cached data. The member variable is the control in the listview layout file
3.Activity main method:
import androidx.appcompat.app.AppCompatActivity;

import android.os.Bundle;
import android.view.View;
import android.widget.ListView;

import java.util.ArrayList;
import java.util.List;

public class MainActivity extends AppCompatActivity {
    List<Bean> data = new ArrayList<Bean>();
    @Override
    protected void onCreate(Bundle savedInstanceState) {
        super.onCreate(savedInstanceState);
        setContentView(R.layout.activity_main);
        for(int i = 0; i < 4; i++){
            Bean bean1 = new Bean("aDog",R.drawable.adog);
            Bean bean2 = new Bean("bDog",R.drawable.bdog);
            Bean bean3 = new Bean("cDog",R.drawable.cdog);
            Bean bean4 = new Bean("dDog",R.drawable.ddog);
            Bean bean5 = new Bean("eDog",R.drawable.edog);
            Bean bean6 = new Bean("aCat",R.drawable.acat);
            Bean bean7 = new Bean("bCat",R.drawable.bcat);
            Bean bean8 = new Bean("cCat",R.drawable.ccat);
            Bean bean9 = new Bean("dCat",R.drawable.dcat);
            Bean bean10 = new Bean("eCat",R.drawable.ecat);
            Bean bean11 = new Bean("fCat",R.drawable.fcat);
            data.add(bean1);
            data.add(bean2);
            data.add(bean3);
            data.add(bean4);
            data.add(bean5);
            data.add(bean6);
            data.add(bean7);
            data.add(bean8);
            data.add(bean9);
            data.add(bean10);
            data.add(bean11);
        }
        ListView listView = findViewById(R.id.lv);
        MyListViewAdapter adapter = new MyListViewAdapter(this, data);
        listView.setAdapter(adapter);
    }
}
The most critical of these are the three lines of code:
        ListView listView = findViewById(R.id.lv);
        MyListViewAdapter adapter = new MyListViewAdapter(this, data);
        listView.setAdapter(adapter);
OK, run the following program without monitoring:
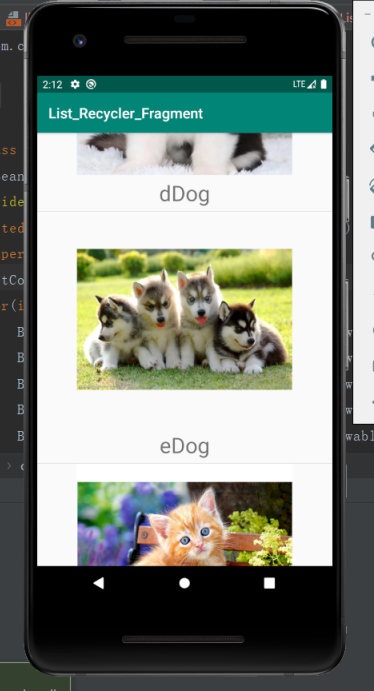
After success, you can pull the data up and down.
Finally, let's talk about the listening function of ListView:
ListView has its own exclusive listener - setOnItemClickListener():
The code is as follows:
        listView.setOnItemClickListener(new AdapterView.OnItemClickListener() {
            @Override
            public void onItemClick(AdapterView<?> parent, View view, int position, long id) {
                Log.e("MainActivity", "onItemClick: " + "I am " + data.get(position).getName());
            }
        });
You can customize the logic by overriding the onItemClick() method
Only simple printing is done here
Then run it again and click any Item:

2, Basic usage of RecyclerView
RecyclerView is an official more recommended control because it is more flexible than ListView. It manages the layout of the layout by LayoutManager and has a variety of rendering methods. The layout of ListView can only be defined in the configuration layout
Don't say much, just open the code and feel its usage directly:
1: The operation process steps are as follows:
1. Add dependency
2. Use RecyclerView in the required layout file
3. Customize the layout file to fill the data of RecyclerView
4. Create a new Bean class and put the resource id
5. Create a new Java class Adapter and inherit it to RecyclerViewAdapter
6. Configure Bean data and data presentation logic in the Adapter
7. Add a LayoutManager and select layout according to the required method
Here's the code:
1. First, the code of the Adapter:
package com.coolweather.list_recycler_fragment;

import android.content.Context;
import android.view.LayoutInflater;
import android.view.View;
import android.view.ViewGroup;
import android.widget.ImageView;
import android.widget.TextView;
import android.widget.Toast;

import androidx.annotation.NonNull;
import androidx.recyclerview.widget.RecyclerView;

import java.util.List;

public class MyRecyclerViewAdapter extends RecyclerView.Adapter<MyRecyclerViewAdapter.MyViewHolder> {
    List<Bean> data;
    Context context;
    public MyRecyclerViewAdapter(Context context, List<Bean> data){
        this.data = data;
        this.context = context;
    }

    @NonNull
    @Override
    public MyViewHolder onCreateViewHolder(@NonNull ViewGroup parent, int viewType) {
        //Pass in the configured layout file to create the ViewHolder
        //Note: the RecyclerView does not have a specific listening function, but the listening function can be set arbitrarily for the control in the layout file, as follows:
        final MyViewHolder myViewHolder = new MyViewHolder(LayoutInflater.from(context).inflate(R.layout.listview_item, parent, false));
        myViewHolder.imageView.setOnClickListener(new View.OnClickListener() {
            @Override
            public void onClick(View v) {
                Toast.makeText(v.getContext(),"You click "+ data.get(myViewHolder.getAdapterPosition()).getName(),Toast.LENGTH_SHORT).show();
            }
        });
        return myViewHolder;
    }

    @Override
    public void onBindViewHolder(@NonNull MyViewHolder holder, int position) {
        //Set the displayed resources for each item in the location
          holder.textView.setText(data.get(position).getName());
          holder.imageView.setImageResource(data.get(position).getId());
//          holder.imageView.setOnClickListener(new View.OnClickListener() {
//            @Override
//            public void onClick(View v) {
//                Toast.makeText(v.getContext(),"You click "+ data.get(holder.getAdapterPosition()).getName(),Toast.LENGTH_SHORT).show();
//            }
//        });     // To set up the listening function in this method, change the method parameter to final myviewholder

    }

    @Override
    public int getItemCount() {
        //How much data does RecyclerView want to display
        return data.size();
    }

    class MyViewHolder extends RecyclerView.ViewHolder{
        //This class is necessary and must inherit from RecyclerView.ViewHolder
        TextView textView;
        ImageView imageView;

        public MyViewHolder(@NonNull View itemView) {
            //The construction method of ViewHolder. The parameter is the passed in layout file
            super(itemView);
            textView = itemView.findViewById(R.id.tv);
            imageView = itemView.findViewById(R.id.iv);
//            imageView.setOnClickListener(new View.OnClickListener() {
//                @Override
//                public void onClick(View v) {
//                    Toast.makeText(v.getContext(),"You click "+ data.get(getAdapterPosition()).getName(),Toast.LENGTH_SHORT).show();
//                }
//            });
        }
    }
}
The method rewritten here is different from ListView. The function of each method is written in the comment;
Next is the main code:
        RecyclerView recyclerView = (RecyclerView) findViewById(R.id.rv);
        MyRecyclerViewAdapter myRecyclerViewAdapter = new MyRecyclerViewAdapter(this,data);
//        LinearLayoutManager layoutManager = new LinearLayoutManager(this);
//        layoutManager.setOrientation(LinearLayoutManager.HORIZONTAL);
//        GridLayoutManager layoutManager = new GridLayoutManager(this, 2);
        StaggeredGridLayoutManager layoutManager = new StaggeredGridLayoutManager(2, StaggeredGridLayoutManager.VERTICAL);
        recyclerView.setLayoutManager(layoutManager);
        recyclerView.setAdapter(myRecyclerViewAdapter);
The difference from listview is that there are more GridLayout (grid layout, the number of parameters represents several columns) and staggerdgridlayout (waterfall flow layout, the number of parameters also represents several columns) than listview, and the layout of orientation can be changed flexibly, such as HORIZONTAL or VERTICAL
The following is the operation result diagram:
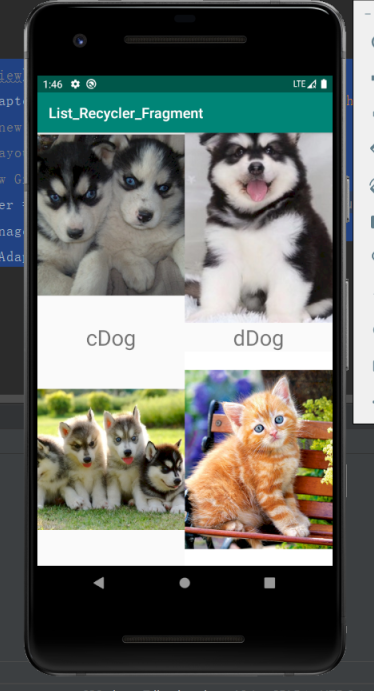
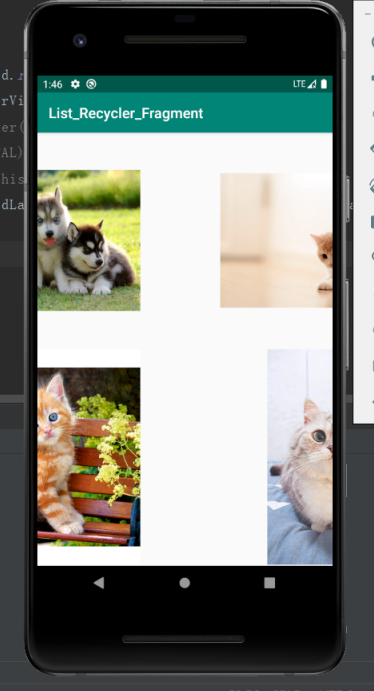
The above implements the VERTICAL attribute of StaggerdGridLayout (i.e. data can be pulled up and down) and HORIZONTAL attribute (i.e. data can be pulled left and right);
Note: Although there is no difference in effect between StaggerdGridLayout and GridLayout at first glance, here's a hint. If the text of TextView becomes very long and long, the display difference between the two will come out (the data of different columns will be displayed in, one will be uneven and the other will be horizontally aligned - direct attempt can be more intuitive)
Finally, summarize the usage differences between ListView and RecyclerView:
1. There is no need to add dependencies when using ListView, but RecyclerView needs to add dependency files as shown in the figure in build.gradle of app (because RecyclerView is a third-party framework):
implementation 'androidx.recyclerview:recyclerview:1.0.0'
2. The Adapter inheritance of listview can select the BaseAdapter and ArrayAdapter provided by the system (I haven't studied the difference between these two adapters, and they are almost the same at present). The customized ViewHolder can be customized without inheriting any parent class (in order to save the performance consumption of dynamically loading layout and initializing control)
The RecyclerView's adapter and custom ViewHolder must inherit from the RecyclerView's adapter and ViewHolder, and the ViewHolder must pass parameters for the RecyclerView's adapter
3. The rewriting methods of the two adapters are different,
4. The Layout mode of the innermost Layout in listview can only be realized by relying on the Layout file, while RecyclerView needs to apply for various layoutmanagers to realize various Layout modes, which is more flexible.
5. Different listening functions. ListView has setItemOnclickListener() provided by the system API:
        listView.setOnItemClickListener(new AdapterView.OnItemClickListener() {
            @Override
            public void onItemClick(AdapterView<?> parent, View view, int position, long id) {
                Log.e("MainActivity", "onItemClick: " + "I am " + data.get(position).getName());
            }
        });
Each control of the layout file in RecyclerView can be monitored separately in the Adapter, which is more flexible. You can refer to the above code
This is the end of the summary. I hope it can help the sprouting newcomers who have just entered the pit.
Finally, attach the layout file:
The first is MainActivity:
<?xml version="1.0" encoding="utf-8"?>
<LinearLayout xmlns:android="http://schemas.android.com/apk/res/android"
    android:layout_width="match_parent"
    android:layout_height="match_parent"
    android:orientation="vertical" >
    <ListView
        android:id="@+id/lv"
        android:layout_width="match_parent"
        android:layout_height="match_parent"/>

</LinearLayout>
Then comes the of Main2Activity:
<?xml version="1.0" encoding="utf-8"?>
<LinearLayout xmlns:android="http://schemas.android.com/apk/res/android"
    android:layout_width="match_parent"
    android:layout_height="match_parent"
    android:orientation="vertical" >
<androidx.recyclerview.widget.RecyclerView
    android:id="@+id/rv"
    android:layout_width="match_parent"
    android:layout_height="match_parent"/>
</LinearLayout>
Finally, the of item:
<?xml version="1.0" encoding="utf-8"?>
<LinearLayout xmlns:android="http://schemas.android.com/apk/res/android"
    android:orientation="vertical"
    android:layout_width="match_parent"
    android:layout_height="wrap_content">
    <ImageView
        android:id="@+id/iv"
        android:layout_width="300dp"
        android:layout_gravity="center"
        android:layout_height="300dp"
        />
    <TextView
        android:id="@+id/tv"
        android:textSize="30dp"
        android:layout_width="match_parent"
        android:layout_gravity="center"
        android:gravity="center"
        android:layout_height="wrap_content"
        />
</LinearLayout>