Hello, I'm brother Manon Feige. Thank you for reading this article. Welcome to one click three times.
Highlights of this article: details the creation of an Activity and how to pass parameters and receive return parameters
Android series articles are in the Android column. You are welcome to pay attention to them.
Previous review
❤️ [Android improvement road-01] make a plan and take action to learn Android ❤️
❤️ [Android improvement road-02] install Android Studio, know Android SDK and learn step by step ❤️
❤️ [Android improvement road-03] how simple is it to create the first Android application ❤️
❤️ [Android improvement road-04] knowledge points that must be mastered for Android core component Activity (what is Activity and what is its life cycle) ❤️
preface
Last article ❤️ [Android improvement road-04] knowledge points that must be mastered for Android core component Activity (what is Activity and what is its life cycle) ❤️ This paper introduces the basic concept and life cycle of activities, but does not talk about how to create activities and how to transfer values between activities. SO, this article will focus on the creation of activities and how to pass parameters between activities.
Create a custom Activity
Using Android Studio, you can directly create a custom Activity by:
- As shown in Figure 1 below, right-click the package path of java source code and select new - > Activity. There are various activities under the Activity option. We can select one of the activities as needed to create it. Here I select the Empty Activity option.
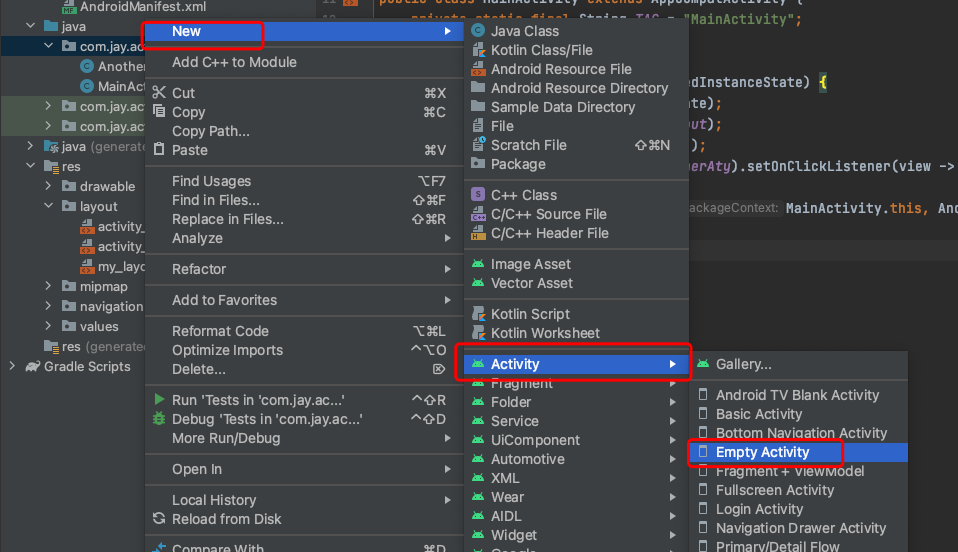
- After specifying the name of the Activity and the name of the layout page in Figure 2, click Finish to create a custom Activity.

The advantage of using Android Studio here is that it can help us automatically create layout page activity_test.xml and register the Activity in AndroidManifest.xml - Layout Page * * layout - > activity_ test.xml **
<?xml version="1.0" encoding="utf-8"?>
<androidx.constraintlayout.widget.ConstraintLayout xmlns:android="http://schemas.android.com/apk/res/android"
    xmlns:app="http://schemas.android.com/apk/res-auto"
    xmlns:tools="http://schemas.android.com/tools"
    android:layout_width="match_parent"
    android:layout_height="match_parent"
    tools:context=".TestActivity">
</androidx.constraintlayout.widget.ConstraintLayout>
- Register the Activity in AndroidManifest.xml
<manifest ... >
    <application ... >
        <activity android:name = ".TestActivity" />
        ...
    </application ... >
    ...
</manifest >
If the Activity is the primary Activity, its registration will have two more lines of configuration.
<manifest ... >
    <application ... >
       <activity
            android:name=".MainActivity"
            android:exported="true"
            android:label="@string/title_activity_main"
            android:theme="@style/Theme.Activity_test.NoActionBar">
            <intent-filter>
                <!-- Indicates that Activity As master Activity appear -->
                <action android:name="android.intent.action.MAIN" />
                <!-- Indicates that Activity It will be displayed in the top startup list -->
                <category android:name="android.intent.category.LAUNCHER" />
            </intent-filter>
        </activity>
        ...
    </application ... >
    ...
</manifest >
< action Android: name = "Android. Intent. Action. Main" / > indicates that the Activity appears as the primary Activity.
< category Android: name = "Android. Intent. Category. Launcher" / > indicates that the Activity will be displayed in the top startup list.
Activity binding custom view (layout page)
Having finished how to create a custom Activity, let's take a look at how an Activity binds a custom view. Override the onCreate method, in which the view to be bound is set through the setContentView method. A new one named my is created here_ View of layout.xml. Then through R.layout.my_layout to get it. The R class here is a class generated based on external resources. It is created when compiling the project. It contains all the resource IDS in the rest / directory, such as layout files, resource files and pictures. Most of the files saved in the res directory will be compiled and given resource IDs. These IDs are saved in the R.java file, so that we can access the resources of the res class through the ID in the program.
  @Override
    protected void onCreate(Bundle savedInstanceState) {
       super.onCreate(savedInstanceState);
       setContentView(R.layout.my_layout);
    }
Start another Activity
In Android applications, except that the main Activity is started by the application, other activities are started by user operation. So how to start another Activity. The method to start an Activity is: startactivity (New intent (mainactivity. This, anotherity. Class)); This method is usually invoked in a listening event of a button.
- This is in the view of the main Activity_ A button has been added to layout.xml to start another Activity.
  <Button
        android:id="@+id/btnStartAnotherAty"
        android:layout_width="wrap_content"
        android:layout_height="wrap_content"
        android:text="Start another Activity"
        tools:layout_editor_absoluteX="116dp"
        tools:layout_editor_absoluteY="257dp"
        tools:ignore="MissingConstraints" />
A Button button named btnStartAnotherAty is defined here. Used to start another Activity when the user clicks.
3. Add a listening event to the button in MainActivity to start another activity.
   @Override
    protected void onCreate(Bundle savedInstanceState) {
        super.onCreate(savedInstanceState);
        setContentView(R.layout.my_layout);
        findViewById(R.id.btnStartAnotherAty).setOnClickListener(view -> {
            //Start target Activity
            startActivity(new Intent(MainActivity.this, AnotherAty.class));
        });
    }
Here, the findViewById(R.id.btnStartAnotherAty) method is very important. It means to find the button named btnStartAnotherAty according to the ID, and then call the setOnClickListener method to bind the listening event of a button click. The value passed between activities described below should also be written in this event.
If you want to jump from Activity to a web page, it is also possible. You only need to do the following:
startActivity(new Intent(Intent.ACTION_VIEW,Uri.parse("https://feige.blog.csdn.net/")));
The above code demonstrates a jump from the current Activity to Mainong Feige In this page.
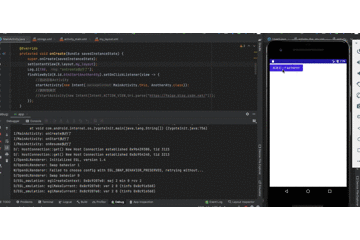
The operation result is:
Close Activity
The finish() method is used to close the Activity. The finishActivity() method can be used to close other activities started before.
Although the Android system provides the finish() method to close the Activity, it is not recommended that developers call this method to force the closing of the Activity. Because the Android system maintains the complete life cycle of Activity. It also provides a complete resource recovery mechanism and resource reconstruction mechanism, which can dynamically recover and reconstruct activities.
Activity pass data
When an Activity passes data, it essentially stores data in Intent. There are three different ways:
The first method is to directly set the data into Intent,
intent.putExtra("name", "Hello, brother Manon Fei");
The second method is to set a value object in Intent,
intent.putExtra("user", new User("Mainong Feige", 30));
The third way is to set a Bundle object in Intent.
   Bundle bundle = new Bundle();
   bundle.putString("name", "Man Nongfei, Bundle");
   bundle.putInt("age", 30);
   intent.putExtras(bundle);
Let's take a detailed look!
Pass simple data between activities
When passing simple data, you can set the value directly to intent. Generally speaking, you only need to pass a small amount of basic type data. You can set and pass the value directly through intent's putExtra method.
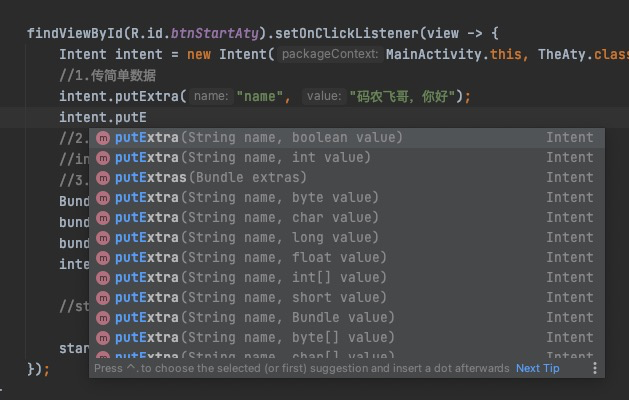
- Value transfer operation of source Activity
 Intent intent = new Intent(MainActivity.this, TheAty.class);
 //1. Transfer simple data
 intent.putExtra("name", "Hello, brother Manon Fei");
 startActivity(intent);
Here, a String named name is passed.
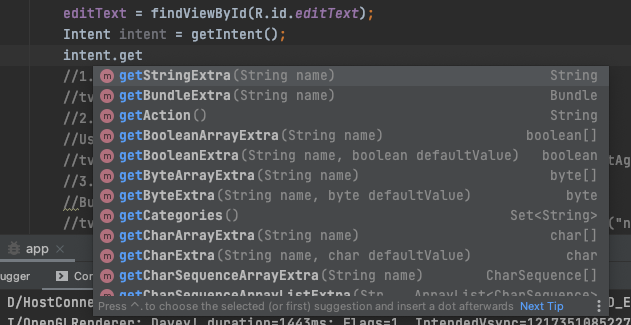
2. The target Activity to be started receives the value
 Intent intent = getIntent();
 intent.getStringExtra("name")
Here, the method receiving the value call needs to call different methods according to the value type, that is, if the incoming value is String type, call getStringExtra type, and if it is int type, call getIntExtra method.
The operation result is:
Pass value objects between activities
When there are a lot of incoming data and complex types, it is not suitable to use intent directly. This is to encapsulate the value to be passed into an object Bean. For example, the following defines a User object with two attributes: name and age. It should be noted here that the passed value object must implement the java.io.Serializable interface so that it can be serialized. Otherwise, the object cannot be set to intent
public class User implements Serializable {

    private String name;
    private int age;

    public User(String name, int age) {
        this.name = name;
        this.age = age;
    }
 	······ellipsis get,set method······
}
If you use the Serializable interface for serialization, you can also use the Parcelable interface provided by the Android system to realize serialization. This interface has better performance than the Serializable interface.
public class User2 implements Parcelable {

    private String name;
    private int age;


    protected User2(Parcel in) {
        name = in.readString();
        age = in.readInt();
    }

    @Override
    public void writeToParcel(Parcel dest, int flags) {
        dest.writeString(name);
        dest.writeInt(age);
    }

    @Override
    public int describeContents() {
        return 0;
    }

    public static final Creator<User2> CREATOR = new Creator<User2>() {
        @Override
        public User2 createFromParcel(Parcel in) {
            return new User2(in);
        }

        @Override
        public User2[] newArray(int size) {
            return new User2[size];
        }
    };
}
- Value transfer operation of source Activity
 Intent intent = new Intent(MainActivity.this, TheAty.class);
//2. Transfer value object
 intent.putExtra("user", new User("Mainong Feige", 30));
 startActivity(intent);
- The operation that the target Activity is started to receive the value
 Intent intent = getIntent();
 User user = (User) intent.getSerializableExtra("user");
If the Serializable sequence is used, the getSerializableExtra method is called. If it is a Parcelable serialization, the getParcelableExtra method is called.
Transfer data package Bundle between activities
The third way to pass values is to pass the packet Bundle. The setting method of Bundle packet is similar to that of Map. It is also an incoming key value pair. Different put methods need to be called for different data types
- Value transfer operation of source Activity
    Intent intent = new Intent(MainActivity.this, TheAty.class);
    Bundle bundle = new Bundle();
    bundle.putString("name", "Man Nongfei, Bundle");
    bundle.putInt("age", 30);
    intent.putExtras(bundle);
    startActivity(intent);
Here, the putExtras method is called to put the Bundle object into the Intent. Of course, you can also call the putExtra method to set the Bundle object. The way to use putExtra is: intent.putExtra("data",bundle) needs to specify a key.
2. The target Activity to be started receives the value
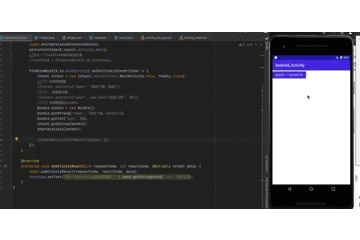
Intent intent = getIntent();
Bundle data = intent.getExtras();
String.format("name=%s,age=%s,name1=%s", data.getString("name"), data.getInt("age"), data.getString("name1", "Default value does not exist"))
If the putExtras method is used for setting values, the getExtras() method needs to be used when taking values. If the set value uses intent.putExtra("data",bundle), the value needs to use intent.getExtra("data").
In addition, taking values from the Bundle also calls different methods according to different data types. For String type, getString() is called, and for int type, getInt() is called. If you wear a hat and a hat, you can't get the specified value. If the value corresponding to the specified name does not exist, you can set the default value, that is, data.getString("name1", "nonexistent default value") above. When the value named name1 does not exist, the default value that does not exist will be displayed.
Operation results
Get the return result of the started Activity
In the previous introduction, the source Activity transfers data to the target Activity. How does the source Activity receive the returned results of the started Activity? It can also be realized here.
- Operation of source Activity
- Define a TextView in the view of the source Activity to receive the returned results
  <TextView
        android:id="@+id/textView"
        android:layout_width="match_parent"
        android:layout_height="wrap_content"
        android:text="Presentation results" />
- Instantiate the TextView in the onCreate method of the source Activity to implement the click listening event of the button. Special attention should be paid here that the target Activity cannot be started when calling startActivity. Instead, you need to call startActivityForResult to start the target Activity. This method has a parameter named requestCode that specifies the code of the request. The requestCode specified here is 0.
 private TextView textView;

    @Override
    protected void onCreate(Bundle savedInstanceState) {
        super.onCreate(savedInstanceState);
        setContentView(R.layout.activity_main);
        //Define a textView to receive the returned value
        textView = findViewById(R.id.textView);
        findViewById(R.id.btnStartAty).setOnClickListener(view -> {
            Intent intent = new Intent(MainActivity.this, TheAty.class);
            startActivityForResult(intent, 0);
        });
    }
- Next, you need to override the onActivityResult method to assign a value to the TextView object.
   @Override
    protected void onActivityResult(int requestCode, int resultCode, @Nullable Intent data) {
        super.onActivityResult(requestCode, resultCode, data);
        textView.setText("the other one Activity The data returned is:" + data.getStringExtra("data"));
    }
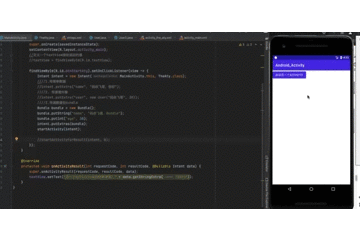
- The operation of the target Activity to be started. The main operation here is to set the return value
 @Override
    protected void onCreate(Bundle savedInstanceState) {
        super.onCreate(savedInstanceState);
        setContentView(R.layout.activity_the_aty);
        editText = findViewById(R.id.editText);
        //Define a button named sendBackDataBtn to jump back to the source Activity.
        findViewById(R.id.sendBackDataBtn).setOnClickListener(view -> {
            Intent resultIntent = new Intent();
            resultIntent.putExtra("data", editText.getText().toString());
            setResult(1, resultIntent);
            //End current Activity
            finish();
        });
    }
Operation results:
summary
This article introduces the creation and value transfer of Activity in detail, hoping to be helpful to readers.
Java knowledge map
Because learning Android requires a good foundation of Java, here we recommend CSDN's latest java knowledge map, which is really good! The atlas of java knowledge, with a size of 870mm x 560mm, can be expanded to the size of a desk or folded into the size of a book. Interested partners can learn about it - scan the QR code in the figure below to buy it.
I've used it myself. It feels very easy to use. Put the manual on the table and keep knowledge in your heart.
I'm brother Manon Feige. Thank you again for reading this article.
Write at the end
Welcome to click "card below" 👇👇👇 Pay attention to bloggers, learn together and make progress together.