6. 2.4G wireless module (NRF24L01)
explain:
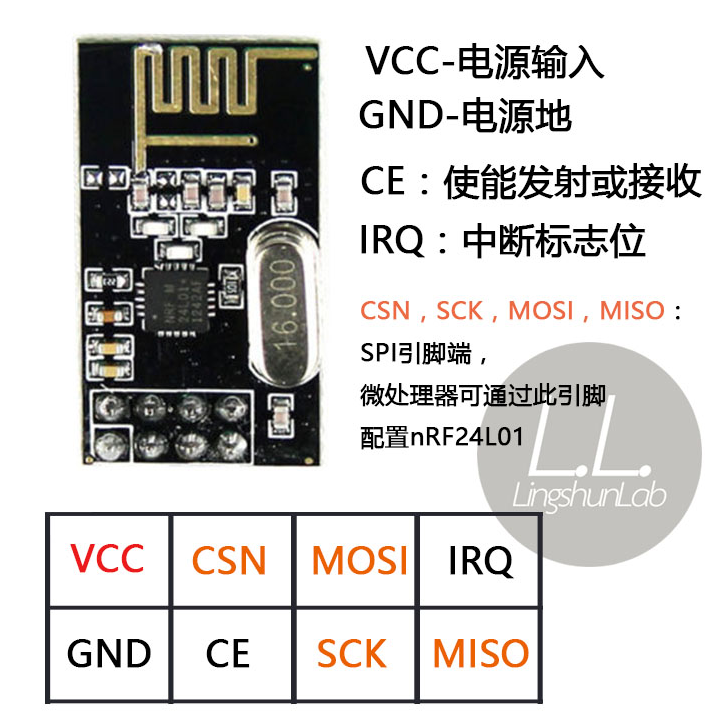
Use 1.9-3.6v power supply, typical power supply is 3.3v
 |  |
NRF24L01 The 2.4G wireless module is divided into two parts and implemented using two different libraries.
NRF24L01 has six channels on the hardware, and each terminal can occupy one channel. Therefore, nRF24L01 can realize one-to-five two-way transmission or one-to-infinite one-way transmission. At this time, the receiving end is in the silent listening state.
1. Beginner Edition
I implemented it using the Mirf library
When using Mirf library for one-to-one one one-way or two-way transmission, it is more convenient and the development speed will be faster. It is recommended for beginners
Wiring mode:
3.3V --- VCC
GND --- GND
7 --- CSN
8 --- CE
11 --- MOSI
13 --- SCK
12 --- MISO
Transmitter:
#include <SPI.h>
#include <Mirf.h>
#include <nRF24L01.h>
#include <MirfHardwareSpiDriver.h>

int value;

void setup()
{
  Mirf.spi = &MirfHardwareSpi;
  Mirf.init();
  Mirf.setRADDR((byte *)"ABCDE"); //Set your own address (sender address) and use 5 characters
  Mirf.payload = sizeof(value);
  Mirf.channel = 90;              //Set channel used
  Mirf.config();
}

void loop()
{
  Mirf.setTADDR((byte *)"FGHIJ");           //Set receiver address
  value = random(255);                      //Random number from 0 to 255
  Mirf.send((byte *)&value);                //Send instruction, send random number value
  while(Mirf.isSending()) delay(1);         //Until the transmission is successful, exit the cycle
  delay(1000);
}
Receiving end:
#include <SPI.h>
#include <Mirf.h>
#include <nRF24L01.h>
#include <MirfHardwareSpiDriver.h>

int value;
void setup()
{
  Serial.begin(9600);
  Mirf.spi = &MirfHardwareSpi;
  Mirf.init();
  Mirf.setRADDR((byte *)"FGHIJ"); //Set your own address (receiver address) and use 5 characters
  Mirf.payload = sizeof(value);
  Mirf.channel = 90;               //Set the channel used
  Mirf.config();
  Serial.println("Listening...");  //Start listening for received data
}

void loop()
{
  if(Mirf.dataReady()) {          //When the program is received, the received data is output from the serial port
    Mirf.getData((byte *) &value);
    Serial.print("Got data: ");
    Serial.println(value)
    ;
  }
}
2. Advanced one-way communication
The advanced version is implemented using rf24 master function library
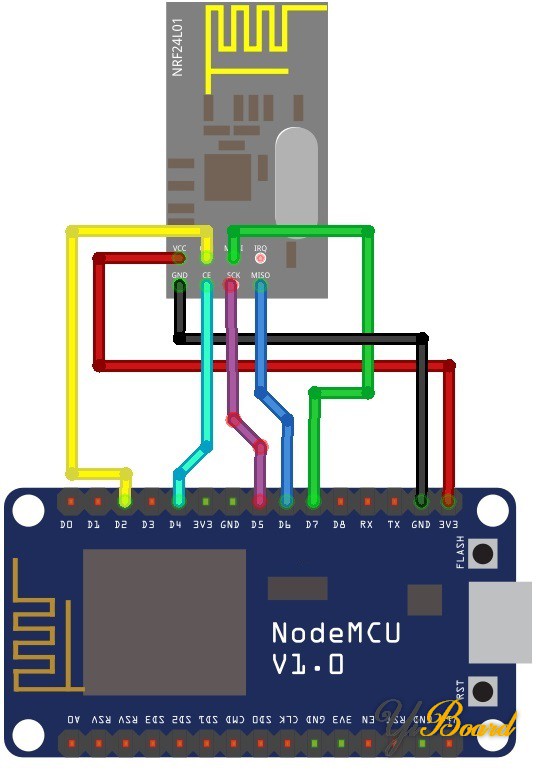
Wiring:
3.3V --- VCC
GND --- GND
7 --- CE
8 --- CSN
11 --- MOSI
13 --- SCK
12 --- MISO
The simplest and most necessary steps: 1 start begin, 2 open the receiving / transmitting pipe, 3 set the Power Amplifier (PA) power level, and 4 start / stop listening. Determine whether data is received (available).
There is a problem. When using arduino to transfer an array to esp8266, overflow occurs when using integer int, but it does not occur when using short integer short or floating point float.
Transmitter:
#include <SPI.h>
#include <nRF24L01.h>
#include <RF24.h>

RF24 radio(7, 8); // CE, CSN
const byte address[6] = "00001";   //Set identification code

void setup() {
  radio.begin();                     //Start the system
  radio.setChannel(115);             //Modify channel, 0 ~ 127
  radio.openWritingPipe(address);    //Open the write pipeline and place the identification code inside
  radio.setPALevel(RF24_PA_MIN);
  //Transmit power RF24_PA_MIN=-18dBm, RF24_PA_LOW=-12dBm,RF24_PA_MED=-6dBM, and RF24_PA_HIGH=0dBm.
  radio.stopListening();            //Stop listening
}

void loop() {
  const char text[] = "Hello my mom";   //Prepare data
  radio.write(&text, sizeof(text));     //send data
  delay(1000);
}
Receiving end:
#include <SPI.h>
#include <nRF24L01.h>
#include <RF24.h>

RF24 radio(7, 8); // CE, CSN
const byte address[6] = "00001";          //Set identification code

void setup() {
  Serial.begin(9600);
  radio.begin();                         //Start the system
  radio.setChannel(115);                 //Modify channel, 0 ~ 127
  radio.openReadingPipe(0, address);     //Open read channel 0-6
  radio.setPALevel(RF24_PA_MIN);
  //Transmit power RF24_PA_MIN=-18dBm, RF24_PA_LOW=-12dBm,RF24_PA_MED=-6dBM, and RF24_PA_HIGH=0dBm.
  radio.startListening();                //Start listening
}

void loop() {
  if (radio.available()) {               //Determine whether there is data
  char text[32] = "";                    //Define a string
  radio.read(&text, sizeof(text));       //Read data
  Serial.println(text);
  }
}
4. Advanced two-way communication
Note that after sending data, you need to delay a certain time before starting listening, and wait for the data to be sent. Otherwise, the data may be stuck until the data is sent.
The anti jitter algorithm is used for the buttons at the transmitting end of the routine. Press the button once to transmit. After receiving the data from the transmitting end, the receiving end will return the received information "1". The transmitting end can judge whether the data has been successfully sent to the receiving end.
Transmitter:
#include <SPI.h>
#include <nRF24L01.h>
#include <RF24.h>

RF24 radio(7, 8);                        // CE, CSN
const byte address[6] = {00001,00002};   //Set identification code
const int buttonPin = A0;
int buttonState;
int lastButtonState = LOW;
long lastDebounceTime = 0;
long debounceDelay = 20;                //Jitter range size

void setup() {
  pinMode(buttonPin, INPUT);            //Define interface input
  radio.begin();                        //Start the system
  radio.setChannel(50);                 //Modify channel, 0 ~ 127
  radio.openWritingPipe(address[1]);    //Open the write pipeline and place the identification code inside
  radio.openReadingPipe(1, address[0]); //Open read channels 1-6
  radio.setPALevel(RF24_PA_MIN);
  //Transmit power RF24_PA_MIN=-18dBm, RF24_PA_LOW=-12dBm,RF24_PA_MED=-6dBM, and RF24_PA_HIGH=0dBm.
  radio.stopListening();                //Stop listening
  Serial.begin(9600);
}
void loop() {
  buttonclick();
  delay(5);
  listening();
}
void buttonclick(){
  radio.stopListening();
  int reading = digitalRead(buttonPin);
  if (reading != lastButtonState) {
    lastDebounceTime = millis();
  }
  if ((millis() - lastDebounceTime) > debounceDelay) {
    if (reading != buttonState) {
      buttonState = reading;
      if (buttonState == HIGH) {
        float text[5];                         //Prepare data
        text[0]=1234;
        Serial.println(text[0]);
        radio.write(&text, sizeof(text));      //send data
        delay(5);
      }
    }
  }
  lastButtonState = reading;
  radio.startListening();
}
void listening(){
  radio.startListening();
  if (radio.available()) {                 //Determine whether there is data
    int back;                              //Define a string
    radio.read(&back, sizeof(back));       //Read data
    Serial.println(back);
  }
}
Receiving end:
#include <SPI.h>
#include <nRF24L01.h>
#include <RF24.h>

RF24 radio(7, 8);                        // CE, CSN
const byte address[6] = {00001,00002};   //Set identification code
const int buttonPin = A0;
int buttonState;
int lastButtonState = LOW;
long lastDebounceTime = 0;
long debounceDelay = 20;

void setup() {
  pinMode(buttonPin, INPUT);            //Define interface input
  radio.begin();                        //Start the system
  radio.setChannel(50);                 //Modify channel, 0 ~ 127
  radio.openWritingPipe(address[1]);    //Open the write pipeline and place the identification code inside
  radio.openReadingPipe(1, address[0]); //Open read channels 1-6
  radio.setPALevel(RF24_PA_MIN);
  //Transmit power RF24_PA_MIN=-18dBm, RF24_PA_LOW=-12dBm,RF24_PA_MED=-6dBM, and RF24_PA_HIGH=0dBm.
  radio.stopListening();                //Stop listening
  Serial.begin(9600);
}
void loop() {
  buttonclick();
  delay(5);
  listening();
}
void buttonclick(){
  radio.stopListening();
  int reading = digitalRead(buttonPin);
  if (reading != lastButtonState) {
    lastDebounceTime = millis();
  }
  if ((millis() - lastDebounceTime) > debounceDelay) {
    if (reading != buttonState) {
      buttonState = reading;
      if (buttonState == HIGH) {
        float text[5];                         //Prepare data
        text[0]=1234;
        Serial.println(text[0]);
        radio.write(&text, sizeof(text));      //send data
        delay(5);
      }
    }
  }
  lastButtonState = reading;
  radio.startListening();
}
void listening(){
  radio.startListening();
  if (radio.available()) {                 //Determine whether there is data
    int back;                              //Define a string
    radio.read(&back, sizeof(back));       //Read data
    Serial.println(back);
  }
}
You can think about how to carry out one to many and many to many two-way communication.