Building nginx service under Linux
1.nginx introduction:
- Nginx is an open-source, high-performance and highly reliable Web and reverse proxy server, and supports hot deployment. It can run almost 7 * 24 hours without interruption. Even if it runs for several months, it does not need to be restarted. It can also hot update the software version under the condition of uninterrupted service.
- Performance is the most important consideration of Nginx. It occupies less memory, has strong concurrency, and can support up to 5w concurrent connections. Most importantly, Nginx is free and can be commercialized, and its configuration and use are relatively simple.
- The following provides the detailed steps of nginx installation, nginx reverse proxy setup, nginx load balancing, and nginx high availability configuration
2.nginx installation:
2.1 install nignx using Yum or up2date:
1. Features:
Installing nginx using yum is simple and convenient, and the latest version is installed
2. Configure the yum source of nginx:
[root@server-3 ~]# vim /etc/yum.repos.d/nginx.repo
[nginx-stable]
name=nginx stable repo
baseurl=https://nginx.org/packages/centos/7/x86_64/
gpgcheck=1
enabled=1
gpgkey=https://nginx.org/keys/nginx_signing.key
module_hotfixes=true

[nginx-mainline]
name=nginx mainline repo
baseurl=https://nginx.org/packages/mainline/centos/7/x86_64/
gpgcheck=1
enabled=0
gpgkey=https://nginx.org/keys/nginx_signing.key
module_hotfixes=true
3. Install nginx
Install nginx using yum and start to view the version
[root@server-3 ~]# yum install -y nginx
[root@server-3 ~]# nginx
[root@server-3 ~]# nginx -v
nginx version: nginx/1.20.1
2.2 source code installation nginx
1. Features:
The feature of using the source code installation is that you can choose to install the required nginx version
2. Configure centos yum source:
Because the source code installation requires some dependent packages, configure the yum source and Alibaba cloud's Yum source first. The premise is to ensure that the virtual machine can access the Internet
[root@server-3 ~]# curl -o /etc/yum.repos.d/centos7.repo http://mirrors.aliyun.com/repo/Centos-7.repo
3. Install dependent packages:
[root@server-3 ~]# yum install -y gcc-c++ pcre pcre-devel zlib zlib-devel openssl openssl-devel
4. Download nginx source package:
Download address of nginx official website: https://nginx.org/download/
Any version of nginx has.
Download using the wget tool:
[root@server-3 ~]# yum install -y wget

[root@server-3 ~]# wget https://nginx.org/download/nginx-1.17.8.tar.gz
--2021-10-02 15:32:32--  https://nginx.org/download/nginx-1.17.8.tar.gz
Resolving nginx.org (nginx.org)... 3.125.197.172, 52.58.199.22, 2a05:d014:edb:5704::6, ...
Connecting to nginx.org (nginx.org)|3.125.197.172|:443... connected.
ERROR: cannot verify nginx.org's certificate, issued by '/C=US/O=Let's Encrypt/CN=R3':
  Issued certificate has expired.
To connect to nginx.org insecurely, use `--no-check-certificate'.


[root@server-3 ~]# wget https://nginx.org/download/nginx-1.17.8.tar.gz --no-check-certificate
--2021-10-02 15:32:44--  https://nginx.org/download/nginx-1.17.8.tar.gz
Resolving nginx.org (nginx.org)... 52.58.199.22, 3.125.197.172, 2a05:d014:edb:5704::6, ...
Connecting to nginx.org (nginx.org)|52.58.199.22|:443... connected.
WARNING: cannot verify nginx.org's certificate, issued by '/C=US/O=Let's Encrypt/CN=R3':
  Issued certificate has expired.
HTTP request sent, awaiting response... 200 OK
Length: 1038627 (1014K) [application/octet-stream]
Saving to: 'nginx-1.17.8.tar.gz'

100%[========================================================================================================>] 1,038,627    153KB/s   in 6.6s

2021-10-02 15:32:53 (153 KB/s) - 'nginx-1.17.8.tar.gz' saved [1038627/1038627]
5. Decompression and installation:
[root@server-3 ~]# tar -xzf nginx-1.17.8.tar.gz -C /usr/local/

[root@server-3 ~]# mkdir -p /var/temp/nginx

[root@server-3 ~]# cd /usr/local/nginx-1.17.8/

[root@server-3 nginx-1.17.8]# ls
auto  CHANGES  CHANGES.ru  conf  configure  contrib  html  LICENSE  man  README  src

[root@server-3 nginx-1.17.8]# ./configure --prefix=/usr/local/nginx --pid-path=/var/run/nginx/nginx.pid --lock-path=/var/lock/nginx.lock --error-log-path=/var/log/nginx/error.log --http-log-path=/var/log/nginx/access.log --with-http_gzip_static_module --http-client-body-temp-path=/var/temp/nginx/client --http-proxy-temp-path=/var/temp/nginx/proxy --http-fastcgi-temp-path=/var/temp/nginx/fastcgi --http-uwsgi-temp-path=/var/temp/nginx/uwsgi --with-http_stub_status_module --with-http_ssl_module --http-scgi-temp-path=/var/temp/nginx/scgi

The above command directly copies the code:
./configure \
--prefix=/usr/local/nginx \
--pid-path=/var/run/nginx/nginx.pid \
--lock-path=/var/lock/nginx.lock \
--error-log-path=/var/log/nginx/error.log \
--http-log-path=/var/log/nginx/access.log \
--with-http_gzip_static_module \
--http-client-body-temp-path=/var/temp/nginx/client \
--http-proxy-temp-path=/var/temp/nginx/proxy \
--http-fastcgi-temp-path=/var/temp/nginx/fastcgi \
--http-uwsgi-temp-path=/var/temp/nginx/uwsgi \
--with-http_stub_status_module \
--with-http_ssl_module \
--http-scgi-temp-path=/var/temp/nginx/scgi


To compile and install:
[root@server-3 nginx-1.17.8]# make
[root@server-3 nginx-1.17.8]# make install
6. Start nginx
[root@server-3 nginx-1.17.8]# cd /usr/local/nginx
[root@server-3 nginx]# ls
conf  html  sbin
[root@server-3 nginx]# sbin/nginx
[root@server-3 nginx]# ps -ef |grep nginx
root      10562      1  0 15:40 ?        00:00:00 nginx: master process sbin/nginx
nobody    10563  10562  0 15:40 ?        00:00:00 nginx: worker process
root      10566   7566  0 15:40 pts/1    00:00:00 grep --color=auto nginx
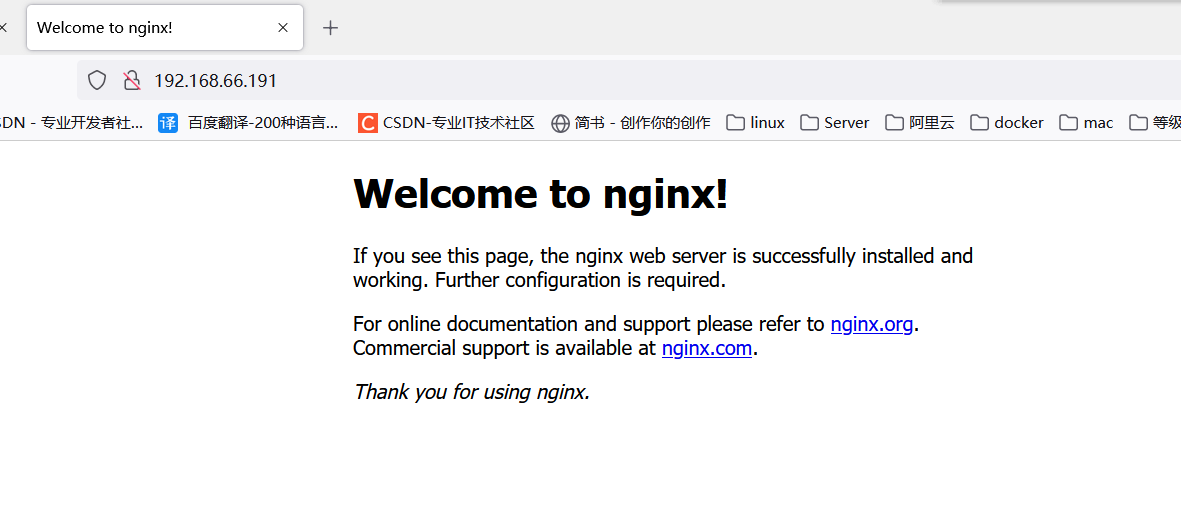
Visit the browser: virtual machine ip:80 to check whether the nginx home page appears
The premise is to turn off the virtual machine firewall and selinux
3.nginx configure reverse proxy (example 1):
Reverse proxy 1:
Effect to be achieved:
The browser visiting www.123.com will jump to the home page of tomcat
1. Preparation:
To install tomcat:
[root@server-3 ~]# wget https://dlcdn.apache.org/tomcat/tomcat-9/v9.0.53/bin/apache-tomcat-9.0.53.tar.gz

[root@server-3 ~]# tar -xzvf apache-tomcat-9.0.53.tar.gz -C /usr/local/
Because starting tomcat needs to be based on the java environment, configure the java environment before starting tomcat here
Download address of java package: https://www.oracle.com/java/technologies/javase/javase-jdk8-downloads.html
[root@server-3 ~]# tar -xzvf jdk-8u181-linux-x64.tar.gz -C /usr/local/

[root@server-3 ~]# vim /etc/profile
export JAVA_HOME=/usr/local/jdk1.8.0_291
export PATH=$PATH:$JAVA_HOME/bin

[root@server-3 ~]# source /etc/profile
[root@server-3 ~]# java -version
openjdk version "1.8.0_302"
OpenJDK Runtime Environment (build 1.8.0_302-b08)
OpenJDK 64-Bit Server VM (build 25.302-b08, mixed mode)
[root@server-3 ~]# jps
10840 Jps
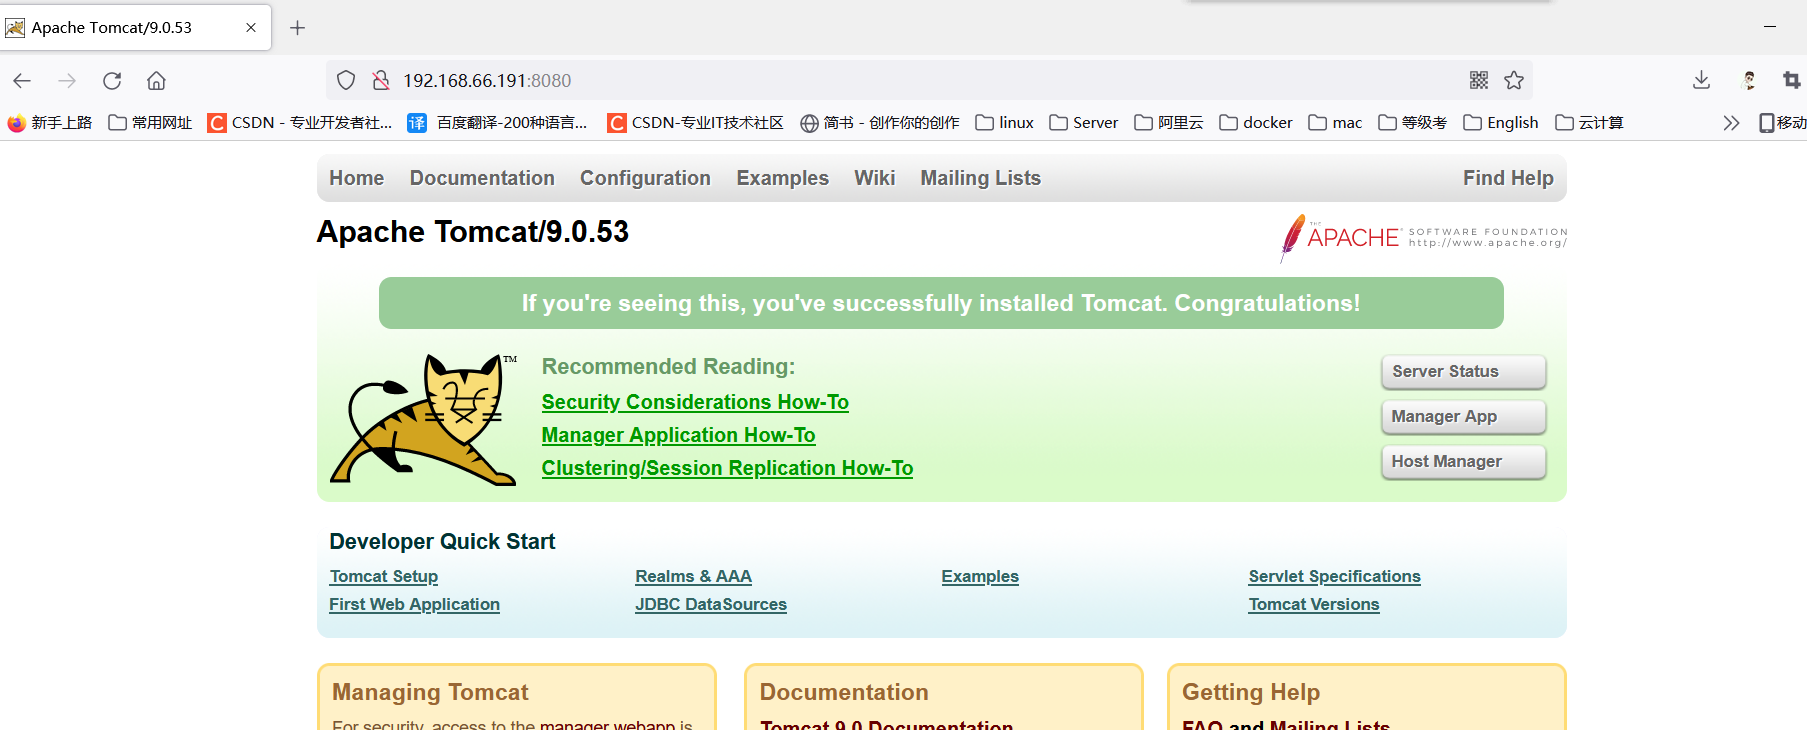
Start tomcat
[root@server-3 ~]# cd /usr/local/apache-tomcat-9.0.53/
[root@server-3 apache-tomcat-9.0.53]# bin/startup.sh start
Using CATALINA_BASE:   /usr/local/apache-tomcat-9.0.53
Using CATALINA_HOME:   /usr/local/apache-tomcat-9.0.53
Using CATALINA_TMPDIR: /usr/local/apache-tomcat-9.0.53/temp
Using JRE_HOME:        /usr/local/jdk1.8.0_291
Using CLASSPATH:       /usr/local/apache-tomcat-9.0.53/bin/bootstrap.jar:/usr/local/apache-tomcat-9.0.53/bin/tomcat-juli.jar
Using CATALINA_OPTS:
Tomcat started.

[root@server-3 apache-tomcat-9.0.53]# jps
10947 Jps
10874 Bootstrap
verification:
2. Configure nginx reverse proxy
Modify nginx configuration file
[root@server-3 ~]# cd /usr/local/nginx/conf/

stay sever Configuration under module
[root@server-3 conf]# vim nginx.conf
    server {
        listen       80;
        server_name  192.168.66.191;	#Change the localhost here to the cost machine ip, and the browser needs to resolve to this ip when accessing the domain name

        #charset koi8-r;

        #access_log  logs/host.access.log  main;

        location / {
            proxy_pass http://127.0.0.1:8080; 	# Because the tomcat service is also built in this virtual machine, tomcat is port 8080. This configuration is the key to the success of the reverse proxy
            root   html;
            index  index.html index.htm;
        }

restart nginx,Make its configuration effective:
[root@server-3 conf]# cd ../sbin
[root@server-3 sbin]# ./nginx -s reload
3. hosts analysis in win
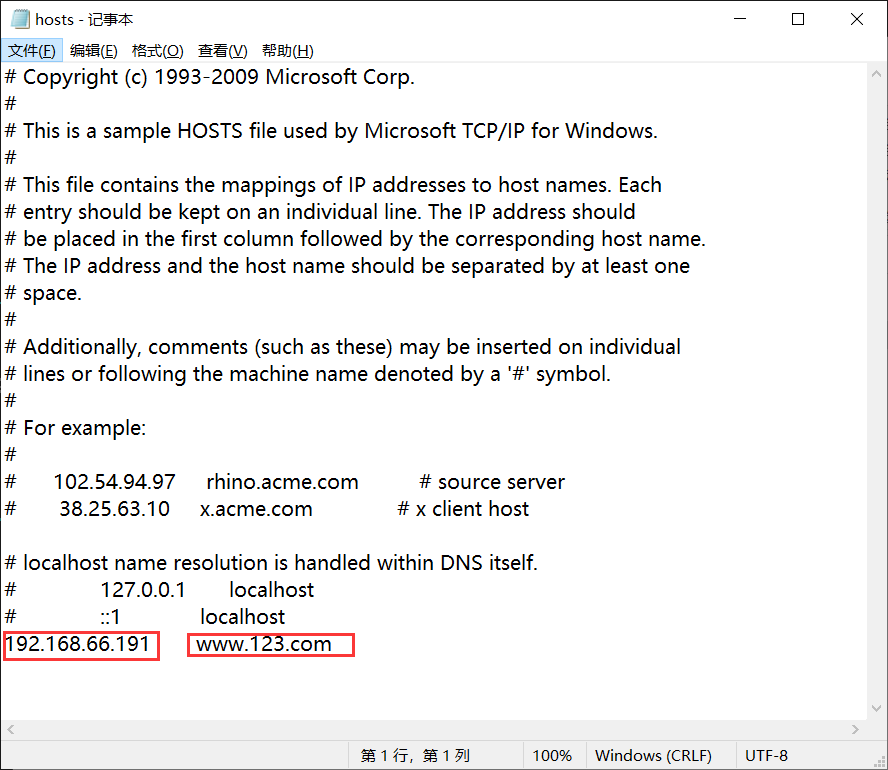
Add hosts resolution in windows:
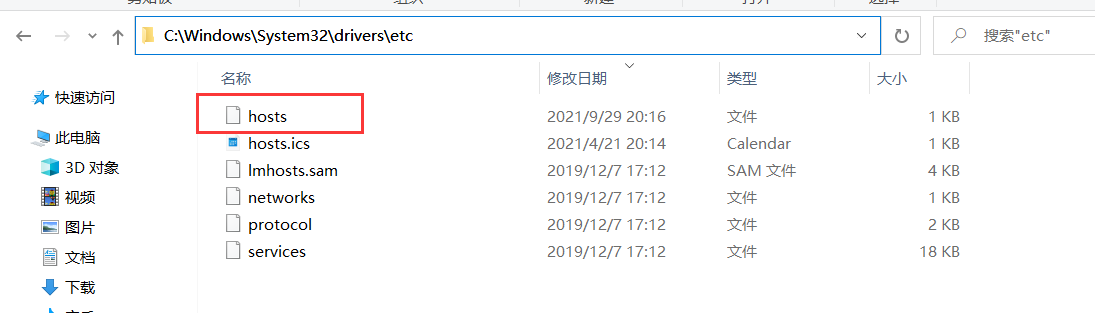
Add a row
Virtual machine ip www.123.com
For example: 192.168.66.191 www.123.com
4. Test:
Browser access: www.123.com
Check whether it will jump to the tomcat home page
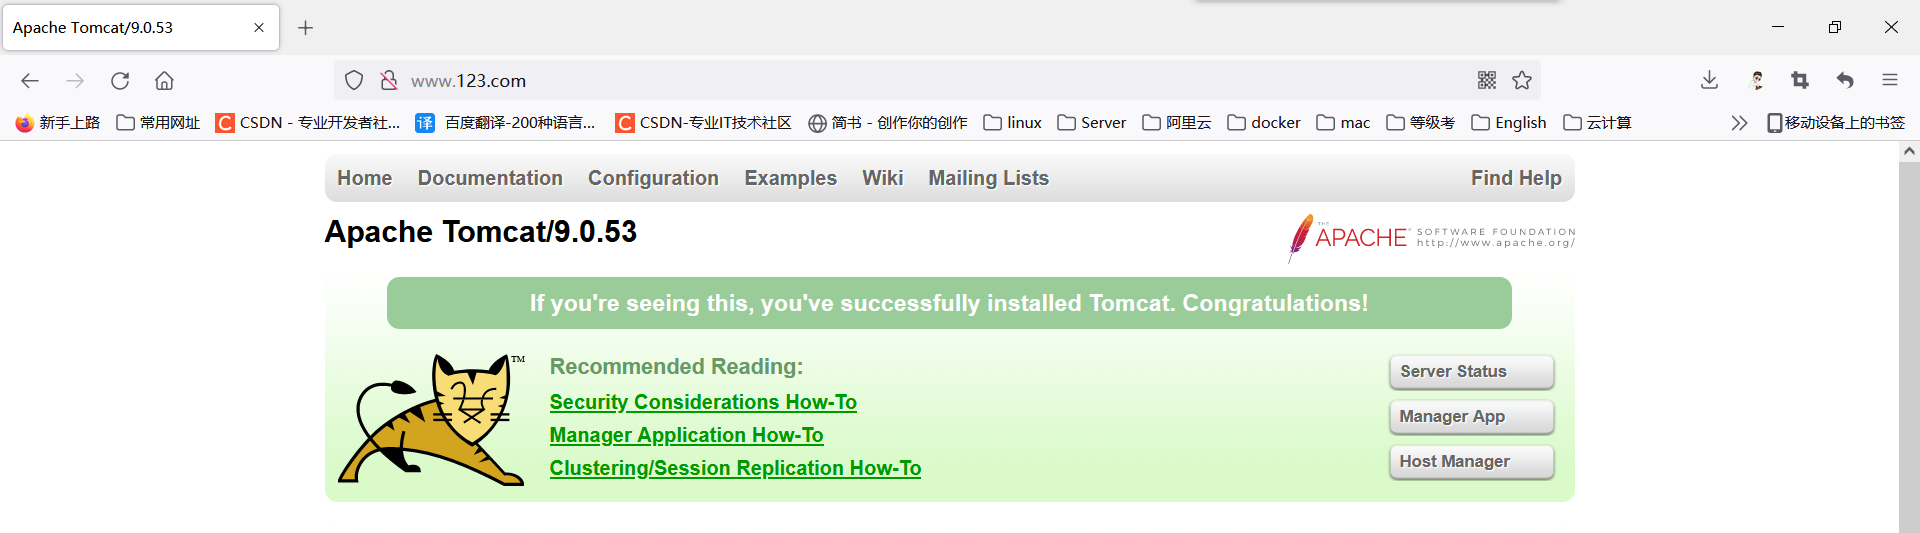
Thus, a simple nginx reverse proxy configuration success!!
4.nginx configure reverse proxy (example 2):
Use nginx reverse proxy to jump to different port services according to the access path. The listening port of nginx is 9001
The effects to be achieved here are:
visit http://192.168.11.131:9001/edu/ Jump directly to 127.0.0.1:8080
visit http://192.168.11.131:9001/stu/ Jump directly to 127.0.0.1:8081
This effect can be easily realized by using nginx to access different pages when accessing the same ip or the same domain name followed by other parameters.
1. Preparation:
Prepare two tomcat, tomcat1 and tomcat2
Because of the above experiment, a Tomcat is 8080 port, and then install a tomcat2 as 8081 port;
Close the start of the last experiment first tomcat
[root@server-3 ~]# ps -ef |grep apache
root       7221      1  1 15:35 pts/0    00:00:03 /usr/local/jdk1.8.0_291/bin/java -Djava.util.logging.config.file=/usr/local/tomcat1/conf/logging.properties -Djava.util.logging.manager=org.apache.juli.ClassLoaderLogManager -Djdk.tls.ephemeralDHKeySize=2048 -Djava.protocol.handler.pkgs=org.apache.catalina.webresources -Dorg.apache.catalina.security.SecurityListener.UMASK=0027 -Dignore.endorsed.dirs= -classpath /usr/local/tomcat1/bin/bootstrap.jar:/usr/local/tomcat1/bin/tomcat-juli.jar -Dcatalina.base=/usr/local/tomcat1 -Dcatalina.home=/usr/local/tomcat1 -Djava.io.tmpdir=/usr/local/tomcat1/temp org.apache.catalina.startup.Bootstrap start
root      10869   1218  0 15:39 pts/0    00:00:00 grep --color=auto apache

[root@server-3 ~]# kill -9 7221


Start second tomcat
[root@server-3 ~]# cd /usr/local/
[root@server-3 local]# mkdir /usr/local/tomcat1 /usr/local/tomcat2

[root@server-3 local]# mv apache-tomcat-9.0.53/ tomcat1/
[root@server-3 local]# tar -xvzf /root/apache-tomcat-9.0.53.tar.gz -C /usr/local/tomcat2


modify tomcat2 Port:
[root@server-3 local]# cd tomcat2/apache-tomcat-9.0.53/
[root@server-3 tomcat2]# vim conf/server.xml
<Server port="8015" shutdown="SHUTDOWN">

    <Connector port="8081" protocol="HTTP/1.1"
               connectionTimeout="20000"
               redirectPort="8443"
2. Verify whether the two tomcat are started
Start tomcat1 and tomcat2
[root@server-3 ~]# cd /usr/local/tomcat1/
[root@server-3 tomcat1]# bin/startup.sh start
Using CATALINA_BASE:   /usr/local/tomcat1
Using CATALINA_HOME:   /usr/local/tomcat1
Using CATALINA_TMPDIR: /usr/local/tomcat1/temp
Using JRE_HOME:        /usr/local/jdk1.8.0_291
Using CLASSPATH:       /usr/local/tomcat1/bin/bootstrap.jar:/usr/local/tomcat1/bin/tomcat-juli.jar
Using CATALINA_OPTS:
Tomcat started.


[root@server-3 tomcat1]# cd ../tomcat2/apache-tomcat-9.0.53/
[root@server-3 tomcat2]# bin/startup.sh start
Using CATALINA_BASE:   /usr/local/tomcat2
Using CATALINA_HOME:   /usr/local/tomcat2
Using CATALINA_TMPDIR: /usr/local/tomcat2/temp
Using JRE_HOME:        /usr/local/jdk1.8.0_291
Using CLASSPATH:       /usr/local/tomcat2/bin/bootstrap.jar:/usr/local/tomcat2/bin/tomcat-juli.jar
Using CATALINA_OPTS:
Tomcat started.
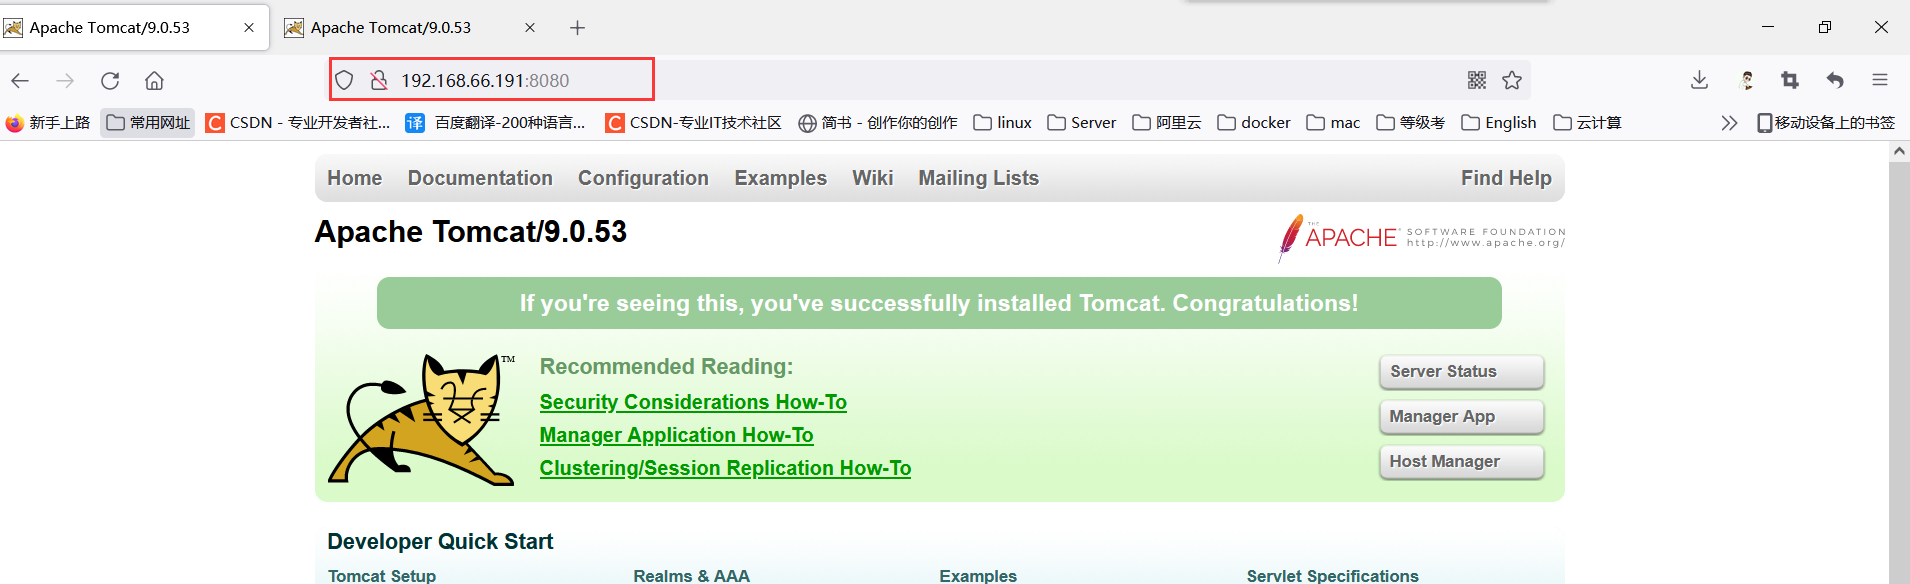
Browser access test: 192.168.66.191:8080
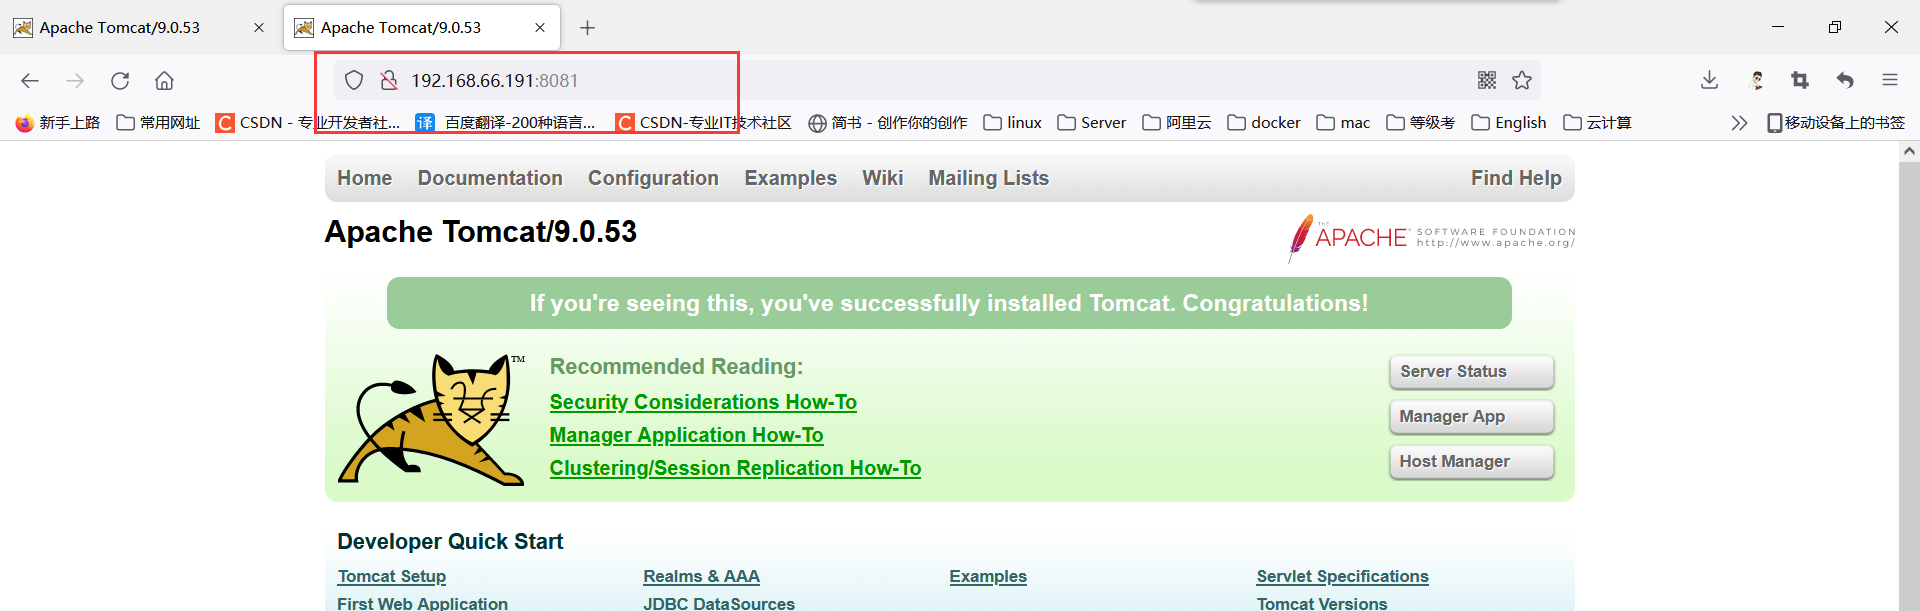
Browser access test: 192.168.66.191:8081
After two tomcat are started successfully, you can enter tomcat to create directories and write files
The port number is written in the index.html file for easy identification
[root@server-3 ~]# cd /usr/local/tomcat1/webapps/
[root@server-3 webapps]# mkdir edu
[root@server-3 webapps]# echo "<h1>8080</h1>" > edu/index.html

[root@server-3 webapps]# cd /usr/local/tomcat2/apache-tomcat-9.0.53/webapps/
[root@server-3 webapps]# mkdir stu
[root@server-3 webapps]# echo "<h1>8081</h1>" > stu/index.html
3. Configure nginx configuration file
The configuration of nginx reverse proxy is as follows:
[root@server-3 ~]# cd /usr/local/nginx/conf/
[root@server-3 conf]# vim nginx.conf

Add a server modular:
    server {
        listen       9001;
        server_name  192.168.66.191;

        location ~/edu/ {
            proxy_pass http://127.0.0.1:8080;
        }

        location ~/stu/ {
            proxy_pass http://127.0.0.1:8081;
        }
    }
start nginx
[root@server-3 conf]# cd ../sbin/
[root@server-3 sbin]# ls
nginx
[root@server-3 sbin]# ./nginx
4. Access test:
Browser access: 192.168.66.191:9001/edu/

Browser access: 192.168.66.191:9001/stu/
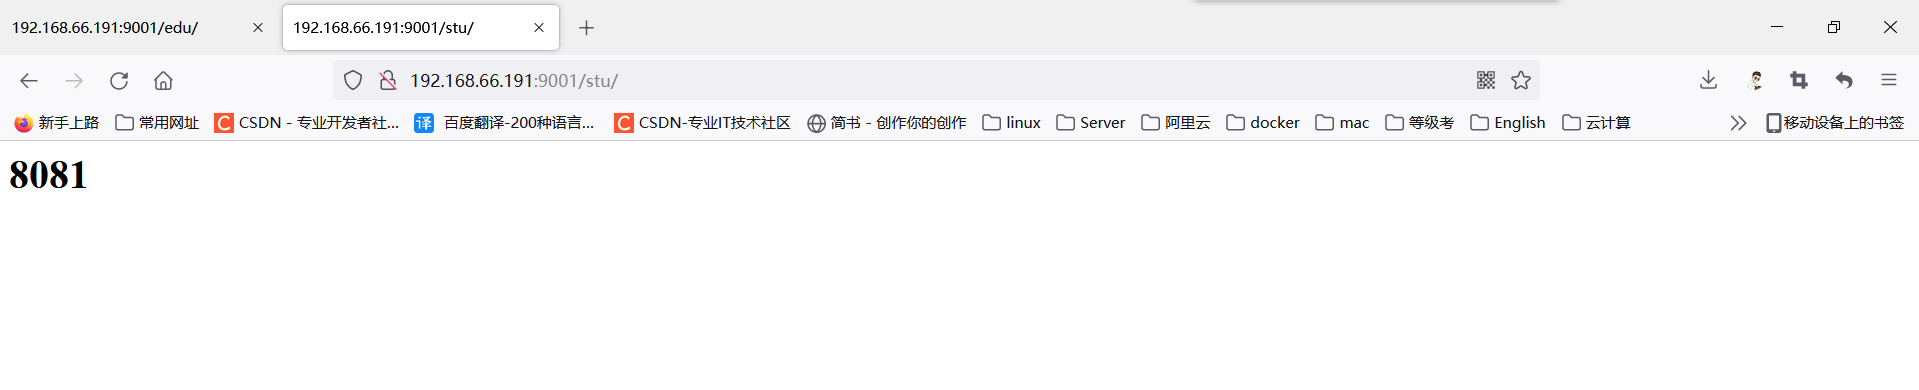
That is to achieve a domain name / ip, a port to access different pages!
5.nginx configuration load balancing
5.1 introduction to load balancing + implementation effect:
Using nignx to configure load balancing is a very common scenario in nginx services. The original situation where requests are concentrated on a single server is changed to distribute to multiple servers. As the number of servers increases, nginx will distribute various requests to each server, which is what we call load balancing.
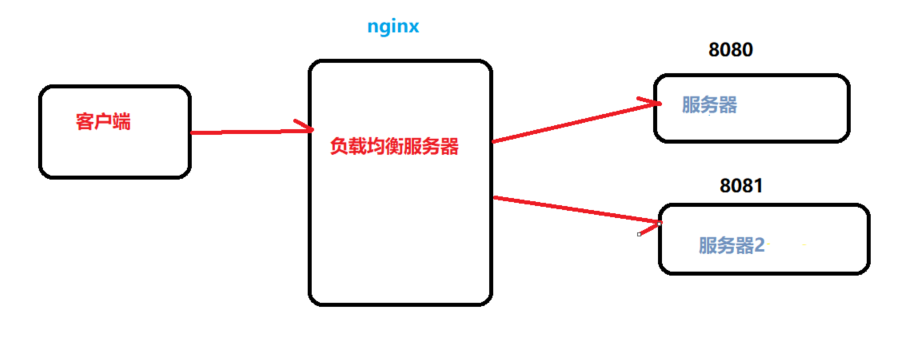
As described in the above figure, the browser accesses the server from the client. Through nginx, the client's requests can be evenly distributed to other servers to make the requests received by these servers average.
The effects of nginx load balancing are as follows:
Browser access: 192.168.66.191/edu/index.html,
His requests will be distributed equally to tomcat1 (8080) and tomcat2 (8081)
That is, every time the page is refreshed, it will be converted between 8080 and 8081.
5.2 preparation:
Create edu directories in both tomcat1 and tomcat2, where 8080 and 8081 are written for easy identification
In the previous reverse proxy experiment, tomcat1 already has this directory and file, so it only needs to be created in tomcat2
Stop the last experiment first tomcat and nginx

[root@server-3 ~]# ps -ef |grep nginx
root      11938      1  0 15:59 ?        00:00:00 nginx: master process ./nginx
nobody    11939  11938  0 15:59 ?        00:00:00 nginx: worker process
root      13041   1218  0 16:22 pts/0    00:00:00 grep --color=auto nginx
[root@server-3 ~]# kill -9 11938
[root@server-3 ~]# kill -9 11939
[root@server-3 ~]#
[root@server-3 ~]# ps -ef |grep apache
root      11191      1  0 15:45 pts/0    00:00:06 /usr/local/jdk1.8.0_291/bin/java -Djava.util.logging.config.file=/usr/local/tomcat1/conf/logging.properties -Djava.util.logging.manager=org.apache.juli.ClassLoaderLogManager -Djdk.tls.ephemeralDHKeySize=2048 -Djava.protocol.handler.pkgs=org.apache.catalina.webresources -Dorg.apache.catalina.security.SecurityListener.UMASK=0027 -Dignore.endorsed.dirs= -classpath /usr/local/tomcat1/bin/bootstrap.jar:/usr/local/tomcat1/bin/tomcat-juli.jar -Dcatalina.base=/usr/local/tomcat1 -Dcatalina.home=/usr/local/tomcat1 -Djava.io.tmpdir=/usr/local/tomcat1/temp org.apache.catalina.startup.Bootstrap start start
root      11224      1  0 15:45 pts/0    00:00:06 /usr/local/jdk1.8.0_291/bin/java -Djava.util.logging.config.file=/usr/local/tomcat2/apache-tomcat-9.0.53/conf/logging.properties -Djava.util.logging.manager=org.apache.juli.ClassLoaderLogManager -Djdk.tls.ephemeralDHKeySize=2048 -Djava.protocol.handler.pkgs=org.apache.catalina.webresources -Dorg.apache.catalina.security.SecurityListener.UMASK=0027 -Dignore.endorsed.dirs= -classpath /usr/local/tomcat2/apache-tomcat-9.0.53/bin/bootstrap.jar:/usr/local/tomcat2/apache-tomcat-9.0.53/bin/tomcat-juli.jar -Dcatalina.base=/usr/local/tomcat2/apache-tomcat-9.0.53 -Dcatalina.home=/usr/local/tomcat2/apache-tomcat-9.0.53 -Djava.io.tmpdir=/usr/local/tomcat2/apache-tomcat-9.0.53/temp org.apache.catalina.startup.Bootstrap start start
root      13058   1218  0 16:22 pts/0    00:00:00 grep --color=auto apache
[root@server-3 ~]# kill -9 11191
[root@server-3 ~]# kill -9 11224

tomcat2 establish edu Directories and files
[root@server-3 ~]# cd /usr/local/tomcat2/apache-tomcat-9.0.53/webapps/
[root@server-3 webapps]# mkdir edu
[root@server-3 webapps]# echo "<h1>8081</h1>" >edu/index.html
Next, configure load balancing in nginx
[root@server-3 ~]# cd /usr/local/nginx/conf/
[root@server-3 conf]# vim nginx.conf
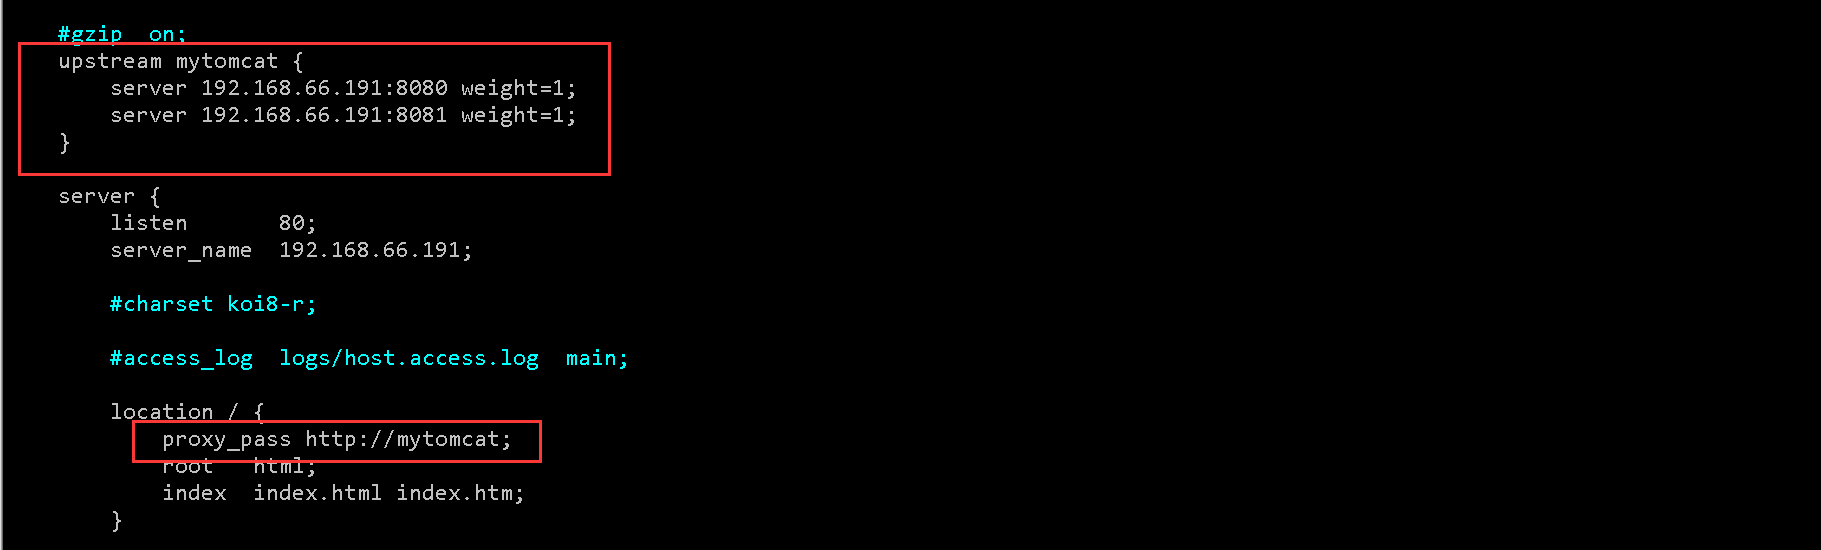
http This configuration is added under the module
upstream mytomcat {
server 192.168.66.191:8080 weight=1;
server 192.168.66.191:8081 weight=1;
}
server {
listen 80;
server_name 192.168.66.191;
#charset koi8-r;
#access_log logs/host.access.log main;
location / {
proxy_pass http://mytomcat;
root html;
index index.html index.htm;
}
Add mytomcat and the configuration in location
5.3 start nginx and tomcat1 tomcat2
[root@server-3 conf]# cd ../sbin/
[root@server-3 sbin]# ./nginx


[root@server-3 sbin]# cd /usr/local/tomcat1/bin/
[root@server-3 bin]# ./startup.sh
Using CATALINA_BASE:   /usr/local/tomcat1
Using CATALINA_HOME:   /usr/local/tomcat1
Using CATALINA_TMPDIR: /usr/local/tomcat1/temp
Using JRE_HOME:        /usr/local/jdk1.8.0_291
Using CLASSPATH:       /usr/local/tomcat1/bin/bootstrap.jar:/usr/local/tomcat1/bin/tomcat-juli.jar
Using CATALINA_OPTS:
Tomcat started.
[root@server-3 bin]#


[root@server-3 bin]# cd /usr/local/tomcat2/apache-tomcat-9.0.53/bin/
[root@server-3 bin]# ./startup.sh
Using CATALINA_BASE:   /usr/local/tomcat2/apache-tomcat-9.0.53
Using CATALINA_HOME:   /usr/local/tomcat2/apache-tomcat-9.0.53
Using CATALINA_TMPDIR: /usr/local/tomcat2/apache-tomcat-9.0.53/temp
Using JRE_HOME:        /usr/local/jdk1.8.0_291
Using CLASSPATH:       /usr/local/tomcat2/apache-tomcat-9.0.53/bin/bootstrap.jar:/usr/local/tomcat2/apache-tomcat-9.0.53/bin/tomcat-juli.jar
Using CATALINA_OPTS:
Tomcat started.
[root@server-3 bin]#
5.4 verification test:
Browser access: 192.168.66.191:80/edu/index.html

Then refresh
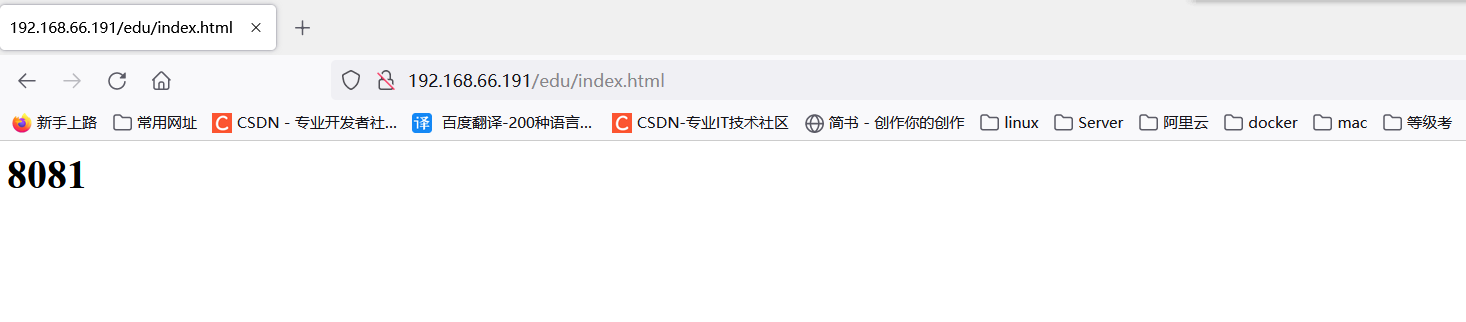
The browser's requests for tomcat are distributed equally to the two services 8080 and 8081,
That is to achieve the load balancing of nginx!
6. nginx configuration is highly available
6.1 high availability:
In daily management, if the server goes down, other servers can be used. If nginx goes down, those requests will not be distributed to the server and will not work normally. Therefore, in order to prevent nginx from going down, nginx high availability is configured.
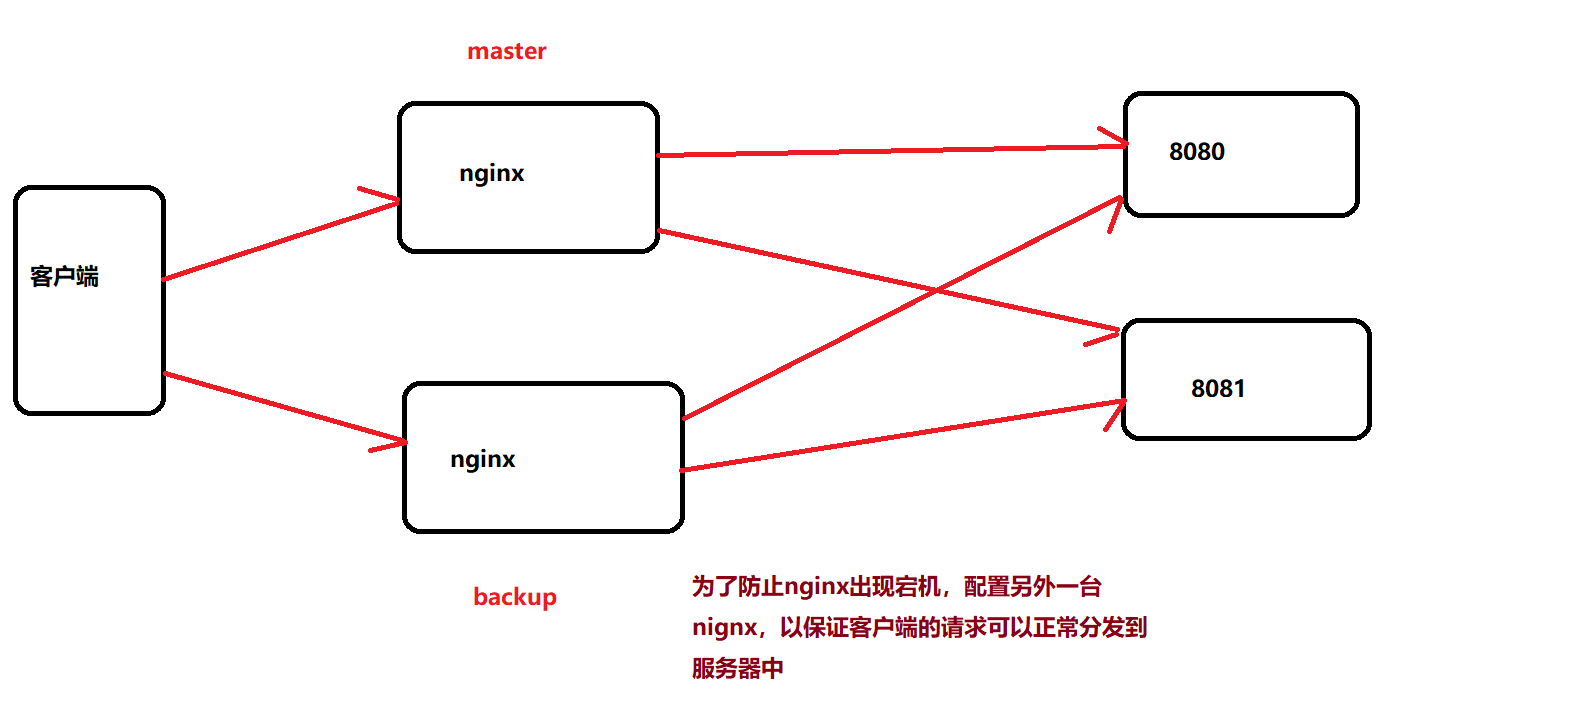
6.2 configure nginx high availability
Two nginx are required to configure nginx high availability. For the steps of installing nginx, refer to chapter 2.2 above and install with source code. Nginx installation will not be described in detail here.
After the two nginx are installed,
Its ip address is:
192.168.66.191
192.168.66.192
191 is called the master node as the primary node, and 192 is called the backup node
To configure nginx high availability, you also need to install keepalived
Close the service started in the previous experiment
 use ps -ef |grep apache/nginx  Filter view processes and use kill -9 Turn off all services.
Refer to 5 for detailed operation.2

Two node installation keepalived
[root@server-3 ~]# yum install -y keepalived

[root@server-4 ~]#  yum install -y keepalived
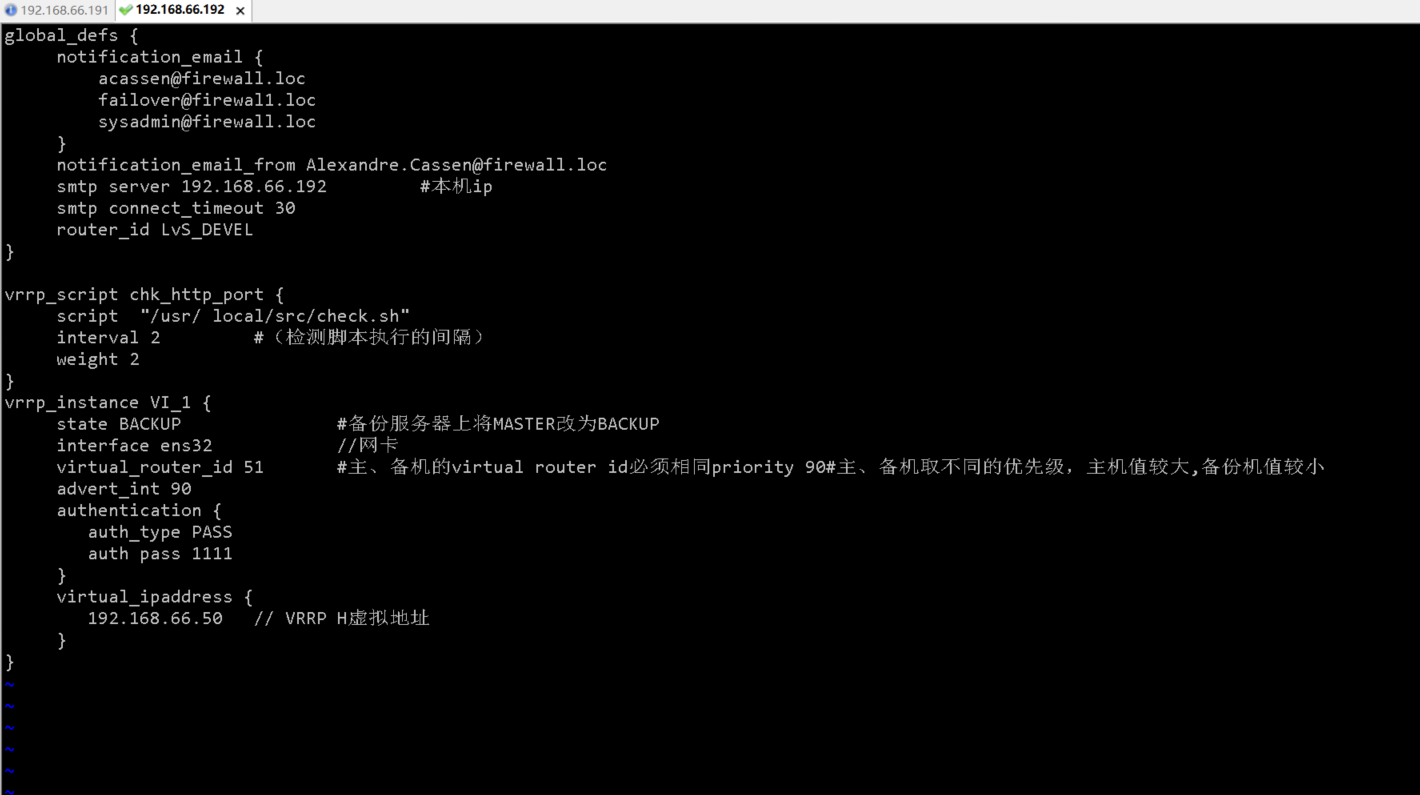
Modify the keepalived configuration file:
[root@server-3 ~]# vim /etc/keepalived/keepalived.conf
global_defs {
     notification_email {
         acassen@firewall.loc
         failover@firewal1.loc
         sysadmin@firewall.loc
     }
     notification_email_from Alexandre.Cassen@firewall.loc
     smtp server 192.168.66.191         #Native ip
     smtp connect_timeout 30
     router_id LvS_DEVEL
}

vrrp_script chk_http_port {
     script  "/usr/local/src/check.sh"
     interval 2         #(detect the interval between script execution)
     weight 2
}
vrrp_instance VI_1 {
     state MASTER               #Change MASTER to BACKUP on the BACKUP server
     interface ens32            //network card
     virtual_router_id 51       #Of main and standby machines virtual router id Must be the same priority 90#The primary and standby machines have different priorities. The host value is larger and the backup machine value is smaller
     advert_int 100
     authentication {
        auth_type PASS
        auth pass 1111
     }
     virtual_ipaddress {
        192.168.66.50   // VRRP H virtual address
     }
}

Remove this profile from master node 191(master)Copy to slave node 192(backup)node
[root@server-3 ~]# scp /etc/keepalived/keepalived.conf 192.168.66.192:/etc/keepalived/keepalived.conf


stay backup Node modification profile:
[root@server-4 ~]# vim /etc/keepalived/keepalived.conf
     smtp server 192.168.66.192         #Native ip
     state BACKUP               #Change MASTER to BACKUP on the BACKUP server
     advert_int 90
Two servers write detection scripts:
[root@server-3 ~]# vim /usr/local/src/check.sh
#!bin/bash
A=`ps -C nginx -no-header |wc -l`
if [ $A -eq 0 ]; then
    /usr/local/nginx/sbin/nginx
    sleep 2
    if [ `ps -C nginx --no-header |wc -l` -eq 0 ];then
        killall keepalived
    fi
fi

use scp Slave master node cp To standby node
[root@server-3 ~]# scp /usr/local/src/check.sh 192.168.66.192:/usr/local/src/
6.3 start up service:
Start nginx and keepalived for both servers
[root@server-3 ~]# cd /usr/local/nginx/sbin/
[root@server-3 sbin]# ./nginx
[root@server-3 sbin]# systemctl start keepalived

[root@server-4 ~]# systemctl start keepalived
[root@server-4 ~]# cd /usr/local/nginx/sbin/
[root@server-4 sbin]# ./nginx
6.4 access test:
When the browser accesses the virtual ip address, it can be seen clearly that it is the virtual ip address, which is at the end of the keepalived configuration file,
There is one place where the virtual ip address is configured,
The browser accesses the virtual IP written in the configuration file
I wrote: 192.168.66.50
Therefore, visit 192.168.66.50 in the browser