catalogue
redis compilation and installation
1. redis configuration of server1
2. redis installation of server2
3. Configuring redis for server3
3, redis master-slave replication
4, Sentine master-slave automatic switching
2. Automatic switching between master and slave nodes
6, Redis+Mysql read / write separation
7, redis and mysql keep the data consistent
2. Install the database development kit in server3
4. Download and unzip gearman from server3, solve the dependency, and compile
5. Edit the mysql trigger and re import the database
6. Start the service and worker task in server1
Introduction to Redis
Redis is completely open source and complies with BSD protocol. It is a high-performance key value database.
characteristic
1.Redis supports data persistence. It can save the data in memory on disk and can be loaded again for use when restarting.
2.Redis not only supports simple key value data, but also provides storage of list, set, zset, hash and other data structures.
3.Redis supports data backup, that is, data backup in master slave mode.
redis compilation and installation
https://redis.io/download
tar zxf redis-5.0.8.tar.gz
make && make install
utils/install_server.sh
1. redis configuration of server1
server1 host, install and compile redis.


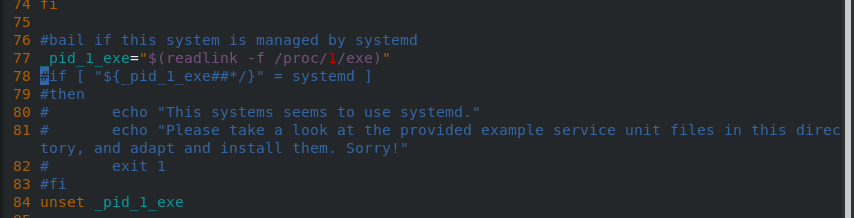
 Run the built-in installer. The installation fails. The judgment of the operating system in the file will lead to the failure. Modify the file and reinstall
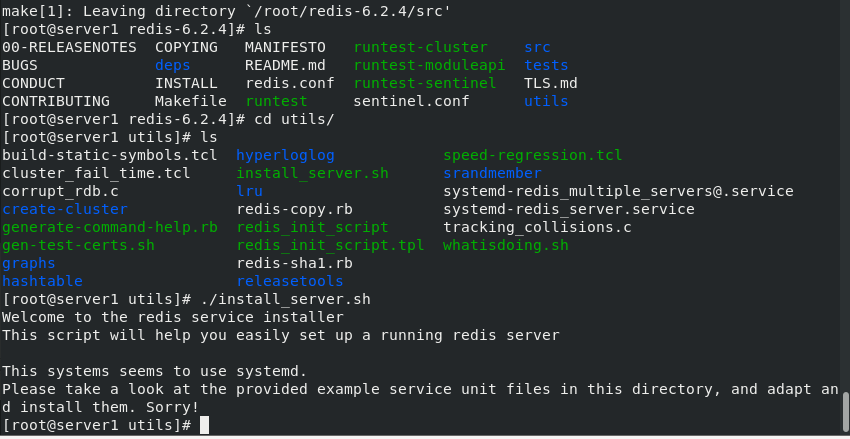
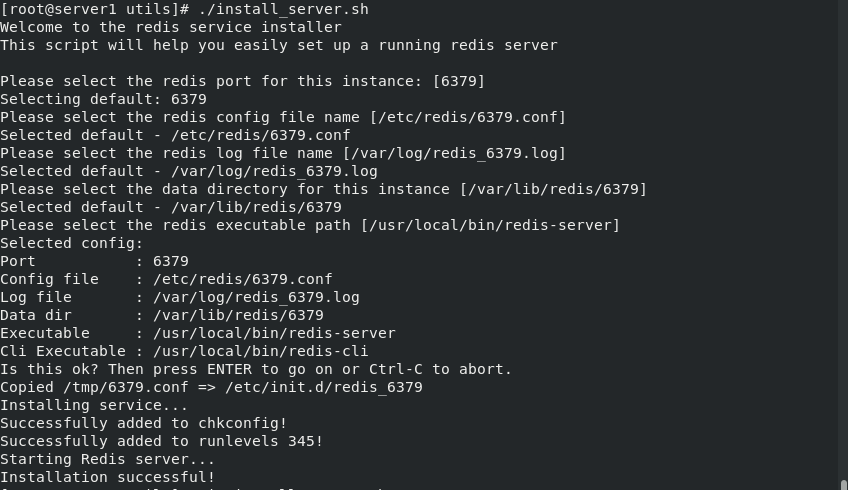
cd utils/
ls
./install_server.sh			##Failed to run the built-in installer
vim install_server.sh 		##Note the following sections and rerun the built-in installer

Press enter when prompted
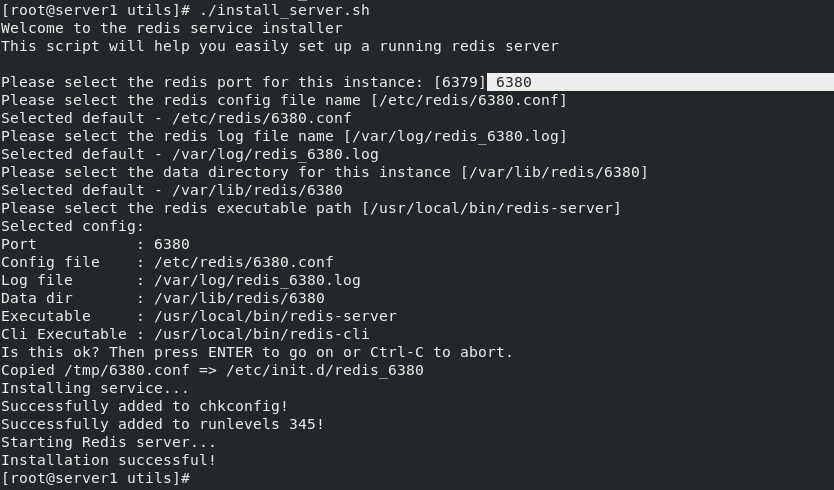
If you want to install again, enter 6380 after 6379 at the prompt:
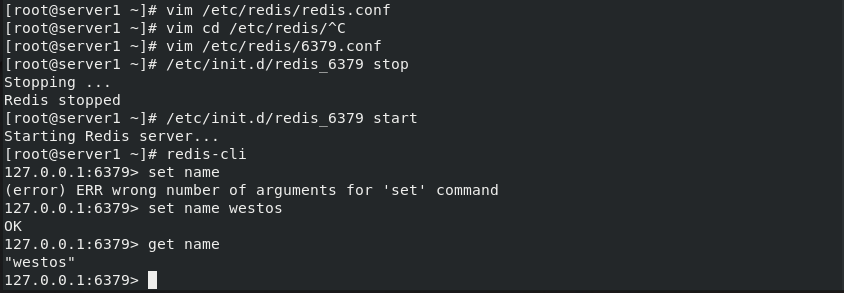
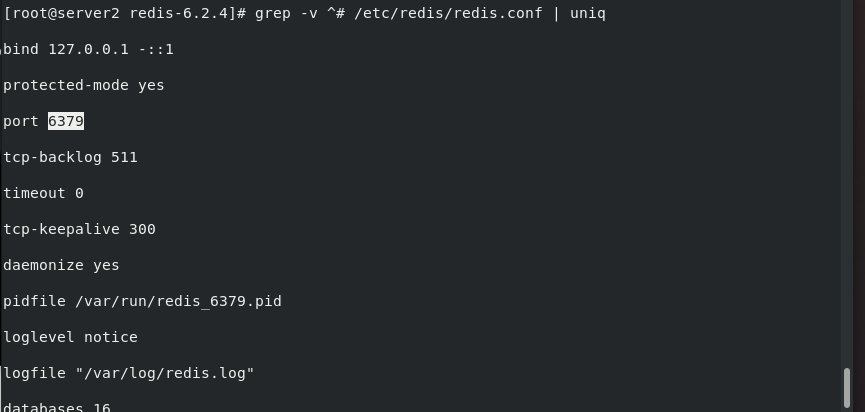
At this time, switch to the configuration directory, you can see that the configuration file is automatically generated, view the port, and open the port. Modify the configuration file and restart the service.
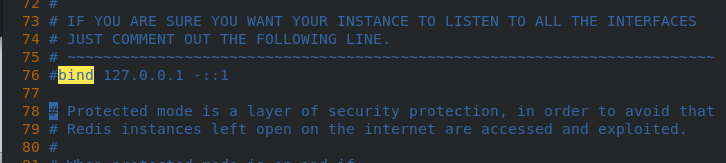
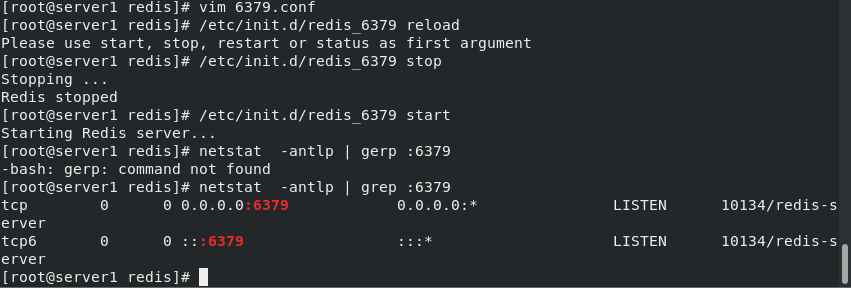
cd /etc/redis
ls							##6379.conf
netstat -antlp				##6379
vim 6379.conf
///
  75 #bind 127.0.0.1 -::1	##When linking redis, you can only link through the local localhost (127.0.0.1), not the network ip(192.168..). Because it is in the protection mode, you can only link locally, so set this comment
  94 protected-mode no		##Set off protection mode
///
/etc/init.d/redis_6379 stop
/etc/init.d/redis_6379 start
netstat -antlp | grep :6379


2. redis installation of server2
On the server2 host, use another method to configure redis.
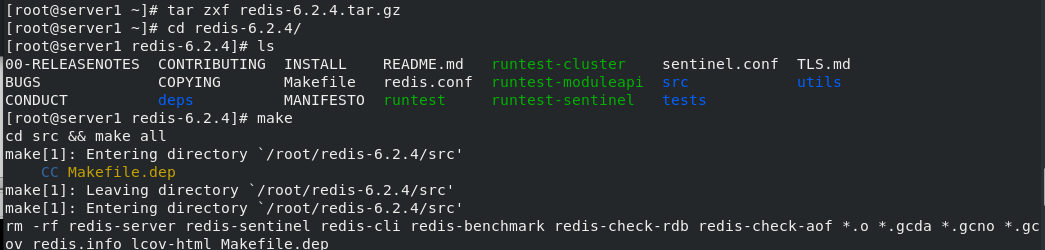
First, unzip the file first, and then build it with systemd support, but the dependency gcc is missing. Install the dependency and make again, but it still fails. Remind jemalloc that the dependency is missing. At this time, delete the redis directory, delete the cache generated in c environment, unzip and make again, remind the lack of systemd, and continue to make after installation. Success, make install
scp -r redis-6.2.4.tar.gz server2:   #server1 directly transfers the decompressed mulu to server2
 because redis yes c Language development, so you need to download it gcc Install and compile
yum install -y gcc    #Download gcc
yum install -y systemd-devel
vim README.md      #After checking the user manual, you can find that if the service needs to use knife SYSTEMd, you need to add the parameter USE_SYSTEMD=yes when making
make USE_SYSTEMD=yes           #redis uses the systemd daemon
make install   #install
Switch to the utils directory, run the built-in installer, copy the service file to the configuration location where the startup file is automatically stored in the directory, reload the configuration file and restart the service.
cd utils/
./install_server.sh
cp systemd-redis_server.service  /usr/lib/systemd/system/redis.service		##Directory is the configuration location where startup files are stored automatically
systemctl daemon-reload 	##Reload profile
systemctl start redis.service
3. Configuring redis for server3
The redis configuration of server3 is the same as that of server1
3, redis master-slave replication
1. Modify the redis.service file in server2, establish the directory where the configuration file and data file are stored, edit the configuration file, and set server2 host as the slave end of server1 host, that is, master-slave copy settings, reload the configuration file and restart the service.
cd /usr/lib/systemd/system/
vim redis.service
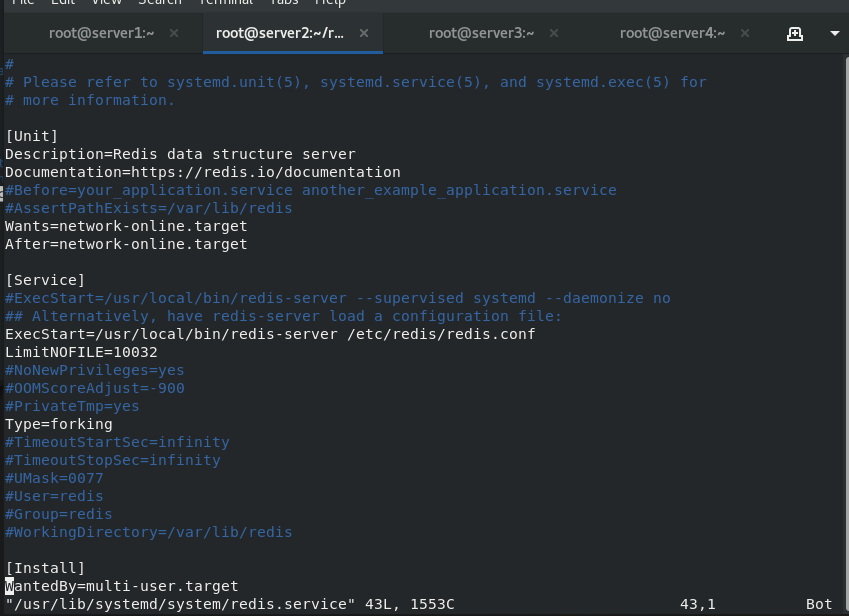
mkdir /etc/redis
mkdir /var/lib/redis

cd
cd redis-6.2.4/
cp redis.conf /etc/redis/
vim /etc/redis/redis.conf
///
   94 protected-mode no				##Turn off protection mode
   75 #bind 127.0.0.1 -::1			##Note: allow network ip link redis
   257 daemonize yes					##Run as a daemon
   302 logfile "/var/log/redis.log"	##Log storage directory
   454 dir /var/lib/redis				##Directory where data files are placed
   2052 slaveof 172.25.35.16379		##Master slave replication
///
systemctl daemon-reload
systemctl restart redis
 2. At this time, insert the data on the server1 host, which can be seen on the server2 and server3 hosts, that is, the master-slave replication is set successfully.


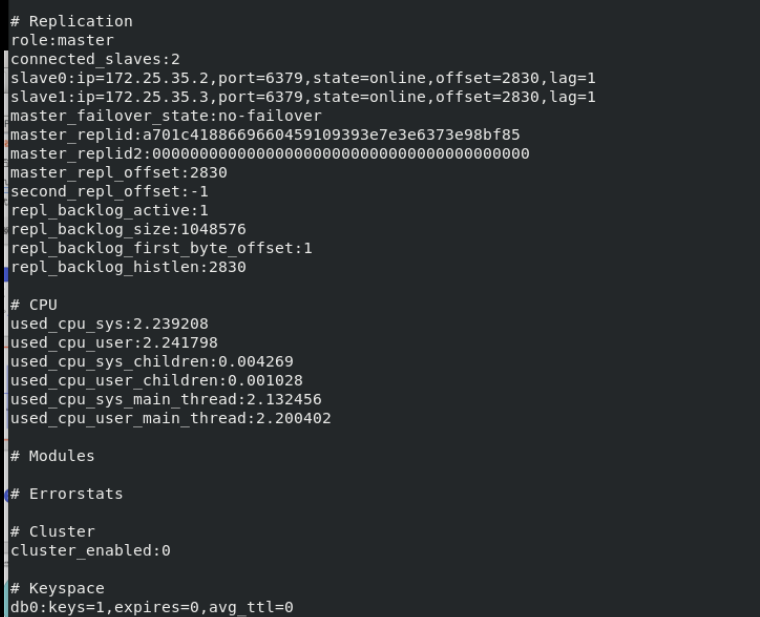
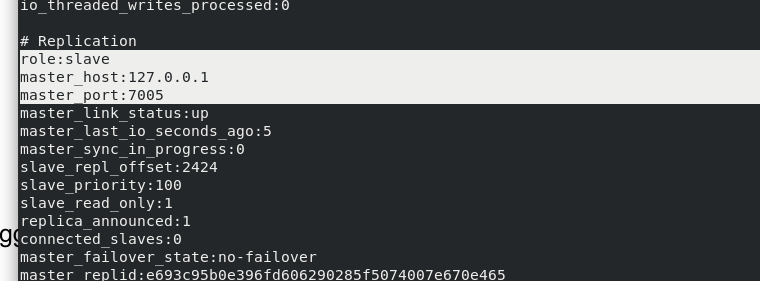
3. After entering redis info, you can see the affiliation of redis

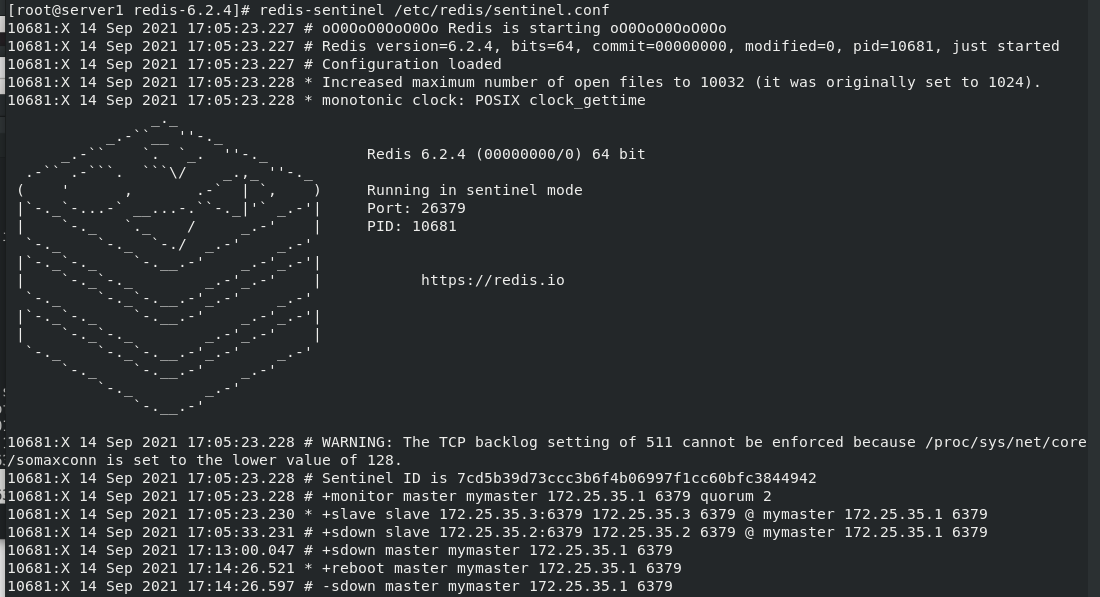
4, Sentine master-slave automatic switching
Use the sentinel mode to automatically monitor the Master node. After hanging up, the slave node will be automatically changed into a Master node
Environment: Currently, server1 is master and server2 and 3 are slave
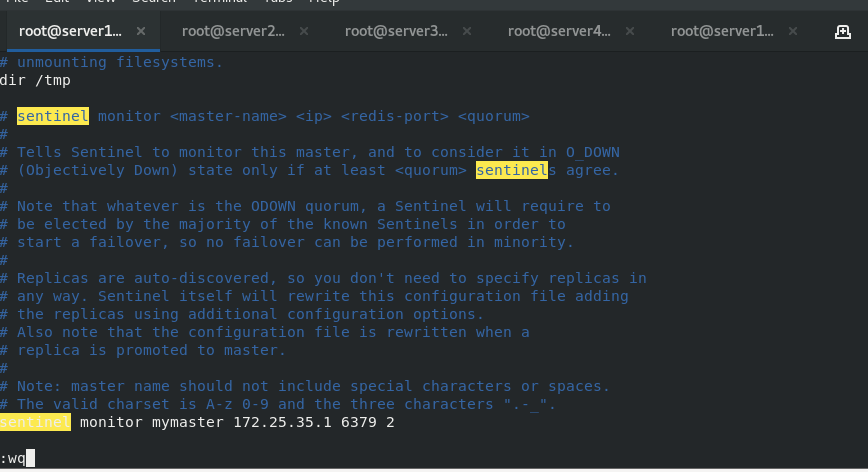
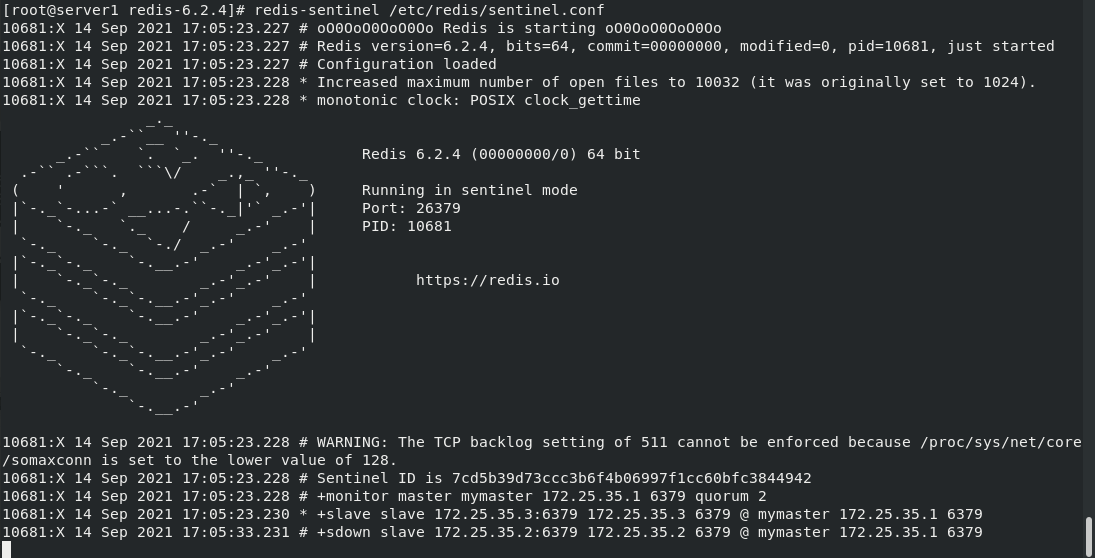
Configure sentinel mode, i.e. high availability
###server1
cd redis-6.2.4/
cp sentinel.conf /etc/redis/
cd /etc/redis/
vim sentinel.conf
///
sentinel monitor mymaster 172.25.35.1 6379 2	##If the master is server1 and 2, it means that two votes are required to pass, and the host is deemed to be down
sentinel down-after-milliseconds mymaster 10000	##The connection timeout is 10s
///
scp sentinel.conf server2:/etc/redis/
scp sentinel.conf server3:/etc/redis/
redis-sentinel /etc/redis/sentinel.conf 		##You can see two slave ends

Turn off redis in server1 , Viewing the changes will display the process of closing and running for master of server2 and server3
redis-cli --> info --> SHUTDDOWN
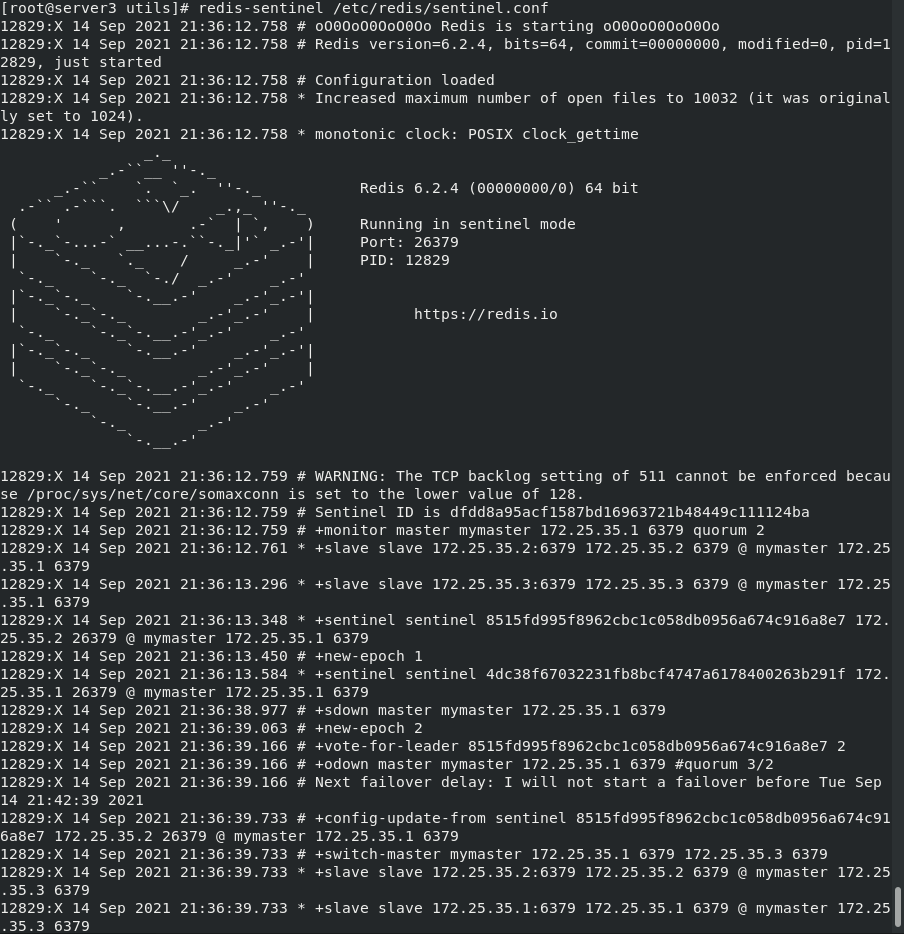
At this time, server3 becomes a master (or server2, because it is the master selected by two slave, so different environments may select different Masters)
Check the status of redis connected to server3. server3 is master, server2 is slave, and server1 is off

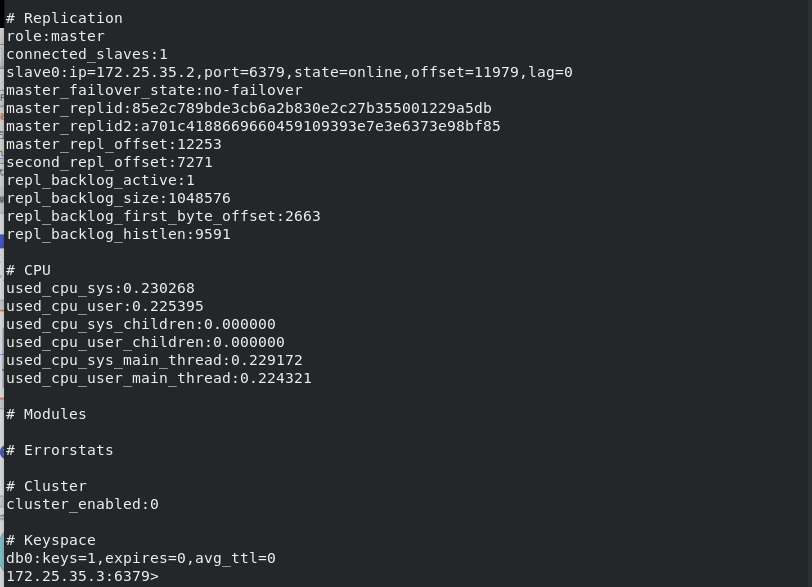 Now server1 is turned off. After redis of server1 is turned on, server1 will automatically switch to slave and clear all previous data
5, redis cluster
Redis cluster summary
1.Redis cluster is a distributed service cluster composed of multiple nodes. It has the characteristics of replication, high availability and fragmentation
2. The redis cluster has no central node and has replication and failover features, which can avoid a single node becoming a performance bottleneck or the whole cluster going offline because a node goes offline
3. The master node in the cluster is responsible for processing the slot (storing data), while the slave node is a replica of the master node
4. The redis cluster divides the entire database into 16384 slots, and each key in the database belongs to one of the 16384 slots
5. Each primary node in the cluster can be responsible for 0 to 16384 slots. When there are nodes in charge of 16384 slots, the cluster enters the online state and can execute the data commands sent by the client
6. The master node will only execute commands related to the slot it is responsible for. When the node receives a command that does not belong to the slot it is processing, it will process the address of the node of the specified slot and return it to the client, and the client will resend it to the correct node
7. If you need complete fragmentation, replication and high availability features, and you want to avoid performance bottlenecks and resource consumption caused by using agents, you can choose to use Redis cluster;
If only some features are required (for example, only sharding is required, but replication and high availability are not required), select one or more of twoproxy, Redis replication and Redis Sentinel separately
1. Cluster construction
Build the cluster manually
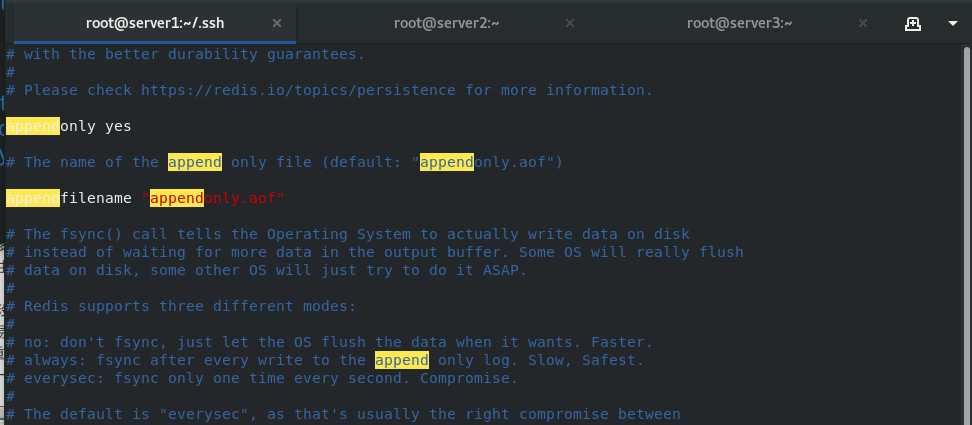
The host of server1 is the master. Restart redis, start AOF mode, establish the media directory and cluster 7001 ~ 7006 directories, configure the configuration files under the directory respectively, and start the service
/etc/init.d/redis_6379 restart
vim /etc/redis/6379.conf
\\\
appendonly yes ##Turn on AOF mode
\\\
cd /usr/local
mkdir redis #Create directory
cd redis/
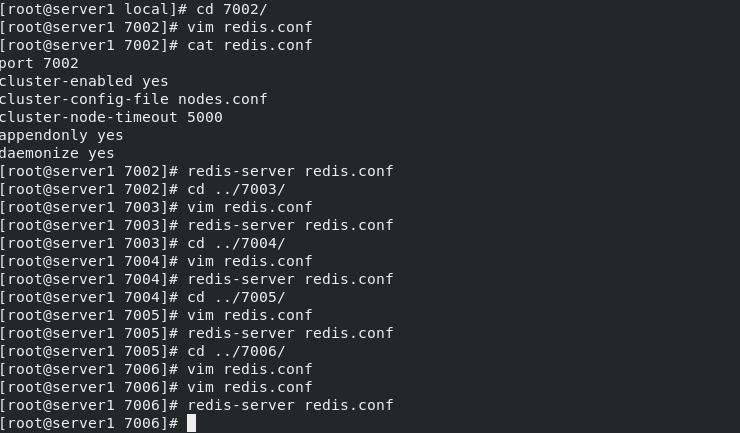
mkdir 700{1..6} #Create a directory of six nodes
cd 7001
vim redis.conf #Edit profile
///
port 7001
cluster-enabled yes ##Start cluster
cluster-config-file nodes.conf ##Cluster profile
cluster-node-timeout 5000 ##Node timeout
appendonly yes ##Turn on AOF mode
daemonize yes ##Start as a daemon thread
///
redis-server redis.conf ##Start service
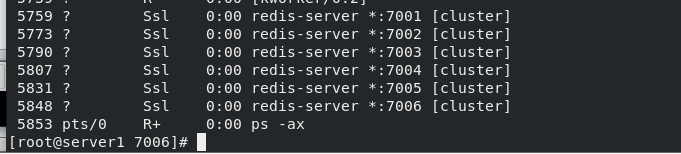
ps ax ##redis-server *:7001 [cluster]
cp redis.conf ../7002/ ##Copy profile to 7002-7006
cp redis.conf ../7003/
cp redis.conf ../7004/
cp redis.conf ../7005/
cp redis.conf ../7006/
Then enter the directory of each node to modify the configuration file—— port 7001
For example:
cd 7002/
vim redis.conf
///
port 7002
cluster-enabled yes
cluster-config-file nodes.conf
cluster-node-timeout 5000
appendonly yes
daemonize yes
///
redis-server redis.conf #Start service server1 is master
##Turn on AOF mode
After creating the redis directory, edit the configuration file redis.conf (file in 7001 directory) in each node directory
Finally, you can use ps to view. At this time, the services of all nodes have been started
Create a cluster master-slave node. The – cluster replica parameter is a number. 1 means that each master node needs 1 slave node. Then check the cluster and view the cluster information.
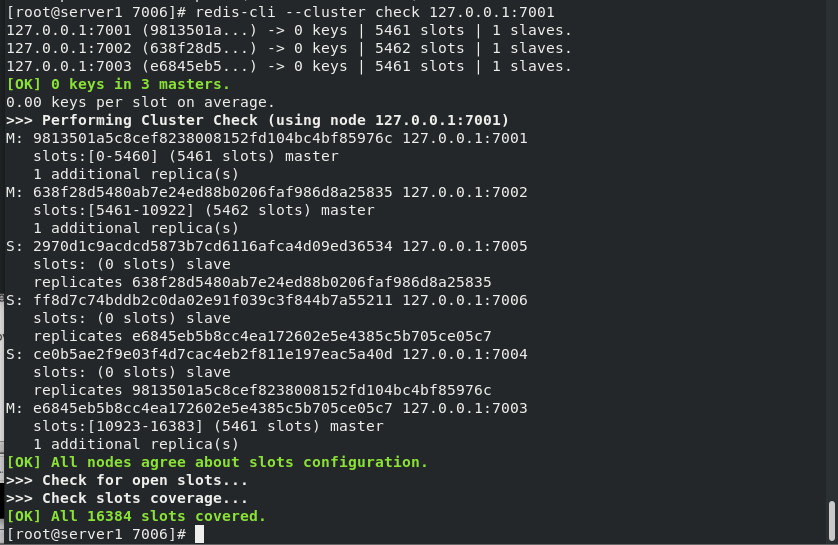
redis-cli --cluster create 127.0.0.1:7001 127.0.0.1:7002 127.0.0.1:7003 127.0.0.1:7004 127.0.0.1:7005 127.0.0.1:7006 --cluster-replicas 1    #Create cluster
redis-cli --cluster check 127.0.0.1:7001	##Check cluster
redis-cli --cluster info 127.0.0.1:7001		##View cluster information
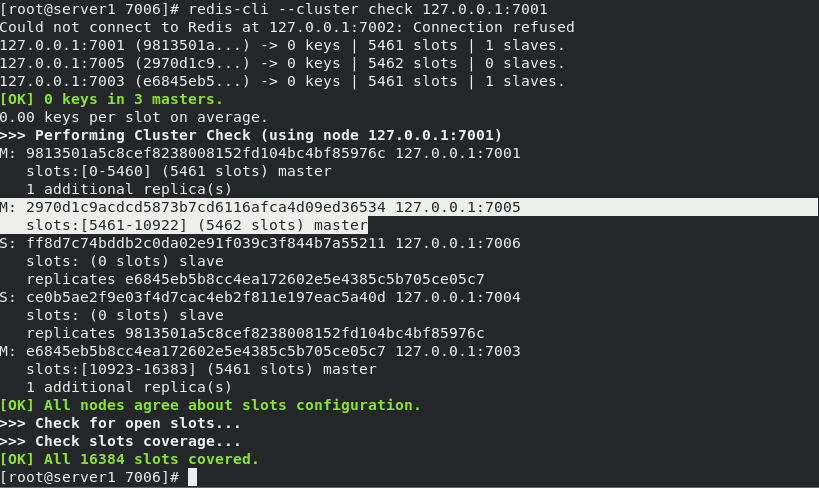
Create six nodes, 1, 2 and 3 as master, one master and one slave
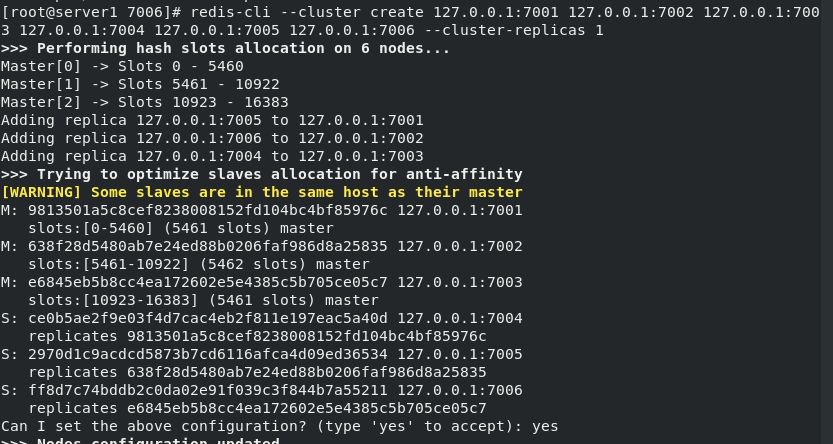
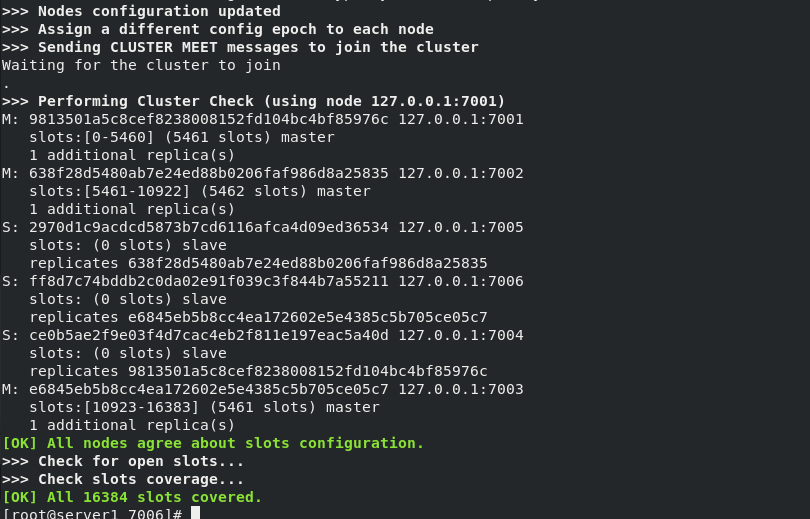
View cluster information (by observing the key here, you can see that the master and slave correspond one by one)
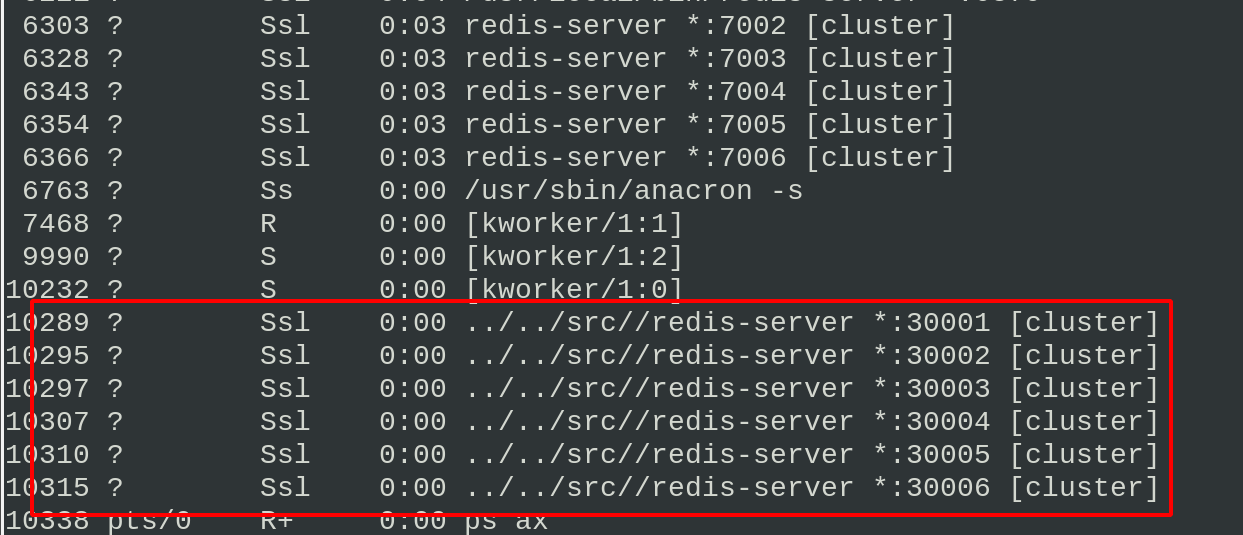
Script build cluster
cd
cd redis-6.2.4/
cd utils/create-cluster/
./create-cluster start		##Start instance Starting 30001~30006
ps ax
./create-cluster stop		##Stop all instances and use the manually built cluster to do the next experiment to prevent confusion
ps ax   #see

2. Automatic switching between master and slave nodes
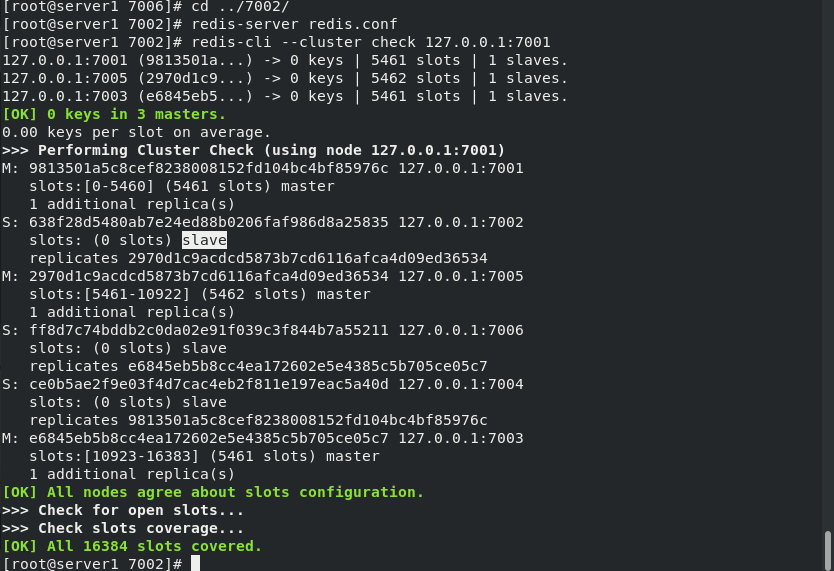
Before viewing the node information, let's go to the node master-slave information, as follows: Master 2 corresponds to slave 5
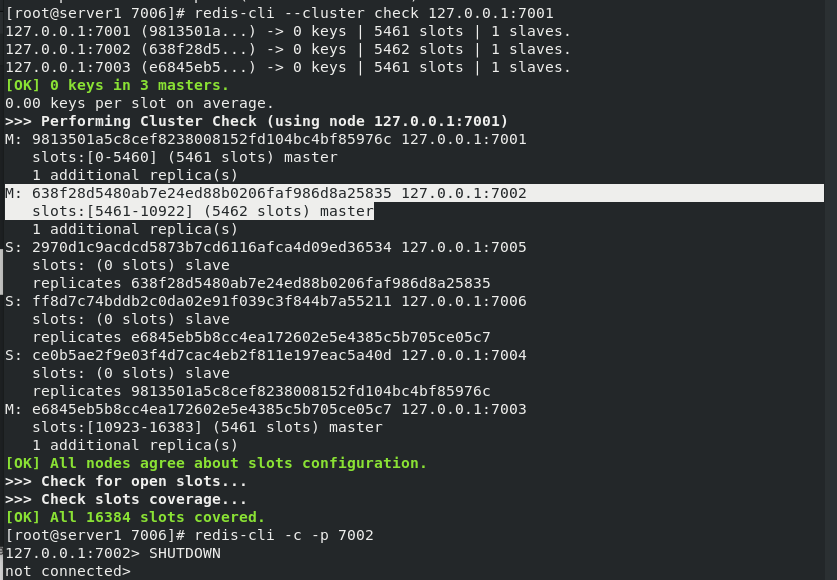
When master 2:7002 is turned off, 7005 will automatically switch to the master node , At this time, there is no slave node. Reopen 7002 and find that 7002 becomes a slave node of 7005


3. Add nodes and shards
Create directories and configuration files for 7007 and 7008 nodes
mkdir 700{7,8}
cd 7007
cp ../7001/redis.conf .
vim redis.conf
///
port 7007
cluster-enabled yes
cluster-config-file nodes.conf
cluster-node-timeout 5000
appendonly yes
daemonize yes
///
redis-server redis.conf

7008 identical
ps ax
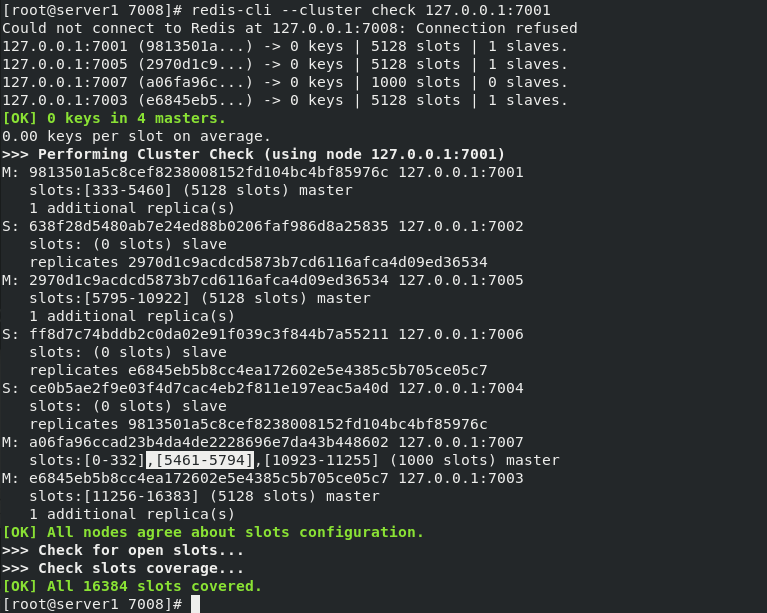
Open 7007, The 7007 node is added to the cluster, but no slot is allocated, so this node does not really start to share the cluster work, so it needs to be fragmented. Re fragmentation basically means moving the Hashi slot from one group of nodes to another group of nodes, and it is like creating a cluster.

7007 node is master
Assign slot
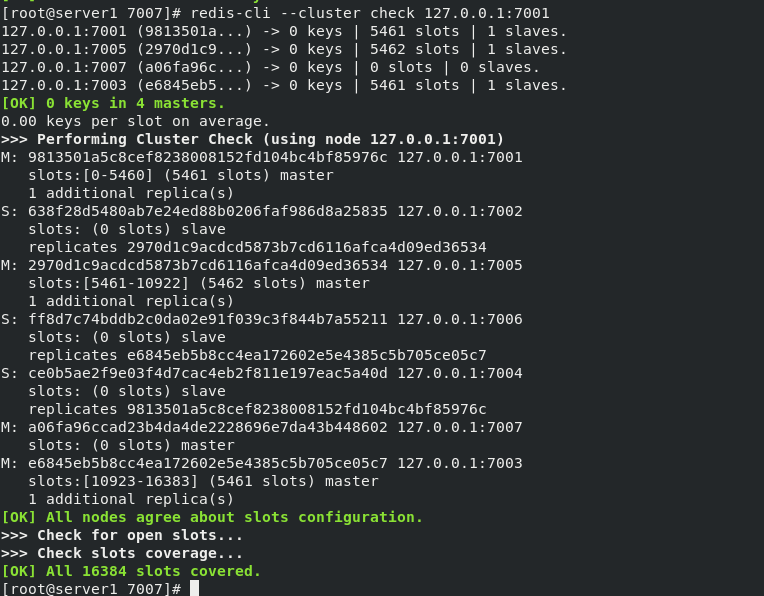
redis-cli --cluster reshard 127.0.0.1:7001								#Repartition

Slice operation
How many slots do you want to move (from 1 to 16384)? 1000				#Number of slots moved
What is the receiving node    ##7007 node ID (receiving node ID)
Source node #1: all	  #From which nodes to obtain these keys, enter all to obtain these hash slots from all other master nodes
Do you want to proceed with the proposed reshard plan (yes/no)? yes		#To determine whether to continue re slicing, enter yes
redis-cli --cluster check 127.0.0.1:7001   #Check cluster information

At this time, the 7007 node has 1000 hash slots, and there is no slave node
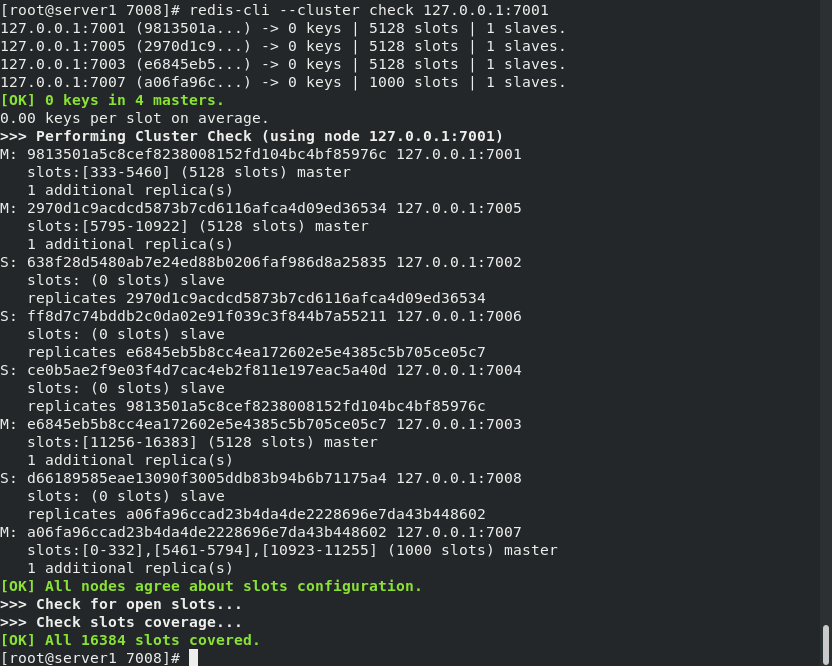
Start 7008 and add 7008 nodes to the cluster of 7001 nodes , As the slave node of 7007. If -- cluster master ID is not specified, it will be randomly assigned to any master node.

View the cluster. At this time, 7007 has a slave node
6, Redis+Mysql read / write separation
In the actual production environment, the client reads the database directly from redis
If there is no data in the redis cache, you will go to mysql to get the data and cache a copy in redis
There are two situations in which the data in redis cannot be used: the data is expired or the data in mysql is updated. Users access redis when reading and mysql when writing
In fact, the demand for reading is very large. redis just caches the data in memory, and the response speed is fast. It can also reduce the pressure on our background mysql database
Generally, for highly concurrent systems, it is inevitable to build a robust cache system.
The QPS of stand-alone reids may only be tens of thousands. If there is a high concurrency scenario, the stand-alone cannot be solved, and there will be its system bottleneck.
Generally speaking, cache is used to support highly concurrent reads. At this time, we may think of read-write separation. Read-write separation is used to deal with scenarios with large read concurrency and small write concurrency.
In server1 host (nginx+php)
Next, in the last experiment, we need to kill all redis processes. For convenience, we need to install a process management tool to use the kill command to shut down all previous redis processes
yum install -y psmisc	##Easy to use Kill Command
killall redis-server
ps ax					##No redis and nginx and php are normal
Install the packages php, gearland, libevent devel, libgearman and other related packages
Get package from local host
lftp 172.25.254.250
cd /pub/docs/redis
mirror rhel7/
exit

cd rhel7/
yum install -y *.rpm      #Install all
systemctl daemon-reload
systemctl start php-fpm   #Open php
Modify the content of test.php on the test page and modify the master-slave ip
mv test.php /usr/local/nginx/html/

vim test.php
///
  3         $redis->connect('172.25.35.2',6379)
 10                         $connect = mysql_connect('172.25.35.3','redis','westos');
///
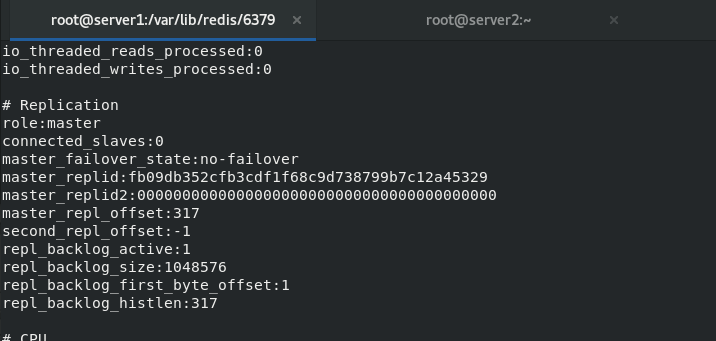
In server2 host (redis)
Enable redis info to view the information. Currently, it is the slave of server1. Modify the configuration file / etc/redis/redis.conf, delete the master-slave settings, and restart redis. Info view that server2 is the master at this time
In server3 host (mariadb database)
Stop redis and cancel startup. Delete the redis environment variable and take effect
/etc/init.d/redis_6379 stop
chkconfig redis_6379 off		##Cancel startup
vim .bash_profile
///
PATH=$PATH:$HOME/bin
///
source .bash_profile
In server3 host (mariadb database)
Stop rdis and cancel startup. Delete redis environment variables and take effect. Install mariadb, restore mysql configuration files, delete all mysql data files, and start mariadb
/etc/init.d/redis_6379 stop
chkconfig redis_6379 off		##Cancel startup
vim .bash_profile
///
PATH=$PATH:$HOME/bin
///
source .bash_profile

yum install -y mariadb-server.x86_64
vim /etc/my.cnf
///
[mysqld]
datadir=/var/lib/mysql
socket=/var/lib/mysql/mysql.sock
[mysqld_safe]
log-error=/var/lib/mysql/mysqld.log
pid-file=/var/lib/mysql/mysqld.pid
///

systemctl start mariadb
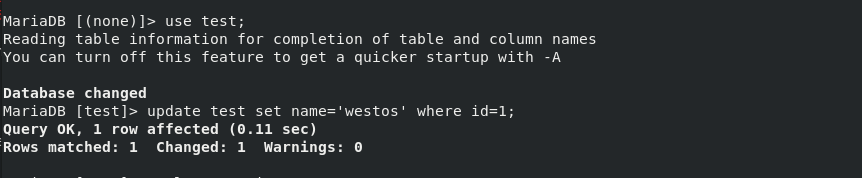
When you enter the database, you can see the test database, import the local file test.sql, enter the database, you can see the imported data, and authorize the redis user
mysql
show databases;

mysql < test.sql     #Import test library contents into
mysql
> use test
> show tables;
> select * from test;		##test1~test9
> grant all on test.* to redis@'%' identified by 'westos';    #to grant authorization

systemctl restart mariadb.service
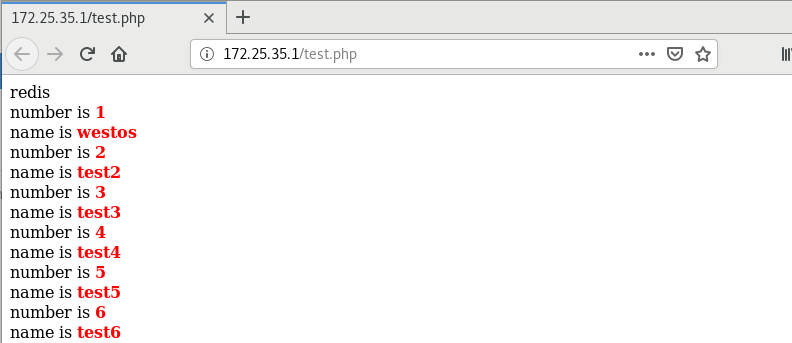
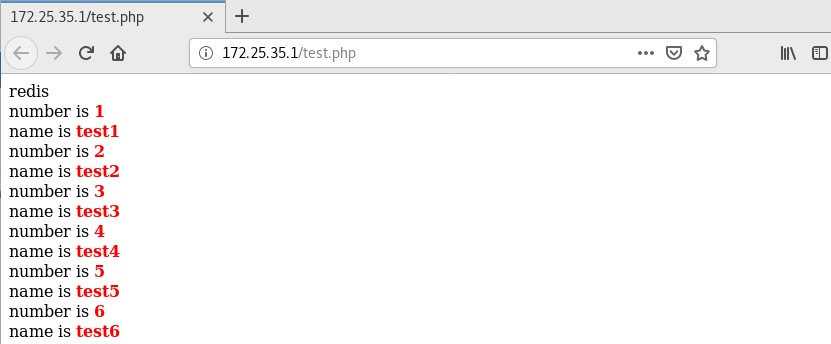
Visit 172.25.173.5/test.php in the browser
This data can only be copied synchronously, not asynchronously. It can only be rewritten and read on redis. The changes on mysql side do not take effect, that is, the data is inconsistent, because the client looks for redis cache when reading and mysql when writing
In server2
redis-cli
--> get 1
"test1"
--> SET 1 westos
ok
...

7, redis and mysql keep the data consistent
1. Introduction to Gearman
Gearman provides a general application framework for transferring work to other machines or processes more suitable for work. It allows you to work in parallel, load balance processing, and call functions between languages. It can be used in a variety of applications, from high availability websites to transmitting database replication events
2. Install the database development kit in server3
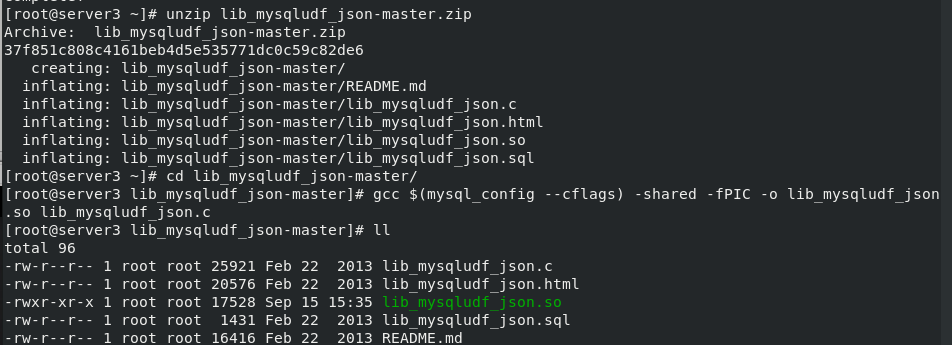
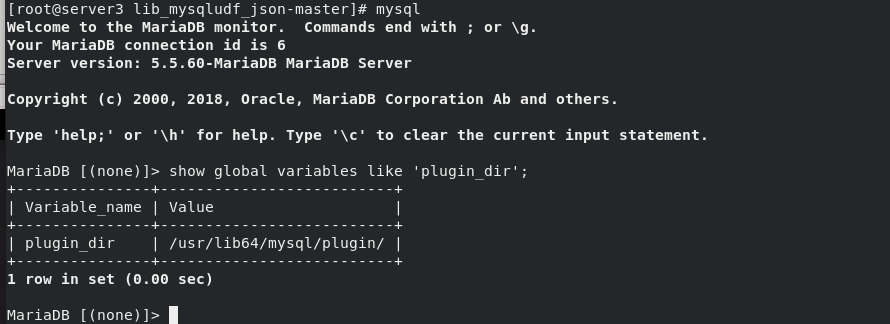
Install the development package of the database, map the relational data to JSON format through the lib_mysqludf_json UDF library function, and copy the lib_mysqludf_json.so module. Enter the database, view the mysql module directory, register the UDF function, and view the function
yum install -y unzip
unzip lib_mysqludf_json-master.zip
cd lib_mysqludf_json-master/
yum install -y gcc
gcc $(mysql_config --cflags) -shared -fPIC -o lib_mysqludf_json.so lib_mysqludf_json.c
cp lib_mysqludf_json.so  /usr/lib64/mysql/plugin/

get into mysql see
mysql
mysql> show global variables like 'plugin_dir';


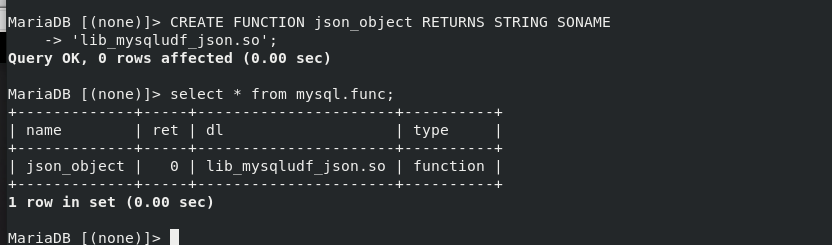
3. Register UDF functions
mysql> CREATE FUNCTION json_object RETURNS STRING SONAME 'lib_mysqludf_json.so';
mysql> select * from mysql.func;
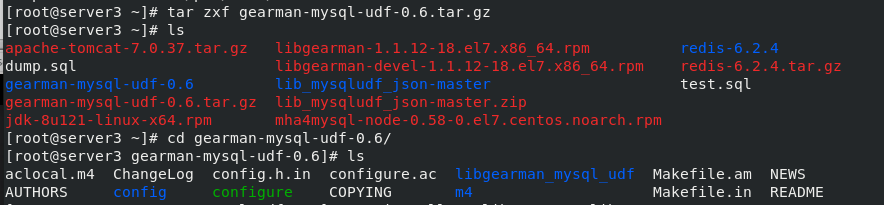
4. Download and unzip gearman from server3, solve the dependency, and compile
tar zxf gearman-mysql-udf-0.6.tar.gz
cd gearman-mysql-udf-0.6/
./configure --libdir=/usr/lib64/mysql/plugin/
server1 On the host rhel7 The package contains the following rpm Installation package
yum install -y libgearman* libevent*
#libevent-devel-2.0.21-4.el7.x86_64.rpm
#libgearman-1.1.12-18.el7.x86_64.rpm
#libgearman-devel-1.1.12-18.el7.x86_64.rpm
./configure --libdir=/usr/lib64/mysql/plugin/ Retest
make compile
make install install
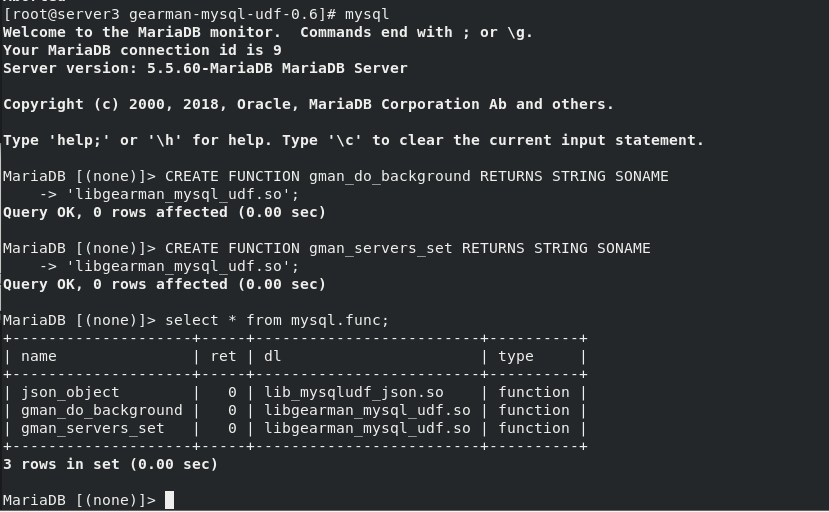
register UDF Function and view
mysql
mysql> CREATE FUNCTION gman_do_background RETURNS STRING SONAME 'libgearman_mysql_udf.so';
mysql> CREATE FUNCTION gman_servers_set RETURNS STRING SONAME 'libgearman_mysql_udf.so';
mysql> select * from mysql.func;
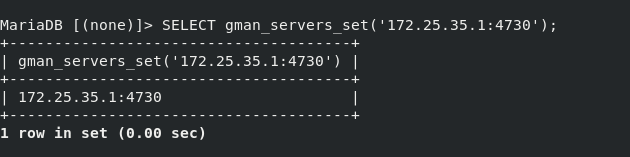
SELECT gman_servers_set('172.25.173.5:4730'); appoint gearman Service information for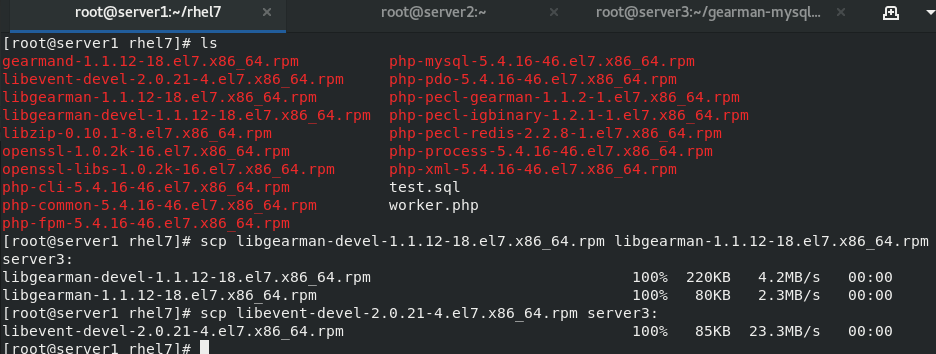


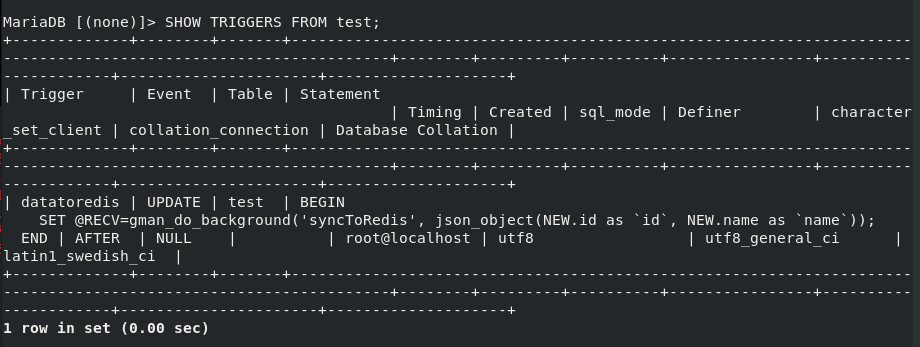
5. Edit the mysql trigger and re import the database
vim test.sql                ##Writing mysql triggers

mysql -pwestos < test.sql
mysql
> SHOW TRIGGERS FROM test;    ##View triggers


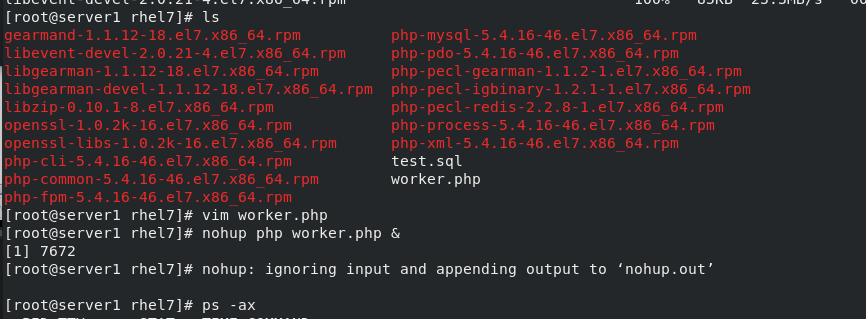
6. Start the service and worker task in server1
systemctl  start gearmand	##Start gearman service
php -m | grep gearman		#View services
php -m | grep redis
netstat -antlp				#Check whether the 4370 port is turned on
cd /root/rhel7/             #Switch the environment to the worker.php directory

vim worker.php			    #Write the worker side of gearman
///
  7 $redis->connect('172.25.35.2', 6379);
///
cp worker.php /usr/local
cd /usr/local

nohup php worker.php  &		#Run worker.php and enter the background
ps ax						#Check whether to open worker.php

After the service in server1 is started, go to mariadb to change the data. redis in server2 checks whether it is synchronized and the browser checks it.