catalogue
1, Overview of Mybatis operation process
2, Configure loaded core classes
2.1 three core classes of builder
3.2 difference from factory mode
4, Introduction to Configuration object
1, Overview of Mybatis operation process
In order to get familiar with the operation process of Mybatis, let's look at a piece of code first
public class MybatisDemo {


	private SqlSessionFactory sqlSessionFactory;

	@Before
	public void init() throws IOException {
		//--------------------Step 1: load configuration---------------------------
	    // 1. Read mybatis configuration file and create SqlSessionFactory
		String resource = "mybatis-config.xml";
		InputStream inputStream = Resources.getResourceAsStream(resource);
		// 1. Read mybatis configuration file and create SqlSessionFactory
		sqlSessionFactory = new SqlSessionFactoryBuilder().build(inputStream);
		inputStream.close();
	}

	@Test
	// quick get start
	public void quickStart() throws IOException {
		//--------------------The second part is to create a proxy object---------------------------
		// 2. Get sqlSession
		SqlSession sqlSession = sqlSessionFactory.openSession();
		// 3. Get the corresponding mapper
		TUserMapper mapper = sqlSession.getMapper(TUserMapper.class);

		//--------------------Step 3: get data---------------------------
		// 4. Execute the query statement and return a single piece of data
		TUser user = mapper.selectByPrimaryKey(2);
		System.out.println(user);

		System.out.println("----------------------------------");

		// 5. Execute the query statement and return multiple pieces of data
//		List<TUser> users = mapper.selectAll();
//		for (TUser tUser : users) {
//			System.out.println(tUser);
//		}
	}
}
The above is a demo of using MyBatis to access data. Through the analysis of the quick start code, the operation process of MyBatis can be divided into three stages:
- Initialization stage: read the configuration information in XML configuration file and annotation, create configuration objects, and complete the initialization of each module;
- Agent encapsulation stage: encapsulate the programming model of iBatis and initialize the development using mapper interface;
- Data access stage: complete SQL parsing, parameter mapping, SQL execution and result parsing through SqlSession;
Today, we will introduce how Mybatis reads the configuration in the first phase below
2, Configure loaded core classes
2.1 three core classes of builder
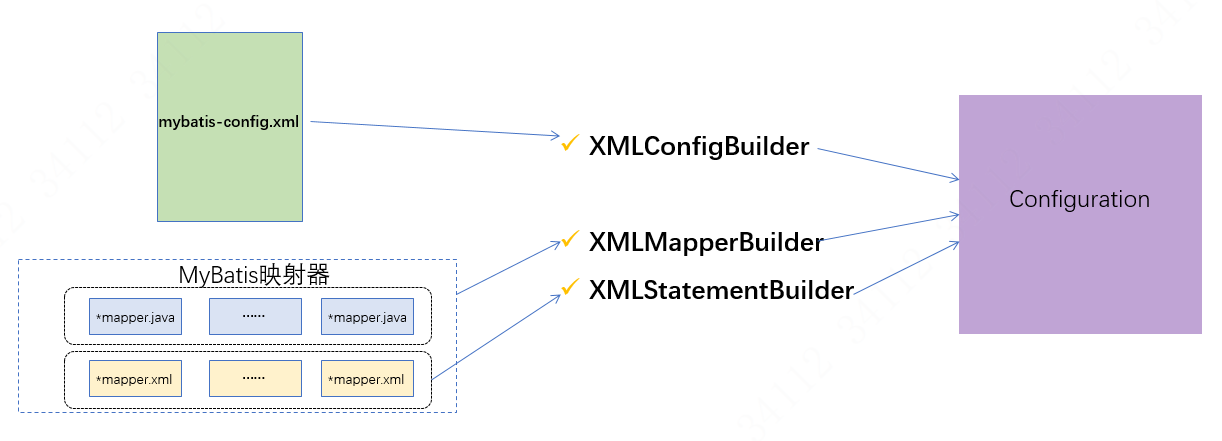
In MyBatis, there are three core classes responsible for loading configuration files. The class diagram is as follows:

- BaseBuilder: the parent class of all parsers, including configuration file instances and some general methods for parsing files;
- XMLConfigBuilder: mainly responsible for parsing mybatis-config.xml;
- XMLMapperBuilder: mainly responsible for parsing mapping configuration Mapper.xml file;
- XML Statement Builder: mainly responsible for parsing SQL nodes in the mapping configuration file;
XMLConfigBuilder, XMLMapperBuilder and XMLStatementBuilder are very important in the process of loading configuration files. The specific division of labor is shown in the following figure:
These three classes use the builder mode to initialize the configuration object, but do not use the builder mode
The "body" (flow programming style) uses only the soul (shielding the creation process of complex objects) and deduces the builder mode
It has become a factory model; The source code of these three classes will be analyzed later;
Actually, these three objects use the builder mode, so let's introduce what the builder mode is later
3, Builder mode
3.1 what is the builder model
Builder pattern uses multiple simple objects to build a complex object step by step. This type of design pattern is a creation pattern, which provides the best way to create objects.
The class diagram of builder mode is as follows:
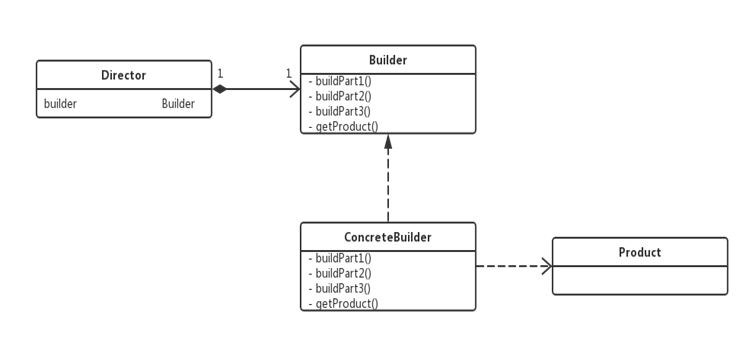
The elements are as follows:
- Product: complex object to create
- Builder: an abstract interface is given to standardize the construction of various components of product objects. This interface specifies which parts of complex objects to create, and does not involve the creation of specific object components;
- ConcreteBuilder: it implements the Builder interface and concretes the creation of various parts of complex objects for different business logic. Provide examples of products after the completion of the construction process;
- Director: call the specific builder to create each part of the complex object. The director does not involve the information of the specific product, but is only responsible for ensuring that each part of the object is created completely or in a certain order;
Application example: red envelope creation is a complex process, which can be created using builder mode
Code example:
1. Red packet object RedPacket
public class RedPacket {

	private String publisherName; //Employer

    private String acceptName; //Recipient

    private BigDecimal packetAmount; //Red envelope amount

    private int packetType; //Red envelope type

    private Date pulishPacketTime; //Contract issuing time

    private Date openPacketTime; //Bag grabbing time

    public RedPacket(String publisherName, String acceptName, BigDecimal packetAmount, int packetType, Date pulishPacketTime, Date openPacketTime) {
        this.publisherName = publisherName;
        this.acceptName = acceptName;
        this.packetAmount = packetAmount;
        this.packetType = packetType;
        this.pulishPacketTime = pulishPacketTime;
        this.openPacketTime = openPacketTime;
    }

	public String getPublisherName() {
		return publisherName;
	}

	public void setPublisherName(String publisherName) {
		this.publisherName = publisherName;
	}

	public String getAcceptName() {
		return acceptName;
	}

	public void setAcceptName(String acceptName) {
		this.acceptName = acceptName;
	}

	public BigDecimal getPacketAmount() {
		return packetAmount;
	}

	public void setPacketAmount(BigDecimal packetAmount) {
		this.packetAmount = packetAmount;
	}

	public int getPacketType() {
		return packetType;
	}

	public void setPacketType(int packetType) {
		this.packetType = packetType;
	}

	public Date getPulishPacketTime() {
		return pulishPacketTime;
	}

	public void setPulishPacketTime(Date pulishPacketTime) {
		this.pulishPacketTime = pulishPacketTime;
	}

	public Date getOpenPacketTime() {
		return openPacketTime;
	}

	public void setOpenPacketTime(Date openPacketTime) {
		this.openPacketTime = openPacketTime;
	}

	@Override
	public String toString() {
		return "RedPacket [publisherName=" + publisherName + ", acceptName="
				+ acceptName + ", packetAmount=" + packetAmount
				+ ", packetType=" + packetType + ", pulishPacketTime="
				+ pulishPacketTime + ", openPacketTime=" + openPacketTime + "]";
	}

}
2. Build object
public class Director {

	public static void main(String[] args) {
		RedPacket redPacket = RedPacketBuilderImpl.getBulider().setPublisherName("DK")
				                                               .setAcceptName("fans")
                                                               .setPacketAmount(new BigDecimal("888"))
                                                               .setPacketType(1)
                                                               .setOpenPacketTime(new Date())
                                                               .setPulishPacketTime(new Date()).build();

		System.out.println(redPacket);
	}

}
PS: streaming programming style is becoming more and more popular, such as zookeeper's cursor, JDK8's streaming programming and so on. Stream programming has the advantages of higher code programmability and better readability, while the disadvantage is that it has higher coding requirements for programmers and is not conducive to debugging. Builder mode is a way to realize streaming programming style;
3.2 difference from factory mode
The application scenario of builder mode is as follows:
- The object to be generated has a complex internal structure. When instantiating an object, the object code should be shielded from decoupling from the instantiation process of complex objects, and the builder mode can be used; In short, if "consider using a builder when encountering multiple constructor parameters";
- Object instantiation depends on the generation and assembly sequence of each component, and focuses on assembling the target pair step by step
- For example, you can use builder mode;
The difference between builder mode and engineering mode is:
| Design pattern | Image metaphor | Object complexity | Client participation |
| Factory mode | Mass production | The focus is on the whole product, and there is no need to care about how each part of the product is created; | The client's participation in the product creation process is low, and the attribute value is relatively fixed when the object is instantiated; |
| Builder pattern | Production customized version | The built object is more complex. It is a composite product, which is composed of various parts. Different parts, different product objects and fine granularity of the generated products; | The client participates in the creation of the product, determines the type and content of the product, and has a high degree of participation; Suitable for scenes with frequent attribute changes when instantiating objects; |
4, Introduction to Configuration object
Instantiating and initializing the configuration object is the final goal of the first phase, so you are familiar with the configuration pair
Image is the core of understanding the first stage code; The key attributes of the configuration object are resolved as follows:
- MapperRegistry: the registry of the mapper interface dynamic proxy factory class. In MyBatis, the InvocationHandler interface is implemented through mapperProxy, and MapperProxyFactory is used to generate the instance object of dynamic proxy;
- resultMap: used to parse the resultMap node in the mapper.xml file, and use ResultMapping to encapsulate sub elements such as id and result;
- MappedStatement: used to store the select, insert, update and delete nodes in the mapper.xml file. It also contains many important attributes of these nodes;
- SqlSource: used to create BoundSql. The sql statements in the mapper.xml file will be parsed into BoundSql objects. After parsing, the statements contained in BoundSql will only contain? Placeholder, which can be directly submitted to the database for execution;
Configuration object diagram:
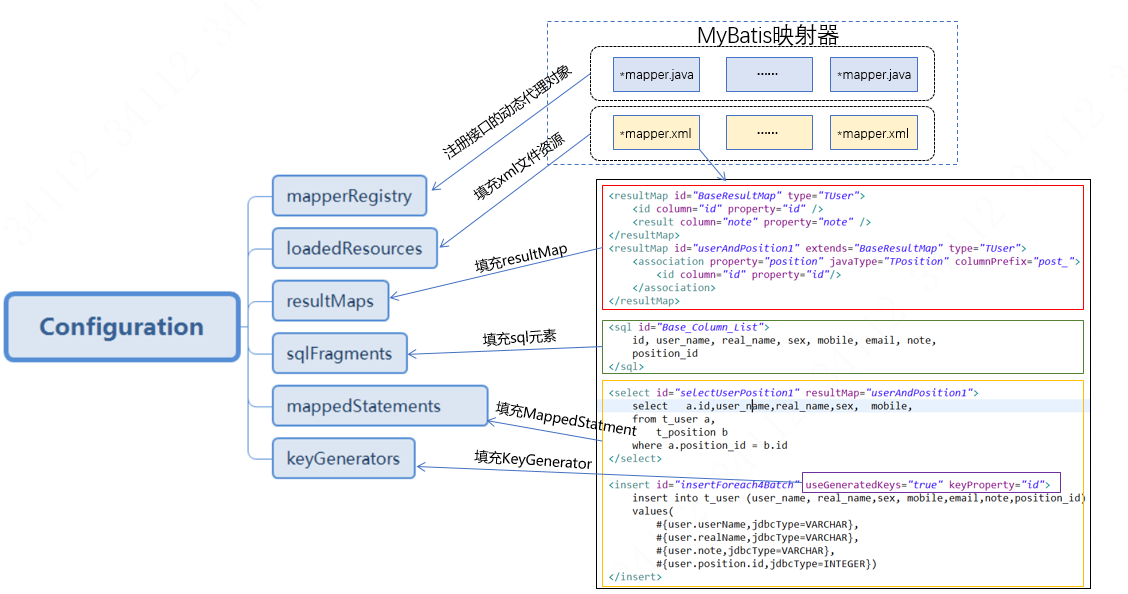
It should be noted that the Configuration object is a singleton in MyBatis, and its life cycle is application level. In other words, as long as MyBatis runs, the Configuration object will exist uniquely; In MyBatis, only
org.apache.ibatis.builder.xml.XMLConfigBuilder.XMLConfigBuilder(XPathParser, String, Properties) contains the code to instantiate the configuration object, as shown in the following figure:

The initialization (attribute replication) of the Configuration object is carried out during the construction of SqlSessionfactory. Next
To analyze the internal process of the first stage;
5, Configure load process resolution
5.1 configuration loading process
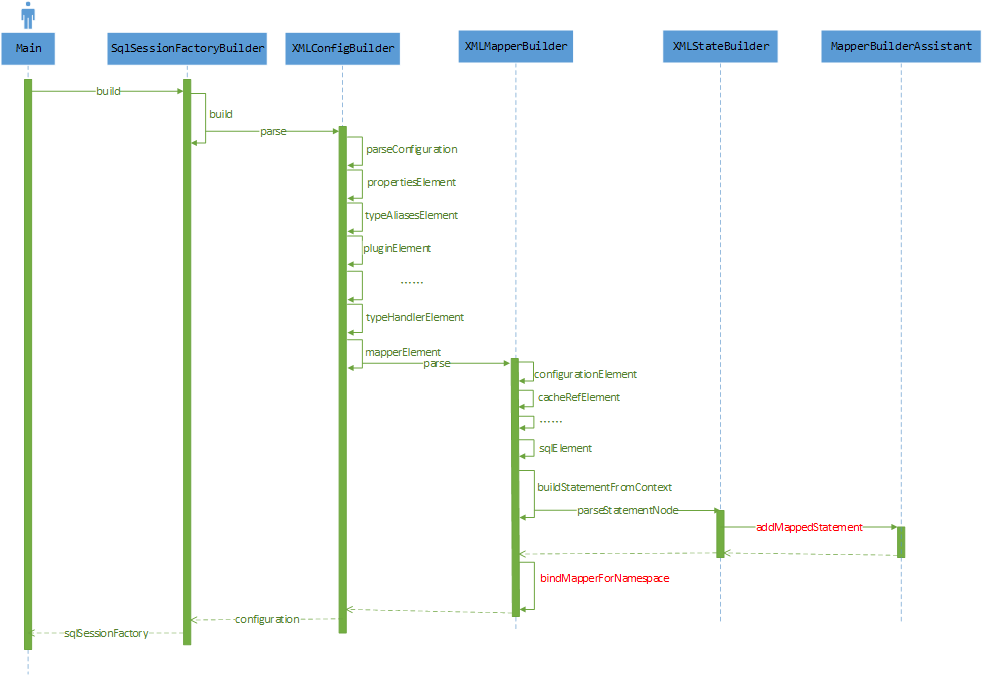
The first stage configuration loading process can be divided into four steps, as shown in the figure below:
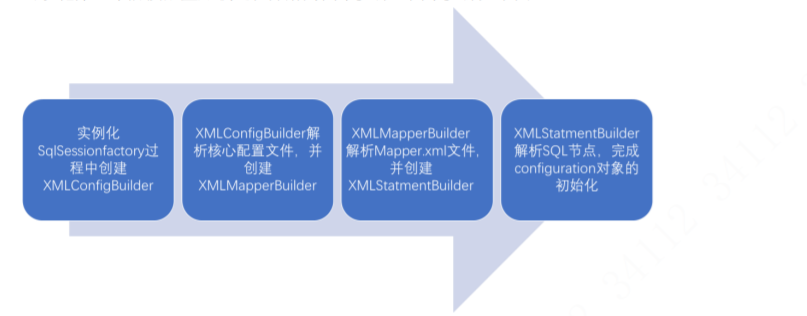
Step 1: build SqlSessionFactory through SqlSessionFactoryBuilder and create XMLConfigBuilder pairs
For example, read the MyBatis core configuration file, see Source code method:
org.apache.ibatis.session.SqlSessionFactoryBuilder.build(Reader, String, Properties):
  public SqlSessionFactory build(Reader reader, String environment, Properties properties) {
    try {
      //Read configuration file
      XMLConfigBuilder parser = new XMLConfigBuilder(reader, environment, properties);
      return build(parser.parse());//Parse the configuration file to get the configuration object and return SqlSessionFactory
    } catch (Exception e) {
      throw ExceptionFactory.wrapException("Error building SqlSession.", e);
    } finally {
      ErrorContext.instance().reset();
      try {
        reader.close();
      } catch (IOException e) {
        // Intentionally ignore. Prefer previous error.
      }
    }
  }
Step 2: enter the parseConfiguration method of XMLConfigBuilder, and perform a detailed description of each of the MyBatis core configuration files
The element is parsed and filled into the configuration object after reading the element information. In XMLConfigBuilder
Read all mapper.xml files through XMLMapperBuilder in mapperElement () method; See method:
org.apache.ibatis.builder.xml.XMLConfigBuilder.parseConfiguration(XNode);
public Configuration parse() {
    if (parsed) {
      throw new BuilderException("Each XMLConfigBuilder can only be used once.");
    }
    parsed = true;
    parseConfiguration(parser.evalNode("/configuration"));
    return configuration;
  }

  private void parseConfiguration(XNode root) {
    try {
      //issue #117 read properties first
     //Resolve < Properties > node
      propertiesElement(root.evalNode("properties"));
      //Resolve < Settings > node
      Properties settings = settingsAsProperties(root.evalNode("settings"));
      loadCustomVfs(settings);
      //Resolve < typealiases > nodes
      typeAliasesElement(root.evalNode("typeAliases"));
      //Resolve < plugins > nodes
      pluginElement(root.evalNode("plugins"));
      //Resolve < objectfactory > nodes
      objectFactoryElement(root.evalNode("objectFactory"));
      //Resolve the < objectwrapperfactory > node
      objectWrapperFactoryElement(root.evalNode("objectWrapperFactory"));
      //Resolve < reflectorfactory > nodes
      reflectorFactoryElement(root.evalNode("reflectorFactory"));
      settingsElement(settings);//Populate settings into configuration
      // read it after objectFactory and objectWrapperFactory issue #631
      //Resolving < environments > nodes
      environmentsElement(root.evalNode("environments"));
      //Resolve < databaseidprovider > node
      databaseIdProviderElement(root.evalNode("databaseIdProvider"));
      //Resolve < typehandlers > nodes
      typeHandlerElement(root.evalNode("typeHandlers"));
      //Resolve < mappers > nodes
      mapperElement(root.evalNode("mappers"));
    } catch (Exception e) {
      throw new BuilderException("Error parsing SQL Mapper Configuration. Cause: " + e, e);
    }
Step 3: the core method of XMLMapperBuilder is configurationElement (XNode), which parses each element of the mapper.xml configuration file, reads the element information and fills it into the configuration object.
private void configurationElement(XNode context) {
    try {
    	//Gets the namespace attribute of the mapper node
      String namespace = context.getStringAttribute("namespace");
      if (namespace == null || namespace.equals("")) {
        throw new BuilderException("Mapper's namespace cannot be empty");
      }
      //Set the namespace property of builder assistant
      builderAssistant.setCurrentNamespace(namespace);
      //Parsing cache ref nodes
      cacheRefElement(context.evalNode("cache-ref"));
      //Key analysis: parsing cache nodes ------------- 1-------------------
      cacheElement(context.evalNode("cache"));
      //Resolve parameterMap node (obsolete)
      parameterMapElement(context.evalNodes("/mapper/parameterMap"));
      //Key analysis: resolve resultMap node ------------- 2-------------------
      resultMapElements(context.evalNodes("/mapper/resultMap"));
      //Parsing sql nodes
      sqlElement(context.evalNodes("/mapper/sql"));
      //Key analysis: analyze the select, insert, update and delete nodes ------------- 3-------------------
      buildStatementFromContext(context.evalNodes("select|insert|update|delete"));
    } catch (Exception e) {
      throw new BuilderException("Error parsing Mapper XML. The XML location is '" + resource + "'. Cause: " + e, e);
    }
  }
During xmlmaperbuilder parsing, there are four points to note:
- The resultMapElements(List) method is used to parse resultMap nodes. This method is very important and must be understood with the source code; After parsing, the data is saved in the resultMaps attribute of the configuration object; As shown below
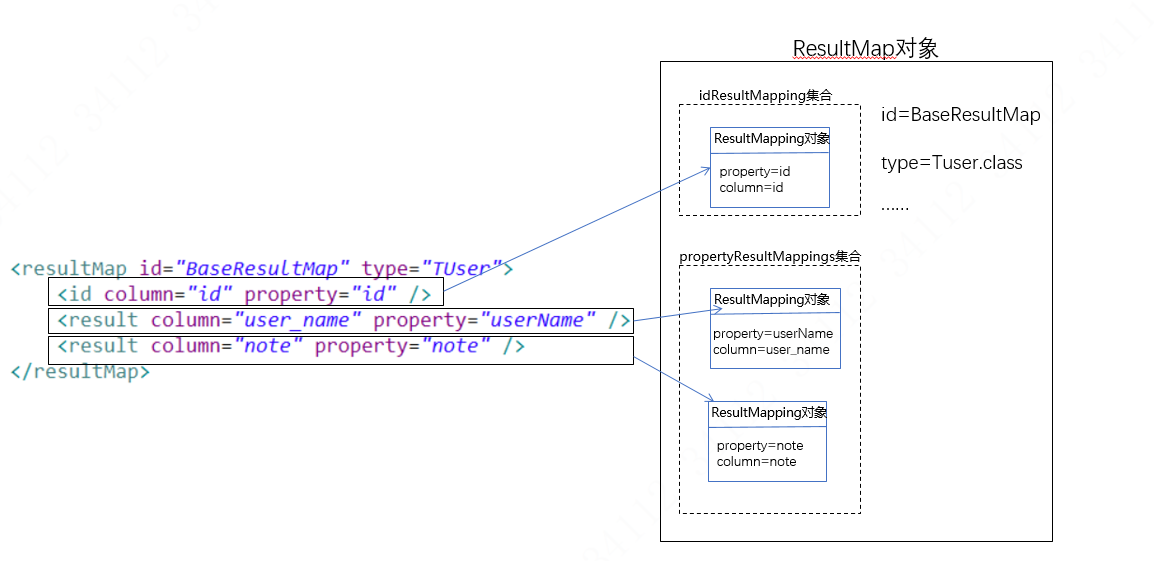
- In 2XMLMapperBuilder, builder mode is used in instantiating L2 cache (see cacheElement(XNode)) and resultMap (see resultMapElements(List)), which is a typical application of builder mode;
- XMLMapperBuilder and xmlmaperstatmentbuilder have their own "secretary" mapperbuilder assistant. XMLMapperBuilder and xmlmaperstatmentbuilder are responsible for parsing and reading the information in the configuration file, and mapperbuilder assistant is responsible for filling the information into the configuration. Separating the work of file parsing and data filling into different classes conforms to the principle of single responsibility;
- In the buildStatementFromContext(List) method, create xmlstatementbuilder to parse the select, insert, update and delete nodes in Mapper.xml
Step 4: in the parseStatementNode() method of xmlstatementbuilder, parse the select, insert, update and delete nodes in Mapper.xml, and call MapperBuilderAssistant to fill the information into the configuration. Before understanding the parseStatementNod() method, it is necessary to understand MappedStatement, which is used to encapsulate the information of select, insert, update and delete nodes; As shown in the figure below:

So far, the whole Mybatis configuration has been loaded. The whole loading flow chart is as follows:
