preface
spring source code is compiled locally. According to the operation steps of online blog references, there will always be all kinds of inexplicable errors. Find a solution according to the error information, but you can't compile it in your own environment. Combined with the training and learning methods provided by teacher Jack, I tried in many ways, and finally compiled successfully.
In order to verify whether there are mistakes in my way, I walked about 5 times in the whole process and recorded each step in detail. If you count by 8 hours a day, it took at least 3 ~ 4 days to compile the source code. I think it's worth it to remove a stumbling block for the later source code reading.
Only this article records the pit stepped on. For students who also want to read the source code, they can spend less time in compiling this step, or they can read the source code later to increase their self-confidence. At the same time, I would like to thank the students who left a blog on the Internet for giving me a lot of help, which is also the reason why I want to write this article.
Reference blog:
https://www.it610.com/article/1295306604677242880.htm
https://www.cnblogs.com/haoxianrui/p/12825586.html
https://www.cnblogs.com/jhj117/p/5455081.html
1. Description of resources and environment:
idea 2019.3.3
gradle-5.6.4 (the version in the source code should be consistent, otherwise various exceptions will occur in the compilation process)
jdk1.8 or above
spring-5.2.8.RELEASE
System: win7 or above
2. Download the source code
choice gitee The download speed is fast, and the official website is very slow, taking about 60 minutes s
git clone --branch v5.2.8.RELEASE https://gitee.com/Z201/spring-framework.git
2.1. Check the gradle version number of the source code
View file path:/gradle/wrapper/gradle-wrapper.properties

Corresponding gradle edition: gradle-5.6.4-bin.zip

3.gradle Download & configure environment variables
3.1.gradle Download
# gradle download address
https://services.gradle.org/distributions/
Select version: gradle-5.6.4-bin.zip
 Download to this computer and unzip to the specified path

3.2. Configuring environment variables
Configure environment variables
 Variable name: GRADLE_HOME
 Variable value: A:\java_about\gradle-5.6.4
 stay Path add ;%GRADLE_HOME%\bin

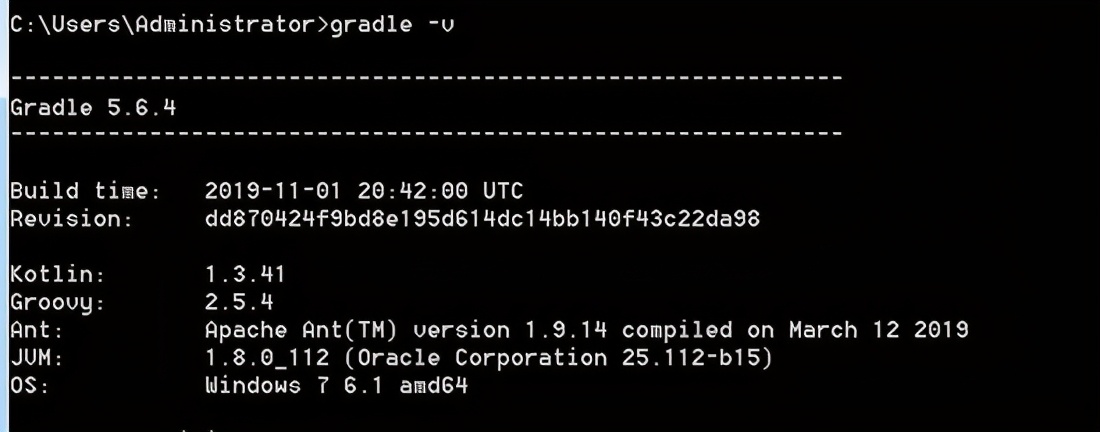
3.3. Verify gradle

4. Modification of source code configuration
4.1.gradle-wrapper.properties configuration modification
catalog: spring-framework/gradle/wrapper
 modify distributionUrl=file:///A:/java_about/gradle-5.6.4-bin.zip # (local path)

4.2. Confirm kotlin version number
Check the kotlin version of idea first. Check the path: File - > setting - > plugins. Search for kotlin. If it has not been installed, install it first.
My version number is 1.3.61

4.3.build.gradle configuration
The target file: build.gradle is in the root directory
4.3.1. Notes gradle enterprise constraints
Because the plugins are not annotated, many unexpected errors will occur,
Search keywords: io.spring.gradle-enterprise-conventions
Notes are as follows:
// id 'io.spring.gradle-enterprise-conventions' version '0.0.2'

4.3.2. Confirm whether the version number of kotlin is consistent
If it is inconsistent, it should be modified to be the same as the version number of kotlin in idea. My version number is 1.3.61, while the version number of kotlin corresponding to Spring-5.2.8.RELEASE is 1.3.72, so it needs to be modified. There are 2 places that need to be modified
Search keywords: kotlin.jvm , kotlin-bom

4.3.3. Add Alibaba image
Adding an Ali image to the warehouse aims to speed up resource download and compilation. The line number is about 279. Add in repositories under dependency management:
maven { url 'https://maven.aliyun.com/nexus/content/groups/public/' }
maven { url 'https://maven.aliyun.com/nexus/content/repositories/jcenter'}
4.4.settings.gradle configuration
Add an Ali image for the plug-in warehouse, line number about 2, and add it in repositories under plugin Management:
maven { url "https://maven.aliyun.com/repository/public" }
4.5. Solve the problem of slow gradle build
Target file: gradle.properties
1.Increase memory allocation -- This is allocated according to the local memory. Mine is 16 G
org.gradle.jvmargs=-Xmx2048M

2.On demand configuration
org.gradle.configureondemand=true

3.Start daemon
org.gradle.daemon=true

5.idea import source code
Click file - > New - > project from existing sources, and select the source package path build.gradle File source code import completed

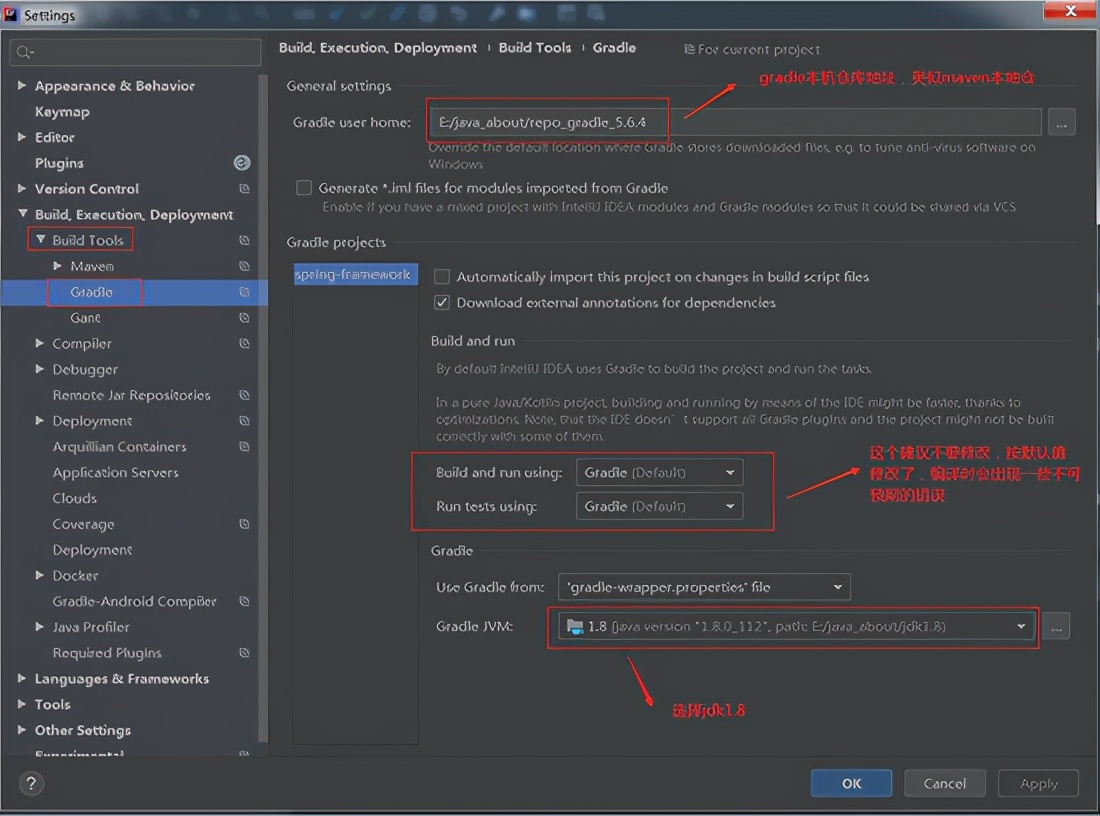
5.1.idea configuration gradle
You can open the idea configuration in advance or configure it during the import process (a progress bar will appear after import, and select background to run in the background)
Operation path: File - > setting - > build, execution, deployment - > build tools - > gradle

5.2. Wait for & configure to import successfully
After the above settings are completed, it is a waiting process. The specific time depends on the network speed. My import and compilation took about 11m 57s and succeeded at one time.
The contents of the compilation log are as follows:
Starting Gradle Daemon...
Gradle Daemon started in 4 s 477 ms
> Task :buildSrc:compileJava
> Task :buildSrc:compileGroovy NO-SOURCE
> Task :buildSrc:pluginDescriptors
> Task :buildSrc:processResources
> Task :buildSrc:classes
> Task :buildSrc:jar
> Task :buildSrc:assemble
> Task :buildSrc:pluginUnderTestMetadata
> Task :buildSrc:compileTestJava NO-SOURCE
> Task :buildSrc:compileTestGroovy NO-SOURCE
> Task :buildSrc:processTestResources NO-SOURCE
> Task :buildSrc:testClasses UP-TO-DATE
> Task :buildSrc:test NO-SOURCE
> Task :buildSrc:validateTaskProperties
> Task :buildSrc:check
> Task :buildSrc:build

CONFIGURE SUCCESSFUL in 11m 57s

5.3. Precompiling
In the menu bar at the bottom of idea, switch to the Terminal menu and enter the precompiled command of spring oxm:
gradlew :spring-oxm:compileTestJava
Precompiled successfully, taking about 29s:

6. Test
6.1. Pre description
Add a test class in the spring context to test and verify whether it can be compiled and get the object of the instance.
6.2. Add test entity class
In order to quickly locate the, first add the package: com.elephant.bean of the test and create the Student entity class
package com.elephant.bean;

import org.springframework.stereotype.Service;

@Service
public class Student {

	private String username = "elephant";

	private String password;

	public String getUsername() {
		return username;
	}

	public void setUsername(String username) {
		this.username = username;
	}

	public String getPassword() {
		return password;
	}

	public void setPassword(String password) {
		this.password = password;
	}
}
6.3. Test configuration file
spring-test.xml. The directory is in test/resources. The contents are as follows:
<beans xmlns="http://www.springframework.org/schema/beans"
       xmlns:xsi="http://www.w3.org/2001/XMLSchema-instance"
       xmlns:context="http://www.springframework.org/schema/context"
       xsi:schemaLocation="
	http://www.springframework.org/schema/beans
	http://www.springframework.org/schema/beans/spring-beans.xsd
    http://www.springframework.org/schema/context
    http://www.springframework.org/schema/context/spring-context.xsd
	">
    <context:component-scan base-package="com.elephant"/>
</beans>
6.4. Add test class
To quickly locate, add the package of the test: com.elephant.test and create the MyTest class
package com.elephant.test;

import com.elephant.bean.Student;
import org.junit.Test;
import org.springframework.context.support.ClassPathXmlApplicationContext;

public class MyTest {

	@Test
	public void test1() {
		ClassPathXmlApplicationContext applicationContext = new ClassPathXmlApplicationContext("spring-test.xml");
		Student student = (Student)applicationContext.getBean("student");
		System.out.println(student.getUsername());
		System.out.println("I got the user name:"+student.getUsername());
	}
}
6.5. Operation test
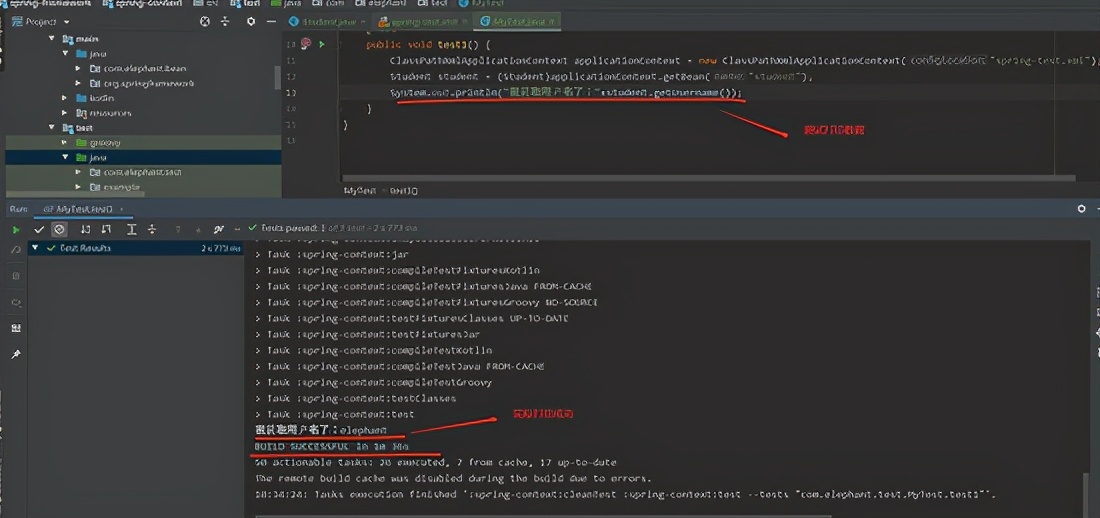
The MyTest method test1() of this class right-click Run and wait for the Run result.

6.6. Operation results
It takes about 1m 36s
Expected result: the student's userName is printed successfully. The result meets the expectation. Success!
I got the user name: elephant
BUILD SUCCESSFUL in 1m 36s
50 actionable tasks: 26 executed, 7 from cache, 17 up-to-date
The remote build cache was disabled during the build due to errors.
18:34:24: Tasks execution finished ':spring-context:cleanTest :spring-context:test --tests "com.elephant.test.MyTest.test1"'.

