introduction
In order to strengthen the review of basic knowledge and consolidate learning achievements, ape redeployed the recently launched company project, recorded the whole process, explained the key points, and made a comprehensive case for traditional project deployment for reference.
operating system
CentOS memory 4g dual core
Database operating system
CentOS memory 2g dual core
jdk installation
In the previous articles of little ape, there have been articles dedicated to installing jdk. If you are installing jdk Xiaobai, please click to see the articles of little ape jdk offline installation If you understand the mechanism of jdk, the ape will go directly to the next step.
Stem one: get system bits
First, before installing each software, you need to determine some information about your operating system. For example, you can decide to install that software only if you want to obtain the number of bits of your operating system and determine which system it is.
#Acquisition system
getconf LONG_BIT
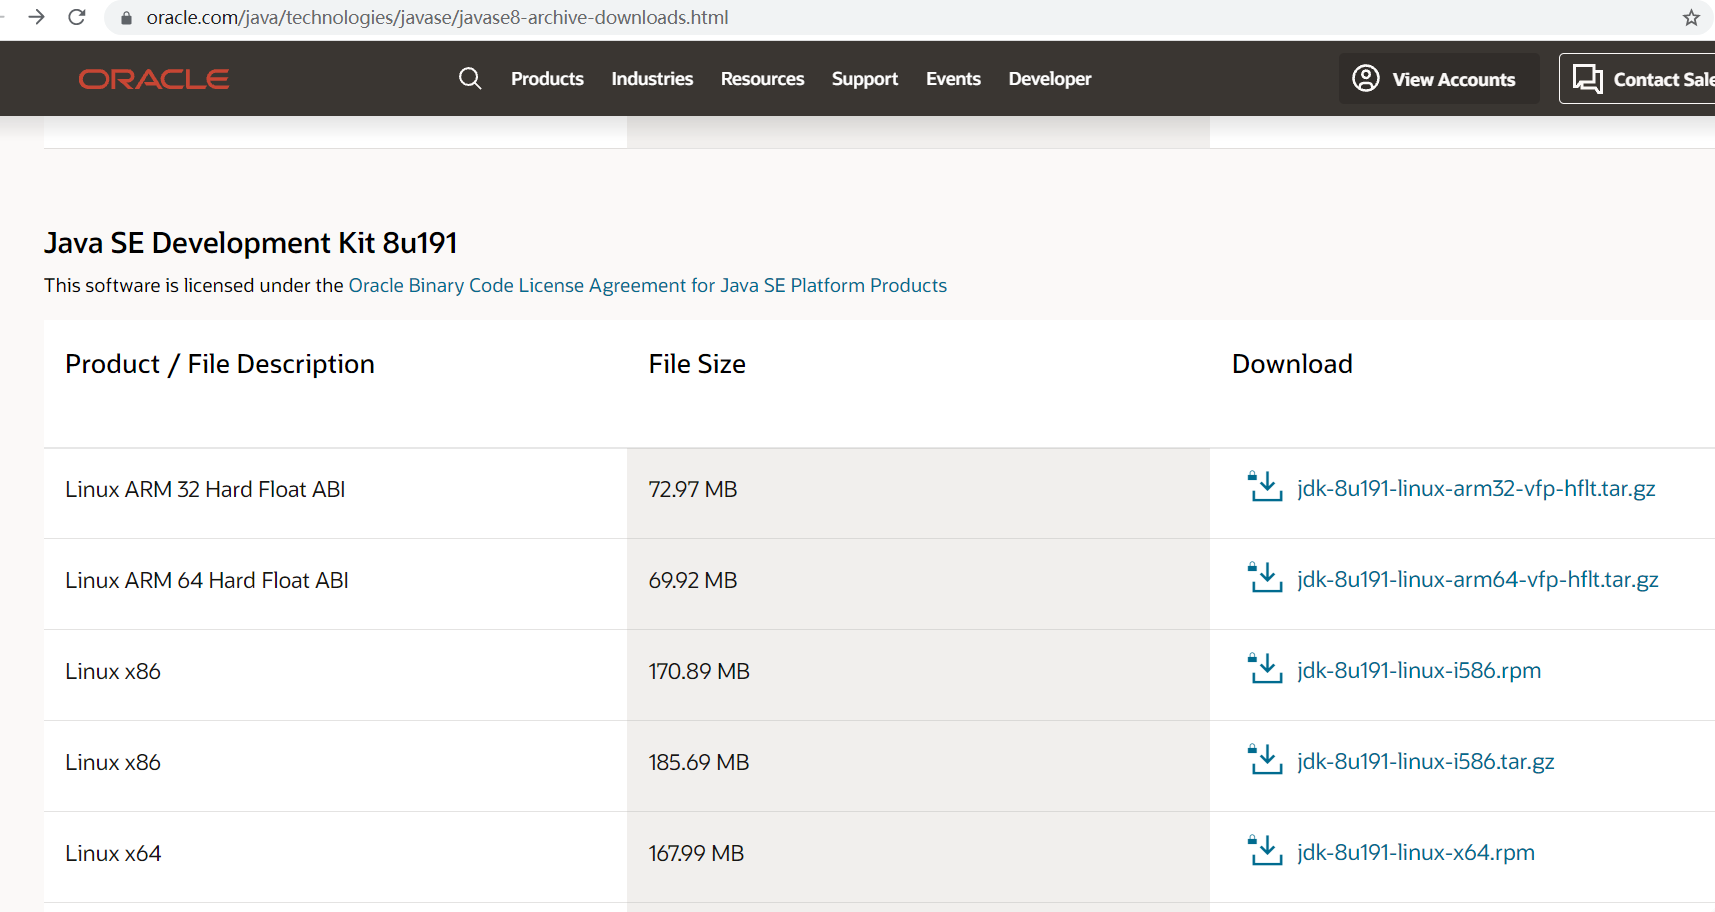
Step two: download of JDK
Download JDK and download the JDK version. If there are no special needs, it is recommended to download the version before jdk1.8.192. According to the ape, oracle charges from jdk1.8.192, so you need to pay attention when downloading the version. At present, to download oracle products, you must register an oracle account, that is, register first and then download.
Official website download address
https://www.oracle.com/java/technologies/javase/javase8-archive-downloads.html
Step three: uninstall jdk
View openjdk
If yes, uninstall directly
rpm -qa | grep jdk

Uninstall installation package
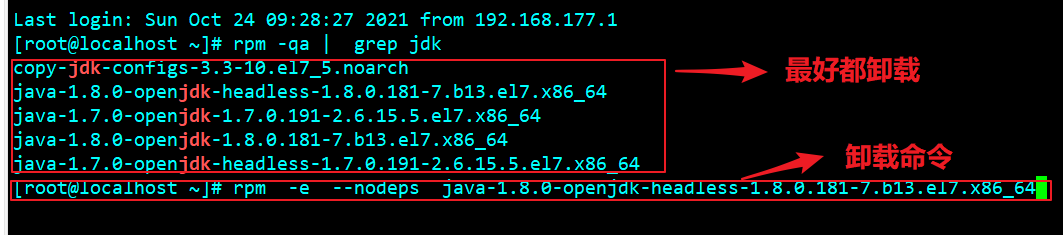
rpm -e --nodeps java-1.8.0-openjdk-headless-1.8.0.181-7.b13.el7.x86_64
Step four: JDK installation
rpm package installation
If it is not compression software but rpm package, install it directly
rpm -ivh xxx
Package installation
If it is a. gz file, unzip it directly
tar -zxvf jdk-8u191-linux-x64.tar.gz -C /usr/local/jdk
Step five: configure environment variables
Open environment variable configuration file
vim /etc/profile
Add the following configuration code at the bottom
#set jdk environment
JAVA_HOME=/usr/local/jdk/jdk1.8.0_191
JRE_HOME=${JAVA_HOME}/jre
CLASSPATH=.:${JAVA_HOME}/lib:${JRE_HOME}/lib
PATH=${JAVA_HOME}/bin:$PATH
export JAVA_HOME CLASSPATH PATH
You need to make the profile file effective again
source /etc/profile
Step six: check whether the installation is successful
java -version

mysql installation
Step one: uninstall mysql from the system
The unloading method is similar to the above unloading openjdk, which will not be repeated here.
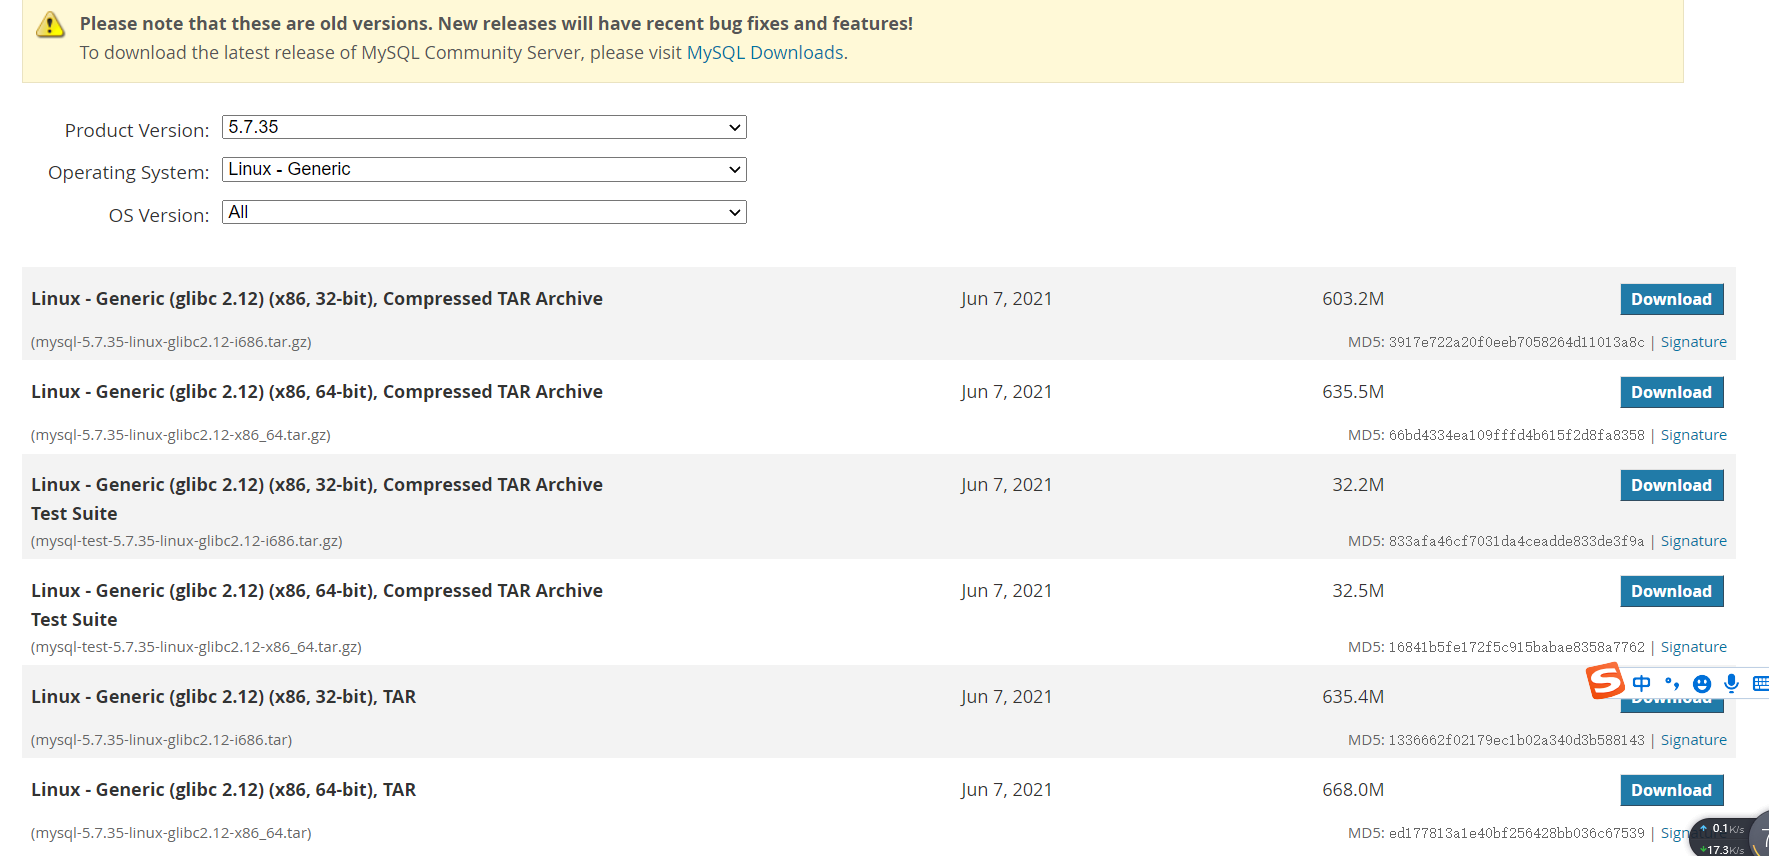
Step two: Download mysql
There are also versions for downloading mysql. Since MySQL was acquired by oracle, MySQL has launched the enterprise version. For example, version 8.0 can be divided into enterprise version and community version, while many versions before MySQL 5.7 are community versions. However, at present, many small and medium-sized projects in China use open source projects, so there is no need to worry about paying:
Official website download address: https://downloads.mysql.com/archives/community/
Step three: MySQL preparation
Unzip the mysql compressed file
tar  -zxvf  mysql Installation package  -C  /usr/local/
mv  -f   mysql Installation folder   mysql
Create mysql users and user groups
groupadd mysql
useradd mysql -g mysql
Create the data file and my.cnf file
cd /usr/local/mysql
mkdir  data
touch  my.cnf
Mount mysql to mysql users and user groups
cd /usr/local
chown -R  mysql:mysql ./mysql
Step four: writing configuration files
vim my.cnf
The configuration file is as follows
[client]    # Client settings, that is, the default connection parameters of the client
port = 7006  # Default connection port
socket = /usr/local/mysql/data/mysql.sock  # The mysqld daemon generates the socket for local connection
default-character-set=utf8mb4

[mysql]
socket=/usr/local/mysql/data/mysql.sock
# set mysql client default chararter
default-character-set=utf8mb4

[mysqld]     # Basic settings of server
# Basic settings
#user = root
#server-id = 1  # Unique number of MySQL service. Each MySQL service Id must be unique
port = 7006    # MySQL listening port
basedir = /usr/local/mysql   # MySQL installation root directory
datadir = /usr/local/mysql/data  # Location of MySQL data file
tmpdir  = /usr/local/mysql/tmp   # Temporary directories, such as load data infile, are used
socket =  /usr/local/mysql/data/mysql.sock  # Specify a socket file for local communication between MySQL client program and server
pid-file =  /usr/local/mysql/data/localhost.pid # Directory of pid file
skip_name_resolve = 1         # Only the IP address can be used to check the login of the client without using the host name
character-set-server = utf8mb4   # The default character set of the database. The mainstream character set supports some special emoticons (special emoticons occupy 4 bytes)
transaction_isolation = READ-COMMITTED # Transaction isolation level, which is repeatable read by default, and MySQL is repeatable read by default
collation-server = utf8mb4_general_ci  # The database character set corresponds to some sorting rules. Note that it corresponds to character set server
#init_connect='SET NAMES utf8mb4'  # Set the character set when the client connects to mysql to prevent garbled code
lower_case_table_names = 1        # Whether it is case sensitive to sql statements. 1 means insensitive
max_connections = 400             # maximum connection
max_connect_errors = 1000         # Maximum number of wrong connections
explicit_defaults_for_timestamp = true # TIMESTAMP if the declaration NOT NULL is not displayed, NULL value is allowed
max_allowed_packet = 128M         # The size of the SQL packet sent. If there is a BLOB object, it is recommended to modify it to 1G
interactive_timeout = 1880000        # The MySQL connection will be forcibly closed after it is idle for more than a certain time (unit: seconds)
wait_timeout = 1880000               # MySQL default wait_ The timeout value is 8 hours, interactive_ The timeout parameter needs to be configured at the same time to take effect
tmp_table_size = 16M              # The maximum value of the internal memory temporary table is set to 128M; For example, a temporary table may be used when a large amount of data is group by and order by; If this value is exceeded, it will be written to disk and the system IO pressure will increase
max_heap_table_size = 128M        # Defines the size of the memory table that users can create
query_cache_size = 0              # Disable the query result set caching function of mysql; In the later stage, test and decide whether to open it according to the business situation; In most cases, close the following two items
query_cache_type = 0

#Threads_created: the number of threads created,
#  1G  ---> 8
#  2G  ---> 16
#  3G  ---> 32
thread_cache_size = 8
# The memory setting allocated by the user process. Each session will allocate the memory size set by the parameter
key_buffer_size = 256M         #key_buffer_size specifies the size of the index buffer, which determines the speed of index processing
read_buffer_size = 2M             # MySQL read in buffer size. The request for sequential scanning of tables will allocate a read in buffer, and MySQL will allocate a memory buffer for it.
read_rnd_buffer_size = 8M         # Random read buffer size of MySQL
sort_buffer_size = 8M             # Buffer size used by MySQL to perform sorting
binlog_cache_size = 1M            # When a transaction is not committed, the generated log is recorded in the Cache; When the transaction needs to be committed, the log is persisted to disk. Default binlog_cache_size 32K
back_log = 130                    # How many requests can be stored in the stack in a short time before MySQL temporarily stops responding to new requests; Official recommendation back_log = 50 + (max_connections / 5), and the number of capping is 900
skip-external-locking     #Skip external locks. If a polymorphic server wants to open the external locking feature, it can comment directly. If it is a single server, it can be opened directly
#skip-grant-tables


# log setting
log_error = /usr/local/mysql/data/logs/error.log # Database error log file
slow_query_log = 1                # Slow query sql log settings
long_query_time = 1               # Slow query time; If it exceeds 1 second, it is a slow query
slow_query_log_file = /usr/local/mysql/data/logs/slow_query.log # Slow query log file
log_queries_not_using_indexes = 1 # Check sql that is not used to index
log_throttle_queries_not_using_indexes = 5   # Used to indicate the number of SQL statements that are allowed to be recorded to the slow log and do not use the index per minute. The default value is 0, which means there is no limit
min_examined_row_limit = 100                 # The number of retrieved rows must reach this value before it can be recorded as a slow query. SQL returned by query check less than the rows specified by this parameter will not be recorded in the slow query log
expire_logs_days = 5              # The expiration time of MySQL binlog log files. After expiration, they are automatically deleted

# Master slave copy settings
#skip_slave_start, so that the replication process will not start with the start of the database
#skip-slave-start
# Enable mysql binlog function
#log-bin = mysql-bin
# binlog records the contents and records each line operated
#binlog_format = ROW
# For binlog_ Format = in row mode, the contents of the log are reduced and only the affected columns are recorded
#binlog_row_image = minimal

# Innodb settings
innodb_open_files = 500           # Limit the data of tables that Innodb can open. If there are too many tables in the library, please add this. This value defaults to 300
innodb_buffer_pool_size = 64M     # InnoDB uses a buffer pool to store indexes and original data, generally 60% - 70% of the physical storage; The larger you set here, the less disk I/O you need to access the data in the table
innodb_log_buffer_size = 2M       # This parameter determines the amount of memory used to write log files, in M. Larger buffers improve performance, but unexpected failures will lose data. MySQL developers recommend setting it between 1 and 8M
innodb_flush_method = O_DIRECT    # O_DIRECT reduces conflicts between the operating system level VFS cache and Innodb's own buffer cache
innodb_write_io_threads = 2     # The CPU multi-core processing capacity setting is adjusted according to the read and write ratio. The best number of cores is the number of CPUs
innodb_read_io_threads = 2
innodb_lock_wait_timeout = 120    # The number of timeout seconds that InnoDB transactions can wait for a lock before being rolled back. InnoDB automatically detects transaction deadlocks in its own lock table and rolls back transactions. InnoDB noticed the lock settings with the LOCK TABLES statement. The default value is 50 seconds
innodb_log_file_size = 32M        # This parameter determines the size of the data log file. A larger setting can improve performance, but it will also increase the time required to recover the failed database
In order to ensure that no errors are reported, some things need to be changed. In principle, they need to be modified and mounted after creation
chmod -R 755 my.cnf
Step five: initialize mysql
./bin/mysql_install_db --user=mysql --basedir=/usr/local/mysql --datadir=/usr/local/mysql/data
Step sex: start mysql for the first time
./support-files/mysql.server start
If there is no error in creating a folder or file during the process
Starting MySQL.2021-10-24T14:55:12.749885Z mysqld_safe error: log-error set to '/usr/local/mysql/data/logs/error.log', however file don't exists. Create writable for user 'mysql'.
 ERROR! The server quit without updating PID file (/usr/local/mysql/data/localhost.pid).
Create a folder or file directly
mkdir logs
touch  ./logs/error.log
Mount again`
chown -R mysql:mysql   ./logs
chmod  -R 755  ./logs
In short, if you encounter the following similar problems
ERROR! The server quit without updating PID file (/usr/local/mysql/data/localhost.pid).
Basically, most problems are about permissions. You need to modify permissions and mount user groups
Another kind of problem is caused by selinux. This kind of problem needs to check the system log. Generally, it can be solved by executing the following commands.
vim /etc/selinux/config
# Change SELinux = forcing to SELINUX=disabled, save the disk, exit and restart the machine
Step seven: added as startup
cp support-files/mysql.server /etc/init.d/mysql
If the above command is executed, you can also use the following command to start the mysql service
./etc/init.d/mysqld start
Add to boot
# Add boot
chkconfig mysql on
Step eight: configure environment variables
Add the following to the profile
vim /etc/profile
#Move the cursor to the bottom and add the following
export MYSQL_HOME=/usr/local/mysql
export PATH=$PATH:$MYSQL_HOME/bin
Refresh profile file
source profile
Step night: set other parameters
Temporary password first login
The first login of mysql requires a password. After mysql is installed, a temporary password is generated. To view the password, you need to perform the following operations.
cat /root/.mysql_secret
#obtain
NlT6a,hnWvkN
If the temporary password is invalid or you do not want to use the temporary password, you need to modify the my.cnf file to skip password authorization and add the following items in mysqld.
skip-grant-tables
Restart mysql
Configure Ciphers
use mysql
update mysql.user set authentication_string=password('root') where user='root';
flush privileges;
perhaps
set password=password("root");
flush privileges;
If the above statement is executed, an error is reported

Follow the prompts to directly use the following statements
alter user 'root'@'localhost' identified by 'root';
Modify my.cnf and comment out the skip password. If you don't do this step, you may encounter an error when setting up the remote connection
#skip-grant-tables
Change the password and restart mysql
service mysql restart
Set remote connection enable
For security under Linux, machines other than mysql are not allowed to access mysql database services by default, so root needs to be re authorized.
grant all privileges on *.* to 'root'@'%' identified by 'root' with grant option;
flush privileges;
perhaps
use mysql;
update user set host='%' where user='root';
flush privileges;
Restart mysql after the above operations, that is, mysql is successfully installed
matters needing attention
Generally, the above steps can basically solve the problem, but there are exceptions to everything. When exceptions occur, we need to learn to watch the log. If the information given by the black window is not comprehensive, we need to check the mysql log. When the ape is installed, set the log to / usr/local/mysql/data/logs, and all error logs are recorded in it.

All error logs are recorded in error.log.

According to the mode of the above solution, this way of installing mysql is basically no problem.
Project deployment ideas
In order to understand the deployment of the whole project more clearly, ape directly shows the deployment schematic diagram of the whole project in the form of diagram.

From the above figure, we can clearly know the deployment framework of the whole project. What we need to do is to do a good job in the installation and administration configuration environment of each link.
nginx installation configuration
Dependent package and nginx Download
nginx installation depends on the following library files, so you need to download them in advance and give the website of the dependent library
Dependent Library Download
https://www.openssl.org/source/
http://www.zlib.net/
https://ftp.pcre.org/pub/pcre/
nginx download address
http://nginx.org/download/
It is best to match the version of the library with the version of nginx, otherwise an error will be reported. Generally, the error caused by the version mismatch is to match the version and install it again. The following ape gives the recommended version:
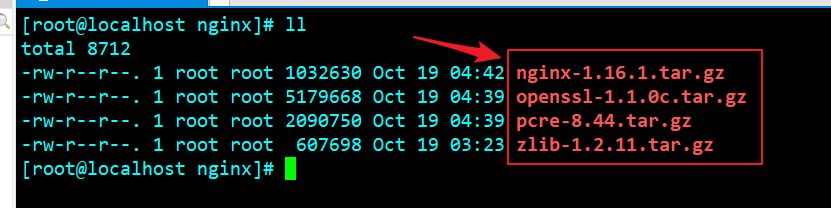
The above four compressed packages need to be decompressed
tar -zxvf pcre-8.44.tar.gz  -C /usr/develop/nginxref/
tar -zxvf  nginx-1.16.1.tar.gz  -C /usr/local/nginxref/
tar -zxvf  zlib-1.2.11.tar.gz  -C /usr/local/nginxref/
tar -zxvf  openssl-1.1.0c.tar.gz  -C /usr/local/nginxref/
After the version matches, directly decompress it. After that, you need to check whether there is a gcc compiler. If not, you need to install it.
gcc compiler installation
View gcc and gcc++
#View gcc version
gcc --version
#View gcc-c + + version
g++ --version
If the gcc or gcc + + compiler is not installed, you need to install the relevant compiler
#Install gcc
yum -y install gcc
#Install gcc-c++
yum -y install gcc-c++
Install pcre
cd  /usr/local/nginxref/pcre-8.44
./configure&&make&&make install
Install zlib
cd /usr/local/nginxref/zlib-1.2.11/
 ./configure&&make&&make install
Install openssl
cd /usr/local/nginxref/openssl-1.1.0c/
./config&&make&&make install
nginx installation
cd /usr/local/nginxref/nginx-1.16.1/
Start compiling and installing nginx
./configure --sbin-path=/usr/local/nginx/nginx --conf-path=/usr/local/nginx/nginx.conf --pid-path=/usr/local/nginx/nginx.pid --with-http_ssl_module --with-pcre=/usr/local/nginxref/pcre-8.44 --with-zlib=/usr/local/nginxref/zlib-1.2.11 --with-openssl=/usr/local/nginxref/openssl-1.1.0c
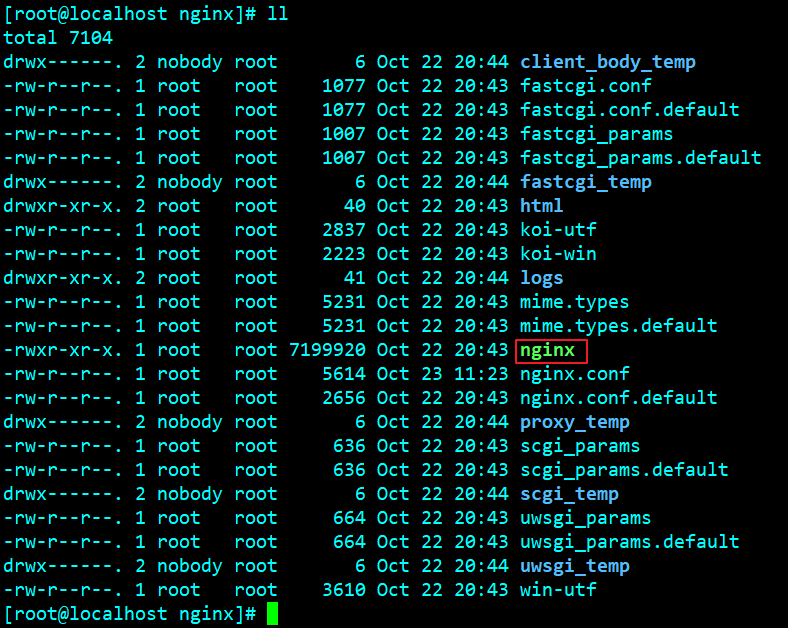
Until the installation is completed, you can see the relevant executive files in the configured directory
nginx startup
Modify permissions before starting
cd /usr/local
chmod -R 777 nginx/
Start
cd /usr/local/nginx
./nginx -c ./nginx.conf
nginx stop
./nginx -s stop
nginx restart
./nginx -s reload
nginx precautions
Startup error: for example, permission problems, user group problems, configuration file syntax errors, you can view the corresponding logs.
For this purpose, the ape deliberately makes errors. The corresponding error items can be displayed in detail in the error.log, and can be changed directly according to the error information.
vim ./logs/error.log

After the problem is solved, you can restart. It is emphasized that you must read the log.
nginx file configuration
According to the project requirements, the nginx configuration of ape is as follows:
#user  nobody;
worker_processes  1;

#error_log  logs/error.log;
#error_log  logs/error.log  notice;
#error_log  logs/error.log  info;

#pid        logs/nginx.pid;


events {
    worker_connections  1024;
}


http {
    include       mime.types;
    default_type  application/octet-stream;

    #log_format  main  '$remote_addr - $remote_user [$time_local] "$request" '
    #                  '$status $body_bytes_sent "$http_referer" '
    #                  '"$http_user_agent" "$http_x_forwarded_for"';

    #access_log  logs/access.log  main;

    sendfile        on;
    #tcp_nopush     on;

    #keepalive_timeout  0;
    keepalive_timeout  65;
    #gzip  on;
    upstream tomcat8_1 {
        server localhost:9000 ;
    }
    upstream tomcat8_2 {
        server localhost:9001 ;
    }
    upstream tomcat8_3 {
        server localhost:9002 ;
    }
    server {
        listen       80;
        server_name  localhost;

        #charset koi8-r;

        #access_log  logs/host.access.log  main;

        location / {
            root   /usr/local/tomcats/wlhy/wlhy-site;
            index  index.html index.htm;
        }

        #error_page  404              /404.html;

        # redirect server error pages to the static page /50x.html
        #
       # error_page   500 502 503 504  /50x.html;
       # location = /50x.html {
        #    root   html;
       # }
       location ~ /vvise-js/{
	    root /usr/local/tomcats/wlhy/ ;
	}

        # proxy the PHP scripts to Apache listening on 127.0.0.1:80
        #
        #location ~ \.php$ {
        #    proxy_pass   http://127.0.0.1;
        #}

        # pass the PHP scripts to FastCGI server listening on 127.0.0.1:9000
        #
        #location ~ \.php$ {
        #    root           html;
        #    fastcgi_pass   127.0.0.1:9000;
        #    fastcgi_index  index.php;
        #    fastcgi_param  SCRIPT_FILENAME  /scripts$fastcgi_script_name;
        #    include        fastcgi_params;
        #}

        # deny access to .htaccess files, if Apache's document root
        # concurs with nginx's one
        #
        #location ~ /\.ht {
        #    deny  all;
        #}
    }

    server {
	listen 80;
	server_name pt.xywl.com;
	add_header backendIP $upstream_addr;
	add_header backendCode $upstream_status;
	location /{
	    root  html;
	    index  index.html index.htm;
	    proxy_pass http://tomcat8_1;
	    proxy_set_header X-Real-IP $remote_addr;
	    proxy_set_header X-Forwarded-For  $proxy_add_x_forwarded_for;
	    proxy_set_header Host $http_host;
	    proxy_http_version 1.1 ;
	    proxy_set_header Upgrade $http_upgrade;
	    proxy_set_header Connection 'upgrade';
	    client_max_body_size 100M;
            client_body_buffer_size 128k;
	    client_body_in_file_only clean;
            proxy_read_timeout 600;
	    proxy_send_timeout 600;
	}

       error_page   500 502 503 504  /50x.html;
       location = /50x.html {
       	   root   html;
       }
       #
    }

    server {
        listen 80;
        server_name fh.xywl.com;
        add_header backendIP $upstream_addr;
        add_header backendCode $upstream_status;
        location /{
            root  html;
            index  index.html index.htm;
            proxy_pass http://tomcat8_2;
            proxy_set_header X-Real-IP $remote_addr;
            proxy_set_header X-Forwarded-For  $proxy_add_x_forwarded_for;
            proxy_set_header Host $http_host;
            proxy_http_version 1.1 ;
            proxy_set_header Upgrade $http_upgrade;
            proxy_set_header Connection 'upgrade';
            client_max_body_size 100M;
            client_body_buffer_size 128k;
            client_body_in_file_only clean;
            proxy_read_timeout 600;
            proxy_send_timeout 600;
        }

       error_page   500 502 503 504  /50x.html;
       location = /50x.html {
           root   html;
       }
     }


    server {
        listen 80;
        server_name cy.xywl.com;
        add_header backendIP $upstream_addr;
        add_header backendCode $upstream_status;
        location /{
            root  html;
            index  index.html index.htm;
            proxy_pass http://tomcat8_3;
            proxy_set_header X-Real-IP $remote_addr;
            proxy_set_header X-Forwarded-For  $proxy_add_x_forwarded_for;
            proxy_set_header Host $http_host;
            proxy_http_version 1.1 ;
            proxy_set_header Upgrade $http_upgrade;
            proxy_set_header Connection 'upgrade';
            client_max_body_size 100M;
            client_body_buffer_size 128k;
            client_body_in_file_only clean;
            proxy_read_timeout 600;
            proxy_send_timeout 600;
        }

       error_page   500 502 503 504  /50x.html;
       location = /50x.html {
           root   html;
       }
     }


    # another virtual host using mix of IP-, name-, and port-based configuration
    #
    #server {
    #    listen       8000;
    #    listen       somename:8080;
    #    server_name  somename  alias  another.alias;

    #    location / {
    #        root   html;
    #        index  index.html index.htm;
    #    }
    #}
    # HTTPS server
    #
    #server {
    #    listen       443 ssl;
    #    server_name  localhost;

    #    ssl_certificate      cert.pem;
    #    ssl_certificate_key  cert.key;

    #    ssl_session_cache    shared:SSL:1m;
    #    ssl_session_timeout  5m;

    #    ssl_ciphers  HIGH:!aNULL:!MD5;
    #    ssl_prefer_server_ciphers  on;

    #    location / {
    #        root   html;
    #        index  index.html index.htm;
    #    }
    #}
}
After the configuration file is configured successfully, the basic installation and deployment of nginx are completed
tomcat configuration and optimization
Common deployment methods of tomcat
war package deployment
The deployment of war package is convenient because tomcat will automatically scan various webapps project packages at startup, automatically decompress and load the project into tomcat container, so that you can directly access the project as long as you access the corresponding project name. If you want to learn more, you can check out the articles on the tomcat startup process.
Profile deployment
Configuration file deployment is a little troublesome, but the advantage of this deployment method is that the project file can be centrally managed and the deployment method is simple
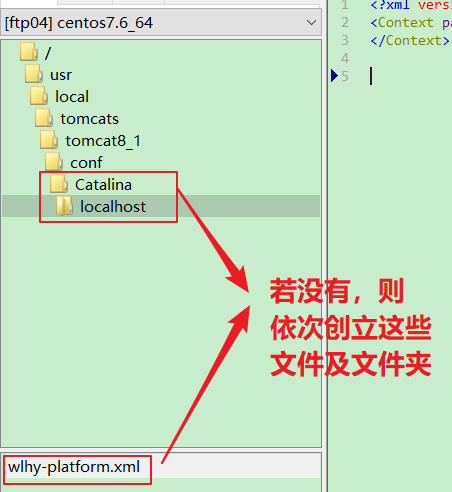
tomcat will automatically scan the above folders and files when starting. If there is xml code, it will automatically scan and load the project file according to the xml script. The xml configuration file is as follows:
<?xml version="1.0" encoding="UTF-8"?>
<Context path="/wlhy-platform" docBase="/usr/local/tomcats/wlhy/wlhy-platform" debug="0" reloadable="true" privileged="false" sessionCookieName="wlhy_8_1" >
</Context>
tomcat file configuration
As we all know, the main configuration file of tomcat is server.xml, which belongs to the core configuration file of tomcat and needs our in-depth understanding.
, both important ports need to be modified
server port modification
<Server port="8005" shutdown="SHUTDOWN">
...
...
</Server>
connector port modification
   <Connector executor="tomcatThreadPool"
           port="9000"/>
tomcat optimization
connector optimization
	    <Connector executor="tomcatThreadPool"
           port="9000"
           protocol="HTTP/1.1"
           maxThreads="500"
           minSpareThreads="40"
           maxSpareThreads="500"
           minProcessors="40"
           maxProcessors="500"
           redirectPort="8443"
           URIEncoding="UTF-8"
           connectionTimeout="20000"
           enableLookups="false"
           disableUploadTimeout="false"
           connectionUploadTimeout="15000"
           acceptCount="300"
           keepAliveTimeout="12000"
           maxKeepAliveRequests="1"
           compression="on"
           compressionMinSize="2048"
compressableMimeType="text/html,text/xml,text/javascript,text/css,text/plain,image/gif,image/jpg,image/png" />
Basic meaning of parameters
tomcatThreadPool The actuator (line program pool) has a name
maxThreads Maximum number of threads for client requests
minSpareThreads Tomcat Created during initialization socket Number of threads
maxSpareThreads Tomcat Maximum idle of connector socket Number of threads
enableLookups If set to true, Domain name resolution is supported ip Address resolves to host name
redirectPort When the secure channel is needed, forward the customer request to the secure channel SSL of redirectPort port
acceptAccount The maximum number of listening port queues. After it is full, the customer request will be rejected (cannot be less than) maxSpareThreads )
connectionTimeout Connection timeout defines the timeout for establishing a client connection. If yes -1, Indicates that the time for establishing customer connection is not limited
minProcessors Minimum number of processing threads at server creation
maxProcessors Maximum number of simultaneous processing threads on the server
URIEncoding URL Unified coding
compression Turn on compression
compressionMinSize Enable the compressed output content size, which is 2 by default KB
compressableMimeType Compression type
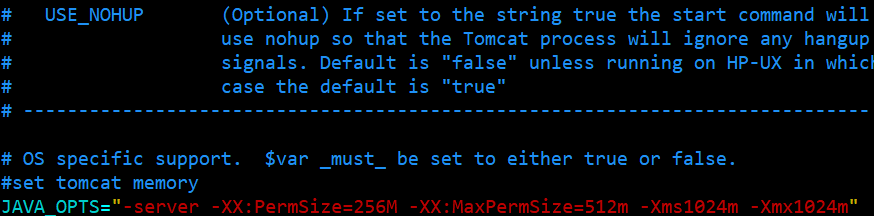
Command optimization
catalina.sh needs to be optimized under windows system and catalina.bat needs to be optimized under linux system
Optimize catalina.sh
JAVA_OPTS="-server -XX:PermSize=256M -XX:MaxPermSize=512m -Xms1024m -Xmx1024m"
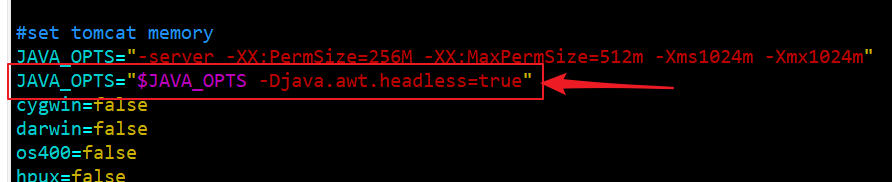
Graphic optimization
In the linux environment, the verification code cannot be displayed normally due to exceptions in graphics processing.
The following contents need to be added to catalina.sh
JAVA_OPTS="$JAVA_OPTS -Djava.awt.headless=true"
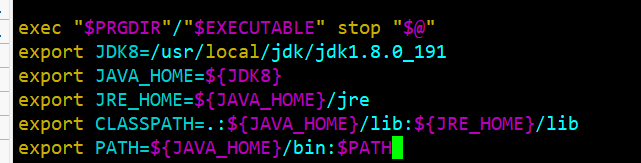
startup.sh and shutdown.sh optimization
At the end of startup.sh and shutdown.sh, add the following content to specify the jdk environment for tomcat to run, which is applicable to the case that there are multiple jdks in a system.
export JDK8=/usr/local/jdk/jdk1.8.0_191
export JAVA_HOME=${JDK8}
export JRE_HOME=${JAVA_HOME}/jre
export CLASSPATH=.:${JAVA_HOME}/lib:${JRE_HOME}/lib
export PATH=${JAVA_HOME}/bin:$PATH
Other tomcat can follow the configuration method and optimization idea step by step.
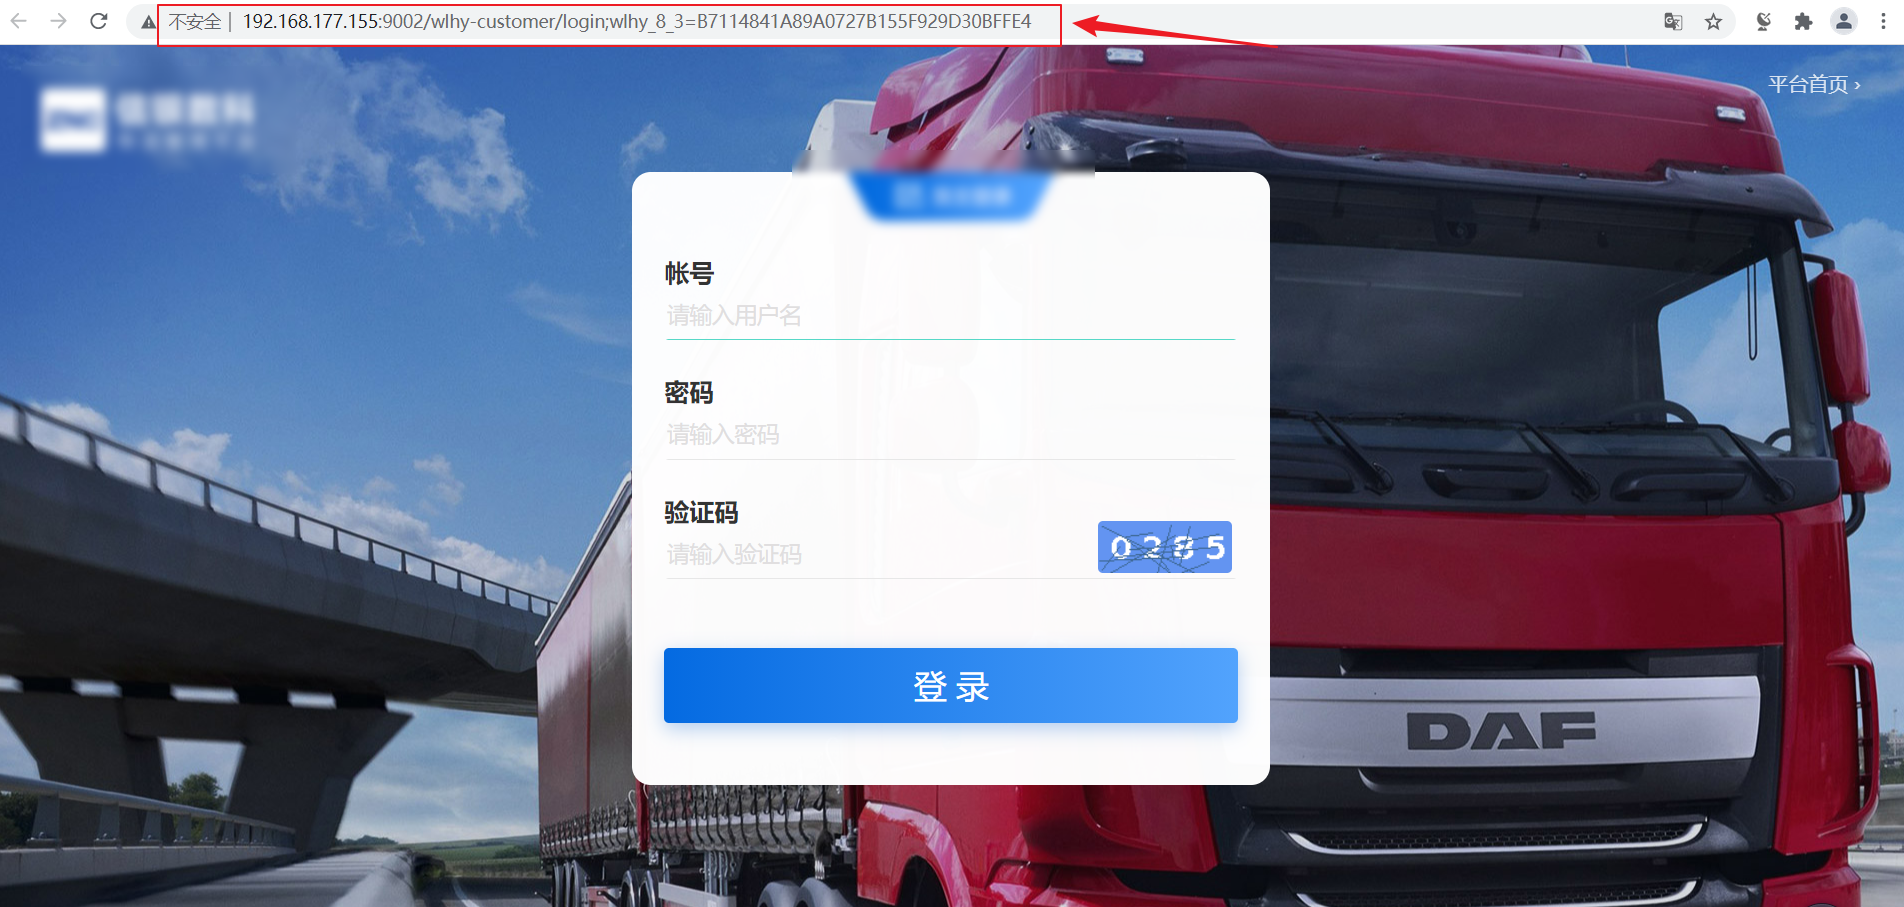
Deployment results
home page

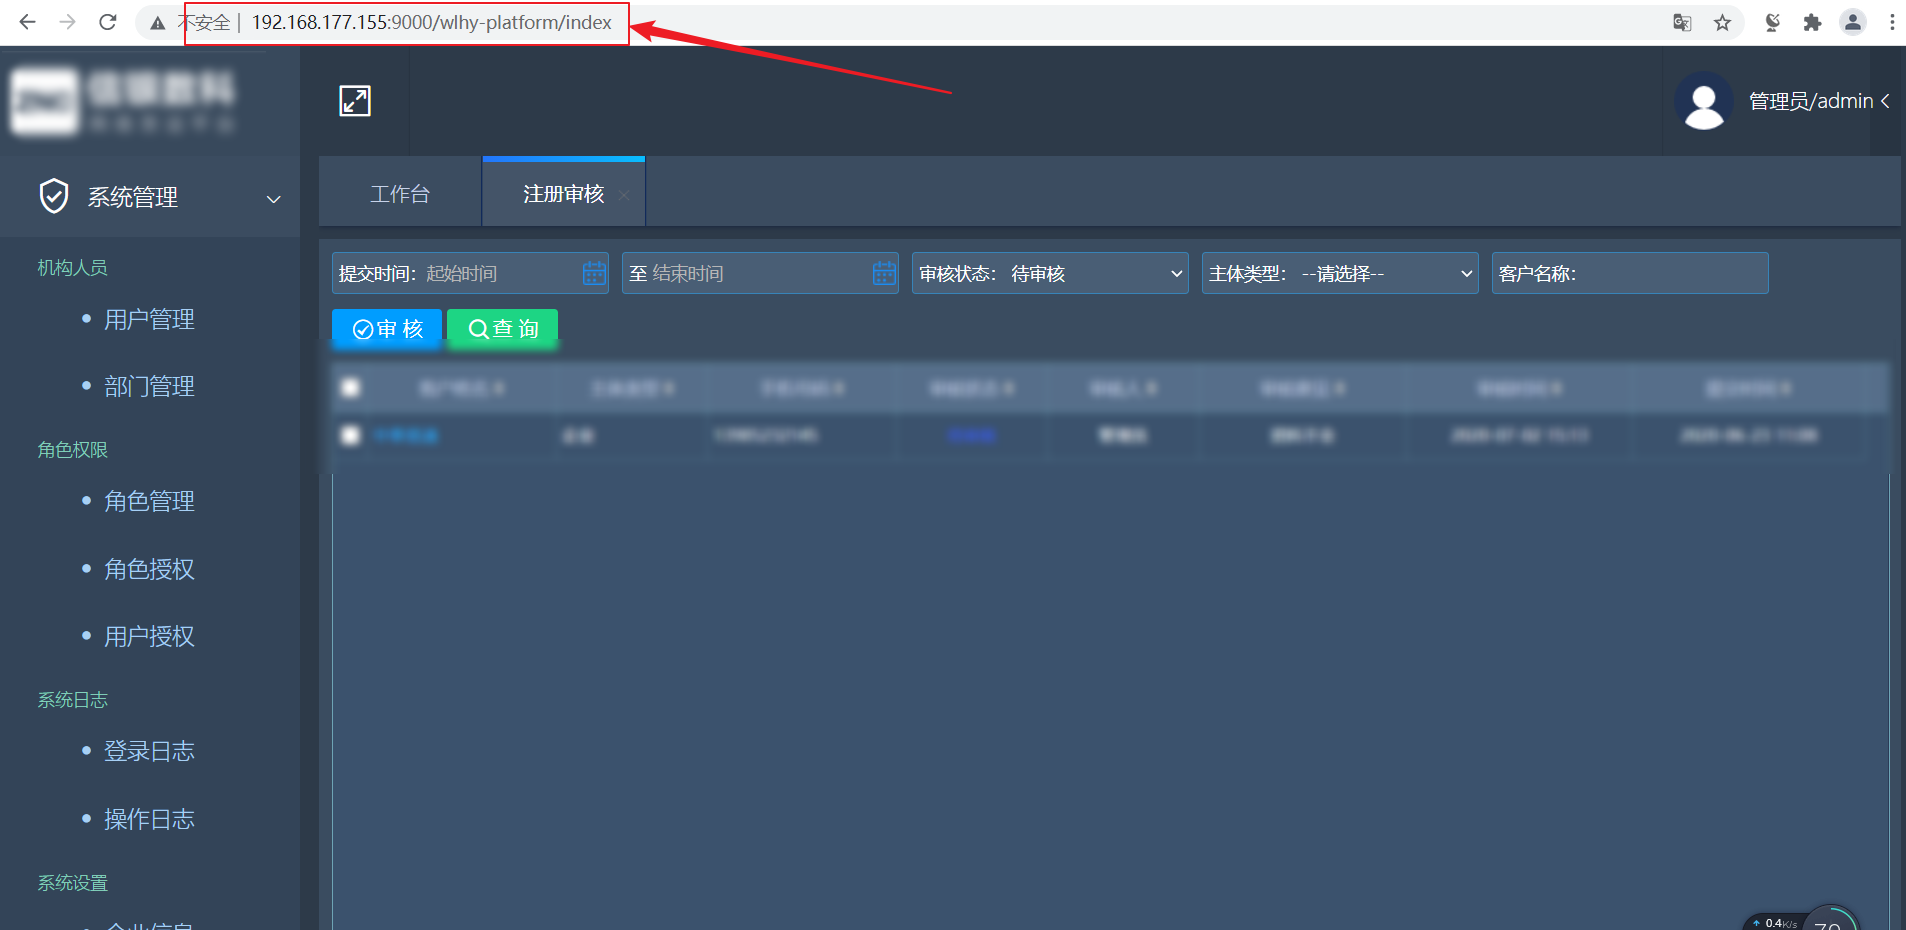
platform

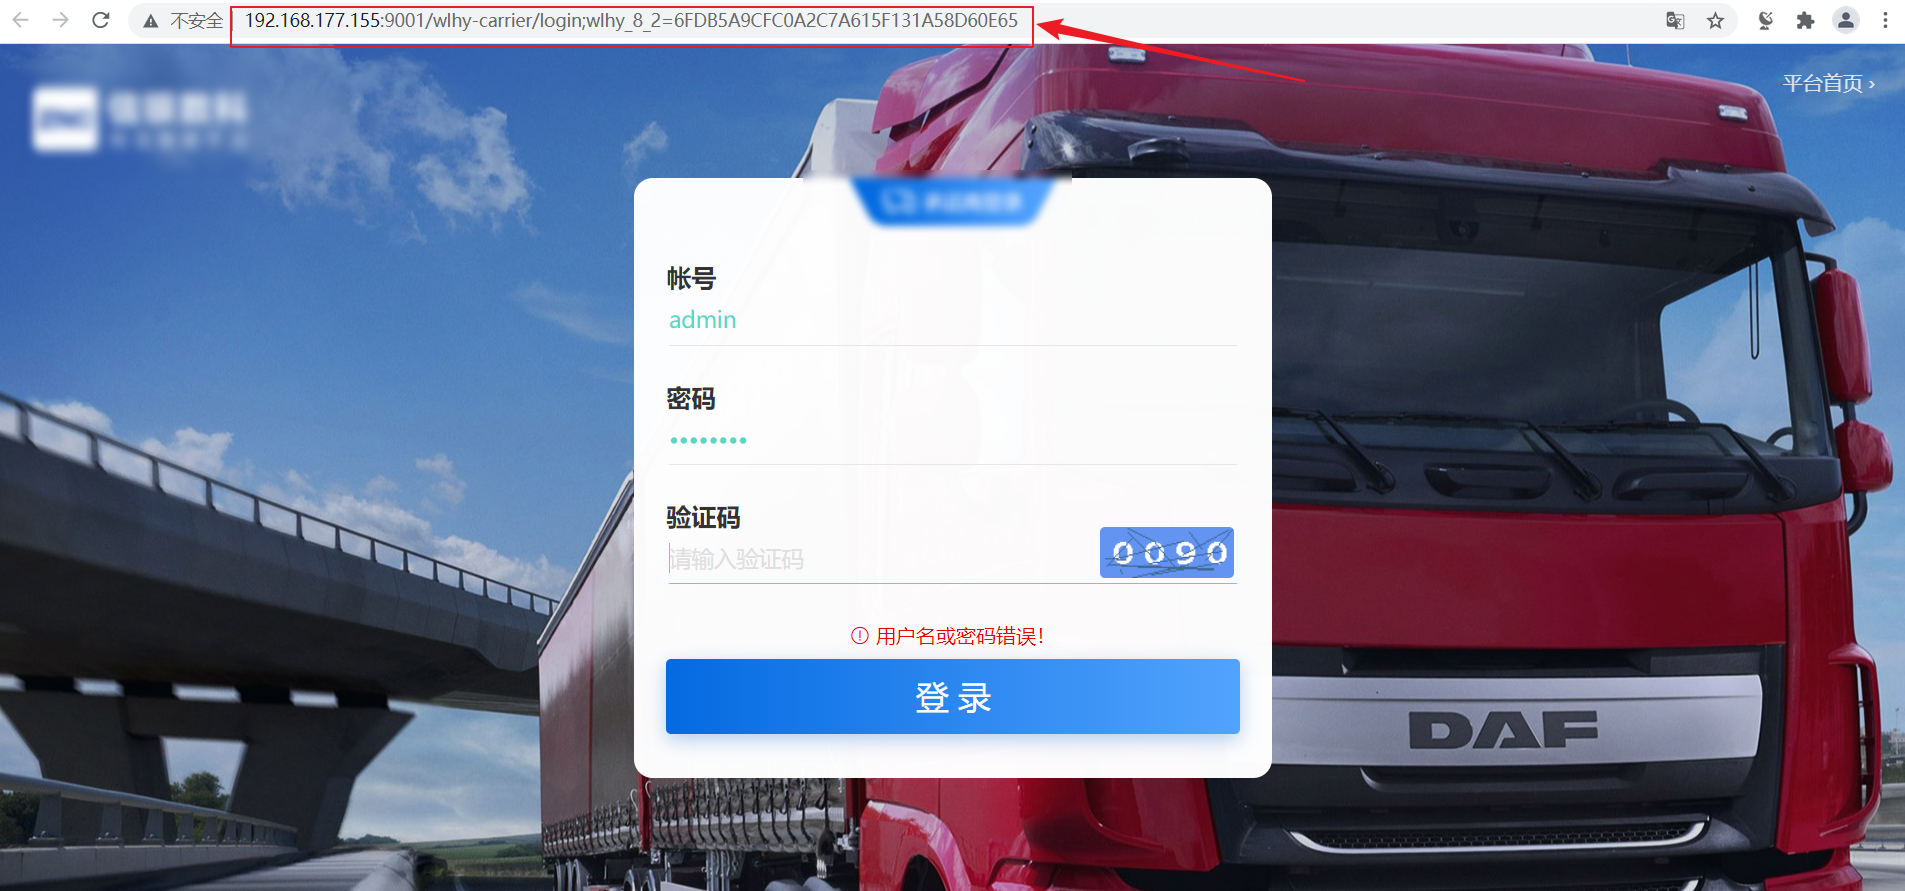
carrier
customer