demo address: https://gitee.com/pdh_gitee/redis-cache-demo.git.
Redis must be available locally, which is the premise. All demo s are tested on windows. In the spring boot project, you can usually use the automatic cache policy, or you can use the RedisTemplate class to operate redis, and redis can be configured (of course, this is troublesome, unless there are special business requirements).
When using redis caching: when using @ Cacheable automatic caching, you need to turn off the Configuration information manually cached by RedisTemplate (including the annotation on the caching method, the @ Configuration annotation on the Configuration class, etc.), and vice versa.
1, New SpringBoot project
Create a new SpringBoot project[ Click me to see how to quickly build a SpringBoot project].
1. Dependence
Import redis, swagger3, lombok, mp, web and other dependencies.
<!-- redis use -->
<dependency>
    <groupId>org.springframework.boot</groupId>
    <artifactId>spring-boot-starter-data-redis</artifactId>
</dependency>

<!--swagger3-->
<dependency>
    <groupId>io.springfox</groupId>
    <artifactId>springfox-boot-starter</artifactId>
    <version>3.0.0</version>
</dependency>

<!-- mp -->
<dependency>
    <groupId>com.baomidou</groupId>
    <artifactId>mybatis-plus-boot-starter</artifactId>
    <version>3.4.3</version>
</dependency>

<!-- web -->
<dependency>
    <groupId>org.springframework.boot</groupId>
    <artifactId>spring-boot-starter-web</artifactId>
</dependency>

<!-- mysql -->
<dependency>
    <groupId>mysql</groupId>
    <artifactId>mysql-connector-java</artifactId>
    <scope>runtime</scope>
</dependency>

<!-- lombok -->
<dependency>
    <groupId>org.projectlombok</groupId>
    <artifactId>lombok</artifactId>
    <optional>true</optional>
</dependency>
2. Configuration file
application.yml
debug: true # Viewing Automatic Configuration

server:
  port: 8082

spring:
  redis:
    host: localhost
    port: 6379

  datasource:
    driver-class-name: com.mysql.cj.jdbc.Driver
    url: jdbc:mysql://localhost:3306/test
    username: root
    password: # you root password

mybatis-plus:
  mapper-locations: classpath*:com/pdh/mapper/*.xml
  global-config:
    db-config:
      table-prefix:
  configuration:
    # log of sql
    log-impl: org.apache.ibatis.logging.stdout.StdOutImpl
    # hump
    map-underscore-to-camel-case: true
3.sql and entity classes
Just execute the sql script (stored in the sql package of the demo)
CREATE TABLE `user_db`  (
  `id` int(4) NOT NULL AUTO_INCREMENT,
  `username` varchar(32) CHARACTER SET utf8 COLLATE utf8_general_ci NOT NULL,
  PRIMARY KEY (`id`) USING BTREE
) ENGINE = InnoDB AUTO_INCREMENT = 8 CHARACTER SET = utf8 COLLATE = utf8_general_ci ROW_FORMAT = Dynamic;

INSERT INTO `user_db` VALUES (1, 'Zhang San');
INSERT INTO `user_db` VALUES (2, 'Li Si');
INSERT INTO `user_db` VALUES (3, 'WangTwo ');
INSERT INTO `user_db` VALUES (4, 'Pockmarks');
INSERT INTO `user_db` VALUES (5, 'Wang San');
INSERT INTO `user_db` VALUES (6, 'Li San');
INSERT INTO `user_db` VALUES (7, 'hh');
User
package com.pdh.entity;

import com.alibaba.fastjson.JSON;
import com.baomidou.mybatisplus.annotation.TableName;
import lombok.AllArgsConstructor;
import lombok.Data;
import lombok.NoArgsConstructor;
import nonapi.io.github.classgraph.json.Id;
import org.apache.commons.lang3.StringUtils;

import java.io.Serializable;

/**
 *@Author: Peng Dehua
 *@Date: 2021-10-26 11:24
 */
@Data
@AllArgsConstructor
@NoArgsConstructor
@TableName("user_db")
public class User implements Serializable {
    @Id
    private Integer id;

    private String username;
}
4. Uniformly return Result
All requests return results uniformly
package com.pdh.entity;

import lombok.AllArgsConstructor;
import lombok.Data;

import java.io.Serializable;

/**
 * @Author: Peng Dehua
 * @Date: 2021-10-26 15:27
 * Unified packaging of results
 */
@Data
@AllArgsConstructor
public class Result implements Serializable {

    private boolean success;

    private int code;

    private String msg;

    private Object data;


    /**
     * success Method, identification successful
     * @param data
     * @return
     */
    public static Result success(Object data){
        return new Result(true,200,"success",data);
    }

    /**
     * fail Method, identification failed
     * @param code
     * @param msg
     * @return
     */
    public static Result fail(int code, String msg){
        return new Result(false,code,msg,null);
    }
}
2, Connection test
Test the interface through swagger3. After receiving the request, the interface accesses the persistence layer to obtain the data in MySQL. Access steps: Browser - controller interface - service - mapper - mysql. After accessing the data, return one by one.
1.controller
UserController
@RequestMapping("/user")
@RestController
public class UserController {
    @Autowired
    private UserService userService;

    @GetMapping("/get/{id}")
    public User get(@PathVariable("id") Integer id){
        return userService.get(id);
    }

    @PostMapping("/insert")
    public boolean insert(@RequestBody User user){
        return userService.insert(user);
    }

    @DeleteMapping("/delete/{id}")
    public boolean delete(@PathVariable("id") Integer id){
        return userService.delete(id);
    }

}
2.service
UserService
@Service
public class UserService {

    @Resource
    private UserMapper userMapper;

    public User get(Integer id){
        LambdaQueryWrapper<User> wrapper = new LambdaQueryWrapper<>();
        wrapper.eq(User::getId,id);
        User user = userMapper.selectOne(wrapper);
        return user;
    }

    public boolean insert(User user){
        int line = userMapper.insert(user);
        if(line > 0)
            return true;
        return false;
    }

    public boolean delete(Integer id){
        LambdaQueryWrapper<User> wrapper = new LambdaQueryWrapper<>();
        wrapper.eq(User::getId,id);
        int line = userMapper.delete(wrapper);
        if(line > 0)
            return true;
        return false;
    }

}
3.mapper
UserMapper
package com.pdh.mapper;

import com.baomidou.mybatisplus.core.mapper.BaseMapper;
import com.pdh.entity.User;

/**
 * @Author: Peng Dehua
 * @Date: 2021-10-26 13:17
 */
public interface UserMapper extends BaseMapper<User> {
}
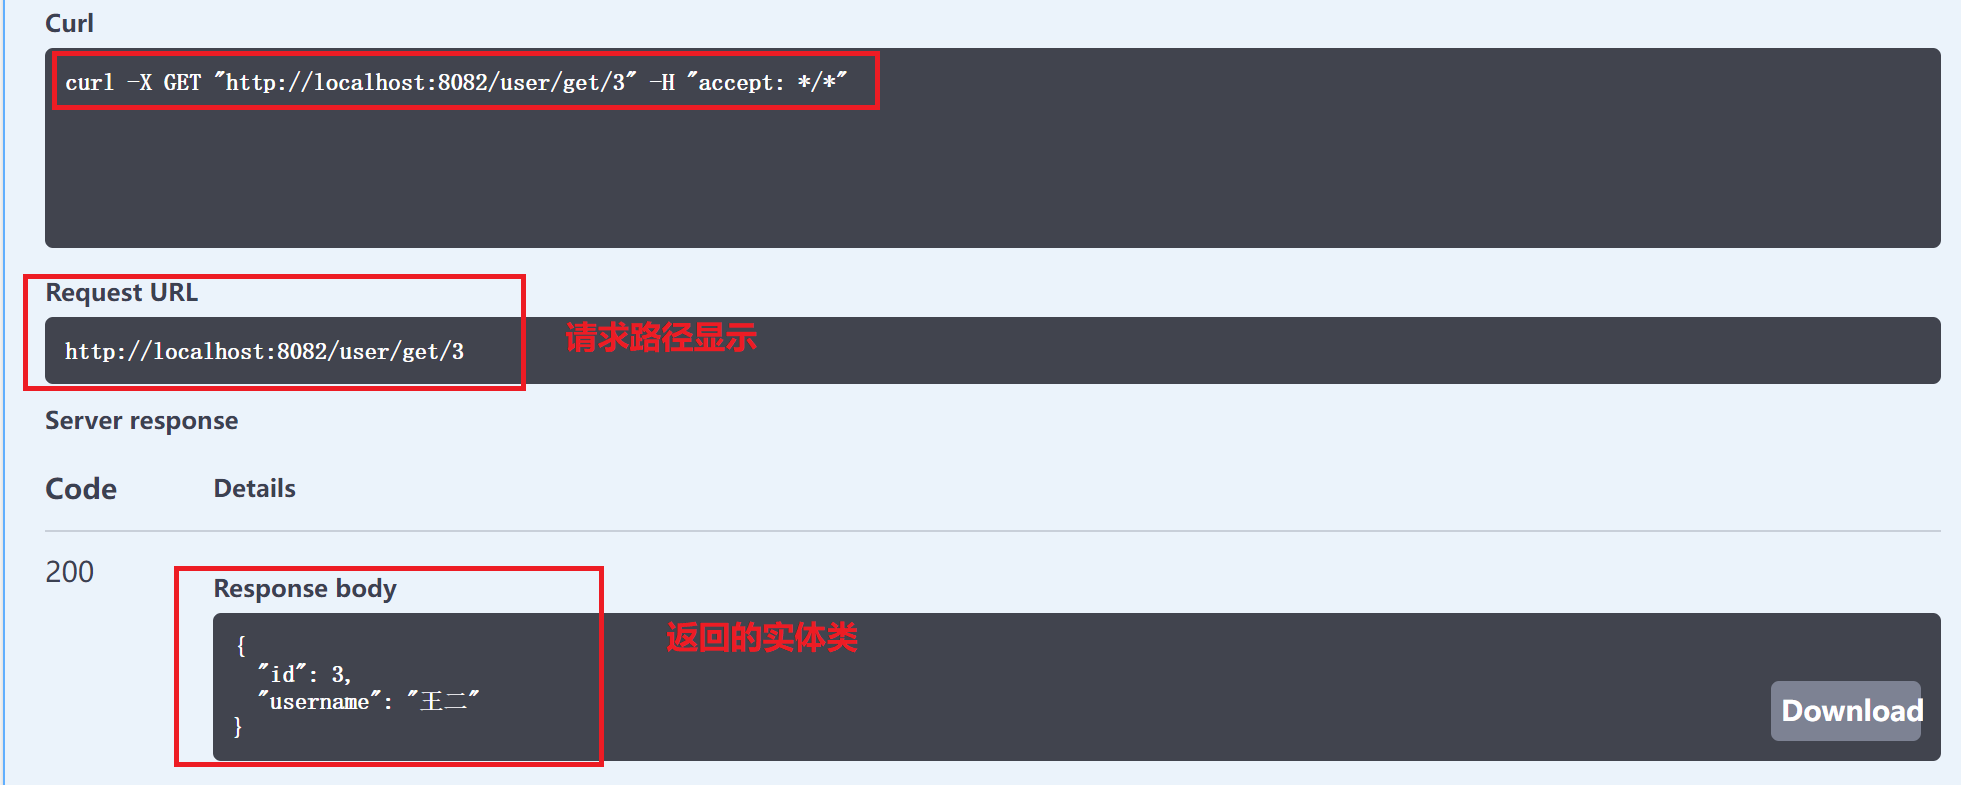
4.swagger3 Startup Test
If the database connection is correct, start the project.
visit: http://localhost:8082/swagger-ui/index.html (port application custom).
Enter the test page, test the get interface, and get the following response (corresponding to the data in the data table, the operation is successful).
3, Redis cache (*)
The biggest benefits of using redis cache are nothing more than two points: improving system response speed and reducing database interaction pressure. Redis data is cached in memory, and the access speed is particularly fast. Take a look at using redis cache and not using redis cache (the following analysis only considers data caching in redis and database):
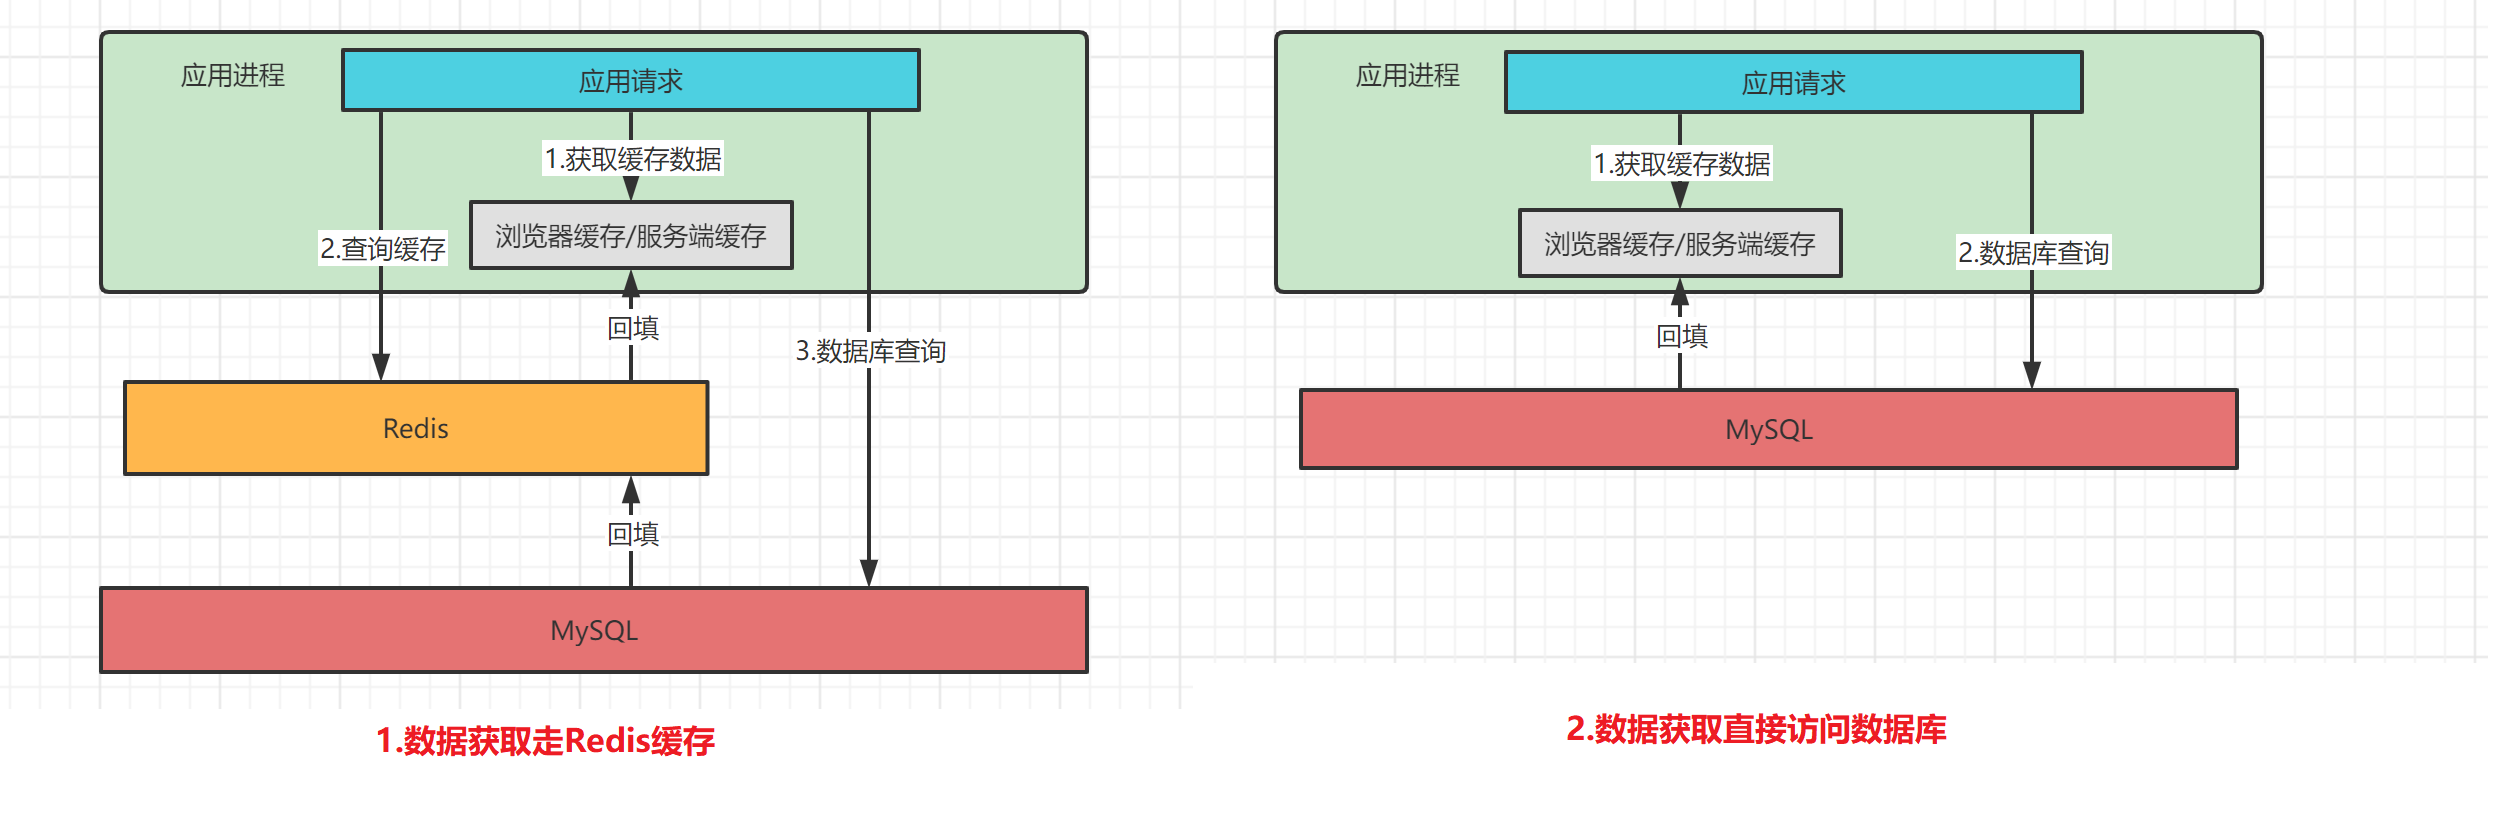
redis for caching
When accessing a data for the first time (redis will be queried for each access) , if there is no specified data in redis, it will access the database to obtain the data. After returning, it will backfill the data obtained for the first time into redis. When accessing the data again within the expiration time, it will return directly without accessing the database. This strategy is necessary when there are many data requests.
Interact directly with the database
Every visit directly requests the database. When the number of requests is large, the pressure on the database is very large, which directly leads to the slow response of the system.
1.redis cache policy
There are many options for caching strategies. I have used two types:
(1) Use @ EnableCaching+@Cacheable to realize automatic caching, (2) use RedisTemplate to manually cache (annotation + aop).
At the beginning of contacting the cache, the first kind of @ EnableCaching+@Cacheable must be much easier to realize automatic cache. However, Shuai b, who has some contact with program development, knows that the automatically configured redis cache is less flexible and cannot customize his own redis cache requirements.
For manual caching using RedisTemplate (annotation + aop) For example, we have obtained absolute control over the redis cache, and the cache logic is implemented by ourselves. This makes us more flexible in the actual development process, and we can configure a lot of information, such as log output, cache time update, setting different cache expiration times for different methods, custom key format.
Here are two ways to use examples (after analyzing the source code).
2.@Cacheable auto cache
@Cacheable is marked on the method or class to be cached, @ EnableCaching means to enable automatic caching (it can be placed on the startup class and configuration class).
Write the configuration class RedisConfig1. The automatically generated key is in the form of cacheNames::params. However, in order to clearly see which method and parameter value the cached key is, you need to customize the generation form of the key, that is, rewrite the keyGenerator() method of the cacheingconfigurersupport class:
- CachingConfigurerSupport class improves many functions of customizing redis cache configuration. Please continue to check the official manual on how to implement it~[ Click me to jump to the details of spring boot integrated redis ]The problem of setting the expiration time is mentioned. It seems that it can only be realized by using RedisTemplate.
- For more settings of RedisConfig, refer to[ https://blog.csdn.net/weixin_40623736/article/details/98097708]
package com.pdh.config;

import org.springframework.cache.annotation.Cacheable;
import org.springframework.cache.annotation.CachingConfigurerSupport;
import org.springframework.cache.annotation.EnableCaching;
import org.springframework.cache.interceptor.KeyGenerator;
import org.springframework.context.annotation.Bean;
import org.springframework.context.annotation.Configuration;
import org.springframework.data.redis.connection.RedisConnectionFactory;
import org.springframework.data.redis.core.RedisTemplate;
import org.springframework.data.redis.serializer.Jackson2JsonRedisSerializer;
import org.springframework.data.redis.serializer.StringRedisSerializer;

import java.lang.reflect.Method;
import java.util.Arrays;

/**
 * @Author: Peng Dehua
 * @Date: 2021-10-27 16:32
 */
@EnableCaching
@Configuration
public class RedisConfig1 extends CachingConfigurerSupport {

    @Bean
    public RedisTemplate<Object, Object> redisTemplate(RedisConnectionFactory factory) {
        RedisTemplate<Object, Object> redisTemplate = new RedisTemplate<>();
        redisTemplate.setConnectionFactory(factory);
        Jackson2JsonRedisSerializer jackson2JsonRedisSerializer = new Jackson2JsonRedisSerializer(Object.class);
        redisTemplate.setValueSerializer(jackson2JsonRedisSerializer);
        redisTemplate.setKeySerializer(new StringRedisSerializer());
        // Additional information can also be set

        return redisTemplate;
    }

    /**
     * Custom key generation policy
     *
     * @return
     */
    @Bean
    @Override
    public KeyGenerator keyGenerator() {
        return new KeyGenerator() {
            public Object generate(Object target, Method method, Object... objects) {
                StringBuilder sb = new StringBuilder();
                Cacheable annotation = method.getAnnotation(Cacheable.class);
                String[] cacheNames = annotation.cacheNames();
                for (String elem : cacheNames) {
                    sb.append(elem + ".");
                }
                sb.deleteCharAt(sb.length() - 1); // Delete the last point (.) in cacheNames

                sb.append("::").append(target.getClass()
                        .getSimpleName()).append("::")
                        .append(method.getName()).append("::")
                        .append(Arrays.toString(objects));

                return sb.toString();
            }
        };
    }
}
Then, take the get method of UserController as an example to test the cache:
@GetMapping("/get/{id}")
@Cacheable(cacheNames = {"get"})
public Result get(@PathVariable("id") Integer id){
    return userService.get(id);
}
Then start the project and start the redis service
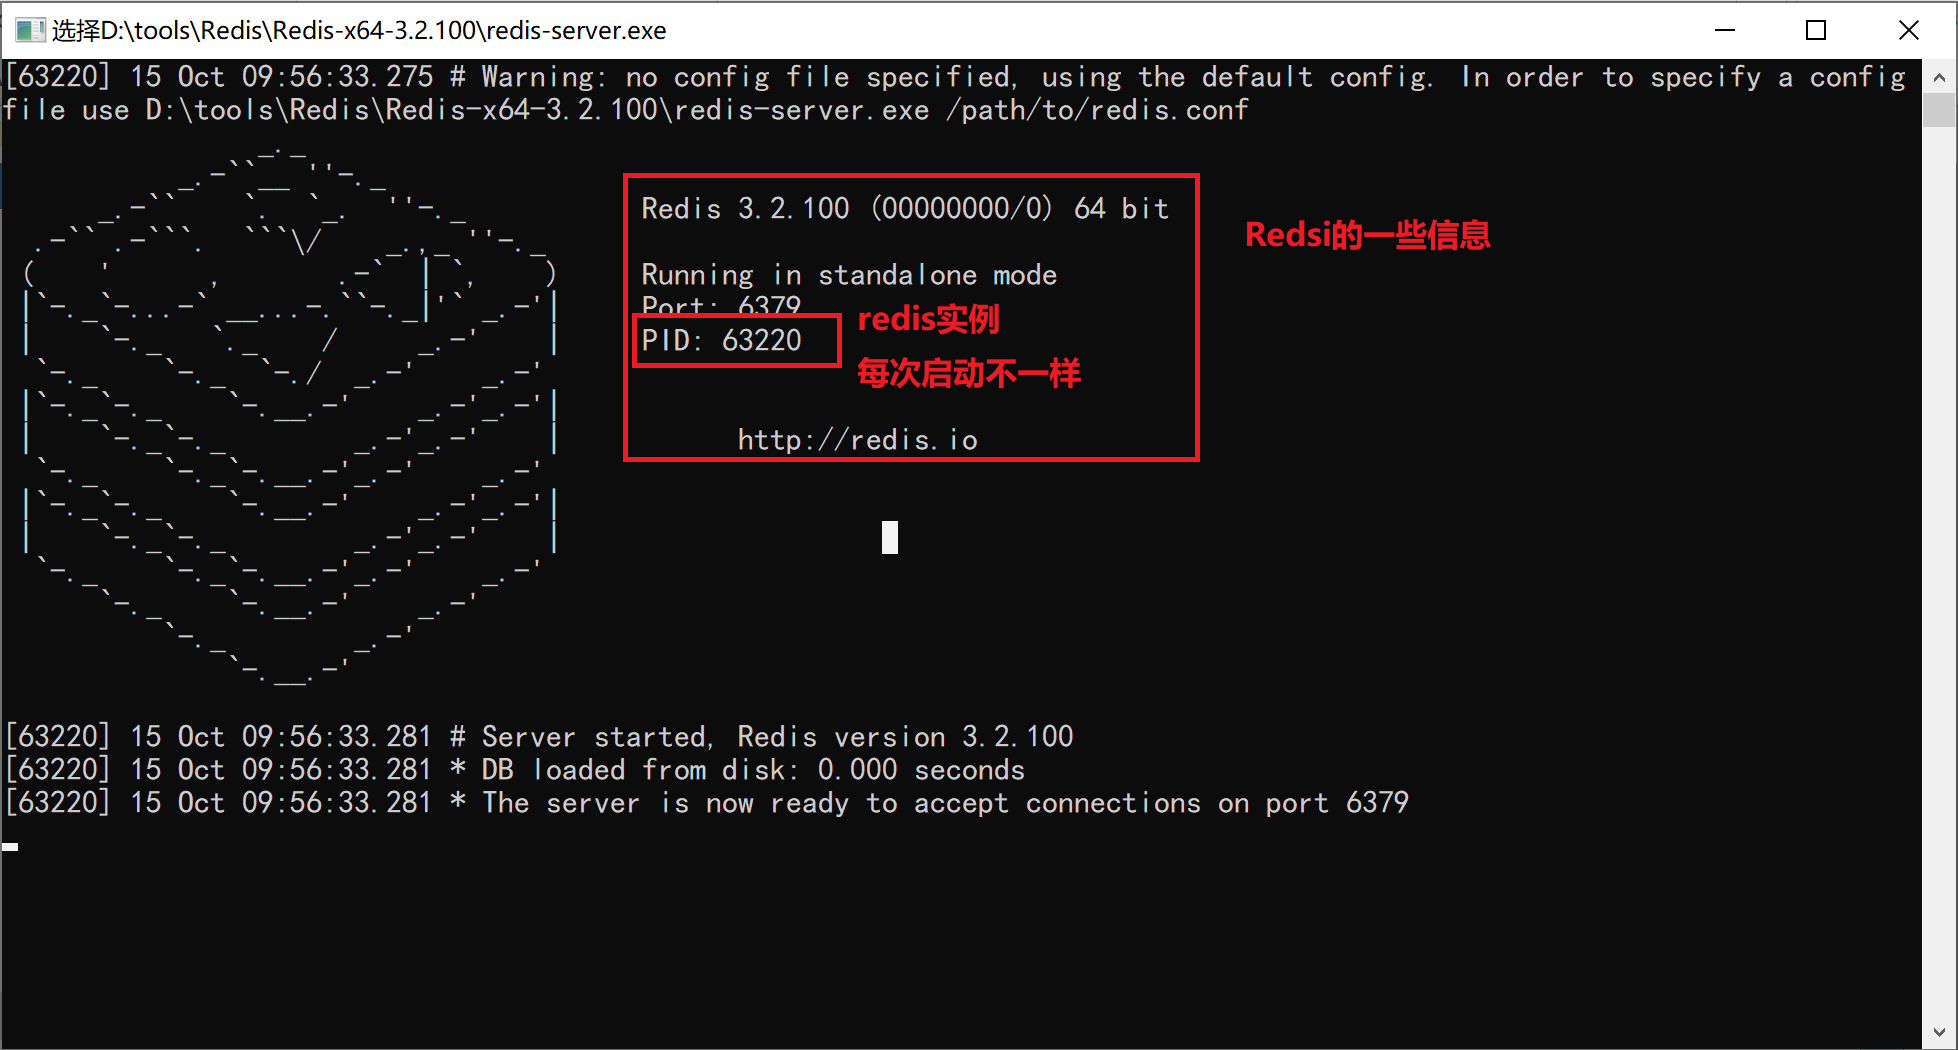
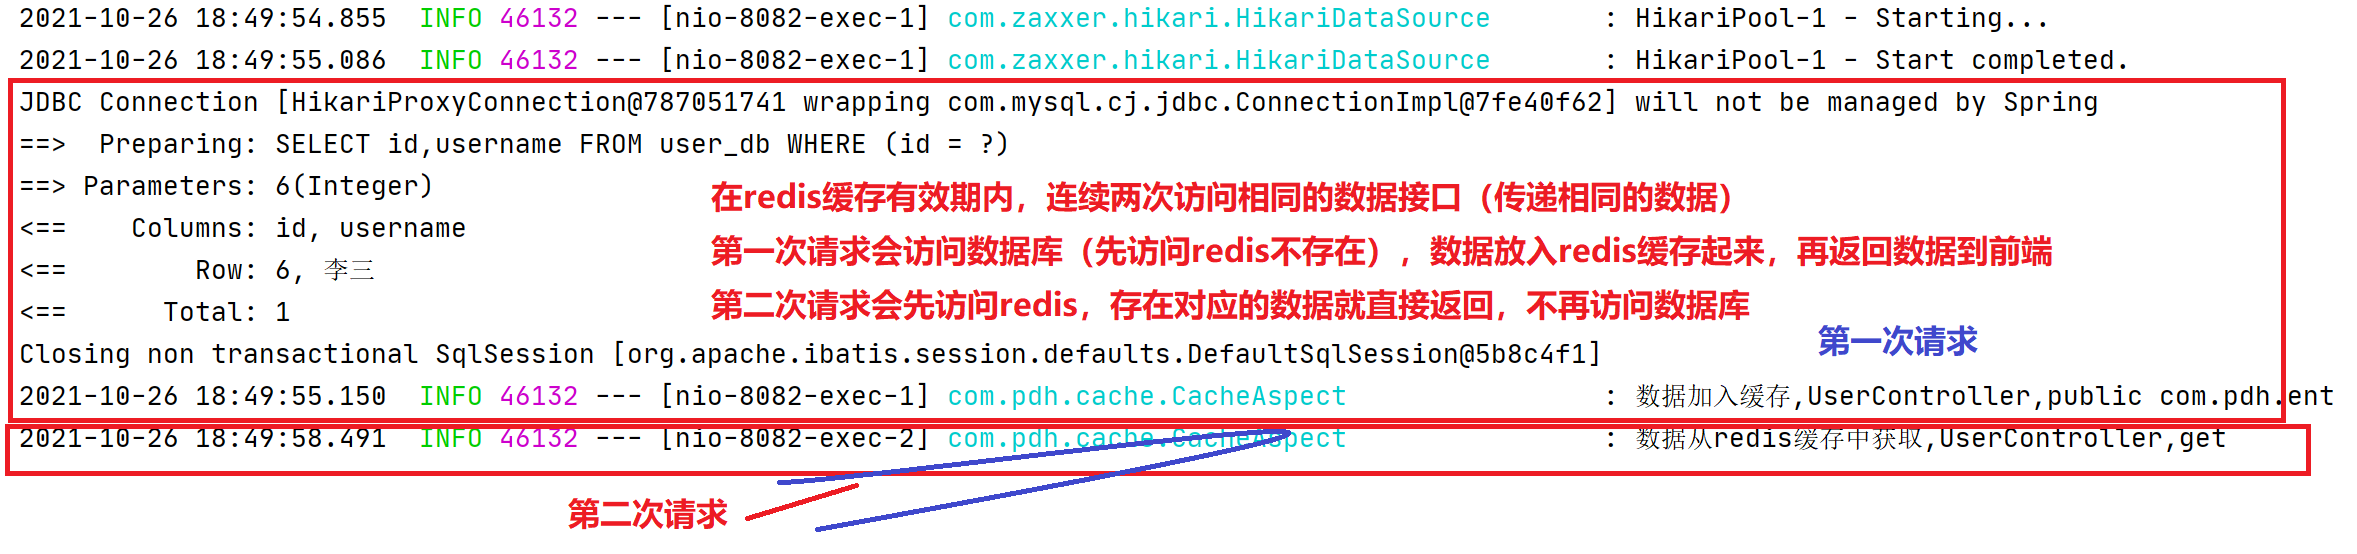
visit http://localhost:8082/swagger-ui/index.html (the default configuration of swagger is used here), test the get interface, and test the same id twice. Check the console, get it from the database for the first time, and get it directly from redis for the second time.
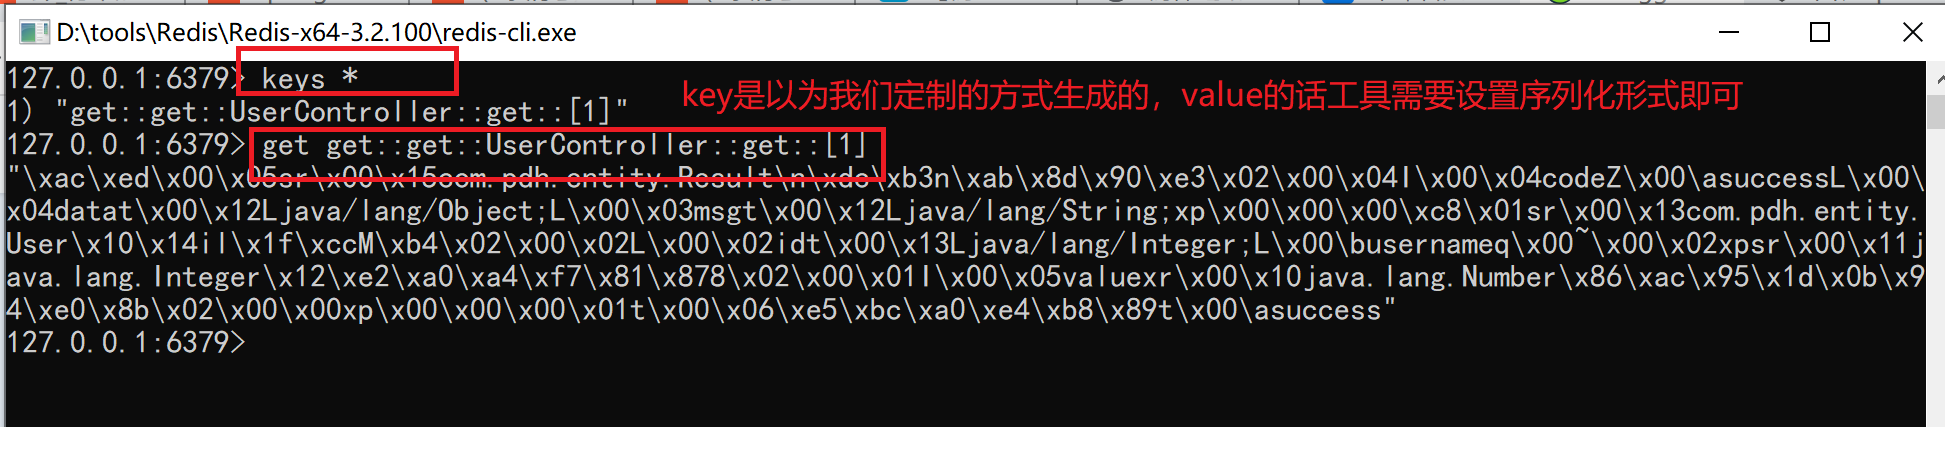
redis data is shown in the figure below:
The expiration time setting can be configured in application.yml (only all can be set. Different key s and different validity periods need to be set, so another caching policy must be used)
spring:
  # cache setting
  cache:
    redis:
      time-to-live: 60000 # 60s
3.RedisTemplate manual caching
RedisTemplate is manually cached, that is, RedisTemplate is used to implement class operations.
You can directly add cache logic code to the normal business logic. What people criticize is that you need to write cache logic every time you need cache, and the biggest problem is to change the original business logic, which is inappropriate.
Did you learn aop and annotations? Use them. It doesn't matter if you're not impressed[ Click me to quickly learn AOP principle],[Click me to quickly learn the principle of annotation].
With AOP + annotation, it is easy to implement RedisTemplate manual caching. The key point is that the caching strategy can be customized. Let's start. I can't wait!
3.1 Cache annotation and cache logic
Cacahe annotation
package com.pdh.cache;

import java.lang.annotation.*;

/**
 * @Author: Peng Dehua
 * @Date: 2021-10-26 15:24
 * Custom annotation class Cache
 */
@Target(ElementType.METHOD)
@Retention(RetentionPolicy.RUNTIME)
@Documented
public @interface Cache {

    /**
     * Expiration time: 60s by default
     * @return
     */
    long expire() default 1 * 60 * 1000;

    /**
     * Cache ID name
     * @return
     */
    String name() default "";

}
Cache logic
Use aop to capture the annotation marked by @ Cache to realize the surround notification operation (Cache logic). The following is the code I directly copy my project:
package com.pdh.cache;

import com.alibaba.fastjson.JSON;
import com.pdh.entity.Result;
import com.pdh.utils.RedisUtils;
import lombok.extern.slf4j.Slf4j;
import org.apache.commons.codec.digest.DigestUtils;
import org.apache.commons.lang3.StringUtils;
import org.aspectj.lang.ProceedingJoinPoint;
import org.aspectj.lang.Signature;
import org.aspectj.lang.annotation.Around;
import org.aspectj.lang.annotation.Pointcut;
import org.springframework.beans.factory.annotation.Autowired;
import org.springframework.stereotype.Component;
import org.aspectj.lang.annotation.Aspect;

import java.lang.reflect.Method;
import java.util.concurrent.TimeUnit;


/**
 * @Author: Peng Dehua
 * @Date: 2021-10-26 15:27
 */
@Component
@Aspect
@Slf4j
public class CacheAspect {

    @Autowired
    private RedisUtils redisUtils; // json data

    /**
     * aop Tangent point
     * Intercepts methods modified by the specified annotation
     */
    @Pointcut("@annotation(com.pdh.cache.Cache)")
    public void cache() {
    }

    /**
     * Cache operation
     *
     * @param pjp
     * @return
     */
    @Around("cache()")
    public Object toCache(ProceedingJoinPoint pjp) {

        try {
            // Idea: set the storage format and get it

            Signature signature = pjp.getSignature();
            // Class name
            String className = pjp.getTarget().getClass().getSimpleName();
            // Method name
            String methodName = signature.getName();

            // Parameter processing
            Object[] args = pjp.getArgs();
            Class[] parameterTypes = new Class[args.length];
            String params = "";
            for (int i = 0; i < args.length; i++) {
                if (args[i] != null) {
                    parameterTypes[i] = args[i].getClass();
                    params += JSON.toJSONString(args[i]);
                }
            }
            if (StringUtils.isNotEmpty(params)) {
                //Encrypt to prevent the key from being too long and the character escape cannot be obtained
                params = DigestUtils.md5Hex(params);
            }

            // Get the corresponding method in the controller
            Method method = signature.getDeclaringType().getMethod(methodName, parameterTypes);

            // Get Cache annotation
            Cache annotation = method.getAnnotation(Cache.class);
            long expire = annotation.expire();
            String name = annotation.name();

            // Access redis (try to get it first, otherwise access the database)
            String redisKey = name + "::" + className + "::" + methodName + "::" + params;
            String redisValue = redisUtils.get(redisKey);
            if (StringUtils.isNotEmpty(redisValue)) {
                // Not null return data
                Result result = JSON.parseObject(redisValue, Result.class);
                log.info("Data from redis Get from cache,key: {}", redisKey);
                return result; // Jump out method
            }
            Object proceed = pjp.proceed();
            redisUtils.set(redisKey, JSON.toJSONString(proceed), expire, TimeUnit.MILLISECONDS);
            log.info("Data storage redis cache,key: {}", redisKey);
            return proceed;
        } catch (Throwable throwable) {
            throwable.printStackTrace();
        }
        return Result.fail(999, "System error");
    }

}
3.2 configuration class RedisConfig2
For the expiration time of the key, if a user has a set time, the set time is preferred.
package com.pdh.config;

import org.springframework.context.annotation.Bean;
import org.springframework.context.annotation.Configuration;
import org.springframework.data.redis.connection.RedisConnectionFactory;
import org.springframework.data.redis.core.RedisTemplate;
import org.springframework.data.redis.serializer.Jackson2JsonRedisSerializer;
import org.springframework.data.redis.serializer.StringRedisSerializer;

/**
 * @Author: Peng_ Dehua
 * @Date: 2021-10-26 11:15
 *  redis Configuration class (use the default configuration without configuration)
 */
@Configuration
public class RedisConfig2 {

    @Bean
    public RedisTemplate<Object,Object> redisTemplate(RedisConnectionFactory factory){
        RedisTemplate<Object,Object> redisTemplate = new RedisTemplate<>();

        // Set connection factory class
        redisTemplate.setConnectionFactory(factory);

        // Set k-v serialization mode
        // Jackson2JsonRedisSerializer implements the RedisSerializer interface
        Jackson2JsonRedisSerializer jackson2JsonRedisSerializer = new Jackson2JsonRedisSerializer(Object.class);
        redisTemplate.setValueSerializer(jackson2JsonRedisSerializer);
        redisTemplate.setKeySerializer(new StringRedisSerializer());

        // You can also set many configurations... (use the default configuration if it is not set)

        return redisTemplate;
    }

}
3.3 Redis tool class writing
For the add, delete and query operations of redis, a unified interface is provided to facilitate management and simplify the complexity of the code. When you need to make different caches for different data, the code is very concise
@Service
public class RedisUtils {
    @Autowired
    private RedisTemplate<String,String> redisTemplate;

    /**
     * Write cache + expiration time
     * @param key
     * @param value
     * @param expireTime
     * @param timeUnit
     * @return
     */
    public boolean set( String key, String value, Long expireTime , TimeUnit timeUnit){
        ValueOperations<String, String> operations = redisTemplate.opsForValue();
        operations.set(key,value);
        redisTemplate.expire(key,expireTime,timeUnit);
        return true;
    }

    /**
     * Get value through key
     * @param key
     * @return
     */
    public String get(String key){
        ValueOperations<String, String> operations = redisTemplate.opsForValue();
        return operations.get(key);
    }

    /**
     * Batch delete k-v
     * @param keys
     * @return
     */
    public boolean remove(final String... keys){
        for(String key : keys){
            if(redisTemplate.hasKey(key)){ //Delete key if it exists
                redisTemplate.delete(key);
            }
        }
        return true;
    }

}
3.4 testing
First, close all the annotations of RedisConfig1 configuration class, and then remove the @ Cacheable annotation on the method in UserController. (if you forget, you may report an error...)
The benefits of using annotation + aop to implement caching have been mentioned above, so you need to mark (annotate) the previously written controller method. Add @ Cache(name = "get method") to get() method:
@GetMapping("/get/{id}")
@Cache(name = "get method")
public Result get(@PathVariable("id") Integer id){
    return userService.get(id);
}
Then start the project, start redis, and access http://localhost:8082/swagger-ui/index.html (default configuration of swagger is used here), test the get interface, and test the same id twice:
The test shows that the data with id=6 is obtained twice. In the sql statement printed by mybatis plus, the sql is executed only once, and the data is obtained from the redis cache the second time (the expiration time is set by us, and the default time also exists).
4, RedisTemplate partial source code
1.redis cache automatic configuration
RedisAutoConfiguration class implements the automatic injection of redisTemplate and stringRedisTemplate, which can be used directly.

**@The ConditionalOnMissingBean annotation indicates that if there is a RedisTemplate object in the Spring container, the automatically configured RedisTemplate will not be instantiated. Therefore, we can directly write a configuration class to configure RedisTemplate** In addition, there are many configuration information that can be configured automatically (such as serialization policy, connection factory, etc.).
In the RedisConfig configuration class written by ourselves, the generic type of redistplate instance object (i.e. K and V in redistemplate < K, V >) does not affect the use of custom specified generic types. When obtaining entity classes from IoC container, such as:
// 1.RedisConfig
RedisTemplate<Integer,Integer> redisTemplate = new RedisTemplate<>();
// 2. Injection
@Autowired
RedisTemplate<String,String> redisTemplate;
In my test, there was no exception, and it did execute the business logic normally. The reason I think is the role of Java type erasure (not sure, just personal)[ Click my quick learning type erase].
2. Data serialization
Why serialize?
Serializable serialization is the process of converting a Java object into a byte stream. In Java, everything is an object, and the state information of an object must be serialized to a form that can be stored or transmitted[ Please move here for details]
How to set serialization policy?
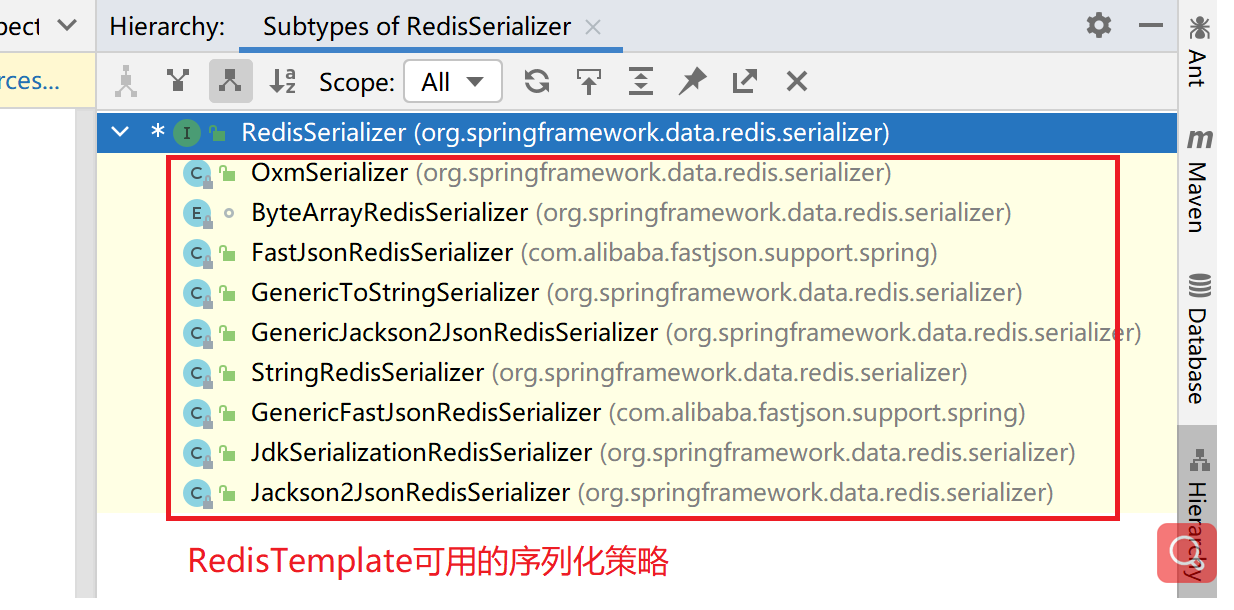
RedisSerializer is the serialization interface of redis data. It provides the following data serialization strategies:
The specific purpose will not be repeated here. When there are business needs, you can directly query the developer manual and select the corresponding serialization strategy.
To set the serialization policy, you need to squeeze out the default RedisTemplate entity class in the IoC container and configure the RedisTemplate yourself (write the RedisConfig configuration class, just like the example used above).