Incremental synchronization of canal data from Mysql8.0 to ElasticSearch7 (windows local environment)
As of the current date 2021-10-29
The current version of canal has only been updated to 1.1.6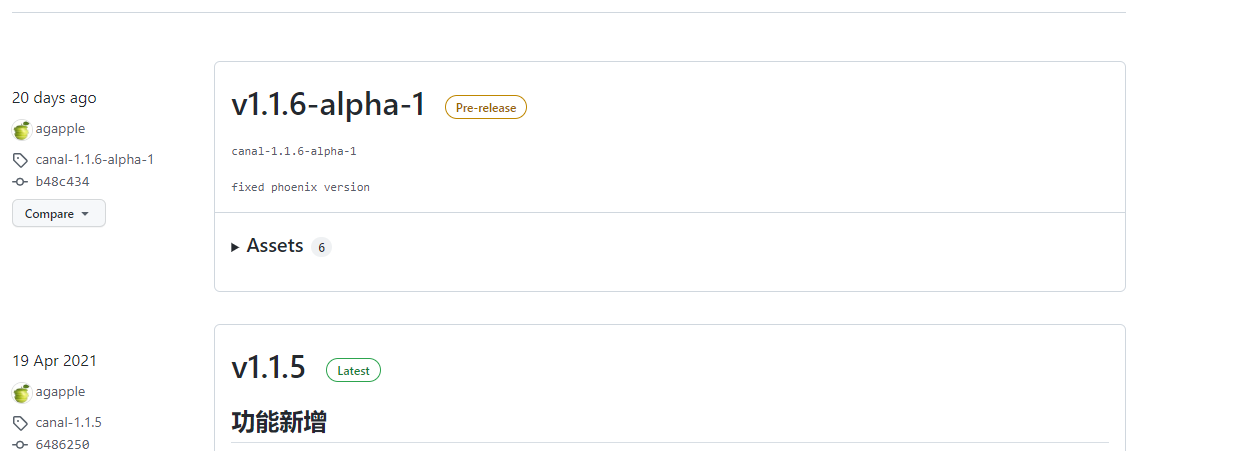
This version of canal is going to use v1.1.5, which supports mysql8.0 and elasticsearch7. X
If you use mysql5. X, elasticsearch6. X, v1.1.4 is recommended
The following is the building tutorial
1. (Mysql, ES) software download and installation
The installation configuration of ElasticSearch is detailed in my blog post( Click go)
Installation and configuration of Mysql8.0( Click go)
Note that after mysql8.0 is installed, binlog should be enabled by default. Check whether binlog format is row
mysql> show variables like 'binlog_format%';
+---------------+-------+
| Variable_name | Value |
+---------------+-------+
| binlog_format | ROW   |
+---------------+-------+
1 row in set, 1 warning (0.00 sec)
2. Download and install Canal
This is the download address
https://github.com/alibaba/canal/releases
Pay attention to downloading this version when downloading v1.1.5. I didn't download the alpha version before, so the es jar under the plugin directory can't be used
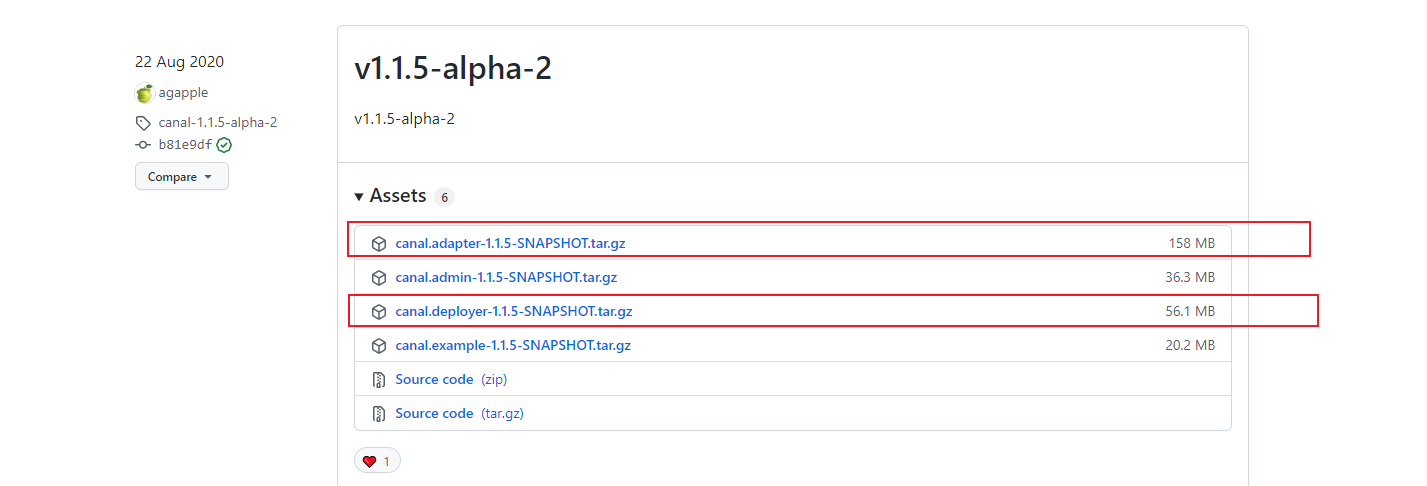
The download may be a little slow and need to wait a little
For the windows version, extract the above two compressed packages separately, even if the download and installation are completed.
3. Prepare the index and table structure of es and mysql
Prepare the required data structure first
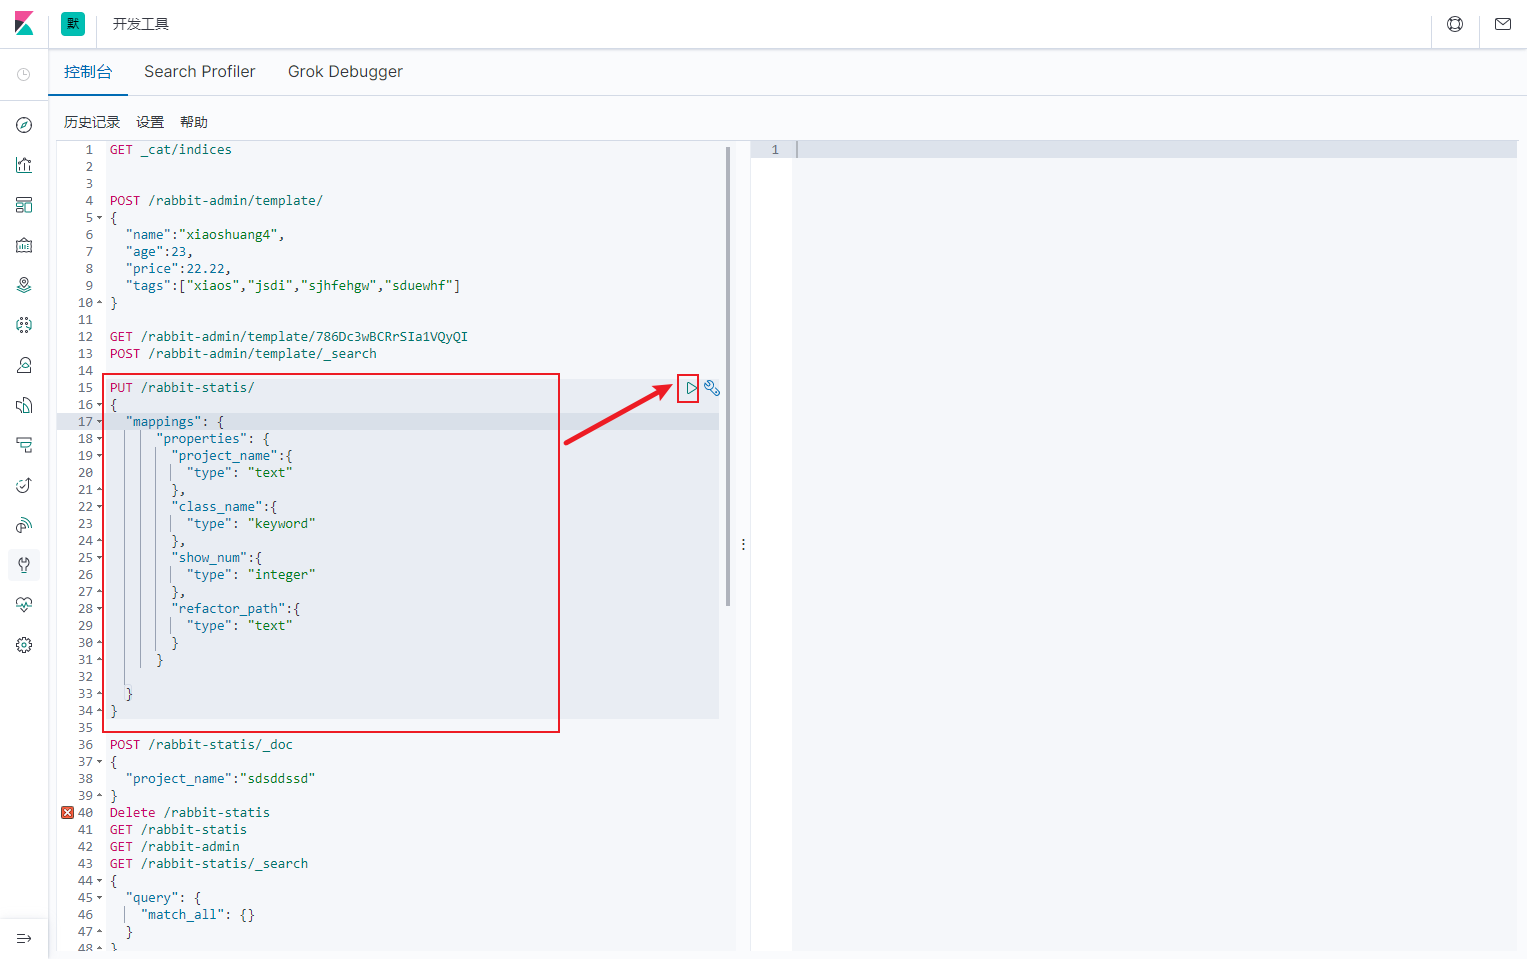
Preparing the index structure in es
PUT /rabbit-statis/
{
  "mappings": {
      "properties": {
        "project_name":{
          "type": "text"
        },
        "class_name":{
          "type": "keyword"
        },
        "show_num":{
          "type": "integer"
        },
        "refactor_path":{
          "type": "text"
        }
      }

  }
}
Copy the above code and put it into kibana's console to run
Next, prepare the table structure of mysql
First build a rabbit-statis2 database, and then run the sql script
-- ----------------------------
-- Table structure for statis
-- ----------------------------
DROP TABLE IF EXISTS `statis`;
CREATE TABLE `statis`  (
  `id` int(0) NOT NULL AUTO_INCREMENT,
  `project_name` text CHARACTER SET utf8mb4 COLLATE utf8mb4_0900_ai_ci NULL,
  `class_name` varchar(255) CHARACTER SET utf8mb4 COLLATE utf8mb4_0900_ai_ci NULL DEFAULT NULL,
  `show_num` int(0) NULL DEFAULT NULL,
  `refactor_path` text CHARACTER SET utf8mb4 COLLATE utf8mb4_0900_ai_ci NULL,
  PRIMARY KEY (`id`) USING BTREE
) ENGINE = InnoDB CHARACTER SET = utf8mb4 COLLATE = utf8mb4_0900_ai_ci ROW_FORMAT = Dynamic;

SET FOREIGN_KEY_CHECKS = 1;
4. Configure canal deploy
The purpose of configuring canal is to enable canal to listen to the binlog logs of our database, read these binlogs, and synchronize the data to es.
Next, configure canal deploy
We first find the file / deployer/conf/canal.properties, and then make the following modifications
# tcp bind ip
canal.ip =127.0.0.1
Then find the configuration file / deployer/conf/example/instance.properties and modify the following items
# canal is a slave disguised as mysql, so the slaveId cannot conflict with the slaveId of other mysql
canal.instance.mysql.slaveId=1234

# ip and port, username and password of the connection database
canal.instance.master.address=127.0.0.1:3306
canal.instance.dbUsername=canal
canal.instance.dbPassword=canal
canal.instance.connectionCharset = UTF-8
Then find the / deployer/bin/startup.bat windows environment and double-click the file. canal runs successfully.
How to confirm that the canal deployer runs successfully?
Locate the / deployer/log/canal/canal.log file
2021-10-29 12:33:25.300 [main] INFO  com.alibaba.otter.canal.deployer.CanalController - ## start the canal server[127.0.0.1(127.0.0.1):11111]
2021-10-29 12:33:26.977 [main] INFO  com.alibaba.otter.canal.deployer.CanalStarter - ## the canal server is running now ......
Locate the / deployer/log/example/example.log file
2021-10-29 11:11:40.568 [main] INFO  c.a.otter.canal.instance.spring.CanalInstanceWithSpring - start CannalInstance for 1-example
2021-10-29 11:11:40.576 [main] WARN  c.a.o.canal.parse.inbound.mysql.dbsync.LogEventConvert - --> init table filter : ^.*\..*$
2021-10-29 11:11:40.576 [main] WARN  c.a.o.canal.parse.inbound.mysql.dbsync.LogEventConvert - --> init table black filter : ^mysql\.slave_.*$
2021-10-29 11:11:40.626 [destination = example , address = /127.0.0.1:3306 , EventParser] WARN  c.a.o.c.p.inbound.mysql.rds.RdsBinlogEventParserProxy - ---> begin to find start position, it will be long time for reset or first position
2021-10-29 11:11:40.638 [main] INFO  c.a.otter.canal.instance.core.AbstractCanalInstance - start successful....
This indicates that the startup is successful.
5. Configuring the Canadian adapter
We first find the file / adapter/conf/application.yml. The modified file is as follows
server:
  port: 8081
spring:
  jackson:
    date-format: yyyy-MM-dd HH:mm:ss
    time-zone: GMT+8
    default-property-inclusion: non_null

canal.conf:
  mode: tcp #tcp kafka rocketMQ rabbitMQ
  flatMessage: true
  zookeeperHosts:
  syncBatchSize: 1000
  retries: 0
  timeout:
  accessKey:
  secretKey:
  consumerProperties:
    # canal tcp consumer
    canal.tcp.server.host: 127.0.0.1:11111
    canal.tcp.zookeeper.hosts:
    canal.tcp.batch.size: 500
    canal.tcp.username:
    canal.tcp.password:
    # kafka consumer
    kafka.bootstrap.servers: 127.0.0.1:9092
    kafka.enable.auto.commit: false
    kafka.auto.commit.interval.ms: 1000
    kafka.auto.offset.reset: latest
    kafka.request.timeout.ms: 40000
    kafka.session.timeout.ms: 30000
    kafka.isolation.level: read_committed
    kafka.max.poll.records: 1000
    # rocketMQ consumer
    rocketmq.namespace:
    rocketmq.namesrv.addr: 127.0.0.1:9876
    rocketmq.batch.size: 1000
    rocketmq.enable.message.trace: false
    rocketmq.customized.trace.topic:
    rocketmq.access.channel:
    rocketmq.subscribe.filter:
    # rabbitMQ consumer
    rabbitmq.host:
    rabbitmq.virtual.host:
    rabbitmq.username:
    rabbitmq.password:
    rabbitmq.resource.ownerId:

  srcDataSources:
    defaultDS:
      url: jdbc:mysql://localhost:3306/rabbit-statis2?serverTimezone=GMT%2B8
      username: canal
      password: canal
  canalAdapters:
  - instance: example # canal instance Name or mq topic name
    groups:
    - groupId: g1
      outerAdapters:
      - name: logger
      - name: es7
        key: exampleKey
        hosts: 127.0.0.1:9300
        properties:
          mode: transport
          # security.auth: test:123456 #  only used for rest mode
          cluster.name: my-application
#        - name: kudu
#          key: kudu
#          properties:
#            kudu.master.address: 127.0.0.1 # ',' split multi address
Then find the file / adapter/conf/es7/mytest_user. The modified file is as follows
dataSourceKey: defaultDS
outerAdapterKey: exampleKey     # Corresponding to the key configured in es in application.yml
destination: example
groupId: g1
esMapping:
  _index: rabbit-statis
  _id: _id
  upsert: true
  sql: "select id as _id,project_name,class_name,show_num,refactor_path from statis"
  commitBatch: 3000