kernel image
GRUB bootloader is obviously unrealistic if it wants to load the kernel at one time. Because the kernel is composed of multiple files, we should package multiple files into one file as much as possible.
This encapsulated file is called the kernel image file:
These include:
Secondary bootstrap module
Kernel module
And picture and font files
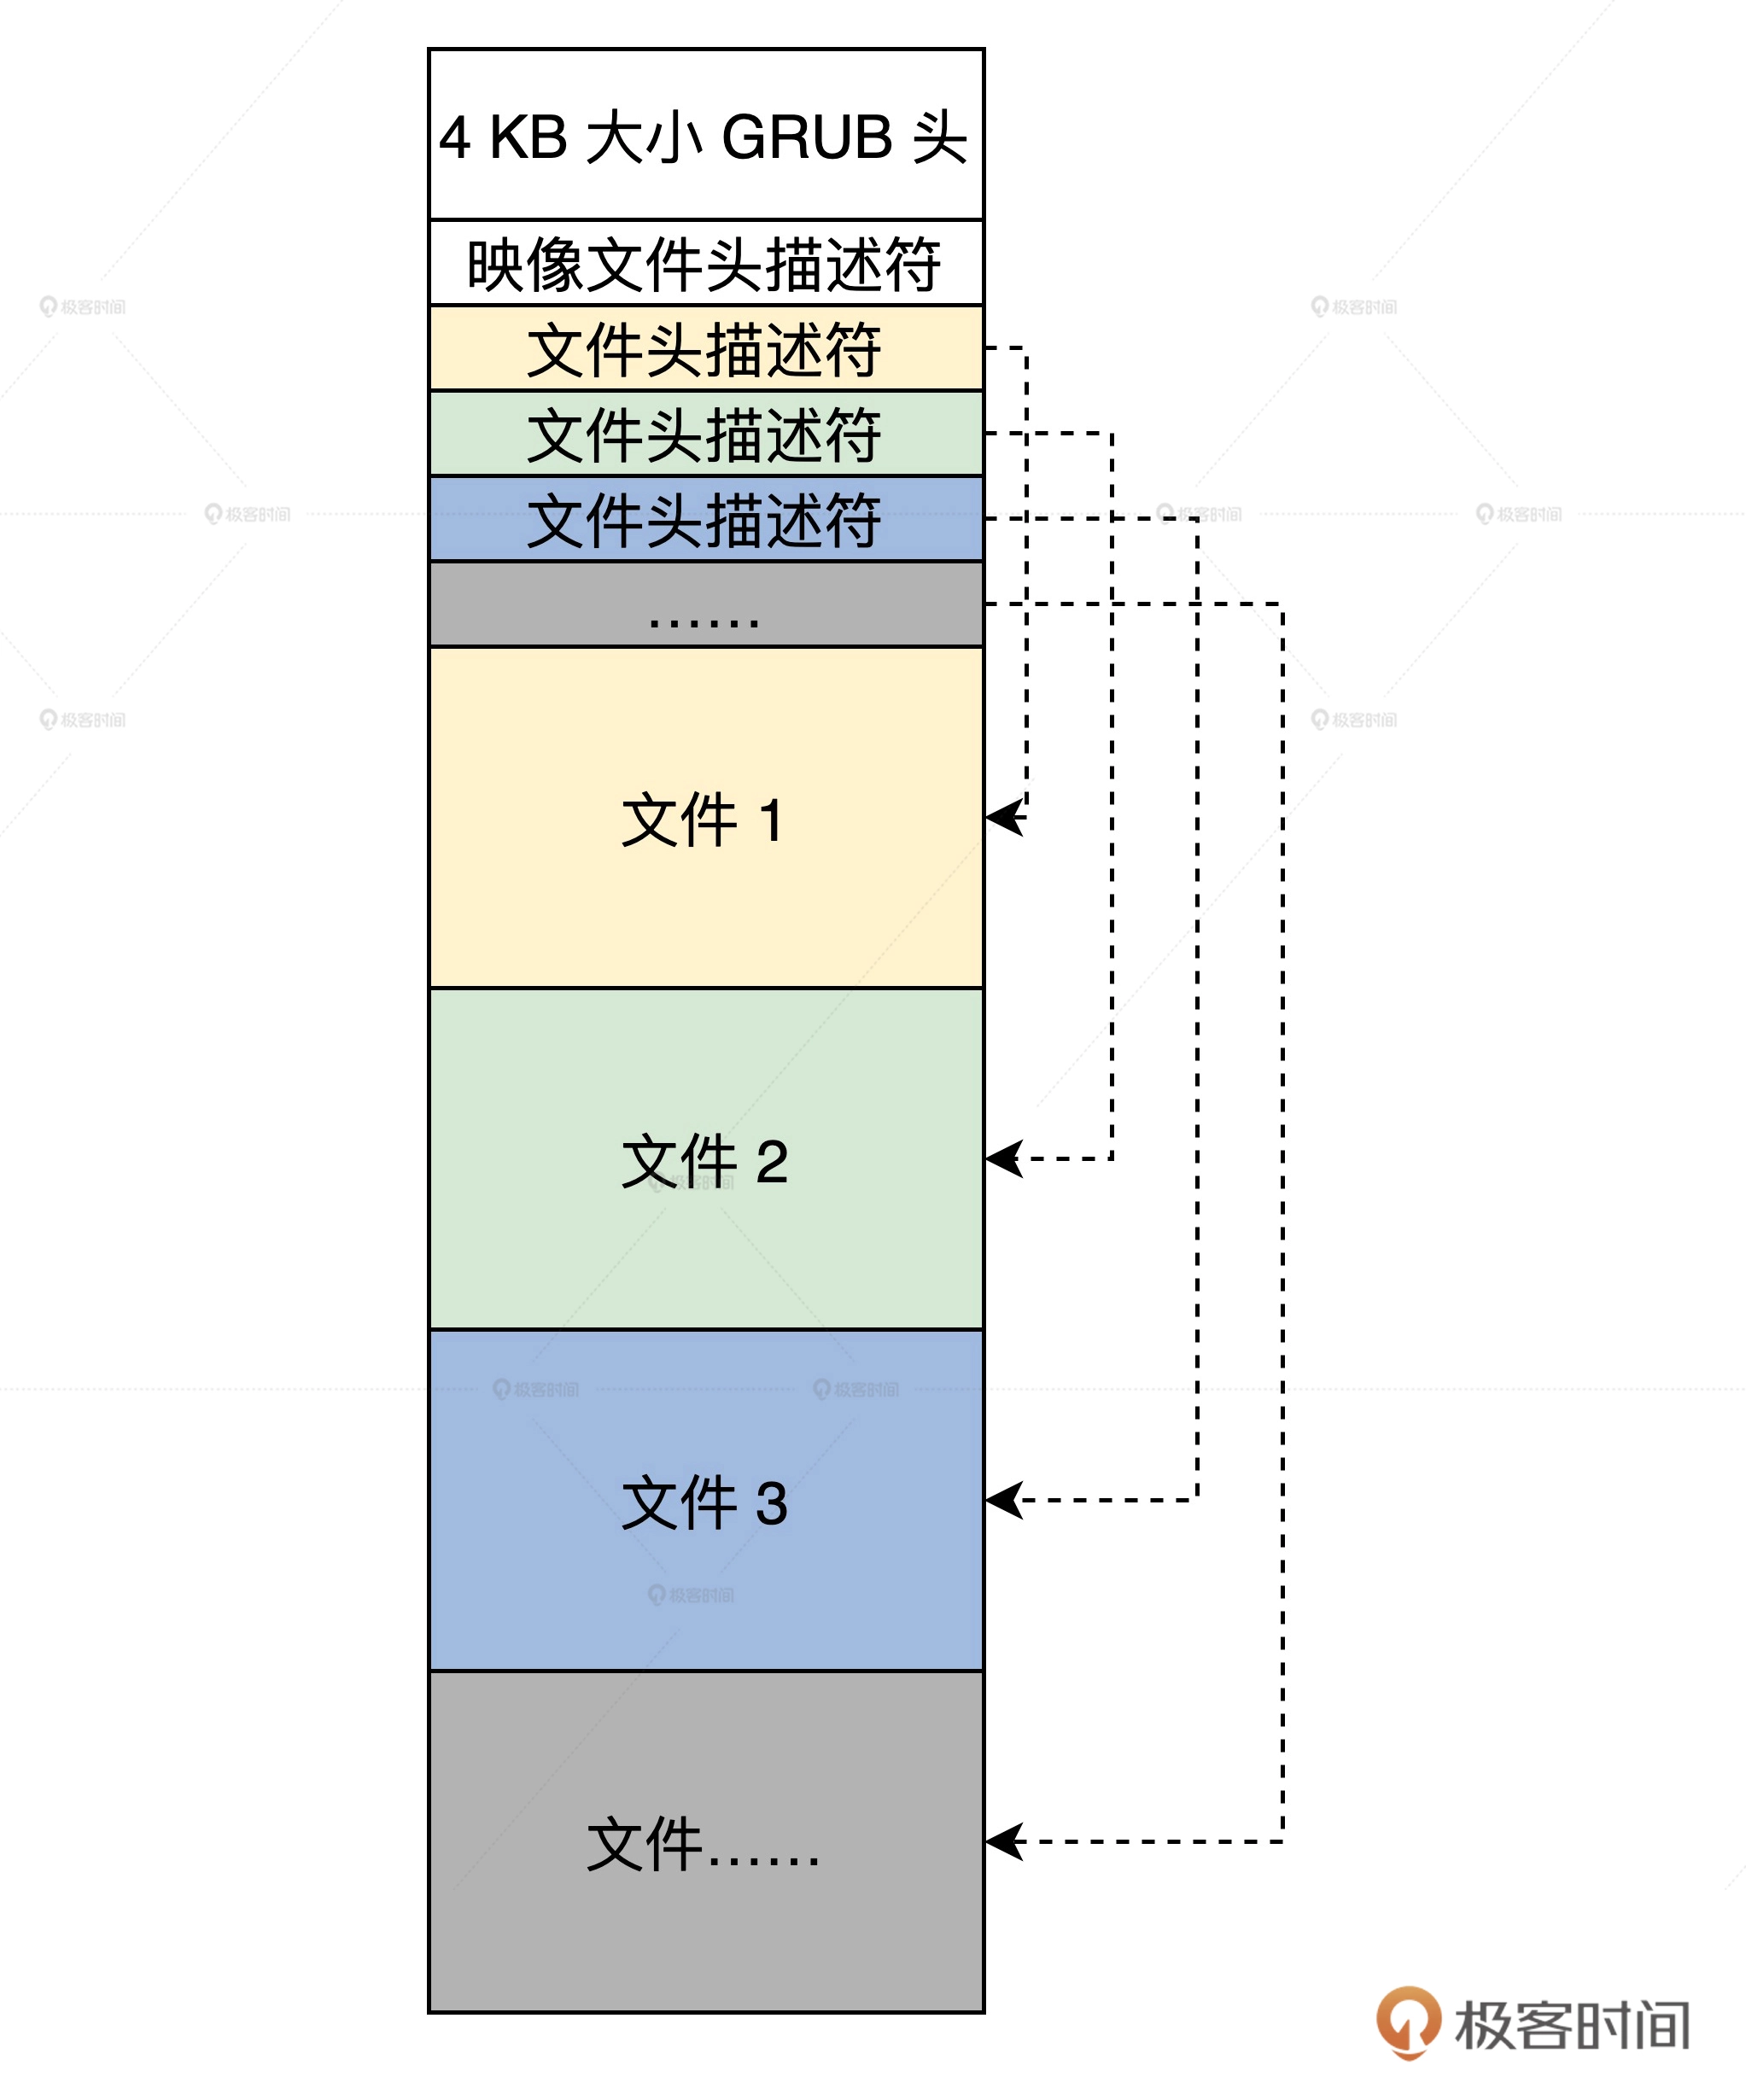
GRUB header has a size of 4KB. GRUB uses this small piece of code to identify the image file. In addition, according to the information in the image file header descriptor and file header descriptor, this small piece of code can also parse other files in the image file.
Image file header descriptor and file descriptor are two C language structures, as shown below.
//Image file header descriptor
typedef struct s_mlosrddsc
{
    u64_t mdc_mgic; //Image file ID
    u64_t mdc_sfsum;//not used
    u64_t mdc_sfsoff;//not used
    u64_t mdc_sfeoff;//not used
    u64_t mdc_sfrlsz;//not used
    u64_t mdc_ldrbk_s;//The start offset of the secondary bootstrap in the image file
    u64_t mdc_ldrbk_e;//The end offset of the secondary bootstrap in the image file
    u64_t mdc_ldrbk_rsz;//The actual size of the secondary bootstrap in the image file
    u64_t mdc_ldrbk_sum;//Checksum of secondary bootstrap in image file
    u64_t mdc_fhdbk_s;//The start offset of the file header description in the image file
    u64_t mdc_fhdbk_e;//The end offset of the file header description in the image file
    u64_t mdc_fhdbk_rsz;//The actual size of the file header description in the image file
    u64_t mdc_fhdbk_sum;//The checksum of the file header description in the image file
    u64_t mdc_filbk_s;//Start offset of file data in image file
    u64_t mdc_filbk_e;//End offset of file data in image file
    u64_t mdc_filbk_rsz;//The actual size of the file data in the image file
    u64_t mdc_filbk_sum;//Checksum of file data in image file
    u64_t mdc_ldrcodenr;//The index number of the file header descriptor of the secondary bootstrap in the image file
    u64_t mdc_fhdnr;//How many file header descriptors are there in the image file
    u64_t mdc_filnr;//How many headers are there in the image file
    u64_t mdc_endgic;//End of image file ID
    u64_t mdc_rv;//Image file version
}mlosrddsc_t;

#define FHDSC_NMAX 192 / / file name length
//File header descriptor
typedef struct s_fhdsc
{
    u64_t fhd_type;//file type
    u64_t fhd_subtype;//file subtype
    u64_t fhd_stuts;//File status
    u64_t fhd_id;//File id
    u64_t fhd_intsfsoff;//The file starts offset at the image file location
    u64_t fhd_intsfend;//The file is offset at the end of the image file
    u64_t fhd_frealsz;//Actual file size
    u64_t fhd_fsum;//file checksum
    char   fhd_name[FHDSC_NMAX];//file name
}fhdsc_t;
With the image file format, we also need a tool to package the image. I provide you with a tool under the Linux command line. You only need to understand the use method, as shown below.
lmoskrlimg -m k -lhf GRUB Header file -o Image file -f List of imported files
-m The representation mode can only be k Kernel mode
-lhf Means to follow GRUB Header file
-o Represents the image file name of the output
-f Represents a list of input files
 For example: lmoskrlimg -m k -lhf grubhead.bin -o kernel.img -f file1.bin file2.bin file3.bin file4.bin
virtual machine
It is strongly recommended to use Ubuntu 20.04, 18.04 instead of 16.04
It is agreed to use Oracle's VirtualBox virtual machine. After testing, I found that VirtualBox virtual machine has many advantages. It has relatively perfect functions, strong performance, few bugs and is relatively stable.
sudo apt-get install virtualbox
Then create a new virtual computer in expert mode
Pay attention to the type and version selection, and no virtual hard disk is required

Manual production of hard disk
There is no hard disk in the virtual machine. Without a hard disk, the virtual machine has no place to load data. Of course, we don't want to buy a hard disk to hang it, but to manually produce a hard disk. You will soon find that it is much easier to produce a virtual hard disk from scratch than to write an operating system from scratch.
Most virtual machines use files to simulate hard disks, that is, files in a specific format under the host system (HOST OS is the physical machine system you use). The data of the operating system in the virtual machine is only written into this file.
Therefore, the production of virtual hard disk becomes the generation of files in the corresponding format, which is much easier. We need to build a 100MB hard disk, which means generating 100MB large files.
Next, we use the dd command under Linux (copy a file with a block of the specified size and perform the specified conversion at the same time) to generate 100MB pure binary files (that is, the files of 1 ~ 100M bytes are filled with 0), as shown below.
dd bs=512 if=/dev/zero of=hd.img count=204800

;bs:Represents the block size, which is 512 bytes
;if: Represents an input file,/dev/zero namely Linux Under the device file that specifically returns 0 data, read it and return 0
;of: Represents the output file, that is, our hard disk file.
;count: Indicates how many blocks are output
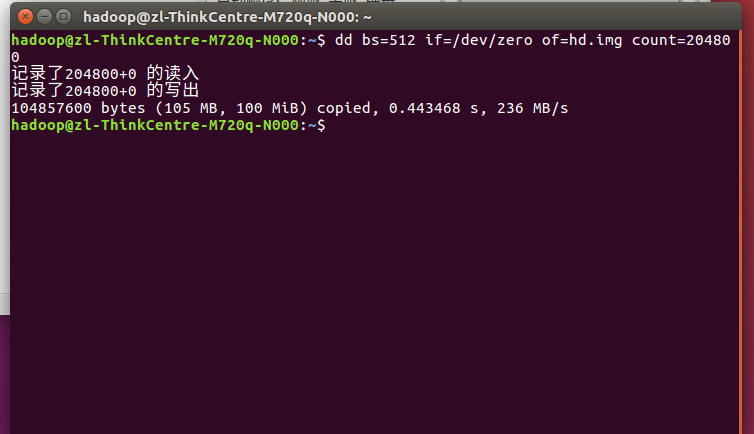
We can see in home that there is an additional 100mb file

Format virtual hard disk
Formatting is to establish a file system on the hard disk. Only when the file system is established can the existing mature operating system store data in it.
Virtual hard disk is a file after all. How can Linux build a file system on a file? We should solve this problem in three steps.
1. Turn the virtual hard disk file into a loopback device under Linux and make Linux think it is a device.
In fact, under Linux, files can be devices, and devices can be files. Next, we use the losetup command to turn hd.img into a loopback device for Linux. The code is as follows.
sudo losetup /dev/loop0 hd.img
be careful:
This step may occur:

losetup -a Look at the command. Do you use it yourself loop Already used

If the above description 5 is empty, use 5:
sudo losetup /dev/loop5 hd.img
2. Format loopback equipment and establish EXT4 file system
Loopback devices can virtualize files into Linux block devices to simulate the entire file system, so that users can regard them as hard disk, optical drive or floppy drive, and mount them as directories.
We can use the mkfs.ext4 command under Linux to format the / dev/loop0 loopback block device and establish the EXT4 file system in it.
sudo mkfs.ext4 -q /dev/loop5
At this time, an additional device can be found on the left side of the Linux system:

3. Regard the hd.img file as a block device, mount it to the pre established hdisk directory, and create a boot in it
We use the mount command under Linux to take the hd.img file as a block device, mount it to the pre established hdisk directory, and establish a boot in it, which is also required for the later installation of GRUB. If it can be established successfully, it means that the previous work has been completed correctly.
The mount command can only recognize the file system established on the pure binary file. If the hard disk file generated by the virtual machine is used, Mount cannot recognize our file system.
First create an hdisk directory, anywhere
sudo mkdir hdisk
Then mount the hard disk file, which is equivalent to establishing a file system after the binary file we created becomes a loopback device, and then make a mapping with this binary file
sudo mount -o loop ./hd.img ./hdisk/ ;Mount hard disk files
sudo mkdir ./hdisk/boot/ ;establish boot catalogue
The first step will find an additional scroll
Step 2: a boot directory is added to the scroll. The mount is successful. (if you open this hdisk file, you will automatically jump to this scroll)
Installing GRUB
Linux will install GRUB on our physical hard disk, but now we want to install GRUB on our virtual hard disk, and our operating system has no installer. Therefore, we have to use Linux (HOST OS) to install GRUB on the specified device (virtual hard disk) through the GRUB installer.
sudo grub-install --boot-directory=./hdisk/boot/ --force --allow-floppy /dev/loop5;
--boot-directory Point to the previously established in the virtual hard disk boot catalogue
--force --allow-floppy : Point to our virtual hard disk device file/dev/loop0
If you encounter EFI problems:
Add parameters:
sudo grub-install --target=i386-pc --boot-directory=./hdisk/boot/ --force --allow-floppy /dev/loop5 ;
Two warnings are given normally:

However, problems may arise:
Error: /usr/lib/grub/i386-pc/modinfo.sh doesn't exist. Please specify --target or --directory.
This means that the file name is different from the default
We went to the gurb folder and found that there was no i386 this file:
Do the following:
sudo apt-get download grub-pc-bin
dpkg-deb -R grub-pc-bin_2.02~beta2-36ubuntu3.16_amd64.deb grub/
sudo mv grub/usr/lib/grub/i386-pc/ /usr/lib/grub/
Just download a gurb file from the Internet, and then unzip it to produce an i386
Execute again
Install GRUB on the specified device through the GRUB installer:
sudo grub-install --target=i386-pc --boot-directory=./hdisk/boot/ --force --allow-floppy /dev/loop0
If there are still errors at this step, it is recommended to use Ubuntu 20.04. There may be a problem with the lower version.
Create a grub.cfg text file (in the gurb folder)
sudo vi grub.cfg
menuentry 'xyOS' {
insmod part_msdos
insmod ext2
set root='hd0,msdos1' #Our hard disk has only one partition, so it is' hd0,msdos1 '
multiboot2 /boot/HelloOS.eki #Load the HelloOS.eki file in the boot directory
boot #Boot start
}
set timeout_style=menu
if [ "${timeout}" = 0 ]; then
  set timeout=5 #Wait for 5 seconds to start automatically
fi
Convert virtual hard disk format
The pure binary format can only be recognized by the Linux system, but not by the virtual machine, so we want the virtual machine to recognize the virtual hard disk.
VBoxManage convertfromraw ./hd.img --format VDI ./hd.vdi
;convertfromraw Point to original format file
;--format VDI  Represents the time required to convert to virtual VDI format

Install virtual hard disk
The virtual hard disk must be installed in the virtual machine to run, so we need to connect this file with the virtual machine software:
There are two steps to configure the virtual hard disk:
The first step is to configure the hard disk controller. We use SATA hard disk, and its controller is Intel AHCI;
Step 2: mount the virtual hard disk file.
#The first step is SATA hard disk, and its controller is Intel AHCI
VBoxManage storagectl xyos --name "SATA" --add sata --controller IntelAhci --portcount 1
#Step 2
VBoxManage closemedium disk ./hd.vdi #Delete the virtual hard disk UUID and reassign it
#Attach the virtual hard disk to the hard disk controller of the virtual machine
VBoxManage storageattach xyos --storagectl "SATA" --port 1 --device 0 --type hdd --medium ./hd.vdi
After these three instructions are input, there is no response. No error is the best response...
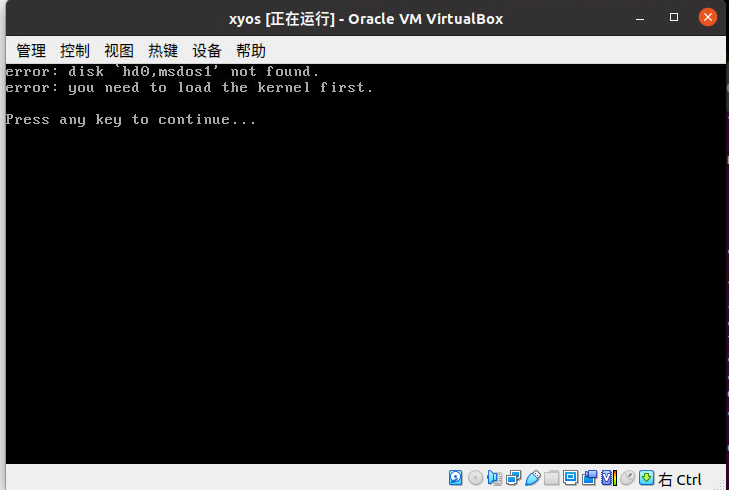
VBoxManage startvm xyos
Press enter to run: you can select our hellos, and GRUB will load our hellos, but the following errors will appear.
The above error shows that GRUB did not find the hellos.eki file. This is because we never put the hellos.eki file into the virtual hard disk, so it failed.
But this is our most successful failure, because we have configured the virtual machine, manually built the hard disk, and installed GRUB on it. Here, we are ready to run the test environment.
summary
- Understand the kernel image format
- It is convenient for us to test the operating system
- Manually create a virtual hard disk, format it, and install GURB boot.
Specific steps:
There are two steps: Step 1: generate files and install gurb:
- Generate a pure binary file
- Format it as a loopback device (so that Linux considers it a device rather than a file) and establish an EXT4 file system in the loopback device
- Mount the hard disk file, establish the boot directory, install GRUB in it, and write a cfg file (set the hard disk partition and the file that should be loaded by boot, and boot it)
Step 2: process the virtual hard disk:
- Convert the virtual hard disk into a format recognized by the virtual function
- Configure virtual hard disk: controller settings and files to mount the virtual hard disk