background
In the project, I want to inject a field with @ Value, but I didn't expect that the injection was unsuccessful, but I can do it in another way, so I want to know the reason why the @ Value annotation was unsuccessful.
The code in this article is based on Spring version 5.3.8
Simulate @ Value successful scenario
First of all, in order to understand the principle of unsuccessful @ Value annotation, let's simulate the successful injection of @ Value annotation with the simplest code:
stay resources Defined under folder application.yml,The contents are as follows:
my:
  value: hello
Define a configuration class:
@Configuration
@Data
public class Config {
    @Value("${my.value}")
    private String myValue;
}
Define a test class:
public class Main {
    public static void main(String[] args) {
        AnnotationConfigApplicationContext context = new AnnotationConfigApplicationContext(Config.class);
        Config config = context.getBean(Config.class);
        System.out.println(config);
    }
}
Output:
Config(myValue=${my.value})
The above code does several things:
- my.value=hello is defined in the resources/application.yml file
- A Config class is defined, and the @ value annotation is used to inject hello into the field myValue
- A Main class is defined to test the effect
The test class does several things:
- Use the AnnotationConfigApplicationContext container to load the configuration class
- Get configuration class Config
- Output injected field myValue
From the results, the injection failed. My first feeling is that we didn't load the contents of our application.yml file into the environment. Let's take a look at the contents of the environment, as shown in the following code:
public class Main {
    public static void main(String[] args) {
        AnnotationConfigApplicationContext context = new AnnotationConfigApplicationContext(Config.class);
        ConfigurableEnvironment environment = context.getEnvironment();
        System.out.println(environment);
    }
}
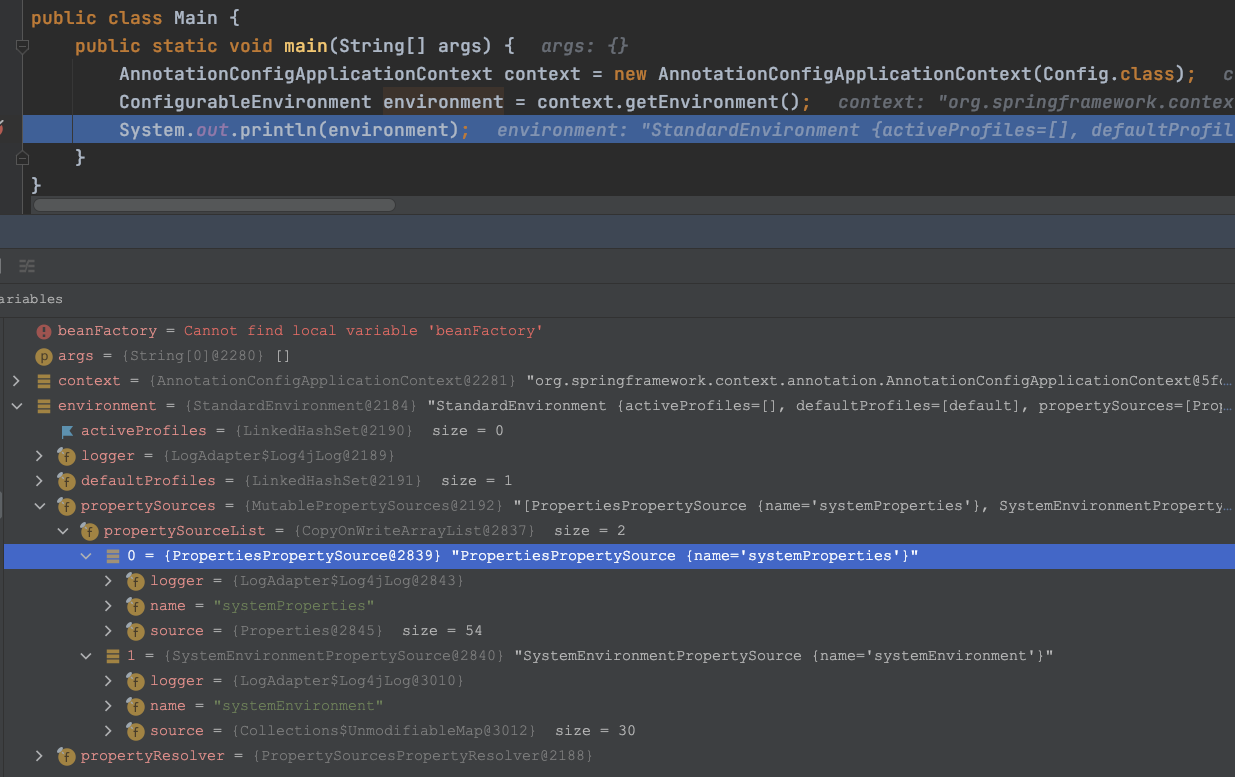
From the results:
- The environment does not contain the contents of our application.yml file
- But it contains two other things, namely system properties and system environment
Then we need to load the contents of the application.yml file into the environment. We need to consider the following two issues:
- How to parse the contents of the yml file
- How to put the parsed content into the environment
To solve problem 1: you can use the load() method of spring's own YamlPropertySourceLoader class, which will return a list < propertysource <? > >
For question 2: let's take a look at how the default content is put in. Let's take a look at the source code of getEnvironment():
public abstract class AbstractApplicationContext extends DefaultResourceLoader
		implements ConfigurableApplicationContext {
	public ConfigurableEnvironment getEnvironment() {
		if (this.environment == null) {
			this.environment = createEnvironment();
		}
		return this.environment;
	}
	protected ConfigurableEnvironment createEnvironment() {
		return new StandardEnvironment();
	}
}
As can be seen from the above, a StandardEnvironment is created by default. Let's take a look at its initialization:
public class StandardEnvironment extends AbstractEnvironment {
	public static final String SYSTEM_ENVIRONMENT_PROPERTY_SOURCE_NAME = "systemEnvironment";

	public static final String SYSTEM_PROPERTIES_PROPERTY_SOURCE_NAME = "systemProperties";

	@Override
	protected void customizePropertySources(MutablePropertySources propertySources) {
		propertySources.addLast(
				new PropertiesPropertySource(SYSTEM_PROPERTIES_PROPERTY_SOURCE_NAME, getSystemProperties()));
		propertySources.addLast(
				new SystemEnvironmentPropertySource(SYSTEM_ENVIRONMENT_PROPERTY_SOURCE_NAME, getSystemEnvironment()));
	}
}
public abstract class AbstractEnvironment implements ConfigurableEnvironment {
	public AbstractEnvironment() {
		this(new MutablePropertySources());
	}

	protected AbstractEnvironment(MutablePropertySources propertySources) {
		this.propertySources = propertySources;
		this.propertyResolver = createPropertyResolver(propertySources);
		customizePropertySources(propertySources);
	}
}
As can be seen from the above code, in
In the method of StandardEnvironment.customizePropertySources(), it is added through the method of propertySources.addLast(). Then we can draw a gourd according to the gourd, as follows:
public class Main {
    public static void main(String[] args) throws IOException {
        AnnotationConfigApplicationContext context = new AnnotationConfigApplicationContext(Config.class);
        ConfigurableEnvironment environment = context.getEnvironment();
        System.out.println(environment);
        YamlPropertySourceLoader loader = new YamlPropertySourceLoader();
        List<PropertySource<?>> propertySources = loader.load("my-properties",
                new FileSystemResource("/Users/tiger/spring-boot-study/src/main/resources/application.yml"));
        environment.getPropertySources().addLast(propertySources.get(0));
        System.out.println(environment);
    }
}
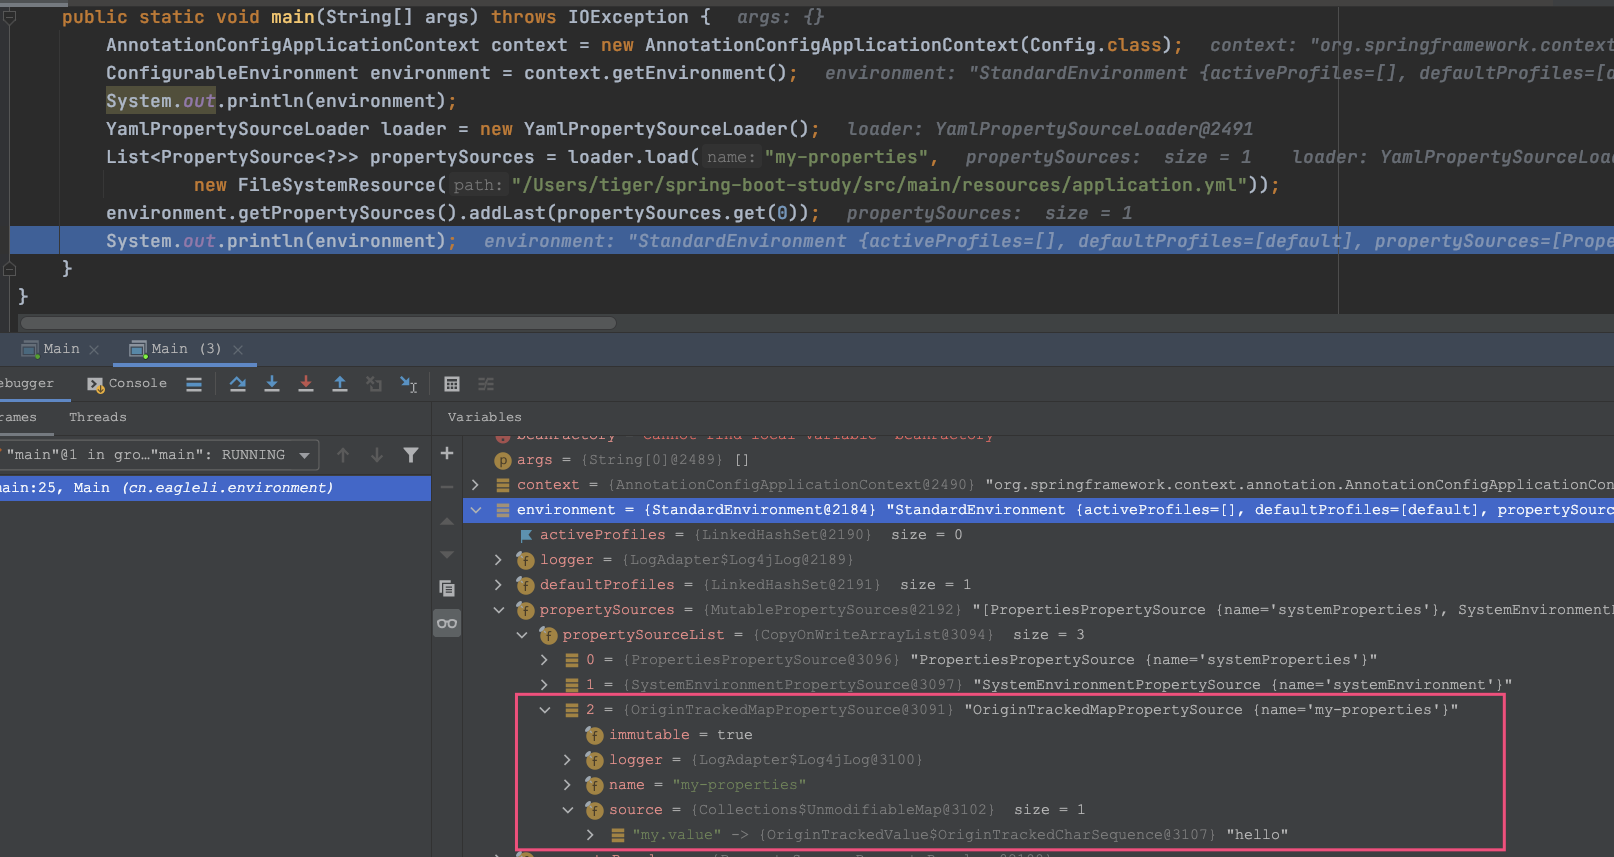
From the above results, we can see that we have successfully put the contents of our application.yml file into the environment
Let's change the test code to:
public class Main {
    public static void main(String[] args) throws IOException {
        AnnotationConfigApplicationContext context = new AnnotationConfigApplicationContext(Config.class);
        YamlPropertySourceLoader loader = new YamlPropertySourceLoader();
        List<PropertySource<?>> propertySources = loader.load("my-properties",
                new FileSystemResource("/Users/tiger/spring-boot-study/src/main/resources/application.yml"));
        context.getEnvironment().getPropertySources().addLast(propertySources.get(0));
        Config config = context.getBean(Config.class);
        System.out.println(config);
    }
}

Output:
Config(myValue=${my.value})
From the above results, we can see that we still don't get the results we want, because the conig class will be initialized in advance in the refresh() method
finishBeanFactoryInitialization() method, so we need to put our content into the environment before this step
After turning over the refresh() method, we found that there is a method of initPropertySources() in the prepareRefresh() method. The comment says to initialize a series of resources, so we can load our configuration file in this method, and it becomes:
public class Main {
    public static void main(String[] args) {
        AnnotationConfigApplicationContext context = new AnnotationConfigApplicationContext(Config.class) {
            @SneakyThrows
            @Override
            public void initPropertySources() {
                YamlPropertySourceLoader loader = new YamlPropertySourceLoader();
                List<PropertySource<?>> propertySources = loader.load("my-properties",
                        new FileSystemResource("/Users/tiger/spring-boot-study/src/main/resources/application.yml"));
                getEnvironment().getPropertySources().addLast(propertySources.get(0));
            }
        };
        Config config = context.getBean(Config.class);
        System.out.println(config);
    }
}

Output:
Config(myValue=hello)
So far, we have simulated the successful scenario of @ Value injection. There should be no problem that the resources are not loaded in the project, because spring boot has helped us do these things
Therefore, there is no problem using @ Value directly under the @ Configuration class
Simulate the scenario of unsuccessful injection
Now let's simulate the scenario of unsuccessful injection. The configuration class is changed as follows:
@Configuration
@Data
public class Config {
    @Value("${my.value}")
    private String myValue;

    @Bean
    public MyBeanFactoryPostProcessor myBeanFactoryPostProcessor() {
        return new MyBeanFactoryPostProcessor();
    }

    public static class MyBeanFactoryPostProcessor implements BeanFactoryPostProcessor {
        @Override
        public void postProcessBeanFactory(ConfigurableListableBeanFactory beanFactory) throws BeansException {
        }
    }
}
Output results:
Config(myValue=null)
This is the problem I encountered in my project. After generating a BeanFactoryPostProcessor in the configuration class, @ Value injection failed
But just write this method as static, as follows:
@Configuration
@Data
public class Config {
    @Value("${my.value}")
    private String myValue;

    @Bean
    public static MyBeanFactoryPostProcessor myBeanFactoryPostProcessor() {
        return new MyBeanFactoryPostProcessor();
    }

    public static class MyBeanFactoryPostProcessor implements BeanFactoryPostProcessor {
        @Override
        public void postProcessBeanFactory(ConfigurableListableBeanFactory beanFactory) throws BeansException {
        }
    }
}
Output results:
Config(myValue=hello)
See why it didn't succeed
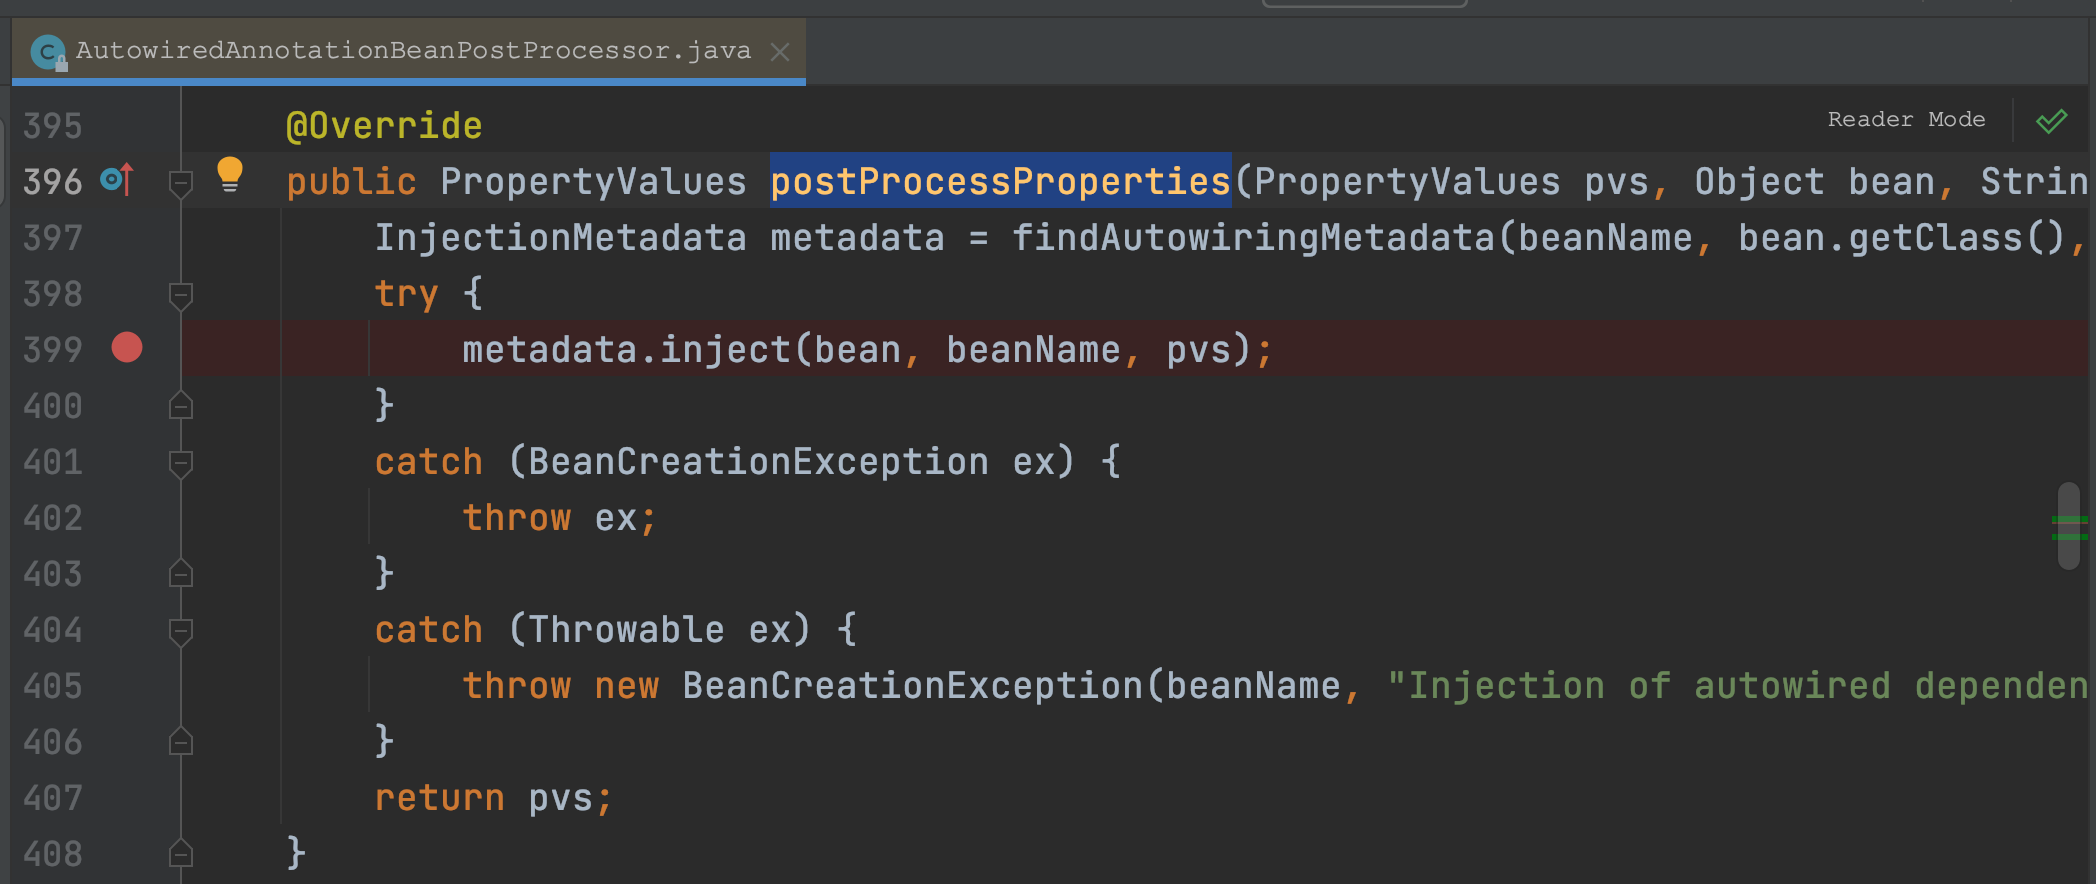
@Value is by
AutowiredAnnotationBeanPostProcessor.postProcessProperties() handles, so we take this as the entry point for debugging.
Let's remove static first:
If the above method is not implemented, let's add static to see the success:
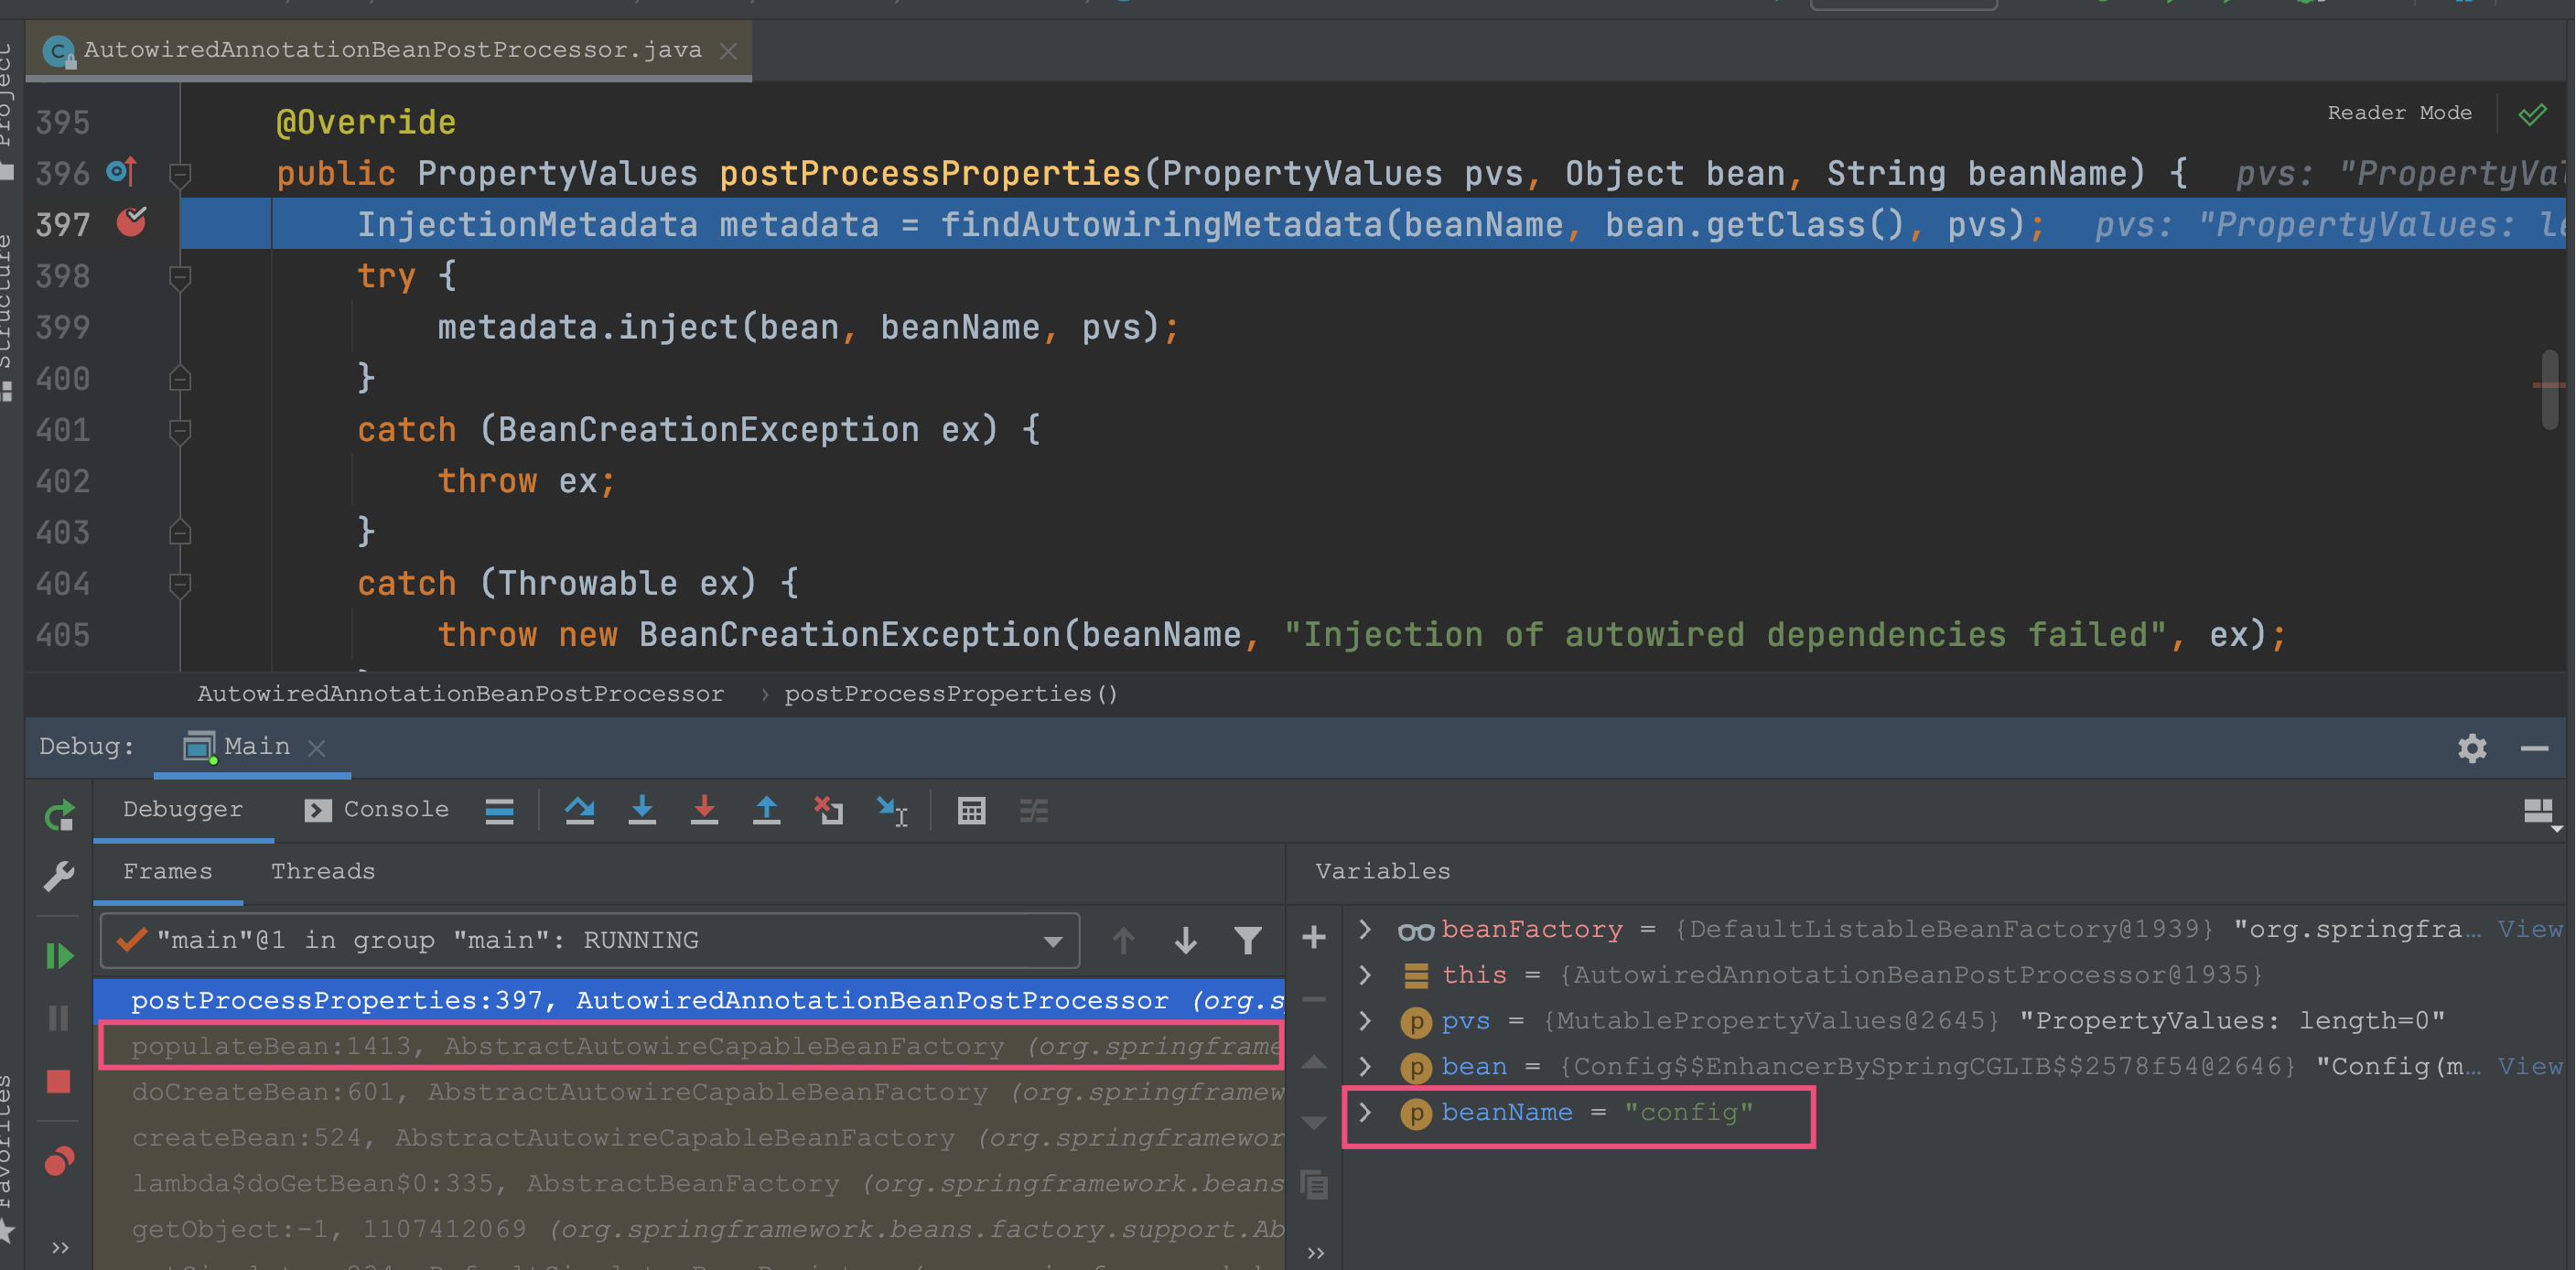
It can be seen that this method can be found, and it is known that this method is used
AbstractAutowireCapableBeanFactory.populateBean() is called. Let's take another look at the situation here:
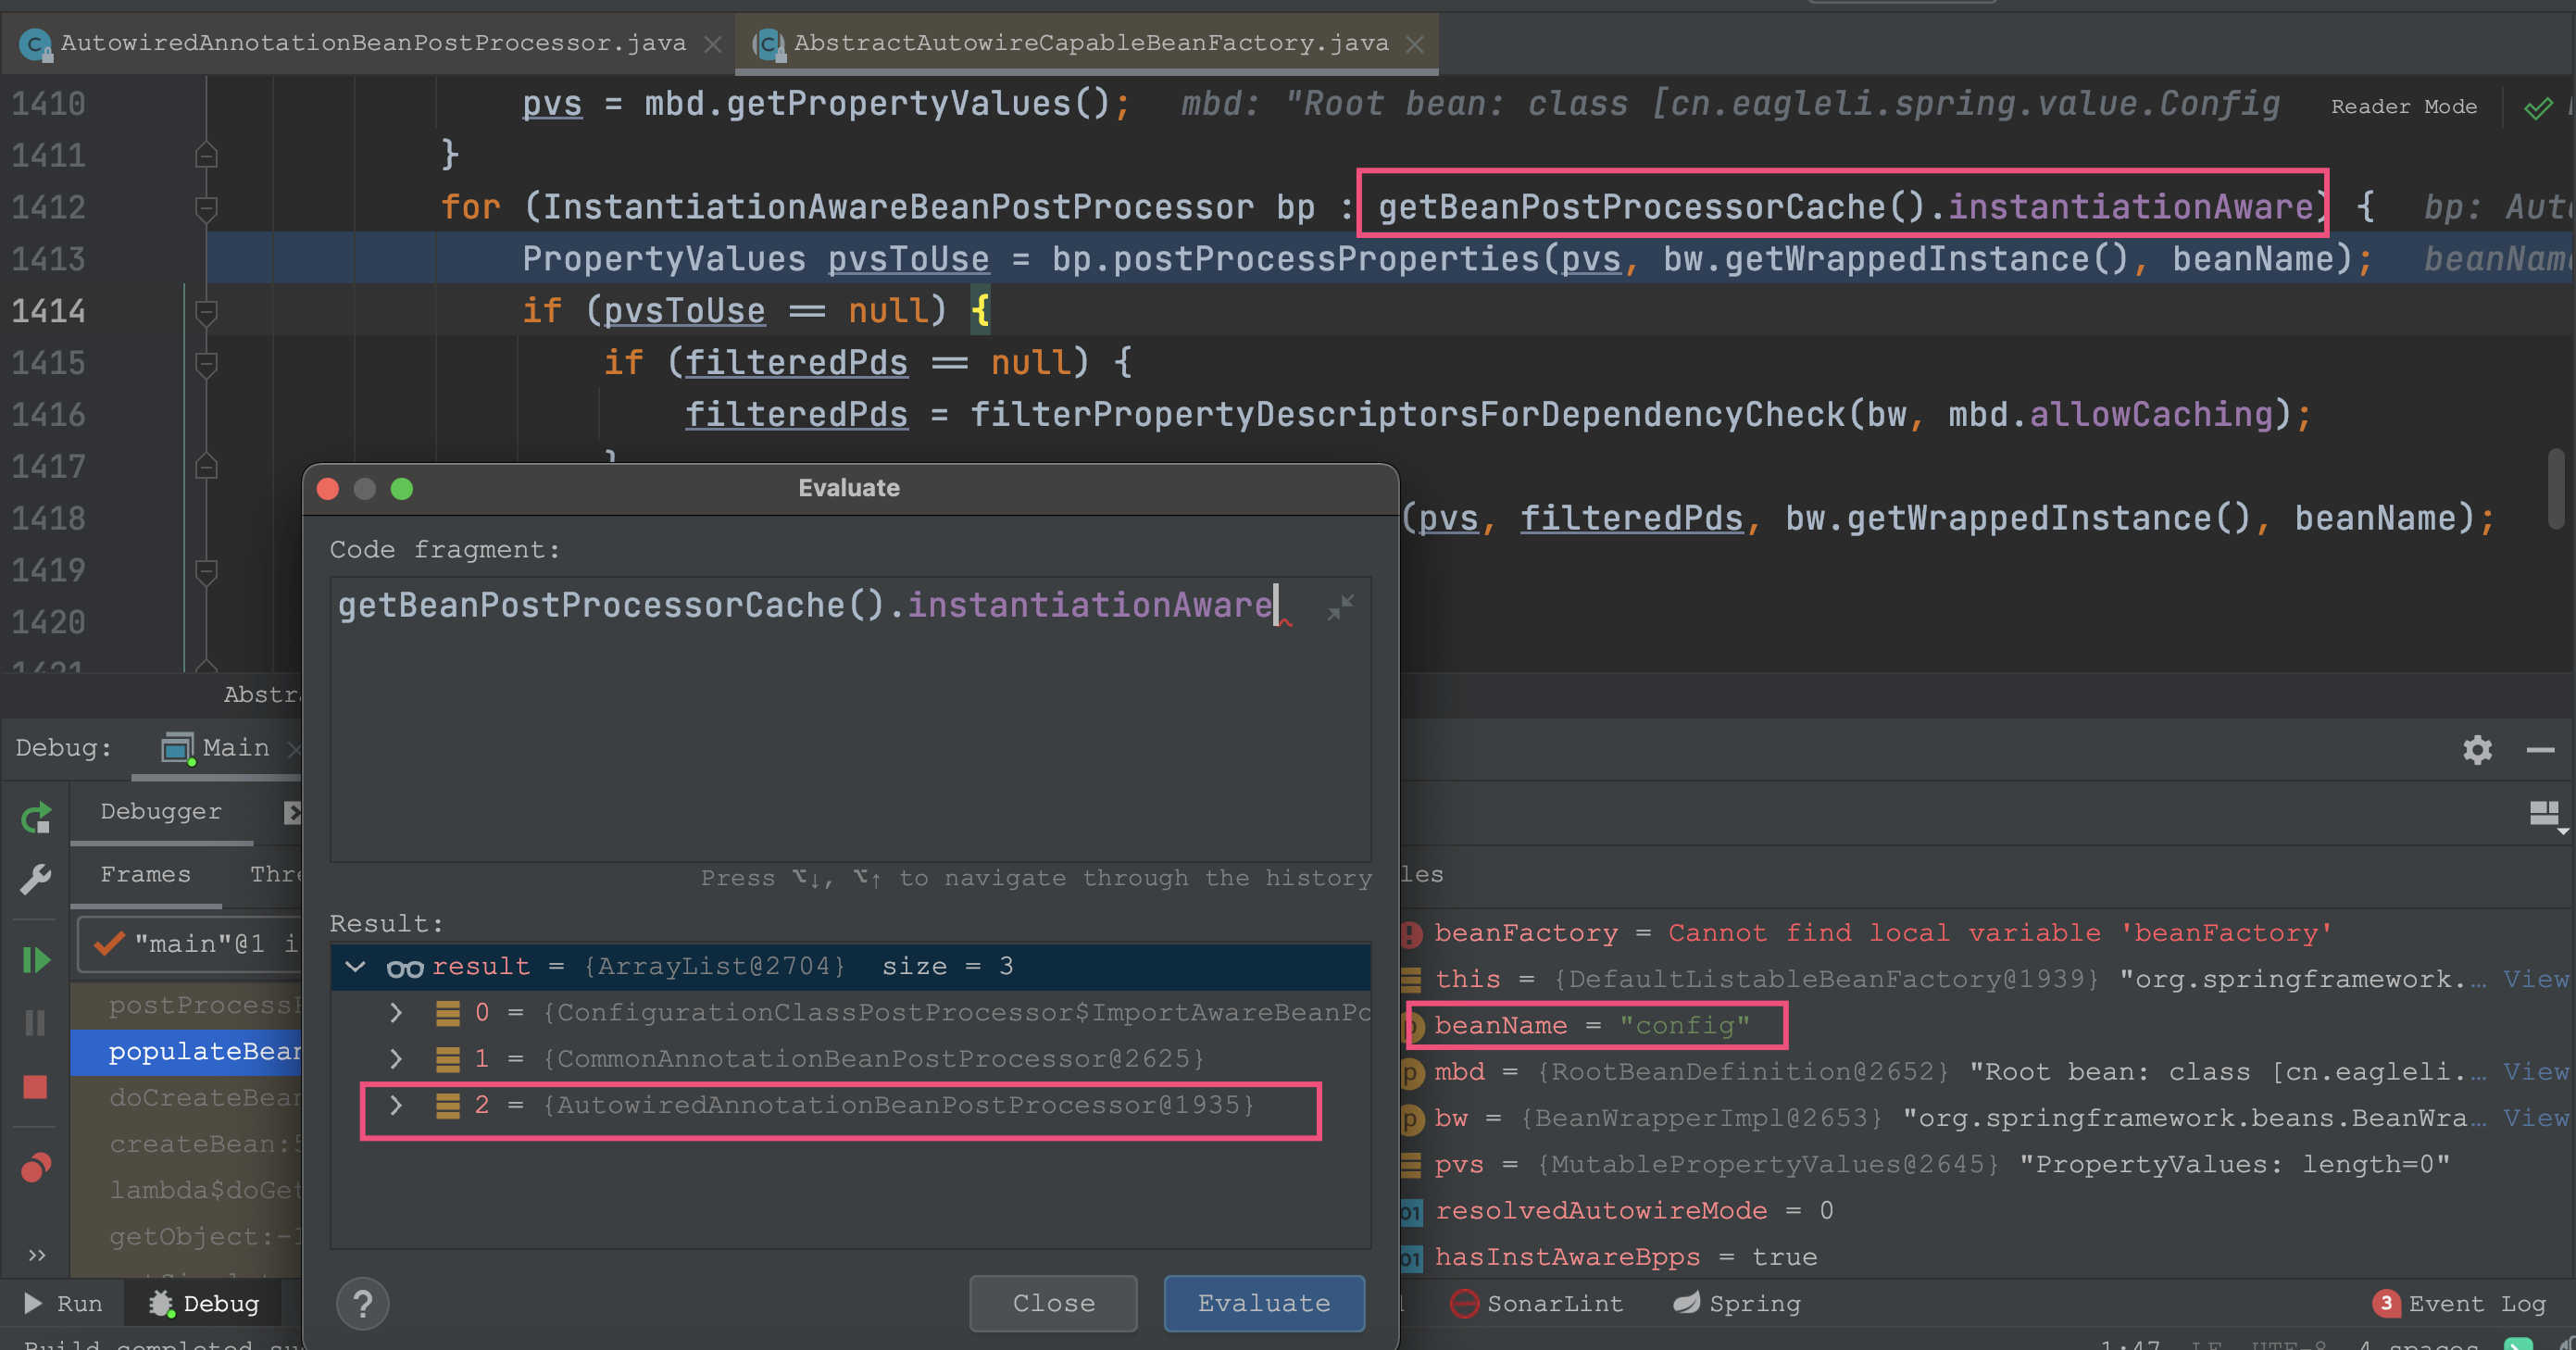
As can be seen from the above figure, getBeanPostProcessorCache().instantiationAware has
AutowiredAnnotationBeanPostProcessor
Let's take another look at the situation without static:
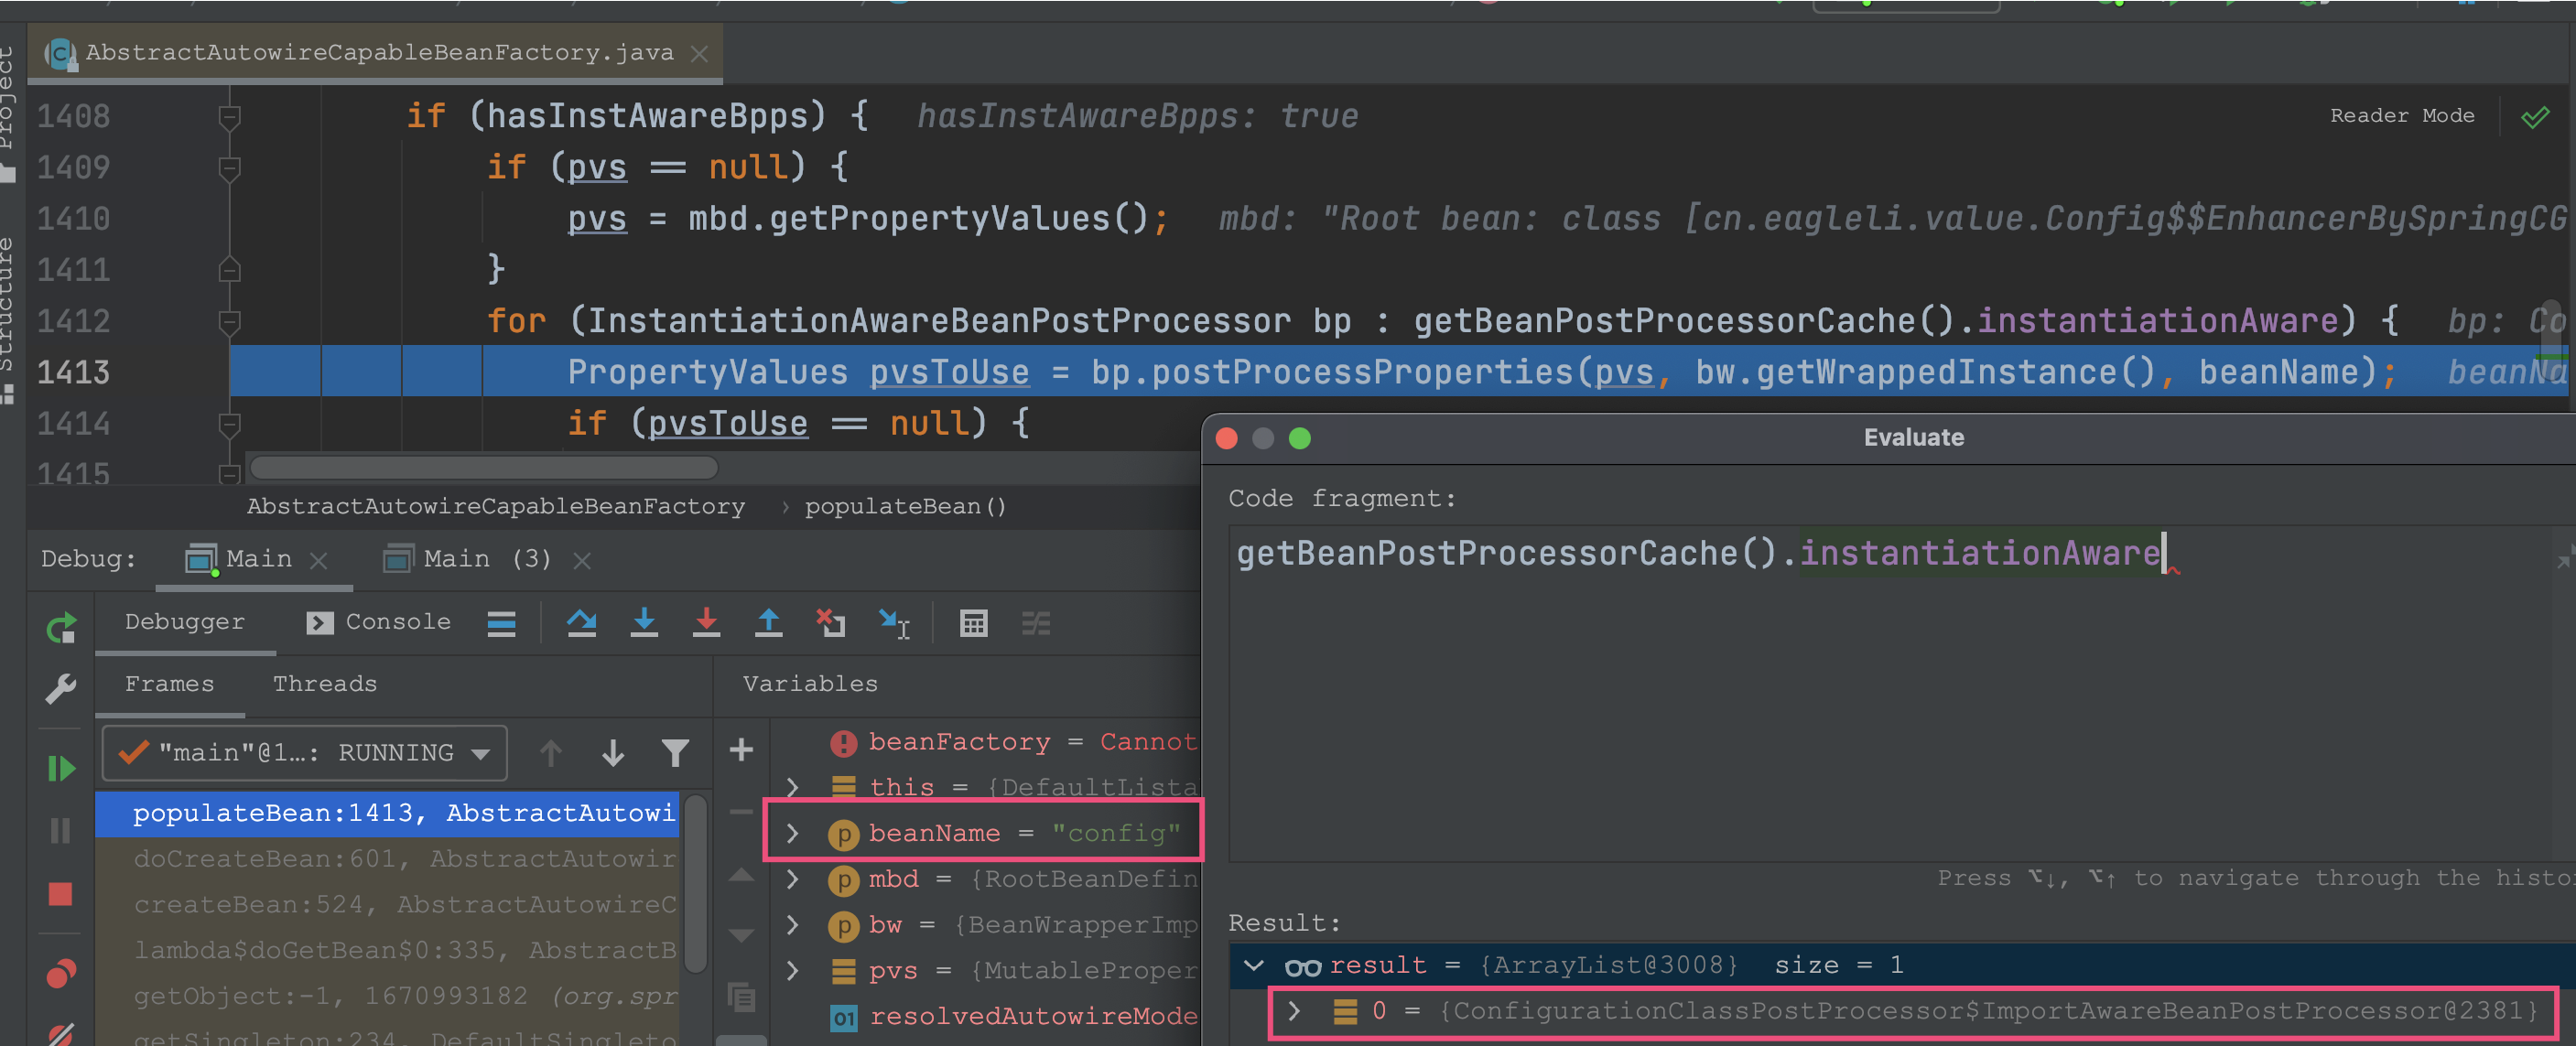
Sure enough, the reason why the injection failed is that the config instance was not created when it was created
AutowiredAnnotationBeanPostProcessor instance
Let's take a look at what the getBeanPostProcessorCache().instantiationAware is and how it is generated
Found only in
AbstractBeanFactory.getBeanPostProcessorCache() this method will
Add instantiawarebeanpostprocessor to instantiaaware as follows:
public abstract class AbstractBeanFactory extends FactoryBeanRegistrySupport implements ConfigurableBeanFactory {
	BeanPostProcessorCache getBeanPostProcessorCache() {
		BeanPostProcessorCache bpCache = this.beanPostProcessorCache;
		if (bpCache == null) {
			bpCache = new BeanPostProcessorCache();
			for (BeanPostProcessor bp : this.beanPostProcessors) {
				if (bp instanceof InstantiationAwareBeanPostProcessor) {
					bpCache.instantiationAware.add((InstantiationAwareBeanPostProcessor) bp);
					if (bp instanceof SmartInstantiationAwareBeanPostProcessor) {
						bpCache.smartInstantiationAware.add((SmartInstantiationAwareBeanPostProcessor) bp);
					}
				}
				if (bp instanceof DestructionAwareBeanPostProcessor) {
					bpCache.destructionAware.add((DestructionAwareBeanPostProcessor) bp);
				}
				if (bp instanceof MergedBeanDefinitionPostProcessor) {
					bpCache.mergedDefinition.add((MergedBeanDefinitionPostProcessor) bp);
				}
			}
			this.beanPostProcessorCache = bpCache;
		}
		return bpCache;
	}
}
From the above code, we can see that the essence is still obtained from this.beanPostProcessors. Let's see when it will be updated
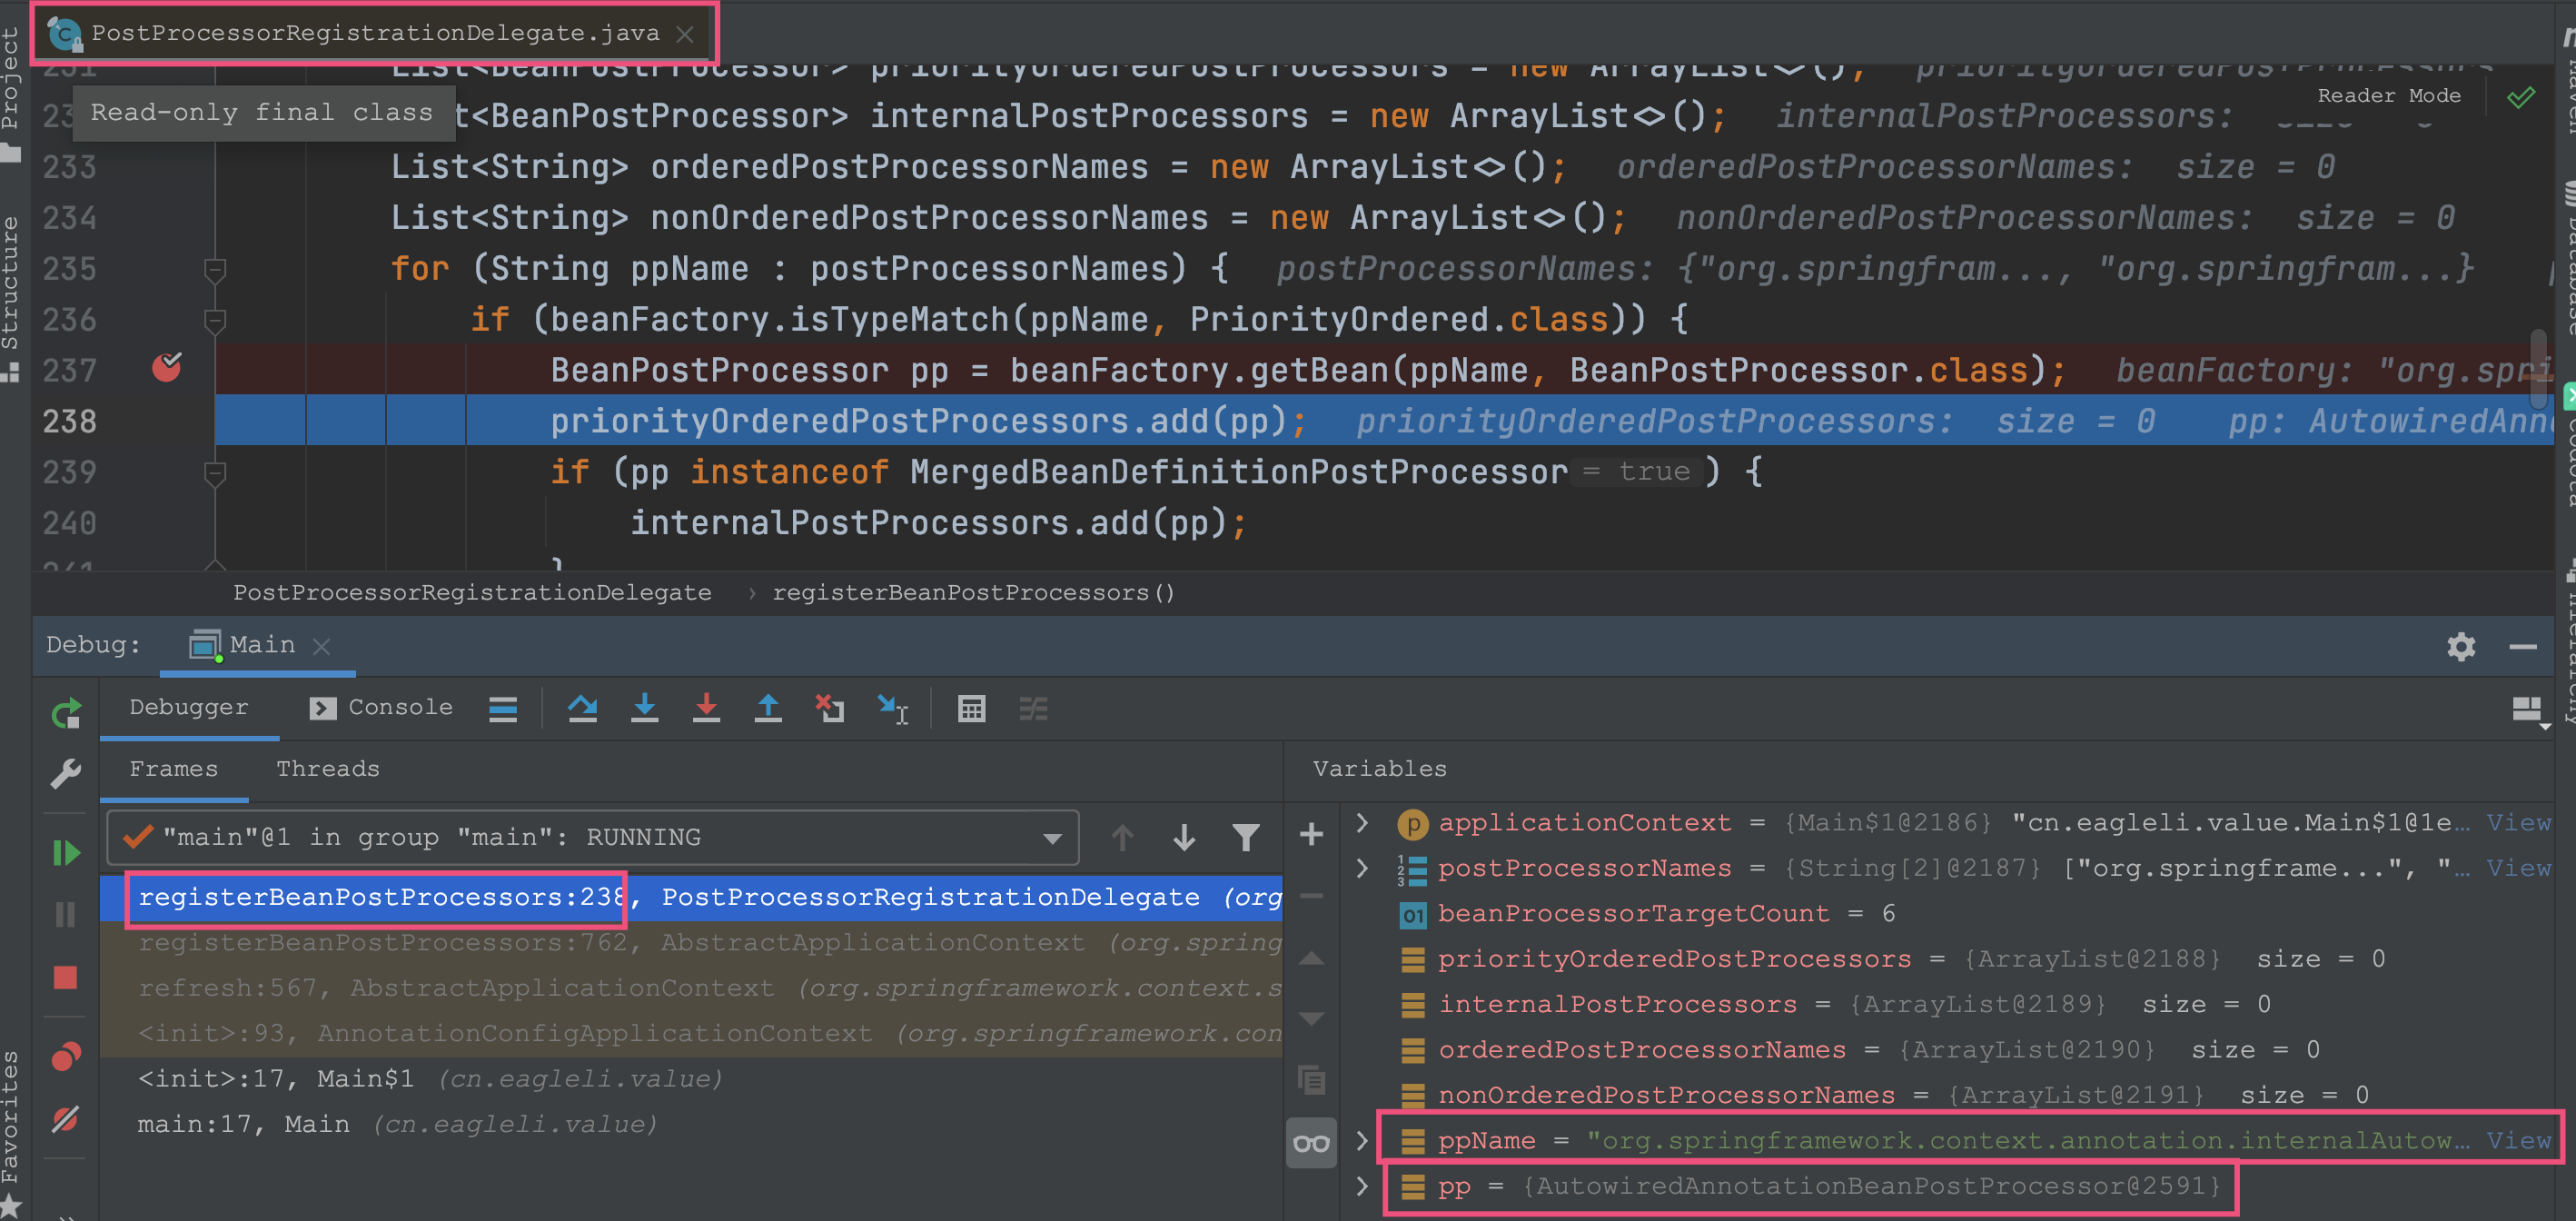
Add AutowiredAnnotationBeanPostProcessor to the container as follows:
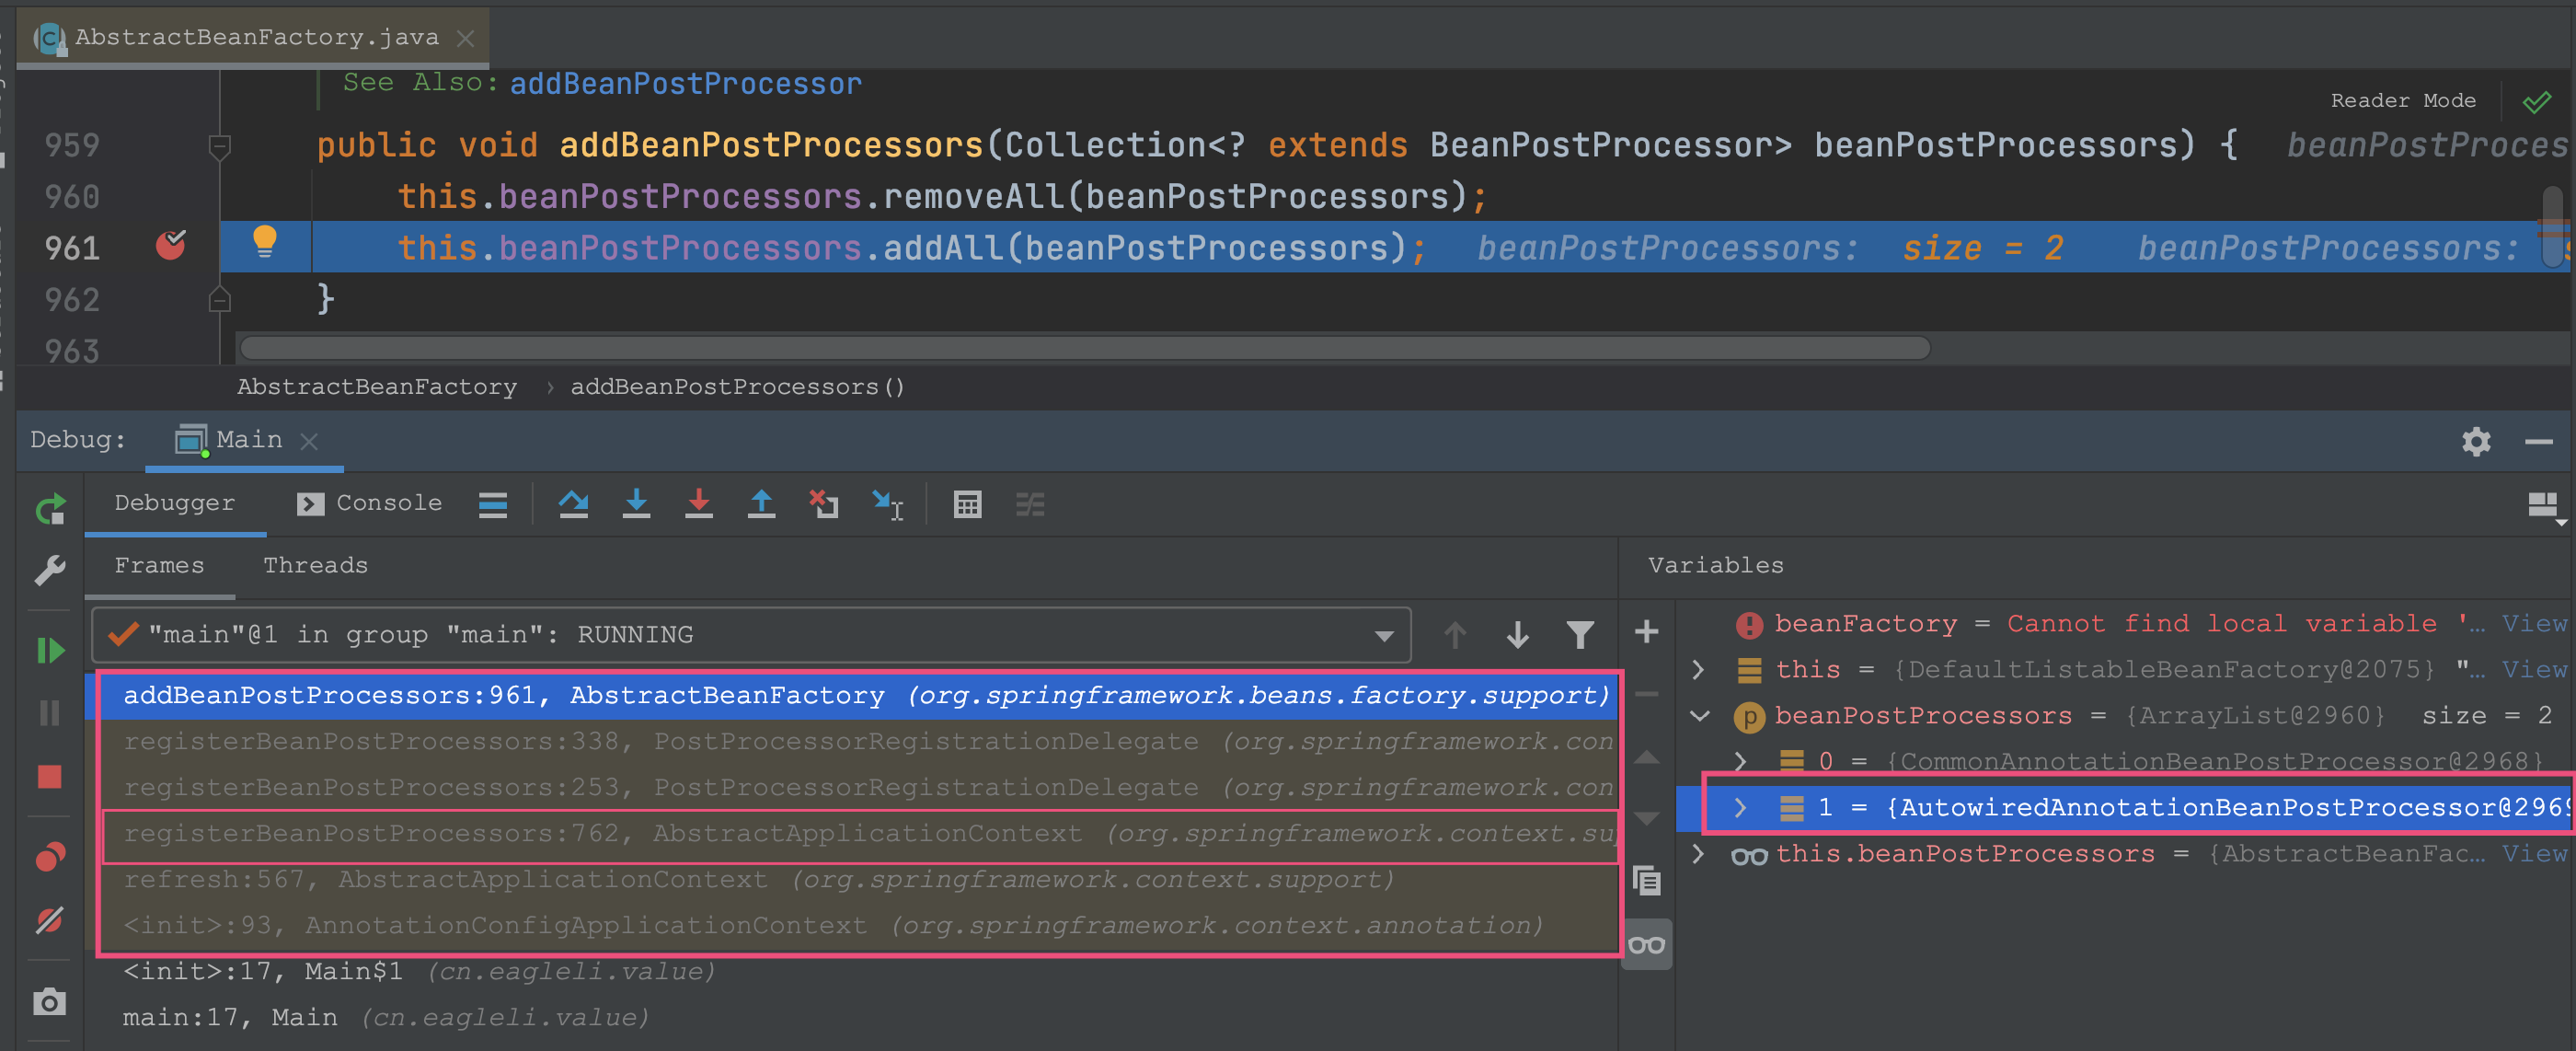
As can be seen from the above figure:
AutowiredAnnotationBeanPostProcessor is in the refresh() method
Injected by registerBeanPostProcessors() method
Let's take another look at when the config class with static method is loaded:
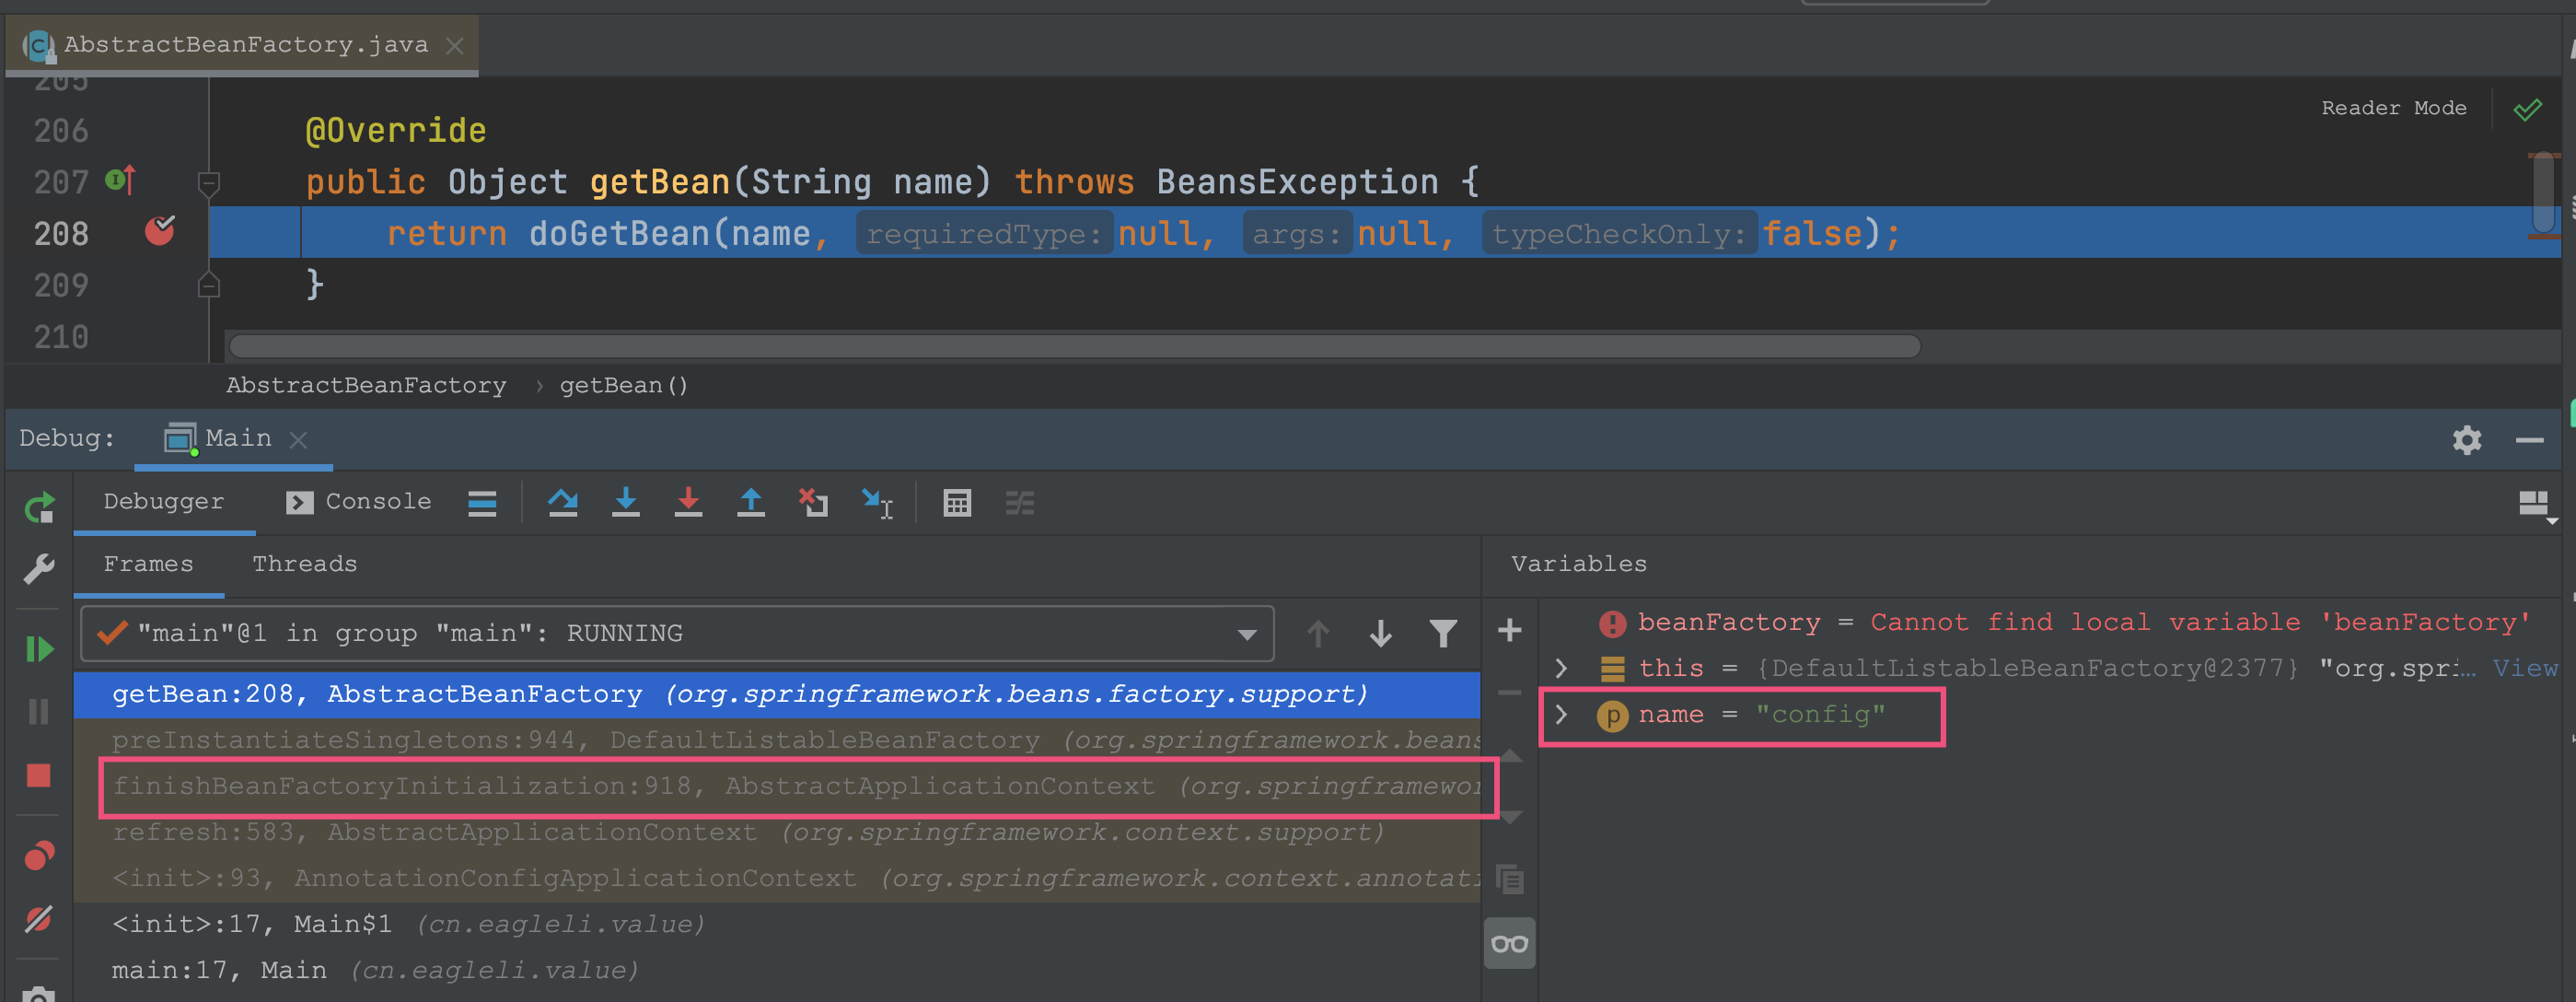
Let's see when the config class without static method is loaded

Let's summarize the order of the methods mentioned in the refresh() method:
invokeBeanFactoryPostProcessors(); -> No static In this step, load config class

registerBeanPostProcessors();  -> register AutowiredAnnotationBeanPostProcessor

finishBeanFactoryInitialization(); plus static In this step, load config class
So we know the reason: when the static field is not added and the config class is loaded, our
AutowiredAnnotationBeanPostProcessor has not been registered, so it will not succeed. When we add static and load the config class, our
AutowiredAnnotationBeanPostProcessor is already registered.
Why is the loading order with and without static different
The spring container will
Invokebeanfactoryprocessors() will load all beanfactoryprocessors. If static is used, the config class will not be loaded. On the contrary, it will be loaded. The reasons are as follows:
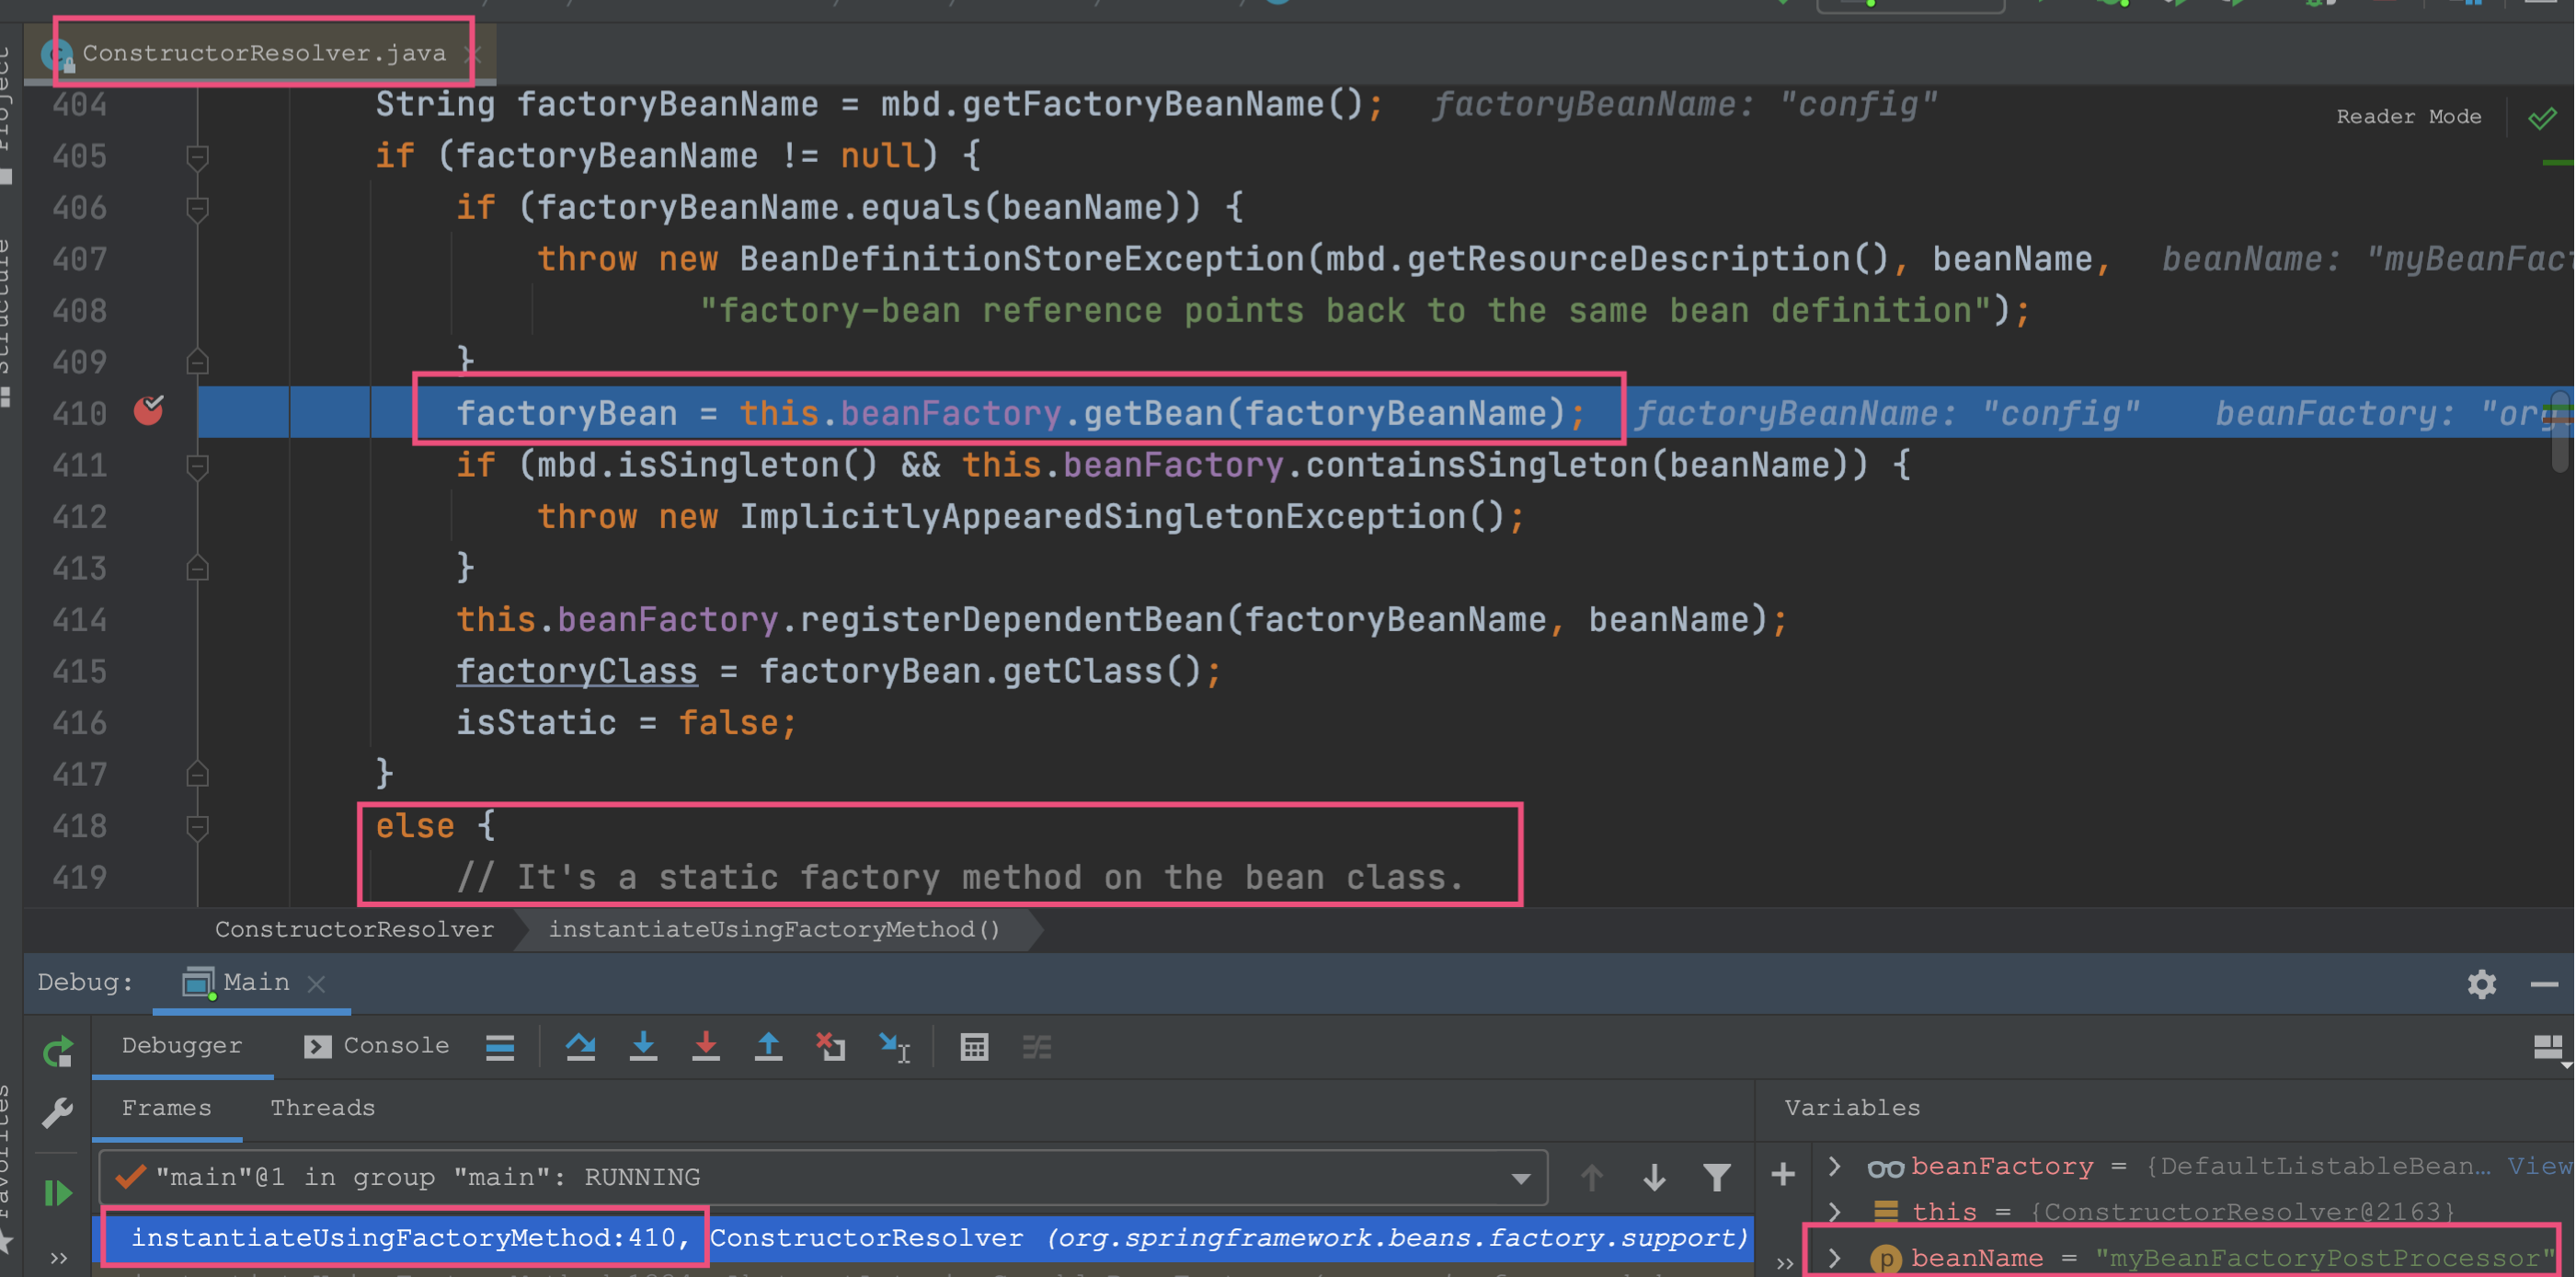
The reason has been given in the figure above. If the factory method for generating bean s is static, it will not be loaded. On the contrary, it will be loaded.
If we don't add static, can we also inject success into it?
That is nothing more than loading the config class
AutowiredAnnotationBeanPostProcessor can be loaded into the container in advance. Let's take a look at how the source code loads this instance:
We can also follow suit and see where it is appropriate to load in advance. We found that the postProcessBeanFactory() method is more appropriate, so we changed it to:
public class Main {
    public static void main(String[] args) {
        AnnotationConfigApplicationContext context = new AnnotationConfigApplicationContext(Config.class) {
            @SneakyThrows
            @Override
            public void initPropertySources() {
                YamlPropertySourceLoader loader = new YamlPropertySourceLoader();
                List<PropertySource<?>> propertySources = loader.load("my-properties",
                        new FileSystemResource("/Users/tiger/spring-boot-study/src/main/resources/application.yml"));
                getEnvironment().getPropertySources().addLast(propertySources.get(0));
            }

            @Override
            protected void postProcessBeanFactory(ConfigurableListableBeanFactory beanFactory) {
                String ppName = "org.springframework.context.annotation.internalAutowiredAnnotationProcessor";
                beanFactory.addBeanPostProcessor(getBean(ppName, BeanPostProcessor.class));
            }
        };
        Config config = context.getBean(Config.class);
        System.out.println(config);
    }
}

Output:
Config(myValue=${my.value})
As a result, the injection was not successful. After some debugging, it was found that there was a problem in the following steps:
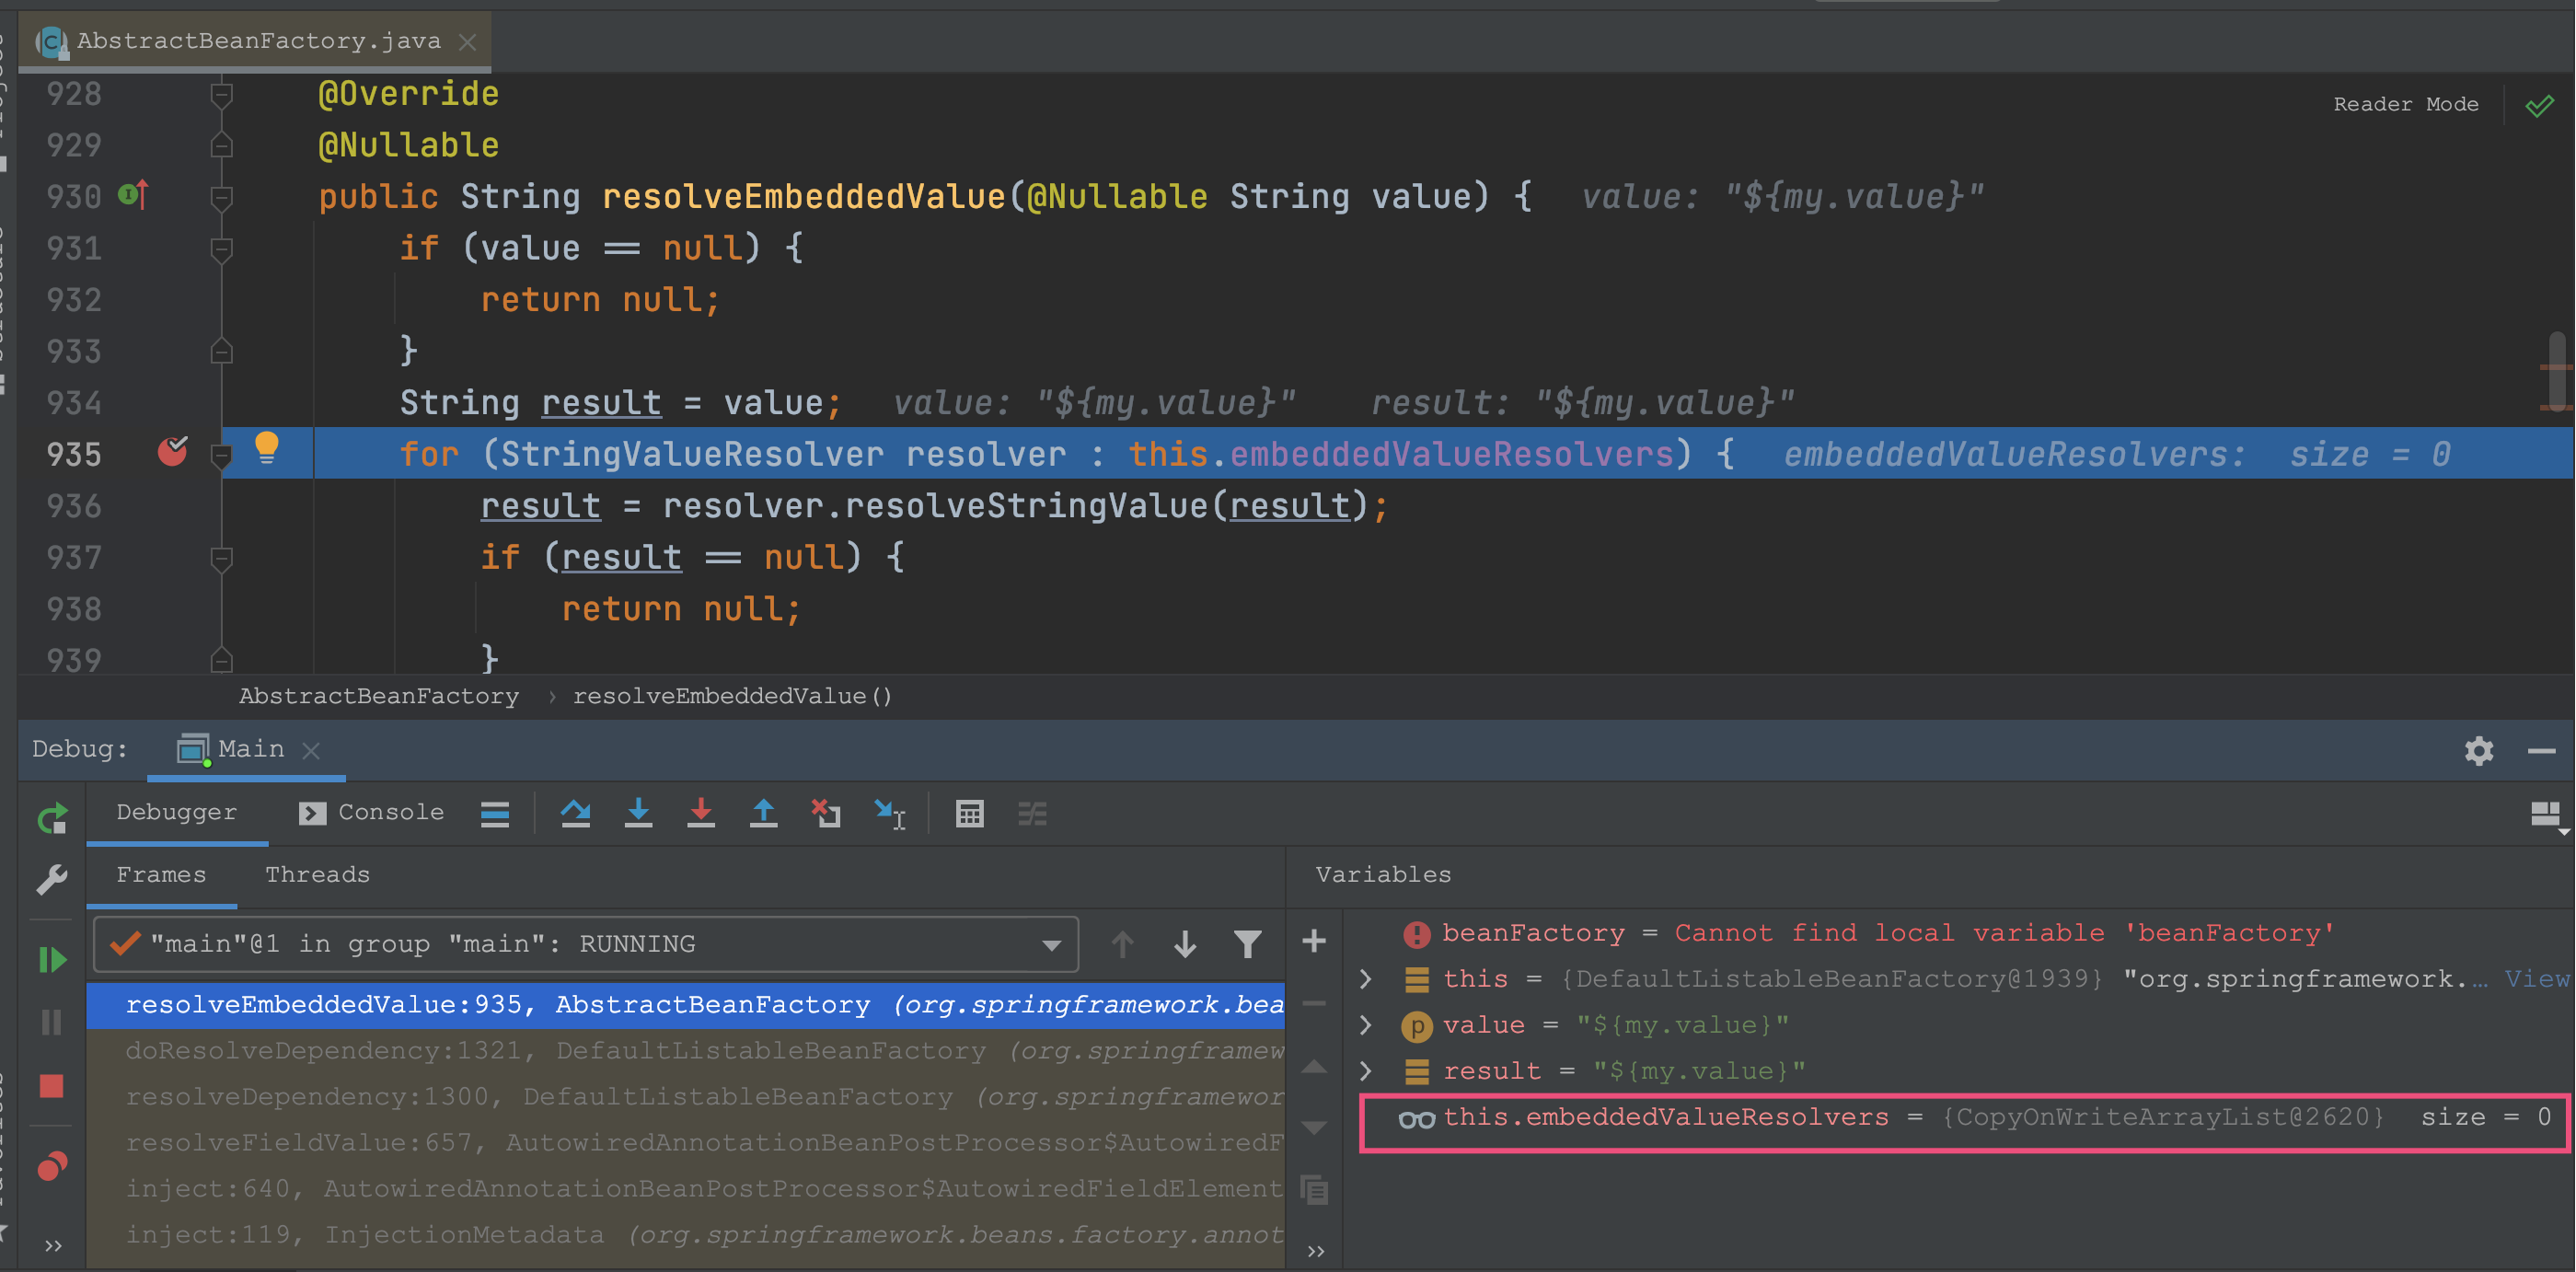
Let's take a look at the successful loading:
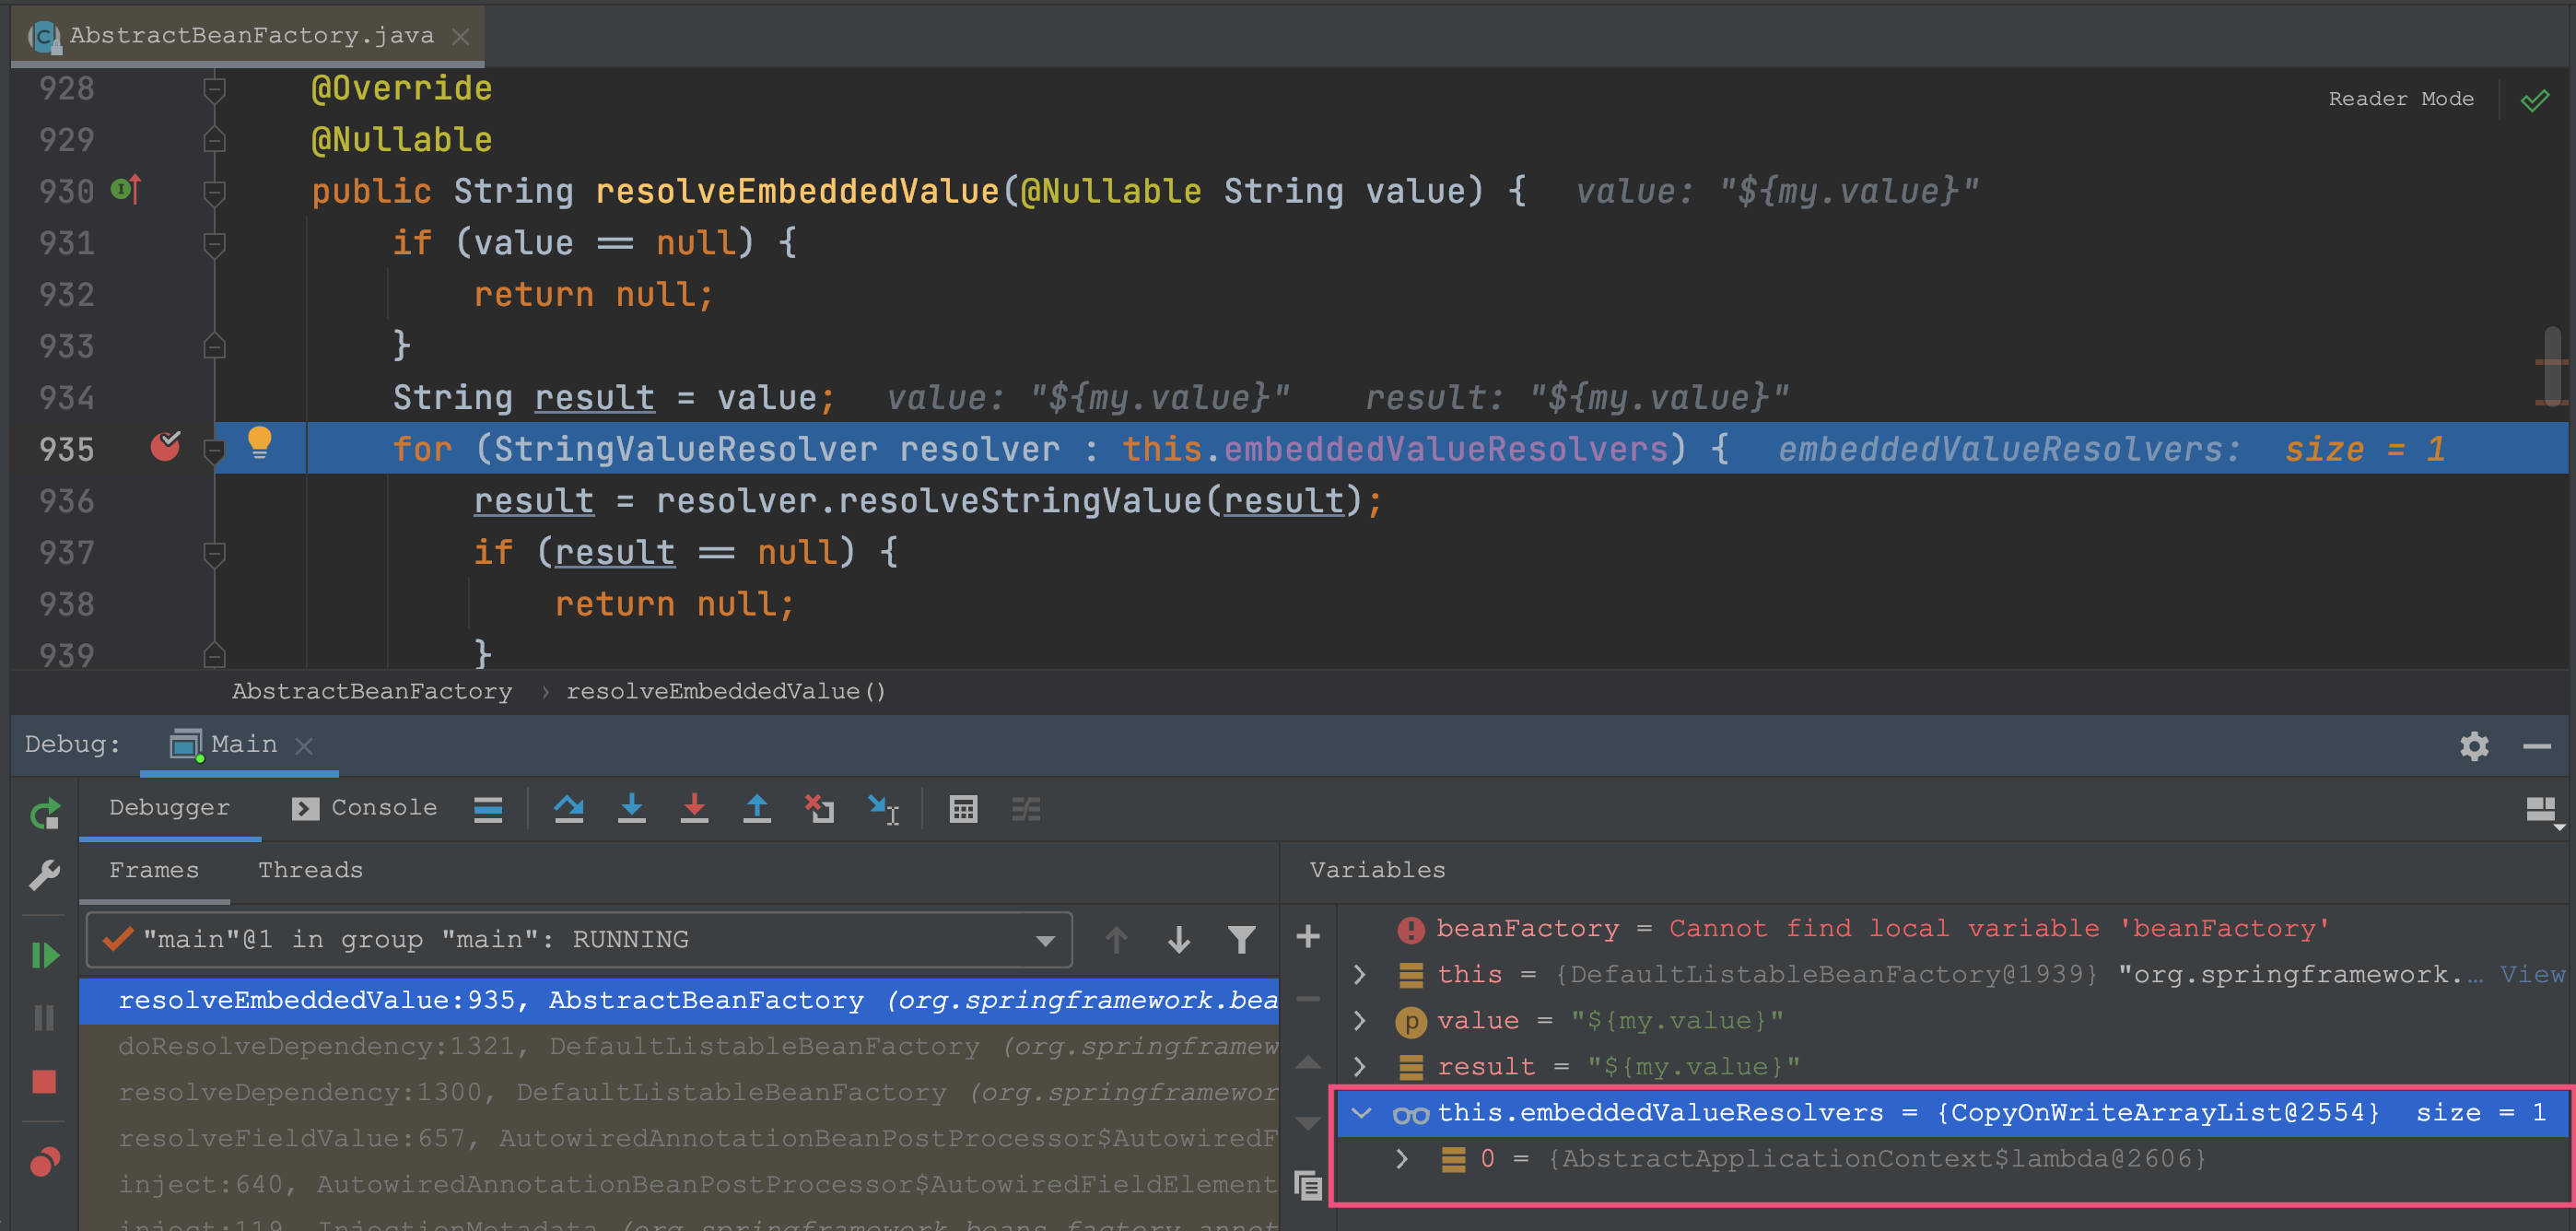
embeddedValueResolver is added in the following steps:

You can see that it is in refresh()
finishBeanFactoryInitialization() is added to this method, so we also need to do it in advance:
public class Main {
    public static void main(String[] args) {
        AnnotationConfigApplicationContext context = new AnnotationConfigApplicationContext(Config.class) {
            @SneakyThrows
            @Override
            public void initPropertySources() {
                YamlPropertySourceLoader loader = new YamlPropertySourceLoader();
                List<PropertySource<?>> propertySources = loader.load("my-properties",
                        new FileSystemResource("/Users/tiger/spring-boot-study/src/main/resources/application.yml"));
                getEnvironment().getPropertySources().addLast(propertySources.get(0));
            }

            @Override
            protected void postProcessBeanFactory(ConfigurableListableBeanFactory beanFactory) {
                String ppName = "org.springframework.context.annotation.internalAutowiredAnnotationProcessor";
                beanFactory.addBeanPostProcessor(getBean(ppName, BeanPostProcessor.class));
                beanFactory.addEmbeddedValueResolver(strVal -> getEnvironment().resolvePlaceholders(strVal));
            }
        };
        Config config = context.getBean(Config.class);
        System.out.println(config);
    }
}

Output:
Config(myValue=hello)
All right, it's done!
summary
Seeing this, I believe everyone knows why @ Value failed to load, mainly because of the loading order. It can be seen that the simplest method is to add a static to the method. The later exploration is mainly to understand the loading order of Spring container
This article explores the existence of BeanFactoryPostProcessor in the configuration class. What if it is replaced by BeanPostProcessor? Will loading fail? Why? In fact, you can also use the same method to test, which is exactly the same as this article. Small partners can explore it by themselves.
Welcome to discuss any questions~~~
If you think this article is helpful to you, you can pay attention to my official account, reply to key words [technology], and then get all kinds of programming materials and interview questions. There are more technical dry goods articles and architecture information sharing. Let's learn and progress together!