preface
[schedule name] Game 1 of cloud computing competition - Private Cloud
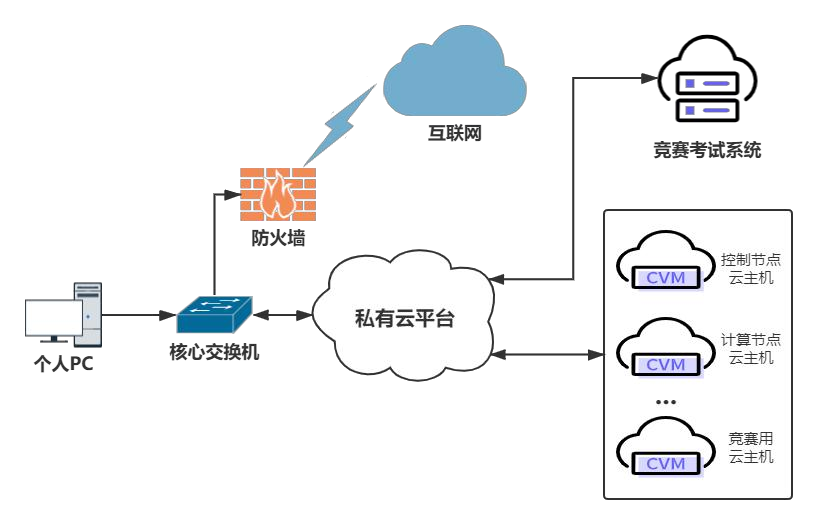
An enterprise plans to use OpenStack to build an enterprise cloud platform to realize resource pooling elastic management, centralized enterprise application management, unified security authentication and authorization. The system architecture is shown in Figure 1, and the IP address planning is shown in Table 1.
[task 1] basic operation and maintenance task [5 points]
[Topic 1] basic environment configuration [1.5 points]
Use the user name and password provided, log in to the OpenStack private cloud platform provided, create two virtual machines using the CentOS7.5 image, and use 4V for the control node flavor_ 12G_ In 100g configuration, the computing node flavor uses 4v_8G_100G_50G configuration. The first network card uses the network provided, and the second network card uses the network created by itself (the network segment is 10.10.X.0/24, and X is the station number). After creating the virtual machine, ensure that the network communicates normally, and then configure the server according to the following requirements:
(1) Set the host name of the control node to controller and the host name of the calculation node to compute;
(2) Modify the hosts file to map the IP address to the host name; After completion, submit the user name, password and IP address of the control node to the answer box.
[root@localhost ~]# hostnamectl set-hostname controller
[root@localhost ~]# hostnamectl set-hostname compute
[root@localhost ~]# logout
[root@controller ~]# vi /etc/hosts
192.168.100.10  controller
192.168.100.20  compute
[root@controller ~]# scp /etc/hosts compute:/etc/hosts
#The question doesn't ask to close the firewall. We closed it first when we practiced
[Title 2] Yum source configuration [1 point]
Use the provided HTTP service address. Under the HTTP service, there are network Yum sources for CentOS 7.5 and iaas. Use the HTTP source as the network source for installing the iaas platform. Set the yum source file http.repo for controller node and compute node respectively. After completion, submit the user name, password and IP address of the control node to the answer box.
Upload the following two packages
CentOS-7.5-x86_64-DVD-1804.iso
chinaskills_cloud_iaas.iso
[root@controller ~]# mkdir /opt/{centos,iaas}
[root@controller ~]# mount CentOS-7.5-x86_64-DVD-1804.iso /opt/centos/
[root@controller ~]# mount chinaskills_cloud_iaas.iso /opt/iaas/
[root@controller ~]# mv /etc/yum.repos.d/* /home/
You only need to use the information provided during the game url Replace with the following baseurl All of the above can be done without operation
[root@controller ~]# vi /etc/yum.repos.d/http.repo
[centos]
name=centos
baseurl=file:///opt/centos
gpgcheck=0
enabled=1

[iaas]
name=iaas
baseurl=file:///opt/iaas/iaas-repo
gpgcheck=0
enabled=1
[root@controller ~]# yum repolist
Loaded plugins: fastestmirror
Loading mirror speeds from cached hostfile
repo id                                 repo name                              status
centos                                  centos                                 3,971
iaas                                    iaas                                   3,232
repolist: 7,203
[root@controller ~]# yum install -y httpd
[root@controller ~]# vi /etc/httpd/conf/httpd.conf
DocumentRoot "/opt/"
<Directory "/opt">
..............
[root@controller ~]# rm -rf  /etc/httpd/conf.d/welcome.conf #This step needs to be performed
[root@controller ~]# systemctl start httpd
[root@controller ~]# systemctl enable  httpd

Compute node operations
[root@compute ~]# vi /etc/yum.repos.d/http.repo
[centos]
name=centos
baseurl=http://192.168.100.10/centos/
gpgcheck=0
enabled=1

[iaas]
name=iaas
baseurl=http://192.168.100.10/iaas/iaas-repo/
gpgcheck=0
enabled=1
[root@compute ~]# yum repolist
Loaded plugins: fastestmirror
Loading mirror speeds from cached hostfile
repo id                                 repo name                              status
centos                                  centos                                 3,971
iaas                                    iaas                                   3,232
repolist: 7,203
[Topic 3] time synchronization configuration [1.5 points]
Deploy the chrony server on the controller node to allow other nodes to synchronize time, start the service and set it to start; On the compute node, specify the controller node as the upstream NTP server, restart the service and set it to startup. After completion, submit the user name, password and IP address of the control node to the answer box.
[root@controller ~]# yum install -y chrony
[root@controller ~]# vi /etc/chrony.conf
#server 0.centos.pool.ntp.org iburst
#server 1.centos.pool.ntp.org iburst
#server 2.centos.pool.ntp.org iburst
#server 3.centos.pool.ntp.org iburst
server controller iburst
minsources 2
allow 192.168.100.0/24
local stratum 10
[root@controller ~]# systemctl restart chronyd
[root@controller ~]# systemctl enable chronyd
[root@controller ~]# chronyc sources
210 Number of sources = 1
MS Name/IP address         Stratum Poll Reach LastRx Last sample
===============================================================================
^- controller                   10   6    17     7  -6852ns[-6852ns] +/-   17us

Compute node operations
[root@compute ~]# yum install -y chrony
[root@compute ~]# vi /etc/chrony.conf
#server 0.centos.pool.ntp.org iburst
#server 1.centos.pool.ntp.org iburst
#server 2.centos.pool.ntp.org iburst
#server 3.centos.pool.ntp.org iburst
server controller iburst
[root@compute ~]# systemctl restart chronyd
[root@compute ~]# systemctl enable chronyd
[root@compute ~]# chronyc sources
210 Number of sources = 1
MS Name/IP address         Stratum Poll Reach LastRx Last sample
===============================================================================
^* controller                   10   6    17     9   +374ns[  +49us] +/-  335us
[title 4] calculation node partition [1 point]
On the compute node, use the blank partition to divide two 20G partitions. After completion, submit the user name, password and IP address of the computing node to the answer box.
[root@compute ~]# fdisk /dev/sdb
Command (m for help): n
Partition type:
   p   primary (0 primary, 0 extended, 4 free)
   e   extended
Select (default p): p
Partition number (1-4, default 1):
First sector (2048-83886079, default 2048):
Using default value 2048
Last sector, +sectors or +size{K,M,G} (2048-83886079, default 83886079): +20G
Partition 1 of type Linux and of size 20 GiB is set
Command (m for help): w
#Repeat twice
[root@compute ~]# lsblk
sdb               8:16   0   40G  0 disk
├─sdb1            8:17   0   20G  0 part
└─sdb2            8:18   0   20G  0 part
[task 2] OpenStack building task [10 points]
[Title 1] foundation installation [1 point]
Table 2 cloud platform configuration information
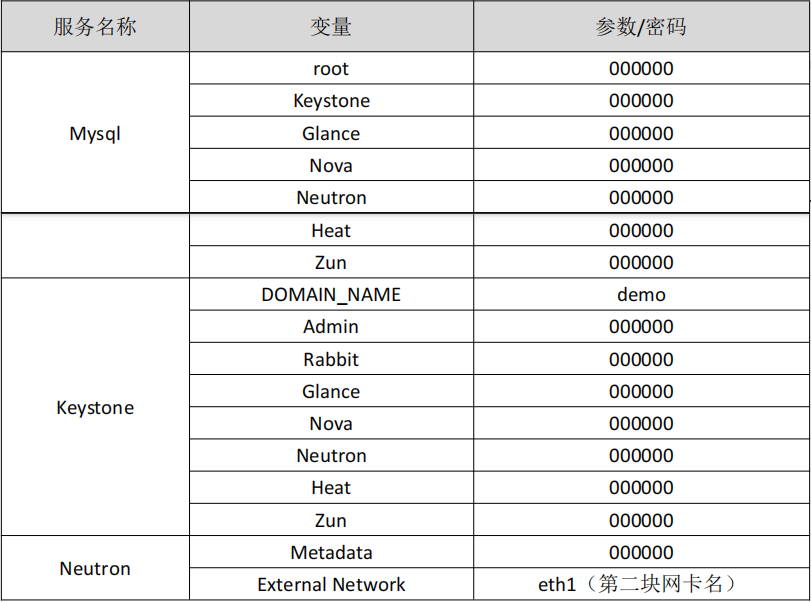
Use the provided script framework iaas-pre-host.sh and openrc.sh environment variable files to fill in the script (just fill in the contents under the Chinese Notes), install the basic components of openstack platform on the controller and compute nodes respectively, and complete the relevant configuration. (the script framework install_openstack.tar.gz software package is under http service) after installation, submit the user name, password and IP address of the control node to the answer box.
Control node operation
[root@controller ~]# yum install -y iaas-xiandian
[root@controller ~]# sed -i 's/^.//g' /etc/xiandian/openrc.sh
[root@controller ~]# sed -i 's/PASS=/PASS=000000/g' /etc/xiandian/openrc.sh
[root@controller ~]# vi /etc/xiandian/openrc.sh
HOST_IP=192.168.100.10
HOST_PASS=000000
HOST_NAME=controller
HOST_IP_NODE=192.168.100.20
HOST_PASS_NODE=000000
HOST_NAME_NODE=compute
network_segment_IP=192.168.100.0/24
RABBIT_USER=openstack
RABBIT_PASS=000000
DB_PASS=000000
DOMAIN_NAME=demo
ADMIN_PASS=000000
DEMO_PASS=000000
KEYSTONE_DBPASS=000000
GLANCE_DBPASS=000000
GLANCE_PASS=000000
NOVA_DBPASS=000000
NOVA_PASS=000000
NEUTRON_DBPASS=000000
NEUTRON_PASS=000000
METADATA_SECRET=000000
INTERFACE_IP=192.168.100.10
INTERFACE_NAME=ens37
Physical_NAME=provider
minvlan=101
maxvlan=200
CINDER_DBPASS=000000
CINDER_PASS=000000
BLOCK_DISK=sdb1
SWIFT_PASS=000000
OBJECT_DISK=sdb2
STORAGE_LOCAL_NET_IP=192.168.100.20
HEAT_DBPASS=000000
HEAT_PASS=000000
ZUN_DBPASS=000000
ZUN_PASS=000000
KURYR_DBPASS=000000
KURYR_PASS=000000
CEILOMETER_DBPASS=000000
CEILOMETER_PASS=000000
AODH_DBPASS=000000
AODH_PASS=000000
BARBICAN_DBPASS=000000
BARBICAN_PASS=000000
[root@controller ~]# scp /etc/xiandian/openrc.sh compute:/etc/xiandian/openrc.sh
[root@controller ~]# source /etc/xiandian/openrc.sh
[root@controller ~]# iaas-pre-host.sh
 Calculation node
[root@compute ~]# vi /etc/xiandian/openrc.sh
.....
INTERFACE_IP=192.168.100.20
.....
[root@compute ~]# source /etc/xiandian/openrc.sh
[root@compute ~]# iaas-pre-host.sh
[Topic 2] database and basic service installation [1 point]
Use the provided script framework iaas-install-mysql.sh to fill in the script (just fill in the contents under the Chinese Notes), install mariadb, mencached, rabbitmq and other services on the controller node, and complete the relevant configuration. After completion, submit the user name, password and IP address of the control node to the answer box.
[root@controller ~]# iaas-install-mysql.sh
[Topic 3] Keystone service installation [1 point]
Use the provided script framework iaas-install-keystone.sh to fill in the script (just fill in the contents under the Chinese Notes), install the keystone service on the controller node and complete the relevant configuration. After completion, submit the user name, password and IP address of the control node to the answer box.
[root@controller ~]# iaas-install-keystone.sh
[title 4] Grace installation [1 point]
Use the provided script framework iaas-install-grace.sh to fill in the script (just fill in the contents under the Chinese Notes), install the grace service on the controller node and complete the relevant configuration. After installation, submit the user name, password and IP address of the control node to the answer box.
[root@controller ~]# iaas-install-glance.sh
[title 5] Nova installation [1 point]
Use the provided script frameworks iaas-install-nova-controller.sh and iaas-install-nova-compute.sh to fill in the script (just fill in the content under the Chinese Comment), install the Nova service on the controller and compute nodes and complete the configuration. After completion, submit the user name, password and IP address of the control node to the answer box.
[root@controller ~]# iaas-install-nova-controller.sh
[root@compute ~]# iaas-install-nova-compute.sh
[title 6] Neutron installation [1 point]
Use the provided script frameworks iaas-install-neutron-controller.sh and iaas-install-neutron-compute.sh to fill in the script (just fill in the content under the Chinese Comment), install the neutron service on the controller and compute nodes and complete the configuration. After completion, submit the user name, password and IP address of the control node to the answer box.
[root@controller ~]# iaas-install-neutron-controller.sh
[root@compute ~]# iaas-install-neutron-compute.sh
[TITLE 7] Doshboard installation [1 point]
Use the provided script framework iaas-install-dashboard.sh to fill in the script (just fill in the contents under the Chinese Notes), install the dashboard service on the controller node and complete the relevant configuration. After completion, submit the user name, password and IP address of the control node to the answer box.
[root@controller ~]# iaas-install-dashboard.sh
[title 8] Cinder installation [1 point]
Use the provided script frameworks iaas-install-cinder-controller.sh and iaas-install-cinder-compute.sh to fill in the script (just fill in the content under the Chinese Comment), install the cinder service on the controller and compute nodes and complete the configuration. After completion, submit the user name, password and IP address of the control node to the answer box.
[root@controller ~]# iaas-install-cinder-controller.sh
[root@compute ~]# iaas-install-cinder-compute.sh
[Title 9] Swift installation [1 point]
Use the provided script frameworks iaas-install-swift-controller.sh and iaas-install-swift-compute.sh to fill in the script (just fill in the content under the Chinese Comment), install the swift service on the controller and compute nodes and complete the configuration. After completion, submit the user name, password and IP address of the control node to the answer box.
[root@controller ~]# iaas-install-swift-controller.sh
[root@compute ~]# iaas-install-swift-compute.sh
[title 10] Heat installation [1 point]
Use the provided script framework iaas-install-heat.sh to fill in the script (just fill in the contents under the Chinese Notes), install the heat service on the controller node and complete the relevant configuration. After completion, submit the user name, password and IP address of the control node to the answer box.
[root@controller ~]# iaas-install-heat.sh
[task 3] OpenStack API operation and maintenance task [10 points]
[Title 1] creating user by calling api in python [2 points]
On the self built OpenStack private cloud platform or the all in one platform provided, complete the installation of Python 3.6 software and dependency libraries according to the Python-api.tar.gz package provided in http service. Create in the / root directory of the controller node_ User.py file, write Python code, connect with OpenStack API, and complete the creation of users. It is required to create a user chinaskill in OpenStack private cloud platform, which is described as "API create user!". After executing the code, it is required to output "user creation succeeded". Write Python code according to the above requirements. After completion, submit the IP address, user name and password of the controller node. (the examination system will connect to your controller node to execute Python script. Please prepare the running environment for the examination system to access.)
Installed in advance python3.6
[root@controller api]# python3 --version
Python 3.6.8
[root@controller ~]# vi create_user.py
import requests
import json


body = {
    'auth':{
        'identity':{
            'methods':['password'],
            'password':{
                'user':{
                    'name':'admin',
                    'domain':{
                        'name':'demo'
                    },
                    'password':'000000'
                }
            }
        },
        'scope':{
            'project':{
                'domain':{
                    'name':'demo'
                },
                'name':'admin'
            }
        }
    }
}

headers = {'Content-Type':'application/json'}

def get_token():
    result = requests.post('http://192.168.100.10:5000/v3/auth/tokens',headers=headers,json=body).headers['X-Subject-Token']
    print(result)
    return result
..............................