Chapter I
Use of basic configuration files
The method of replacing the configuration file and importing the configuration file into the class ImportResource
public class Student {
    private String name;
    private Integer age;
    private String sex;
    //Then there are the set method and toString method
    }
The content of the configuration file, named applicationContext.xml
<bean id="myStudent" class="com.njupt.vo.Student">
        <property name="name" value="Yue Yue"/>
        <property name="age" value="24"/>
        <property name="sex" value="female"/>
    </bean>
package com.njupt.config;

import com.njupt.vo.Student;
import org.springframework.context.annotation.Bean;
import org.springframework.context.annotation.Configuration;
import org.springframework.context.annotation.ImportResource;

/**
 * Creat with IntelliJ IDEA
 *
 * @Auther:Stubborn gava
 * @Date:2021/11/16/16:03
 * @Description:
 */
/*Configuration Note: the function is to indicate that the current class is used as a configuration file, which is used to configure the container
* The position is above the class
* Configuration This class is equivalent to beans.xml*/
@Configuration
@ImportResource(value = "classpath:applicationContext.xml")
public class SpringConfig {
    /*
    * Create a method. The return value of the method is an object. Add @ Bean to the method, and the return value object violating the law will be injected into the container
    * If no name is specified, the method name is used by default
    * */
    @Bean
    public Student creatStudent(){
        Student student = new Student();
        student.setAge(12);
        student.setName("wolf");
        student.setSex("male");
        return student;
    }

    @Bean(name="lang")
    public Student creatStudent1(){
        Student student = new Student();
        student.setAge(15);
        student.setName("Wolf Microsoft");
        student.setSex("male");
        return student;
    }
}
test method
 @Test
    public void test02(){
        ApplicationContext ctx=new AnnotationConfigApplicationContext(SpringConfig.class);
        Student student = (Student) ctx.getBean("creatStudent");
        System.out.println(student);
    }

    @Test
    public void test03(){
        ApplicationContext ctx=new AnnotationConfigApplicationContext(SpringConfig.class);
        Student student = (Student) ctx.getBean("lang");
        System.out.println(student);
    }
@PropertyResource:
Read the properties property configuration file, which can be used to realize external configuration and provide data outside the program code
Steps:
- Under the resources directory, create a properties configuration file to provide data in the way of k=v
- Specify the location of the properties file with PropertyResource
- Use @ Value (value="${key}")
SpringBoot project creation
Connect the network using domestic https://start.springboot.io
Annotations for SpringBootApplication


SpringBoot configuration file
The name is: application
The extension has properties(k=v); yml(k:v)
The properties file is preferred
 When there are multiple environments, the configuration files of different test environments and development environments can be used. The naming rules are as follows:
application - environment name.properties
for example
Development time configuration file: application-dev.properties
Configuration file during test: application-test.properties
You only need to specify which profile to activate in the main profile

Write the simple properties in the configuration file and read them with @ Value
#Specify the port number
server.port=9090
#To specify the project name
server.servlet.context-path=/myboot
#Some simple properties can also be written in the configuration file, and parameters can be injected by this @ Value annotation
inf.name=seawater
inf.site=www.baidu.com
inf.age=12
@Controller
public class MyController {

    @Value("${inf.name}")
    private String name;
    @Value("${inf.site}")
    private String site;
    @Value("${inf.age}")
    private Integer age;

    @ResponseBody
    @RequestMapping("/hello")
    public String getString(){
        return name+site+age;
    }
}
Write some simple properties in a class as objects
@Component
//Find the attribute with this prefix in the configuration file for automatic injection assignment
@ConfigurationProperties(prefix = "inf")
public class Student {
    private String name;
    private Integer age;
    private String site;
    }
    @Resource//Automatic injection, byname first and byType later
    private Student student;
    @ResponseBody
    @RequestMapping("/objHello")
    public String getObject(){
        return student.toString();
    }
Use JSP005
Spring boot does not recommend jsp, but template technology
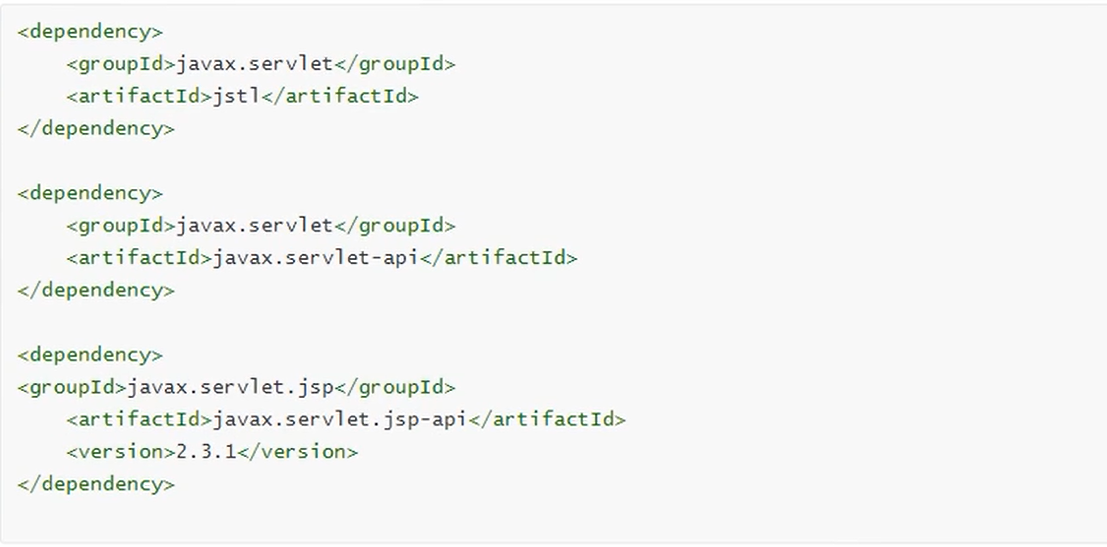
1. Add dependencies first and be responsible for compiling jsp files

2 if you need to use servlet s and JSPS, add corresponding dependencies to the functions of jstl

3 create a directory for storing jsp files under main, which is generally called webapp. At this time, this file is just an ordinary folder. You need to specify that this folder is a resource folder.

 After clicking the plus sign and adding the created directory, you can turn ordinary files into resource files.
Used to place JSP files, such as index.jsp
4. You need to specify the storage directory after jsp compilation in pom.xml
META-INF/resources

5 create Controller and access jsp
@Controller
public class JspController {


//If ResponseBody is not added here, the jsp interface will be returned. If it is added, the string will be returned
    @RequestMapping("/myjsp")
    public String doShow(HttpServletRequest request){
        request.setAttribute("date","This is the use of jsp The returned value of");
        return "index";//This is the front-end jsp file name
    }

    @RequestMapping("/myjsp1")
    public String doShow2(Model model){
        //Put into scope
        model.addAttribute("date","This is the use of jsp The returned value of");
        return "index";
    }
}
6 configure the file parser in the application.properties file
#Configure port number
server.port=8080
server.servlet.context-path=/myboot

#Configure the prefix and suffix of the view parser
#The default starting address is src/main/webapp
spring.mvc.view.prefix=/
spring.mvc.view.suffix=.jsp
Use of getting objects in container 006
You want to get objects from the container through code
The return value of this run method is a container.
@SpringBootApplication
public class Application {

	public static void main(String[] args) {
		SpringApplication.run(Application.class, args);
	}

}
The prepared class wants to get the class from the container and execute the method
@Service("userService")
public class UserServiceImpl implements UserService {
    @Override
    public void sayHello(String name) {
        System.out.println("Business methods implemented"+name);
    }
}
@SpringBootApplication
public class Application {

	public static void main(String[] args) {
		ConfigurableApplicationContext ctx = SpringApplication.run(Application.class, args);
		UserServiceImpl bean = (UserServiceImpl) ctx.getBean("userService");
		bean.sayHello("child");
	}

}
Through this method, you can correctly obtain the object in the container and execute the method
CommandLineRunner interface and ApplicationRunner interface
Both methods have a run method. The execution time is after the container object is created. Actively execute the run() method to complete some customized operations after the container object is created.
@FunctionalInterface
public interface CommandLineRunner {
    void run(String... args) throws Exception;
}

@FunctionalInterface
public interface ApplicationRunner {
    void run(ApplicationArguments args) throws Exception;
}
For example, verify the sequence between the execution of these two interfaces and the creation of containers:
This is preparation
@Service
public class UserServiceImpl implements UserService {
    @Override
    public String sayHello(String name) {
        return "What do you want to welcome this time"+name;
    }
}
This is a test
@SpringBootApplication
public class Application implements CommandLineRunner {
     @Resource
	 UserService userService;
	public static void main(String[] args) {


		System.out.println("Start creating container object 1");
		SpringApplication.run(Application.class, args);
		System.out.println("Finished creating object 2");
	}

	@Override
	public void run(String... args) throws Exception {

		String s = userService.sayHello("child");
		System.out.println(s+3);

	}
}
test result
Start creating container object 1
 The object you want to welcome this time is child 3
 Finished creating object 2
It can be understood that when spring application calls the run method, it will automatically call the next run method, and then execute other programs of the main method.
Chapter 2 SpringBoot and web components
Interceptor
There are system interceptors in the interceptor framework. You can also customize the interceptors to pre process requests
Implement custom interceptors
1. Create a class to implement the HandlerInterceptor interface of the spring MVC framework
public class LoginInterceptor implements HandlerInterceptor {
    /**
     * Interceptor to intercept requests
     * @param request
     * @param response
     * @param handler
     * @return
     * @throws Exception
     */
    @Override
    public boolean preHandle(HttpServletRequest request, HttpServletResponse response, Object handler) throws Exception {
        System.out.println("It has been judged that it meets the requirements, so it passes the interceptor");
        return true;
    }
}
2 declare the interceptor in the configuration file of spring MVC
@Configuration
public class MyAppConfig implements WebMvcConfigurer {
    //Add interceptor objects and inject them into the container
    @Override
    public void addInterceptors(InterceptorRegistry registry) {
        //Create interceptor object
        HandlerInterceptor interceptor=new LoginInterceptor();
        //Specify the blocked address and the non blocked address
        String path[]={"/user/**"};
        String excludePath[]={"/user/login"};
        registry.addInterceptor(interceptor)
                .addPathPatterns(path)
                .excludePathPatterns(excludePath);
    }
}
Test code
@Controller
public class MyController {

    @RequestMapping("/user/account")
    @ResponseBody
    public String userAccount(){
        return "Get user/account Interface";
    }

    @RequestMapping("/user/login")
    @ResponseBody
    public String userLogin(){
        return "Get user/login Interface";
    }

}
When you start to access these interfaces on the browser side, some pass through the filter and some do not pass through the filter.
Servlet
Using Servlet objects in springboot
Use steps:
1 to create a Servlet class is to create a class to inherit HttpServlet
package com.njupt.web;

import javax.servlet.ServletException;
import javax.servlet.http.HttpServlet;
import javax.servlet.http.HttpServletRequest;
import javax.servlet.http.HttpServletResponse;
import java.io.IOException;
import java.io.PrintWriter;

/**
 * Creat with IntelliJ IDEA
 *
 * @Auther:Stubborn gava
 * @Date:2021/11/17/15:30
 * @Description:
 */

public class MyServlet extends HttpServlet {
    @Override
    protected void doGet(HttpServletRequest req, HttpServletResponse resp) throws ServletException, IOException {
        doPost(req, resp);
    }

    @Override
    protected void doPost(HttpServletRequest req, HttpServletResponse resp) throws ServletException, IOException {
        resp.setContentType("text/html;charset=utf-8");
        PrintWriter out=resp.getWriter();
        out.println("The implementation is Servlet");
        out.flush();
        out.close();
    }
}
2 register the Servlet so that the framework can find this class
@Configuration
public class SystemConfig {

    //Define methods to register Servlet objects
    /*The first method is to pass values through the construction method*/
    @Bean
    public ServletRegistrationBean servletRegistrationBean(){
        ServletRegistrationBean bean = new ServletRegistrationBean(new MyServlet(),"/myServletByConstruct");
        return bean;
    }

   /* *//*The second method is to pass values through*//*
    @Bean
    public ServletRegistrationBean servletRegistrationBean1(){
        ServletRegistrationBean bean = new ServletRegistrationBean();
        bean.setServlet(new MyServlet());
        bean.addUrlMappings("/loginByMethod","/testByMethod");
        return bean;
    }*/

}
Filter filter
Filter is a filter in the Servlet specification. It can process requests and adjust the parameters and attributes of requests. It is often used to process character encoding. The steps of using the filter in the framework are as follows:
1. Create a custom filter class
//Custom filter class
public class MyFilter  implements Filter {
    @Override
    public void doFilter(ServletRequest servletRequest, ServletResponse servletResponse, FilterChain filterChain) throws IOException, ServletException {

        System.out.println("The filter method is implemented doFilter");
        filterChain.doFilter(servletRequest,servletResponse);
    }
}
2 register the Filter object
@Configuration
public class MyFilterConfig {

    @Bean
    public FilterRegistrationBean get(){
        FilterRegistrationBean bean = new FilterRegistrationBean();
        bean.setFilter(new MyFilter());
        bean.addUrlPatterns("/user/*");
        return bean;
    }

}
test
@Controller
public class MyController {
    @RequestMapping("/user/account")
    @ResponseBody
    public String getFilter(){

        return "Performed after passing through the filter controller code";
    }

    @RequestMapping("/query/account")
    @ResponseBody
    public String getFilter1(){

        return "Performed without a filter controller code";
    }
}
Use the filter to specify the coded character set to solve the problem of Chinese garbled code
If you do not specify a character set, the default is ISO-8859-1
Content-Typetext/html;charset=ISO-8859-1
1 Basic servlet class
public class MyServlet extends HttpServlet {
    @Override
    protected void doGet(HttpServletRequest req, HttpServletResponse resp) throws ServletException, IOException {
        doPost(req,resp);
    }

    @Override
    protected void doPost(HttpServletRequest req, HttpServletResponse resp) throws ServletException, IOException {
        resp.setContentType("text/html");
        PrintWriter out=resp.getWriter();
        out.println("stay servlet Chinese output test");
        out.flush();
        out.close();
    }
}
2 write and configure character set filter class
@Configuration
public class ServletConfig {

    //Register servlet
    @Bean
    public ServletRegistrationBean getBean(){

        ServletRegistrationBean bean = new ServletRegistrationBean();
        bean.setServlet(new MyServlet());
        bean.addUrlMappings("/myservlet");

        return bean;
    }


    @Bean
    public FilterRegistrationBean filterRegistrationBean(){
        FilterRegistrationBean bean = new FilterRegistrationBean();
        //Using filter classes in the framework
        CharacterEncodingFilter filter = new CharacterEncodingFilter();
        //Specifies the encoding used
        filter.setEncoding("utf-8");
        //Set both request and response to this coded character set
        filter.setForceEncoding(true);
        bean.setFilter(filter);

        bean.addUrlPatterns("/*");
        return bean;
    }

}
Finally, don't forget to change the default configuration in the configuration file
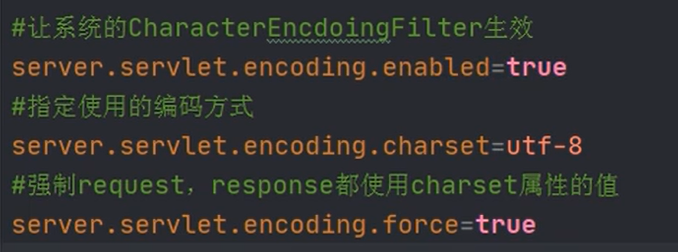
#Why is it set to false? Because the springboot has configured the characterencoding filter by default. The code is 8859-1 by default. It is initially set to false to close the configured filter and use the custom filter
server.servlet.encoding.enabled=false
You can also directly change the character encoding method in the configuration file and use it directly in the configuration file without writing the filter class

Chapter 3 ORM operation MYSQL
Using the MyBatis framework to manipulate data,
Add Mybatis to the SpringBoot framework
Use steps:
1. Add the mybatis dependency to complete the automatic configuration of mybatis objects, which are placed in the container
<repositories><!-- Alicloud code base -->
		<repository>
			<id>maven-ali</id>
			<url>http://maven.aliyun.com/nexus/content/repositories/central</url>
			<releases>
				<enabled>true</enabled>
			</releases>
			<snapshots>
				<enabled>true</enabled>
				<updatePolicy>always</updatePolicy>
				<checksumPolicy>fail</checksumPolicy>
			</snapshots>
		</repository>
	</repositories>

	<dependencies>
		<dependency>
			<groupId>org.springframework.boot</groupId>
			<artifactId>spring-boot-starter-web</artifactId>
		</dependency>

		<dependency>
			<groupId>org.mybatis.spring.boot</groupId>
			<artifactId>mybatis-spring-boot-starter</artifactId>
			<version>2.2.0</version>
		</dependency>
		<dependency>
			<groupId>mysql</groupId>
			<artifactId>mysql-connector-java</artifactId>
			<scope>runtime</scope>
		</dependency>
		<dependency>
			<groupId>org.springframework.boot</groupId>
			<artifactId>spring-boot-starter-test</artifactId>
			<scope>test</scope>
		</dependency>
	</dependencies>
The build of 2pom.xml specifies to include the XML file in src/main/java directory into the classpath
<resources>
			<resource>
				<directory>src/main/java</directory>
				<includes>
					<include>**/*.xml</include>
				</includes>
			</resource>
		</resources>
3 Create entity class Student
4. Create dao interface. StudentDao also creates a method that can query students
When there are few interfaces: @ Mapper
@Mapper
public interface StudentDao {
    Student selectById(@Param("stuId") Integer id);
}
When there are many interfaces, @ MapperScan is added to the main startup class to find dao interfaces and some mapping files
1. Add the annotation @ MapperScan on the main startup class to scan the interface class
@SpringBootApplication
@MapperScan(basePackages = {"com.njupt.dao","other dao Package name of the interface"})
public class Application {

	public static void main(String[] args) {
		SpringApplication.run(Application.class, args);
	}

}
2.Scan interface in configuration file xml File location

```java
server.port=8990
server.servlet.context-path=/myboot

spring.datasource.driver-class-name=com.mysql.cj.jdbc.Driver
spring.datasource.url=jdbc:mysql://localhost:3306/springdb?useUnicode=true&characterEncoding=UTF-8&serverTimezone=GMT%2B8
spring.datasource.username=root
spring.datasource.password=5264
#The location of the configuration file for the scan interface
mybatis.mapper-locations=classpath:mapper/*.xml
3 in the pom file, the main configuration file should also be compiled under the classpath
<build>
      <resources>
            <resource>
                <directory>src/main/resources</directory>
                <includes>
                    <include>**/*.*</include>
                </includes>
            </resource>
        </resources>
</build>
5 establish dao Interface corresponding mapper File i.e StudentDao.xml file,Write red in the file sql sentence

```xml
<mapper namespace="com.njupt.dao.StudentDao">
    <select id="selectById" resultType="com.njupt.entity.Student">
        select id,name,email,age from  student where id=#{stuId}
    </select>
</mapper>
6 service layer to call dao to complete data query
public interface StudentService {
    Student queryStudent(Integer id);
}
@Service
public class StudentServiceImpl implements StudentService {

    @Resource
    private StudentDao studentDao;

    @Override
    public Student queryStudent(Integer id) {
        Student student = studentDao.selectById(id);
        return student;
    }
}
7. Create the controller layer and access the service
@Controller
public class StudentController {
    @Resource
    private StudentService service;

    @RequestMapping("/student/query")
    @ResponseBody
    public String queryStudent(Integer id){
        Student student = service.queryStudent(id);
        return student.toString();
    }


}
8 write configuration file and configure connection information
server.port=9001
server.servlet.context-path=/orm


#Connect to database
spring.datasource.driver-class-name=com.mysql.cj.jdbc.Driver
spring.datasource.url=jdbc:mysql://localhost:3306/springdb?useUnicode=true&characterEncoding=UTF-8&serverTimezone=GMT%2B8
spring.datasource.username=root
spring.datasource.password=5264
Use transaction
- Review transactions in the spring framework
1) Objects that manage transactions: transaction managers (interfaces and implementation classes)
For example, use jdbc or mybatis to access the database, and use the transaction manager: data source transaction manager
2) Declarative transaction: specify the content of transaction control in xml file or with annotations
Control transactions: isolation level, propagation behavior, timeout
3) Transaction processing method:
1) @ Transaction in Spring framework
2)aspectj framework can declare the control content of transaction in xml configuration file
- Using transactions in SpringBoot: both of the above methods work
1) After adding @ Transactional annotation to the business method, the transaction function will be available
2) Explicitly add @ EnableTransactionManager to the main startup class
Learn to use the mybatis code auto generator
1 add a plug-in in the pom file. If the addition is unsuccessful, refer to This one
<plugin>
				<groupId>org.mybatis.generator</groupId>
				<artifactId>mybatis-generator-maven-plugin</artifactId>
				<version>1.3.6</version>
				<configuration>
					<configurationFile>mybatis-generator-cfg.xml</configurationFile>
					<verbose>true</verbose>
					<overwrite>true</overwrite>
				</configuration>
			</plugin>
2. After adding successfully, write the mybatis-generator-cfg.xml configuration file, which I put directly under the project module
<?xml version="1.0" encoding="UTF-8"?>
<!DOCTYPE generatorConfiguration
PUBLIC "-//mybatis.org//DTD MyBatis Generator Configuration 1.0//EN"
"http://mybatis.org/dtd/mybatis-generator-config_1_0.dtd">
<generatorConfiguration>
<!---->
<properties resource="application.properties"></properties>
<!--Specify where to connect to the database jdbc Location of the drive package-->
<classPathEntry location="E:\java\maventools\maven_repository\mysql\mysql-connector-java\8.0.27\mysql-connector-java-8.0.27.jar"/>
<context id="test" targetRuntime="MyBatis3">
<plugin type="org.mybatis.generator.plugins.EqualsHashCodePlugin"></plugin>
<plugin type="org.mybatis.generator.plugins.SerializablePlugin"></plugin>
<plugin type="org.mybatis.generator.plugins.ToStringPlugin"></plugin>
<commentGenerator>
<!-- This element is used to specify whether the generated comment contains the generated date false:Indicates protection -->
<!-- If you generate a date, even if you modify a field, all attributes of the entire entity class will change, which is not conducive to version control, so set it to true -->
<property name="suppressDate" value="true" />
<!-- Remove automatically generated comments true: Yes: false:no -->
<property name="suppressAllComments" value="true" />
</commentGenerator>
<!--Database link URL,User name and password -->
<jdbcConnection driverClass="com.mysql.cj.jdbc.Driver"
connectionURL="jdbc:mysql://localhost:3306/springdb?useUnicode=true&characterEncoding=UTF-8&serverTimezone=GMT%2B8"
userId="root"
password="5264">
</jdbcConnection>
<javaTypeResolver>
<!-- This property is used to specify whether MyBatis Generator should
force the use of java.math.BigDecimal for DECIMAL and NUMERIC fields, -->
<property name="forceBigDecimals" value="false" />
</javaTypeResolver>
<!-- targetpakage Is the directory to be generated, targetProject Is the corresponding prefix directory. You can survive to the corresponding directory according to your own needs. The next run will directly overwrite the file in the original location by default -->
<!-- The package name and location of the generated model map the location of the entity class -->
<javaModelGenerator targetPackage="com.njupt.model"
targetProject="E:\Java study\springboot-prj\015-springboot-transactional\src\main\java">
<property name="enableSubPackages" value="false" />
<property name="trimStrings" value="false" />
</javaModelGenerator>
<!-- Package name and location of the generated mapping file mapper.xml -->
<sqlMapGenerator targetPackage="mapper"
targetProject="src/main/resources">
<property name="enableSubPackages" value="false" />
</sqlMapGenerator>
<!-- generate DAO Package name and location of mapper Interface-->
<javaClientGenerator type="XMLMAPPER" targetPackage="com.njupt.dao"
targetProject="src/main/java">
<property name="enableSubPackages" value="true" />
</javaClientGenerator>
<!-- Which tables do you want to generate orders It's my watch name, Orders Is the generated class name. For example, my mapping class is Order,Mapping interface OrderMapper, The mapping file is OrderMapper.xml,Multiple tables can be added, and several configurations in them roughly mean whether generation is allowed example Documentation and support selectByExample. Used Mybatis You should know selectByExample,For some simple queries, it is more convenient to use this. Ha ha, there are a lot of words. Remember to delete them -->
<table tableName="student" domainObjectName="Student"
enableCountByExample="false" enableUpdateByExample="false"
enableDeleteByExample="false" enableSelectByExample="false"
selectByExampleQueryId="false"></table>
<!-- Which tables do you want to generate
<table tableName="products" domainObjectName="Products"
enableCountByExample="false" enableUpdateByExample="false"
enableDeleteByExample="false" enableSelectByExample="false"
selectByExampleQueryId="false"></table>-->
</context>
</generatorConfiguration>
3. Click the maven plug-in on the right to test the startup. If buildSuccess is displayed, the code will be generated successfully
4. The code for processing transactions can be tested later. If it is not successful, it will be rolled back.
@Transactional//Let this method enable transactions / * the isolation level and propagation behavior of the database are used by default: timeout*/
    @Override
    public int addStudent(Student student) {
        System.out.println("Business method add a new student");
        int insert = dao.insert(student);

        System.out.println("implement sql");

        //int m=10/0;
        return insert;
    }
Main startup class
@MapperScan(basePackages = "com.njupt.dao")
@SpringBootApplication
@EnableTransactionManagement
public class Application {

	public static void main(String[] args) {
		SpringApplication.run(Application.class, args);
	}

}
Chapter 4 interface architecture style - RESTful
1 REST(Representational State Transfer: presentation layer state transfer)
It is an interface framework style and design concept, not a standard. Its advantages are more concise and hierarchical
Presentation layer state transition:
The presentation layer is the view layer, which displays the of resources and displays the results of operating resources through the view page
Status: resource change
Transfer: resources can change. After modification, the resource is different from before
2 elements in rest
Use REST to represent resources and operations on resources, and represent a resource or an operation
Query, create, update and delete resources
GET: query resource sql select
Format:
For individual resources
http://localhost:8080/myboot/student/001
For multiple resources
http://localhost:8080/myboot/students/001/002
POST: create resource sql insert
Format: http://localhost:8080/myboot/student
PUT: update resource -- sql update
http://localhost:8080/myboot/student/1
DELETE: DELETE a resource
http://localhost:8080/myboot/student/1
The summary is to use url to represent resources and http actions to operate resources.
Useful notes
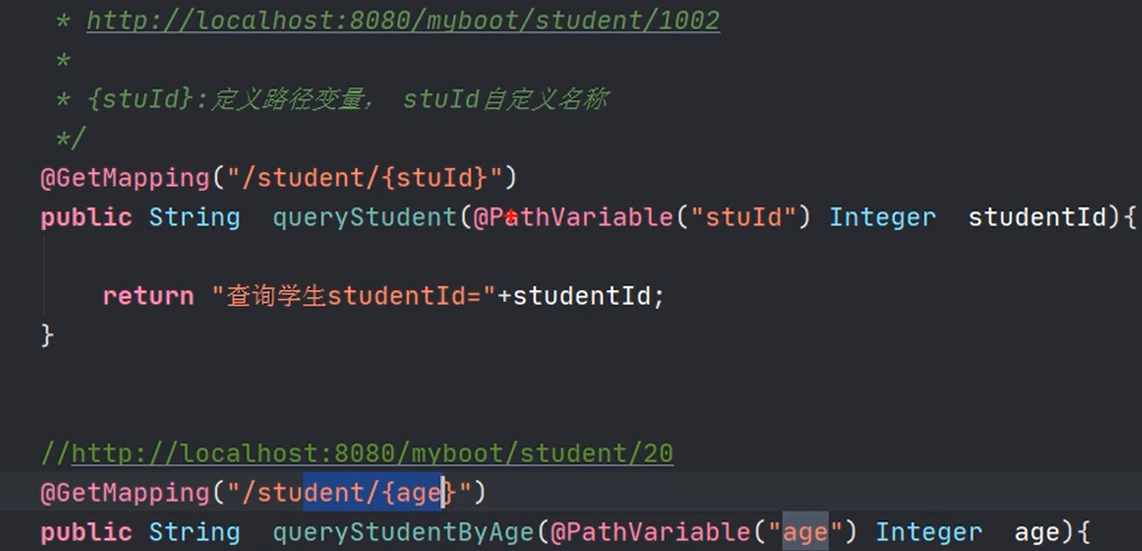
@PathVariable: get data from url
@GetMapping: support get request method, @ RequestMapping(method=RequestMethod.GET)
@PostMapping: supports post requests and creates
@PutMapping: supports put requests and updates
@DeleteMapping: supports the delete request method, which can be deleted
@RestController: conforms to the annotation. It is a combination of @ Controller and @ ResponseBody
Example: you can use the following annotation to obtain the parameters through the parameters passed in front
@RestController
public class MyRestController {
    /**
     *@PathVariable:Get data in url
     * {stuId}The user-defined name is a placeholder. Later, the data of this location is the id value
     */
    @GetMapping("/student/{stuId}")
    public  String query(@PathVariable(value = "stuId") Integer id){
        return "Query students id"+id;
    }


    @PostMapping("/student/{name}/{age}")
    public String post(@PathVariable("name") String name
            ,@PathVariable("age") Integer age){

        return "postmapping Get parameters"+name+age;
    }

    @PutMapping("/student/{id}/{age}")
    public String put(@PathVariable("id") Integer id,@PathVariable("age") Integer age){
        return "Update resources, execute put Request mode id="+id+age;
    }


    @DeleteMapping("/student/{id}")
    public String remove(@PathVariable("id") Integer id){
        return "Parameter passing for delete operation"+id;

    }

}
The Postman test tool has the opportunity to learn that the request method can be specified, but in the interface, such as html and jsp, the form can use get and post, but not put and delete. In order to use these two methods in the front-end interface, a filter needs to be added
put and delete are supported in the front-end interface
There is a filter in spring MVC that supports changing post into put and delete
org.springframework.web.filter.HiddenHttpMethodFilter
This filter has been automatically added in Springboot. You only need to enable HiddenHttpMethodFilter in the configuration file
Implementation steps:
1 enable the use of HiddenHttpMethodFilter filter in the configuration file
#Start support put and delete
spring.mvc.hiddenmethod.filter.enabled=true
2 add hidden fields in the request interface, including_ method parameter. Its values are put and delete. post is required to initiate this request
<form action="/myboot/student/lisi/34" method="post">
    <input type="hidden" name="_method" value="put">
    <input type="submit" value="Registered student">
</form>
Pay attention to ensure the uniqueness of url + request mode, otherwise ambiguity will occur

Chapter 5 spring boot integration Redis

1. Redis serialization


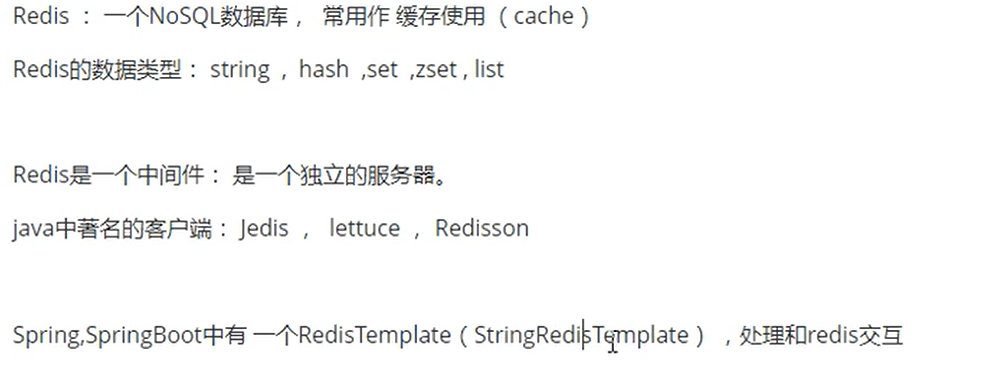
2 compare StringRedisTemplate with RedisTemplate

When serializing simple types, you can serialize them directly
package com.njupt.controller;

import org.springframework.data.redis.core.RedisTemplate;
import org.springframework.data.redis.core.ValueOperations;
import org.springframework.data.redis.serializer.StringRedisSerializer;
import org.springframework.web.bind.annotation.GetMapping;
import org.springframework.web.bind.annotation.PathVariable;
import org.springframework.web.bind.annotation.PostMapping;
import org.springframework.web.bind.annotation.RestController;

import javax.annotation.Resource;

/**
 * Creat with IntelliJ IDEA
 *
 * @Auther:Stubborn gava
 * @Date:2021/11/19/12:40
 * @Description:
 */
@RestController
public class MyRedis {

    @Resource
    RedisTemplate redisTemplate;

    @GetMapping("/user/{name}")
    public String get(@PathVariable("name") String name){
        ValueOperations valueOperations = redisTemplate.opsForValue();
        valueOperations.set("hai","lang");
        return name+"Get this name";
    }

    @PostMapping("user/{key}")
    public String post(@PathVariable("key") String key){

        Object o = redisTemplate.opsForValue().get(key);
        return "Found key yes"+key+",The values obtained are:"+o;
    }

    @PostMapping("user/my/{key}/{value}")
    public String addSer(@PathVariable("key") String key,@PathVariable("value") String value){
        //Serialize key
        redisTemplate.setKeySerializer(new StringRedisSerializer());
        //Serialize value
        redisTemplate.setValueSerializer(new StringRedisSerializer());

        redisTemplate.opsForValue().set(key,value);

        return "Custom serialization key="+key+"value="+value;
    }

    @GetMapping("get/{key}")
    public String getSer(@PathVariable("key") String key){
        Object o = redisTemplate.opsForValue().get(key);
        return "The returned value is"+o;
    }
}
When objects need to be serialized, they are generally serialized into json format
 @PostMapping("/red/{a}")
    public String addJson(@PathVariable("a") String a){
        Student student = new Student();
        student.setId(1001);
        student.setName("Cantonese");
        student.setAge(24);
        redisTemplate.setKeySerializer(new StringRedisSerializer());
        redisTemplate.setValueSerializer(new Jackson2JsonRedisSerializer(Student.class));

        //Serialize objects into json format
        redisTemplate.opsForValue().set("stu1",student);

        //Deserialized object
        Object stu1 = redisTemplate.opsForValue().get("stu1");
        System.out.println(stu1);
        return a;
    }
You can use postman for corresponding access.
Chapter 6 SpringBoot integration Dubbo
Wait a minute. I'll be right back after DUBBO!