1, KNN principle
1.1 introduction to KNN principle
KNN algorithm, i.e. K nearest neighbor algorithm, as the name suggests, its principle is to judge which category x belongs to according to what category most of the K nearest points belong to when predicting a new value X.
zzzzMing - big data technology - simple KNN algorithm when K=3, the three nearest figures of x include two triangles and a circle. Because 2 > 1, x is more likely to be a triangle.
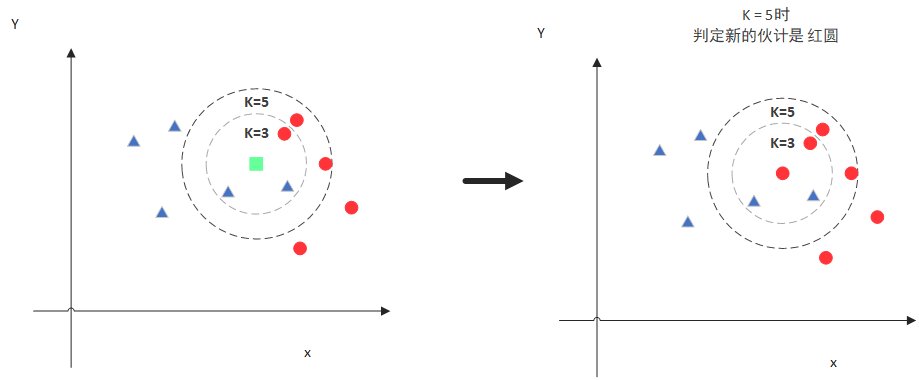
when K=5, the five nearest figures of x include two triangles and three circles. Because 3 > 2, x is more likely to be a circle.
similarly, in terms of image recognition, we need to have a large number of training samples and know the category of each sample before using KNN algorithm. (for example, a large number of digital pictures, and know how many numbers each picture represents). When we want to recognize numbers, we essentially find the K samples closest to the image to be recognized in the training samples, and then count out which number appears most in the K samples, that is, the number to be recognized.
1.2 key parameters of KNN
① How many nearest neighbor samples to find - K selection
K value determines the number of nearest neighbor images to be found in the process of image recognition. It can be seen from the above example that if different K is selected, the recognition results may be completely different. Therefore, K value is one of the most key parameters in KNN algorithm, which directly affects the performance of the model.
if the K value is too small, the recognition result will be greatly affected by the sample quality. If there are some errors or noises in the training sample, and these items are found when looking for the nearest neighbor sample, the recognition result must be wrong. Increasing the K value and looking for more samples will effectively reduce the impact of sample noise.
if the K value is too large, assuming that the K value is equal to the number of training samples, the recognition result is the category with the largest number of samples no matter what the picture to be recognized is.
so how should the K value be selected? Theoretically, there is an extreme value in the relationship between K value and recognition accuracy. The best K value can be selected according to the results through many experiments. (for example, when K=3, the accuracy rate is 72; when K=5, the accuracy rate is 91; when K=8, the accuracy rate is 81, then selecting K=5 will be a relatively good choice)
② How to judge the "proximity" - distance calculation
the distance calculation function generally uses Manhattan distance or Euclidean distance.
Manhattan distance is the sum of the differences of each dimension of sample characteristics. (corresponding to the image, that is, the difference between each pixel of the two images)

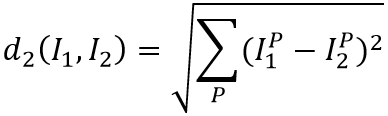
Euclidean distance is the root of the sum of squares of the differences of sample features in each dimension.
2, Recognition of handwritten digits by KNN algorithm
KNN algorithm for handwritten numeral recognition source program- Click here to download
2.1 detailed explanation of training process code
first, we need to obtain training samples. The OpenCV installation directory provides us with sample pictures of handwritten digits opencv\sources\samples\data\digits.png. Each number in this picture has 5x100 samples, and the pixels occupied by each number are 20x20, so we can extract the training samples we need from this picture.
we cut the sample pictures by column. Each time we cut a sample, we add it to the data and add the corresponding number to the label at the same time. In this way, we get the data and label data corresponding to pictures and numbers one by one.
	Mat img = imread("E:/Program/OpenCV/vcworkspaces/knn_test/images/data/digits.png");
	Mat gray;
	cvtColor(img, gray, COLOR_BGR2GRAY);
	int b = 20;
	int m = gray.rows / b;   //The original drawing is 1000 * 2000
	int n = gray.cols / b;   //Cut into 5000 small blocks of 20 * 20
	Mat data, labels;   //Characteristic matrix

	for (int i = 0; i < n; i++)
	{
	    int offsetCol = i * b; //Offset on column
	    for (int j = 0; j < m; j++)
	    {
	        int offsetRow = j * b;  //Offset on line
	                              //Intercept 20 * 20 small pieces
	        Mat tmp;
	        gray(Range(offsetRow, offsetRow + b), Range(offsetCol, offsetCol + b)).copyTo(tmp);
	        //Reshape 0: the channel remains unchanged. Other numbers indicate the number of channels to be set
	        //reshape indicates the number of rows in the matrix. If it is set to 0, it means to keep the original number of rows unchanged. If it is set to other numbers, it means the number of rows to be set
	        data.push_back(tmp.reshape(0, 1));  //Put it into the characteristic matrix after serialization
	        labels.push_back((int)j / 5);  //Corresponding dimensions
	    }
	}
use this training sample to create KNN model.
if you need to test the recognition accuracy of the model, you can select the first 3000 samples as the training data and the last 2000 samples as the test data from the 5000 samples just obtained. The KNN model is used to calculate the recognition correctness of the test data in the sample.
	data.convertTo(data, CV_32F); //Conversion from uchar type to cv_32f
	int samplesNum = data.rows;
	int trainNum = 500;
	Mat trainData, trainLabels;
	trainData = data(Range(0, trainNum), Range::all());   //The first 3000 samples are training data
	trainLabels = labels(Range(0, trainNum), Range::all());

	//Using KNN algorithm
	int K = 5;
	Ptr<TrainData> tData = TrainData::create(trainData, ROW_SAMPLE, trainLabels);
	model = KNearest::create();
	model->setDefaultK(K);
	model->setIsClassifier(true);
	model->train(tData);
	//Forecast classification
	double train_hr = 0, test_hr = 0;
	Mat response;
	// compute prediction error on train and test data
	for (int i = 0; i < samplesNum; i++)
	{
	    Mat sample = data.row(i);
	    float r = model->predict(sample);   //Forecast all rows
	                                        //Compared with the original results, the predicted results are equal to 1 and unequal to 0
	    r = std::abs(r - labels.at<int>(i)) <= FLT_EPSILON ? 1.f : 0.f;

	    if (i < trainNum)
	        train_hr += r;  //Cumulative positive definite number
	    else
	        test_hr += r;
	}

	test_hr /= samplesNum - trainNum;
	train_hr = trainNum > 0 ? train_hr / trainNum : 1.;

	printf("accuracy: train = %.1f%%, test = %.1f%%\n",
	    train_hr * 100., test_hr * 100.);
2.2 implementation process of prediction classification
After the completion of the training samples, the prediction classification is very simple. The image to be identified is read in and processed by two values, and then adjusted to the same size as the sample picture (20x20). push the processed image into test, and you can directly use the KNN model just created for prediction.
    //Forecast classification
    Mat img = imread("E:/Program/OpenCV/vcworkspaces/knn_test/images/test/4.jpg");
    cvtColor(img, img, COLOR_BGR2GRAY);
    //threshold(src, src, 0, 255, CV_THRESH_OTSU);
    imshow("Image", img);
    resize(img, img, Size(20, 20));
    Mat test;
    test.push_back(img.reshape(0, 1));
    test.convertTo(test, CV_32F);
    int result = model->predict(test);
    cout << "Identification number:" << result << endl;
3, Recognition of printed numbers by KNN algorithm
KNN algorithm identifies the source program of printed numbers- Click here to download
2.1 training process
the principle of recognizing printed numbers is the same as that of recognizing handwritten numbers, but the training samples are different. Here, I made 1000 training samples with different fonts. The loading method is as follows:
	//Training result does not exist, retrain
	int add_image_num = 1000;   //Number of folders for expanded training data
	int filenum = 0;
	Mat data, labels;   //Characteristic matrix

	for (int i = 0; i < add_image_num; i++)
	{
	    Mat addimg = imread("E:/Program/OpenCV/vcworkspaces/knn_test/images/data/" + to_string(filenum) + ".jpg");
	    cvtColor(addimg, addimg, COLOR_BGR2GRAY);
	    //threshold(src, src, 0, 255, CV_THRESH_OTSU);
	    resize(addimg, addimg, Size(20, 20));

	    data.push_back(addimg.reshape(0, 1));  //Put it into the characteristic matrix after serialization
	    labels.push_back((int)((filenum++) % 10));  //Corresponding dimensions
	}
after loading the training samples, create the KNN model in the same way as above, and then carry out prediction and recognition.