1, Basic concepts
1. What is Nginx
Nginx is a high-performance HTTP and reverse proxy server, as well as an IMAP/POP3/SMTP proxy server. Its characteristic is that it occupies less memory. The concurrency ability is strong, and its concurrency ability is indeed better in the same type of web server.
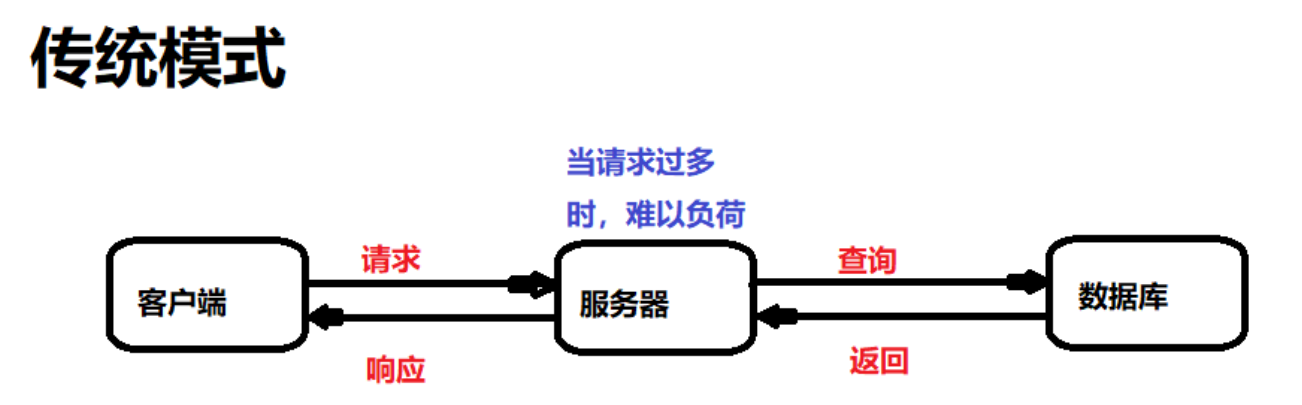
http server
A Web server is a program that resides on some type of computer on the Internet. When a Web browser (client) connects to the server and requests a file, the server will process the request and feed back the file to the browser. The attached information will tell the browser how to view the file (i.e. file type). Servers use HTTP (Hypertext Transfer Protocol) to communicate information with client browsers, which is why they are often called HTTP servers.
proxy server
It usually refers to the machine inside the LAN sends requests to the server on the Internet through the proxy server. The proxy server generally acts on the client.
Reverse proxy
The client sends a normal request to the content in the namespace of the reverse proxy, and then the reverse proxy infers where to forward the request (the original server) and returns the obtained content to the client.
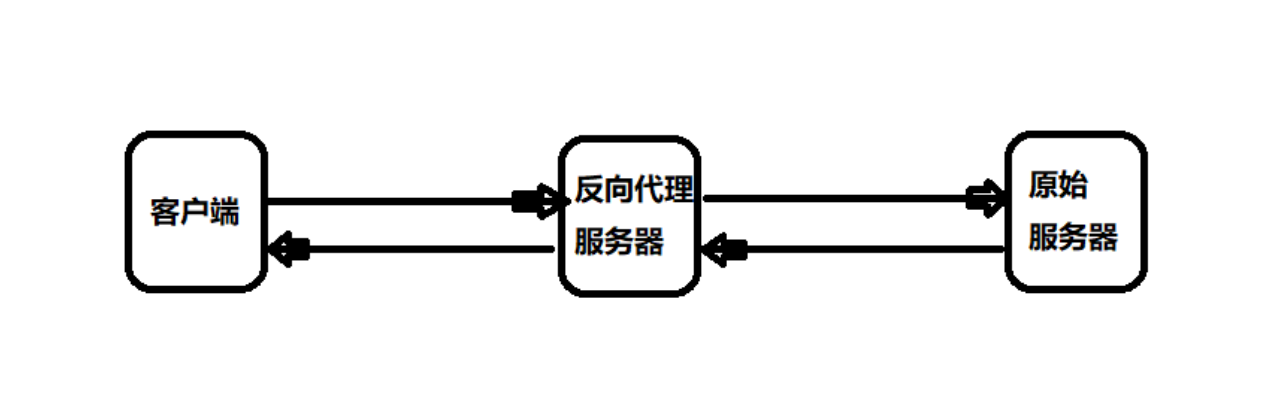
Forward proxy
Forward proxy is a proxy server between the client and the original server. In order to obtain content from the original server, the client sends a request to the proxy server and specifies the target original server. Then the proxy server forwards the request to the original server and returns the obtained content to the client.
Reverse proxy vs forward proxy
In terms of security, the forward proxy allows the client to access arbitrary sites through it and hides the client itself. Therefore, you must take security measures to ensure that only authorized clients are provided with services. Reverse proxy is transparent to the outside world. Visitors do not know that they are visiting an agent.
2.Nginx features
- Reverse proxy:
It's already said.
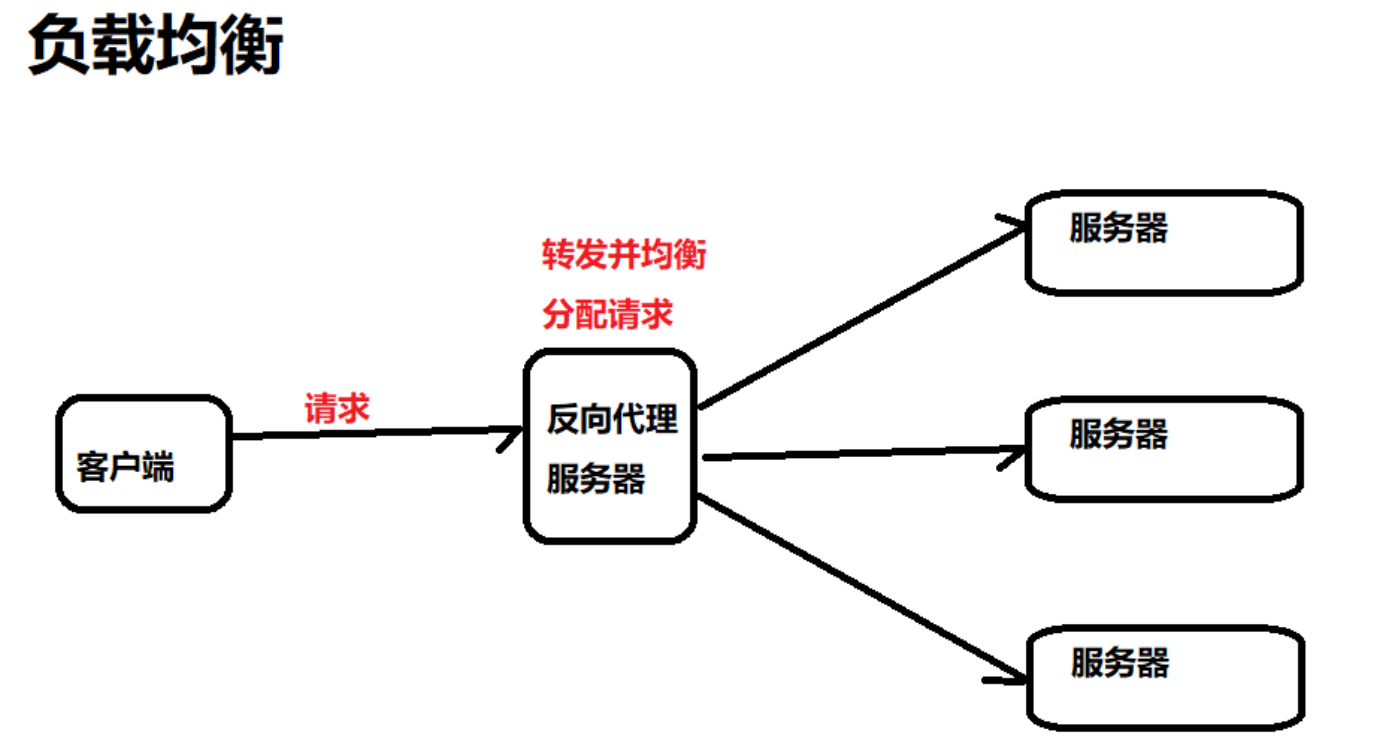
- Load balancing:
When there are too many requests and it is difficult for a single server to load, we increase the number of servers, and then distribute the requests to each server. Instead of concentrating the original requests on a single server, we distribute the requests to multiple servers.
Dynamic and static separation:
In order to speed up the parsing speed of the website, dynamic pages and static pages can be parsed by different servers to speed up the parsing speed and reduce the pressure of the original single server. See Chapter 5 later in this blog for details.
2, Installation, common commands, configuration files
First of all, you have to have a linux operating system environment, either your own server, the virtual machine on your own computer, or the cloud server you rent. Take centos as an example.
1. Installation
Install the gcc environment to compile the source code downloaded from the official website:
yum install gcc-c++
To install the pcre Library:
yum install -y pcre pcre-devel
Install zlib Library:
yum install -y zlib zlib-devel
To install the OpenSSL Library:
yum install -y openssl openssl-devel
Download nginx package:
wget -c https://nginx.org/download/nginx-1.12.0.tar.gz
Unzip nginx package:
tar -zxvf nginx-1.12.0.tar.gz
Enter nginx folder:
cd nginx-1.12.0
Use default configuration:
./configure
Compile and install:
make
make install
At this point, nginx is installed.
2. Common commands
All of the following commands must enter the sbin directory before they can be executed:
# Enter nginx directory
cd /usr/local/nginx/sbin/
View version number:
./nginx -v
Start nginx:
# start nginx
./nginx
When an error occurs during startup, the port is occupied. Solve the following problems:
# Kill the process on port 80
fuser -k 80/tcp
Now start nginx again.
close nginx:
./nginx -s stop
Reload profile:
./nginx -s reload
Access nginx:
# Access the following address in the browser
http://Server ip:80/

3. Configuration file
- Directory of configuration file:
You can access and modify the configuration by executing the following command
vim /usr/local/nginx/conf/nginx.conf
- Profile - Global block:
These are instructions that affect the global configuration of nginx:
#user  nobody;
worker_processes  1;# Configure nginx concurrent processing capacity, but concurrency is also restricted by hardware and software

#error_log  logs/error.log;
#error_log  logs/error.log  notice;
#error_log  logs/error.log  info;

#pid        logs/nginx.pid;
- Configuration file - events block:
This section is used to configure the network connection between nginx server and users:
events {
    worker_connections  1024;# Maximum number of connections supported by nginx
}- Configuration file - http block:
http {
    include       mime.types;
    default_type  application/octet-stream;

	location / { # Configure path jump
            root   html;
            index  index.html index.htm;
        }

    #server {
    #    listen       8000;# listener interface
    #    listen       somename:8080;
    #    server_name  somename  alias  another.alias;# server name

    #    location / {
    #        root   html;
    #        index  index.html index.htm;
    #    }
    #}

    }
4. Firewall related commands
If the firewall is enabled in linux, the nginx port in the linux system cannot be accessed by default in the windows system, and the firewall configuration needs to be modified.
# View open port numbers
firewall-cmd --list-all

# Set open port number
firewall-cmd --add-service=http --permanent
firewall-cmd --add-port=80/tcp --permanent

# service iptables restart
firewall-cmd --reload
3, Configuration - reverse proxy
1. Reverse proxy instance 1
The effect we want to achieve is: open the browser, visit www.123.com and jump to the tomcat main page of linux system. The specific process is as follows:
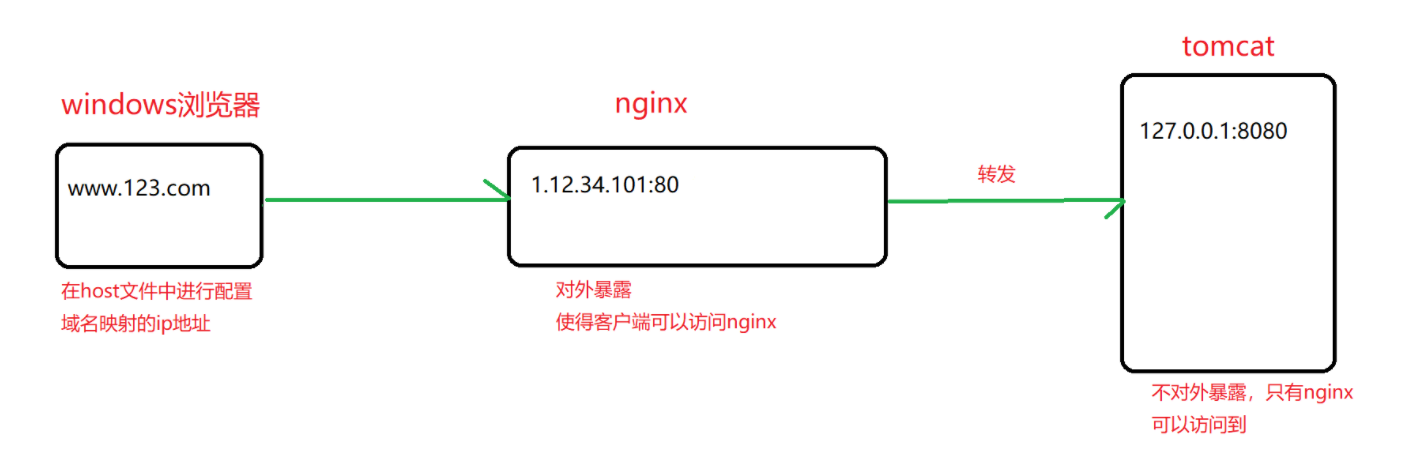
(1) Domain name mapping in the hosts file of windows system
Go to the following path and find the hosts file:
C:\Windows\System32\drivers\etc
After opening the hosts file, add the following configuration:
1.15.34.101 www.123.com
(2) Install tomcat
- Execute the following commands to download and install tomcat:
wget https://archive.apache.org/dist/tomcat/tomcat-8/v8.5.31/bin/apache-tomcat-8.5.31.tar.gz
tar xf apache-tomcat-8.5.31.tar.gz -C /usr/local/
cd /usr/local/
ln -sv apache-tomcat-8.5.31 tomcat
- Configure environment variables:
# Paste the configuration below after executing this command
vim /etc/profile.d/tomcat.sh

# Configuration content
CATALINA_BASE=/usr/local/tomcat
PATH=$CATALINA_BASE/bin:$PATH
export PATH CATALINA_BASE

# Validate profile
source  /etc/profile.d/tomcat.sh
- To view tomcat version status:
catalina.sh version
- Start tomcat:
cd /usr/local/tomcat/bin
./startup.sh
- Access tomcat:
Since the port is not configured, it defaults to 8080.
# Enter the url in the browser to access
http://Server ip:8080/
- How to configure port numbers
# Enter configuration folder
cd /usr/local/tomcat/conf

# Open and modify the server.xml configuration file. The value of the port attribute is the port number of the current tomcat server
<Connector port="8080" protocol="HTTP/1.1"
               connectionTimeout="20000"
               redirectPort="8443" />
(3) Configure forwarding requests in nginx
Execute the following command on the linux server to open the nginx configuration file:
vim /usr/local/nginx/conf/nginx.conf
Then modify the configuration of the server section:
server {
        listen       80;# Configure default port
        server_name  1.12.34.101; # The configuration server name is ip

        location / {
            root   html;
            proxy_pass http://1.15.34.101:8080; #  Add this line
            index  index.html index.htm;
        }
 }
Now, when we visit www.123.com in the browser, we will be forwarded to tomcat by nginx.
2. Reverse proxy instance 2
The effect we want to achieve is to use nginx reverse proxy to jump to different tomcat servers according to the access path.
nginx The listening port is 9001, and the server ip Is 1.12.34.101

visit http://1.12.34.101:9001/edu / jump to tomcat server 1( http://1.12.34.101:8000 )
visit http://1.12.34.101:9001/vod / jump to tomcat server 2( http://1.12.34.101:8001 )
(1) Prepare tomcat server
We need two tomcat servers, one 8000 port and one 8001 port.
The previous section has shown how to install tomcat. The two steps of installing tomcat are similar:
Create two directories and install two tomcat servers respectively, which can be distinguished by different path and folder names
Download and install tomcat in another directory
Configure the port numbers of two servers, one is 8000 and the other is 8001
(2) Configure Nginx
The nginx configuration file path has been described in the previous section, and only the specific configuration is given here.
Modify the server configuration:
server {
        listen       9001;# configure port
        server_name  1.12.34.101; # The configuration server name is ip

        location ~ /edu/ {
            proxy_pass http://1.15.34.101:8000;
        }
		location ~ /vod/ {
            proxy_pass http://1.15.34.101:8001;
        }
 }
3. Description of location instruction
Syntax:
location [ = | ~ | ~* | ^~ ] uri {

}
=: indicates a strict match before a uri without a regular expression
~: case sensitive before the uri used for the regular expression
~*: case insensitive before uri for regular expression
^~: before using the uri without regular expression, the nginx server is required to find the location with the highest matching degree between the identification uri and the request string, and immediately use this location to process the request instead of using the regular uri in the location block to match the request string.
4, Configuration - load balancing
The effect we want to achieve is: access in the browser http://1.12.34.101/edu/a.html , nginx can achieve load balancing and average requests to ports 8080 and 8081. To put it simply, although there is only one request, nginx will forward it to two tomcat servers with the same probability every time it initiates a request.
1. Basic configuration steps
- Build two tomcat servers with ports 8080 and 8081 respectively.
- In the webapps directory of the two tomcat servers, create the edu folder, and then create the a.html page in the edu folder.
- Configure load balancing in the configuration file of nginx:
# Add the following configuration in the http module to indicate the servers to participate in load balancing
upstream myserver{
	ip_hash;
	server 1.12.34.101:8080 weight=1;
	server 1.12.34.101:8081 weight=1;
}

# Modify server module
server {
        listen       80;
        server_name  1.12.34.101;

        location / {
            proxy_pass http://myserver;
            root html;
            index index.html index.htm;
        }
 }
2. Load balancing distribution in nginx
(1) Polling (default)
Each request is allocated to different back-end servers one by one in chronological order, and the suspended servers will be automatically eliminated.
(2)weight
Weight stands for weight, which is 1 by default. The higher the weight, the more client requests will be allocated.
upstream myserver{
    server 1.12.34.101:8080 weight=10;
    server 1.12.34.101:8081 weight=10;
}
(3)ip_hash
Each request is allocated according to the hash result of the access ip, so that each visitor can access a back-end server, which can solve the problem of session.
upstream myserver{
	ip_hash;
	server 1.12.34.101:8080;
	server 1.12.34.101:8081;
}
(4)fair
Requests are allocated according to the response time of the back-end server, and those with short response time are allocated first.
upstream myserver{
	server 1.12.34.101:8080;
	server 1.12.34.101:8081;
	fair;
}
5, Configuration - dynamic and static separation
What is dynamic static separation? Strictly speaking, it is to separate dynamic requests from static requests. It can be understood as using Nginx to process static pages and Tomcat to process dynamic pages.
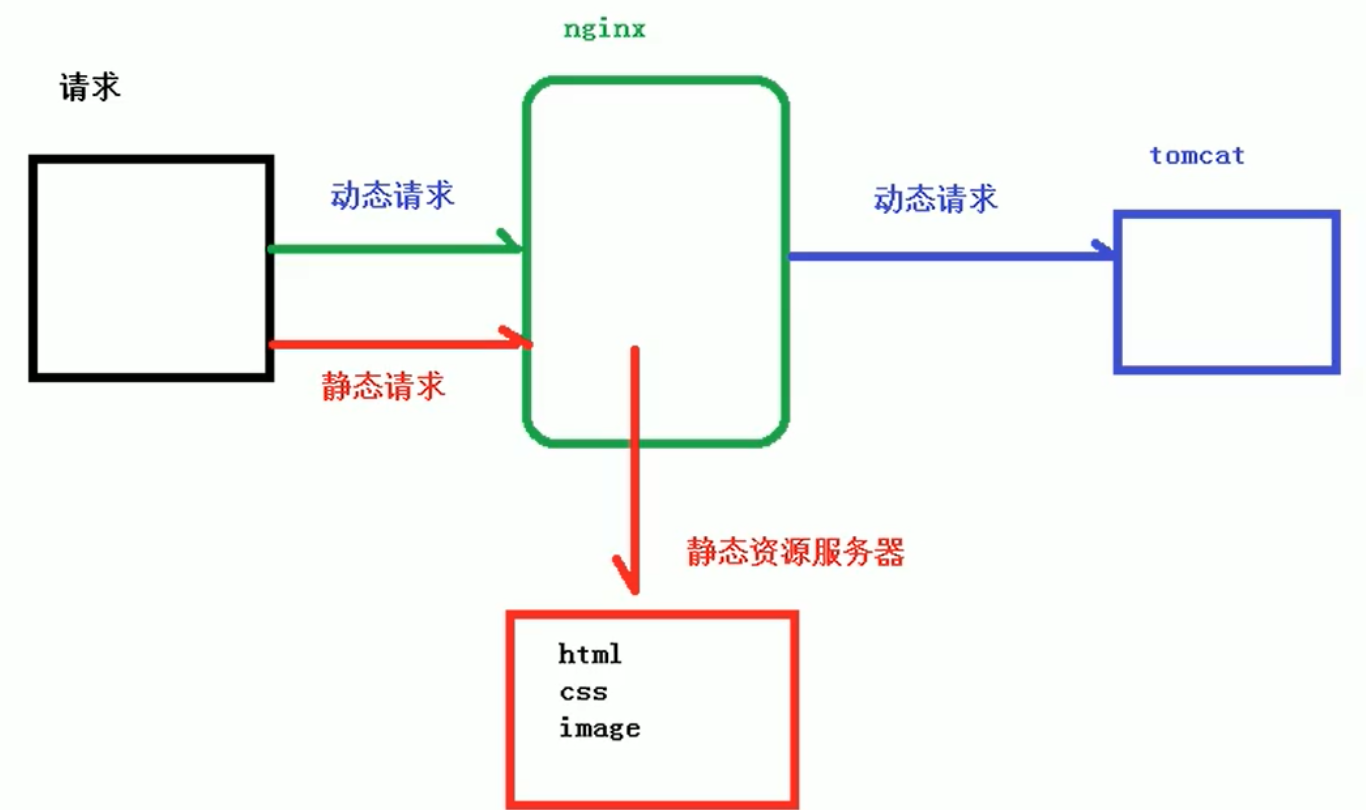
Implementation method:
- Mainstream: purely separate static files into separate domain names and put them on an independent server.
- Dynamic files and static files are put together and separated by Nginx.
Basic configuration steps
- Prepare static resources in linux system:
# Create and enter the data directory, and then enter the data directory to create the directory www for static resources
mkdir data
cd data
mkdir www

# Create a.txt in www, write the content as a test, save and exit
vi a.txt
- Modify nginx configuration so that static resources can be accessed:
# Modify server module
server {
        listen       80;
        server_name  1.12.34.101;

        location /www/ {
        	root /data/;# root directory
            proxy_pass http://myserver;
            index index.html index.htm;
        }
}- Dynamic resource preparation and Nginx configuration:
The third and fourth chapters of this part have been talked about and will not be repeated.
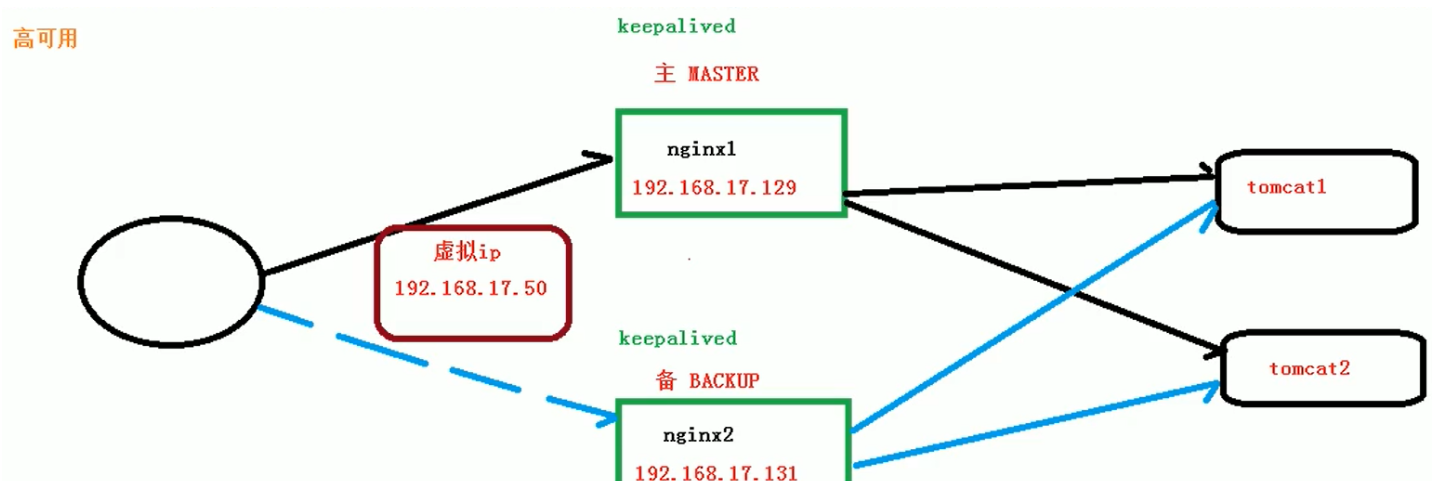
6, Configuration - High Availability Cluster
What is high availability? In short, when our nginx server goes down, the whole system still works, which means that the whole system is highly available.
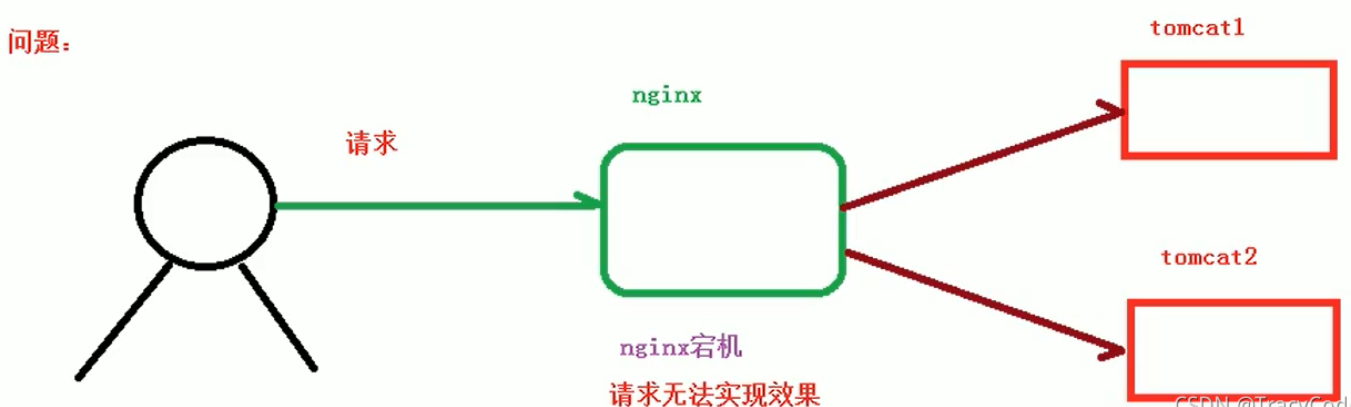
Implementation principle:
Prepare two nginx servers, a master server and a backup server. When the master server hangs up, switch to backup immediately, so that the whole system can still operate.
Keepalived software: both nginx servers need to be installed with keepalived, which is used to judge whether the current nginx server is still alive.
Virtual ip: we also need a virtual ip to access the nginx server. When the master hangs up, the virtual ip will be bound to the backup.
Basic configuration steps
- Prepare two servers and install nginx and keepalived on both servers
Suppose one ip is 1.12.34.101 and the other is 1.12.34.131.
# keepalived installation command:
yum install keepalived -y

# The configuration file path of keepalived is:
/etc/keepalived/keepalived.conf
- Configure the keepalived of the master server:
# open keepalived.conf
vim /etc/keepalived/keepalived.conf
Modify configuration:
! Configuration File for keepalived

global_defs {
   notification_email {
     acassen@firewall.loc
     failover@firewall.loc
     sysadmin@firewall.loc
   }
   notification_email_from Alexandre.Cassen@firewall.loc
   smtp_server 192.168.200.1
   smtp_connect_timeout 30
   router_id LVS_DEVEL # Host name, through which you can access the host
   vrrp_skip_check_adv_addr
   vrrp_strict
   vrrp_garp_interval 0
   vrrp_gna_interval 0
}

# Configuration for detection scripts
vrrp_script chk_http_port{
    script "/usr/local/src/nginx_check.sh" # Script path
    interval 2 # Interval between script execution
    weight 2 # Sets the weight of the current server
}

# Configuration of virtual ip
vrrp_instance VI_1 {
    state MASTER # MASTER is written here for the primary server and BACKUP is written here for the standby server
    interface eth0 # Bound network card
    virtual_router_id 51 # The values of primary server and standby server must be the same
    priority 100 # Priority, the primary server should be larger and the standby server should be smaller
    advert_int 1 # The heartbeat rate of the server jumps every 1s
    authentication {
        auth_type PASS
        auth_pass 1111
    }
    virtual_ipaddress {
        192.168.200.16 # vrrp H virtual address
        192.168.200.17
        192.168.200.18
    }
}- Configure script nginx for master server_ check.sh:
Create a script file in the specified directory:
vim /usr/local/src/nginx_check.sh
Script content:
#!/bin/bash
A=`ps -C nginx -no-header |wc -l`
if [ $A -eq 0 ];then
	/usr/local/nginx/sbin/nginx
	sleep 2
	if [ `ps -C nginx --no-header |wc -l` -eq 0 ];then
	 killall keepalived
	fi
fi
- Configure keepalived from the server:
# open keepalived.conf
vim /etc/keepalived/keepalived.conf
Modify configuration:
! Configuration File for keepalived

global_defs {
   notification_email {
     acassen@firewall.loc
     failover@firewall.loc
     sysadmin@firewall.loc
   }
   notification_email_from Alexandre.Cassen@firewall.loc
   smtp_server 192.168.200.1
   smtp_connect_timeout 30
   router_id LVS_DEVEL
   vrrp_skip_check_adv_addr
   vrrp_strict
   vrrp_garp_interval 0
   vrrp_gna_interval 0
}

# Configuration for detection scripts
vrrp_script chk_http_port{
	script "/usr/local/src/nginx_check.sh"
	interval 2 # Interval between script execution
	weight 2 # Weight parameter
}

# Configuration of virtual ip
vrrp_instance VI_1 {
    state BACKUP # Standby server write BACKUP here
    interface eth0 # The network card should be changed to the network card corresponding to the server
    virtual_router_id 51 # The values of primary server and standby server must be the same
    priority 90 # Priority, the primary server should be larger and the standby server should be smaller
    advert_int 1
    authentication {
        auth_type PASS
        auth_pass 1111
    }
    virtual_ipaddress {
        192.168.200.16 # vrrp H virtual address
        192.168.200.17
        192.168.200.18
    }
}- Configure script nginx for master server_ check.sh:
Same as the primary server.
- Start nginx and keepalived for both servers:
keepalived startup command:
systemctl start keepalived.service
So far, the highly available cluster has been configured. You can configure it yourself and test it to see the effect.