Example of front and back end separated single page application (SPA) project (Vue+ElementUI+Axios+Django+MySql)
1. Front end part
1. 1 construction of front-end vue platform
Installation vue:
vue official website: https://cn.vuejs.org/
There are three ways to install vue:
-
Recommended installation method: npm installation scaffold (vue CLI).
-
You need to install npm first. npm is the Node.js package manager. You need to install Node.js first:
Enter the official website https://nodejs.org/en/ , download the windows version installation file, double-click the installation, and the installation process will continue to the next step.After the installation of Node.js is completed, press win + R to open the command line window (cmd) and run the following commands in turn:
node -v
npm -v
If the version number is displayed, the installation is successful.
-
cmd to set the npm Download Image to Taobao image:
npm config set registry https://registry.npm.taobao.org
-
Install cnpm
Because some npm resources are blocked or foreign resources often cause npm to fail to install dependent packages, we also need the domestic image of npm - cnpm
Enter in cmdnpm install -g cnpm --registry=http://registry.npm.taobao.org
-
Install vue CLI globally
cmd to run the following command:npm install -g @vue/cli
Check the scaffold version number after successful installation
vue -V
Install element UI
- Official documents: https://element.eleme.cn/#/zh-CN/component/installation
cmd:npm i element-ui
1. 2 create the front terminal project (the helloworld example project of vue)
First, create the general project directory BOOKS, such as C:\D\Project\BOOKS.
Next, you need to use the command of vue to create a directory of front terminal items in this directory. The directory name is booksweb
To create a front-end project with vue:
Right click shift + on the BOOKS directory and select "open powershell here" (or command line), or enter the BOOKS directory through the cd command in cmd, as follows:
C:\D\Project\BOOKS>
Enter the command vue create booksweb at the above command line directory location
C:\D\Project\BOOKS>vue create booksweb
The following options pop up:
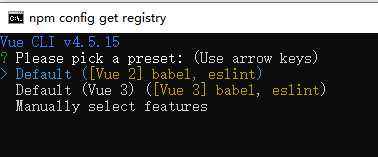
Select the first line and press enter, that is, select vue version 2, convert babel function from es6 to es5, and eslint as the syntax checking tool.
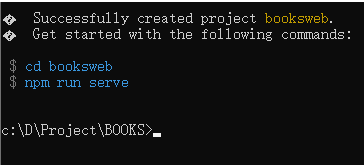
The above figure shows that the project was created successfully. Run the blue command as shown in the figure above:
1. Enter the booksweb directory,
cd booksweb
2. Execute the npm run serve command. Note that it is not "server"
npm run serve
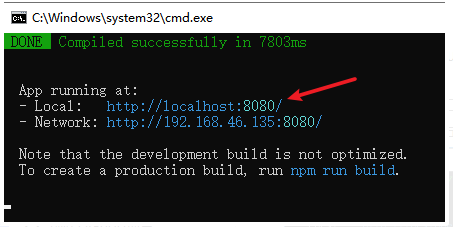
After running the command, the following window appears, indicating that the service has been started and the user can access it http://localhost:8080/ or http://127.0.0.1:8080/ Just.
Note: it may also be other ports, which can be accessed according to the actual port.
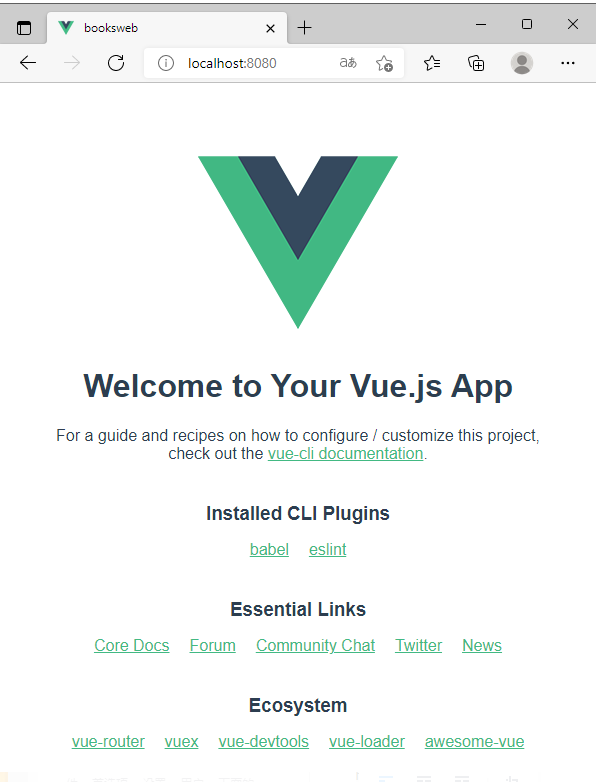
The following figure shows that the HelloWorld project was created successfully by accessing it with a browser!
The directory structure of the newly created "hello world" project is as follows:
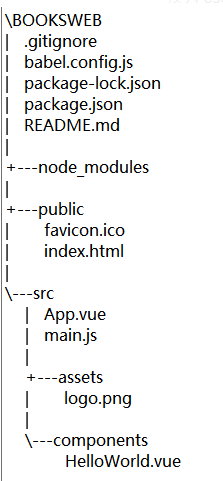
Note: if you open and write a vue project with vscode, you need to install the vetur plug-in as prompted, so that the syntax can be highlighted.
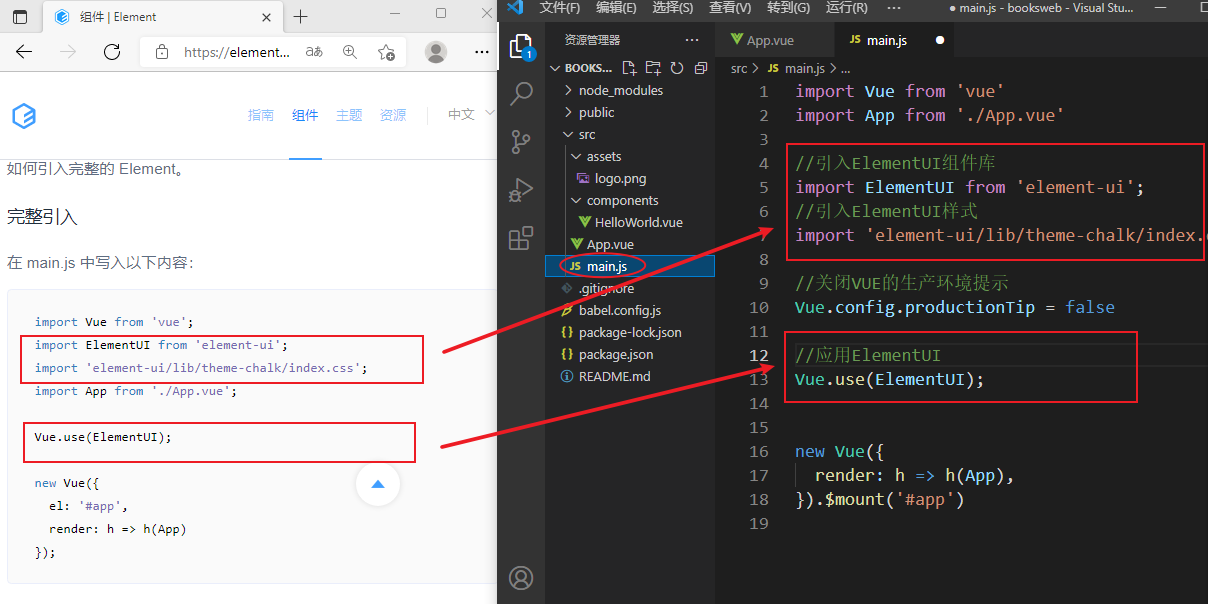
1.3 using ElementUI component library in the project
- Refer to "components - > development guide – > quick start – > introducing code in Element" on the official website, and add the relevant code to the main.js file of your project.
https://element.eleme.cn/#/zh-CN/component/quickstart
Then copy the corresponding component code of the official website to the template of vue of your project (take button as an example):
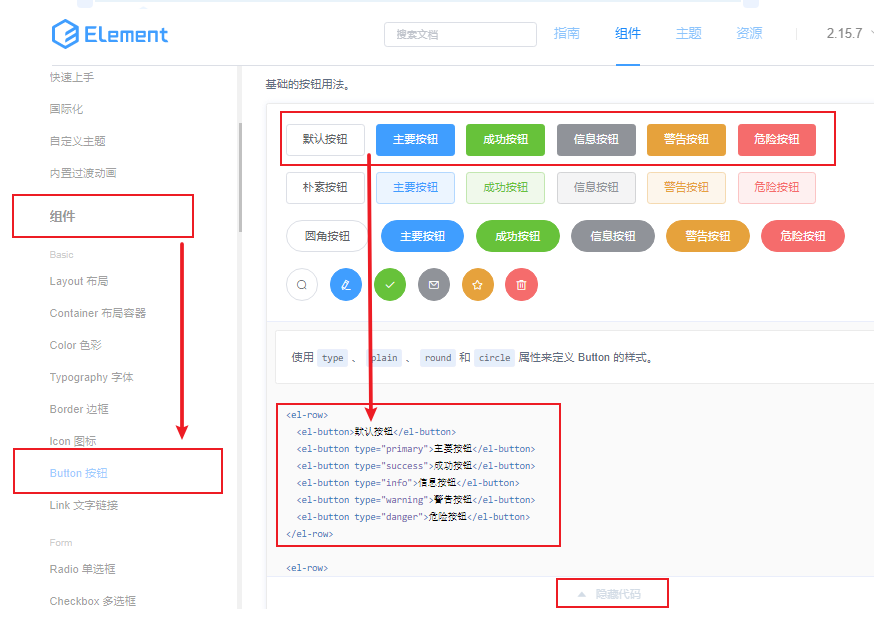
Find a component in the component on the left, view the style on the right, find the corresponding code below through the display code, and copy it to the template of the vue component of your project.
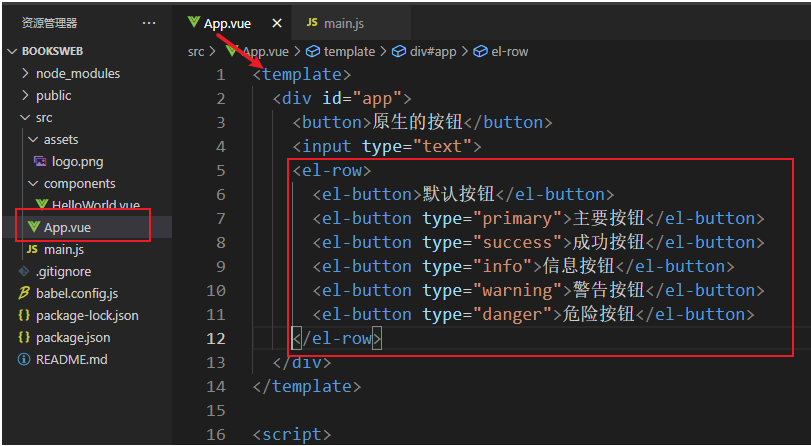
Display effect:

1.4 modify HelloWold project and write single page application (SPA)
- Click the navigation bar on the left and the content area on the right will change,
- That is, different vue components are loaded in the right content area according to the objects clicked on the navigation bar,
- The whole page is a single page, and different components in a certain area of the page are switched.
- The router component library of vue is required.
To install router component library:
Open the terminal in cmd or vscode and execute the following command to install the Vue router routing component library:
npm i vue-router
Use layout in ElementUI
Find the following layout instance in the element UI
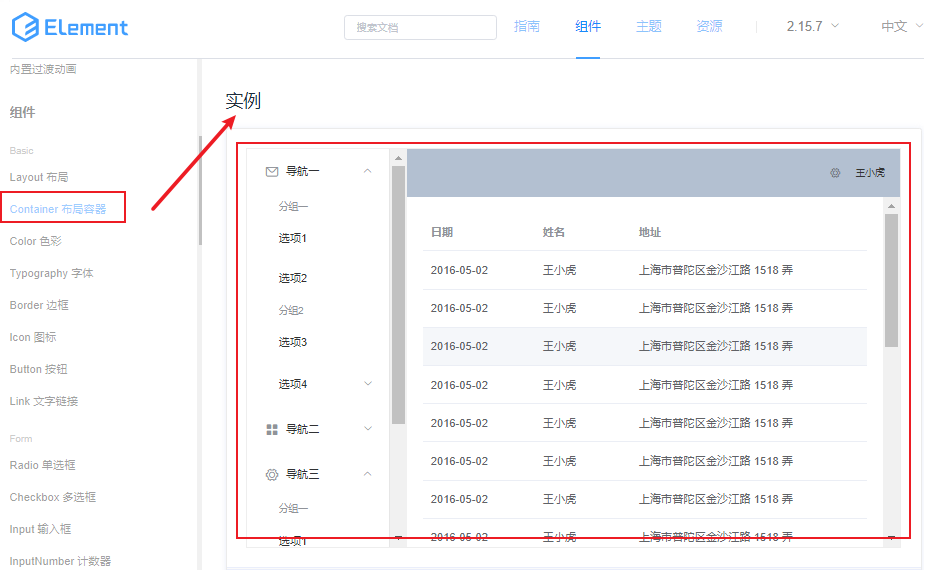
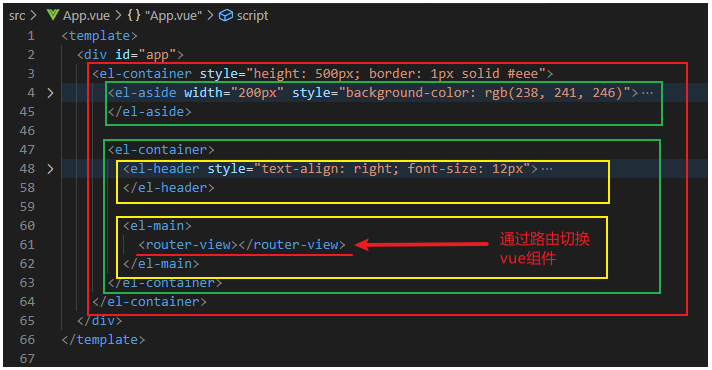
Copy the code to the template in the project's App.vue,
Delete the contents in the main content area at the lower right and replace them with the router view label:
Make two components to be switched: ShowBooks.vue and ShowStudents.vue
In the template part, only one h1 label can be placed, and different words can be written respectively for testing. It will be expanded in the next section.
Set up the router in the project
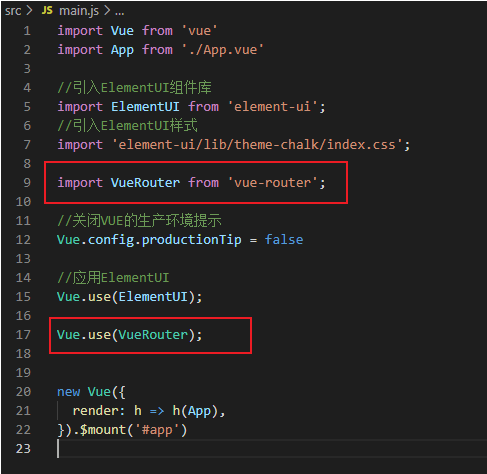
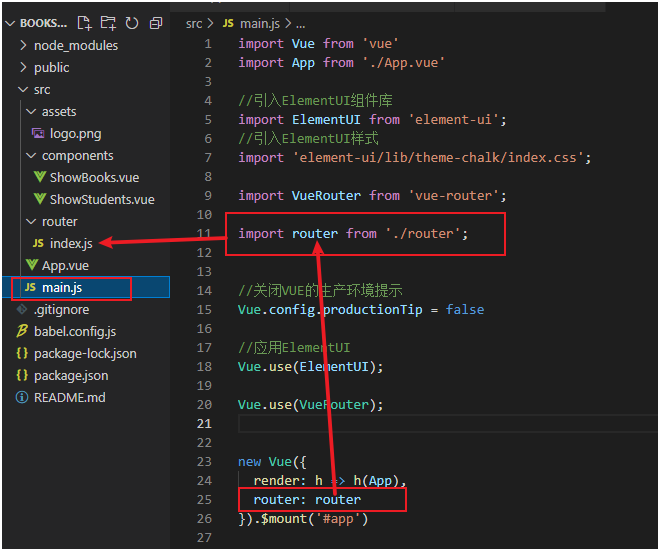
Import and use router in main.js:
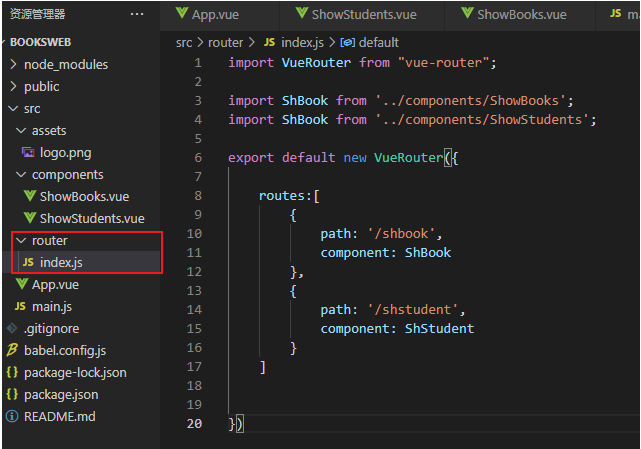
Create a router directory in src directory, where index.js is created
import VueRouter from "vue-router";
//Introduce the ShowBooks component object and name it SBook (used in routes below)
import SBook from '../components/ShowBooks';
import SStudent from '../components/ShowStudents';
export default new VueRouter({
    mode: 'history',  //Remove from url#
    routes:[
        {
            //Set the routing item: that is, the SBook component corresponding to the / shbook access path, that is, the ShowBooks component
            path: '/shbook',
            component: SBook
        },
        {
            path: '/shstudent',
            component: SStudent
        }
    ]
})
The following figure: import index.js under the router folder in main.js. Because index is the default file name, it can be omitted during import. Then, when importing a new vue object, set the router item as the imported router object, with the same name here or different names, for example: import router1 from '. / router'; The following should be changed to: Router: router1
After setting the router, the router can monitor the changes of access path, so as to load different components according to the routing item configuration.
Routing principle
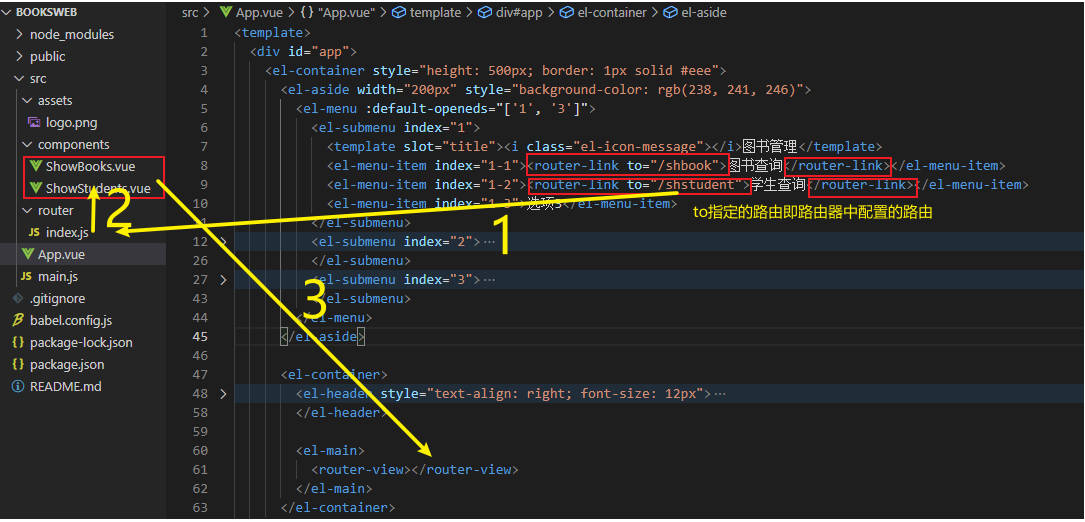
- 1. Router link monitors click operations and indicates the route of click operations.
- 2. router index.js the router is configured with the corresponding components.
- 3. After finding the corresponding component, load it in the router view tab
1.5 front end uses axios to request back-end data
Install axios (cmd):
npm i axios -S
Set axios in main.js
Write it under the import statement of the import router
import axios from 'axios';
axios.defaults.withCredentials = false; //Prohibit ajax from carrying cookie s
Vue.prototype.$axios = axios; //Mount to vue and use it later without using the guide package
Modify App.vue
<template>
  <div id="app">
    <el-container style="border: 1px solid #eee">
      <el-aside width="300px" style="background-color: rgb(238, 241, 246)">
        <el-menu :default-openeds="['1', '3']">
          <el-submenu index="1">
            <template slot="title"><i class="el-icon-message"></i>Information Service</template>
            <el-menu-item index="1-1"><router-link to="/shbook">Book Search</router-link></el-menu-item>
            <el-menu-item index="1-2"><router-link to="/shstudent">Student inquiry</router-link></el-menu-item>
            <el-menu-item index="1-3">Option 3</el-menu-item>
          </el-submenu>
          <el-submenu index="2">
            <template slot="title"><i class="el-icon-menu"></i>Navigation II</template>
            <el-menu-item-group>
              <template slot="title">Group I</template>
              <el-menu-item index="2-1">Option 1</el-menu-item>
              <el-menu-item index="2-2">Option 2</el-menu-item>
            </el-menu-item-group>
            <el-menu-item-group title="Group 2">
              <el-menu-item index="2-3">Option 3</el-menu-item>
            </el-menu-item-group>
            <el-submenu index="2-4">
              <template slot="title">Option 4</template>
              <el-menu-item index="2-4-1">Option 4-1</el-menu-item>
            </el-submenu>
          </el-submenu>
          <el-submenu index="3">
            <template slot="title"
              ><i class="el-icon-setting"></i>Navigation III</template
            >
            <el-menu-item-group>
              <template slot="title">Group I</template>
              <el-menu-item index="3-1">Option 1</el-menu-item>
              <el-menu-item index="3-2">Option 2</el-menu-item>
            </el-menu-item-group>
            <el-menu-item-group title="Group 2">
              <el-menu-item index="3-3">Option 3</el-menu-item>
            </el-menu-item-group>
            <el-submenu index="3-4">
              <template slot="title">Option 4</template>
              <el-menu-item index="3-4-1">Option 4-1</el-menu-item>
            </el-submenu>
          </el-submenu>
        </el-menu>
      </el-aside>
      <el-container>
        <el-header style="text-align: right; font-size: 12px">
          <el-dropdown>
            <i class="el-icon-setting" style="margin-right: 15px"></i>
            <el-dropdown-menu slot="dropdown">
              <el-dropdown-item>see</el-dropdown-item>
              <el-dropdown-item>newly added</el-dropdown-item>
              <el-dropdown-item>delete</el-dropdown-item>
            </el-dropdown-menu>
          </el-dropdown>
          <span>Wang Xiaohu</span>
        </el-header>
        <el-main>
          <router-view></router-view>
        </el-main>
      </el-container>
    </el-container>
  </div>
</template>
<script>
export default {
  name: 'App',
  components: {

  }
}
</script>
<style>
#app {
  font-family: Avenir, Helvetica, Arial, sans-serif;
  -webkit-font-smoothing: antialiased;
  -moz-osx-font-smoothing: grayscale;
  text-align: center;
  color: #2c3e50;
  margin-top: 60px;
}
.el-header {
    background-color: #B3C0D1;
    color: #333;
    line-height: 60px;
  }

  .el-aside {
    color: #333;
  }
  a {
    text-decoration:none;
    color: #646464;
  }
  .router-link-active {
    text-decoration: none;
  }
</style>
Create a new components folder in the src directory and add the following two files:
ShowBooks.vue
<template>
  <div class="shbooks">
    <el-table :data="tableData" >
      <el-table-column prop="Title" label="title" width="160"> </el-table-column>
      <el-table-column prop="Author" label="author" width="100"> </el-table-column>
      <!-- <el-table-column prop="BookID" label="Book number" width="100"> </el-table-column> -->
      <!-- <el-table-column prop="Language" label="language" width="100"> </el-table-column> -->
      <el-table-column prop="Publisher" label="press" width="160"> </el-table-column>
      <el-table-column prop="Pyear" label="Publication date" > </el-table-column>
      <!-- <el-table-column prop="State" label="collection" width="100"> </el-table-column> -->
    </el-table>
  </div>
</template>
<script>
export default {
  data(){
    return {
        tableData:[]
    }
  },
  methods:{
    get_all_books(){
      this.$axios.get('http://127.0.0.1:8000/books').then(response=>{
        this.tableData = response.data;
      })
    }
  },
  mounted(){
    this.get_all_books();
  }
}
</script>
ShowStudents.vue
<template>
  <div class="shstudents">
    <el-table :data="tableData" border style="width: 100%">
      <el-table-column prop="ID" label="Student number" width="160"> </el-table-column>
      <el-table-column prop="Name" label="full name" width="160"> </el-table-column>
      <el-table-column prop="Dept" label="Department" width="160"> </el-table-column>
    </el-table>
  </div>
</template>
<script>
export default {
  data(){
    return {
        tableData:[]
    }
  },
  methods:{
    get_all_books(){
      this.$axios.get('http://127.0.0.1:8000/students').then(response=>{
        this.tableData = response.data;
        console.log(this.tableData);
      })
    }
  },
  mounted(){
    this.get_all_books();
  }
}
</script>
2. Rear end part
2.1 installation of Django
How to install Django ¶ on Windows
Official description: https://docs.djangoproject.com/zh-hans/2.2/howto/windows/
To install Python:
Django is a Python Web framework, so you need to install Python on your machine.
open https://python.org/downloads/ . Download the executable installation package and run it. After running, select Add Python to the environment variable, and then click Install now.
After installation, open the command prompt and run the following command to check whether the Python version is consistent with your installation:
python --version
About pip
Pip is Python's package manager. It makes it easy to install and uninstall Python packages (such as Django). For the rest of the installation process, we will use pip to install Python packages from the command line.
Install Django
At the command prompt cmd, run the following command:
pip install django -i https://pypi.douban.com/simple
This will download and install the latest Django release from the Douban mirror point.
After installation, run Django admin -- version at the command prompt to verify your Django installation.
django-admin --version
2.2. Create Django project
Create project:
Enter the project general directory BOOKS in the command line
C:\D\Project\BOOKS>
Enter Django admin startproject booksapp in this directory to create the post terminal project folder booksapp in this folder
Note: previously, the project folder created by the front end was booksweb
django-admin startproject booksapp
After the project is created, enter the sub project folder:
C:\D\Project\BOOKS\booksapp>
Execute the following command here to start the django server
python manage.py runserver
After the service is started successfully, the following prompt message will appear

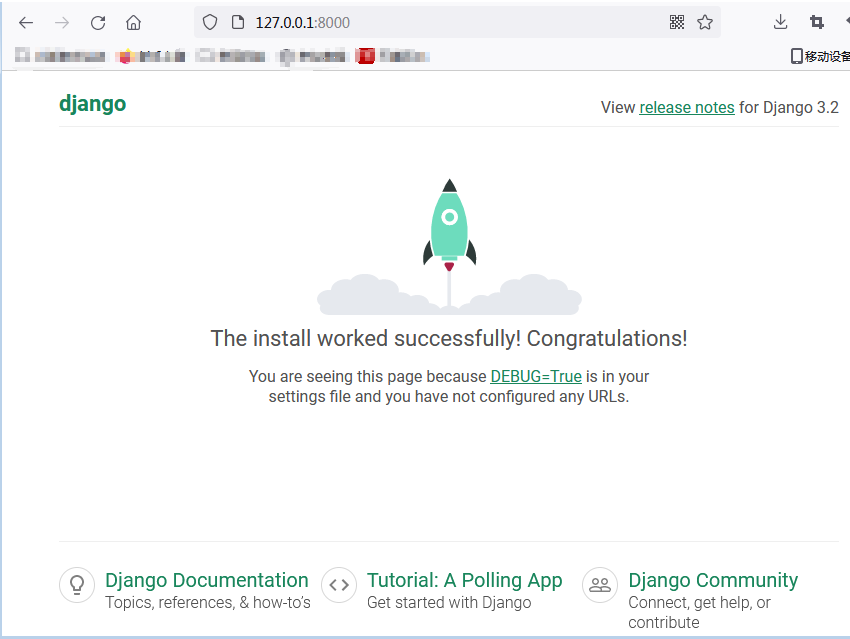
Use your browser to access the address in the prompt: http://127.0.0.1:8000
The following figure indicates success.
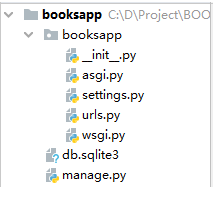
Use pycharm to open the sub project folder you just created.
The initial project directory structure is shown in the following figure:
2.3 preparation of database
Build database and insert data according to tutorial experiment 8:
User name: root
Password: 123456
BooksDB.sql
create database BooksDB;
use BooksDB;
CREATE  TABLE  Book(
  BookID  varchar(20)  PRIMARY  KEY,
  Title   varchar(50)  NOT  NULL,
  Author  varchar(50),
  Publisher varchar(50),
  Pyear   char(4),
  Language  char(1)  DEFAULT 'c',
  State   char(1)    DEFAULT '0'
);
CREATE  TABLE  Student(
 ID    char(6)  PRIMARY  KEY,
 Name  varchar(20)  NOT NULL,
 Dept  varchar(20)  NOT NULL
);
CREATE  TABLE  Assistant(
 ID    char(6)  PRIMARY  KEY,
 Name  varchar(20)  NOT NULL
);
CREATE  TABLE  BBook(
 BID  varchar(20)  NOT  NULL,
 StdID  char(6)   NOT  NULL,
 BDate  date     NOT NULL,
 CONSTRAINT  FK_BBOOK_BID
  FOREIGN  KEY(BID) REFERENCES  Book(BookID),
CONSTRAINT  FK_BBOOK_StdID
  FOREIGN  KEY(StdID) REFERENCES Student(ID)
);
CREATE  TABLE  RBook(
 BookID  varchar(20)  NOT  NULL,
 StdID   char(6)    NOT  NULL,
 RDate   date   NOT  NULL,
 CONSTRAINT  FK_RBook_BookID
   FOREIGN  KEY(BookID) REFERENCES  Book(BookID),
 CONSTRAINT  FK_RBook_StdID
   FOREIGN  KEY(StdID)  REFERENCES  Student(ID)
);
CREATE  TABLE  Lend(
 StdID  char(6)  NOT NULL,
 AstID  char(6)  NOT NULL,
 BookID varchar(20)  NOT NULL,
 LDate  date   NOT  NULL,
 CONSTRAINT FK_LEND_StdID
  FOREIGN  KEY(StdID) REFERENCES  Student(ID),
CONSTRAINT FK_LEND_AstID
  FOREIGN  KEY(AstID) REFERENCES  Assistant(ID),
CONSTRAINT FK_LEND_BookID
  FOREIGN  KEY(BookID) REFERENCES  Book(BookID)
);
CREATE  TABLE  Returnn(
 StdID  char(6)  NOT  NULL,
 AstID  char(6)  NOT  NULL,
 BookID varchar(20)  NOT NULL,
 RDate  date  NOT  NULL,
 CONSTRAINT  FK_RETURN_StdID
   FOREIGN  KEY(StdID) REFERENCES Student(ID) ,
 CONSTRAINT FK_RETURN_AstID
   FOREIGN  KEY(AstID) REFERENCES  Assistant(ID),
 CONSTRAINT  FK_RETURN_BookID
   FOREIGN  KEY(BookID) REFERENCES  Book(BookID)
 );
 INSERT INTO  Student(ID,Name,Dept)  VALUES('s21001' , 'Zhang Xiaohang' , 'faculty of Mathematics' );
 INSERT INTO  Student(ID,Name,Dept)  VALUES('s21002' , 'Wang Wenguang' , 'Information system' );
 INSERT INTO  Student(ID,Name,Dept)  VALUES('s21003' , 'Li Li' ,  'Department of Statistics' );
 INSERT INTO  Student(ID,Name,Dept)  VALUES('s21004' , 'Robin Li' , 'faculty of Mathematics' );
 INSERT INTO  Student(ID,Name,Dept)  VALUES('s21005' , 'Zhang Lixia' , 'Information system' );
 INSERT INTO  Student(ID,Name,Dept)  VALUES('s21006' , 'Wang Qiang' , 'Department of Statistics' );
 INSERT INTO  Student(ID,Name,Dept)  VALUES('s21007' , 'Zhang Baotian' , 'faculty of Mathematics' );
 INSERT INTO  Student(ID,Name,Dept)  VALUES('s21008' , 'Song Wenxia' , 'Information system' );
 INSERT INTO  Student(ID,Name,Dept)  VALUES('s21009' , 'Liu Fangfei' , 'Department of Statistics' );
 INSERT INTO  Student(ID,Name,Dept)  VALUES('s21010' , 'Chang Jiangning' , 'faculty of Mathematics' );
 INSERT INTO  Student(ID,Name,Dept)  VALUES('s21011' , 'Zhang San' , 'Information system' );
 INSERT INTO  Student(ID,Name,Dept)  VALUES('s21012' , 'Li Si' , 'Department of Statistics' );

 INSERT  INTO  Book  VALUES('b001','Database management','Wang Shan','Higher Education Press','2018','c','0');
 INSERT  INTO  Book  VALUES('b002','software test ','He Ping' , 'Machinery Industry Press','2018','c','0');
 INSERT  INTO  Book  VALUES('b003','C++Programming','Tan Haoqiang','tsinghua university press ','2018','c','0');
 INSERT  INTO  Book  VALUES('b004','The Dream of Red Mansion','Cao Xueqin','People's Literature Publishing House','2019','c','0');
 INSERT  INTO  Book  VALUES('b005','Journey to the West','Luo Guanzhong','People's Literature Publishing House','2019','c','0');
 INSERT  INTO  Book  VALUES('b006','Red and black','Stendhal ','People's Literature Publishing House','2019','c','0');
 INSERT  INTO  Book  VALUES('b007','Advanced mathematics','Li Yi','tsinghua university press ','2020','c','0');
 INSERT  INTO  Book  VALUES('b008','Organic Chemistry','Zhang Xiang','Higher Education Press','2020','c','0');
 INSERT  INTO  Book  VALUES('b009','College English','Wang Lin','Higher Education Press','2021','c','0');
 INSERT  INTO  Book  VALUES('b010','English Course','Wang Lin','Higher Education Press','2021','c','0');

 INSERT  INTO  Assistant  VALUES('a001','Huang Bo');
 INSERT  INTO  Assistant  VALUES('a002','Xu Zheng');
 INSERT  INTO  Assistant  VALUES('a003','Ma Dong');
 INSERT  INTO  Assistant  VALUES('a004','Li birthday');
2.4 terminal items after configuration
Configuration database:
- To install the mysqlclient library from the command line:
pip install mysqlclient
- Modify some database options in settings.py
DATABASES = {
    'default': {
        'ENGINE': 'django.db.backends.mysql',
        'HOST': '127.0.0.1',
        'PORT': 3306,
        'USER': 'root',
        'PASSWORD': '123456',
        'NAME': 'booksdb',
    }
}
Back end to solve cross domain problems
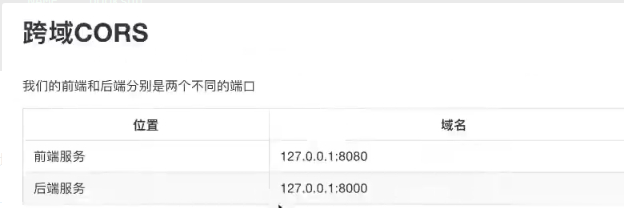
django solves cross domain problems:
1. Installing the cors plug-in
Open the Terminal in cmd or pycham and enter the command:
pip install django-cors-headers
2. Configure in settings.py: add an item: 'corsheders'
INSTALLED_APPS = [
    'django.contrib.admin',
    'django.contrib.auth',
    'django.contrib.contenttypes',
    'django.contrib.sessions',
    'django.contrib.messages',
    'django.contrib.staticfiles',

    'corsheaders',
]
3. Set Middleware in settings.py: the first one must be placed
MIDDLEWARE = [
    'corsheaders.middleware.CorsMiddleware',
    'django.middleware.security.SecurityMiddleware',
    'django.contrib.sessions.middleware.SessionMiddleware',
    'django.middleware.common.CommonMiddleware',
    'django.middleware.csrf.CsrfViewMiddleware',
    'django.contrib.auth.middleware.AuthenticationMiddleware',
    'django.contrib.messages.middleware.MessageMiddleware',
    'django.middleware.clickjacking.XFrameOptionsMiddleware',
]
4. Add whitelist in settings.py
# Add a white list to allow the front-end 8080 port ajax to cross domain request the back-end
CORS_ORIGIN_WHITELIST = (
    'http://127.0.0.1:8080',
    'http://localhost:8080'
)
CORS_ALLOW_CREDENTIALS = False  #Whether to allow front-end ajax requests to carry cookie s
2.5 back end business
Import views in urls.py and add two routes:
from django.contrib import admin
from django.urls import path
from . import views

urlpatterns = [
    path('admin/', admin.site.urls),
    path('books/', views.get_all_books),
    path('students/', views.get_all_students),
]
Create a new views.py file in the directory of urls.py and add the following code:
from django.http import JsonResponse
from django.db import connection

# Convert the result set of sql query to dictionary format
def dictfetchall(cursor):
    "Return all rows from a cursor as a dict"
    columns = [col[0] for col in cursor.description]
    return [
        dict(zip(columns, row))
        for row in cursor.fetchall()
    ]

# The processing function corresponding to the 'books /' route (native sql is used here, and the model layer of django is not used)
def get_all_books(request):
    cursor = connection.cursor()
    cursor.execute("select * from book")
    rows = dictfetchall(cursor) #Result set to dictionary
    return JsonResponse(rows, safe=False, json_dumps_params={'ensure_ascii': False})

# Processing function corresponding to 'students /' route
def get_all_students(request):
    cursor = connection.cursor()
    cursor.execute("select * from student")
    rows = dictfetchall(cursor)  # Result set to dictionary
    return JsonResponse(rows, safe=False, json_dumps_params={'ensure_ascii': False})