preface
At ordinary times, you should be more or less exposed to the relevant needs of wechat authentication login and obtaining user information. There are also small partners who often ask relevant questions in the group, such as
- What is the overall process of authentication login?
- What is the division of labor between the front end and the back end in the whole process?
- The front end has specially prepared an authentication callback page. How do you go back to the page before authentication?
- How to test wechat web authorization locally?
Let's take a look at the official authentication process of wechat
Step 1: the user agrees to authorize and obtains the code
Step 2: exchange code for web access authorization_ token
Step 3: refresh access_token (if required)
Step 4: pull user information (the scope should be snsapi_userinfo)
Still ignorant, it doesn't matter. I've specially prepared a small one here 🌰, To realize a simple version of web page authorization + the function of obtaining user information. The whole process is about this
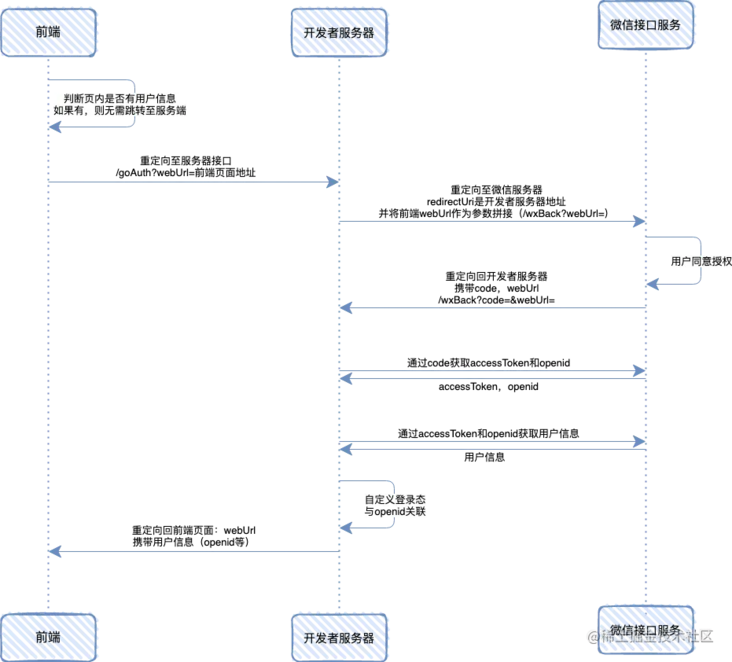
In this process, the front end does not need to do too much. It only needs to judge whether there is user information. If not, the rest will be handed over to the server. When the server completes all processing, it will return to the previous page with user information.
And the front end does not need to prepare a special authorization result page.
technological process
Step 1: intranet mapping
Download a software
Download address: ngrok.com/download
After decompressing it, it's this thing
Terminal startup
Drag the extracted file to the terminal, and then write http 3000, which means to open an http mapping tunnel on port 3000 with ngrok.
After startup, the following interface appears, indicating success.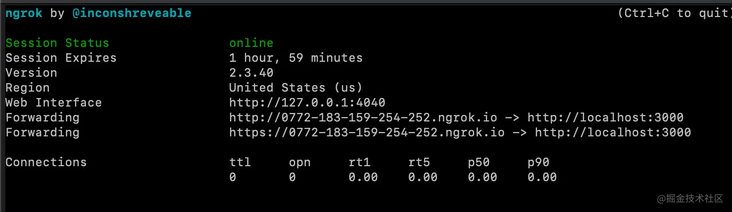
This is the domain name we need: https://0772-183-159-254-252....
Step 2: wechat test number
Login test account
Login address: mp.weixin.qq.com/debug/cgi-b

At present, we have obtained appID and appsecret, interface configuration information and JS interface security domain name. We don't care about it for the time being, and we can't use web page authorization.
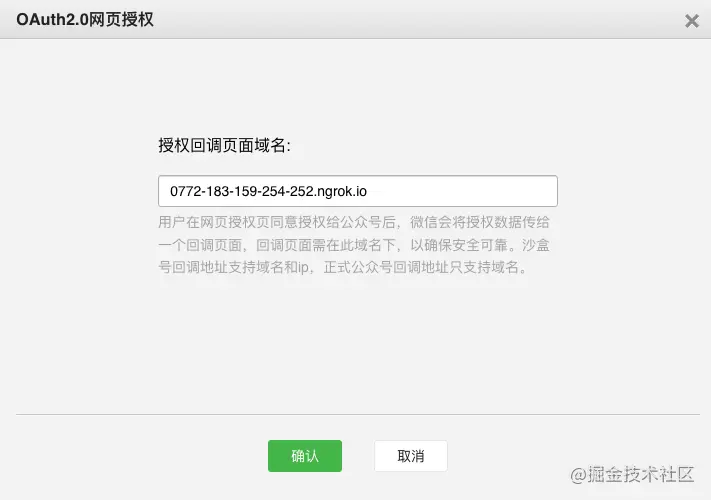
Modify authorization callback domain name
Page down to page service = > page account = > Modify
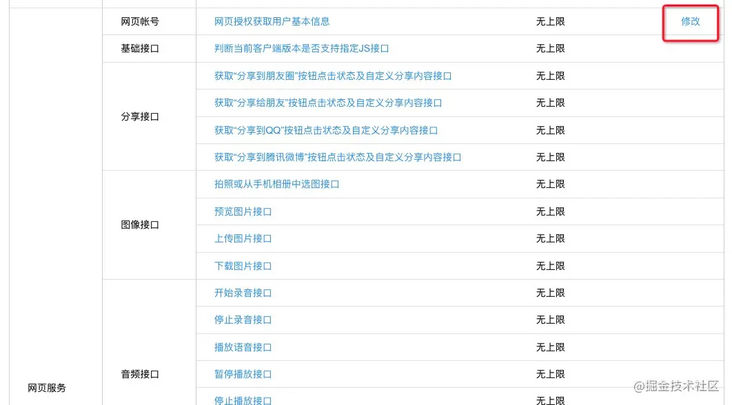
Fill in the previously obtained intranet mapping address. Be careful not to write https://
Scan code and pay attention to test number
Because if you don't pay attention, the test authorization will report an error
Step 3: build the project
Here we use the node framework express
package.json
{
  "name": "simple-wx-auth-by-express",
  "version": "1.0.0",
  "scripts": {
    "start": "node index.js"
  },
  "dependencies": {
    "axios": "^0.21.4",
    "express": "^4.17.1"
  },
  "devDependencies": {}
}
index.js
Note to fill in the address mapped in the previous intranet, appID and appsecret of wechat test number into the corresponding location;
const express = require('express');
const app = express();
const axios = require('axios');
const port = 3000; // Boot port

const SERVICE_URL = 'https://0772-183-159-254-252.ngrok.io'; //  Server address, fill in the address of Intranet mapping here
const appID = ''; // appid of wechat test number
const appsecret = ''; // appsecret of wechat test number

/**
 * @description Splicing complete authorized address
 * @param {string} webUrl The address before the front end invokes the authorization (the address to be returned after the authorization is completed)
 * @date: 2021/9/27
 */
const getAuthUrl = (webUrl) => {
    let redirectUri = encodeURIComponent(`${SERVICE_URL}/wxBack?webUrl=${webUrl}`);
    return `https://open.weixin.qq.com/connect/oauth2/authorize?appid=${appID}&redirect_uri=${redirectUri}&response_type=code&scope=snsapi_userinfo#wechat_redirect`
}

/**
 * @description Get accessToken and openid
 * @param {string} code Authorized code
 * @date: 2021/9/27
 */
const getAccessTokenByCode = async (code) => {
    let {data} = await axios.get(`https://api.weixin.qq.com/sns/oauth2/access_token?appid=${appID}&secret=${appsecret}&code=${code}&grant_type=authorization_code`)
    return data
}

/**
 * @description Get wechat user information
 * @param {string} accessToken
 * @param {string} openid User openid
 * @date: 2021/9/27
 */
const getUserInfo = async (accessToken, openid) => {
    let {data} = await axios.get(`https://api.weixin.qq.com/sns/userinfo?access_token=${accessToken}&openid=${openid}&lang=zh_CN`)
    return data
}

// Front page
app.get('/user', (req, res) => res.sendFile(__dirname + "/" + "user.html"));

// The first step of authentication: redirect to wechat
app.get('/goAuth', (req, res) => {
    // Get the front-end address of the call authorization
    let {webUrl} = req.query;
    // Get the full address of authentication
    let authUrl = getAuthUrl(webUrl);
    // redirect
    res.redirect(authUrl);
})

// Step 2 of authentication: wechat redirect back service
app.get('/wxBack', async (req, res) => {
    // Get the code and the front-end address of the call authorization
    let {webUrl, code} = req.query;
    // Get accessToken
    let {access_token, openid} = await getAccessTokenByCode(code);
    // Get user information
    let {nickname, headimgurl} = await getUserInfo(access_token, openid);
    // Redirect back to front end
    headimgurl = headimgurl.replace('thirdwx.qlogo.cn', 'wx.qlogo.cn');
    res.redirect(`${webUrl}?openid=${openid}&nickname=${nickname}&headimgurl=${headimgurl}`);
})

app.listen(port, () => {
    console.log(`app listening at http://localhost:${port}`)
})
user.html
This is a page specially used for testing, because you only need to test whether you get the user information, so you just simply get the openid and user avatar.
- First judge whether the url carries openid. If not, redirect directly to the server address to start authorization;
- If so, directly display the obtained avatar on the page;
- Note: you also need to modify the intranet mapping address here
<!DOCTYPE html>
<html lang="en">
<head>
    <meta charset="UTF-8">
    <title>Title</title>
    <script src="https://cdn.bootcdn.net/ajax/libs/axios/0.21.1/axios.js"></script>
</head>
<body>
<div id="app"></div>
<script>
    var SERVICE_BASE = 'https://0772-183-159-254-252.ngrok.io '/ / server address of Intranet mapping
    // Get url parameters
    function getQueryVariable() {
        var url = location.search; //Gets the string after the "?" character in the url
        var theRequest = new Object();
        if (url.indexOf("?") != -1) {
            var str = url.substr(1);
            strs = str.split("&");
            for (var i = 0; i < strs.length; i++) {
                theRequest[strs[i].split("=")[0]] = unescape(strs[i].split("=")[1]);
            }
        }
        return theRequest;
    }

    // Get user information
    function getUserInfo() {
        var params = getQueryVariable();
        var openid = params.openid;
        if (!openid) { // Start authorization
            window.location.href = SERVICE_BASE + '/goAuth?webUrl=' + window.location.href;
        } else { // End of authorization
            let html = `head portrait:<img src="${params.headimgurl}">`
            let app = document.getElementById('app');
            app.innerHTML = html;
        }
    }

    window.addEventListener('load', function () {
        getUserInfo();
    })
</script>
</body>
</html>
Step 4: Test
Installation dependency
npm install
Start project
npm run start
Wechat access page
https://0772-183-159-254-252.ngrok.io/user
If there is no accident, after visiting the page, you should be able to pop up the authorization. After agreeing, you should return to the page and show your avatar.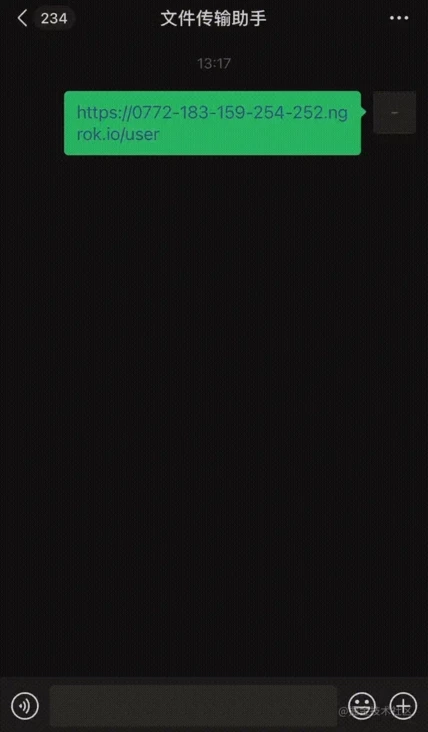
I didn't play it again because I agreed to authorize it
git address
Address: github.com/zhuyuqian/s...
Conclusion
Author: Du Xiaoqian
Original address: https://juejin.cn/post/701248...
If you think the article is well written, please stamp the ↑ link to follow the author and praise the article~
More attention, please pay attention to the official account [push the ape], join the IT staff community, get contacts and expand the face-to-face exchanges with the big guys.