Introduction:
This article is about the first process of big data offline data processing project: data collection
Main contents:
1) Use flume to collect website log file data to access.log
2) Write shell script: split the collected log data file (otherwise the access.log file is too large) and rename it to access_ Mm / DD / yyyy.log. The execution cycle of this script is one minute
3) Collect the collected, split and renamed log data files to HDFS
4) Transfer the log data files on HDFS to the preprocessing working directory on HDFS
1. Collect log data files and split log files
To install crontab (there are crontab operation instructions at the end of the article), you need to switch to root:
yum install crontabs
Script disassembly log files
#!/bin/sh
logs_path="/home/hadoop/nginx/logs/"
pid_path="/home/hadoop/nginx/logs/nginx.pid"
filepath=${logs_path}"access.log"
echo $filepath
mv ${logs_path}access.log ${logs_path}access_$(date -d '-1 day' '+%Y-%m-%d-%H-%M').log
kill -USR1 `cat ${pid_path}`
Of which:
logs_path is the path where the split log files are stored
pid_path refers to the process file running nginx (storing the process id of nginx)
filepath indicates the path of the log file to be split
Note: in renaming, the - 1 here is because it is offline processing, that is, today's processing is yesterday's data, so the name needs the date - 1
Enter crontab configuration command (1 for every minute)
*/1 * * * * sh /home/hadoop/bigdatasoftware/project1/nginx_log.sh
Restart crontab service:
service crond restart
Reload the configuration to make the scheduled task effective:
service crond reload
Start nginx and visit the web pages a.html and b.html under nginx


At this time, the log data is generated continuously, stored in the access.log file, and then split
Log data was successfully collected, split and renamed:

Note that the split access.log is empty:

2. Collect the successfully split log files to HDFS
Create a new configuration file in the flume/job directory
touch job/TaildirSource-hdfs.conf
Write flume configuration file:
agent1.sources = source1
agent1.sinks = sink1
agent1.channels = channel1
#Monitor the newly added contents of multiple files in a directory
agent1.sources.source1.type = TAILDIR
#Save the offset consumed by each file in json format to avoid consumption from scratch
agent1.sources.source1.positionFile = /home/hadoop/taildir_position.json
agent1.sources.source1.filegroups = f1
agent1.sources.source1.filegroups.f1 = /home/hadoop/nginx/logs/access_*.log

agent1.sources.source1.interceptors = i1
agent1.sources.source1.interceptors.i1.type = host
agent1.sources.source1.interceptors.i1.hostHeader = hostname
#Configure sink component as hdfs
agent1.sinks.sink1.type = hdfs
agent1.sinks.sink1.hdfs.path=hdfs://hadoop121:8020/weblog/flume-collection/%Y-%m-%d/%H-%M_%{hostname}
#Specify file name prefix
agent1.sinks.sink1.hdfs.filePrefix = access_log
#Specify the number of records for each batch of sinking data
agent1.sinks.sink1.hdfs.batchSize= 100
agent1.sinks.sink1.hdfs.fileType = DataStream
agent1.sinks.sink1.hdfs.writeFormat =Text
#Specifies that the sinking file is scrolled by 1MB
agent1.sinks.sink1.hdfs.rollSize = 1048576
#Specify the number of files to scroll by 1000000
agent1.sinks.sink1.hdfs.rollCount = 1000000
#Specify the file to scroll by 30 minutes
agent1.sinks.sink1.hdfs.rollInterval = 30
#agent1.sinks.sink1.hdfs.round = true
#agent1.sinks.sink1.hdfs.roundValue = 10
#agent1.sinks.sink1.hdfs.roundUnit = minute
agent1.sinks.sink1.hdfs.useLocalTimeStamp = true

#Using memory type channel
agent1.channels.channel1.type = memory
agent1.channels.channel1.capacity = 500000
agent1.channels.channel1.transactionCapacity = 600

# Bind the source and sink to the channel
agent1.sources.source1.channels = channel1
agent1.sinks.sink1.channel = channel1
Start the program in the flume Directory:
bin/flume-ng agent --conf conf/ --name agent1 --conf-file job/TaildirSource-hdfs.conf -Dflume.root.logger=INFO,console

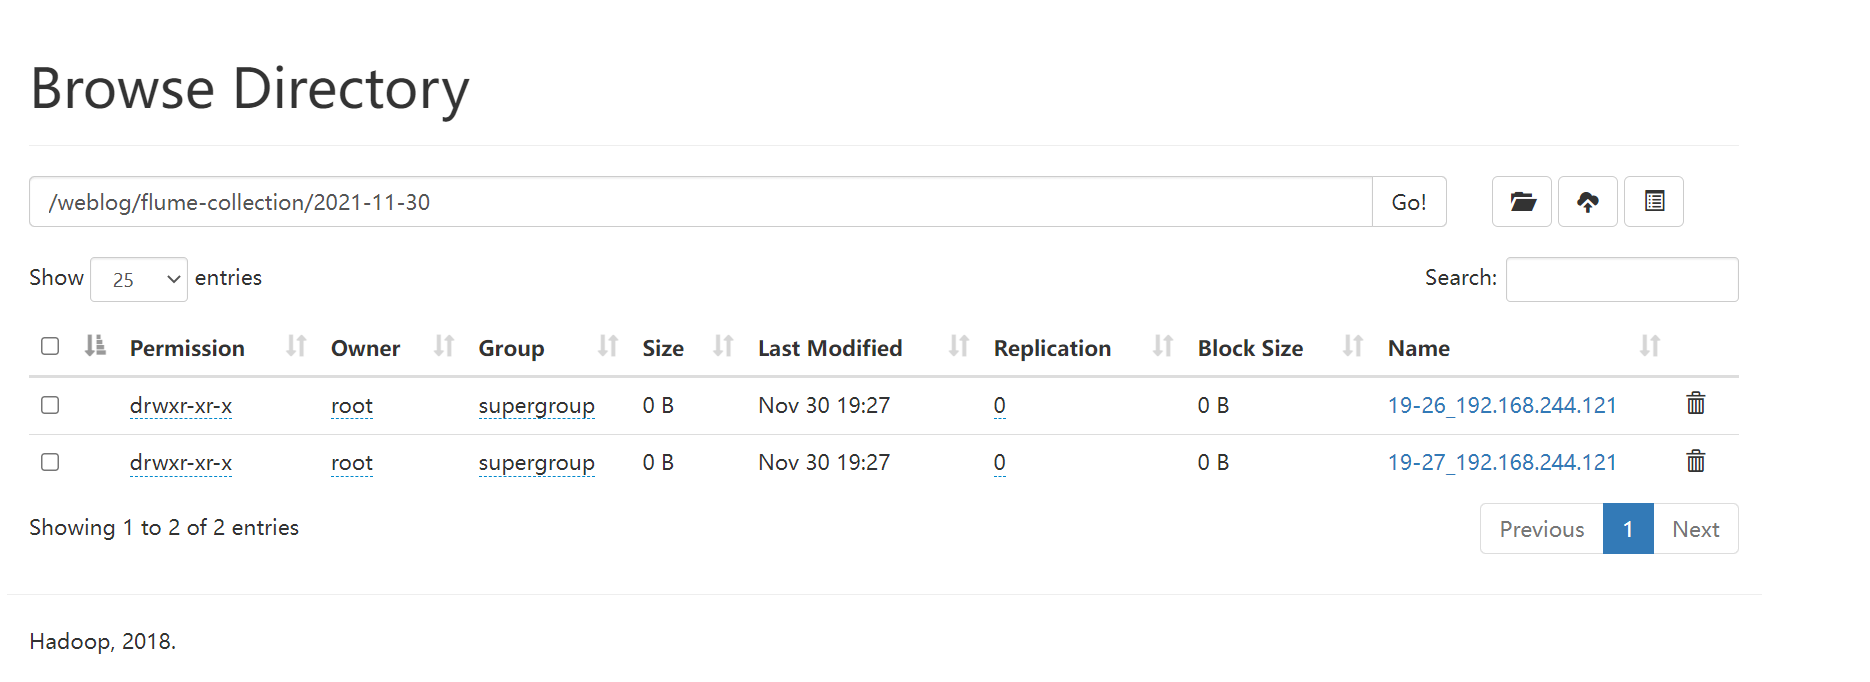
Then crazy access to a.html and b.html is over
The final results are as follows:

3. Transfer the log data file to the preprocessing working file directory
Create a new script file in / home / Hadoop / bigdata software / project1 Directory: movetopreworkdir.sh

Script:
#!/bin/bash

#
# ===========================================================================
# Program name:
# Function Description:       Move files to preprocessing working directory
# Input parameters:       Run date
# Destination path:      / data/weblog/preprocess/input
# Data source:       Flume collection data storage path: / weblog / flume collection
# Code review:
# Modified by:
# Modification date:
# Reason for modification:
# Modify list:
# ===========================================================================

#flume the directory where the generated log files are stored
log_flume_dir=/weblog/flume-collection

#Working directory of preprocessor
log_pre_input=/data/weblog/preprocess/input


#Get time information
day_01="2013-09-18"
day_01=`date -d'-1 day' +%Y-%m-%d`
syear=`date --date=$day_01 +%Y`
smonth=`date --date=$day_01 +%m`
sday=`date --date=$day_01 +%d`


#Read the directory of log files and judge whether there are files to upload
files=`hadoop fs -ls $log_flume_dir | grep $day_01 | wc -l`
if [ $files -gt 0 ]; then
hadoop fs -mv ${log_flume_dir}/${day_01} ${log_pre_input}
echo "success moved ${log_flume_dir}/${day_01} to ${log_pre_input} ....."
fi
Before execution:

Execute script:

Run successfully and view the results:

Since then~
crontab service operation
Start service: service crond start
Close service: Service Cross stop
Restart the service: service crond restart
Reload configuration: service crond reload
View crontab service status: service crond status
Manually start the crontab service: service crond start
Check whether the crondtab service is set to startup and execute the command: chkconfig --list
Add startup and self startup: chkconfig --level 35 crond on
Enter the edit command: crontabs -e
Enter view run instruction: crontabs -l
Delete instruction: crontabs -r
Configuration description
Basic format:
* * * * * command
Cent Time Day Month Week command
The first column represents 1 ~ 59 minutes, and each minute is represented by * or * / 1
The second column represents hours 0 ~ 23 (0 represents 0:00) and 7-9 represents between 8:00 and 10:00
The third column indicates dates 1 to 31
The fourth column indicates the month from January to December
Column 5 identification number: 0 ~ 6 (0 indicates Sunday)
Column 6 commands to run