"Linux should learn like this" collection of reading essays
Chapter VI
Linux system The unique file storage structure in often makes novices dizzy. This chapter will start from Linux Starting with the file storage structure in the system, it describes the file system Hierarchy Standard (FHS), udev hardware naming rules and the principle of hard disk devices.
In order to make readers better understand the role of the file system, Liu Trent In this chapter, the teacher will analyze in detail the differences between Ext3, Ext4 and XFS file system, which are the most common file systems in Linux system, and lead readers to practice hard disk device partition, formatting, mounting and other common hard disk management operations, so as to master the use of file system.
After laying a solid theoretical foundation and completing some relevant practical exercises, we will further fully deploy SWAP partition, configure quota disk quota service, use VDO (virtual data optimization) technology, and master ln command Bring hard and soft links. I believe that after learning this chapter, readers will have an in-depth understanding of disk storage and file system in Linux system and Windows system.
6.1 everything starts with "/"
In Linux system, directory, character device, socket, hard disk, optical drive, printer, etc. are abstracted into file form, that is Liu Trent The teacher has always stressed that "everything in the Linux system is a file". Since we usually deal with documents, how should we find them? In the Windows operating system, if you want to find a file, you should successively enter the disk partition (also known as the drive letter) where the file is located, and then enter the specific directory under the partition to finally find the file. However, there are no drive letters such as C, D, E and F in the Linux system. All files in the Linux system start from the "root" directory (/), and use the inverted tree structure to store files according to the file system Hierarchy Standard (FHS), and define the purpose of common directories.
In addition, file and directory names in Linux systems are strictly case sensitive. For example, root, root, root, root all represent different directories, and the file name must not contain a slash (/). The file storage structure in Linux system is shown in Figure 6-1.
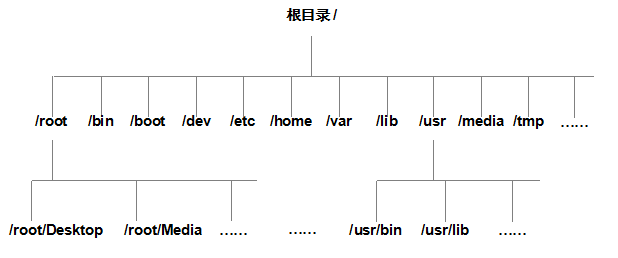
Figure 6-1 file storage structure in Linux system
The FHS mentioned above is based on the experience of countless Linux system users and developers in the past. It is a rule that users need to follow when storing files in the Linux system. It is used to guide users where to save files and tell users where to find the required files. However, FHS can only be regarded as a moral constraint for users. Some users are too lazy to abide by it, and still leave files everywhere, and some have never heard of it. This is not to call on readers to condemn them, but to suggest that you should flexibly use the knowledge you have learned. Do not recognize this FHS agreement and only talk about dead reason, otherwise you will suffer. In Linux system, the most common directories and corresponding storage contents are shown in table 6-1.
Table 6-1 common directory names and corresponding contents in Linux system
| Directory name | The contents of the file should be placed |
|---|---|
| /boot | Files required for boot - kernel, boot menu, required configuration files, etc |
| /dev | Store any equipment and interfaces in the form of files |
| /etc | configuration file |
| /home | User home directory |
| /bin | It can also be operated in single user mode command |
| /lib | The function library used during startup and the functions to be called by the commands below / bin and / sbin |
| /sbin | Commands required during startup |
| /media | Directory for mounting device files |
| /opt | Placing third-party software |
| /root | Home directory of system administrator |
| /srv | Directory of data files for some network services |
| /tmp | A "shared" temporary directory that anyone can use |
| /proc | Virtual file system, such as system kernel, process, external device, network state, etc |
| /usr/local | User installed software |
| /usr/sbin | Software / commands that will not be used when the Linux system is powered on/ script |
| /usr/share | Help and documentation files, or shared files |
| /var | It mainly stores frequently changing files, such as logs |
| /lost+found | When a file system error occurs, some missing file fragments are stored here |
There is another important concept in Linux system - path. Path refers to how to locate a file. It is divided into absolute path and relative path. Absolute path refers to the file or directory name written from the root directory (/), while relative path refers to the writing method relative to the current path. Let's look at the following example to help you understand. If a foreign tourist comes to Panjiayuan, Beijing and is in a hurry but can't find the bathroom, he specially asks you the way, then we have two correct directions.
absolute path: first come to China by plane, get out of the capital airport after arriving in Beijing, take the airport express rail to Sanyuanqiao, then transfer to line 10 to Panjiayuan station, take bus No. 34 to nongguangli after leaving the station, and then turn left at the intersection.
relative path: turn left at the intersection ahead.
Both methods are correct. If you are talking about the absolute path, any foreign tourist can follow this prompt to find the bathroom of Panjiayuan, but it is too cumbersome. If it is a relative path, although the expression is very concise, the foreign tourist can only find the bathroom from the current position (not necessarily Panjiayuan), so it is not guaranteed that he can find the bathroom after turning left at the intersection in front. Thus, the relative path is not universal.
6.2 naming rules of physical equipment
In Linux system, everything is a file, and hardware devices are no exception. Since it is a file, it must have a file name. The udev device manager in the system kernel will automatically standardize the hardware name, so that users can guess the general attributes and partition information of the device through the name of the device file; This is particularly convenient for unfamiliar devices. In addition, the service of udev device manager will always run as a daemon and listen to the signals sent by the kernel to manage the device files in the / dev directory. The common hardware devices and their file names in Linux system are shown in table 6-2.
Table 6-2 common hardware devices and their file names
| Hardware equipment | File name |
|---|---|
| IDE device | /dev/hd[a-d] |
| SCSI / SATA / USB flash disk | /dev/sd[a-z] |
| virtio device | /dev/vd[a-z] |
| floppy disk drive | /dev/fd[0-1] |
| printer | /dev/lp[0-15] |
| CD drive | /dev/cdrom |
| mouse | /dev/mouse |
| Tape drive | /dev/st0 or / dev/ht0 |
Because IDE devices are rare now, general hard disk devices start with "/ dev/sd". There can be multiple hard disks on a host, so the system uses a ~ z to represent 26 different hard disks (assigned from a by default), and the partition number of hard disks is also very particular:
The number of primary partition or extended partition starts from 1 and ends at 4;
Logical partitions start with number 5.
Many domestic Linux trainers and many well-known Linux books always make two mistakes when talking about the names of devices and partitions. The first knowledge point is the wrong understanding of the device name. Many trainers and Linux technical books will mention that / dev/sda, for example, represents the storage device in the first slot on the motherboard. Students or readers will find that this is the case when they practice operation. Therefore, they are more convinced of this theoretical knowledge. But this is not the truth. The reason why the sda device in the / dev directory is a is not determined by the slot, but by the identification order of the system kernel. It happens that the slot order of many motherboards is the identification order of the system kernel, so it will be named / dev/sda. When you use iSCSI network storage devices in the future, you will find that the second slot on the motherboard is empty, but the system can recognize the device / dev/sdb - that's the reason.
The second knowledge point is the wrong understanding of the partition name. Many Linux trainers will tell students that the number of partitions represents the number of partitions. For example, sda3 indicates that this is the third partition on the device, and students do get such results when doing experiments. However, this theoretical knowledge is wrong, because the digital code of the partition is not necessarily mandatory, but may also be manually specified. Therefore, sda3 can only represent the partition numbered 3, and it cannot be judged that there are already three partitions on the SDA device.
After filling in the two "pits", analyze the information contained in the device file name / dev/sda5, as shown in Figure 6-2.
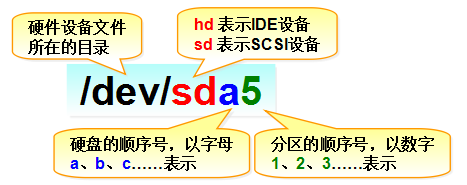
Figure 6-2 equipment file name
First, the hardware device files should be saved in the / dev / directory; Secondly, sd represents the storage device; Then, a represents the first identified device in the same kind of interface in the system; Finally, 5 indicates that the device is a logical partition. In short, "/ dev/sda5" means "this is the device file of the logical partition with partition number 5 in the first recognized hardware device in the system". Considering that many readers have no Linux foundation at all and are not easy to understand the concepts of primary partition, extended partition and logical partition mentioned above, let's briefly popularize the knowledge related to hard disk.
It is precisely because the computer has a hard disk device that we can archive at any time during the process of playing the game or after the game passes the customs, instead of starting over every time. The hard disk device is composed of a large number of sectors, and the capacity of each sector is 512 bytes. The first sector is the most important. It stores the master boot record and partition table information. For the first sector, the main boot record needs to occupy 446 bytes, the partition table needs to occupy 64 bytes, and the terminator needs to occupy 2 bytes; Each partition information recorded in the partition table needs 16 bytes. In this way, only four partition information can be written to the first sector, and these four partitions are four primary partitions. The data information in the first sector is shown in Figure 6-3.
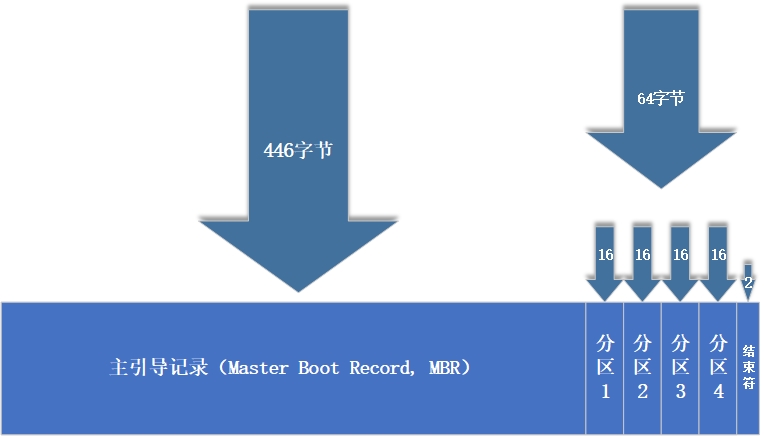
Figure 6-3 data information in the first sector
Now, the question arises - can you create up to four partitions per hard disk? This is obviously unreasonable and not enough.
Therefore, in order to solve the problem of insufficient number of partitions, the 16 byte space (called extended partition) in the partition table of the first sector (originally written into the main partition information) can be taken out to point to another partition. In other words, the extended partition is not a real partition, but more like a pointer occupying 16 byte partition table space - a pointer to another partition. In this way, users generally choose to use the method of three primary partitions plus one extended partition, and then create several logical partitions in the extended partition to meet the needs of multiple partitions (greater than 4). Of course, for now, it's enough for everyone to understand why there can't be more than four primary partitions. The primary partition, extended partition and logical partition can be planned as shown in Figure 6-4.
Tips
Strictly speaking, the so-called extended partition is not a practical partition, but just a pointer to other partitions. This pointer structure will form a one-way linked list. Therefore, the extended partition itself cannot store data, and users need to operate on the corresponding partition it points to (called logical partition).
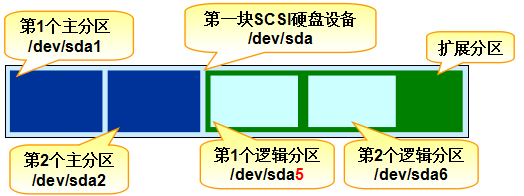
Figure 6-4 hard disk partition planning
6.3 document system and data
Students can take out a piece of A4 paper and write a few lines on it. In the process of writing, they will slowly find that the words are more and more crooked, and finally the whole line will tilt up or down. In order to write more neatly and read more comfortably, the stationery store provides a variety of books - single line book, double line book, Tian geben, staff book, etc. This also shows that the content without format constraints is completely out of our subjective control. The file establishment, writing, reading, modification, transfer and control performed by users in the hardware storage device depend on the file system. The function of file system is to reasonably plan the hard disk to ensure the normal use needs of users.
Linux system supports dozens of file systems, and the most common file systems are as follows.
Ext2: dating back to 1993, it is the first commercial file system of Linux system. It basically follows the design standard of UNIX file system. However, since the log read-write function is not included, there is a great possibility of data loss, so you can not use it, or it is recommended to use it for SD memory card or USB flash disk at most.
Ext3: it is a log file system. It will record the details of each write action of the whole hard disk in advance, and then carry out the actual operation, so as to trace back to the interrupted part after abnormal downtime. Ext3 can avoid file system data loss in case of abnormal system downtime, and can automatically repair data inconsistencies and errors. However, when the capacity of the hard disk is large, the repair time will be very long, and the data will not be lost.
Ext4: an improved version of Ext3. As the default file management system in RHEL 6 system, it supports a storage capacity of up to 1EB (1EB = 1073741824gb) and can have unlimited subdirectories. In addition, ext4 file system can allocate block s in batch, which greatly improves the reading and writing efficiency. Now many mainstream servers also use ext4 file system.
XFS: it is a high-performance log file system and the default file management system in RHEL 7/8. Its advantage is especially obvious after unexpected downtime, that is, it can quickly recover files that may be damaged, and the powerful logging function only needs very low computing and storage performance. It supports a maximum storage capacity of 18EB, which meets almost all requirements.
A big change in RHEL 7/8 system is that XFS is used as the file system, which is different from Ext4 used in RHEL 6. According to the official instructions issued by red hat company, this is indeed a great progress, but teacher Liu Trent found that it is not completely true in the actual measurement. Just to test the "read" performance of a file system, it is uncertain how many files to read, what is the size of each file, how much CPU, memory and other system resources are used when reading files, and whether different hardware configurations will have different effects. Therefore, I really dare not directly copy the official introduction of red hat. Personally, I think XFS is better than Ext4 in performance, but it is by no means overwhelming. Therefore, the most outstanding highlight of XFS file system should be that it can support up to 18EB of storage capacity.
18EB equals 18874368tb. Assuming that the capacity of each hard disk is 100TB, it takes about 190000 hard disks to install 18EB of data. In short, when XFS is used, the upper limit of file storage no longer depends on the technical level, but on the wallet. In the past, I often joked with my classmates, "if there is 18EB data in the computer room in Shanghai and we want to transmit it to Beijing in the fastest way," the answer is "take the Beijing Shanghai high-speed railway".
After you get a new hard disk storage device, you need to partition it first, then format the file system, and finally mount and use it normally. The partition operation of hard disk depends on your needs and hard disk size; You can also choose not to partition, but you must format the hard disk.
Tips
Just like getting a complete piece of uncut paper, first cut it for easy use (partition), then draw a grid on the cut paper so that it can be written neatly (format), and finally use it formally (Mount).
Next, let's briefly introduce what happens after the hard disk is formatted. Again, you don't have to remember it deliberately, as long as you can understand it.
There are too many data that need to be saved in the hard disk every day, so there is a "hard disk map" called super block in the Linux system. Linux does not write the file content directly into the "hard disk map", but records the information of the whole file system. Because if all the file contents are written here, its volume will become very large, and the query and writing speed of file contents will become very slow. Linux only records the permissions and attributes of each file in the inode, and each file occupies an independent inode table. The size of the table is 128 bytes by default, which records the following information:
Access rights of the file (read, write, execute);
The owner and group of the file (owner, group);
The size of the file;
The creation or content modification time of the file (Ctime);
The last access time of the file (Atime);
Modification time of the document (Mtime);
Special permissions of documents (SUID, SGID, SBIT);
The real data address (point) of the file.
The actual contents of the file are saved in block blocks (usually 1KB, 2KB or 4KB). The default size of an inode is only 128 bytes, and recording a block consumes 4 bytes. When the inode of the file is full, the Linux system will automatically allocate a block to record the information of other block blocks like the inode. In this way, the contents of each block can be concatenated together, so that the user can read the complete file content. There are two common cases for block blocks that store file contents (take 4KB block as an example).
Case 1: the file is very small (1KB), but it will still occupy a block, so it will potentially waste 3KB.
Case 2: if the file is large (5KB), it will occupy two blocks (after 5KB − 4KB, the remaining 1KB will also occupy one block).
You see here, do you think the Linux system is a waste? Why can't the capacity of the last block be fully used? In fact, each system is the same, but we haven't paid attention to it before. Students can check an existing file in the computer to see whether the actual size of the file is consistent with the occupied space, as shown in Figure 6-5.
During the development of computer system, many file systems have been produced. In order to make users do not care about the underlying hard disk structure when reading or writing files, the software layer in Linux kernel provides a Virtual File System (VFS) interface for user programs, In this way, users actually operate on the Virtual File System when operating files. Figure 6-6 shows the architecture of VFS. It can be seen that the actual file system hides its own characteristics and details under VFS, so that users will feel that "the file system is the same" in daily use, and can use various commands to perform various operations in any file system (such as using cp command to copy files).
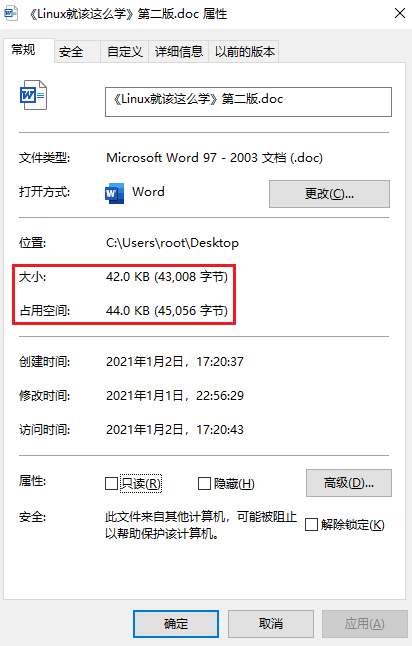
Figure 6-5 actual size and occupied space of files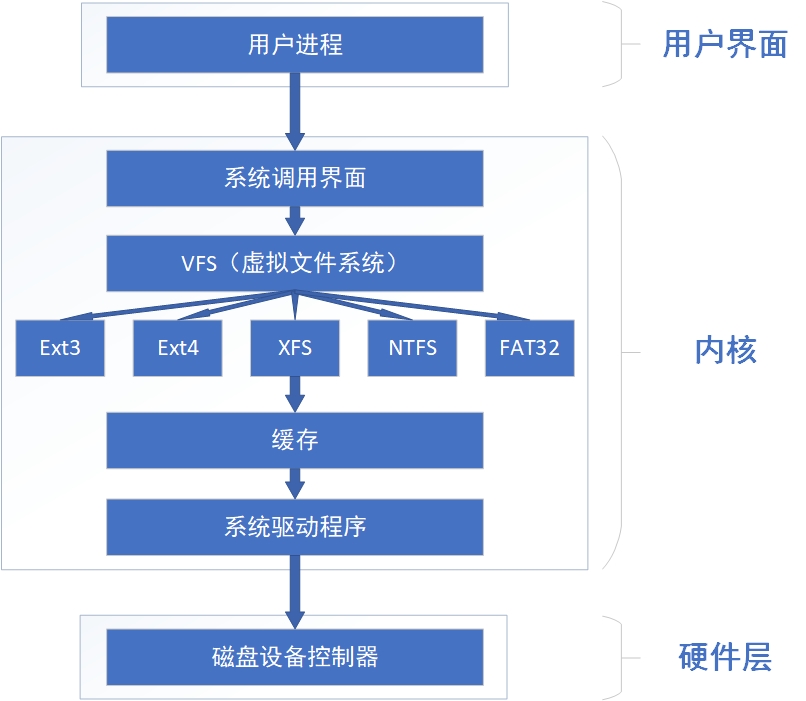
Figure 6-6 schematic diagram of VFS architecture
6.4 mounting hardware equipment
After we are used to the Windows system, we always take everything for granted. After inserting the USB flash disk into the computer, we never consider what the Windows system does to enable us to access this USB flash disk. Next, we will learn the methods of mounting and uninstalling storage devices in Linux system one by one, so that we can better understand the working principle and process of adding hardware devices in Linux system. As mentioned earlier, after getting a brand-new hard disk storage device, you should partition it first, then format it, and finally mount it and use it normally. "Partition" and "format" are often heard before, but what is "Mount"?
Here, Mr. Liu Trent gives you the simplest and most appropriate explanation - when users need to use the data in the hard disk device or partition, they need to associate it with an existing directory file first, and this association action is "Mount". The following will explain how to use the hard disk device step by step. However, in view of the complexity and importance of the theoretical knowledge related to mounting, we decided to take out another section to explain it separately. This time, we hope you can not only understand it, but also remember it.
The mount command is used to mount the file system in the format "Mount file system mount directory". The available parameters and functions of Mount command are shown in table 6-3. Mounting is the last step before using the hardware device. Just use the mount command to associate the hard disk device or partition with a directory file, and then you can see the data in the hardware device in this directory. For relatively new Linux systems, it is generally unnecessary to use the - t parameter to specify the type of file system, and the Linux system will automatically judge. The - a parameter in mount is worse. After execution, it will automatically check whether there are inadvertently mounted device files in the / etc/fstab file. If so, it will be automatically mounted.
Table 6-3 parameters and functions of Mount command
| parameter | effect |
|---|---|
| -a | Mount all file systems defined in / etc/fstab |
| -t | Specifies the type of file system |
For example, to mount the device / dev/sdb2 to the / backup directory, you only need to fill in the device and mount directory parameters in the mount command. The system will automatically determine the type of file to be mounted. The commands are as follows:
[root@linuxprobe ~]# mount /dev/sdb2 /backup
If you want to mount a network storage device at work, the name of the device may change from place to place, so it is not appropriate to write it as sdb. At this time, it is recommended to mount with UUID (universal unique identifier). UUID is a string used to identify each independent hard disk. It is unique and stable. It is especially suitable for mounting network devices. So, how can I know the UUID of the independent hard disk? The answer is to use the blkid command.
The blkid command is used to display the attribute information of the device. The full English name is "block id", and the syntax format is "blkid [device name]". An example of using the blkid command to query a device UUID is as follows:
[root@linuxprobe ~]# blkid
/dev/sdb1: UUID="2db66eb4-d9c1-4522-8fab-ac074cd3ea0b" TYPE="xfs" PARTUUID="eb23857a-01"
/dev/sdb2: UUID="478fRb-1pOc-oPXv-fJOS-tTvH-KyBz-VaKwZG" TYPE="ext4" PARTUUID="eb23857a-02"
After you have the UUID value of the device, you can use it to mount the network device:
[root@linuxprobe ~]# mount UUID=478fRb-1pOc-oPXv-fJOS-tTvH-KyBz-VaKwZG /backup
Although the file system can be used immediately after the mount command is executed according to the above method, the mount of the system will fail after the system is restarted, that is, it needs to be manually mounted after each boot. This is certainly not the effect we want. If we want to permanently and automatically associate the hardware device with the directory, we must write the mounting information into the / etc/fstab file according to the specified filling format "whether the device file mounting directory format type permission option is backed up or self checked" (see table 6-4 for the meaning of each field). This file contains many information items required for mounting. Once configured, it can be done once and for all.
Table 6-4 the meaning of each field in the specified filling format for mounting information
| field | significance |
|---|---|
| Equipment file | Generally, it is the path of the device + the device name. It can also write a unique identifier (UUID) |
| Mount directory | Specify the directory to mount to, which needs to be created before mounting |
| Format type | Specify the file system format, such as Ext3, Ext4, XFS, SWAP, iso9660 (this is an optical device), etc |
| Permission options | If it is set to defaults, the default permissions are: rw, suid, dev, exec, auto, nouser, async |
| Backup | If it is 1, dump will be used for disk backup after startup; if it is 0, no backup will be performed |
| Self inspection | If it is 1, the disk self-test will be performed automatically after power on; if it is 0, the self-test will not be performed |
If you want to mount the hardware device / dev/sdb2 whose file system is Ext4 to the / backup directory automatically after boot, and maintain the default permissions without post, you need to write the following information in the / etc/fstab file, so that it will be mounted successfully after system restart.
[root@linuxprobe ~]# vim /etc/fstab
#
# /etc/fstab
# Created by anaconda on Tue Jul 21 05:03:40 2020
#
# Accessible filesystems, by reference, are maintained under '/dev/disk/'.
# See man pages fstab(5), findfs(8), mount(8) and/or blkid(8) for more info.
#
# After editing this file, run 'systemctl daemon-reload' to update systemd
# units generated from this file.
#
/dev/mapper/rhel-root                     /        xfs     defaults    0 0
UUID=812b1f7c-8b5b-43da-8c06-b9999e0fe48b /boot    xfs     defaults    0 0
/dev/mapper/rhel-swap                     swap     swap    defaults    0 0
/dev/sdb2                                 /backup  ext4    defaults    0 0
Since we need to use the system image to create the Yum/DNF software warehouse later, we mount the optical disk device in the / media/cdrom directory in advance. The file system format of the optical disk device is iso9660:
[root@linuxprobe ~]# vim /etc/fstab
#
# /etc/fstab
# Created by anaconda on Tue Jul 21 05:03:40 2020
#
# Accessible filesystems, by reference, are maintained under '/dev/disk/'.
# See man pages fstab(5), findfs(8), mount(8) and/or blkid(8) for more info.
#
# After editing this file, run 'systemctl daemon-reload' to update systemd
# units generated from this file.
#
/dev/mapper/rhel-root                     /              xfs        defaults       0 0
UUID=812b1f7c-8b5b-43da-8c06-b9999e0fe48b /boot          xfs        defaults       0 0
/dev/mapper/rhel-swap                     swap           swap       defaults       0 0
/dev/sdb2                                 /backup        ext4       defaults       0 0
/dev/cdrom                                /media/cdrom   iso9660    defaults       0 0
The device information written to the / etc/fstab file will not take effect immediately. You need to use the mount -a parameter for automatic mounting:
[root@linuxprobe ~]# mount -a
The df command is used to view the usage of mounted disk space. It is called "disk free" in English, and the syntax format is "df -h".
If you want to check the mounting status of devices in the current system, it is highly recommended that you try the df command. It can not only list the devices being used in the system, but also conveniently "carry" the storage capacity with the - h parameter. For example, when encountering 10240K, it will automatically carry and write 10M, which is very convenient for us to read.
[root@linuxprobe~]# df -h
Filesystem             Size  Used Avail Use% Mounted on
devtmpfs               969M     0  969M   0% /dev
tmpfs                  984M     0  984M   0% /dev/shm
tmpfs                  984M   18M  966M   2% /run
tmpfs                  984M     0  984M   0% /sys/fs/cgroup
/dev/mapper/rhel-root   17G  3.9G   14G  23% /
/dev/sda1             1014M  152M  863M  15% /boot
/dev/sdb2              480M   20M  460M   4% /backup
tmpfs                  197M   16K  197M   1% /run/user/42
tmpfs                  197M  3.5M  194M   2% /run/user/0
/dev/sr0               6.7G  6.7G     0 100% /media/cdrom
by the way! When it comes to network storage devices, it is recommended that you add_ netdev parameter. In addition, the system will try to mount this network storage device after the networking is successful, so as to avoid long startup time or failure (it can be used when learning iSCSI technology in Chapter 17).
[root@linuxprobe ~]# vim /etc/fstab
#
# /etc/fstab
# Created by anaconda on Tue Jul 21 05:03:40 2020
#
# Accessible filesystems, by reference, are maintained under '/dev/disk/'.
# See man pages fstab(5), findfs(8), mount(8) and/or blkid(8) for more info.
#
# After editing this file, run 'systemctl daemon-reload' to update systemd
# units generated from this file.
#
/dev/mapper/rhel-root                       /              xfs       defaults            0 0
UUID=812b1f7c-8b5b-43da-8c06-b9999e0fe48b   /boot          xfs       defaults            0 0
/dev/mapper/rhel-swap                       swap           swap      defaults            0 0
/dev/sdb2                                   /backup        ext4      defaults,_netdev    0 0
/dev/cdrom                                  /media/cdrom   iso9660   defaults            0 0
Mounting a file system is to use hardware resources, while unmounting a file system means that hardware device resources are no longer used. Since the mount operation is the action of associating the hardware device with the directory, the uninstall operation only needs to describe one of the device files or the mount directory that you want to cancel the association, and generally there is no need to add other additional parameters.
The umount command is used to unmount a device or file system. Its full English name is "un mount", and its syntax format is "umount [device file / Mount directory]".
[root@linuxprobe ~]# umount /dev/sdb2
If we are currently in the directory where the device is mounted, the system will prompt that the device is busy. At this time, we only need to exit to another directory and try again. Easy.
[root@linuxprobe ~]# cd /media/cdrom/
[root@linuxprobe cdrom]# umount /dev/cdrom
umount: /media/cdrom: target is busy.
[root@linuxprobe  cdrom]# cd ~
[root@linuxprobe ~]# umount /dev/cdrom
[root@linuxprobe ~]#
Tips
Mounting operation is like two people getting married. Both parties need to be present at the same time. Once the information is registered in the system of the Civil Affairs Bureau, it will not work if you want to remarry (repeatedly mount a device).
Finally, teach the students a little skill. If there are many hard disks and partitions in the system, we don't know whether they are used or what they have done. At this point, you can use the lsblk command to list them in the form of a tree view.
The lsblk command is used to view the space usage of the mounted disk. Its full English name is "list block id". Enter the command and press enter to execute it.
[root@linuxprobe ~]# lsblk
NAME          MAJ:MIN RM  SIZE RO TYPE MOUNTPOINT
sda             8:0    0   20G  0 disk
├─sda1          8:1    0    1G  0 part /boot
└─sda2          8:2    0   19G  0 part
  ├─rhel-root 253:0    0   17G  0 lvm  /
  └─rhel-swap 253:1    0    2G  0 lvm  [SWAP]
sr0            11:0    1  6.6G  0 rom  /media/cdrom
6.5 adding hard disk devices
The fdisk command is used to create, modify and delete partition table information of a disk. The full English name is "format disk" and the syntax format is "fdisk disk name".
In Linux system, fdisk command is the most commonly used method to manage hard disk devices. It provides a "one-stop partition service" integrating the functions of adding, deleting and converting partitions. However, different from the parameters directly written to the back of the command explained earlier, the parameters of this command (see table 6-5) are interactive in the form of question and answer. Therefore, it is particularly convenient to manage hard disk devices and can be dynamically adjusted according to requirements.
Table 6-5 parameters and functions of fdisk command
| parameter | effect |
|---|---|
| m | View all available parameters |
| n | Add a new partition |
| d | Delete a partition information |
| l | Lists all available partition types |
| t | Change the type of a partition |
| p | View partition table information |
| w | Save and exit |
| q | Exit without saving |
First, use the fdisk command to try to manage the / dev/sdb hard disk device. After seeing the prompt, enter the parameter p to view the existing partition information in the hard disk device, including the capacity and number of sectors of the hard disk:
[root@linuxprobe ~]# fdisk /dev/sdb

Welcome to fdisk (util-linux 2.32.1).
Changes will remain in memory only, until you decide to write them.
Be careful before using the write command.

Device does not contain a recognized partition table.
Created a new DOS disklabel with disk identifier 0x88b2c2b0.

Command (m for help): p
Disk /dev/sdb: 20 GiB, 21474836480 bytes, 41943040 sectors
Units: sectors of 1 * 512 = 512 bytes
Sector size (logical/physical): 512 bytes / 512 bytes
I/O size (minimum/optimal): 512 bytes / 512 bytes
Disklabel type: dos
Disk identifier: 0x88b2c2b0
Enter parameter n to try adding a new partition. The system will ask the user to choose whether to continue to enter parameter p to create the primary partition or enter parameter e to create the extended partition. Enter the parameter p here to create a primary partition:
Command (m for help): n
Partition type
   p   primary (0 primary, 0 extended, 4 free)
   e   extended (container for logical partitions)
Select (default p): p
After confirming the creation of a primary partition, the system requires the user to enter the number of the primary partition first. As we learned earlier, the number range of the main partition is 1 ~ 4, so you can enter the default 1 here. Next, the system will prompt to define the starting sector position, which does not need to be changed. Just click enter to keep the default setting, and the system will automatically calculate the position of the front idle sector. Finally, the system will require to define the end sector position of the partition, which is actually to define the size of the whole partition. Instead of calculating the number of sectors, we just need to enter + 2G to create a hard disk partition with a capacity of 2GB.
Partition number (1-4, default 1): 1
First sector (2048-41943039, default 2048): Click enter here
Last sector, +sectors or +size{K,M,G,T,P} (2048-41943039, default 41943039): +2G

Created a new partition 1 of type 'Linux' and of size 2 GiB.
Use the parameter p again to view the partition information in the hard disk device. Sure enough, you can see a primary partition with the name of / dev/sdb1, the start sector position of 2048 and the end sector position of 4196351. At this time, do not close the window directly, but hit the parameter w and press the Enter key, so that the partition information can be written successfully.
Command (m for help): p
Disk /dev/sdb: 20 GiB, 21474836480 bytes, 41943040 sectors
Units: sectors of 1 * 512 = 512 bytes
Sector size (logical/physical): 512 bytes / 512 bytes
I/O size (minimum/optimal): 512 bytes / 512 bytes
Disklabel type: dos
Disk identifier: 0x88b2c2b0

Device     Boot Start     End Sectors Size Id Type
/dev/sdb1        2048 4196351 4194304   2G 83 Linux

Command (m for help): w
The partition table has been altered.
Calling ioctl() to re-read partition table.
Syncing disks.
The Id value of the 6th field in the partition information is a code used to identify the role of the partition, which can help users quickly understand the role of the partition. Generally, it is not necessary to modify it. Use the l parameter to check the disk codes, and then modify them during the SWAP operation in section 6.6:
Command (m for help): l

 0  Empty           24  NEC DOS         81  Minix / old Lin bf  Solaris
 1  FAT12           27  Hidden NTFS Win 82  Linux swap / So c1  DRDOS/sec (FAT-
 2  XENIX root      39  Plan 9          83  Linux           c4  DRDOS/sec (FAT-
 3  XENIX usr       3c  PartitionMagic  84  OS/2 hidden or  c6  DRDOS/sec (FAT-
 4  FAT16 <32M      40  Venix 80286     85  Linux extended  c7  Syrinx
 5  Extended        41  PPC PReP Boot   86  NTFS volume set da  Non-FS data
 6  FAT16           42  SFS             87  NTFS volume set db  CP/M / CTOS / .
 7  HPFS/NTFS/exFAT 4d  QNX4.x          88  Linux plaintext de  Dell Utility
 8  AIX             4e  QNX4.x 2nd part 8e  Linux LVM       df  BootIt
 9  AIX bootable    4f  QNX4.x 3rd part 93  Amoeba          e1  DOS access
 a  OS/2 Boot Manag 50  OnTrack DM      94  Amoeba BBT      e3  DOS R/O
 b  W95 FAT32       51  OnTrack DM6 Aux 9f  BSD/OS          e4  SpeedStor
 c  W95 FAT32 (LBA) 52  CP/M            a0  IBM Thinkpad hi ea  Rufus alignment
 e  W95 FAT16 (LBA) 53  OnTrack DM6 Aux a5  FreeBSD         eb  BeOS fs
 f  W95 Ext'd (LBA) 54  OnTrackDM6      a6  OpenBSD         ee  GPT
10  OPUS            55  EZ-Drive        a7  NeXTSTEP        ef  EFI (FAT-12/16/
11  Hidden FAT12    56  Golden Bow      a8  Darwin UFS      f0  Linux/PA-RISC b
12  Compaq diagnost 5c  Priam Edisk     a9  NetBSD          f1  SpeedStor
14  Hidden FAT16 <3 61  SpeedStor       ab  Darwin boot     f4  SpeedStor
16  Hidden FAT16    63  GNU HURD or Sys af  HFS / HFS+      f2  DOS secondary
17  Hidden HPFS/NTF 64  Novell Netware  b7  BSDI fs         fb  VMware VMFS
18  AST SmartSleep  65  Novell Netware  b8  BSDI swap       fc  VMware VMKCORE
1b  Hidden W95 FAT3 70  DiskSecure Mult bb  Boot Wizard hid fd  Linux raid auto
1c  Hidden W95 FAT3 75  PC/IX           bc  Acronis FAT32 L fe  LANstep
1e  Hidden W95 FAT1 80  Old Minix       be  Solaris boot    ff  BBT
After the above steps are completed, the Linux system will automatically abstract the hard disk primary partition into a / dev/sdb1 device file. You can use the file command to view the properties of the file, but I found in my lectures and work that sometimes the system does not automatically synchronize the partition information to the Linux kernel, and this situation seems to be common (but it can not be regarded as a serious bug). You can enter the partprobe command to manually synchronize the partition information to the kernel, and it is generally recommended to execute the command twice in a row, which will have a better effect. If you can't solve the problem with this command, restart the computer. This "killer mace" will be useful.
[root@linuxprobe ]# file /dev/sdb1
/dev/sdb1: cannot open `/dev/sdb1' (No such file or directory)
[root@linuxprobe ]# partprobe
[root@linuxprobe ]# partprobe
[root@linuxprobe ]# file /dev/sdb1
/dev/sdb1: block special
If the hardware storage device is not formatted, the Linux system cannot know how to write data on it. Therefore, formatting is also required after partitioning the storage device. In Linux systems, the command used for formatting operations is mkfs. This command is very interesting, because after entering the mkfs name in the Shell terminal and then clicking the Tab key for completing the command twice, the effect will be as follows:
[root@linuxprobe ~]# mkfs
mkfs         mkfs.ext2    mkfs.ext4    mkfs.minix   mkfs.vfat
mkfs.cramfs  mkfs.ext3    mkfs.fat     mkfs.msdos   mkfs.xfs
yes! This mkfs command lovingly saves the commonly used file system name into multiple command files in the form of suffix, which is also very simple to use - mkfs. File type name. For example, to format a file system partitioned into XFS, the command should be mkfs.xfs/dev/sdb1.
[root@linuxprobe ~]# mkfs.xfs /dev/sdb1
meta-data=/dev/sdb1              isize=512    agcount=4, agsize=131072 blks
         =                       sectsz=512   attr=2, projid32bit=1
         =                       crc=1        finobt=1, sparse=1, rmapbt=0
         =                       reflink=1
data     =                       bsize=4096   blocks=524288, imaxpct=25
         =                       sunit=0      swidth=0 blks
naming   =version 2              bsize=4096   ascii-ci=0, ftype=1
log      =internal log           bsize=4096   blocks=2560, version=2
         =                       sectsz=512   sunit=0 blks, lazy-count=1
realtime =none                   extsz=4096   blocks=0, rtextents=0
Finally, the partition and formatting of the storage device are completed. The next step is to mount and use the storage device. The related steps are also very simple: first, create a mount point directory for mounting devices; Then use the mount command to associate the storage device with the mount point; Finally, use the df -h command to view the mounting status and hard disk usage information.
[root@linuxprobe ~]# mkdir /newFS
[root@linuxprobe ~]# mount /dev/sdb1 /newFS
[root@linuxprobe ~]# df -h
Filesystem             Size  Used Avail Use% Mounted on
devtmpfs               969M     0  969M   0% /dev
tmpfs                  984M     0  984M   0% /dev/shm
tmpfs                  984M  9.6M  974M   1% /run
tmpfs                  984M     0  984M   0% /sys/fs/cgroup
/dev/mapper/rhel-root   17G  3.9G   14G  23% /
/dev/sr0               6.7G  6.7G     0 100% /media/cdrom
/dev/sda1             1014M  152M  863M  15% /boot
tmpfs                  197M   16K  197M   1% /run/user/42
tmpfs                  197M  3.5M  194M   2% /run/user/0
/dev/sdb1              2.0G   47M  2.0G   3% /newFS
The du command is used to view the disk capacity occupied by a partition or directory. The full English name is "disk usage", and the syntax format is "du -sh directory name".
Now that the storage device has been successfully mounted, you can try to write files to the storage device through the mount point directory. Before writing to a file, let's take a look at the du command used to view the amount of file data. Simply put, this command is used to see how much hard disk space is occupied by one or more files.
When using the Window system, we always encounter the situation that "the capacity of Disk C is insufficient and it is quickly occupied after cleaning the garbage". In the Linux system, you can use the du -sh / * command to check the space occupied by all first level directories under the root directory of the Linux system. You can find which directory occupies the most space within 1s:
[root@linuxprobe ~]# du -sh /*
0	/bin
113M	/boot
0	/dev
29M	/etc
12K	/home
0	/lib
0	/lib64
6.7G	/media
0	/mnt
0	/newFS
0	/opt
0	/proc
8.6M	/root
9.6M	/run
0	/sbin
0	/srv
0	/sys
12K	/tmp
3.5G	/usr
155M	/var
First copy a batch of files from some directories, and then check the total capacity of these files:
[root@linuxprobe ~]# cp -rf /etc/* /newFS
[root@linuxprobe ~]# ls /newFS
adjtime                     hostname                  profile.d
aliases                     hosts                     protocols
alsa                        hosts.allow               pulse
alternatives                hosts.deny                qemu-ga
anacrontab                  hp                        qemu-kvm
asound.conf                 idmapd.conf               radvd.conf
..................Omit some input information
[root@linuxprobe ~]# du -sh /newFS
39M /newFS/
Careful readers must remember that when explaining the mount command earlier, it was mentioned that the device files mounted with the mount command will become invalid the next time the system restarts. If you want the attachment of this device file to be permanently valid, you need to write the attached information into the configuration file:
[root@linuxprobe ~]# vim /etc/fstab
#
# /etc/fstab
# Created by anaconda on Tue Jul 21 05:03:40 2020
#
# Accessible filesystems, by reference, are maintained under '/dev/disk/'.
# See man pages fstab(5), findfs(8), mount(8) and/or blkid(8) for more info.
#
# After editing this file, run 'systemctl daemon-reload' to update systemd
# units generated from this file.
#
/dev/mapper/rhel-root                     /                      xfs      defaults        0 0
UUID=812b1f7c-8b5b-43da-8c06-b9999e0fe48b /boot                  xfs      defaults        0 0
/dev/mapper/rhel-swap                     swap                   swap     defaults        0 0
/dev/cdrom                                /media/cdrom           iso9660  defaults        0 0
/dev/sdb1                                 /newFS                 xfs      defaults        0 0
6.6 add switch partition
SWAP partition is a technology that divides a certain space in the hard disk in advance, and then temporarily stores the temporarily unused data in the memory in the hard disk, so as to free up the physical memory space for more active program services. Its design purpose is to solve the problem of insufficient real physical memory. Generally speaking, let the hard disk help the memory share the pressure. However, because the SWAP partition reads and writes data through the hard disk device, the speed must be slower than the physical memory, so the resources of the SWAP partition will be called only when the real physical memory is exhausted.
The process of creating a swap partition is very similar to the process of mounting and using storage devices mentioned earlier. Before partitioning the / dev/sdb storage device, it is necessary to talk about the partition suggestions of the swap partition: in the production environment, the size of the swap partition is generally 1.5 ~ 2 times of the real physical memory. In order to let everyone feel the change of the exchange partition space more clearly, a 5GB primary partition is taken as the exchange partition resource:
[root@linuxprobe ~]# fdisk /dev/sdb
Welcome to fdisk (util-linux 2.32.1).
Changes will remain in memory only, until you decide to write them.
Be careful before using the write command.

Command (m for help): n
Partition type
   p   primary (1 primary, 0 extended, 3 free)
   e   extended (container for logical partitions)
Select (default p): p
Partition number (2-4, default 2): Tap enter
First sector (4196352-41943039, default 4196352): Tap enter
Last sector, +sectors or +size{K,M,G,T,P} (4196352-41943039, default 41943039): +5G

Created a new partition 2 of type 'Linux' and of size 5 GiB.
After the above operation, we get a new partition with a capacity of 5GB. Then try to modify the identification code of the hard disk. Here, change it to 82 (Linux swap) to know its function in the future:
Command (m for help): t
Partition number (1,2, default 2): 2
Hex code (type L to list all codes): 82

Changed type of partition 'Linux' to 'Linux swap / Solaris'.

Command (m for help): p
Disk /dev/sdb: 20 GiB, 21474836480 bytes, 41943040 sectors
Units: sectors of 1 * 512 = 512 bytes
Sector size (logical/physical): 512 bytes / 512 bytes
I/O size (minimum/optimal): 512 bytes / 512 bytes
Disklabel type: dos
Disk identifier: 0x88b2c2b0

Device     Boot   Start      End  Sectors Size Id Type
/dev/sdb1          2048  4196351  4194304   2G 83 Linux
/dev/sdb2       4196352 14682111 10485760   5G 82 Linux swap / Solaris
Done! Click w parameter to exit the partition table editing tool:
Command (m for help): w
The partition table has been altered.
Calling ioctl() to re-read partition table.
Syncing disks.
Let's look at two simple commands related to switching partitions.
The mkswap command is used to format the exchange partition of a new device. The full English name is "make swap", and the syntax format is "mkswap device name".
[root@linuxprobe ~]# mkswap /dev/sdb2
Setting up swapspace version 1, size = 5 GiB (5368705024 bytes)
no label, UUID=45a4047c-49bf-4c88-9b99-f6ac93908485
The swap on command is used to activate a new switching partition device. The full English name is "swap on", and the syntax format is "swap on device name".
Use the swapon command to formally mount the prepared SWAP hard disk device to the system. You can use the free -m command to view the size change of the SWAP partition (from 2047MB to 7167MB):
[root@linuxprobe ~]# free -m
              total        used        free      shared  buff/cache   available
Mem:           1966        1391         105          12         469         384
Swap:          2047           9        2038
[root@linuxprobe ~]# swapon /dev/sdb2
[root@linuxprobe ~]# free -m
              total        used        free      shared  buff/cache   available
Mem:           1966        1395         101          12         469         380
Swap:          7167           9        7158
In order to make the new switching partition device still take effect after restart, you need to write the relevant information into the configuration file in the following format and remember to save it:
[root@linuxprobe ~]# vim /etc/fstab
#
# /etc/fstab
# Created by anaconda on Tue Jul 21 05:03:40 2020
#
# Accessible filesystems, by reference, are maintained under '/dev/disk/'.
# See man pages fstab(5), findfs(8), mount(8) and/or blkid(8) for more info.
#
# After editing this file, run 'systemctl daemon-reload' to update systemd
# units generated from this file.
#
/dev/mapper/rhel-root                        /               xfs        defaults    1 1
UUID=812b1f7c-8b5b-43da-8c06-b9999e0fe48b    /boot           xfs        defaults    1 2
/dev/mapper/rhel-swap                        swap            swap       defaults    0 0
/dev/cdrom                                   /media/cdrom    iso9660    defaults    0 0
/dev/sdb1                                    /newFS          xfs        defaults    0 0
/dev/sdb2                                    swap            swap       defaults    0 0
6.7 disk capacity quota
As mentioned earlier in this book, the original design intention of Linux system is to let many people use and perform their own tasks together, so as to become a multi-user and multi task operating system. However, the hardware resources are fixed and limited. If some users constantly create files or store movies on the Linux system, the hard disk space will be occupied one day. In this case, the root administrator needs to use the disk capacity quota service to limit the maximum hard disk space or the maximum number of files that a user or a user group can use for a specific folder. Once this maximum value is reached, it is no longer allowed to continue to use. Quota technology can be used for disk capacity quota management, so as to limit the user's available hard disk capacity or the maximum number of files that can be created. Quota technology also has the function of soft restriction and hard restriction.
Soft limit: when the soft limit is reached, the user will be prompted, but the user is still allowed to continue to use within the limited limit.
Hard limit: when the hard limit is reached, the user will be prompted and the user's operation will be forcibly terminated.
Quota disk capacity quota service package has been installed in RHEL 8 system, but the storage device does not support quota technology by default. At this time, you need to manually edit the configuration file and restart the system to enable the startup directory (/ boot) in the system to support quota disk quota technology.
[root@linuxprobe ~]# vim /etc/fstab
#
# /etc/fstab
# Created by anaconda on Tue Jul 21 05:03:40 2020
#
# Accessible filesystems, by reference, are maintained under '/dev/disk/'.
# See man pages fstab(5), findfs(8), mount(8) and/or blkid(8) for more info.
#
# After editing this file, run 'systemctl daemon-reload' to update systemd
# units generated from this file.
#
/dev/mapper/rhel-root                        /             xfs        defaults         1 1
UUID=812b1f7c-8b5b-43da-8c06-b9999e0fe48b    /boot         xfs        defaults,uquota  1 2
/dev/mapper/rhel-swap                        swap          swap       defaults         0 0
/dev/cdrom                                   /media/cdrom  iso9660    defaults         0 0
/dev/sdb1                                    /newFS        xfs        defaults         0 0
/dev/sdb2                                    swap          swap       defaults         0 0
[root@linuxprobe ~]# reboot
In addition, for readers who have studied the early Linux system or have experience in RHEL 5/6 system, special attention should be paid here. In the early Linux system, the usrquota parameter was used to enable the hard disk device to support the quota disk capacity quota service, while the RHEL 7/8 system used the uquota parameter. After restarting the system, use the mount command to check. You can find that the / boot directory already supports the quota disk quota Technology:
[root@linuxprobe ~]# mount | grep boot
/dev/sda1 on /boot type xfs (rw,relatime,seclabel,attr2,inode64,usrquota)
Next, create a user tom to check the effect of quota disk capacity quota, and increase the write permission of others for the / boot directory to ensure that users can write data normally:
[root@linuxprobe ~]# useradd tom
[root@linuxprobe ~]# chmod -R o+w /boot
xfs_ The quota command is used to manage the disk capacity quota of the device. The syntax format is "xfs_quota [parameter] quota file system".
This is a command designed specifically for the XFS file system to manage the quota disk capacity quota service. The - c parameter is used to set the command to be executed in the form of a parameter- The x parameter is an expert mode, which enables the operation and maintenance personnel to configure the quota service more complex. Next, use XFS_ The quota command is used to set the quota disk capacity quota of user tom to the / boot directory. The specific quota control includes: the soft limit and hard limit of hard disk usage are 3MB and 6MB respectively; The soft and hard limits for the number of files created are 3 and 6, respectively.
[root@linuxprobe ~]# xfs_quota -x -c 'limit bsoft=3m bhard=6m isoft=3 ihard=6 tom' /boot
[root@linuxprobe ~]# xfs_quota -x -c report /boot
User quota on /boot (/dev/sda1)
                               Blocks
User ID          Used       Soft       Hard    Warn/Grace
---------- --------------------------------------------------
root           114964          0          0     00 [--------]
tom                 0       3072       6144     00 [--------]
The parameters used above are divided into two groups: isoft/ihard and bsoft/bhard, which will be explained in detail below. As mentioned in section 6.3, in the Linux system, each file uses an independent inode information block to save attribute information, and a file corresponds to an inode information block. Therefore, isoft and ihard limit the number of files by limiting the maximum number of inodes used by the system. bsoft and bhard represent the block size occupied by the file, that is, the maximum capacity occupied by the file.
Soft is a soft limit. When the limit is exceeded, it only writes the operation records to the log without limiting the user's behavior. Hard is a hard limit. Once it exceeds the system, it will be banned immediately. Users can no longer create or occupy any new hard disk capacity.
After configuring the above software and hardware restrictions, try to switch to an ordinary user, and then try to create a file with a volume of 5MB and 8MB respectively. You can see that you are limited by the system when creating 8MB files:
[root@linuxprobe ~]# su - tom
[tom@linuxprobe ~]$ cd /boot
[tom@linuxprobe boot]$ dd if=/dev/zero of=/boot/tom bs=5M count=1
1+0 records in
1+0 records out
5242880 bytes (5.2 MB, 5.0 MiB) copied, 0.00298178 s, 1.8 GB/s
[tom@linuxprobe boot]$ dd if=/dev/zero of=/boot/tom bs=8M count=1
dd: error writing '/boot/tom': Disk quota exceeded
1+0 records in
0+0 records out
4194304 bytes (4.2 MB, 4.0 MiB) copied, 0.00398607 s, 1.1 GB/s
The edquota command is used to manage the disk quota of the system. Its full English name is "edit quota", and its syntax format is "edquota [parameter] user name".
After setting the quota disk capacity quota limit for users, you can use the edquota command to modify the quota value as needed. Where, - u parameter indicates which user to set for- The g parameter indicates which user group to set, as shown in table 6-6.
Table 6-6 parameters and functions available in edquota command
| parameter | effect |
|---|---|
| -u | Set up a user |
| -g | Set up a user group |
| -p | Copy the original rule to the new user / group |
| -t | Limit grace period |
The edquota command will call the Vi or Vim editor to let the root administrator modify the specific details to be restricted. Remember to save and exit with wq. Next, the hard disk quota of user tom's hard disk usage is increased from 5MB to 8MB:
[tom@linuxprobe ~]$ exit
[root@linuxprobe ~]# edquota -u tom
Disk quotas for user tom (uid 1001):
  Filesystem                   blocks       soft       hard     inodes     soft     hard
  /dev/sda1                      4096       3072       8192          1        3        6
[root@linuxprobe ~]# su - tom
[tom@linuxprobe ~]$ cd /boot
[tom@linuxprobe boot]$ dd if=/dev/zero of=/boot/tom bs=8M count=1
1+0 records in
1+0 records out
8388608 bytes (8.4 MB, 8.0 MiB) copied, 0.0185476 s, 452 MB/s
6.8 VDO virtual data optimization
VDO (virtual data optimization) is a technology that optimizes storage space by compressing or deleting data on storage devices. VDO is a new technology acquired by red hat after it acquired Permabit. It has been tested on RHEL 7.5/7.6/7.7 for many times before and after 2019-2020, and finally officially announced with RHEL 8 system. The key of VDO technology is to delete and duplicate the original data in the hard disk. It is a bit similar to the network disk service we usually use. The speed is particularly slow when uploading files normally for the first time. When uploading the same file for the second time, it is only used as a data pointer, which can almost achieve the effect of "second transmission", without occupying another space or waiting for a long time. In addition to duplicate deletion, VDO technology can also automatically compress logs and databases to further reduce storage waste. The compression effect of VDO for various types of files is shown in table 6-7.
Table 6-7 summary of compression effects on various types of files
| file name | describe | type | Original size (KB) | Actual occupied space (KB) |
|---|---|---|---|---|
| dickens | Dickens Anthology | English original | 9953 | 9948 |
| mozilla | Mozilla 1.0 executable | Execution procedure | 50020 | 33228 |
| mr | Medical resonase image | picture | 9736 | 9272 |
| nci | Structured chemical database | database | 32767 | 10168 |
| ooffice | Open Office.org 1.01 DLL | Executable program | 6008 | 5640 |
| osdb | MySQL format sample database for benchmarking | database | 9849 | 9824 |
| reymont | Wadiswaff Raymond's book | 6471 | 6312 | |
| samba | samba source code | src source code | 21100 | 11768 |
| sao | Sky data | bin file in astronomical format | 7081 | 7036 |
| webster | unabridged dictionary | HTML | 40487 | 40144 |
| xml | XML file | HTML | 5220 | 2180 |
| x-ray | Perspective medical pictures | Hospital data | 8275 | 8260 |
VDO technology supports local storage and remote storage, and can be used as an additional storage layer under local file system, iSCSI or Ceph storage. Red hat mentioned on the VDO introduction page that when deploying virtual machines or containers, it is recommended to use the ratio of logical storage to physical storage of 10:1, that is, 1TB physical storage corresponds to 10TB logical storage; When deploying object storage (such as Ceph), the ratio of logical storage to physical storage is 3:1, that is, 1TB physical storage corresponds to 3TB logical storage.
In short, VDO technology can save space!
There are two special situations that need to be mentioned in advance. First, technologies such as DM crypt on the company's server can be compatible with VDO technology, but remember to encrypt the volume before using VDO. Because encryption will make duplicate data different, the deletion operation cannot be realized. Always remember to put the encryption layer under VDO, as shown in Figure 6-14.
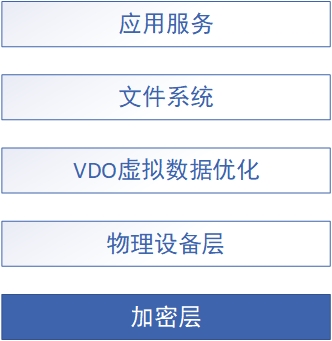
Figure 6-14 VDO technology topology
Second, VDO technology can not be superimposed. It is no problem to upgrade 1TB physical storage to 10TB logical storage, but it can't be converted from 10TB to 100TB. If you step on your left foot and your right foot, you really can't fly.
Through the study in section 6.5, I believe that the students have mastered the methods of partitioning, formatting and mounting the hard disk. We shut down the virtual machine and add a new SATA hard disk with a capacity of 20GB. After power on, we can see the new hard disk with the name of / dev/sdc:
[root@linuxprobe ~]# ls -l /dev/sdc
brw-rw----. 1 root disk 8, 32 Jan 6 22:26 /dev/sdc
VDO technology is enabled by default in RHEL/CentOS 8 system. VDO technology is now red hat's own technology, so it's not necessary to say its compatibility. If VDO is not installed on your system, don't worry. Use dnf command to complete the installation:
[root@linuxprobe ~]# dnf install kmod-kvdo vdo
Updating Subscription Management repositories.
Unable to read consumer identity
This system is not registered to Red Hat Subscription Management. You can use subscription-manager to register.
Last metadata expiration check: 0:01:56 ago on Wed 06 Jan 2021 10:37:19 PM CST.
Package kmod-kvdo-6.2.0.293-50.el8.x86_64 is already installed.
Package vdo-6.2.0.293-10.el8.x86_64 is already installed.
Dependencies resolved.
Nothing to do.
Complete!
First, create a new VDO volume.
The newly added physical devices are managed using the vdo command, where the name parameter represents the name of the new device volume; The device parameter represents which disk is made; The vdoLogicalSize parameter represents the size of the device after production. According to the principle recommended by red hat, 20GB hard disk will be turned into 200GB logical storage:
[root@linuxprobe ~]# vdo create --name=storage --device=/dev/sdc --vdoLogicalSize=200G
Creating VDO storage
Starting VDO storage
Starting compression on VDO storage
VDO instance 0 volume is ready at /dev/mapper/storage
Tips
The Linux command line is strictly case sensitive, and the L and S letters in the vdoLogicalSize parameter must be capitalized.
After the creation is successful, use the status parameter to view the overview information of the new volume:
[root@linuxprobe ~]# vdo status --name=storage
VDO status:
  Date: '2021-01-06 22:51:33+08:00'
  Node: linuxprobe.com
Kernel module:
  Loaded: true
  Name: kvdo
  Version information:
    kvdo version: 6.2.0.293
Configuration:
  File: /etc/vdoconf.yml
  Last modified: '2021-01-06 22:49:33'
VDOs:
  storage:
    Acknowledgement threads: 1
    Activate: enabled
    Bio rotation interval: 64
    Bio submission threads: 4
    Block map cache size: 128M
    Block map period: 16380
    Block size: 4096
    CPU-work threads: 2
    Compression: enabled
    Configured write policy: auto
    Deduplication: enabled
..................Omit some output information
It can be seen from the above that the output information contains key information such as the time when the VDO volume was created, host name, version, Compression and duplication.
Next, format the new volume and mount it for use.
The newly created VDO volume device will be stored in the / dev/mapper directory and named after the device name. Just operate on it. In addition, you can use the udevadm set command to refresh the device before mounting to avoid that the previous configuration does not take effect:
[root@linuxprobe ~]# mkfs.xfs /dev/mapper/storage
meta-data=/dev/mapper/storage    isize=512    agcount=4, agsize=13107200 blks
         =                       sectsz=4096  attr=2, projid32bit=1
         =                       crc=1        finobt=1, sparse=1, rmapbt=0
         =                       reflink=1
data     =                       bsize=4096   blocks=52428800, imaxpct=25
         =                       sunit=0      swidth=0 blks
naming   =version 2              bsize=4096   ascii-ci=0, ftype=1
log      =internal log           bsize=4096   blocks=25600, version=2
         =                       sectsz=4096  sunit=1 blks, lazy-count=1
realtime =none                   extsz=4096   blocks=0, rtextents=0
[root@linuxprobe ~]# udevadm settle
[root@linuxprobe ~]# mkdir /storage
[root@linuxprobe ~]# mount /dev/mapper/storage /storage
If you want to view the actual usage of the device, use the vdostats command. The human readable parameter is used to automatically carry the storage capacity and output it in a way that is easier for people to read (for example, display 20G instead of 20971520K):
[root@linuxprobe ~]# vdostats --human-readable
Device                    Size      Used Available Use% Space saving%
/dev/mapper/storage      20.0G      4.0G     16.0G  20%           99%
The Size shown here is the actual physical storage space (that is, 20.0GB is the Size of the hard disk). If you want to see the logical storage space, you can use the df command:
[root@linuxprobe ~]# df -h
Filesystem             Size  Used Avail Use% Mounted on
devtmpfs               969M     0  969M   0% /dev
tmpfs                  984M     0  984M   0% /dev/shm
tmpfs                  984M  9.6M  974M   1% /run
tmpfs                  984M     0  984M   0% /sys/fs/cgroup
/dev/mapper/rhel-root   17G  3.9G   14G  23% /
/dev/sr0               6.7G  6.7G     0 100% /media/cdrom
/dev/sda1             1014M  152M  863M  15% /boot
tmpfs                  197M   16K  197M   1% /run/user/42
tmpfs                  197M  3.5M  194M   2% /run/user/0
/dev/sdb1              2.0G   47M  2.0G   3% /newFS
/dev/mapper/storage    200G  2.4G  198G   2% /storage
Copy a large file casually to see how much capacity it occupies and how much Space saving it is:
[root@linuxprobe ~]# ls -lh /media/cdrom/images/install.img
-r--r--r--. 1 root root 448M Apr 4 2019 /media/cdrom/images/install.img
[root@linuxprobe ~]# cp /media/cdrom/images/install.img /storage/
[root@linuxprobe ~]# ls -lh /storage/install.img
-r--r--r--. 1 root root 448M Jan  6 23:06 /storage/install.img
[root@linuxprobe ~]# vdostats --human-readable
Device                    Size      Used Available Use% Space saving%
/dev/mapper/storage      20.0G      4.4G     15.6G  22%           18%
The effect is not obvious. Copy the same file to see how much space it takes this time:
[root@linuxprobe ~]# cp /media/cdrom/images/install.img /storage/rhel.img
[root@linuxprobe ~]# vdostats --human-readable
Device                    Size      Used Available Use% Space saving%
/dev/mapper/storage      20.0G      4.5G     15.5G  22%           55%
Does it feel great?! The original 448MB files only occupy less than 100MB this time, and the space saving rate has increased from 18% to 55%. Of course, this is only two operations, and the benefits are already so obvious.
Finally, set the device to be permanently mounted to take effect and provide service all the time.
The VDO device volume will always exist after it is created, but the / etc/fstab file needs to be manually edited before it can be automatically mounted and effective after the next restart. It is used by us. For this kind of logical storage device, it is not recommended to use / dev/mapper/storage as the device name for mounting. Let's try the UUID mentioned earlier:
[root@linuxprobe ~]# blkid /dev/mapper/storage
/dev/mapper/storage: UUID="cd4e9f12-e16a-415c-ae76-8de069076713" TYPE="xfs"
Open the / etc/fstab file and complete the corresponding fields. Suggest adding_ netdev parameter, which means that the VDO device volume can be mounted after the system and network are started to ensure safety.
[root@linuxprobe ~]# vim /etc/fstab
#
# /etc/fstab
# Created by anaconda on Tue Jul 21 05:03:40 2020
#
# Accessible filesystems, by reference, are maintained under '/dev/disk/'.
# See man pages fstab(5), findfs(8), mount(8) and/or blkid(8) for more info.
#
# After editing this file, run 'systemctl daemon-reload' to update systemd
# units generated from this file.
#
/dev/mapper/rhel-root                        /             xfs        defaults           1 1
UUID=812b1f7c-8b5b-43da-8c06-b9999e0fe48b    /boot         xfs        defaults,uquota    1 2
/dev/mapper/rhel-swap                        swap          swap       defaults           0 0
/dev/cdrom                                   /media/cdrom  iso9660    defaults           0 0
/dev/sdb1                                    /newFS        xfs        defaults           0 0
/dev/sdb2                                    swap          swap       defaults           0 0
UUID=cd4e9f12-e16a-415c-ae76-8de069076713    /storage      xfs        defaults,_netdev   0 0
6.9 hard and soft link
There are two different types of soft link and hard link in Linux system.
soft link: also known as symbolic link, it only contains the name and path of the linked file, much like a label recording the address. When the original file is deleted or moved, the new linked file will become invalid and cannot be accessed. Soft links can be set for files and directories, and cross file system links are not a problem. From this point of view, it has the same nature as the "shortcut" of Windows system. The effect of users accessing soft links is shown in Figure 6-15.
Hard link: as like as two peas to the original file block, the system will create a inode block of information that is exactly the same as the original one. Therefore, as like as two peas, the hard link file is exactly the same as the original one, but the name is different. Every time a hard link is added, the number of inodes of the file will increase by 1; And only when the number of inodes of the file is 0 can it be completely deleted. In other words, since the hard link is actually a pointer to the original file block, even if the original file is deleted, it can still be accessed through the hard link file. It should be noted that due to technical limitations, directory files cannot be hard linked across partitions. The effect of users accessing hard links is shown in Figure 6-16.
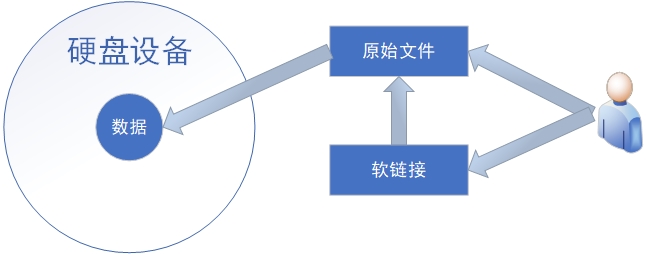
Figure 6-15 schematic diagram of soft link principle
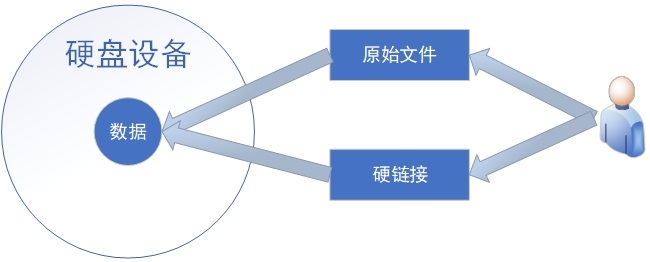
Figure 6-16 schematic diagram of hard link
Tips
If you open the table of contents page of the book in hand and look at the table of contents title and corresponding page numbers, you should be able to understand it. A linked file is a label that points to the location of the actual content. Through this label, you can find the corresponding data.
The ln command is used to create soft and hard links to files. The full English name is "link", and the syntax format is "ln [parameter] original file name link file name".
The available parameters and functions of ln command are shown in table 6-8. When using the ln command, whether to add the - s parameter will create two "shortcuts" with different properties. Therefore, if there is no solid theoretical knowledge and practical experience to pave the way, although we can successfully complete the experiment, we will never understand why we will succeed.
Table 6-8 parameters and functions available in LN command
| parameter | effect |
|---|---|
| -s | Create a symbolic link (if you do not take the - s parameter, a hard link is created by default) |
| -f | Forces the creation of a link to a file or directory |
| -i | Ask before overwriting |
| -v | Displays the process of creating a link |
In order to better understand the different properties of soft links and hard links, we first create a file and create a soft link for it:
[root@linuxprobe ~]# echo "Welcome to linuxprobe.com" > old.txt
[root@linuxprobe ~]# ln -s old.txt new.txt
[root@linuxprobe ~]# cat old.txt
Welcome to linuxprobe.com
[root@linuxprobe ~]# cat new.txt
Welcome to linuxprobe.com
[root@linuxprobe ~]# ls -l old.txt
-rw-r--r-- 1 root root 26 Jan 11 00:08 old.txt
The original file name is old and the new soft link file name is new. After deleting the original file, the soft link file cannot be read immediately:
[root@linuxprobe ~]# rm -f old.txt
[root@linuxprobe ~]# cat new.txt
cat: readit.txt: No such file or directory
Next, create a hard link for the original file old, which is equivalent to creating a pointer to the hard disk storage location of the original file. In this way, the newly created hard link will no longer depend on the name of the original file and other information, and will not be unreadable due to the deletion of the original file. At the same time, you can see that after creating the hard link, the number of hard disk links of the original file has increased to 2.
[root@linuxprobe ~]# echo "Welcome to linuxprobe.com" > old.txt
[root@linuxprobe ~]# ln old.txt new.txt
[root@linuxprobe ~]# cat old.txt
Welcome to linuxprobe.com
[root@linuxprobe ~]# cat new.txt
Welcome to linuxprobe.com
[root@linuxprobe ~]# ls -l old.txt
-rw-r--r-- 2 root root 26 Jan 11 00:13 old.txt
This is a very interesting phenomenon. The hard link file created will make the number in the second column of the file attribute become 2. This number represents the number of inode information blocks of the file. I believe that the students have been very sure that even if the original file is deleted, the new file will always be readable, because only when the number of inodes of the file is "cleared", it really means that the file has been deleted.
[root@linuxprobe ~]# rm -f old.txt
[root@linuxprobe ~]# cat new.txt
Welcome to linuxprobe.com