preface
In daily development, it is inevitable to publish your library to maven warehouse, which is more convenient to use.
Publishing aar package to maven warehouse mainly uses the plug-ins provided by Gradle:
- maven plug-in (old version) was completely abandoned after Gradle 6.2 (added @ Deprecated annotation)
- Maven publish plug-in
Maven plug-in is a plug-in provided by Gradle 1.0 for publishing aar/jar packages to Maven warehouse. In Gradle 1.3, a new publishing plug-in, Maven publish, is introduced. This new plug-in introduces some new concepts and functions to make Gradle publishing more powerful. Now it is the preferred option for publishing artifacts.
1, Basic concepts
1. What is POM?
POM (Project Object Model) refers to the Project Object Model, which is used to describe the basic information of project components. An effective POM node mainly contains the following information:
| to configure | describe | Example ('com.github.bumptech.glide:glide:4.11.0 ') |
|---|---|---|
| groupId | Name of organization / company | com.github.bumptech.glide |
| artifactId | Name of the component | glide |
| version | Version of the component | 4.11.0 |
| packaging | Packaged format | aar/jar |
2. What is a repository?
In a project, we will need to rely on various second-party or third-party libraries. These dependencies must be stored in a Place, which is called a warehouse. Using a repository can help us manage project artifacts, such as jar s, AARS, and so on.
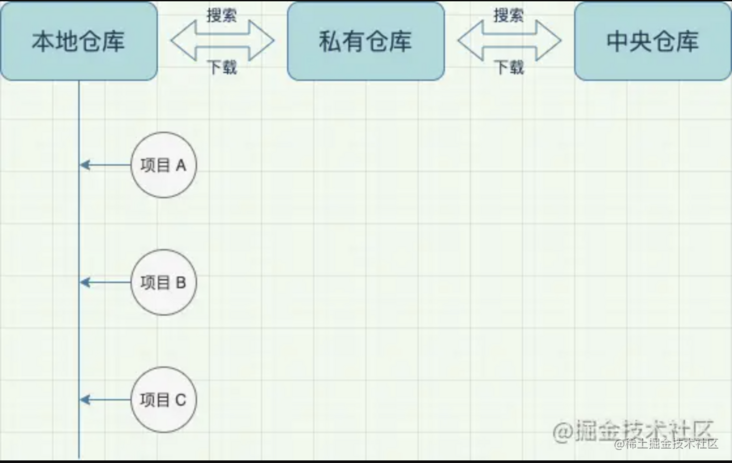
Mainstream construction tools have three levels of warehouse concept:
- 1. Local warehouse: whether Linux or Window is used, there will be a directory in the computer to store dependent files downloaded from the central warehouse or remote warehouse;
- 2. Central warehouse: the warehouse provided by the open source community is the storage location of most open source libraries. Like the central warehouse in Maven community Maven Central;
- 3. Private warehouse: the user-defined warehouse of a company or organization, which can be understood as the storage location of two-party libraries.
The order of searching dependencies during construction is as follows:
- 1. Search in the local warehouse. If the search cannot be found, execute step 2;
- 2. Search in the central warehouse and private warehouse. The search order is in the order declared in the repositories. If it is found, download the dependent file to the local warehouse; otherwise, execute step 3;
- 3. If the dependency cannot be found in the end, the error "dependency cannot be found" is thrown.
After understanding these basic concepts, let's introduce how to publish the aar/jar package through the maven plug-in and maven publish plug-in provided by Gradle.
2, maven plugin
The maven plug-in was provided in Gradle 1.0. To use the maven plug-in, follow the following steps:
1. Using the maven plug-in
In the build.gradle file of the library module that needs to publish the aar package, apply the maven plug-in:
apply plugin: "maven"
2. Configure POM
In the build.gradle file, add the following configuration information:
def localDefaultRepo = "file://" + new File(System.getProperty("user.home"), '.m2/repository').absolutePath
uploadArchives {
    repositories.mavenDeployer {
        // repository(url: uri('~/.m2/repository')) / / Note 1
        // Configure warehouse address
        repository(url: uri(localDefaultRepo))
        // repository(url: uri('../repo'))

        // Configure pom information
        pom.groupId "com.mei.http"
        pom.artifactId "myhttp"
        pom.version "1.0.0-SNAPSHOT"
        pom.packaging "aar"

          // pom.project {
        //    groupId "com.mei.http"
        //    artifactId "myhttp"
        //    version "1.0.1-SNAPSHOT"
        //    packaging "aar"
        // }
    }
}
As shown above, specify the address of the warehouse and configure pom information. After this configuration is completed, you can see the upload/uploadArchives task in the task task list.
The warehouse address configured here is a local path, that is, publish aar to a local folder. User here\_ Home /. M2 / repository / directory is the default local warehouse address of Gradle, where USER\_HOME is the user directory.
2-1. Default local warehouse
When specifying the local warehouse address, step on a pit. If you want to use the local default warehouse address, such as:
repository(url: uri('/.m2/repository'))
println "path=${uri('~/.m2/repository')}"
Printed path:
path=file:/Users/mei/WorkSpace/AndroidDemo/MAarPublish/myhttpjava/~/.m2/repository/
After the uploadArchives task is executed, click user\_ There is no aar file in the home /. M2 / repository / directory, such as:

So at this time, if you use it, you can't load the aar file.
implementation 'com.mei.http:myhttp:1.0.0-SNAPSHOT'
What causes this? In fact, it is a path problem.
When an absolute path is used, that is:
def localDefaultRepo = "file://" + new File(System.getProperty("user.home"), '.m2/repository').absolutePath
When the warehouse address uses localDefaultRepo, it is displayed in user\_ You can see the published aar package in the home /. M2 / repository / directory, such as:
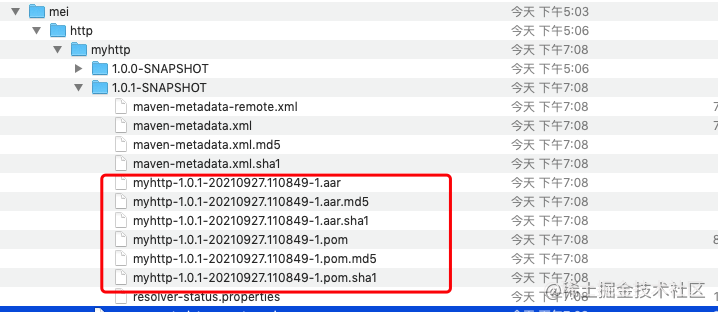
In this way, the aar package is published successfully.
use
In the build.gradle file of the project, introduce the default local warehouse, such as:
allprojects {
    repositories {
        .....
        mavenLocal() // Use default local warehouse
    }
}
In the build.gradle file of app, reference the myhttp Library:
dependencies {
        .....
    implementation 'com.mei.http:myhttp:1.0.1-SNAPSHOT'
}
In this way, the code in myhttp can be used in the app.
2-2. Customize local warehouse
In addition to using the default local warehouse, you can also specify a custom local warehouse, that is, you can specify a directory as the local warehouse, such as:
uploadArchives {
    repositories.mavenDeployer {
        // Configure warehouse address
        repository(url: uri('../repo'))

        // Configure pom information
        pom.groupId "com.mei.http"
        pom.artifactId "myhttp"
        pom.version "1.0.0-SNAPSHOT"
        pom.packaging "aar"
    }
}
For example, the above path is to create a repo folder under the root directory of the project to serve as a local warehouse. After the uploadArchives task is executed, you can see the repo directory under the project directory, such as:
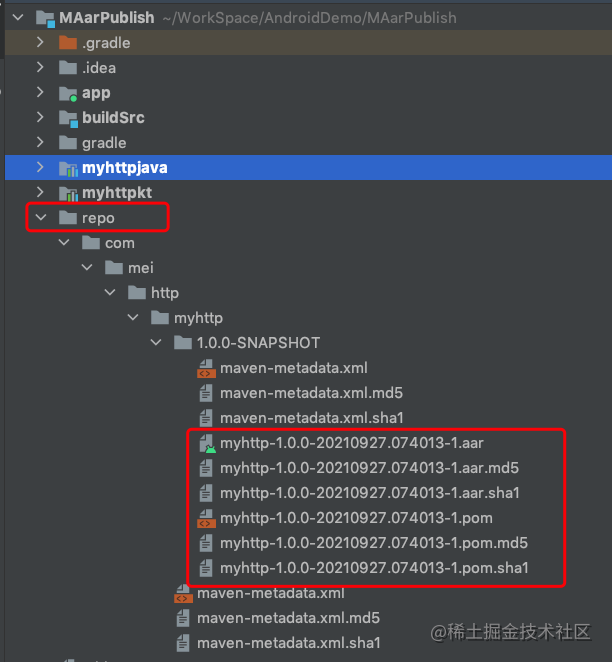
It can be seen that this is also a successful release. When using, it is also necessary to specify the path of the local warehouse, that is, the file path where the aar package is stored. Similar to the above, the following code is added to the build.gradle file of the project to indicate the path of the local warehouse:
allprojects {
    repositories {
                .....
       maven {
           url '../repo' // If it is the path of the project, it can be displayed directly in this way
       }
    }
}
If other projects want to use this library, you need to use the absolute path, that is:
allprojects {
    repositories {
                .....
       maven {
           url '/Users/mei/WorkSpace/AndroidDemo/MAarPublish/repo'
       }
    }
}
3. Upload source code and documents
Through the above steps, aar is basically released successfully, but the code in the aar package is not annotated and has no source code. Just decompile and see some code information. This experience is not very good, such as:
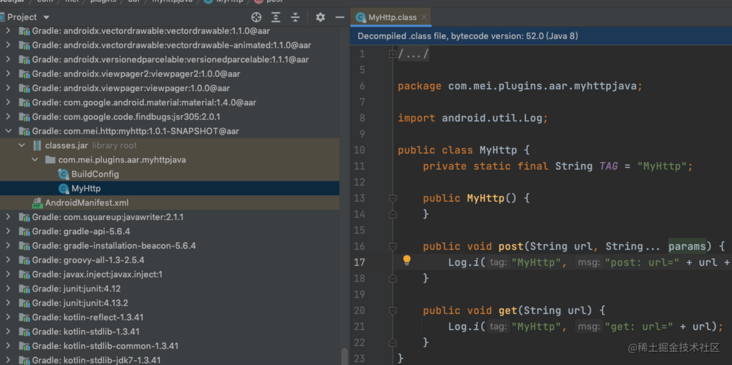
The reason for this problem is that the source code and documents are not uploaded when uploading aar files.
3-1. Upload source code
Create a Task to upload source code, as follows:
task uploadSourceJar(type: Jar) {
  // Define a flag (add sources after the generated jar package, such as: myhttp-1.0.2-20210927.115550-2-sources.jar)
    classifier = 'sources'
    println "srcDirs=${project.android.sourceSets.main.java.sourceFiles}"
  // Specify the source file path
    from project.android.sourceSets.main.java.sourceFiles
}

// Specify the task s to be performed when contracting
artifacts {
    archives uploadSourceJar
}
After the above code is added, the source code will be uploaded when the uploadArchives task is executed, such as: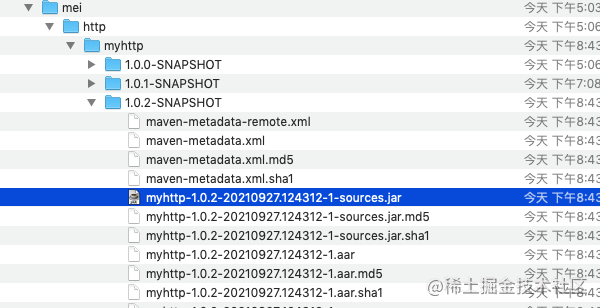
In Android Studio, view the source code of myhttp as follows:
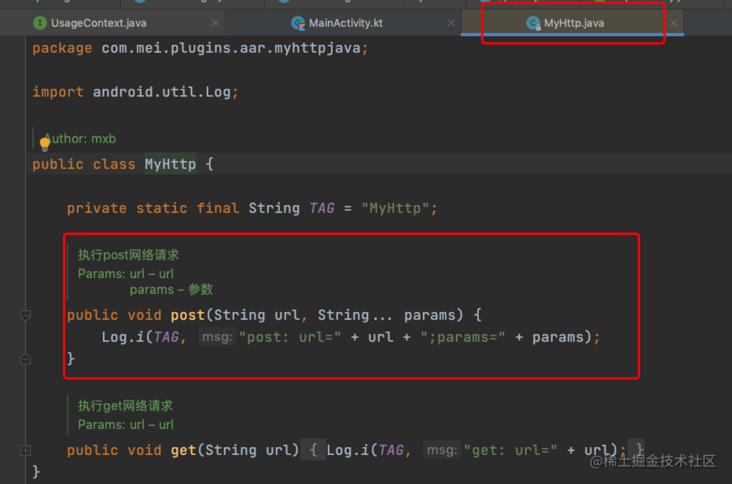
You can really see the source code and comments.
Extension: artifact
The artifact method provides an Object object. What is it? There are mainly three kinds.
- Artifact 'my file name. Jar' is a specific file.
- artifact sourceJar task sourceJar output. For example, here is the Jar package that packages the source code.
- artifact source: sourceJar, classifier: 'src', extension: 'zip' MavenArtifact instance constructed through source, classifier and extension. The parameters correspond to the source file, name category (artifactid classifier) and extension name (. jar/.zip, etc.).
3-2. Generate and upload documents
Through the above operations, the source code is uploaded to the maven warehouse. When the aar file is referenced, you can see the source code and annotation information.
If it is an SDK, you also need to upload documents in order to facilitate others' access.
task androidJavadocs(type: Javadoc) {
    doLast {
        source = project.android.sourceSets.main.java.srcDirs
        // Code path to generate doc
        classpath += project.files(project.android.getBootClasspath().join(File.pathSeparator))
        failOnError = false // task will not stop abnormally when javadoc parsing error occurs
    }
}

// Solve the problem that JavaDoc Chinese annotation generation fails
tasks.withType(Javadoc) {
    options.addStringOption('Xdoclint:none', '-quiet')
    options.addStringOption('encoding', 'UTF-8')
    options.addStringOption('charSet', 'UTF-8')
}

task androidJavadocsJar(type: Jar, dependsOn: androidJavadocs) {
    doLast {
        //archiveFileName  The archive name. If the name has not been explicitly set
        // , the pattern for the name is:
        //[archiveBaseName]-[archiveAppendix]-[archiveVersion]-[archiveClassifier].[archiveExtension]
        // The classifier part of the archive name, followed by the category distinguished name. e.g. xxxx-javadoc.jar.
        classifier = 'javadoc'
        from androidJavadocs.destinationDir
    }
}

artifacts {
    // Add comments to aar package
    archives androidJavadocsJar
}
Add the above code to generate Java documents.
4. Upload remote Maven warehouse
To upload the aar package to the remote maven warehouse, you only need to replace the above maven warehouse address with the remote maven warehouse address. In addition, you also need to provide the user name and password of the maven warehouse, because the built private maven warehouse generally needs the user name and password.
The details are as follows:
uploadArchives {
    repositories.mavenDeployer {
      // Assume that the remote maven warehouse address is: http://10.0.192.56:8081/repository/core/
      // Account No.: meiTest, password: 123456
        repository(url: "http://10.0.192.56:8081/repository/core/") {
            authentication(userName: "meiTest", password: "123456")
        }
        // Configure pom information
        pom.groupId "com.mei.http"
        pom.artifactId "myhttp"
        pom.version "1.0.0-SNAPSHOT"
        pom.packaging "aar"
    }
}
As above, by replacing the maven warehouse address and adding the warehouse account and password, you can upload it to the remote warehouse.
use
When uploading the aar package to maven's private warehouse, you need to verify the account and password. When using it, you also need to verify the account and password, such as:
allprojects {
    repositories {
        ....
        // Specify private server path, account and password
        maven{
            url 'http://10.0.192.56:8081/repository/core/'
            credentials {
                username = "meiTest"
                password = "123456"
            }
        }
    }
}
3, Maven publish plug-in
Plug in class: maven publishplugin
After Gradle 6.2, the maven plug-in was completely abandoned and can not be used. Only the maven publish plug-in can be used. Therefore, the use of maven publish plug-in should also be mastered. Let's take a look at the specific usage.
1. Basic use of Maven publish plug-in
Application plug-ins:
apply plugin: "maven-publish"
**Configure publishing products: * * when publishing aar packages using Maven publish plug-in, the basic configuration information is as follows:
publishing {
    // Configure maven warehouse
    repositories { RepositoryHandler handler->
        handler.mavenLocal()  // Publish to the default local maven warehouse, path: USER_HOME/.m2/repository/
    }
  // Configure publishing products
    publications {PublicationContainer publication->
      // The name can be defined arbitrarily. It is defined as maven here because my aar package is published to the maven warehouse. Therefore, it is defined as maven here to see the meaning of the name
      // Task name: maven
        maven(MavenPublication) {// Container configurable information Maven publication
            // Rely on the bundlereaseaar task and upload the aar of its output
            afterEvaluate { artifact(tasks.getByName("bundleReleaseAar")) } // Method 1: generate aar package
              // artifact "$buildDir/outputs/aar/${project.name}-release.aar" / / method 2: specify the generated aar path
            groupId = "com.mei.http"
            artifactId = "myhttp"
            version = "1.0.4-SNAPSHOT"
        }
    }
}
The extension configuration class of Maven publish plug-in is: PublishingExtension. Viewing the source code of PublishingExtension class, you can see that there are two information that can be configured for publishing configuration:
repositories: used to configure maven warehouse addresses
Multiple addresses can be configured. When the publish task is executed, the aar package will be published to all specified maven warehouse addresses.
repositories { RepositoryHandler handler ->
    handler.mavenLocal()
    handler.maven {
        url "${rootDir}/repo"
    }
    // Warehouse user name and password
    // handler.maven { MavenArtifactRepository mavenArtifactRepository ->
    //     //maven warehouse address
    //     url 'http://10.0.192.56:8081/repository/core/'
    //     //Account and password to access the warehouse
    //     credentials {
    //         username = "meiTest"
    //         password = "123456"
    //     }
    // }
}
Publications: configure the information of the jar to be published, that is, the information of the product aar package. Publications is a container. Its type is PublicationContainer, and its configurable information type is Maven publication. That is, publications is a list collection, and the object stored in the collection is Maven publication, and the name of the object can be defined by yourself. Therefore, multiple publications can be configured, such as:
publications { PublicationContainer publicationContainer ->
  // Publish snapshot package
    debug(MavenPublication) {
        afterEvaluate { artifact(tasks.getByName("bundleReleaseAar")) }
        groupId = "com.mei.http"
        artifactId = "myhttp"
        version = "1.0.4-SNAPSHOT"
    }
  // Release official package
    release(MavenPublication) {
        afterEvaluate { artifact(tasks.getByName("bundleReleaseAar")) }
        groupId = "com.mei.http"
        artifactId = "myhttp"
        version = "1.0.4"
    }
Specify how to upload the aar package:
- Generate aar package tasks through dependencies, such as afterevaluate {artifact (tasks. Getbyname ("bundlereleasear")}
- Specify the generated aar path, such as: artifact "buildDir/outputs/aar/buildDir/outputs/aar/buildDir/outputs/aar/{project.name}-release.aar"
Publish aar:
After adding the above configuration, execute the publishing/publish task in the Tasks list on the right side of the AS to publish the aar package.
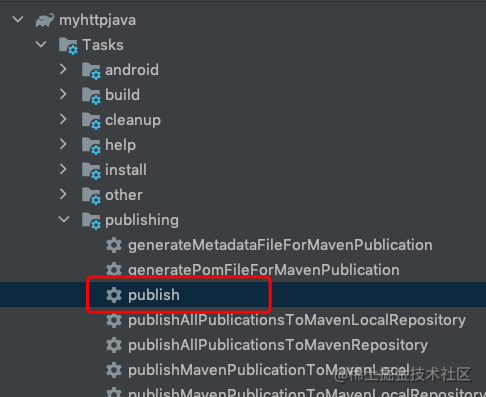
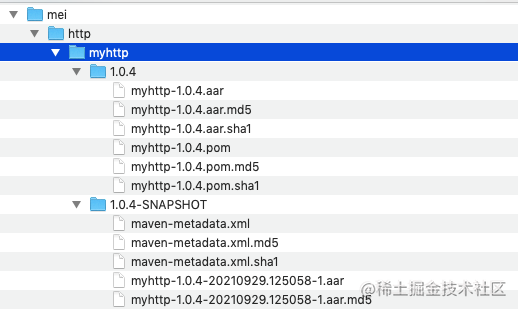
Two release products, debug and release, are configured. After the release task is executed, you can see that there are formal packages and test packages in the default local warehouse, as shown in the following figure:
2. Upload source code
In the basic use of Maven publish plug-in, the source code of aar package is not uploaded. In Android Studio, open the class to view the source code:
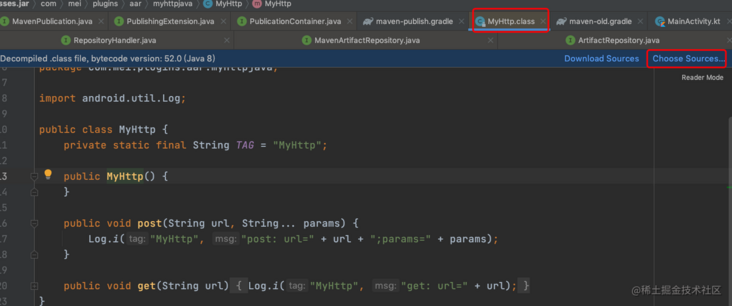
Prompt the user to select the source code. Here you can see the code, which is decompiled by Android Studio according to the bytecode. So you need to upload the source code here.
Add the task of uploading source code, such as:
// 1. Add the task of uploading source code
task sourceJar(type: Jar) {
    from android.sourceSets.main.java.srcDirs
    archiveClassifier = "sources"
}

publishing {
    repositories { RepositoryHandler handler ->
        handler.mavenLocal()
    }
    publications { PublicationContainer publicationContainer ->
        maven(MavenPublication) {
            artifact sourceJar // Add task to upload source code

            afterEvaluate { artifact(tasks.getByName("bundleReleaseAar")) }
            groupId = "com.mei.http"
            artifactId = "myhttp"
            version = "1.0.5-SNAPSHOT"
        }
    }
}
After adding the code in the above comments, it will be uploaded together with the source code when publishing the aar package, such as:
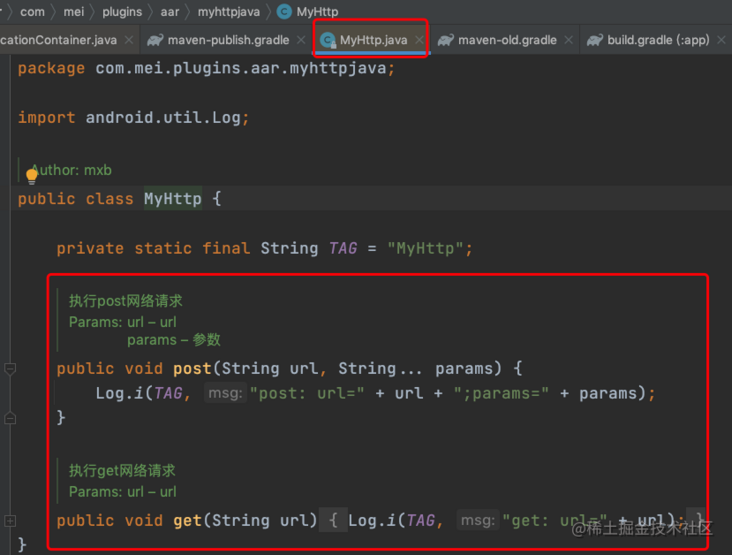
As can be seen from the above code, the source code is indeed uploaded, and the comments can be seen.
3. Dependency delivery
Through the above steps, the published aar package will not pass dependencies. For example, in demo: myHttpjava, I rely on OkHttp. After publishing the aar package and referencing myHttpjava, the Api related to OkHttp cannot be used in the app project because the dependencies are not passed. In the app module:
dependencies {
        . . . .

    implementation 'com.mei.http:myhttp:1.0.4-SNAPSHOT'
}
The Api related to OkHttp cannot be used, but the class written by myHttpjava can be called, such as:

It can also be seen from the above figure that OkHttp dependency is not passed on.
In maven warehouse, you can open the. pom file, as shown in the figure:
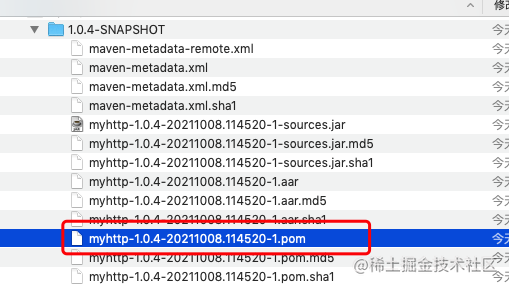
It is found that there is only the declaration of the myHttpjava library, and there is no declaration of its dependent library, such as:
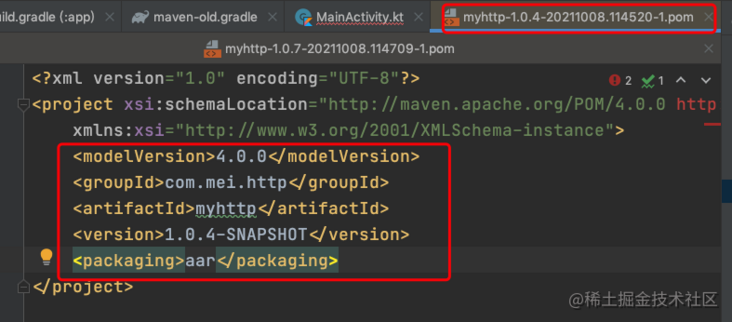
There is only the declaration information of myHttpjava, and there is no declaration information of dependent libraries, such as OkHttp. The aar package published by maven plug-in is dependent on delivery by default, such as:
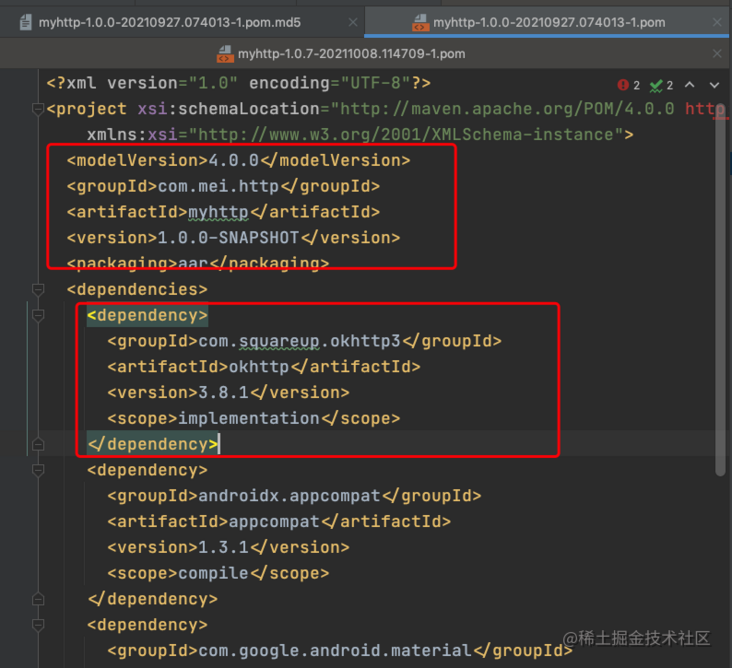
Of course, the Maven publish plug-in also supports dependency passing. Manually add the dependency information in the library to the pom file (refer to Maven pom class for configuration information) to complete the dependency transfer, as follows:
maven(MavenPublication) {
    // Rely on the bundlereaseaar task and upload the aar of its output
    afterEvaluate { artifact(tasks.getByName("bundleReleaseAar")) }
    artifact sourceJar
    groupId = "com.mei.http"
    artifactId = "myhttp"
    version = "1.0.6-SNAPSHOT"
    // The dependency is declared in the pom file and passed to the user
    pom.withXml {
        def dependenciesNode = asNode().appendNode('dependencies')
        configurations.implementation.allDependencies.each {
            // Avoid empty nodes or nodes with artifactId=unspecified
            if (it.group != null && (it.name != null && "unspecified" != it.name) && it.version != null) {
                println "dependency=${it.toString()}"
                def dependencyNode = dependenciesNode.appendNode('dependency')
                dependencyNode.appendNode('groupId', it.group)
                dependencyNode.appendNode('artifactId', it.name)
                dependencyNode.appendNode('version', it.version)
                dependencyNode.appendNode('scope', 'implementation')
            }
        }
    }
}
Add the pom module above. When publishing the aar package, open the pom file to see the declaration information of the dependent library, as shown in the figure:
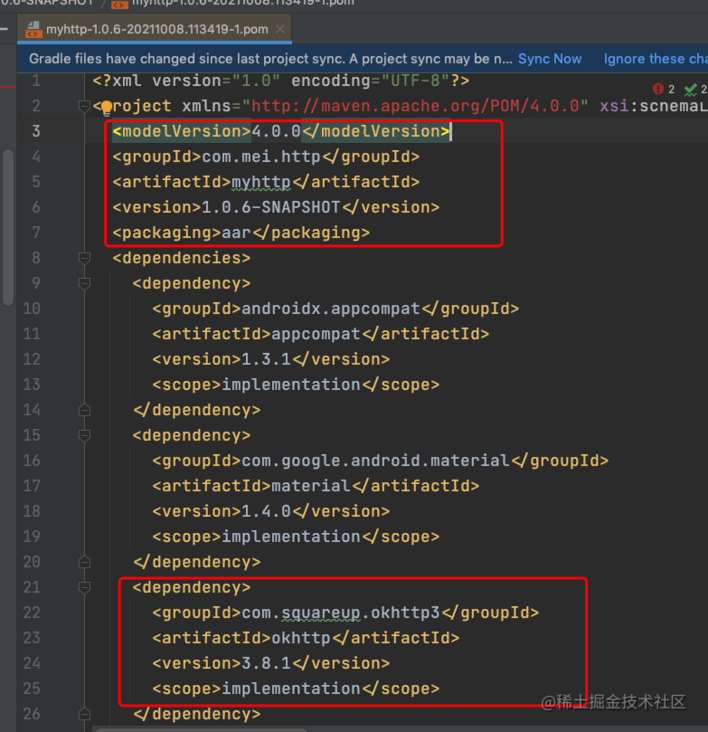
In the app module, when using the myhttp library, although the OkHttp library is still not manually referenced, it is found that the OkHttp related APIs can be used. It shows that the dependency is indeed passed.
We can also see whether the dependency is passed by printing the information of the dependency library, such as:

The information configured in the pom closure will eventually be saved to the. pom file, such as description information, name, licenses, developers, scm, etc., such as:
pom {
    name = "Demo"
    description = "A demonstration of Maven POM customization"
    url = "http://www.example.com/project"
}
result:

4. Complete the release of aar package in combination with Android Gradle plug-in
In the above steps, some configurations in the publications closure are not elegant and cumbersome, such as:
Configuring the published content (that is, configuring the uploaded aar file) is done in the following two ways:
- Rely on the Task that generates the aar package, such as afterevaluate {artifact (tasks. Getbyname ("bundlereaseaar")}
- Specify the path of the generated aar file, such as: artifact "buildDir/outputs/aar/buildDir/outputs/aar/buildDir/outputs/aar/{project.name}-release.aar"
- Dependency passing: manually configure, that is, use withXml closure to add dependency dependency information to. pom file.
The details are as follows:
publishing {
    // Configure maven warehouse
    repositories { RepositoryHandler handler ->
        handler.mavenLocal()
    }
    publications { PublicationContainer publicationContainer ->
        maven(MavenPublication) {
            // Rely on the bundlereaseaar task and upload the aar of its output
            afterEvaluate { artifact(tasks.getByName("bundleReleaseAar")) }
            // //You can also specify the uploaded AAR package, but you need to manually generate the AAR first
            // artifact "$buildDir/outputs/aar/${project.name}-release.aar"
            artifact sourceJar
            groupId = "com.mei.http"
            artifactId = "myhttp"
            version = "1.0.8-SNAPSHOT"
            // The dependency is declared in the pom file and passed to the user
            pom.withXml {
                def dependenciesNode = asNode().appendNode('dependencies')
                configurations.implementation.allDependencies.each {
                    // Avoid empty nodes or nodes with artifactId=unspecified
                    if (it.group != null && (it.name != null && "unspecified" != it.name) && it.version != null) {
                        println "dependency=${it.toString()}"
                        def dependencyNode = dependenciesNode.appendNode('dependency')
                        dependencyNode.appendNode('groupId', it.group)
                        dependencyNode.appendNode('artifactId', it.name)
                        dependencyNode.appendNode('version', it.version)
                        dependencyNode.appendNode('scope', 'implementation')
                    }
                }
            }
        }
    }
}
In Android development, the above configuration can be simplified. Specifically, the Android Gradle plug-in supports Maven publish plug-in.
However, after Android Gradle plug-in 3.6.0 and later (the classpath here is' com. Android. Tools. Build: gradle: 3.6.0 '), Maven publish plug-in is also supported, so that the configuration can be more concise.
The Android Gradle plug-in creates a component for each build variant artifact in the application or library module, which you can use to customize the publishing content to be published to the Maven code library
The components created by Android plug-ins depend on whether the module uses application or library plug-ins, as described in the following table.
| module should be a plug-in | Publish content artifacts | Component name |
|---|---|---|
| com.android.library | AAR | components.variant |
| com.android.application | ZIP of APK and available ProGuard or R8 mapping files | components.variant\_apk |
| com.android.application | Android App Bundle (AAB) | components.variant\_aab |
After knowing this, the configuration of publications becomes very simple, as follows:
afterEvaluate {// components.release can get the value only after the configuration is completed
    publishing {
        // Configure maven warehouse
        repositories { RepositoryHandler handler ->
            handler.mavenLocal()
        }
        publications { PublicationContainer publicationContainer ->
            maven(MavenPublication) {
                from components.release // Note 1: components generated by Android Gradle plug-in are used as published content
                artifact sourceJar // Upload source code
                groupId = "com.mei.http"
                artifactId = "myhttp"
                version = "1.0.8-SNAPSHOT"
            }
        }
    }
}
As shown above, in note 1: set the published content through the from method, and the content is a component generated by the Android Gradle plug-in.
After specifying this, you can upload the aar package normally. And there is no need to manually add dependency transmission information. The Android Gradle plug-in has been added for us.
After publishing the aar package, you can view the. pom file and the configuration information of the dependent library, such as:
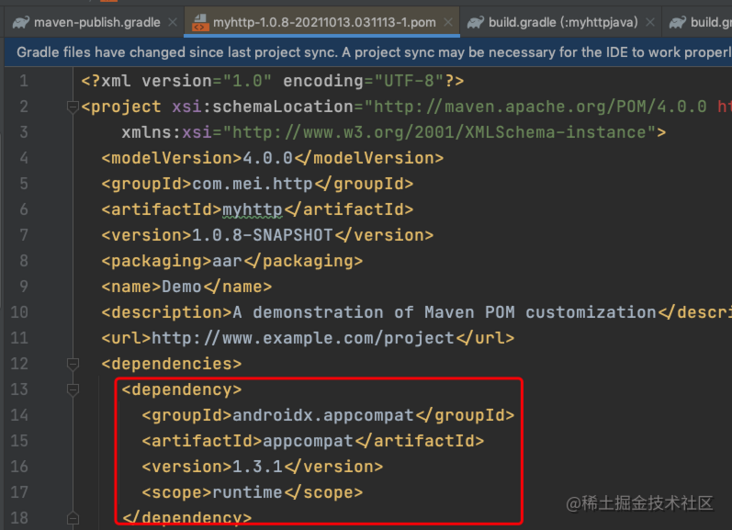
Therefore, when components created by Android Gradle plug-in are used as publishing content, aar files and dependency transmission have been solved, which is very perfect.
Here is a problem that needs special attention
The components component information can only be obtained after the Gradle configuration is completed, so it needs to be placed in the afterEvaluate closure when using. It must be noted that this is where I got stuck. I didn't put it in the afterEvaluate closure at first, so I couldn't find the release component. The official Android website also reminds us:
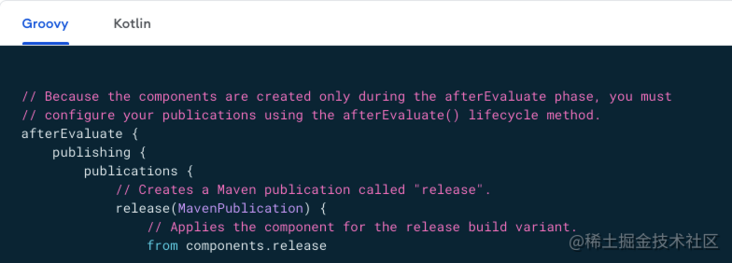
Maven publish plug-in combined with Android Gradle plug-in makes it easy to upload aar package configuration.
4, Release the aar package of Kotlin project and upload the source code
When configuring the task of uploading source code, the basic configuration is as follows:
task sourceJar(type: Jar) {
    from android.sourceSets.main.java.srcDirs
    archiveClassifier = "sources"
}
However, in this configuration, if the library project is written in Java, the source code can be uploaded normally, but if it is a library written by Kotlin, the source code cannot be viewed when publishing aar package.
Through the source code specified by android.sourceSets.main.java.srcDirs, only Java files can be recognized, while kt files are ignored. However, it can be seen from the official documents that the source code path can be specified by the from function. Therefore, the parameters of the from function are directly replaced by the source code path, that is:
task sourceJar(type: Jar) {
    from android.sourceSets.main.java.getSrcDirs() // Source path
    archiveClassifier = "sources"
}
In this way, when publishing the aar package, it is found that the source code can be accessed normally.
Summary:
1. Differences between maven and maven publish plug-ins:
- maven plug-in is old and simple to configure. It was completely abandoned after Gradle 6.2.
- Maven publish plug-in has been supported since gradle 1.3. It is now a general scheme with more powerful functions. It is also simple to configure with the component content provided by Android Gradle plug-in. It is recommended to use.
Well, that's all for today's article. Thank you for reading. Don't forget Sanlian if you like. Everyone's support and recognition is the biggest driving force I share.