General catalogue of phase III link
catalogue
3. Installing and configuring Tomcat
4. Tomcat related instructions
5. Description of Tomcat main configuration file
2, Nginx+Tomcat load balancing cluster
1. Tomcat server 1 configuration and 192.168 The configuration method of 1.4 is basically the same
3. Set in nginx configuration file
I. deploy Tomcat
(1) Introduction to Tomcat
Tomcat was originally developed by Sun's software architect James Duncan Davidson. Later, he helped turn it into an open source project, and Sun contributed it to the Apache Software Foundation.
Tomcat is the Apache Software Foundation (Apache Software Foundation) a core project in the Jakarta project is developed by Apache, Sun and other companies and individuals. With the participation and support of Sun, the latest Servlet and JSP specification can always be reflected in Tomcat. Because Tomcat technology is advanced, stable and free, it is very popular among the fans. It has been recognized by some software developers and has become a more popular Web application server.
(2) Application scenario
Tomcat server is a free open source Web application server. It is a lightweight application server. It is widely used in small and medium-sized systems and when there are not many concurrent access users. It is the first choice for developing and debugging JSP programs. In fact, Tomcat is an extension of Apache server, but it runs independently when running, so when you run tomcat, It actually runs as a separate process from Apache
In addition, like IIS and other Web servers, Tomcat has the function of processing HTML pages. In addition, it is also a Servlet and JSP container. The independent Servlet container is the default mode of Tomcat. However, Tomcat does not handle static HTML as well as the Apache server.
(III) cases
1. Preparation
1) Turn off the firewall and selinux, disable iptables (ip filtering packets)
2) Install JDK before installing Tomcat. The full name of JDK is Java Development Kit, which is free of charge by Sun
Provides a software development kit for the Java language, which contains the Java virtual machine (JVM). The compiled Java source program can form Java bytecode. As long as JDK is installed, these bytecode files can be interpreted by JVM, so as to ensure the cross platform of Java.
If there is a java environment in the system, you need to uninstall it first
[root@C7--04 ~]# yum -y remove java
Plug in loaded: fastestmirror
 parameter java No match
 Do not delete any packages
2. Install JDK
[root@C7--04 ~]# tar xf jdk-8u91-linux-x64.tar.gz    #Unzip jdk
[root@C7--04 ~]# mv jdk1.8.0_91/ /usr/local/java     #Move to / usr/local/java file
[root@C7--04 ~]# vim /etc/profile.d/java.sh          #Edit java script

export JAVA_HOME=/usr/local/java                     #Set java root directory
export PATH=$PATH:$JAVA_HOME/bin                     #Add the bin subdirectory under the java root directory to the path environment variable
 Save exit

[root@C7--04 ~]# source /etc/profile.d/java.sh       #Startup script
[root@C7--04 ~]# echo $PATH                          #Output variable content
/usr/local/sbin:/usr/local/bin:/usr/sbin:/usr/bin:/root/bin:/usr/local/java/bin
[root@C7--04 ~]# java -version                       #Check whether the java running version is consistent
java version "1.8.0_91"
Java(TM) SE Runtime Environment (build 1.8.0_91-b14)
Java HotSpot(TM) 64-Bit Server VM (build 25.91-b14, mixed mode)
3. Installing and configuring Tomcat
The port of Tomcat is 8080 by default
[root@C7--04 ~]# tar xf apache-tomcat-8.5.16.tar.gz           #Unzip tomcat
[root@C7--04 ~]# mv apache-tomcat-8.5.16 /usr/local/tomcat    #Move to / usr/local/tomcat folder

[root@C7--04 ~]# /usr/local/tomcat/bin/startup.sh             #Start Tomcat
Using CATALINA_BASE:   /usr/local/tomcat
Using CATALINA_HOME:   /usr/local/tomcat
Using CATALINA_TMPDIR: /usr/local/tomcat/temp
Using JRE_HOME:        /usr/local/java
Using CLASSPATH:       /usr/local/tomcat/bin/bootstrap.jar:/usr/local/tomcat/bin/tomcat-juli.jar
Tomcat started.

[root@C7--04 ~]# netstat -anpt | grep 8080                   #View listening port information
tcp6       0      0 :::8080                 :::*                    LISTEN      1531/java


[root@C7--04 ~]# /usr/local/tomcat/bin/shutdown.sh            #Close Tomcat
Using CATALINA_BASE:   /usr/local/tomcat
Using CATALINA_HOME:   /usr/local/tomcat
Using CATALINA_TMPDIR: /usr/local/tomcat/temp
Using JRE_HOME:        /usr/local/java
Using CLASSPATH:       /usr/local/tomcat/bin/bootstrap.jar:/usr/local/tomcat/bin/tomcat-juli.jar
Method 1: access
[root@C7--04 ~]# yum -y install elinks     #Install text browser
........
...


[root@C7--04 ~]# elinks --dump http://192.168. 1.4:8080 # access succeeded
   [1]Home [2]Documentation [3]Configuration [4]Examples [5]Wiki [6]Mailing
   Lists [7]Find Help

                              Apache Tomcat/8.5.16

If you're seeing this, you've successfully installed Tomcat. Congratulations!

   [8][tomcat logo]
Method 2: use your own computer to access http: / / address: 8080
4. Tomcat related instructions
Install tree: lists all contents in the specified directory in a tree structure, including all files, subdirectories and directories and files in the subdirectories
[root@C7--04 ~]# yum -y install tree

[root@C7--04 ~]# cd /usr/local/tomcat     #Home directory location
[root@C7--04 tomcat]# tree
.
├── bin
│   ├── bootstrap.jar
│   ├── catalina.bat
│   ├── catalina.sh
│   ├── catalina-tasks.xml
│   ├── commons-daemon.jar
│   ├── commons-daemon-native.tar.gz
│   ├── configtest.bat
│   ├── configtest.sh
│   ├── daemon.sh
..........
.....
| home directory | |
| bin | Manage script files |
| conf | configuration file |
| lib | Library files required to run (JARS) |
| logs | log file |
| webapps | Web publishing directory |
| work | Store the class file generated after jsp compilation |
| configuration file | |
| catalina.policy | Permission control |
| catalina.properies | Property profile |
| context.xml | Context profile |
| logging.properies | log related configuration files |
| server.xml | Master profile |
| tomcat-users.xml | Manager GUI manage user profile (background management interface) |
| web.xml | Tomcat's servlet, servlet mapping, filter, MIME and other configurations |
5. Description of Tomcat main configuration file
server.xml: Tomcat's main configuration file, management of Tomcat's startup port, website directory, virtual host, opening https, etc
The entire server XML consists of the following structures: < server >, < Service >, < connector > < Engine > host >
< context > < / context > < / host >, < / Engine >, < / Service > and < / server >
[root@C7--04 tomcat]# vim /usr/local/tomcat/conf/server.xml
<?xml version="1.0" encoding="UTF-8"?>
.......
...
<Server port="8005" shutdown="SHUTDOWN"> #Close the port. By default, it is only open to the local address
......
...
<Connector port="8080" protocol="HTTP/1.1" #Startup default port: 8080, which can be changed as needed
connectionTimeout="20000"
redirectPort="8443" />
......
...
<Connector port="8009" protocol="AJP/1.3" redirectPort="8443" /> #The default port number when starting AJP 1.3 connector. It receives requests forwarded by other servers through port 8009
......
...
<Host name="localhost" appBase="webapps" #Define the configuration of the virtual host
unpackWARs="true" autoDeploy="true">
......
...
<Valve className="org.apache.catalina.valves.AccessLogValve" directory="logs" #Define the configuration of virtual host logs
prefix="localhost_access_log" suffix=".txt"
pattern="%h %l %u %t "%r" %s %b" />
| Component description of Tomcat Server | |
| Server | Is the servlet container for the entire Catalina |
| Service | Is a collection: it consists of one or more connectors and an Engine (responsible for processing the customer requests obtained by all connectors) |
| Connector | A Connector will listen for customer requests on a specified port, hand over the obtained requests to the Engine for processing, obtain responses from the Engine and return them to the customer TOMCAT has two typical connectors, one directly listens to http requests from browser s and the other listens to requests from other webservers The Coyote Http/1.1 Connector listens for HTTP requests from the client browser at port 8080 Coyote JK2 Connector listens for servlet/jsp proxy requests from other webservers (APACHE) on port 8009 |
| Engine | Multiple virtual hosts can be configured under Engine. Each Virtual Host has a domain name When the Engine obtains a request, it matches the request to a Host, and then gives the request to the Host for processing The Engine has a default virtual Host. When the request cannot be matched to any Host, it will be handed over to the default Host for processing |
| Host | Represents a Virtual Host and Virtual Host. Each Virtual Host matches a network Domain Name domain name One or more web apps can be deployed under each virtual host. Each Web App corresponds to a Context and has a Context path Therefore, a Context with path = = "" will become the default Context of the Host. All requests that cannot match the pathnames of other contexts will eventually match the default Context |
| Context | A Context corresponds to a Web Application, which is composed of one or more servlets |
6. Establish a java web site
[root@C7--04 ~]# mkdir -pv /web/webapp #New web document directory
mkdir: Directory created "/web"
mkdir: Directory created "/web/webapp"
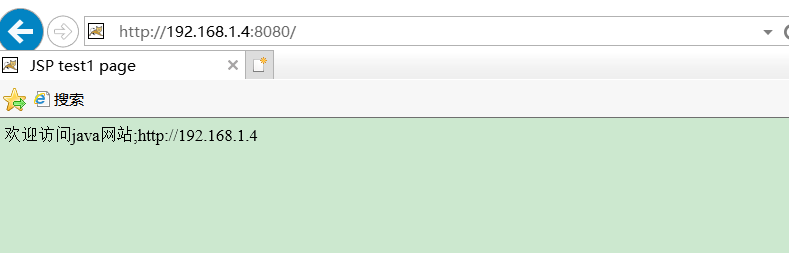
[root@C7--04 ~]# vim /web/webapp/index.jsp #Write home page
<%@ page language="java" import="java.util.*" pageEncoding="UTF-8"%>
<html>
<head>
<title> JSP test1 page </title>
</head>
<body>
<% out.println("Welcome to visit java website;http://192.168.1.4");%>
</body>
</html>
Save exitEnter the tomcat server XML file
< context > represents a single Web application running on < host >. A < host > can have multiple < context > elements. Each Web application must have a unique URL path, which is set in the attribute path in < context >
| Attribute of < context > element | |
| docBase | The file path of the Web application can be given either an absolute path or a relative path relative to the appBase attribute of < host >. If the Web application adopts an open directory structure, specify the root directory of the Web application. If the Web application is a war file, specify the path of the war file |
| path | URL entry to access this Web app |
| reloadable | If this attribute is set to true, the tomcat server will monitor the changes of class files in WEB-INF/classes and WEB-INF/lib directories when running. If class files are detected to be updated, the server will automatically reload the Web application |
[root@C7--04 ~]# vim /usr/local/tomcat/conf/server.xml
.......
....
<Host name="localhost" appBase="/web" # Line 148, modify the appbase path
unpackWARs="true" autoDeploy="true">
<Context docBase="/web/webapp" path="" reloadable="false"></Context> # Line 150, add the context field
<!-- SingleSignOn valve, share authentication between web applications
Documentation at: /docs/config/valve.html -->
<!--
<Valve className="org.apache.catalina.authenticator.SingleSignOn" />
-->
<!-- Access log processes all example.
Documentation at: /docs/config/valve.html
Note: The pattern used is equivalent to using pattern="common" -->
<Valve className="org.apache.catalina.valves.AccessLogValve" directory="logs"
prefix="localhost_access_log" suffix=".txt"
pattern="%h %l %u %t "%r" %s %b" />
</Host>
.....
Save exitRestart tomcat service
[root@C7--04 ~]# /usr/local/tomcat/bin/shutdown.sh   #Out of Service
Using CATALINA_BASE:   /usr/local/tomcat
Using CATALINA_HOME:   /usr/local/tomcat
Using CATALINA_TMPDIR: /usr/local/tomcat/temp
Using JRE_HOME:        /usr/local/java
Using CLASSPATH:       /usr/local/tomcat/bin/bootstrap.jar:/usr/local/tomcat/bin/tomcat-juli.jar

[root@C7--04 ~]# /usr/local/tomcat/bin/startup.sh   #Start service
Using CATALINA_BASE:   /usr/local/tomcat
Using CATALINA_HOME:   /usr/local/tomcat
Using CATALINA_TMPDIR: /usr/local/tomcat/temp
Using JRE_HOME:        /usr/local/java
Using CLASSPATH:       /usr/local/tomcat/bin/bootstrap.jar:/usr/local/tomcat/bin/tomcat-juli.jar
Tomcat started.
Access test
2, Nginx+Tomcat load balancing cluster
Nginx is an excellent http server software. It can support responses of up to 50000 concurrent connections and has strong
Large static resource processing capacity, stable operation, and very low consumption of system resources such as memory and CPU. At present, many large websites use Nginx server as the reverse proxy and load balancer of back-end website programs to improve the load concurrency of the whole site
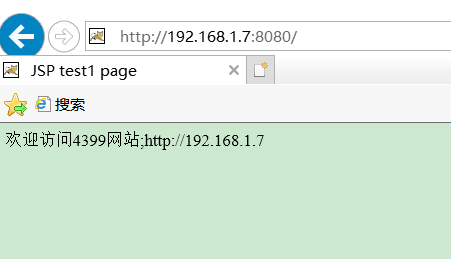
1. Tomcat server 1 configuration and 192.168 The configuration method of 1.4 is basically the same
2. Nginx server configuration
Install related software packages
[root@C7--01 ~]# yum -y install pcre-devel zlib-devel openssl-devel

.......
...
[root@C7--01 ~]# groupadd nginx                       #Create group
[root@C7--01 ~]# useradd -g nginx -s /bin/false nginx  #Create user nginx and enter nginx group
| /The difference between bin/false and / sbin/nologin | |
| /bin/false | Is the most strictly prohibited login option. All services cannot be used |
| /sbin/nologin | The login system is just not allowed |
[root@C7--01 ~]# tar xf nginx-1.12.0.tar.gz /usr/src/  #Unzip the nginx installation package to / usr/src /
[root@C7--01 ~]# cd /usr/src/nginx-1.12.0/             #Enter directory


[root@C7--01 nginx-1.12.0]# ./configure --prefix=/usr/local/nginx --user=nginx --group=nginx --with-file-aio --with-http_stub_status_module --with-http_gzip_static_module --with-http_flv_module --with-http_ssl_module && make && make install
| --user=www --group=www | Specify the users, groups, and groups to run |
| --with-file-aio | Enable file modification support |
| --with-http_stub_status_module | Enable status statistics |
| --with-http_gzip_static_module | Enable gzip static compression |
| --with-http_flv_module | Enable the flv module to provide time-based offset files for seeking memory usage |
| --with-http_ssl_module | Enable ssl module |
3. Set in nginx configuration file
[root@C7--01 ~]# vim /usr/local/nginx/conf/nginx.conf
.............
.....
    #gzip  on;
    upstream tomcat_server {                    #Line 34; Set load balancing server list
          server 192.168.1.4:8080 weight=1;      #Line 35; Weight means weight: the higher the weight, the greater the probability of being assigned
          server 192.168.1.4:8080 weight=1;     #Line 36; In order to make the test more obvious, we set the weight to the same
}
......
..
      location / {
            root   html;
            index  index.html index.htm;
            proxy_pass http://tomcat_server;   # Line 49 passes the default site of nginx through proxy_ The pass method proxy to the set tomcat_server load balancing server group
......

Save exit
4. Check the configuration file of nginx
The reason for startup failure is found during startup: we set / bin/false to prohibit all services
[root@C7--01 nginx-1.12.0]# /usr/local/nginx/sbin/nginx -t
nginx: the configuration file /usr/local/nginx/conf/nginx.conf syntax is ok
nginx: [emerg] getgrnam("nginx") failed
nginx: configuration file /usr/local/nginx/conf/nginx.conf test failed


[root@C7--01 nginx-1.12.0]# /usr/local/nginx/sbin/nginx -c /usr/local/nginx/conf/nginx.conf    #Start Nginx
nginx: [emerg] getgrnam("nginx") failed

[root@C7--01 ~]# tail -1 /etc/passwd    #View user
nginx:x:1001:1001::/home/nginx:/usr/bin/false
The solution is modified to nologin
[root@C7--01 ~]# usermod -s /usr/sbin/nologin nginx
[root@C7--01 ~]# tail -1 /etc/passwd
nginx:x:1001:1001::/home/nginx:/usr/sbin/nologin
[root@C7--01 nginx-1.12.0]# /usr/local/nginx/sbin/nginx -t      #Check the configuration file of nginx
nginx: the configuration file /usr/local/nginx/conf/nginx.conf syntax is ok
nginx: configuration file /usr/local/nginx/conf/nginx.conf test is successful


[root@C7--01 nginx-1.12.0]# /usr/local/nginx/sbin/nginx -c /usr/local/nginx/conf/nginx.conf     #Start Nginx

[root@C7--01 nginx-1.12.0]# ps aux | grep nginx    #View nginx service process
root       4166  0.0  0.1  45896  1132 ?        Ss   20:21   0:00 nginx: master process /usr/local/nginx/sbin/nginx -c /usr/local/nginx/conf/nginx.conf
nginx      4167  0.0  0.1  48420  1988 ?        S    20:21   0:00 nginx: worker process
root       4169  0.0  0.0 112676   984 pts/0    R+   20:21   0:00 grep --color=auto nginx

[root@C7--01 nginx-1.12.0]# netstat -anpt | grep nginx   #View port number and PID process number
tcp        0      0 0.0.0.0:80              0.0.0.0:*               LISTEN      4166/nginx: master
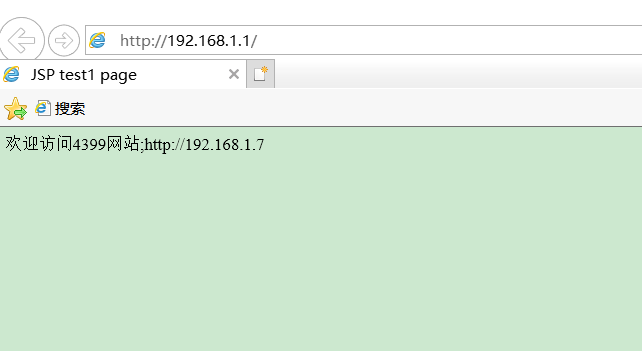
5. Test load balancing effect
visit: http://192.168.1.1
Constantly refresh the test and find that the page will be switched repeatedly on the following pages. The load balancing cluster is successfully built and can be switched on the two Tomcat server websites

Exercises
1. Briefly describe the characteristics and application scenarios of Tomcat
Application scenario: usually as a servlet and JSP container, it runs separately on the back end
Tomcat features: it occupies less system resources; Good scalability
2. What commands can be executed in the Linux system to view the JDK version?
Execution: java -version , you can view the JDK version
3. What is the default running port of Tomcat? What commands can be executed to view the listening information of its port?
The default running port of Tomcat is 8080
View all port information: netstat -anpt | grep 8080
4. Describe the functions of the corresponding bin, conf, lib and webapps directories generated after Tomcat compilation and installation
| bin | Manage script files |
| conf | configuration file |
| lib | Library files required to run (JARS) |
| webapps | Web publishing directory |
5. server.xml is the main configuration file of Tomcat. What is its structure?
server.xml structure: < server >, < Service >, < connector > < Engine > host >
< context > < / context > < / host >, < / Engine >, < / Service > and < / server >
6. Briefly describe the components of Tomcat Server
The components are: Server, Service, Connector, Engine, Host and Context
7. What configuration item enables SSL module when compiling and installing Nginx?
Configuration -- with http_ ssl_ Module enable SSL module
8. Add upstream Tomcat in the main configuration file of Nginx_ server {...} What is the role of the configuration segment?
Function: set the load balancing server list. The higher the weight, the greater the probability of being allocated
9. Add proxy in Nginx main configuration file_ pass http://tomcat_server ; What is the role of configuration?
Function: send the default site of nginx through proxy_ The pass method proxy to the set tomcat_server load balancing server group
10. What commands can be executed in the Linux system to view the Nginx service process?
Execution: ps aux | grep nginx