Dynamic drawing using mouse events
We are already OpenCV Python practice (3) -- drawing graphics and text in OpenCV Learned how to draw graphics and text using OpenCV. In this part, we will further use the drawing functions learned to learn how to use mouse events to perform dynamic drawing.
Drawing graphics dynamically
In order to use mouse events for dynamic drawing, we must first understand how to use OpenCV to handle mouse events, and use CV2 The setmousecallback() function performs this function. The usage of this function is as follows:
cv2.setMouseCallback(windowName, onMouse, param=None)
This function creates a mouse handler for the window named windowName. onMouse function is a callback function. It will be called when mouse events occur (for example, double click, left click, left click, etc.); The optional param parameter is used to pass additional information to the callback function.
Therefore, in order to handle mouse events, the first step is to create a callback function:
def draw_circle(event, x, y, flags, param):
    if event == cv2.EVENT_LBUTTONDBLCLK:
        print("event: EVENT_LBUTTONDBLCLK")
        cv2.circle(image, (x, y), 20, colors['magenta'], -1)

    if event == cv2.EVENT_MOUSEMOVE:

        print("event: EVENT_MOUSEMOVE")

    if event == cv2.EVENT_LBUTTONUP:
        print("event: EVENT_LBUTTONUP")

    if event == cv2.EVENT_LBUTTONDOWN:
        print("event: EVENT_LBUTTONDOWN")
        cv2.rectangle(image,(x,y),(x+20,y+20),colors['cyan'],1)
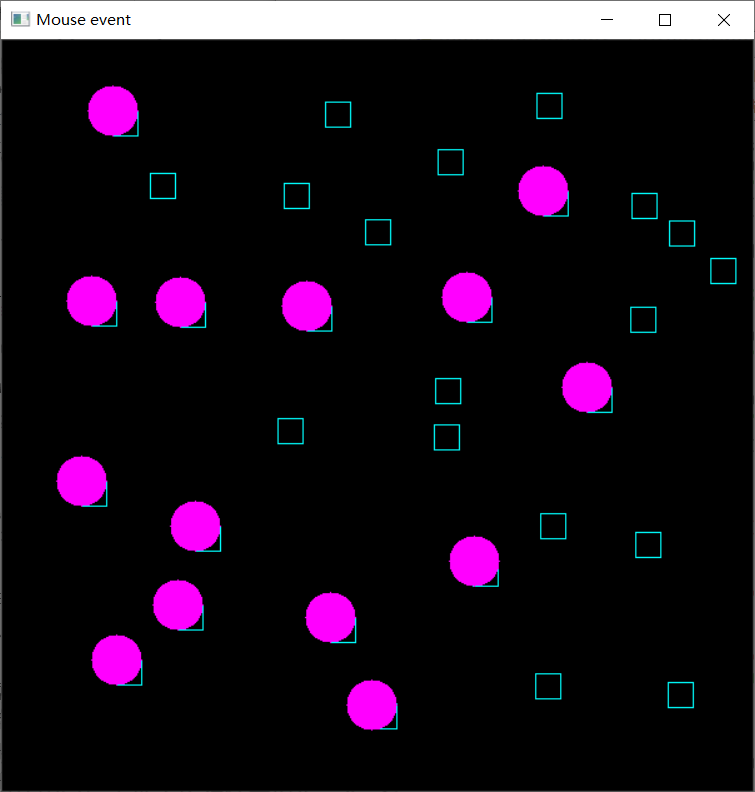
draw_ The circle() function receives the coordinates (x, y) of a specific event and each mouse event. When the left click (cv2.EVENT_LBUTTONDBLCLK) is performed, we draw a circle at the corresponding (x, y) coordinates of the event; When left clicking (cv2.EVENT_LBUTTONDOWN) is performed, a square is drawn at the corresponding (x, y) coordinates. In addition, we printed some messages to see other generated events, but we don't use them to perform any other operations for the time being.
Next, create a named window and name it Mouse event. This named window will be associated with the mouse callback function:
cv2.namedWindow('Image mouse')
Finally, set the mouse callback function to the function we created earlier:
cv2.setMouseCallback('Image mouse', draw_circle)
At this time, when double clicking with the left mouse button, a filled magenta circle will be drawn centered on the (x, y) position of the double click. When left clicking, a square will be drawn at the corresponding (x, y) coordinates. The complete code is as follows:
import cv2
import numpy as np

colors = {'blue': (255, 0, 0), 'green': (0, 255, 0), 'red': (0, 0, 255), 'yellow': (0, 255, 255),
          'magenta': (255, 0, 255), 'cyan': (255, 255, 0), 'white': (255, 255, 255), 'black': (0, 0, 0),
          'gray': (125, 125, 125), 'rand': np.random.randint(0, high=256, size=(3,)).tolist(),
          'dark_gray': (50, 50, 50), 'light_gray': (220, 220, 220)}

# Callback function
def draw_circle(event, x, y, flags, param):
    if event == cv2.EVENT_LBUTTONDBLCLK:
        print("event: EVENT_LBUTTONDBLCLK")
        cv2.circle(image, (x, y), 20, colors['magenta'], -1)
    if event == cv2.EVENT_MOUSEMOVE:
        print("event: EVENT_MOUSEMOVE")
    if event == cv2.EVENT_LBUTTONUP:
        print("event: EVENT_LBUTTONUP")
    if event == cv2.EVENT_LBUTTONDOWN:
        print("event: EVENT_LBUTTONDOWN")
        cv2.rectangle(image,(x,y),(x+20,y+20),colors['cyan'],1)

# Create canvas
image = np.zeros((600, 600, 3), dtype="uint8")
# Create a named window
cv2.namedWindow('Image mouse')
# Set the callback function to 'draw'_ circle'
cv2.setMouseCallback('Image mouse', draw_circle)

while True:
    cv2.imshow('Image mouse', image)

    if cv2.waitKey(20) & 0xFF == ord('q'):
        break

cv2.destroyAllWindows()

Drawing graphics and text dynamically
In this practical program, graphics and text will be drawn dynamically combined with mouse events. First, draw text to show how to use mouse events to perform specific actions:
def draw_text():
    # We set the position to be used for drawing text:
    menu_pos = (10, 540)
    menu_pos2 = (10, 555)
    menu_pos3 = (10, 570)
    menu_pos4 = (10, 585)

    # Draw text to show how to use mouse events to perform specific actions
    cv2.putText(image, 'Double left click: add a circle', menu_pos, cv2.FONT_HERSHEY_SIMPLEX, 0.5, (255, 255, 255))
    cv2.putText(image, 'Simple right click: delete last circle', menu_pos2, cv2.FONT_HERSHEY_SIMPLEX, 0.5, (255, 255, 255))
    cv2.putText(image, 'Double right click: delete all circle', menu_pos3, cv2.FONT_HERSHEY_SIMPLEX, 0.5, (255, 255, 255))
    cv2.putText(image, 'Press \'q\' to exit', menu_pos4, cv2.FONT_HERSHEY_SIMPLEX, 0.5, (255, 255, 255))
From the above code, we know that the code needs to implement the following operations:
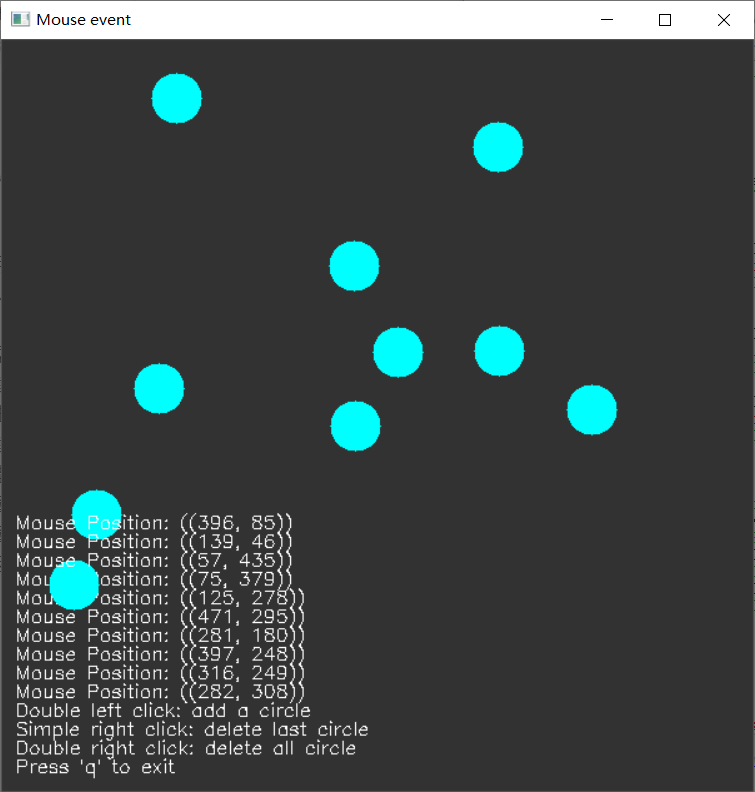
- Double click the left button to add a circle and display the center coordinates at the same time
- Right click to delete the last added circle
- Use the double-click right button to delete all circles
To achieve these functions, we first create a list called circles, in which we maintain the current circle drawn by the user. In addition, we use rendered text to create backup images. When a mouse event occurs, we add or remove circles and text from the circle list. Then, when drawing, we only draw the current circle and its center position text in the list. When the user right clicks, the last added circle will be deleted from the list.
def draw_circle(event, x, y, flags, param):
    global circles
    if event == cv2.EVENT_LBUTTONDBLCLK:
        # Adds the center coordinates to the list
        print("event: EVENT_LBUTTONDBLCLK")
        circles.append((x, y))

    if event == cv2.EVENT_RBUTTONDBLCLK:
        # Delete all circles
        print("event: EVENT_RBUTTONDBLCLK")
        circles[:] = []
    elif event == cv2.EVENT_RBUTTONDOWN:
        # Delete the last circle added
        print("event: EVENT_RBUTTONDOWN")
        try:
            circles.pop()
        except (IndexError):
            print("no circles to delete")
    if event == cv2.EVENT_MOUSEMOVE:
        print("event: EVENT_MOUSEMOVE")
    if event == cv2.EVENT_LBUTTONUP:
        print("event: EVENT_LBUTTONUP")
    if event == cv2.EVENT_LBUTTONDOWN:
        print("event: EVENT_LBUTTONDOWN")
The complete code is as follows:
import cv2
import numpy as np

# Color dictionary
colors = {'blue': (255, 0, 0), 'green': (0, 255, 0), 'red': (0, 0, 255), 'yellow': (0, 255, 255),
          'magenta': (255, 0, 255), 'cyan': (255, 255, 0), 'white': (255, 255, 255), 'black': (0, 0, 0),
          'gray': (125, 125, 125), 'rand': np.random.randint(0, high=256, size=(3,)).tolist(),
          'dark_gray': (50, 50, 50), 'light_gray': (220, 220, 220)}

def draw_text():
    # Menu coordinates
    menu_pos = (10, 540)
    menu_pos2 = (10, 555)
    menu_pos3 = (10, 570)
    menu_pos4 = (10, 585)

    # Draw text
    cv2.putText(image, 'Double left click: add a circle', menu_pos, cv2.FONT_HERSHEY_SIMPLEX, 0.5, (255, 255, 255))
    cv2.putText(image, 'Simple right click: delete last circle', menu_pos2, cv2.FONT_HERSHEY_SIMPLEX, 0.5, (255, 255, 255))
    cv2.putText(image, 'Double right click: delete all circle', menu_pos3, cv2.FONT_HERSHEY_SIMPLEX, 0.5, (255, 255, 255))
    cv2.putText(image, 'Press \'q\' to exit', menu_pos4, cv2.FONT_HERSHEY_SIMPLEX, 0.5, (255, 255, 255))


# Mouse callback function
def draw_circle(event, x, y, flags, param):
    global circles
    if event == cv2.EVENT_LBUTTONDBLCLK:
        # Adds the center coordinates to the list
        print("event: EVENT_LBUTTONDBLCLK")
        circles.append((x, y))

    if event == cv2.EVENT_RBUTTONDBLCLK:
        # Delete all circles
        print("event: EVENT_RBUTTONDBLCLK")
        circles[:] = []
    elif event == cv2.EVENT_RBUTTONDOWN:
        # Delete the last circle added
        print("event: EVENT_RBUTTONDOWN")
        try:
            circles.pop()
        except (IndexError):
            print("no circles to delete")
    if event == cv2.EVENT_MOUSEMOVE:
        print("event: EVENT_MOUSEMOVE")
    if event == cv2.EVENT_LBUTTONUP:
        print("event: EVENT_LBUTTONUP")
    if event == cv2.EVENT_LBUTTONDOWN:
        print("event: EVENT_LBUTTONDOWN")

circles = []

image = np.zeros((600, 600, 3), dtype="uint8")

image[:] = colors['dark_gray']
cv2.namedWindow('Mouse event')
cv2.setMouseCallback('Mouse event', draw_circle)
draw_text()
clone = image.copy()

while True:
    image = clone.copy()

    i = 0
    for pos in circles:
        cv2.circle(image, pos, 20, colors['cyan'], -1)
        pos_text = (10, 525-15*i)
        cv2.putText(image, 'Mouse Position: ({})'.format(pos), pos_text, cv2.FONT_HERSHEY_SIMPLEX, 0.5,(255, 255, 255))
        i+=1

    cv2.imshow('Mouse event', image)

    if cv2.waitKey(400) & 0xFF == ord('q'):
        break

cv2.destroyAllWindows()

Related links
OpenCV Python practice (3) -- drawing graphics and text in OpenCV