Rabbitmq
1. Download and install
**Step 1: * * Download and install Erlang. The RabbitMQ server code is written in parallel language Erlang. The prerequisite for installing RabbitMQ is to install Erlang.
Download address: http://www.erlang.org/downloads
Select the appropriate version to download. Remember to remember the installation path during installation. After installation, remember to configure the environment variables of the system
This computer – > right click "properties" – > advanced system settings – > environment variables – > new system environment variable
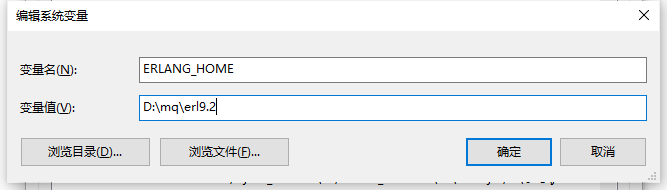
Variable name: ERLANG_HOME, the variable value is the installation address of erlang just now. Click OK.
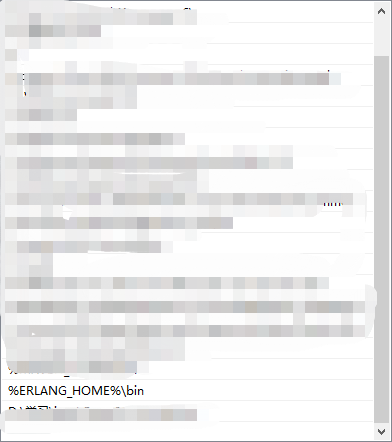
Double click the system variable path and click "new" to open% Erlang_ Add home% \ bin to path.
Finally, press the windows key + R key, enter cmd, and then enter erl. Seeing the version number indicates that erlang has been successfully installed.

Step 2: install rabbitmq
Download address: http://www.rabbitmq.com/download.html
- Double click the downloaded exe file. The installation process is the same as that of erlang.
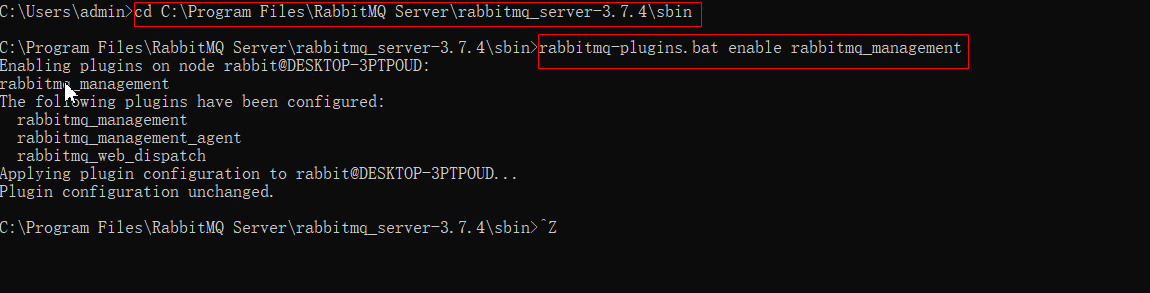
- After RabbitMQ is installed, install RabbitMQ plugins. Open the command line cd and enter the sbin directory of RabbitMQ.
cmd to the sbin directory of rabbitmq server. Open the cmd command line tool
cd C:\Program Files\RabbitMQ Server\rabbitmq_server-3.7.4\sbin
Execute command:
rabbitmq-plugins.bat enable rabbitmq_management
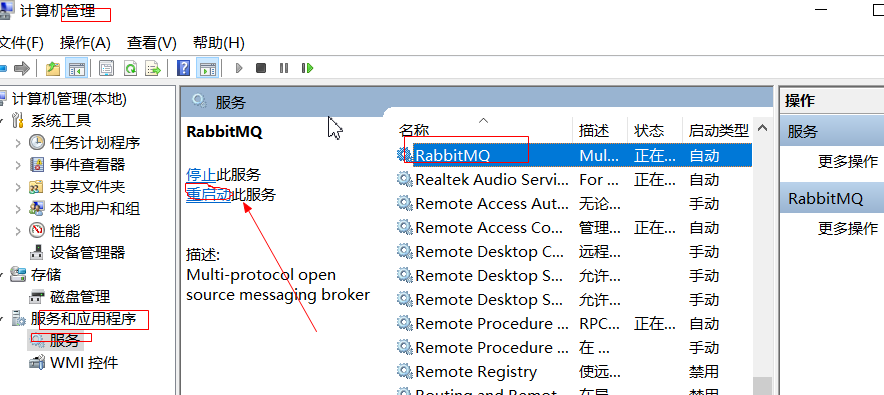
Restart rabbitmq server:
This computer – "right click management interface" – "double click services and Applications" – "double click services" – "click restart button
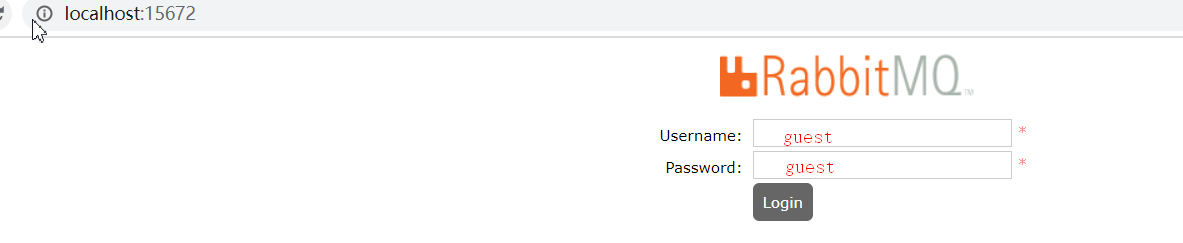
Enter localhost:15672 in the browser and enter guest/guest
2. Concept description
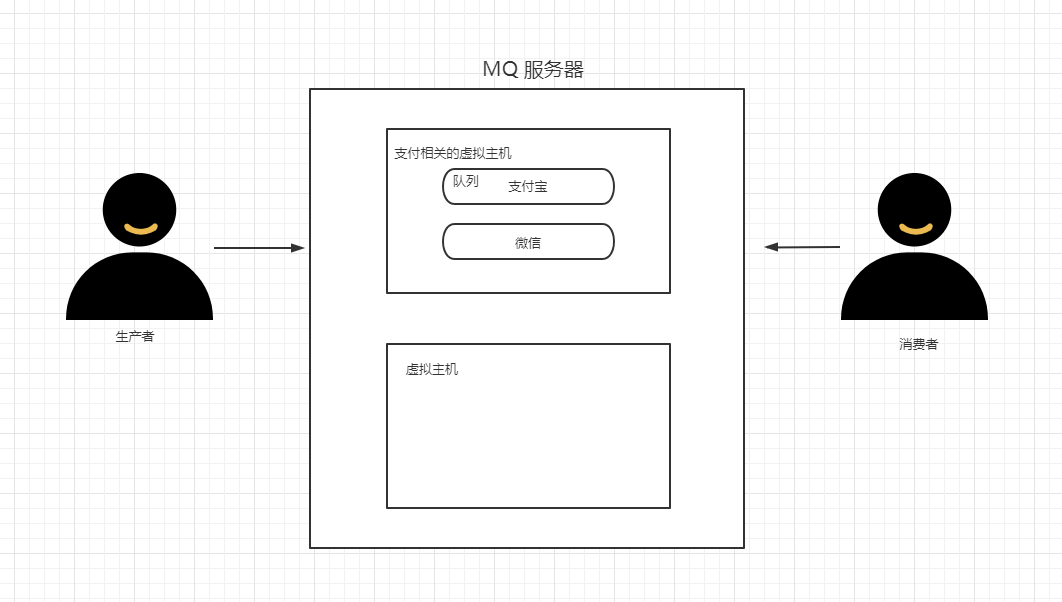
The concepts include:
- Producer: the producer who sends the message
- Consumer: the consumer who receives the message
- broker: a component used to store logical concepts of information
- Virtual hosts: virtual hosts, which are used to distinguish different business components
- Queue: the component (queue) that actually stores messages
3. Interface introduction
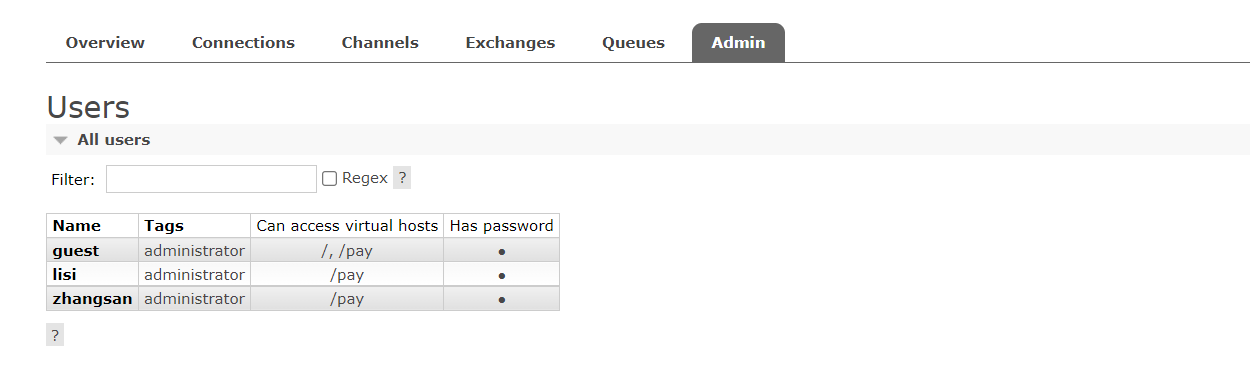
The admin tab represents the user interface:
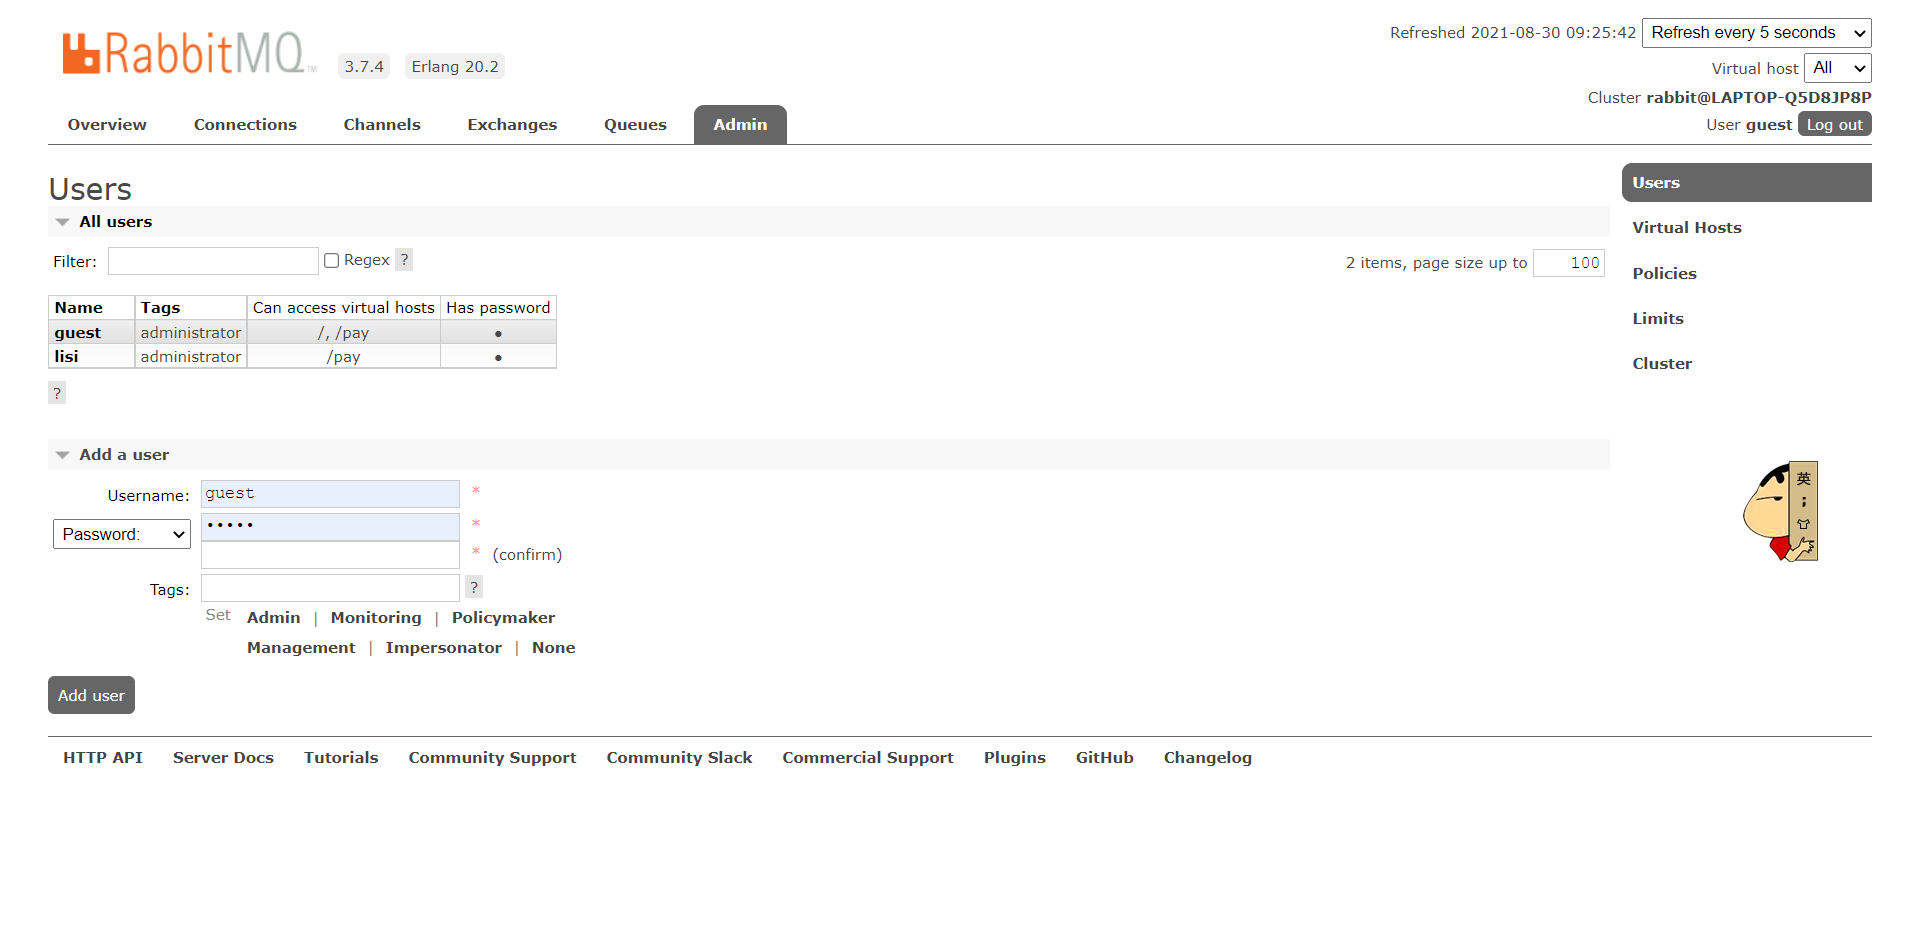
add a user as follows:
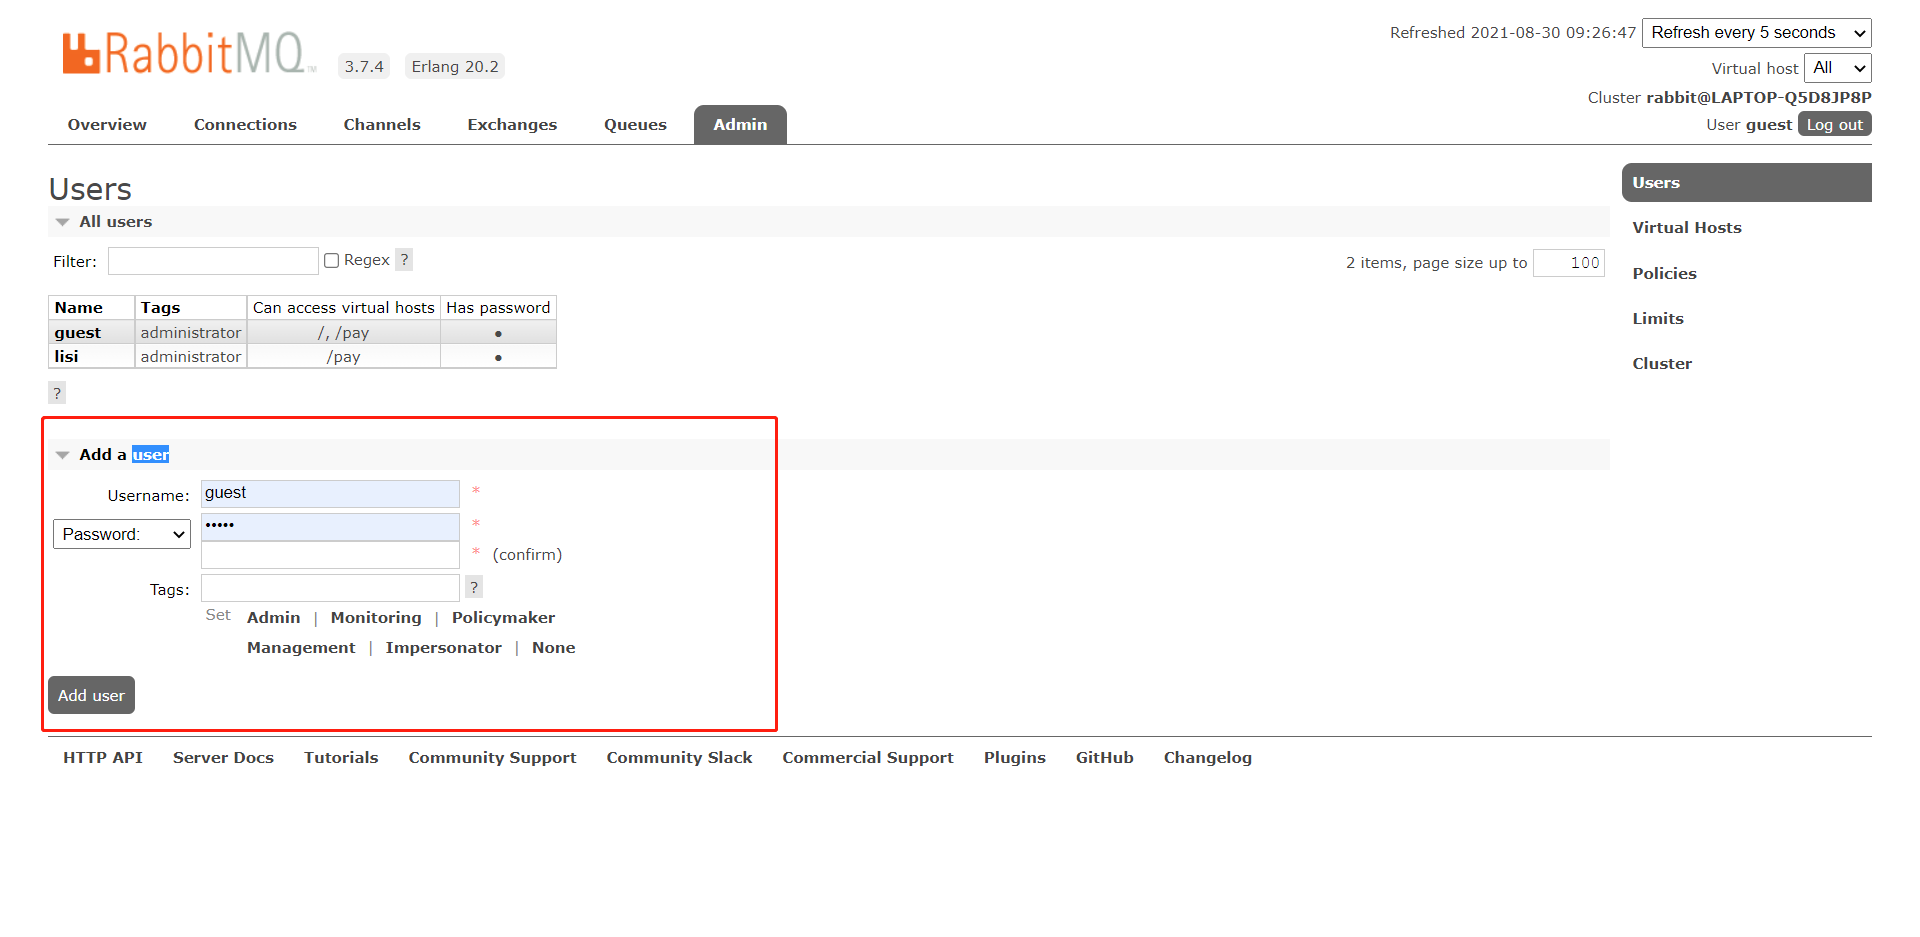
We created a user named zhangsan
Role description:
1. Super administrator
You can log in to the management console, view all information, and operate user policies.
2. Monitoring
You can log in to the management console and view the related information of rabbitmq node (number of processes, memory usage, disk usage, etc.)
3. Policy maker
You can log in to the management console and manage policies at the same time. However, you cannot view the relevant information of the node (the part identified by the red box in the above figure).
4. General manager
You can only log in to the management console. You cannot see node information or manage policies.
5. Other
Unable to log in to the management console, usually ordinary producers and consumers.
Then a new User will appear in the User list above:
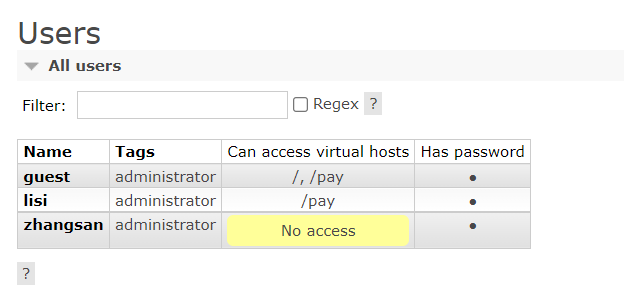
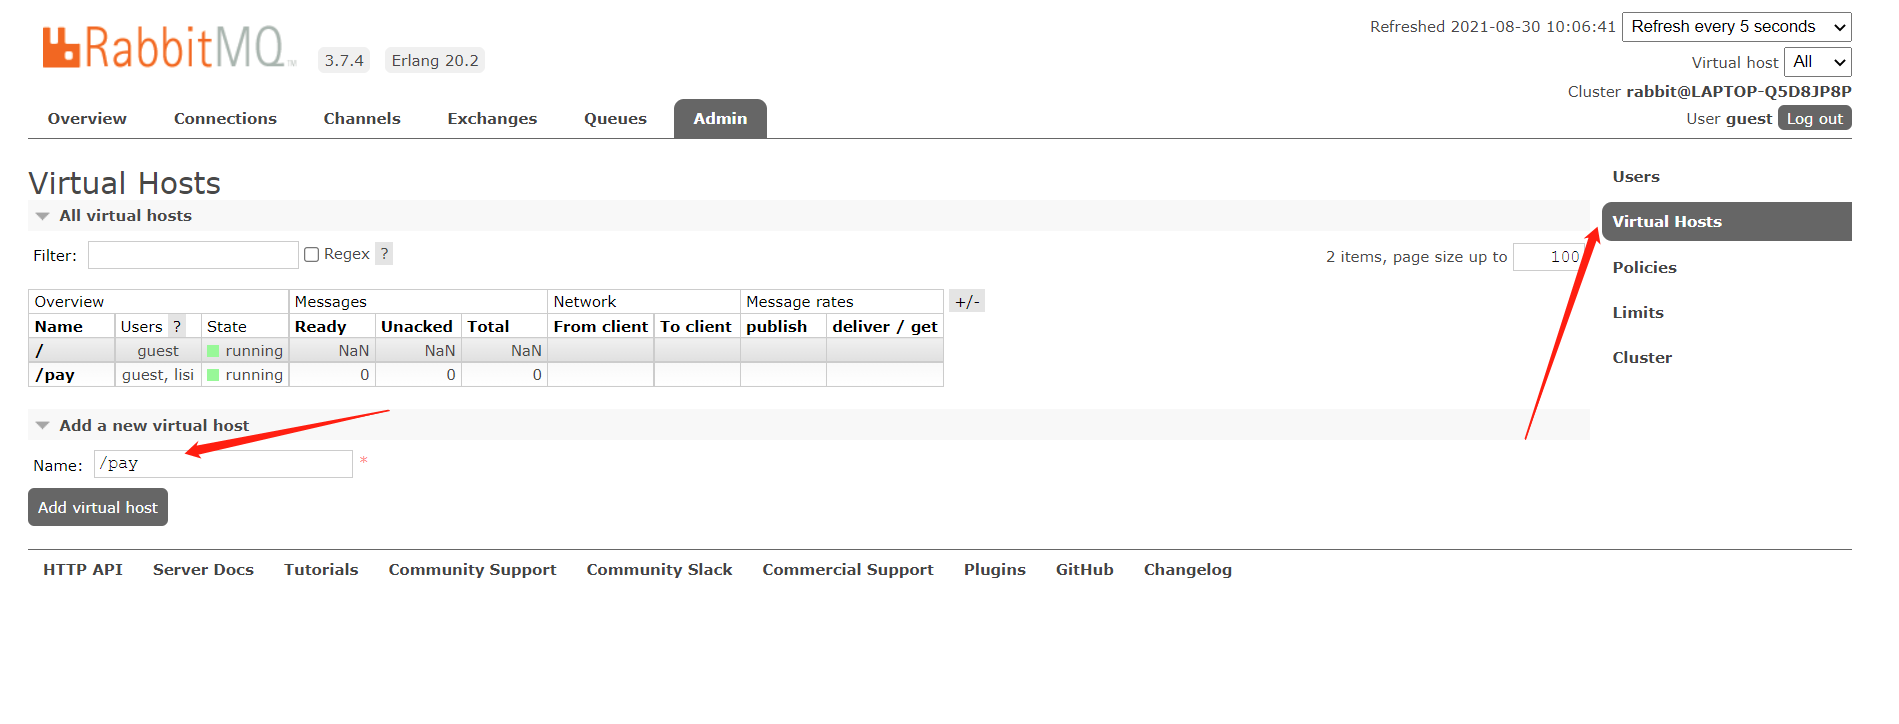
It can be seen that zhangsan users do not have their own virtual host. At this time, we can assign a virtual host to zhangsan, whose name is pay, that is, payment related:
Click pay to set permissions:
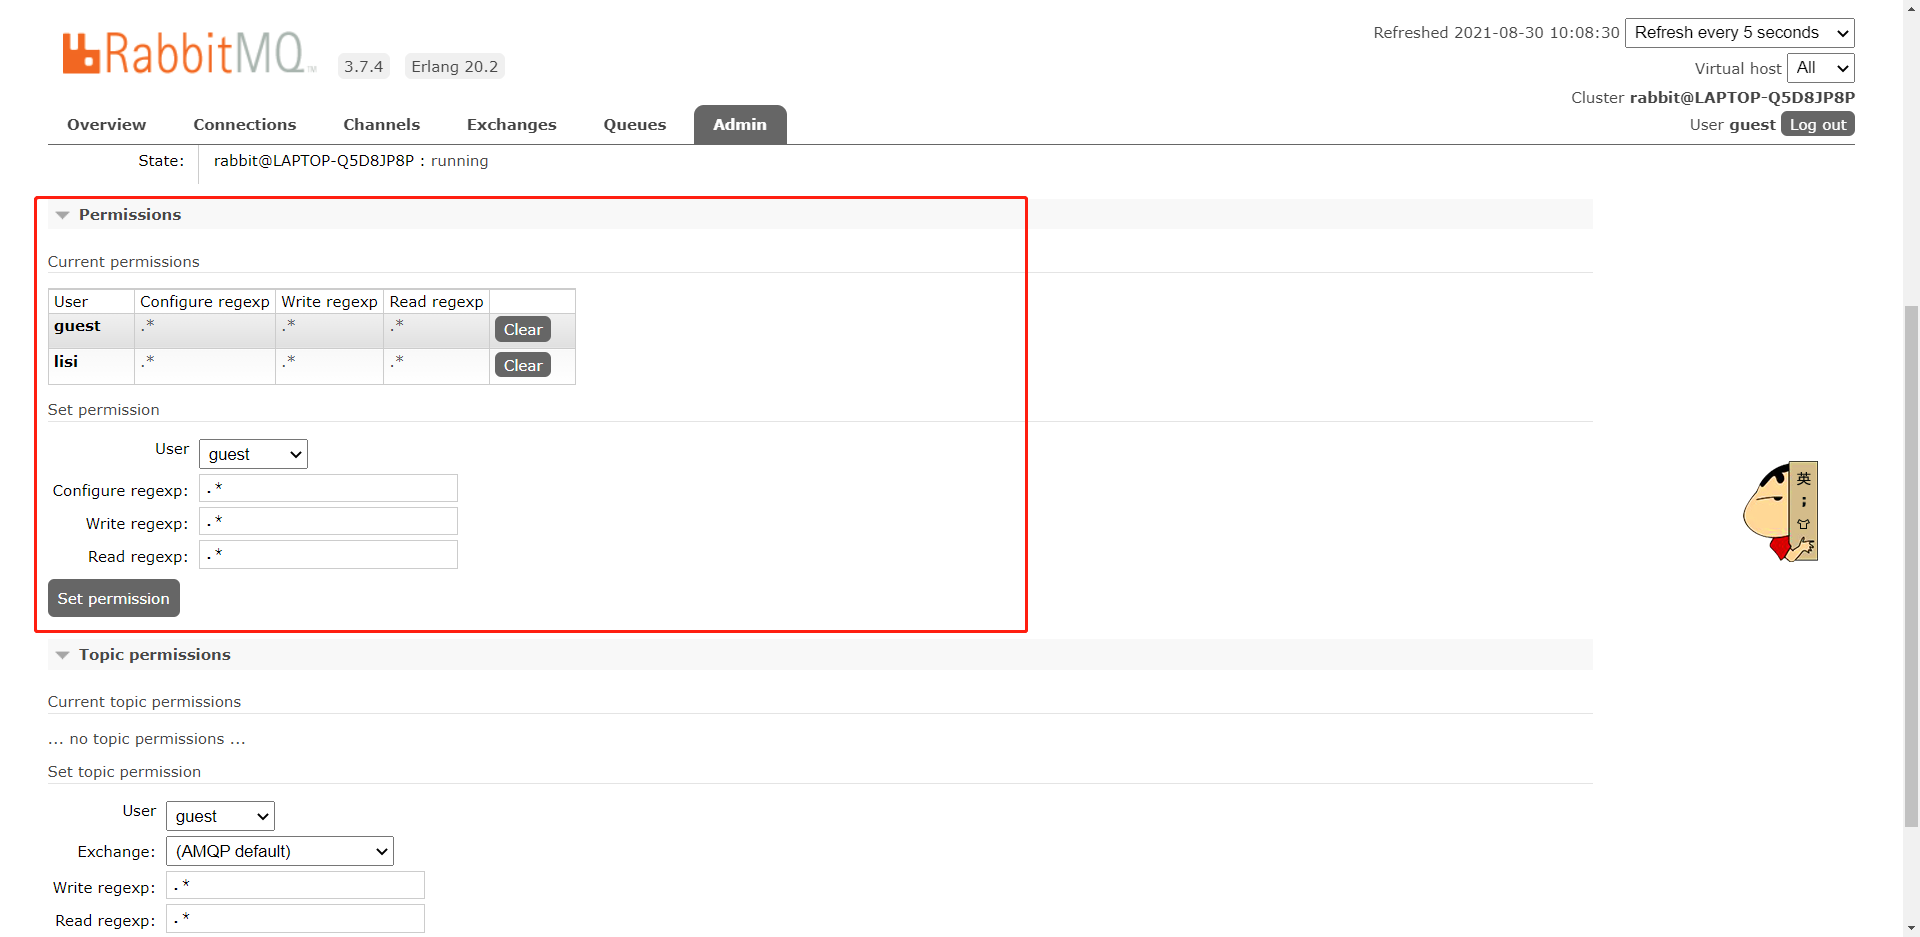
After setting:

Parameter Description:
- User: user name
- Configure: a regular expression. The user has the permission to configure all resources that match the regular expression
- Write: a regular expression. The user has write permission on all resources that match the regular expression
- Read: a regular expression. The user has read permission on all resources that match the regular expression
After configuration, zhangsan will have a pay virtual host:
4. RabbitMQ getting started
Add dependency:
<dependency>
    <groupId>com.rabbitmq</groupId>
    <artifactId>amqp-client</artifactId>
    <version>5.6.0</version>
</dependency>
4.1 consumers
The creation of producers is divided into the following steps:
//Create linked factory object
//Set the RabbitMQ service host address. The default is localhost
//Set the RabbitMQ service port. The default value is 5672
//Set virtual host name, default/
//Set the user connection name. The default is guest
//Set link password, default guest
//create link
//Create channel
//Declaration queue
//Create message
//message sending
//close resource
Follow the above steps to create a message producer,
package com.yxinmiracle.simple;

import com.rabbitmq.client.Channel;
import com.rabbitmq.client.Connection;
import com.rabbitmq.client.ConnectionFactory;

import java.io.IOException;
import java.util.concurrent.TimeoutException;

/**
 * @version 1.0
 * @author:  YxinMiracle
 * @date:  2021-08-30 10:22
 */

public class Producer {

    // send message
    public static void main(String[] args) throws IOException, TimeoutException {
        // Create factory object
        ConnectionFactory connectionFactory = new ConnectionFactory();
        // Set up RabbitMq server host
        connectionFactory.setHost("localhost");
        // Set port
        connectionFactory.setPort(5672);
        // Set virtual host name
        connectionFactory.setVirtualHost("/pay");
        connectionFactory.setUsername("zhangsan");
        connectionFactory.setPassword("zhangsan");
        Connection connection = connectionFactory.newConnection();
        // Create channel
        Channel channel = connection.createChannel();

        // Create queue
        /*
        * 1. Parameter 1: make queue name
        * 2. Parameter 2: determines whether to persist. It is generally true
        * 3. Parameter 3: whether to monopolize this channel. Generally, it is not monopolized
        * 4. Parameter 4: specify whether to delete automatically
        * 5. Parameter 5: specify additional parameters
        * */
        channel.queueDeclare("simple_queue1",true,false,false,null);
        // Create message
        String msg = "hello i am from simple producer";

        // message sending
        /*
        * 1. Parameter 1: Specifies that the default empty string is used in switch simple mode
        * 2. Parameter 2: simple mode is queue name
        * 3. Parameter 3: Specifies that the extra parameter carried is null
        * 4. Sent message itself
        * */
        channel.basicPublish("","simple_queue1",null,msg.getBytes());

        channel.close();
        connection.close();
    }
}
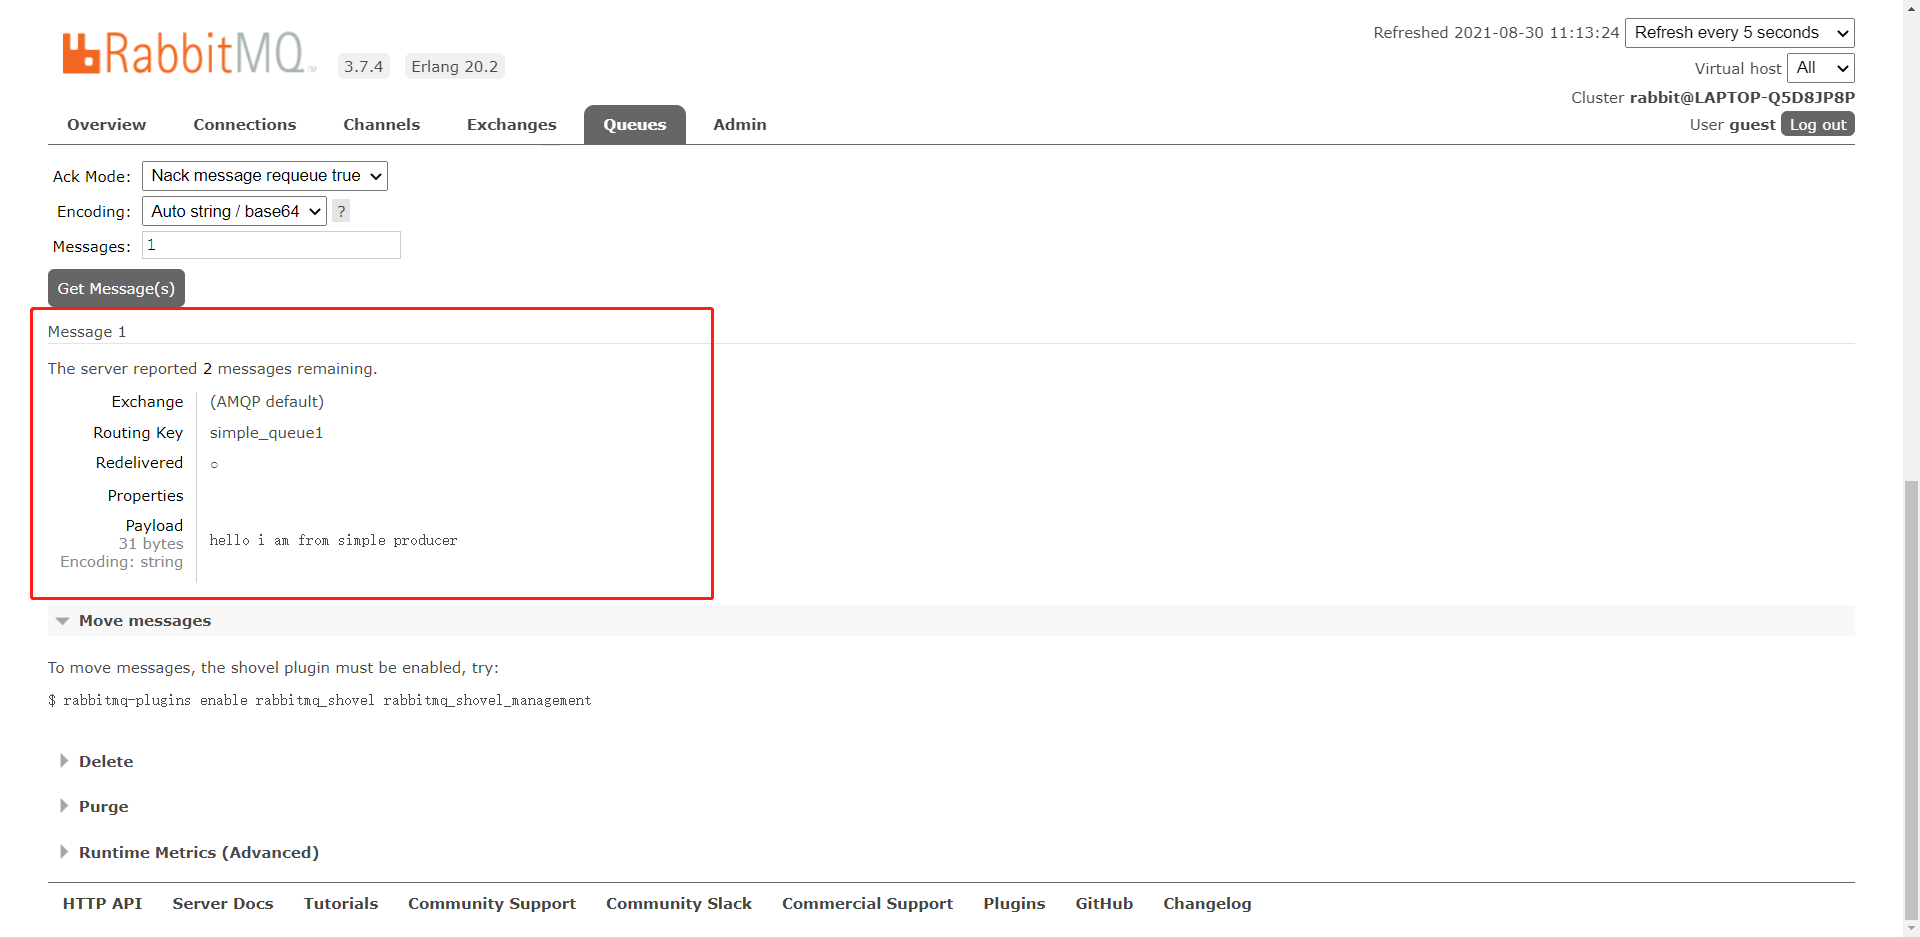
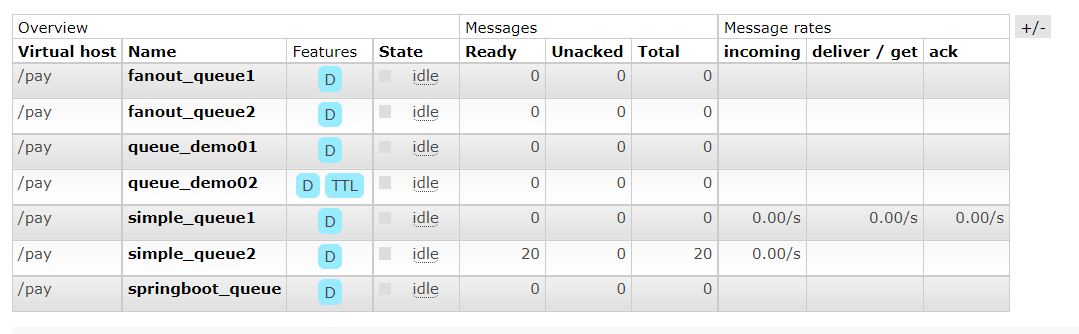
After performing the above message transmission; You can log in to rabbitMQ's administrative console to discover the queue and its messages:
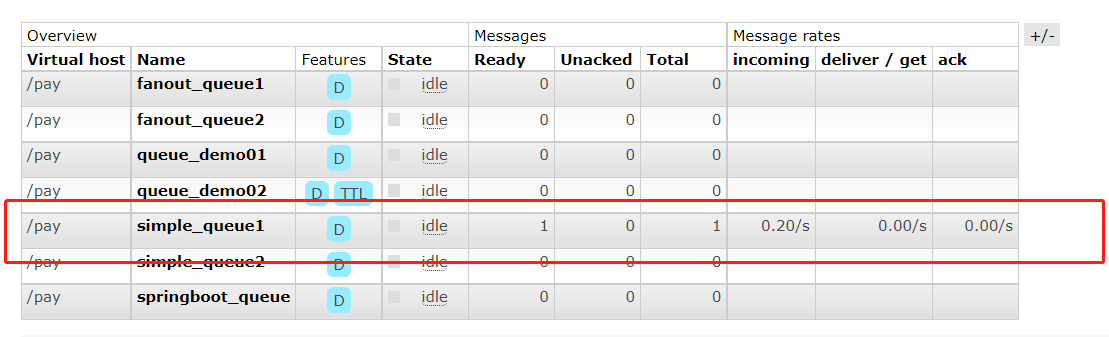
To view messages, click queue name - > get messages, as shown in the following figure:
4.2 consumers
Consumer creation can be realized as follows:
//Create linked factory object
//Set the RabbitMQ service host address. The default is localhost
//Set the RabbitMQ service port. The default value is 5672
//Set virtual host name, default/
//Set the user connection name. The default is guest
//Set link password, default guest
//create link
//Create channel
//Create queue
//Create a consumer and set up message processing
//Message listening
//Close the resource (it is not recommended to close, and it is recommended to listen to messages all the time)
Follow the steps above to create a message consumer:
package com.yxinmiracle.simple;

import com.rabbitmq.client.*;

import java.io.IOException;
import java.util.concurrent.TimeoutException;

/**
 * @version 1.0
 * @author:  YxinMiracle
 * @date:  2021-08-30 10:23
 */

public class Consumer {
    public static void main(String[] args) throws IOException, TimeoutException {
        // Create factory object
        ConnectionFactory connectionFactory = new ConnectionFactory();
        // Set up RabbitMq server host
        connectionFactory.setHost("localhost");
        // Set port
        connectionFactory.setPort(5672);
        // Set virtual host name
        connectionFactory.setVirtualHost("/pay");
        connectionFactory.setUsername("zhangsan");
        connectionFactory.setPassword("zhangsan");
        Connection connection = connectionFactory.newConnection();
        // Create channel
        Channel channel = connection.createChannel();
        // listen queue
        channel.queueDeclare("simple_queue1",true,false,false,null);

        // Create a consumer and set up to process messages
        DefaultConsumer consumer = new DefaultConsumer(channel){
            // Override the parent class method to process the message after receiving the message
            /***
             * @param consumerTag   Message sender tag, in channel Basicconsume can be specified
             * @param envelope      The content of the message package, from which you can obtain the message id, message routingkey, switch, message and retransmission flag (whether you need to resend after receiving the message failure)
             * @param properties    Attribute information
             * @param body           news
             * @throws IOException
             */
            @Override
            public void handleDelivery(String consumerTag, Envelope envelope, AMQP.BasicProperties properties, byte[] body) throws IOException {
                //Routing key
                String routingKey = envelope.getRoutingKey();
                //Get switch information
                String exchange = envelope.getExchange();
                //Get message ID
                long deliveryTag = envelope.getDeliveryTag();
                //Get message information
                String message = new String(body,"UTF-8");
                System.out.println("routingKey:"+routingKey+",exchange:"+exchange+",deliveryTag:"+deliveryTag+",message:"+message);

            }
        };

        // Message listening
        channel.basicConsume("simple_queue1",true,consumer);

    }
}
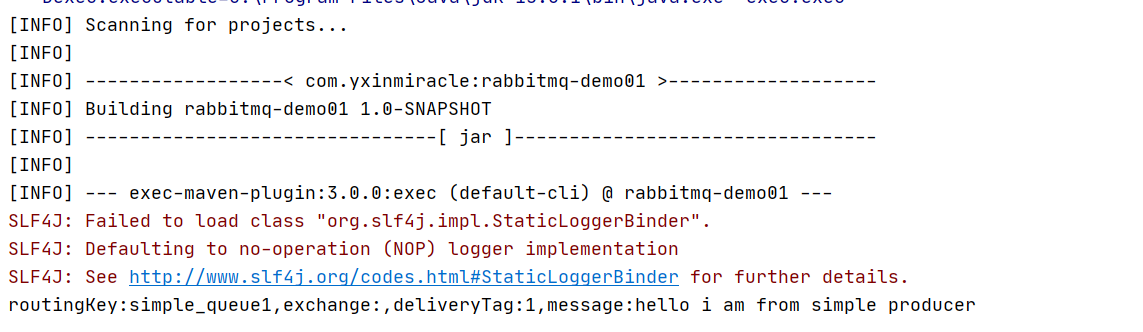
After running console printing:
4.3 extraction of tools
Tool class extraction
Whether consumers or producers as like as two peas, we found that the steps taken before were almost the same, so we could extract a tool class and extract the following code.
Create a tool class to create a Connection. The code is as follows:
package com.yxinmiracle.utils;

import com.rabbitmq.client.Connection;
import com.rabbitmq.client.ConnectionFactory;

import java.io.IOException;
import java.util.concurrent.TimeoutException;

/**
 * @version 1.0
 * @author:  YxinMiracle
 * @date:  2021-08-30 11:23
 */
public class ConnectionUtil {

    /***
     * Create linked objects
     * @return
     * @throws IOException
     * @throws TimeoutException
     */
    public static Connection getConnection() throws IOException, TimeoutException {
        //Create linked factory object
        ConnectionFactory connectionFactory = new ConnectionFactory();

        //Set the RabbitMQ service host address. The default is localhost
        connectionFactory.setHost("localhost");

        //Set the RabbitMQ service port. The default value is 5672
        connectionFactory.setPort(5672);

        //Set virtual host name, default/
        connectionFactory.setVirtualHost("/pay");

        //Set the user connection name. The default is guest
        connectionFactory.setUsername("zhangsan");

        //Set link password, default guest
        connectionFactory.setPassword("zhangsan");

        //create link
        Connection connection = connectionFactory.newConnection();
        return connection;
    }
}
5. Working mode
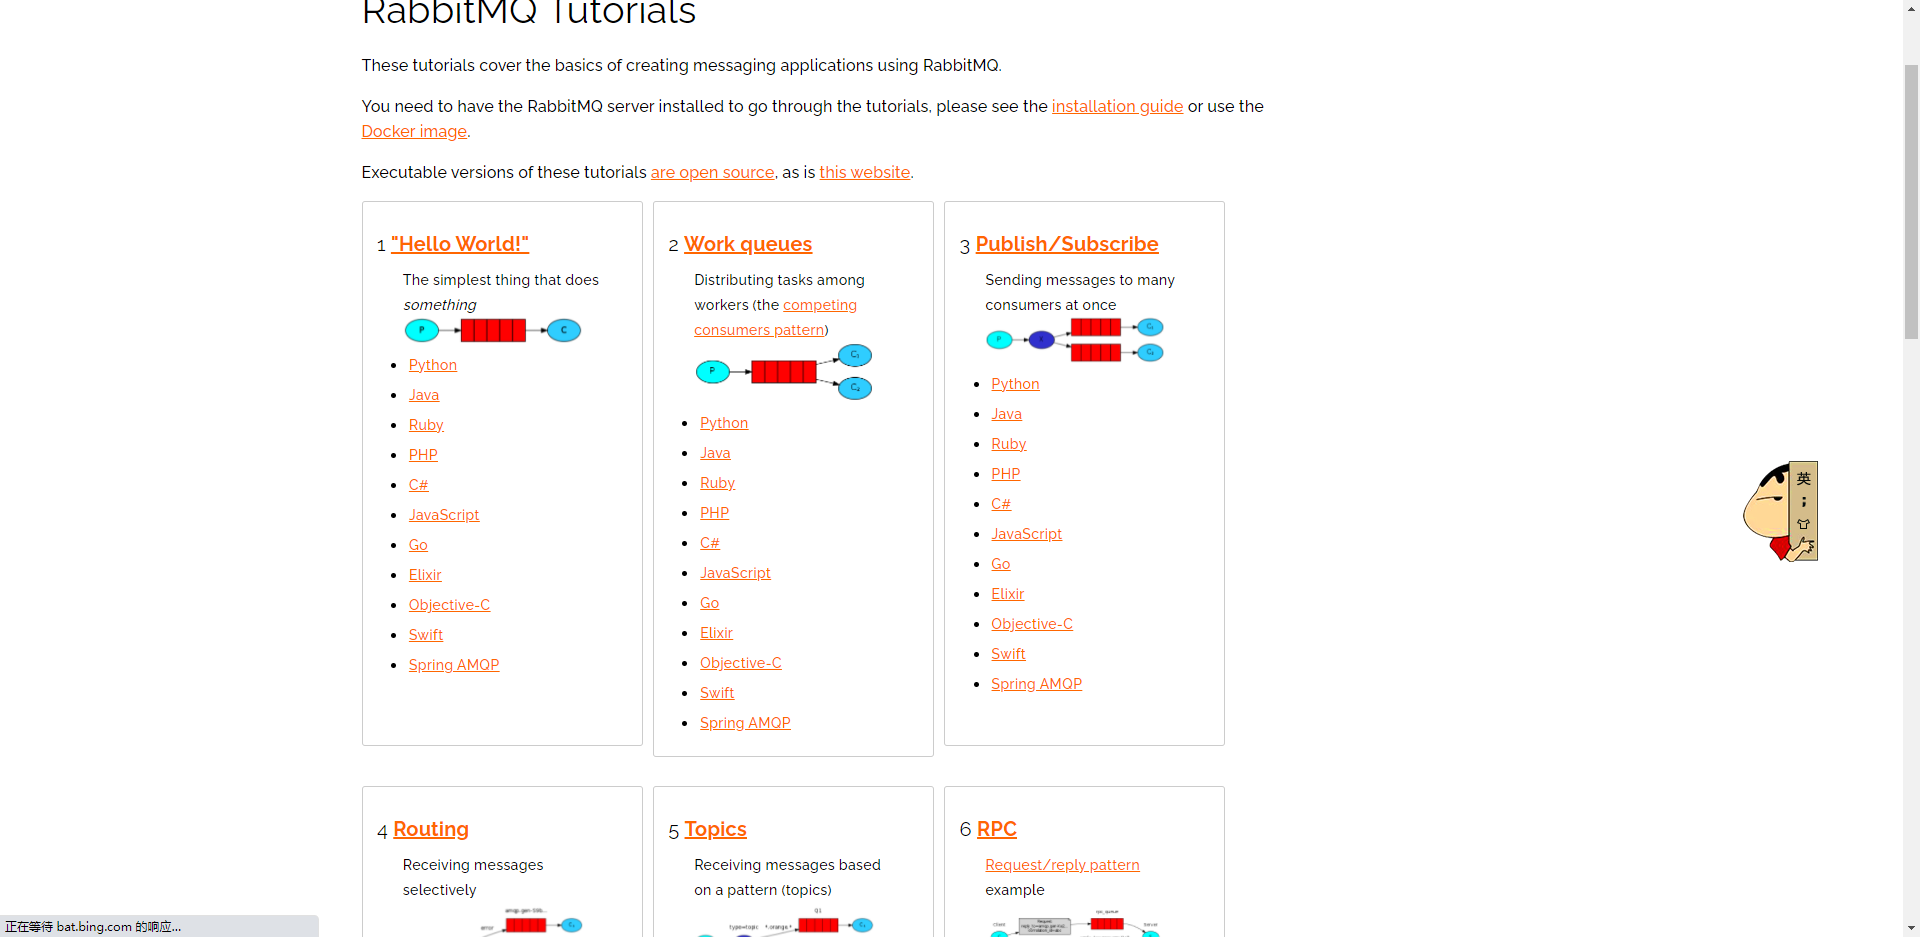
Link: https://rabbitmq.com/getstarted.html , you can view all the official modes through this website:
5.1 Work queues
5.1. 1 mode description
Compared with the simple mode of the entry program, Work Queues has one or more consumers, and multiple consumers consume messages in the same queue together.
Application scenario: when tasks are too heavy or there are many tasks, using work queue can improve the speed of task processing.
5.1. 2 code
The code of Work Queues is almost the same as that of the simple mode of the entry program; You can completely copy and copy one more consumer to test the simultaneous consumption of messages by multiple consumers.
(1) Producer
Create a message producer object with the following code:
package com.yxinmiracle.work;

import com.rabbitmq.client.Channel;
import com.rabbitmq.client.Connection;
import com.yxinmiracle.utils.ConnectionUtil;

import java.io.IOException;
import java.util.concurrent.TimeoutException;

/**
 * @version 1.0
 * @author:  YxinMiracle
 * @date:  2021-08-30 11:27
 */

public class Producer {
    public static void main(String[] args) throws IOException, TimeoutException {
        Connection connection = ConnectionUtil.getConnection();
        // Create channel
        Channel channel = connection.createChannel();

        // Create queue
        /*
         * 1. Parameter 1: make queue name
         * 2. Parameter 2: determines whether to persist. It is generally true
         * 3. Parameter 3: whether to monopolize this channel. Generally, it is not monopolized
         * 4. Parameter 4: specify whether to delete automatically
         * 5. Parameter 5: specify additional parameters
         * */
        channel.queueDeclare("simple_queue2",true,false,false,null);

        for (int i = 0; i < 20; i++) {
            // Create message
            String msg = "hello i am from simple producer";

            // message sending
            /*
             * 1. Parameter 1: Specifies that the default empty string is used in switch simple mode
             * 2. Parameter 2: simple mode is queue name
             * 3. Parameter 3: Specifies that the extra parameter carried is null
             * 4. Sent message itself
             * */
            channel.basicPublish("","simple_queue2",null,msg.getBytes());
        }

        channel.close();
        connection.close();
    }
}
(2) Consumer One
Create the first Work consumer with the following code:
public class WorkConsumerOne {

    /***
     * Message consumer
     * @param args
     * @throws IOException
     * @throws TimeoutException
     */
    public static void main(String[] args) throws IOException, TimeoutException {
        //create link
        Connection connection = ConnectionUtil.getConnection();

        //Create channel
        Channel channel = connection.createChannel();

        //Create queue
        channel.queueDeclare("work_queue",true,false,false,null);

        //Create a consumer and set up message processing
        DefaultConsumer defaultConsumer = new DefaultConsumer(channel){
            /***
             * @param consumerTag   Message sender tag, in channel Basicconsume can be specified
             * @param envelope      The content of the message package, from which you can obtain the message id, message routingkey, switch, message and retransmission flag (whether you need to resend after receiving the message failure)
             * @param properties    Attribute information
             * @param body           news
             * @throws IOException
             */
            @Override
            public void handleDelivery(String consumerTag, Envelope envelope, AMQP.BasicProperties properties, byte[] body) throws IOException {
                //Routing key
                String routingKey = envelope.getRoutingKey();
                //Get switch information
                String exchange = envelope.getExchange();
                //Get message ID
                long deliveryTag = envelope.getDeliveryTag();
                //Get message information
                String message = new String(body,"UTF-8");
                System.out.println("Work-One:routingKey:"+routingKey+",exchange:"+exchange+",deliveryTag:"+deliveryTag+",message:"+message);
            }
        };

        /**
         * Message listening
         * Parameter 1: queue name
         * Parameter 2: whether to confirm automatically. If it is set to true, it means that the message is received and replied to mq automatically. If mq receives the reply, it will delete the message. If it is set to false, it needs to be confirmed manually
         * Parameter 3: callback after receiving message
         */
        channel.basicConsume("work_queue",true,defaultConsumer);

        //Close the resource (it is not recommended to close, and it is recommended to listen to messages all the time)
        //channel.close();
        //connection.close();
    }
}
(3) Consumer Two
Create the second Work consumer with the following code:
public class WorkConsumerTwo {

    /***
     * Message consumer
     * @param args
     * @throws IOException
     * @throws TimeoutException
     */
    public static void main(String[] args) throws IOException, TimeoutException {
        //create link
        Connection connection = ConnectionUtil.getConnection();

        //Create channel
        Channel channel = connection.createChannel();

        //Create queue
        channel.queueDeclare("work_queue",true,false,false,null);

        //Create a consumer and set up message processing
        DefaultConsumer defaultConsumer = new DefaultConsumer(channel){
            /***
             * @param consumerTag   Message sender tag, in channel Basicconsume can be specified
             * @param envelope      The content of the message package, from which you can obtain the message id, message routingkey, switch, message and retransmission flag (whether you need to resend after receiving the message failure)
             * @param properties    Attribute information
             * @param body           news
             * @throws IOException
             */
            @Override
            public void handleDelivery(String consumerTag, Envelope envelope, AMQP.BasicProperties properties, byte[] body) throws IOException {
                //Routing key
                String routingKey = envelope.getRoutingKey();
                //Get switch information
                String exchange = envelope.getExchange();
                //Get message ID
                long deliveryTag = envelope.getDeliveryTag();
                //Get message information
                String message = new String(body,"UTF-8");
                System.out.println("Work-Two:routingKey:"+routingKey+",exchange:"+exchange+",deliveryTag:"+deliveryTag+",message:"+message);
            }
        };

        /**
         * Message listening
         * Parameter 1: queue name
         * Parameter 2: whether to confirm automatically. If it is set to true, it means that the message is received and replied to mq automatically. If mq receives the reply, it will delete the message. If it is set to false, it needs to be confirmed manually
         * Parameter 3: callback after receiving message
         */
        channel.basicConsume("work_queue",true,defaultConsumer);

        //Close the resource (it is not recommended to close, and it is recommended to listen to messages all the time)
        //channel.close();
        //connection.close();
    }
}
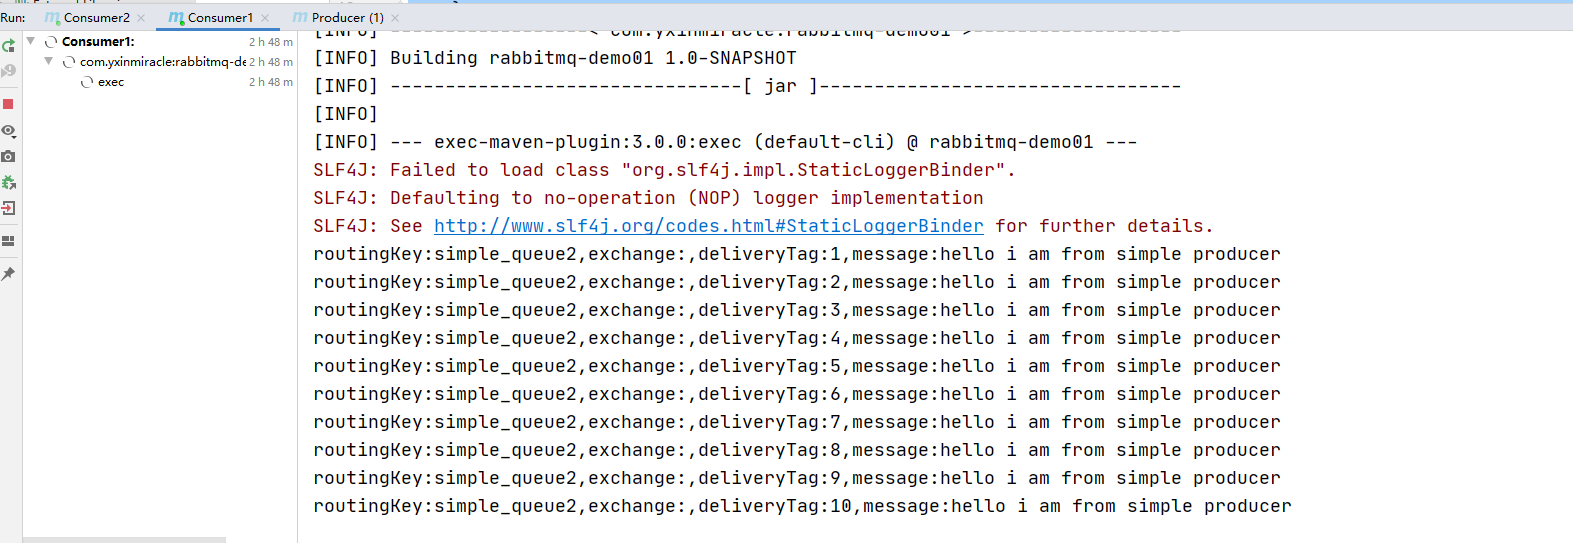
After the test, you can see that the two consumers received 10 messages respectively
(1) First consumer
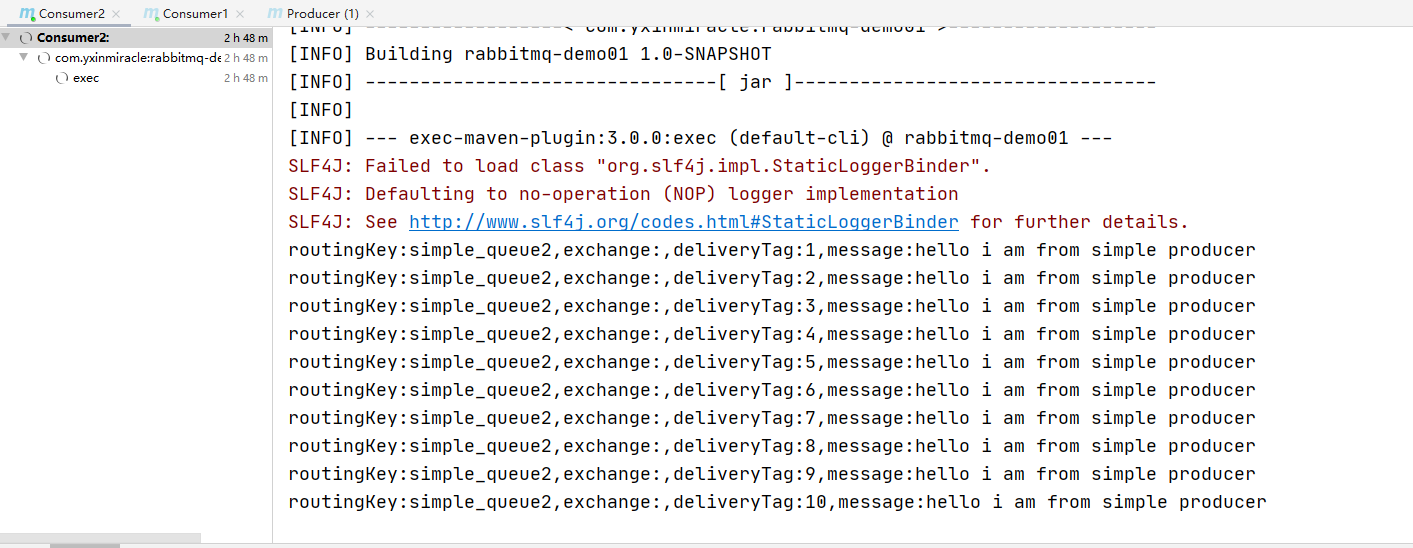
(2) Second consumer
6. Publish subscribe mode - broadcast mode
In this subscription mode, there is an exchange role. The role of this role is to forward messages to the queue. It does not store messages, but only forward messages. If the queue wants to receive the information forwarded by the switch, it needs to make a binding.
In the first two cases, there are only three roles:
P: The producer is the program that sends the message
C: Consumer: the receiver of the message will always wait for the message to arrive.
Queue: Message queue, shown in red
In the subscription model, there is an exchange role, and the process changes slightly:
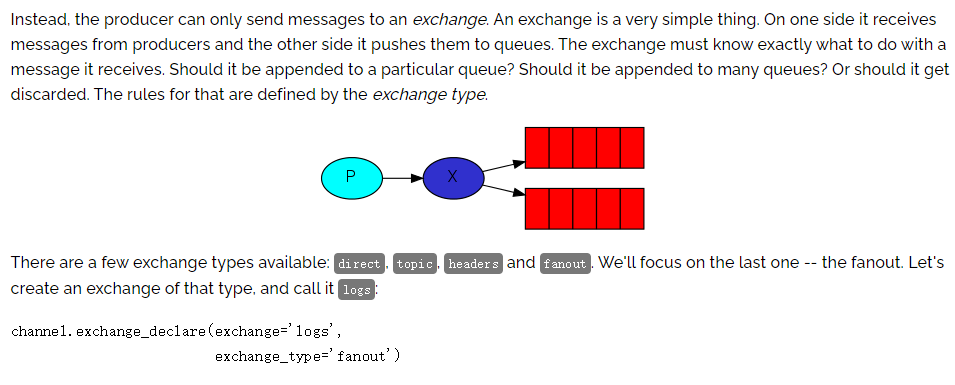
P: The producer, that is, the program that sends the message, but no longer sends it to the queue, but to X(Switch)
C: Consumers, the recipients of news, will always wait for the news to come.
Queue: Message queue, receiving messages and caching messages.
Exchange: Switch, in Figure X. On the one hand, it receives messages sent by producers. On the other hand, you know how to process messages, such as delivering to a special queue, delivering to all queues, or discarding messages. How to operate depends on Exchange Type of. Exchange There are three common types:
	Fanout: Broadcast and deliver the message to all queues bound to the switch
	Direct: Directional, deliver the message to the qualified user routing key Queue of
	Topic: Wildcard, give the message to the routing pattern(Routing mode) queue
Exchange (switch) is only responsible for forwarding messages and does not have the ability to store messages. Therefore, if there is no queue bound to exchange or no queue that meets the routing rules, the messages will be lost!
6.1 producer code
package com.yxinmiracle.famout;

import com.rabbitmq.client.BuiltinExchangeType;
import com.rabbitmq.client.Channel;
import com.rabbitmq.client.Connection;
import com.yxinmiracle.utils.ConnectionUtil;

import java.io.IOException;
import java.util.concurrent.TimeoutException;

/**
 * @version 1.0
 * @author:  YxinMiracle
 * @date:  2021-08-30 11:27
 */

public class Producer {
    public static void main(String[] args) throws IOException, TimeoutException {
        Connection connection = ConnectionUtil.getConnection();
        // Create channel


        Channel channel = connection.createChannel();


        // Create switch
        channel.exchangeDeclare("exchange_fanout", BuiltinExchangeType.FANOUT);

        // Reputation two queues
        channel.queueDeclare("fanout_queue1",true,false,false,null);
        channel.queueDeclare("fanout_queue2",true,false,false,null);

        // Bind the queue to the specified switch
        // The third parameter is null by default in broadcast mode
        channel.queueBind("fanout_queue1","exchange_fanout","");
        channel.queueBind("fanout_queue2","exchange_fanout","");


        // Create message
        String msg = "hello i am from fanout producer";

        // message sending
        /*
         * 1. Parameter 1: Specifies that the default empty string is used in switch simple mode
         * 2. Parameter 2: simple mode is queue name
         * 3. Parameter 3: Specifies that the extra parameter carried is null
         * 4. Sent message itself
         * */
        channel.basicPublish("exchange_fanout","",null,msg.getBytes());

        channel.close();
        connection.close();
    }
}
6.2 consumer code
package com.yxinmiracle.famout;

import com.rabbitmq.client.*;
import com.yxinmiracle.utils.ConnectionUtil;

import java.io.IOException;
import java.util.concurrent.TimeoutException;

/**
 * @version 1.0
 * @author:  YxinMiracle
 * @date:  2021-08-30 11:30
 */

public class Consumer1 {
    public static void main(String[] args) throws IOException, TimeoutException {
        Connection connection = ConnectionUtil.getConnection();
        // Create channel
        Channel channel = connection.createChannel();


        // listen queue
        channel.queueDeclare("fanout_queue1",true,false,false,null);

        // Create a consumer and set up to process messages
        DefaultConsumer consumer = new DefaultConsumer(channel){
            // Override the parent class method to process the message after receiving the message
            /***
             * @param consumerTag   Message sender tag, in channel Basicconsume can be specified
             * @param envelope      The content of the message package, from which you can obtain the message id, message routingkey, switch, message and retransmission flag (whether you need to resend after receiving the message failure)
             * @param properties    Attribute information
             * @param body           news
             * @throws IOException
             */
            @Override
            public void handleDelivery(String consumerTag, Envelope envelope, AMQP.BasicProperties properties, byte[] body) throws IOException {
                //Routing key
                String routingKey = envelope.getRoutingKey();
                //Get switch information
                String exchange = envelope.getExchange();
                //Get message ID
                long deliveryTag = envelope.getDeliveryTag();
                //Get message information
                String message = new String(body,"UTF-8");
                System.out.println("routingKey:"+routingKey+",exchange:"+exchange+",deliveryTag:"+deliveryTag+",message:"+message);

            }
        };

        // Message listening
        channel.basicConsume("fanout_queue1",true,consumer);
    }
}
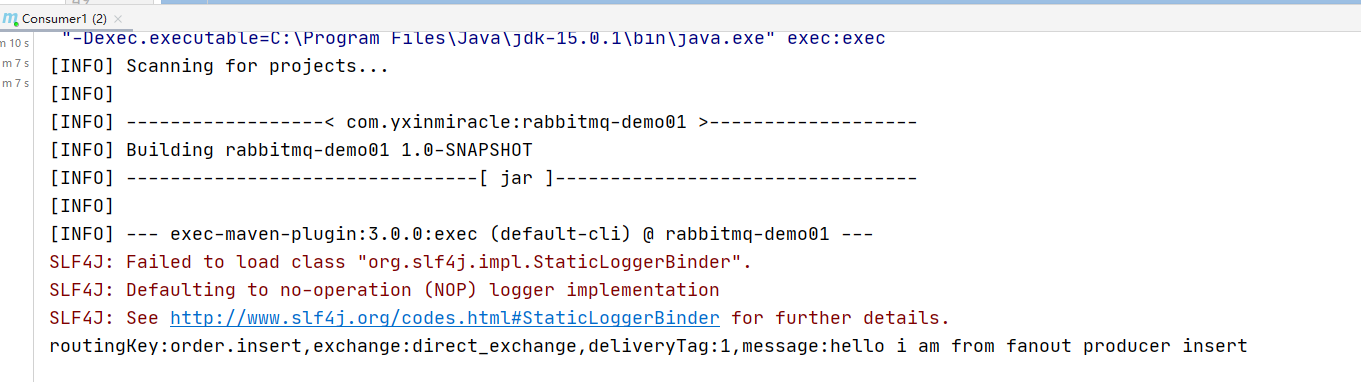
6.3 consumer 2 code
package com.yxinmiracle.famout;

import com.rabbitmq.client.*;
import com.yxinmiracle.utils.ConnectionUtil;

import java.io.IOException;
import java.util.concurrent.TimeoutException;

/**
 * @version 1.0
 * @author:  YxinMiracle
 * @date:  2021-08-30 11:30
 */

public class Consumer2 {
    public static void main(String[] args) throws IOException, TimeoutException {
        Connection connection = ConnectionUtil.getConnection();
        // Create channel
        Channel channel = connection.createChannel();


        // listen queue
        channel.queueDeclare("fanout_queue2",true,false,false,null);

        // Create a consumer and set up to process messages
        DefaultConsumer consumer = new DefaultConsumer(channel){
            // Override the parent class method to process the message after receiving the message
            /***
             * @param consumerTag   Message sender tag, in channel Basicconsume can be specified
             * @param envelope      The content of the message package, from which you can obtain the message id, message routingkey, switch, message and retransmission flag (whether you need to resend after receiving the message failure)
             * @param properties    Attribute information
             * @param body           news
             * @throws IOException
             */
            @Override
            public void handleDelivery(String consumerTag, Envelope envelope, AMQP.BasicProperties properties, byte[] body) throws IOException {
                //Routing key
                String routingKey = envelope.getRoutingKey();
                //Get switch information
                String exchange = envelope.getExchange();
                //Get message ID
                long deliveryTag = envelope.getDeliveryTag();
                //Get message information
                String message = new String(body,"UTF-8");
                System.out.println("routingKey:"+routingKey+",exchange:"+exchange+",deliveryTag:"+deliveryTag+",message:"+message);

            }
        };

        // Message listening
        channel.basicConsume("fanout_queue2",true,consumer);
    }
}
6.4 testing
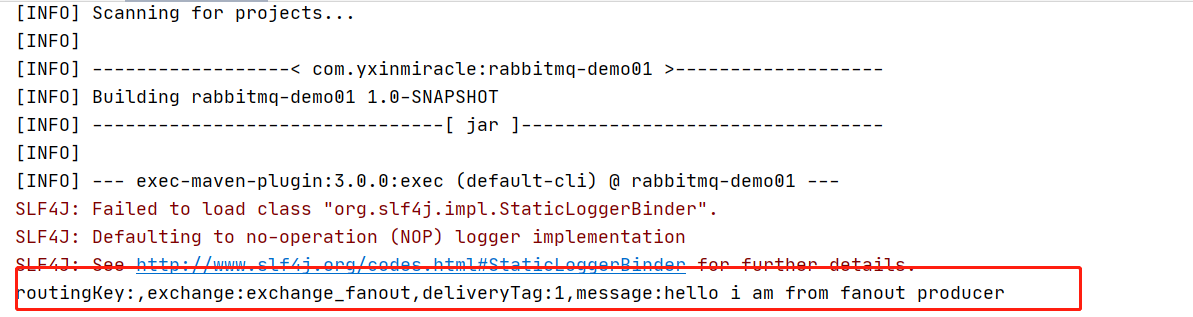
After the producer runs:

consumer:
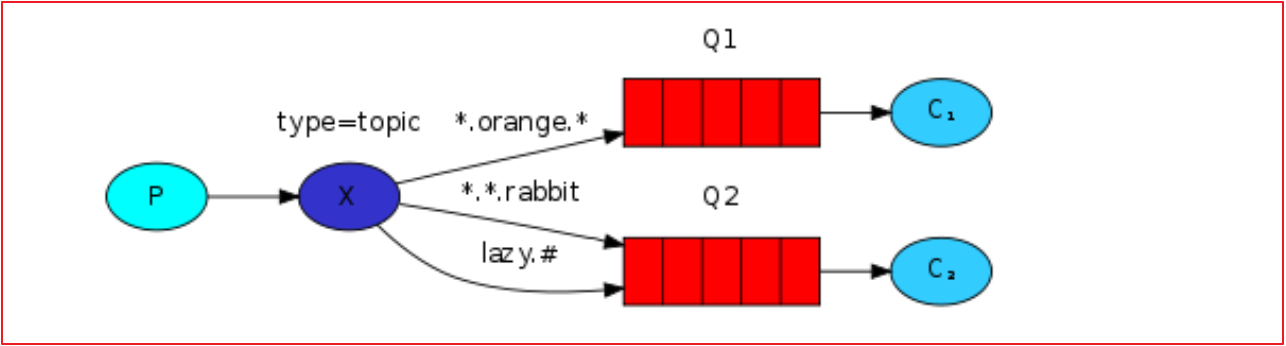
7. Publish subscribe mode - routing mode
7.1 mode description
Routing mode features:
1.The binding between the queue and the switch cannot be arbitrary, but one must be specified RoutingKey(route key)
2.The sender of the message is sending Exchange When sending a message, you must also specify the name of the message RoutingKey.
3.Exchange Instead of giving the message to each bound queue, it is based on the number of messages Routing Key To judge, only the queue Routingkey Message related Routing key The message will not be received until it is completely consistent
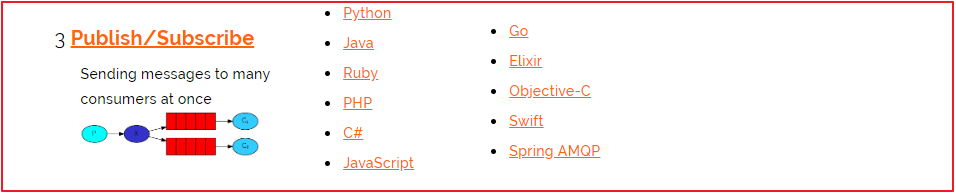
Illustration:
P: Producer, to Exchange Send a message. When you send a message, you specify a routing key.
X: Exchange(Switch) to receive the producer's message, and then submit the message to routing key Exact match queue
C1: Consumer whose queue specifies the required routing key by error News of
C2: Consumer whose queue specifies the required routing key by info,error,warning News of
7.2 codes
(1) Producer
Producers should pay attention to the following three points:
1.Claim switch
2.Declaration queue
3.The queue needs to be bound to the specified switch
Create a message producer with the following code:
package com.yxinmiracle.routing;

import com.rabbitmq.client.BuiltinExchangeType;
import com.rabbitmq.client.Channel;
import com.rabbitmq.client.Connection;
import com.yxinmiracle.utils.ConnectionUtil;

import java.io.IOException;
import java.util.concurrent.TimeoutException;

/**
 * @version 1.0
 * @author:  YxinMiracle
 * @date:  2021-08-30 16:15
 */

public class Producer {
    public static void main(String[] args) throws IOException, TimeoutException {
        Connection connection = ConnectionUtil.getConnection();
        // Create channel


        Channel channel = connection.createChannel();


        // Create switch
        channel.exchangeDeclare("direct_exchange", BuiltinExchangeType.DIRECT);

        // Reputation two queues
        channel.queueDeclare("direct_queue1",true,false,false,null);
        channel.queueDeclare("direct_queue2",true,false,false,null);

        // Bind the queue to the specified switch
        // The third parameter is null by default in broadcast mode
        // A routing key must be specified in the routing mode
        channel.queueBind("direct_queue1","direct_exchange","order.insert");
        channel.queueBind("direct_queue2","direct_exchange","order.select");


        // Create message
        String msg1 = "hello i am from fanout producer insert";
        String msg2 = "hello i am from fanout producer select";

        // message sending
        /*
         * 1. Parameter 1: Specifies that the default empty string is used in switch simple mode
         * 2. Parameter 2: simple mode is queue name
         * 3. Parameter 3: Specifies that the extra parameter carried is null
         * 4. Sent message itself
         * */
        channel.basicPublish("direct_exchange","order.insert",null,msg1.getBytes());
        channel.basicPublish("direct_exchange","order.select",null,msg2.getBytes());

        channel.close();
        connection.close();
    }
}
(2) Consumer One
package com.yxinmiracle.routing;

import com.rabbitmq.client.*;
import com.yxinmiracle.utils.ConnectionUtil;

import java.io.IOException;
import java.util.concurrent.TimeoutException;

/**
 * @version 1.0
 * @author:  YxinMiracle
 * @date:  2021-08-30 11:30
 */

public class Consumer1 {
    public static void main(String[] args) throws IOException, TimeoutException {
        Connection connection = ConnectionUtil.getConnection();
        // Create channel
        Channel channel = connection.createChannel();


        // listen queue
        channel.queueDeclare("direct_queue1",true,false,false,null);

        // Create a consumer and set up to process messages
        DefaultConsumer consumer = new DefaultConsumer(channel){
            // Override the parent class method to process the message after receiving the message
            /***
             * @param consumerTag   Message sender tag, in channel Basicconsume can be specified
             * @param envelope      The content of the message package, from which you can obtain the message id, message routingkey, switch, message and retransmission flag (whether you need to resend after receiving the message failure)
             * @param properties    Attribute information
             * @param body           news
             * @throws IOException
             */
            @Override
            public void handleDelivery(String consumerTag, Envelope envelope, AMQP.BasicProperties properties, byte[] body) throws IOException {
                //Routing key
                String routingKey = envelope.getRoutingKey();
                //Get switch information
                String exchange = envelope.getExchange();
                //Get message ID
                long deliveryTag = envelope.getDeliveryTag();
                //Get message information
                String message = new String(body,"UTF-8");
                System.out.println("routingKey:"+routingKey+",exchange:"+exchange+",deliveryTag:"+deliveryTag+",message:"+message);

            }
        };

        // Message listening
        channel.basicConsume("direct_queue1",true,consumer);
    }
}
(3) Consumer Two
package com.yxinmiracle.routing;

import com.rabbitmq.client.*;
import com.yxinmiracle.utils.ConnectionUtil;

import java.io.IOException;
import java.util.concurrent.TimeoutException;

/**
 * @version 1.0
 * @author:  YxinMiracle
 * @date:  2021-08-30 11:30
 */

public class Consumer2 {
    public static void main(String[] args) throws IOException, TimeoutException {
        Connection connection = ConnectionUtil.getConnection();
        // Create channel
        Channel channel = connection.createChannel();


        // listen queue
        channel.queueDeclare("direct_queue2",true,false,false,null);

        // Create a consumer and set up to process messages
        DefaultConsumer consumer = new DefaultConsumer(channel){
            // Override the parent class method to process the message after receiving the message
            /***
             * @param consumerTag   Message sender tag, in channel Basicconsume can be specified
             * @param envelope      The content of the message package, from which you can obtain the message id, message routingkey, switch, message and retransmission flag (whether you need to resend after receiving the message failure)
             * @param properties    Attribute information
             * @param body           news
             * @throws IOException
             */
            @Override
            public void handleDelivery(String consumerTag, Envelope envelope, AMQP.BasicProperties properties, byte[] body) throws IOException {
                //Routing key
                String routingKey = envelope.getRoutingKey();
                //Get switch information
                String exchange = envelope.getExchange();
                //Get message ID
                long deliveryTag = envelope.getDeliveryTag();
                //Get message information
                String message = new String(body,"UTF-8");
                System.out.println("routingKey:"+routingKey+",exchange:"+exchange+",deliveryTag:"+deliveryTag+",message:"+message);

            }
        };

        // Message listening
        channel.basicConsume("direct_queue2",true,consumer);
    }
}
7.3 testing
8. Wildcard pattern
Compared with Direct, Topic can route messages to different queues according to RoutingKey. However, Topic Exchange allows the queue to use wildcards when Binding routing keys!
A Routingkey is usually composed of one or more words with "." between them Split, for example: item insert
Wildcard rule:
#: matches one or more words
*: no more, no less, exactly 1 word
give an example:
item.#: Can match item insert. ABC or item insert
item.*: Only item. Can be matched insert
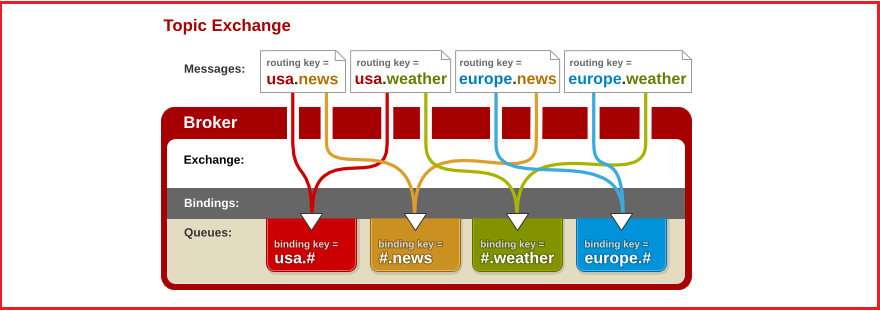
Illustration:
- Red Queue: the bound is usa. #, so all routing key s starting with usa. will be matched
- Yellow Queue: bound to # News, so usually with The routing key s at the end of news will be matched
9. Spring boot integration rabbitmq
Add dependency
<!--Parent project-->
    <parent>
        <groupId>org.springframework.boot</groupId>
        <artifactId>spring-boot-starter-parent</artifactId>
        <version>2.1.4.RELEASE</version>
    </parent>

    <!--rely on-->
    <dependencies>
        <dependency>
            <groupId>org.springframework.boot</groupId>
            <artifactId>spring-boot-starter-amqp</artifactId>
        </dependency>
        <dependency>
            <groupId>org.springframework.boot</groupId>
            <artifactId>spring-boot-starter-web</artifactId>
        </dependency>
    </dependencies>
Startup class:
package com.yxinmiracle;
import org.springframework.amqp.core.Binding;
import org.springframework.amqp.core.BindingBuilder;
import org.springframework.amqp.core.Queue;
import org.springframework.amqp.core.TopicExchange;
import org.springframework.amqp.rabbit.core.RabbitTemplate;
import org.springframework.beans.factory.annotation.Autowired;
import org.springframework.boot.SpringApplication;
import org.springframework.boot.autoconfigure.SpringBootApplication;
import org.springframework.context.annotation.Bean;
import org.springframework.web.bind.annotation.GetMapping;
import org.springframework.web.bind.annotation.RequestMapping;
import org.springframework.web.bind.annotation.RestController;
/**
* @version 1.0
* @author: YxinMiracle
* @date: 2021-08-30 18:32
*/
@SpringBootApplication
public class RabbitMqApplication {
public static void main(String[] args) {
SpringApplication.run(RabbitMqApplication.class,args);
}
@Bean
public Queue queue(){
return new Queue("springboot_topic_queue");
}
@Bean
public TopicExchange exchange(){
return new TopicExchange("topic_exchange");
}
@Bean
public Binding binding(){
return BindingBuilder.bind(queue()).to(exchange()).with("order.*");
}
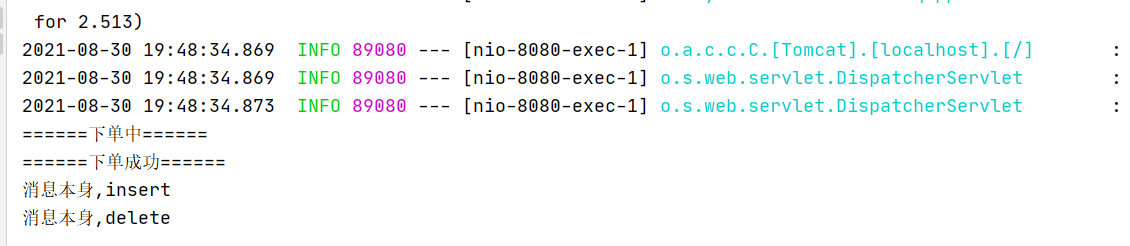
// send message
@RequestMapping("/order")
@RestController
class OrderController{
@Autowired
private RabbitTemplate rabbitTemplate;
@GetMapping("/add")
public String addOrder(){
System.out.println("======Under order======");
try {
Thread.sleep(5000);
} catch (InterruptedException e) {
e.printStackTrace();
}
System.out.println("======checkout success ======");
rabbitTemplate.convertAndSend("topic_exchange","order.insert","Message itself,insert");
rabbitTemplate.convertAndSend("topic_exchange","order.delete","Message itself,delete");
return "success";
}
}
}
Configure rabbitMq
spring:
  rabbitmq:
    host: localhost
    port: 5672
    virtual-host: /szitheima
    username: admin
    password: admin
Message listening and processing class
package com.yxinmiracle;

import org.springframework.amqp.core.Binding;
import org.springframework.amqp.core.BindingBuilder;
import org.springframework.amqp.core.Queue;
import org.springframework.amqp.core.TopicExchange;
import org.springframework.amqp.rabbit.core.RabbitTemplate;
import org.springframework.beans.factory.annotation.Autowired;
import org.springframework.boot.SpringApplication;
import org.springframework.boot.autoconfigure.SpringBootApplication;
import org.springframework.context.annotation.Bean;
import org.springframework.web.bind.annotation.GetMapping;
import org.springframework.web.bind.annotation.RequestMapping;
import org.springframework.web.bind.annotation.RestController;

/**
 * @version 1.0
 * @author:  YxinMiracle
 * @date:  2021-08-30 18:32
 */

@SpringBootApplication
public class RabbitMqApplication {
    public static void main(String[] args) {
        SpringApplication.run(RabbitMqApplication.class,args);
    }


    @Bean
    public Queue queue(){
        return new Queue("springboot_topic_queue");
    }

    @Bean
    public TopicExchange exchange(){
        return new TopicExchange("topic_exchange");
    }

    @Bean
    public Binding binding(){
        return BindingBuilder.bind(queue()).to(exchange()).with("order.*");
    }


    // send message
    @RequestMapping("/order")
    @RestController
    class OrderController{

        @Autowired
        private RabbitTemplate rabbitTemplate;

        @GetMapping("/add")
        public String addOrder(){
            System.out.println("======Under order======");
            try {
                Thread.sleep(5000);
            } catch (InterruptedException e) {
                e.printStackTrace();
            }
            System.out.println("======checkout success ======");

            rabbitTemplate.convertAndSend("topic_exchange","order.insert","Message itself,insert");
            rabbitTemplate.convertAndSend("topic_exchange","order.delete","Message itself,delete");
            return "success";
        }
    }
}
Test:
10. rabbitmq advanced features
There are some problems in the use of messages. For example, how can we ensure the reliability of message delivery? How to ensure the reliability of consumer information? If there is no guarantee, losses may occur in some cases. For example, can we simulate some business scenarios according to the characteristics of messages when sending and receiving messages? The order expires in 30 minutes, etc., and the confirmation of system communication, etc.
10.1 producer reliability message delivery
Reliability message
When using RabbitMQ, the message sender wants to eliminate any message loss or delivery failure scenarios. RabbitMQ provides us with two modes to control the delivery reliability of messages. mq provides the following two modes:
+ confirm pattern
	The timing at which the producer sends messages to the switch
+ return pattern
    Switch forwards message to queue Timing
The process of MQ message delivery is as follows:

1.The producer sends a message to the switch
2.Switch according to routingkey Forward message to queue
3.The consumer monitors the queue and obtains the information in the queue
4.Consumption successfully deleted the message in the queue
- If the message goes from product to exchange, a confirmCallback will be returned.
- If the message fails to be delivered from exchange to queue, a returnCallback will be returned.
10.1. 1. Code implementation of confirmcallback
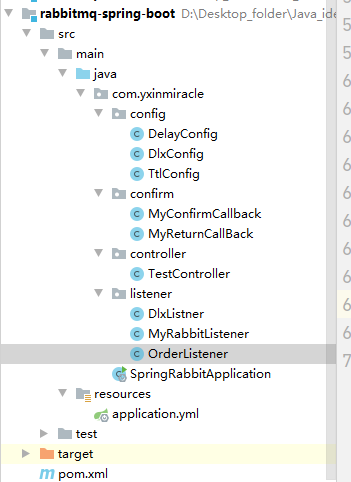
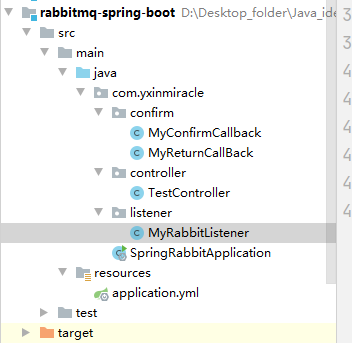
Engineering structure:
Add dependency
   <dependencies>
        <dependency>
            <groupId>org.springframework.boot</groupId>
            <artifactId>spring-boot-starter-amqp</artifactId>
        </dependency>
        <dependency>
            <groupId>org.springframework.boot</groupId>
            <artifactId>spring-boot-starter-web</artifactId>
        </dependency>


        <dependency>
            <groupId>org.springframework.boot</groupId>
            <artifactId>spring-boot-starter-test</artifactId>
        </dependency>
    </dependencies>
Startup class:
package com.yxinmiracle;


import org.springframework.amqp.core.Binding;
import org.springframework.amqp.core.BindingBuilder;
import org.springframework.amqp.core.DirectExchange;
import org.springframework.amqp.core.Queue;
import org.springframework.boot.SpringApplication;
import org.springframework.boot.autoconfigure.SpringBootApplication;
import org.springframework.context.annotation.Bean;

/**
 * @version 1.0
 * @author:  YxinMiracle
 * @date:  2021-08-30 20:17
 */
@SpringBootApplication
public class SpringRabbitApplication {
    public static void main(String[] args) {
        SpringApplication.run(SpringRabbitApplication.class,args);
    }

    @Bean
    public Queue queue(){
        return new Queue("queue_demo01");
    }

    @Bean
    public DirectExchange exchange(){
        return new DirectExchange("exchange_direct_demo1");
    }

    @Bean
    public Binding createBinding(){
        return BindingBuilder.bind(queue()).to(exchange()).with("item.insert");
    }
}
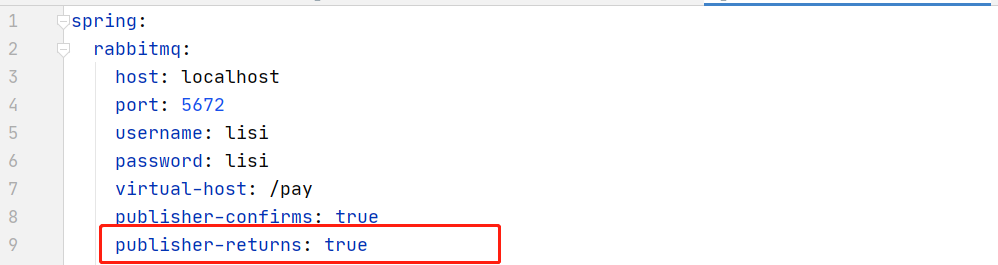
Create application The YML file is configured as follows. The configuration enables the confirm mode, which is false by default
spring:
  rabbitmq:
    host: localhost
    port: 5672
    username: guest
    password: guest
    publisher-confirms: true
server:
  port: 8080
Create controller to send message
package com.yxinmiracle.controller;

import com.yxinmiracle.confirm.MyConfirmCallback;
import com.yxinmiracle.confirm.MyReturnCallBack;
import org.springframework.amqp.rabbit.core.RabbitTemplate;
import org.springframework.beans.factory.annotation.Autowired;
import org.springframework.web.bind.annotation.RequestMapping;
import org.springframework.web.bind.annotation.RestController;

/**
 * @version 1.0
 * @author:  YxinMiracle
 * @date:  2021-08-30 20:17
 */
@RestController
@RequestMapping("/test")
public class TestController {
    @Autowired
    private RabbitTemplate rabbitTemplate;

    @Autowired
    private MyConfirmCallback myConfirmCallback;

    @RequestMapping("/send")
    public String send1(){
        rabbitTemplate.setConfirmCallback(myConfirmCallback);
        rabbitTemplate.setReturnCallback(myReturnCallBack);
        rabbitTemplate.convertAndSend("exchange_direct_demo01","item.insert","hello,insert");
        return "success";
    }
}
Create callback function:
package com.yxinmiracle.confirm;

import org.springframework.amqp.rabbit.connection.CorrelationData;
import org.springframework.amqp.rabbit.core.RabbitTemplate;
import org.springframework.context.annotation.Configuration;
import org.springframework.stereotype.Component;

/**
 * @version 1.0
 * @author:  YxinMiracle
 * @date:  2021-08-30 20:33
 */
@Component
public class MyConfirmCallback implements RabbitTemplate.ConfirmCallback {
    /**
     *
     * @param correlationData
     * @param ack Confirm that the sending is successful. If true, it is successful
     * @param cause If it is a success, cause is null. If it is a failure, there is a failure message
     */
    @Override
    public void confirm(CorrelationData correlationData, boolean ack, String cause) {
        if(ack){
            System.out.println("===success===");
        }else {
            System.out.println(cause);
        }
    }
}
Test send message:

Change to nonexistent switch:

Test again:

report errors!
Summary:
1.Send and play according to confrim Mechanism to ensure whether messages have been sent to the switch
2.confirm The mechanism can ensure that there is a callback when the message is sent to the switch, but can not ensure that the message is forwarded to the switch queue With callback
10.1. 2. Implementation of returncallback code
As described above, the content of the message sent to the switch has been realized. If yes, the switch sends the message successfully, but the message is sent incorrectly when the route is forwarded to the queue. At this time, the returncallback mode needs to be used. Next, let's implement it.
The implementation steps are as follows:
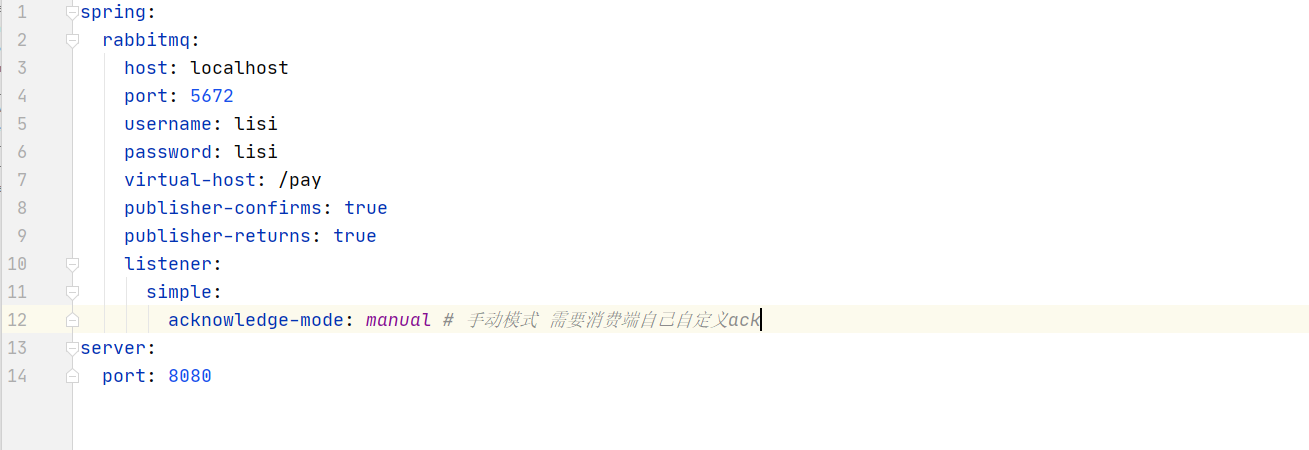
1.open returncallback pattern
2.Set callback function
3.send message
Configure yml to enable returncallback
Write the returncallback Code:
package com.yxinmiracle.confirm;

import org.springframework.amqp.core.Message;
import org.springframework.amqp.rabbit.core.RabbitTemplate;
import org.springframework.stereotype.Component;

/**
 * @version 1.0
 * @author:  YxinMiracle
 * @date:  2021-08-30 20:57
 */
@Component
public class MyReturnCallBack implements RabbitTemplate.ReturnCallback {
    /**
     * This method is called as soon as an error occurs
     * @param message
     * @param replyCode
     * @param replyText Error message expression
     * @param exchange Switch
     * @param routingKey
     */
    @Override
    public void returnedMessage(Message message, int replyCode, String replyText, String exchange, String routingKey) {
        System.out.println(new String(message.getBody()));
        System.out.println("returned  replyCode Yes:"+replyCode);
        System.out.println("returned  replyText Yes:"+replyText);
        System.out.println("returned  exchange Yes:"+exchange);
        System.out.println("returned  routingKey Yes:"+routingKey);
    }
}
send message
We send the correct switch, but send the wrong routingkey test

controller:
package com.yxinmiracle.controller;

import com.yxinmiracle.confirm.MyConfirmCallback;
import com.yxinmiracle.confirm.MyReturnCallBack;
import org.springframework.amqp.rabbit.core.RabbitTemplate;
import org.springframework.beans.factory.annotation.Autowired;
import org.springframework.web.bind.annotation.RequestMapping;
import org.springframework.web.bind.annotation.RestController;

/**
 * @version 1.0
 * @author:  YxinMiracle
 * @date:  2021-08-30 20:17
 */
@RestController
@RequestMapping("/test")
public class TestController {
    @Autowired
    private RabbitTemplate rabbitTemplate;

    @Autowired
    private MyConfirmCallback myConfirmCallback;

    @Autowired
    private MyReturnCallBack myReturnCallBack;

    @RequestMapping("/send")
    public String send1(){
        rabbitTemplate.setConfirmCallback(myConfirmCallback);
        rabbitTemplate.setReturnCallback(myReturnCallBack);
        rabbitTemplate.convertAndSend("exchange_direct_demo01","itemxxx.insert","hello,insert");
        return "success";
    }
}
Test:

You can see that the report is wrong.
10.1. 3 summary of the two modes
The confirm mode is used when messages are sent to the switch, and the return mode is used when messages are routed to the queue by the switch to send errors.
However, in general, we can use confirm, because the routing key is specified by the developer, and generally no error occurs. If you want to ensure that messages are in the switch and routingkey, you need to combine the two methods to set them.
10.2 consumer confirmation mechanism (ACK)
Above, we learned about the sender's reliable delivery, but there may also be problems with the consumer, such as not accepting the message, for example, an exception occurs during code execution after receiving the message. In this case, we need additional processing, so we need to manually confirm and sign in the message. rabbtimq provides us with a mechanism: ACK mechanism.
ACK mechanism: there are three ways
- Auto acknowledge acknowledge = "none"
- Manually confirm acknowledge = "manual"
- Confirm according to abnormal conditions (not used for the time being) acknowledge = "auto"
Explanation:
Automatic confirmation refers to:
	When the message is Consumer If it is received, it will automatically confirm the receipt and send the corresponding message message from RabbitMQ Removed from the message cache. However, in the actual business processing, it is likely that the message will be lost if an exception occurs in the business processing after the message is received.
Manual confirmation means:
	It needs to be called after the business process is successful. channel.basicAck(),Manually sign in. If an exception occurs, call channel.basicNack()And other methods to process it according to business functions, such as resending, refusing to sign in, entering the dead letter queue, etc.
10.2. 1. Ack code implementation
Implementation steps:
1.Create a normal listener to listen for messages
2.modify controller Send correct message test
3.Set profile on ack Manual confirmation. The default is automatic confirmation
4.Modify the message listener to manually confirm the business judgment logic
To create a normal message listener:
package com.yxinmiracle.listener;

import com.rabbitmq.client.Channel;
import org.springframework.amqp.core.Message;
import org.springframework.amqp.rabbit.annotation.RabbitHandler;
import org.springframework.amqp.rabbit.annotation.RabbitListener;
import org.springframework.stereotype.Component;

import java.io.IOException;

/**
 * @version 1.0
 * @author:  YxinMiracle
 * @date:  2021-08-30 21:11
	 Sign in if it is normal, and discard if it is abnormal.
 */
@Component
@RabbitListener(queues = "queue_demo01")
public class MyRabbitListener {

    @RabbitHandler // Different methods can be triggered according to different types
    public void msg(Message message, Channel channel, String msg) {
        System.out.println("The message received is:" + msg);

        try {
            System.out.println("start=============");
            Thread.sleep(1000);
            int i = 1 / 0;
            System.out.println("end==============");
            // succeed
            // Parameter 1: make the sequence number of the message
            // Parameter 2: determine whether to sign in in batch

            channel.basicAck(message.getMessageProperties().getDeliveryTag(),true); // accept
        } catch (Exception e) {
            e.printStackTrace();
            // If there is an exception, you should refuse to sign in
            try {
                // Parameter 3: Yes, return to the queue
                //If an exception occurs, the reject message can be returned to the queue or discarded, which can be changed according to the business scenario
                channel.basicNack(message.getMessageProperties().getDeliveryTag(),true,false);
            } catch (IOException ioException) {
                ioException.printStackTrace();
            }
        }
    }
}
First: sign in
channel.basicAck()
The second method: reject signing in batch processing
channel.basicNack()
The third method: refuse to sign in and do not batch process
channel.basicReject()
Modify the Testcontroller method to test sending the correct message:
 @RequestMapping("/send")
    public String send1(){
        rabbitTemplate.setConfirmCallback(myConfirmCallback);
        rabbitTemplate.setReturnCallback(myReturnCallBack);
        rabbitTemplate.convertAndSend("exchange_direct_demo01","itemxxx.insert","hello,insert");
        return "success";
    }
Set yml to manual confirmation mode
Test results:

10.3 current limiting at consumer end
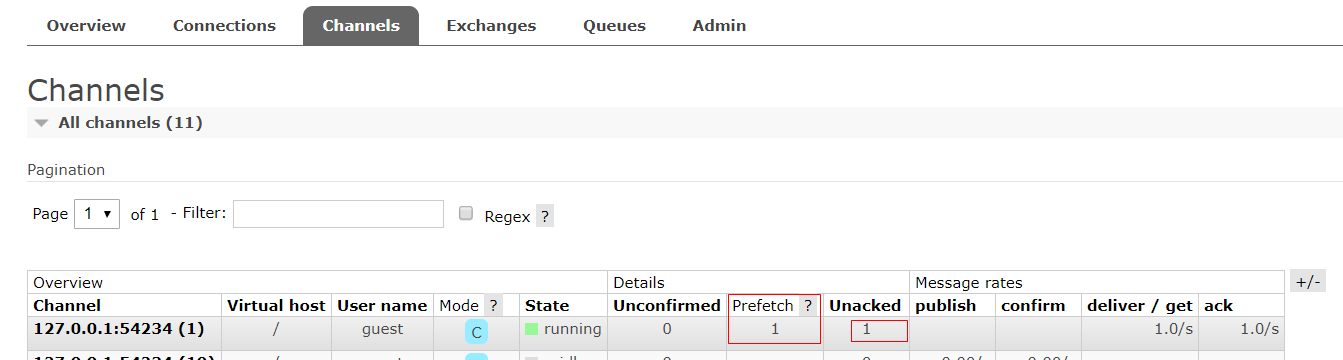
If there is a large amount of concurrency, the manufacturer keeps sending messages, which may not be able to process so many messages. At this time, there are a lot of messages in the queue. When the consumer starts, many messages will flow in instantly, and the consumer may collapse instantly. At this time, we can limit the current at the consumer and release how many messages per second. In this way, the concurrency can be controlled, the load of the system can be reduced, and the availability of the system can be provided. This effect can often be used in second kill and rush purchase. Some configurations of finite flows are also in rabbitmq.
The configuration is as follows:
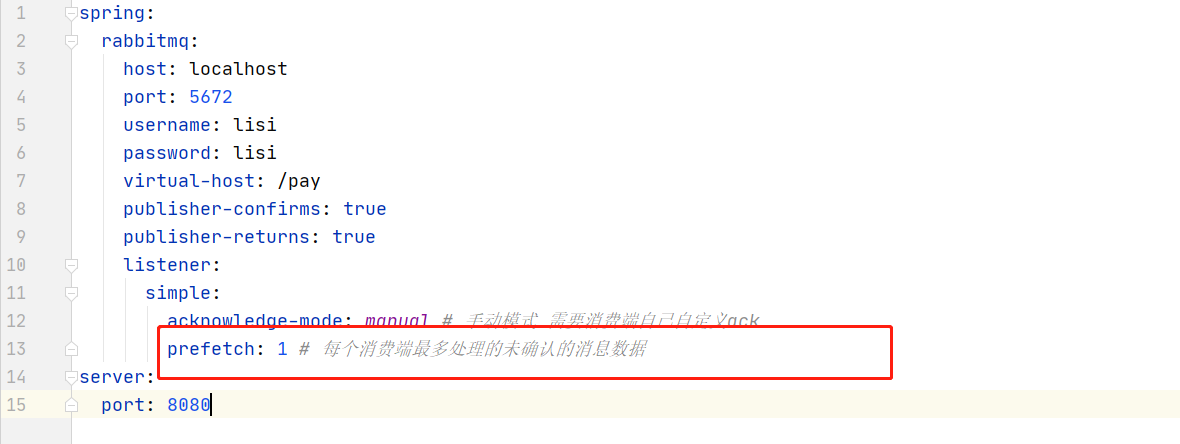
The default is 250.
Test: send 10 messages concurrently. At this time, as shown in the figure below, each message is processed one by one. The processing can be continued only after the processing is completed.
You can also simulate multithreading:

10.4 TTL
The full name of TTL is Time To Live. When the message reaches the lifetime, it has not been consumed and will be automatically cleared.
RabbitMQ sets the expiration time in two ways:
- Set the expiration time for a queue; After the expiration time, all messages in the queue will be cleared if they are not consumed
- Set the expiration time for a specific message; After setting the expiration time for a message in the queue, if the message is not deleted, it will be cleared.
It should be noted that:
 	When setting the expiration time for a specific message, it must be calculated when the message is at the head of the queue. If a message A Set the expiration time to 5 seconds, and the message B At the head of the team, the news B No expiration time is set, B At this time, it has been 5 seconds and has not been consumed. Note that at this time A The message is not deleted because it no longer has a queue header.
Generally, it is used alone in work TTL There are fewer cases.
To demonstrate TTL code steps:
1.Create configuration classes to configure expired queue switches and bindings
2.establish controller Test send message
To create a configuration class:
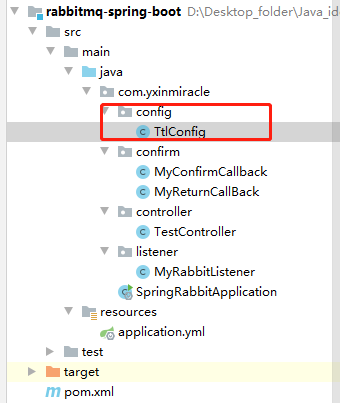
package com.yxinmiracle.config;

import org.springframework.amqp.core.*;
import org.springframework.context.annotation.Bean;
import org.springframework.context.annotation.Configuration;


@Configuration
public class TtlConfig {

    //Create expiration queue
    @Bean
    public Queue createqueuettl1(){
        //Set the queue expiration time to 10000 10S
        return QueueBuilder.durable("queue_demo02").withArgument("x-message-ttl",10000).build();
    }

    //Create switch

    @Bean
    public DirectExchange createExchangettl(){
        return new DirectExchange("exchange_direct_demo02");
    }

    //Create binding
    @Bean
    public Binding createBindingttl(){
        return BindingBuilder.bind(createqueuettl1()).to(createExchangettl()).with("item.ttl");
    }
}
To create a controller test:
@RequestMapping("/send2")
    public String send2(){
        rabbitTemplate.setConfirmCallback(myConfirmCallback);
        rabbitTemplate.setReturnCallback(myReturnCallBack);
        rabbitTemplate.convertAndSend("exchange_direct_demo02","item.ttl","hello,insert");
        return "success";
    }
Test:

After 10s:

10.5 dead letter queue
Dead letter queue: when the message becomes Dead message, it can be re sent to another switch, which is Dead Letter Exchange (Dead Letter Exchange abbreviation: DLX).
The process is as follows:
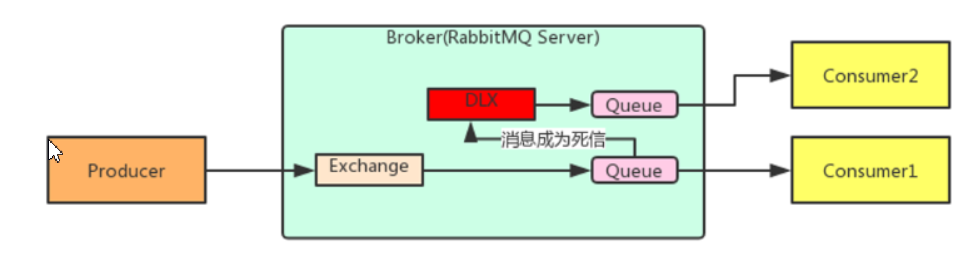
Three conditions for becoming a dead letter:
- The queue message length reaches the limit;
- The consumer rejects the consumption message, basicNack/basicReject, and does not put the message back into the original target queue, request = false;
- The message expiration setting exists in the original queue, and the message arrival timeout is not consumed;
10.5. 1. Processing of dead letter
DLX is also a normal Exchange. It is no different from general Exchange. It can be specified on any queue. In fact, it is to set the properties of a queue.
When there is a dead letter in the queue, RabbitMQ will automatically republish the message to the set Exchange and then route it to another queue.
You can listen to the messages in this queue and process them accordingly.
10.5. 2 setting of dead letter queue
Just now, the dead letter queue is also a normal exchange Just set some parameters.
Set parameters for the queue: x-dead-letter-exchange and x-dead-letter-routing-key.
Steps:
1.establish queue1 Receive forwarded dead letter
2.establish queue2 Used to receive messages sent by producers
3.Create dead letter switch
4.binding queue1 To dead letter switch
Configuration class code:
package com.yxinmiracle.config;
import org.springframework.amqp.core.*;
import org.springframework.context.annotation.Bean;
import org.springframework.context.annotation.Configuration;
@Configuration
public class DlxConfig {
//Create queue 1 to receive the forwarded dead letter queue1
@Bean
public Queue createqueuetdlq(){
return QueueBuilder.durable("queue_demo03").build();
}
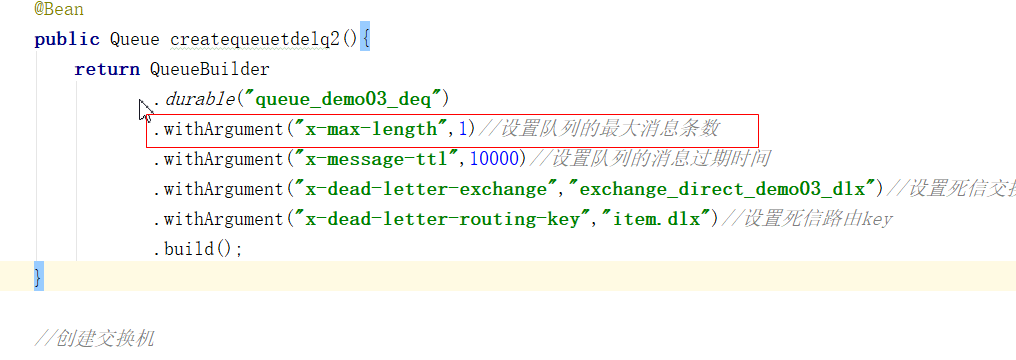
//Queue 2 is created to receive messages sent by the producer, and then to expire, it becomes a dead letter and is forwarded to queue 1
@Bean
public Queue createqueuetdelq2(){
return QueueBuilder
.durable("queue_demo03_deq") // name
.withArgument("x-max-length",1)//Set the length of the queue
.withArgument("x-message-ttl",10000)//Set the message expiration time of the queue to 10S
.withArgument("x-dead-letter-exchange","exchange_direct_demo03_dlx")//Set dead letter switch name
.withArgument("x-dead-letter-routing-key","item.dlx")//Set the dead letter route key item Dlx is routingkey
.build();
}
//Create dead letter switch
@Bean
public DirectExchange createExchangedel(){
return new DirectExchange("exchange_direct_demo03_dlx");
}
// queue1 is bound to the routing key of the dead letter exchange and the dead letter routing key specified when the queue forwards messages should be consistent
@Bean
public Binding createBindingdel(){
return BindingBuilder.bind(createqueuetdlq()).to(createExchangedel()).with("item.dlx");
}
}
controller:
 @RequestMapping("/send3")
    public String send3(){
        rabbitTemplate.convertAndSend("","queue_demo03_deq","hello,insert");
        return "success";
    }
10.5. 2.1 entering dead letter after test timeout:
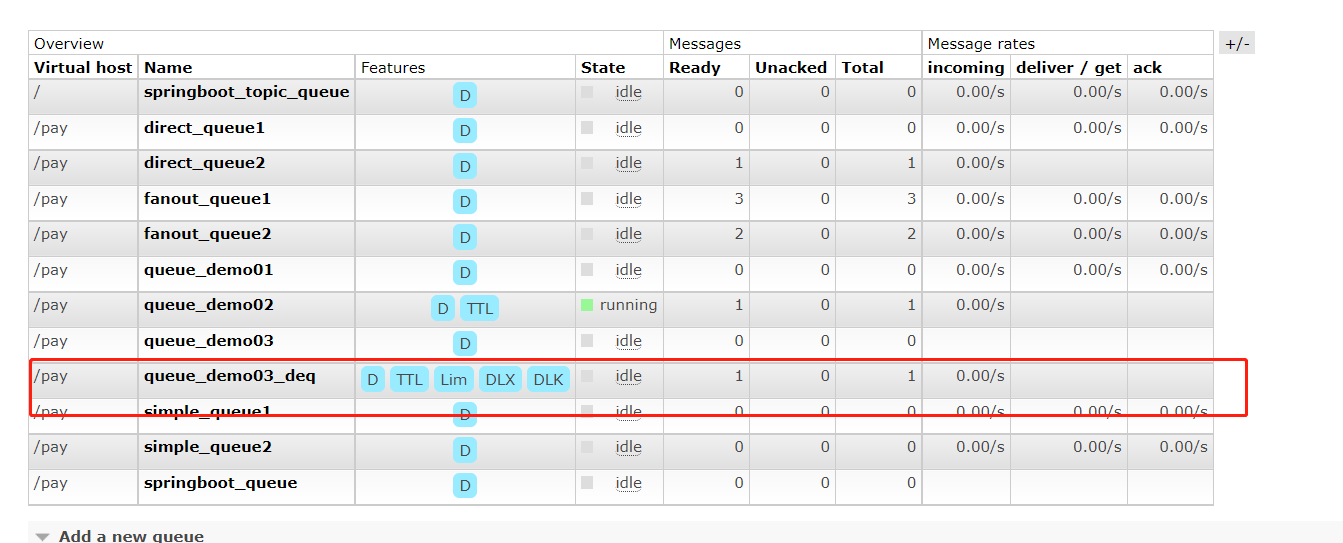
After becoming a dead letter queue:
10.5. 2.2 the test refuses to sign in the dead letter
package com.yxinmiracle.listener;

import com.rabbitmq.client.Channel;
import org.springframework.amqp.core.Message;
import org.springframework.amqp.rabbit.annotation.RabbitHandler;
import org.springframework.amqp.rabbit.annotation.RabbitListener;
import org.springframework.stereotype.Component;

import java.io.IOException;

/**
 * @version 1.0
 * @author:  YxinMiracle
 * @date:  2021-08-31 18:24
 */
@Component
@RabbitListener(queues = "queue_demo03_deq")
public class DlxListner {
    @RabbitHandler
    public void jieshouMsg(Message message, Channel channel,String msg){
        System.out.println(msg);
        try {
            channel.basicReject(message.getMessageProperties().getDeliveryTag(),false);
        } catch (IOException e) {
            e.printStackTrace();
        }
    }
}
Check the console and forward it to the dead letter queue immediately without waiting for 10S
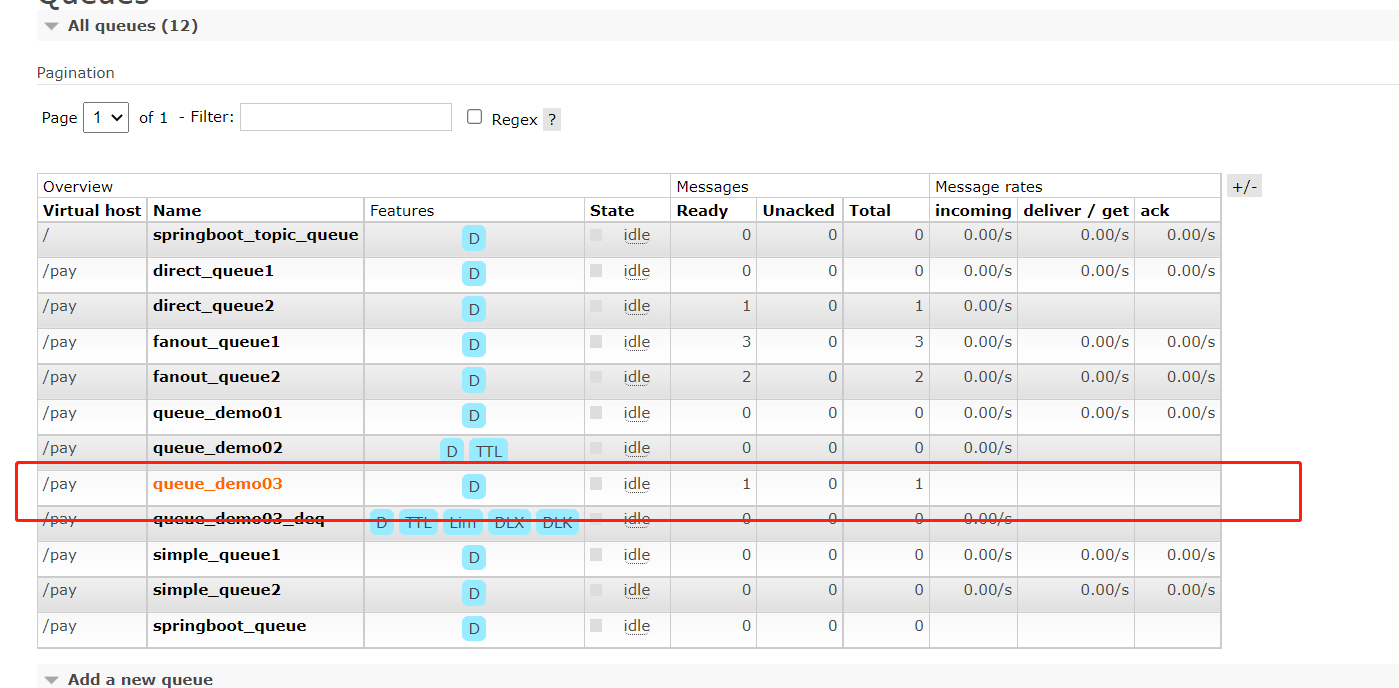
10.5. 2.3 test setting length into dead letter
Modify the configuration and add the queue length parameter
Messages exceeding the length will directly enter the dead letter queue
10.6 delay queue
Delay queue, that is, messages will not be consumed immediately after entering the queue, but only after reaching the specified time. In rabbitmq, there is no concept of delay queue, but we can use ttl and dead letter queue to achieve the effect of delay. This requirement often appears in some application scenarios. Of course, you can also use plug-ins.
As shown in the figure:
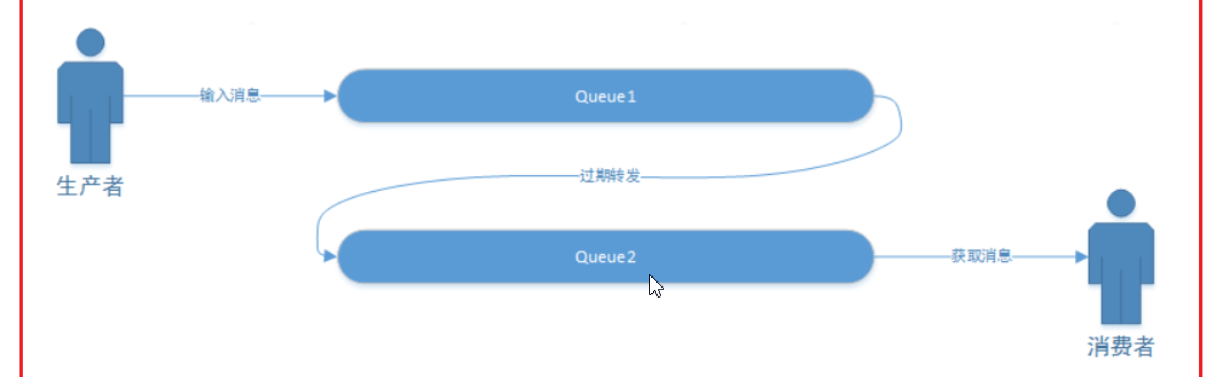
1.The producer generates a message and sends it to queue1
2.queue1 Messages in are forwarded to when they expire queue2
3.Consumer in queue2 Get messages for consumption
The typical case in the above scenario: if the payment has not been made within 30 minutes after the order is placed, the order will be cancelled and the inventory will be rolled back. Let's simulate the following requirements:
Create configuration class
package com.yxinmiracle.config;

import org.springframework.amqp.core.*;
import org.springframework.context.annotation.Bean;
import org.springframework.context.annotation.Configuration;

@Configuration
public class DelayConfig {
    //The normal queue receives messages transferred from the dead letter queue
    @Bean
    public Queue createQueue2(){
        return QueueBuilder.durable("queue_order_queue2").build();
    }

    //Dead letter queue -- > when messages are sent here in the future, the expiration time is not set here. We should set the expiration time of a message (ordered by a user) when sending messages
    @Bean
    public Queue createQueue1(){
        return QueueBuilder
                .durable("queue_order_queue1")
                .withArgument("x-dead-letter-exchange","exchange_order_delay")//Set up dead letter switch
                .withArgument("x-dead-letter-routing-key","item.order")//Set dead letter routing key
                .build();
    }

    //Create switch
    @Bean
    public DirectExchange createOrderExchangeDelay(){
        return new DirectExchange("exchange_order_delay");
    }

    //Create a binding to bind the normal queue to the dead letter switch
    @Bean
    public Binding createBindingDelay(){
        return BindingBuilder.bind(createQueue2()).to(createOrderExchangeDelay()).with("item.order");
    }
}
Modify controller
 @RequestMapping("/send5")
    public String send5(){
        // Simulated order
        System.out.println("checkout success ");
        // Simulated inventory reduction
        System.out.println("Inventory reduction succeeded");
        // Producer sends message
        rabbitTemplate.convertAndSend("queue_order_queue1", (Object) "Delayed queued messages: orderId The value of is 12334545", new MessagePostProcessor() {
            @Override
            public Message postProcessMessage(Message message) throws AmqpException {
                message.getMessageProperties().setExpiration("10000");// Set expiration time
                return message;
            }
        });
        return "success";
    }
Note: send the message to queue1 and listen to queue2
/**
 * Send order
 *
 * @return
 */
@RequestMapping("/send6")
public String send6() {
    //To send a message to the dead letter queue, you can use the default switch and specify ourtingkey as the name of the dead letter queue
    System.out.println("The user orders successfully. If there is no payment after 10 seconds, it will expire and roll back the order");
    System.out.println("Time:"+new Date());
    rabbitTemplate.convertAndSend("queue_order_queue1", (Object) "Ha ha, I want to check whether you have paid", new MessagePostProcessor() {
        @Override
        public Message postProcessMessage(Message message) throws AmqpException {
            message.getMessageProperties().setExpiration("10000");//Set the expiration time of the message
            return message;
        }
    });
    return "The user orders successfully. If there is no payment after 10 seconds, it will expire and roll back the order";
}
Set listening class
Note: listen to queue2 for listening messages and send queue1 for sending messages
@Component
@RabbitListener(queues = "queue_order_queue2")
public class OrderListener {

    @RabbitHandler
    public void orderhandler(Message message, Channel channel, String msg) {
        System.out.println("Get message:" + msg + ":Time is:" + new Date());
        try {
            System.out.println("Start of simulation check=====start");
            Thread.sleep(1000);
            System.out.println("End of simulation check=====end");
            System.out.println("If the user fails to pay, the check fails, and the rollback inventory processing is entered");
            channel.basicAck(message.getMessageProperties().getDeliveryTag(), false);
        } catch (Exception e) {
            e.printStackTrace();
        }
    }
}
Test successful
Code structure: