Hello, I'm Jiejie.
Today, we introduce a Python library * * [filesools] * *, which was developed by a big man who is very familiar with us.
The filesools library currently contains four toolkits. I really like these four functions, namely:
- I tree directory display;
- II. Comparison of differences between text documents;
- III. add watermark to the picture;
- Ⅳ convert curl network request command into requests library request code;
You need to install the library before using it. One line of command:
pip install filestools -i https://pypi.org/simple/ -U
1. Tree directory display
This function can help us recursively display all files and folders in the specified directory, and display the size of each file and folder at a glance.
We take windows as an example.
The whole operation is carried out in the CMD black window. First, you should learn how to switch to the specified disk and specify the directory.
# In this way, drive C can be switched to drive D
C:\Users\Administrator>D:

# Using the cd command, you can switch to the specified directory of the specified disk
C:\Users\Administrator>cd C:\Users\Administrator\Desktop\python Three swordsman\Franchise store crawler
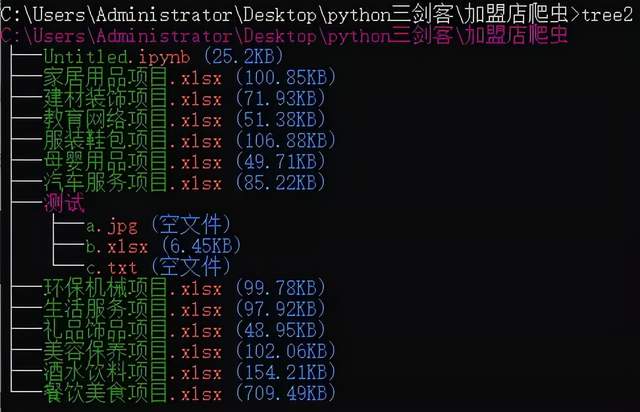
There are two commands: tree and tree2.
- If the local python priority of your system is higher than the priority of the system environment, directly execute the tree command;
- For your system, since the priority of the system environment is higher than that of the local python, in addition to adjusting the order of environment variables and modifying the priority, you can also use the tree2 command, which is consistent with the tree. But when you execute the tree command at this time, you can't see the effect;
Based on my computer, I will show you:

You can see: I execute the tree command here to display the system display before the library is installed.
This is because the system environment takes precedence over local python.

At this point, we can directly execute the tree2 command.
Of course, people don't like to execute commands in CMD window. Here, we directly perform the following operations in the Jupiter Notebook:
from treedir.tree import tree_dir
tree_dir(r"C:\Users\Administrator\Desktop\python Three swordsman\Franchise store crawler", m_level=7, no_calc=False)
The results are as follows:
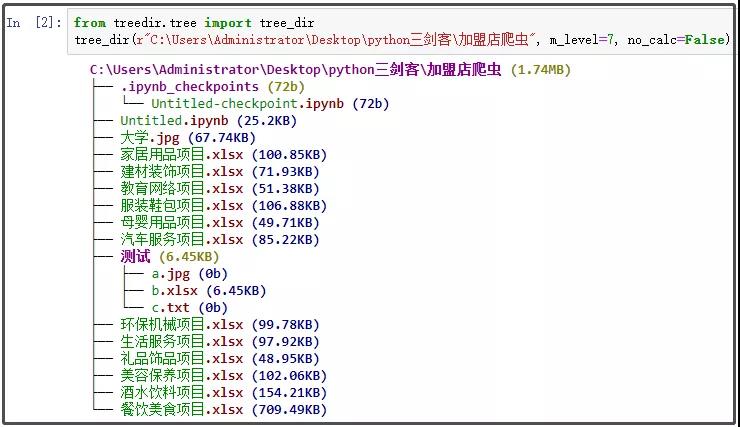
About tree_ The dir() function introduces the following three parameters:
- Path: the directory path displayed recursively. The default is the current directory;
- m_level: the maximum number of layers displayed recursively. The default is 7 layers;
- no_calc: after this parameter is specified, recursive calculation of folder size will not be continued for folders that exceed the maximum number of layers displayed recursively;
2. Comparison of text file differences
This function can help us compare the differences between the two files and output them to HTML web pages. For example, we wrote a piece of code and changed it later. However, due to too much code, we don't know where to change. At this time, using this function can help us compare well.
Let's take a look at such an example. I once had an a.txt file. After a period of time, I modified the contents and got the final b.txt.
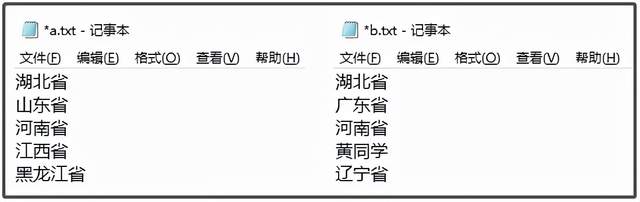
**Requirements: * * I want to see what changes have been made (if there are many contents)
from filediff.diff import file_diff_compare
file_diff_compare("a.txt", "b.txt")
This will generate an html web page file in the current working directory.
Double click to open and observe the contents:
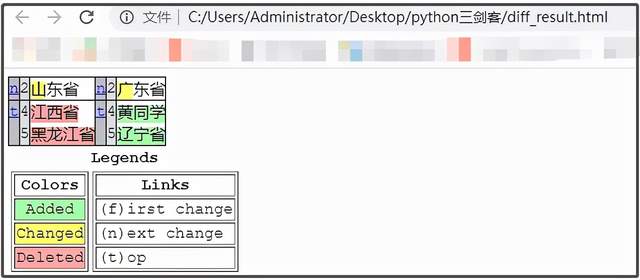
Where: yellow indicates the changed content, green indicates the newly added content, and red indicates the deleted content.
For file_ diff_ The compare() function has the following 7 parameters:
from filediff.diff import file_diff_compare
file_diff_compare(file1, file2, diff_out='diff_result.html', max_width=70, numlines=0, show_all=False, no_browser=False)
The seven parameters are described as follows:
- file1 / file2: two files to be compared, which must be text files;
- diff_out: the file name (web page format) for saving the difference result. The default value is diff_result.html;
- max_width: the number of characters in each line will automatically wrap. The default value is 70;
- numlines: the number of lines displayed before and after the difference line. The default value is 0;
- show_all: as long as this parameter is set, all original data will be displayed. At this time, the - n parameter is invalid, and all data will not be displayed by default;
- no_browser: setting this parameter will not automatically open the browser after generating the results. When set to False, the browser will be opened automatically;
3. Add watermark to the picture
This should be the best image watermarking code I've ever seen. Adding watermark to the image calls add_mark() function.
from watermarker.marker import add_mark

# Note: some parameters are default parameters and you can modify them at will;
add_mark(file, mark, out='output', color='#8B8B1B', size=30, opacity=0.15, space=75, angle=30)
About add_ The mark() function introduces the following 8 parameters:
- file: photo to be watermarked;
- mark: which words are used as watermark;
- out: the location saved after adding watermark;
- Color: the color of the watermark font, the default color #8B8B1B;
- Size: the size of the watermark font, which is 50 by default;
- opacity: transparency of watermark font, 0.15 by default;
- space: interval between watermark fonts, 75 spaces by default;
- Angle: rotation angle of watermark font, 30 degrees by default;
For example, we execute the following command:
from watermarker.marker import add_mark
add_mark(file=r"C:\Users\Administrator\Desktop\university.jpg", out=r"C:\Users\Administrator\Desktop\python Three swordsman\Franchise store crawler", mark="Classmate Huang", opacity=0.2, angle=30, space=30)
We want to give it to the University jpg adds a classmate Huang watermark, which is saved in the crawler folder of the franchise store. The transparency is 0.2, the rotation angle is 30 °, and the interval between Fonts is 30 °.
The original drawing is as follows:

The final effect is as follows:

4. curl network request to requests library request code
When writing crawlers, we often use some parameter information, such as:
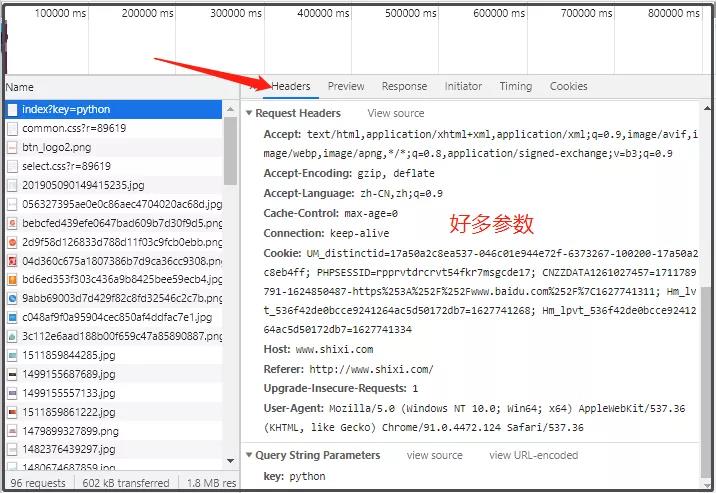
If you manually copy one by one, will it be very troublesome?
This function can solve this problem. It can convert cURL into Python code. We just need to copy it.
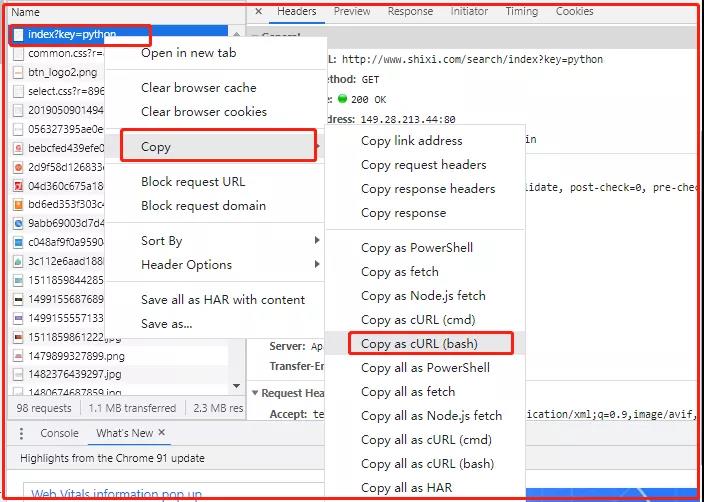
The general steps are as follows:
- First, in the Google viewer, copy the network request caught by the network as cURL(bash);
- II convert it into python code by curl2py command;
Take the Python post of internship network as an example.
http://www.shixi.com/search/index?key=python
According to the following figure, we copied the curl of a single request.
You can see that there are various request URLs, and then - H is followed by various parameters corresponding to the request. We need to copy the corresponding c url for which link we need to request.
Carefully observe the following figure:
After copying curl, you can paste it to see what you have.
curl 'http://www.shixi.com/search/index?key=python' \
  -H 'Connection: keep-alive' \
  -H 'Cache-Control: max-age=0' \
  -H 'Upgrade-Insecure-Requests: 1' \
  -H 'User-Agent: Mozilla/5.0 (Windows NT 10.0; Win64; x64) AppleWebKit/537.36 (KHTML, like Gecko) Chrome/91.0.4472.124 Safari/537.36' \
  -H 'Accept: text/html,application/xhtml+xml,application/xml;q=0.9,image/avif,image/webp,image/apng,*/*;q=0.8,application/signed-exchange;v=b3;q=0.9' \
  -H 'Referer: http://www.shixi.com/' \
  -H 'Accept-Language: zh-CN,zh;q=0.9' \
  -H 'Cookie: UM_distinctid=17a50a2c8ea537-046c01e944e72f-6373267-100200-17a50a2c8eb4ff; PHPSESSID=rpprvtdrcrvt54fkr7msgcde17; CNZZDATA1261027457=1711789791-1624850487-https%253A%252F%252Fwww.baidu.com%252F%7C1627741311; Hm_lvt_536f42de0bcce9241264ac5d50172db7=1627741268; Hm_lpvt_536f42de0bcce9241264ac5d50172db7=1627741334' \
  --compressed \
  --insecure
With the above curl, you can convert it into python code through the curl2py command.
from curl2py.curlParseTool import curlCmdGenPyScript

curl_cmd = """curl 'http://www.shixi.com/search/index?key=python' \
  -H 'Connection: keep-alive' \
  -H 'Cache-Control: max-age=0' \
  -H 'Upgrade-Insecure-Requests: 1' \
  -H 'User-Agent: Mozilla/5.0 (Windows NT 10.0; Win64; x64) AppleWebKit/537.36 (KHTML, like Gecko) Chrome/91.0.4472.124 Safari/537.36' \
  -H 'Accept: text/html,application/xhtml+xml,application/xml;q=0.9,image/avif,image/webp,image/apng,*/*;q=0.8,application/signed-exchange;v=b3;q=0.9' \
  -H 'Referer: http://www.shixi.com/' \
  -H 'Accept-Language: zh-CN,zh;q=0.9' \
  -H 'Cookie: UM_distinctid=17a50a2c8ea537-046c01e944e72f-6373267-100200-17a50a2c8eb4ff; PHPSESSID=rpprvtdrcrvt54fkr7msgcde17; CNZZDATA1261027457=1711789791-1624850487-https%253A%252F%252Fwww.baidu.com%252F%7C1627741311; Hm_lvt_536f42de0bcce9241264ac5d50172db7=1627741268; Hm_lpvt_536f42de0bcce9241264ac5d50172db7=1627741334' \
  --compressed \
  --insecure"""

output = curlCmdGenPyScript(curl_cmd)
print(output)
The final results are as follows:
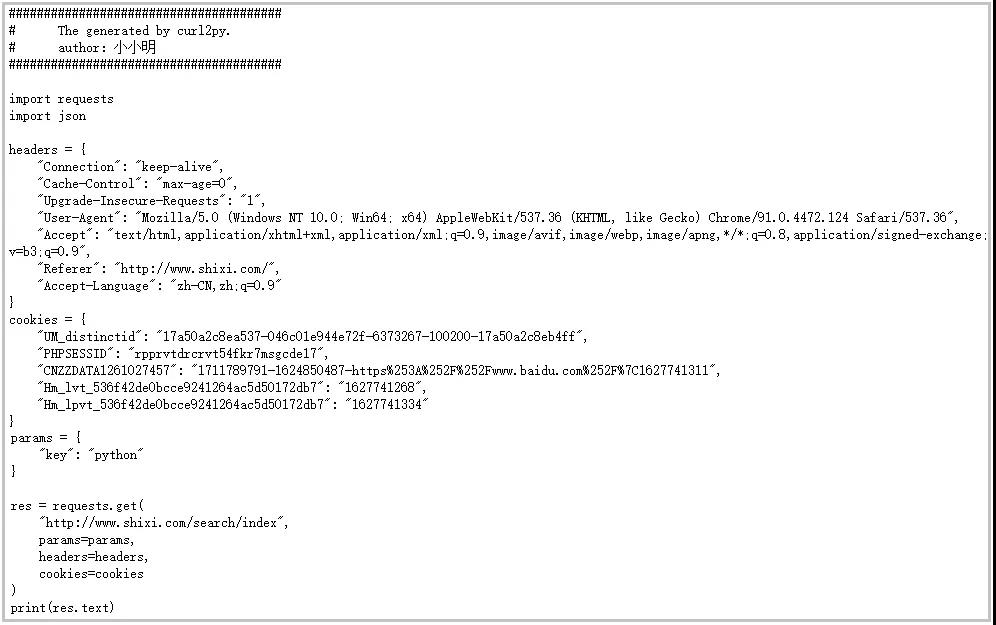
You can see that many parameters have been converted into regular Python code. We can just take them and use them directly. Is it very convenient.
If you think this article is helpful to you, remember not to forget 3 companies. Your affirmation will be the strongest driving force for me to continue to output more high-quality articles!