1.Mybatis:
First meet Mybatis:
Introduction to MyBatis
Environmental description:
- jdk 8 +
- MySQL 5.7.19
- maven-3.6.1
- IDEA
Before learning, you need to master:
- JDBC
- MySQL
- Java Foundation
- Maven
- Junit
What is Mybatis:
-
MyBatis is an excellent persistence layer framework
-
MyBatis avoids almost all JDBC code and the process of manually setting parameters and obtaining result sets
-
MyBatis can use simple XML or annotations to configure and map native information, and map the interface and Java entity class [Plain Old Java Objects] into records in the database.
-
MyBatis was originally an open source project ibatis of apache. In 2010, this project was migrated from apache to google code and renamed MyBatis.
-
Moved to Github in November 2013
-
Official documents of Mybatis: http://www.mybatis.org/mybatis-3/zh/index.html
-
GitHub : https://github.com/mybatis/mybatis-3
Persistence:
Persistence is a mechanism to convert program data between persistent state and transient state.
-
The main application of persistence is to store the objects in memory in the database, or in disk files, XML data files, etc.
-
JDBC is a persistence mechanism. File IO is also a persistence mechanism.
-
In life: refrigerate fresh meat and thaw it when eating. The same is true of canned fruit.
Why do you need persistence services? That is caused by the defect of memory itself
-
Data will be lost after memory power failure, but some objects cannot be lost anyway, such as bank accounts. Unfortunately, people can't guarantee that memory will never power down.
-
Memory is too expensive. Compared with external memory such as hard disk and optical disc, the price of memory is 2 ~ 3 orders of magnitude higher, and the maintenance cost is also high. At least it needs to be powered all the time. Therefore, even if the object does not need to be permanently saved, it will not stay in memory all the time due to the capacity limit of memory, and it needs to be persisted to cache to external memory.
Persistence layer:
What is persistence layer?
-
Code block to complete persistence. --- > Dao layer [DAO (Data Access Object)]
-
In most cases, especially for enterprise applications, data persistence often means saving the data in memory to disk for solidification, and the implementation process of persistence is mostly completed through various relational databases.
-
However, there is a word that needs special emphasis, that is, the so-called "layer". For application systems, data persistence is an essential part. In other words, our system has a natural concept of "persistence layer"? Maybe, but maybe that's not the case. The reason why we want to separate the concept of "persistence layer" instead of "persistence module" and "persistence unit" means that there should be a relatively independent logical level in our system architecture, focusing on the implementation of data persistence logic
- compared with other parts of the system, this level should have a clear and strict logical boundary. [to put it bluntly, it is used to operate the existence of the database!]
Why do you need Mybatis
-
Mybatis is to help the program store data in the database and get data from the database
-
Traditional jdbc operations have many repeated code blocks For example, the encapsulation of data extraction, the establishment and connection of database, etc. the framework can reduce duplicate code and improve development efficiency
-
MyBatis is a semi-automatic ORM framework (object relationship mapping) - > object relationship mapping
-
All things can still be done without Mybatis, but with it, all the implementation will be easier! There is no difference between high and low technology, only the people who use it
-
Advantages of MyBatis
-
Easy to learn: itself is small and simple. There is no third-party dependency. The simplest installation is just two jar files + several sql mapping files. It is easy to learn and use. Through documents and source code, you can fully master its design idea and implementation.
-
Flexibility: mybatis does not impose any impact on the existing design of the application or database. sql is written in xml for unified management and optimization. All requirements for operating the database can be met through sql statements.
-
Decouple sql and program code: by providing DAO layer, separate business logic and data access logic, so as to make the system design clearer, easier to maintain and easier to unit test. The separation of sql and code improves maintainability.
-
Provide xml tags to support writing dynamic sql.
-
...
-
-
Most importantly, many people use it! The company needs!
MyBatis first program
Thought process: build environment - > Import Mybatis - > write code - > test
-
Code demonstration:
-
Build experimental data
CREATE DATABASE `mybatis`;

USE `mybatis`;

DROP TABLE IF EXISTS `user`;

CREATE TABLE `user` (
  `id` int(20) NOT NULL,
  `name` varchar(30) DEFAULT NULL,
  `pwd` varchar(30) DEFAULT NULL,
  PRIMARY KEY (`id`)
) ENGINE=InnoDB DEFAULT CHARSET=utf8;

insert  into `user`(`id`,`name`,`pwd`) values (1,'Mad God','123456'),(2,'Zhang San','abcdef'),(3,'Li Si','987654');
-
Import MyBatis related jar package
- Find it on GitHub
<dependency>
    <groupId>org.mybatis</groupId>
    <artifactId>mybatis</artifactId>
    <version>3.5.2</version>
</dependency>
<dependency>
    <groupId>mysql</groupId>
    <artifactId>mysql-connector-java</artifactId>
    <version>5.1.47</version>
</dependency>
3. Write MyBatis core configuration file
- View help documentation
<?xml version="1.0" encoding="UTF-8" ?> <!DOCTYPE configuration PUBLIC "-//mybatis.org//DTD Config 3.0//EN" "http://mybatis.org/dtd/mybatis-3-config.dtd"> <configuration> <environments default="development"> <environment id="development"> <transactionManager type="JDBC"/> <dataSource type="POOLED"> <property name="driver" value="com.mysql.jdbc.Driver"/> <property name="url" value="jdbc:mysql://localhost:3306/mybatis?useSSL=true&useUnicode=true&characterEncoding=utf8"/> <property name="username" value="root"/> <property name="password" value="123456"/> </dataSource> </environment> </environments> <mappers> <mapper resource="com/kuang/dao/userMapper.xml"/> </mappers> </configuration>4. Write MyBatis tool class
- View help documentation
import org.apache.ibatis.io.Resources;
import org.apache.ibatis.session.SqlSession;
import org.apache.ibatis.session.SqlSessionFactory;
import org.apache.ibatis.session.SqlSessionFactoryBuilder;
import java.io.IOException;
import java.io.InputStream;
private static SqlSessionFactory sqlSessionFactory;

public class MybatisUtils {
static {
    try {
        String resource = "mybatis-config.xml";
        InputStream inputStream = Resources.getResourceAsStream(resource);
        sqlSessionFactory = new SqlSessionFactoryBuilder().build(inputStream);
    } catch (IOException e) {
        e.printStackTrace();
    }
}

//Get SqlSession connection
public static SqlSession getSession(){
    return sqlSessionFactory.openSession();
	}
}
5. Create entity class
public class User {

    private int id;  //id
    private String name;   //full name
    private String pwd;   //password

    //Structure, with and without parameters
    //set/get
    //toString()

}
6. Writing Mapper interface classes
import com.kuang.pojo.User;
import java.util.List;

public interface UserMapper {
    List<User> selectUser();
}
7. Write mapper XML configuration file
- namespace is very important. You can't write it wrong!
<?xml version="1.0" encoding="UTF-8" ?>
<!DOCTYPE mapper
        PUBLIC "-//mybatis.org//DTD Mapper 3.0//EN"
        "http://mybatis.org/dtd/mybatis-3-mapper.dtd">
<mapper namespace="com.kuang.dao.UserMapper">
  <select id="selectUser" resultType="com.kuang.pojo.User">
    select * from user
  </select>
</mapper>
8. Writing test classes
- Junit package test
public class MyTest {
    @Test
    public void selectUser() {
        SqlSession session = MybatisUtils.getSession();
        //Method 1:
        //List<User> users = session.selectList("com.kuang.mapper.UserMapper.selectUser");
        //Method 2:
        UserMapper mapper = session.getMapper(UserMapper.class);
        List<User> users = mapper.selectUser();

        for (User user: users){
            System.out.println(user);
        }
        session.close();
    }
}
9. Run the test and successfully query our data, ok!
-
Problem Description: (static filtering problem)
Possible problem description: Maven static resource filtering problem
Resource filtering problem:
Error: Java lang.ExceptionInInitializerError The error may exist in com/atguigu/dao/UserMapper. xml
maven, because his agreement is greater than the configuration, we may encounter the problem that the configuration file we wrote cannot be exported or take effect. Solution:
Configure resources in build to prevent the export failure of our resources:
<build>
    <resources>
        <resource>
            <directory>src/main/resources</directory>
            <includes>
                <include>**/*.properties</include>
                <include>**/*.xml</include>
            </includes>
            <filtering>true</filtering>
        </resource>
        <resource>
            <directory>src/main/java</directory>
            <includes>
                <include>**/*.properties</include>
                <include>**/*.xml</include>
            </includes>
            <filtering>true</filtering>
        </resource>
    </resources>
</build>
2. Note: error is reported.
org.apache.ibatis.binding.BindingException: Type interface com.atguigu.dao.UserDao is not known to the MapperRegistry.
<!--every last Mapper.xml All need to be in Mybatis Core profile registration-->
<mappers>
    <mapper resource="com/atguigu/dao/UserMapper.xml"></mapper>
</mappers>
2.CRUB
1.namespace:
The package name in the namespace should be consistent with the package name of Dao/mapper interface;
2.select:
Select, query statement;
1)id: is the method name in the corresponding namespace
2) resultType: return value of Sql statement execution.
3) parameterType: parameter type.
Write interface:
//Query user by ID
User getUserById(int n);
Write the sql statement in the corresponding mapper:
<select id="getUserById" resultType="com.atguigu.pojo.User" parameterType="int">
    select * from mybatis.user where id=#{id}
</select>
Test:
@Test
public void getUserById(){
    //Step 1: get the object of sqlSession
    SqlSession sqlSession = MybatisUtils.getSqlSession();

    UserDao mapper = sqlSession.getMapper(UserDao.class);
    User user = mapper.getUserById(1);
    System.out.println(user);

    sqlSession.close();

}
3.insert
<insert id="addUser" parameterType="com.atguigu.pojo.User">
    insert into mybatis.user(id,name,pwd)values(#{id},#{name},#{pwd})
</insert>
4.update
<update id="upDate" parameterType="com.atguigu.pojo.User">
    update mybatis.user set name = #{name},pwd = #{pwd} where id= #{id}
</update>
5.delete
<delete id="deleteUser" parameterType="int">
    delete from mybatis.user where id = #{id}
</delete>
matters needing attention:
//Transactions need to be committed when adding, deleting or modifying
sqlSession.commit();

//After all data operations are completed, you need to close the database
sqlSession.close();
1. Universal map
Assuming that there are too many entity classes or tables, fields or parameters in the database, we should consider using Map;
//Omnipotent map
int addUser2(Map<String , Object> map);
<insert id="addUser2" parameterType="map">
    insert into mybatis.user(id,name,pwd)values(#{userId},#{userName},#{passWord})
</insert>
@Test
public void addUser2(){
    //Step 1: get the object of sqlSession
    SqlSession sqlSession = MybatisUtils.getSqlSession();

    UserDao mapper = sqlSession.getMapper(UserDao.class);

    Map<String,Object> map = new HashMap<>();
    map.put("userId",5);
    map.put("userName","Hello");
    map.put("passWord","123456");

    mapper.addUser2(map);

    //Commit transaction
    sqlSession.commit();
    //close database
    sqlSession.close();
}
Pass parameters from map and directly get the key from sql! [parameterType=“map”]
Object transfer parameters, you can directly get the object attributes in sql! [parameterType=“Object”]
If there is only one basic type parameter, you can get it directly in sql.
Map is used for multiple parameters. Or comment!
2. Thinking questions:
How to write fuzzy query?
1. When executing java code, pass wildcard%%;
List<User> userList = userMapper.getUserLike("%Chen%");
2. Use wildcards in sql splicing!
3. Configuration resolution
1. Core profile
-
mybatis-config.xml
-
The Mybatis configuration file contains settings and attribute information that will deeply affect Mybatis behavior;
-
configuration (type processor, object factory, plug-in do not need to understand)
- properties
- settings
- typeAliases
- typeHandlers
- objectFactory (object factory)
- plugins
- environments
- Environment (environment variable)
- Transaction manager
- dataSource
- Environment (environment variable)
- databaseIdProvider (database vendor ID)
- mappers
2. environment configuration
Mybatis can be configured to adapt to a variety of environments
However, keep in mind that although multiple environments can be configured, only one environment can be selected for each SqlSessionFactory instance
Learn to use and configure multiple operating environments
The default transaction manager of Mybatis is JDBC, connection pool and POOLED
3. properties
We can implement the application configuration file through the properties property
These properties are configured outside the classroom and can be replaced dynamically. They can be configured either in a typical java property file or through the child elements of the properties element. [db.properties]
Write a configuration file:
In xml. All labels can be ordered. Don't Scribble at will
db.properties
driver=com.mysql.jdbc.Driver
url=jdbc:mysql://localhost:3306/mybatis?useSSL=true&useUnicode=true&characterEncoding=UTF-8
username=root
password=123456
Import in core configuration file
<properties resource="db.properties">
    <property name="password" value="123456"/>
</properties>
- You can import external files directly;
- You can add some attribute configurations
- If two files have the same field, the external configuration file is preferred!
4. Type aliases
- A type alias is a short name for a java type
- The significance of existence is only to reduce the complexity of fully qualified class names
<!--You can give an entity class its alias-->
<typeAliases>
    <typeAlias type="com.atguigu.pojo.User" alias="User"></typeAlias>
</typeAliases>
You can also specify a package name. MyBatis will search for the required Java beans under the package name, such as:
Scan the package of entity class. Its default alias is the class name of this class. The first letter should be lowercase!
//Or it can be written like this
<typeAliases>
    <package name="com.atguigu.pojo"/>
</typeAliases>
- The first method is used when there are few entity classes
- If there are many entity classes, the second one is recommended
- The first can be a DIY (user-defined) alias, but the second can't. If you have to change it, you need to add annotations on the entity class.
@Alias("user")
public class User {
5. Setting
These are important tuning settings in Mybatis, which change the runtime behavior of Mybatis.
6. Ejector
MapperRedistry: register and bind our Mapper file
Method 1: use resource (recommended)
<!--every last Mapper.xml All need to be in Mybatis Core profile registration-->
<mappers>
    <mapper resource="com/atguigu/dao/UserMapper.xml"></mapper>
</mappers>
Method 2: register with class file binding
    <!--every last Mapper.xml All need to be in Mybatis Core profile registration-->
    <mappers>
        <mapper class="com.atguigu.dao.UserMapper"></mapper>
    </mappers>
Note:
- Interface and its Mapper configuration file must have the same name;
- The interface and its Mapper configuration file must be in the same package;
Method 3: register and bind using scanning package:
    <!--every last Mapper.xml All need to be in Mybatis Core profile registration-->
    <mappers>
        <package name="com.atguigu.dao"/>
    </mappers>
Note:
- Interface and its Mapper configuration file must have the same name;
- The interface and its Mapper configuration file must be in the same package;
7. Life cycle and scope:
Different scopes and lifecycle categories are critical because incorrect use can lead to very serious problems.
[the external chain image transfer fails. The source station may have an anti-theft chain mechanism. It is recommended to save the image and upload it directly (img-qbjyiwtf-1629597023308) (C: / users / 16337 / appdata / roaming / typora user images / image-20210813165233899. PNG)]
SqlSessionFactoryBuilder:
-
Once SqlSessionFactory is created, it is not needed;
-
local variable
SqlSessionFactory:
-
To put it bluntly, it can be imagined as: database connection pool
-
Once SqlSessionFactory is created, it should always exist during the application. There is no reason to discard or recreate another instance
-
Because the best scope of SqlSessionFactory is the application scope.
-
The simplest is to use singleton mode or static singleton mode.
SqlSession:
- A request linked to the connection pool!
- The instance of SqlSession is not thread safe, so it cannot be shared, so its best scope is the request or method scope
- After use, it needs to be shut down quickly, otherwise resources will be wasted.
[the external chain image transfer fails. The source station may have an anti-theft chain mechanism. It is recommended to save the image and upload it directly (img-hemk3dbu-1629597023310) (C: / users / 16337 / appdata / roaming / typora user images / image-20210813170503671. PNG)]
Each Mapper in this represents a specific business!
4. Solve the inconsistency between attribute name and field name:
1. Fields in the database:
[the external chain image transfer fails. The source station may have an anti-theft chain mechanism. It is recommended to save the image and upload it directly (img-pvdkhgmw-1629597023311) (C: / users / 16337 / appdata / roaming / typora / typora user images / image-20210813200558598. PNG)]
Create a new folder and test the inconsistency of entity class fields before copying.
[the external chain image transfer fails. The source station may have an anti-theft chain mechanism. It is recommended to save the image and upload it directly (img-etsc068e-1629597023313) (C: / users / 16337 / appdata / roaming / typora / typora user images / image-20210813200727057. PNG)]
Test problems:
The value in the last password is null;
//select * from mybatis.user where id=#{id}
//Type processor
//select  id,name,pwd mybatis.user where id=#{id}
resolvent;
- Its alias:
<select id="getUserById" resultMap="UserMap">
    //select  id,name,pwd as password mybatis.user where id=#{id}
</select>
2.resultMap
Result set mapping
id name pwd
id name password
<!--Result set mapping  id: resultMap hinder, type: return type-->
<resultMap id="UserMap" type="User">
    <!--column:Fields in the database, property Properties in entity classes-->
    <result column="id" property="id"></result>
    <result column="name" property="name"></result>
    <result column="pwd" property="password"></result>
</resultMap>

<select id="getUserById" resultMap="UserMap">
    select * from mybatis.user where id=#{id}
</select>
- The resultMap element is the most important and powerful element in Mybatis
- The design idea of ResultMap is that there is no need to configure the displayed result map for simple statements, but only need to describe their relationship for more complex statements.
- The best thing about ResultMap is that although you already know it well, you don't need to explicitly use them at all.
- If only the world were always so simple.
5. Log
1. Log factory (based on iogImpl in configuration file settings)
If an exception occurs in a database operation, we need to shoot the error. The log is the best assistant!
Once: South, debug
Now: log factory!
[the external chain image transfer fails. The source station may have an anti-theft chain mechanism. It is recommended to save the image and upload it directly (img-3l0jhl5o-1629597023315) (C: / users / 16337 / appdata / roaming / typora user images / image-20210813215837775. PNG)]
- SLF4J
- LOG4J [Master]
- LOG4J2
- JDK_LOGGING
- COMMONS_LOGGING
- STDOUT_LOGGING [mastering]
- NO_LOGGING
The specific log implementation used in mybatis is set in settings!
STDOUT_LOGGING standard log output
Configure our logs in the mybatis core configuration file;
<settings>
    <!--Standard log factory implementation-->
    <setting name="logImpl" value="STDOUT_LOGGING"/>
</settings>
[the external chain image transfer fails. The source station may have an anti-theft chain mechanism. It is recommended to save the image and upload it directly (img-fteoxyca-1629597023316) (C: / users / 16337 / appdata / roaming / typora / typora user images / image-20210813221700813. PNG)]
2.LOG4J:
What is LOG4J:
- Log4j yes Apache By using Log4j, we can control the destination of log information delivery Console , documents GUI assembly
- We can also control the output format of each log
- By defining the level of each log information, we can control the log generation process in more detail.
- Through a configuration file To flexibly configure without modifying the application code.
1. Import the package of LOG4J first;
<!-- https://mvnrepository.com/artifact/log4j/log4j -->
<dependency>
    <groupId>log4j</groupId>
    <artifactId>log4j</artifactId>
    <version>1.2.17</version>
</dependency>
2. Configuration file of logj:
#Output the log information with the level of DEBUG to the two destinations of console and file. The definitions of console and file are in the following code
log4j.rootLogger=DEBUG,console,file

#Settings related to console output
log4j.appender.console = org.apache.log4j.ConsoleAppender
log4j.appender.console.Target = System.out
log4j.appender.console.Threshold=DEBUG
log4j.appender.console.layout = org.apache.log4j.PatternLayout
log4j.appender.console.layout.ConversionPattern=[%c]-%m%n

#Settings related to file output
log4j.appender.file = org.apache.log4j.RollingFileAppender
log4j.appender.file.File=./log/atguigu.log
log4j.appender.file.MaxFileSize=10mb
log4j.appender.file.Threshold=DEBUG
log4j.appender.file.layout=org.apache.log4j.PatternLayout
log4j.appender.file.layout.ConversionPattern=[%p][%d{yy-MM-dd}][%c]%m%n

#Log output level
log4j.logger.org.mybatis=DEBUG
log4j.logger.java.sql=DEBUG
log4j.logger.java.sql.Statement=DEBUG
log4j.logger.java.sql.ResultSet=DEBUG
log4j.logger.java.sql.PreparedStatement=DEBUG
3. Configure log4j as the implementation of log:
 <settings>
        <!--Standard log factory implementation-->
		<!--<setting name="logImpl" value="STDOUT_LOGGING"/>-->
        <setting name="logImpl" value="LOG4J"/>
    </settings>
4. Use of log4: directly test and run the query just now.
[the external chain image transfer fails. The source station may have an anti-theft chain mechanism. It is recommended to save the image and upload it directly (img-c2z0d6tz-1629597023317) (C: / users / 16337 / appdata / roaming / typora user images / image-20210814142901324. PNG)]
Simple use:
1. In the class of Log4j to be used, import the package import org. apache.log4 j.Logger;
2. Log object. The parameter is the class of the current class
static Logger logger = Logger.getLogger(UserDaoTest.class);
3. Log level:
logger.info("info:Entered testLog4j");
logger.debug("debug:Entered testLog4j");
logger.error("error:Entered testLog4j");
6. Pagination
1. Use Limit paging;
Syntax: SELECT * FROM USER LIMIT STARTINDEX,PAGESIZE;
select * from user limit 3;   amount to[0,3]
Pagination using Mybatis, core SQL
1. Interface:
//paging
List<User> getUserByLimit(Map<String,Integer> map);
2.Mapper.xml
<!--paging-->
<select id="getUserByLimit" parameter="map" resultMap="userMap">
    select * from mybatis.user Limit #{startIndex},#{pageSize}
</select>
3. Test:
@Test
public void getUserByLimit(){
    SqlSession sqlSession = MybatisUtils.getSqlSession();
    UserMapper mapper = sqlSession.getMapper(UserMapper.class);
    HashMap<String, Integer> map = new HashMap<>();
    map.put("startIndex",1);
    map.put("pageSize",2);

    List<User> userByLimit = mapper.getUserByLimit(map);
    for (User user : userByLimit) {
        System.out.println(user);
    }
}
7. Development using annotations:
1. Annotation is implemented on the interface:
//Use annotations to query users
@Select("select * from user")
List <User> getUsers();
2. The interface needs to be bound in the core configuration file:
<!--Binding interface-->
<mappers>
    <mapper class="com.atguigu.dao.UserMapper"></mapper>
</mappers>
3. Test;
Essence: reflection mechanism implementation
Bottom layer: dynamic agent;
[the external chain picture transfer fails. The source station may have an anti-theft chain mechanism. It is recommended to save the picture and upload it directly (img-st2oyceo-1629597023318) (flowchart. png)]
Use annotations to add, delete, modify and query
We can automatically commit transactions when the tool class is created!
//Now that we have SqlSessionFactory, as the name suggests, we can get an instance of SqlSession from it.
    // SqlSession provides all the methods required to execute SQL commands in the database.
    public static SqlSession getSqlSession(){
        return sqlSessionFactory.openSession(true);//Add the parameter true to auto submit;
    }
Write the interface and add comments
public interface UserMapper {
    //Use annotations to query users
    @Select("select * from user")
    List <User> getUsers();

    //When there are multiple parameters in a method, all parameters must be preceded by the @ param ("parameter name") annotation; the premise is the basic type or String type.
    @Select("select * from user where id = #{id}")
    User getUserByID(@Param("id") int id);

    @Insert("insert into user(id,name,pwd) values (#{id},#{name},#{password})")
    int addUser(User user);

    @Update("update user set name=#{name},pwd=#{password} where id = #{id}")
    int updateUser(User user);

    @Delete("delete from user where id = #{id}")
    int deleteUser(@Param("id") int id);
}
Test:
[Note: we must bind the interface registration to our core configuration file! Note the difference between resource and class]
About @ Param() annotation
- Parameters of basic type or String type need to be added
- Reference types do not need to be added
- If there is only one basic type, it can be ignored, but it is recommended that everyone add it
- What we refer to in SQL is the attribute name set in @ Param();
8.Locbok()
Standby: it mainly simplifies the code amount of entity class (pojo)
1. Use steps:
-
Install the Locbok plug-in in the IDEA
-
Import the jar package of lombok in the project
<!-- https://mvnrepository.com/artifact/org.projectlombok/lombok -->
<dependency>
    <groupId>org.projectlombok</groupId>
    <artifactId>lombok</artifactId>
    <version>1.18.20</version>
</dependency>
- Annotate the entity class:
@Data  //Build getter setting toString method
@AllArgsConstructor//Construct parametric structure
@NoArgsConstructor//Construct parameterless structure
@Getter and @Setter
@FieldNameConstants
@ToString
@EqualsAndHashCode
@AllArgsConstructor, @RequiredArgsConstructor and @NoArgsConstructor
@Log, @Log4j, @Log4j2, @Slf4j, @XSlf4j, @CommonsLog, @JBossLog, @Flogger, @CustomLog
@Data
@Builder
@SuperBuilder
@Singular
@Delegate
@Value
@Accessors
@Wither
@With
@SneakyThrows
@Date: parameterless construction, get, set, toString,hashcode,equals
9. Many to one processing
Many to one:
[the external chain image transfer fails. The source station may have an anti-theft chain mechanism. It is recommended to save the image and upload it directly (img-hccsyvsh-1629597023319) (C: / users / 16337 / appdata / roaming / typora user images / image-20210816145605246. PNG)]
- Multiple students correspond to one teacher
- For students, multiple students and one teacher (many to one)
- For teachers, a collection, a teacher, has many students (one to many)
SQL:
CREATE TABLE `teacher` (
  `id` INT(10) NOT NULL,
  `name` VARCHAR(30) DEFAULT NULL,
  PRIMARY KEY (`id`)
) ENGINE=INNODB DEFAULT CHARSET=utf8

INSERT INTO teacher(`id`, `name`) VALUES (1, Miss Qin);

CREATE TABLE `student` (
  `id` INT(10) NOT NULL,
  `name` VARCHAR(30) DEFAULT NULL,
  `tid` INT(10) DEFAULT NULL,
  PRIMARY KEY (`id`),
  KEY `fktid` (`tid`),
  CONSTRAINT `fktid` FOREIGN KEY (`tid`) REFERENCES `teacher` (`id`)
) ENGINE=INNODB DEFAULT CHARSET=utf8INSERT INTO `student` (`id`, `name`, `tid`) VALUES (1, Xiao Ming, 1);
INSERT INTO `student` (`id`, `name`, `tid`) VALUES (2, Xiao Hong, 1);
INSERT INTO `student` (`id`, `name`, `tid`) VALUES (3, Xiao Zhang, 1);
INSERT INTO `student` (`id`, `name`, `tid`) VALUES (4, petty thief, 1);
INSERT INTO `student` (`id`, `name`, `tid`) VALUES (5, Xiao Wang, 1);
Test environment construction
1. Import lombok
2. Create a new entity class Teacher, Student
3. Establish Mapper interface
4. Create mapper XML file
5. Bind and register our Mapper interface or rule file in the core configuration file! [there are many ways to choose]
6. Test whether the query is successful!
Nested processing by query
    <!--
    Idea:
        1.Query all student information
        2.According to the student's tid,Find the corresponding teacher! Similar to subquery;
    -->
    <select id="getStudent" resultMap="StudentTeacher">
        select * from student
    </select>
    <resultMap id="StudentTeacher" type="Student">
        <result property="id" column="id"></result>
        <result property="name" column="name"></result>
        <!--For complex properties, we need to deal with objects separately: association   Set: collection-->
        <association property="teacher" column="tid" javaType="Teacher" 		       select="getTeacher"></association>
    </resultMap>

    <select id="getTeacher" resultType="Teacher">
        select * from teacher where id = #{id}
    </select>
Review the Mysql many to one query method:
- Subquery
- Join table query
10 one to many processing
For example, a teacher has multiple students
For teachers, it is a one to many relationship
Environment construction
1. Environment construction, as before, rapid construction:
Entity class:
@Data
@AllArgsConstructor
@NoArgsConstructor
public class Student {
    private int id;
    private String name;

    //Students need to associate with a teacher
    private int tid;
}
@Data
@NoArgsConstructor
@AllArgsConstructor
public class Teacher {
    private int id;
    private String name;

    //A teacher has many students
    private List<Student> students;
}
Nested query by result
<!--Nested query by result-->
    <select id="getTeacher" resultMap="TeacherStudent">
        select s.id sid,s.name sname,t.name tname,t.id tid
        from student s,teacher t
        where s.tid = t.id and t.id = #{tid}
    </select>

    <resultMap id="TeacherStudent" type="Teacher">
        <result property="id" column="tid"></result>
        <result property="name" column="tname"></result>
        <!--For complex properties, we need to deal with objects separately: association   Set: collection
        javaType="" Specifies the type of the property
        Collection, we use ofType obtain;
        -->
        <collection property="students" ofType="Student">
            <result property="id" column="sid"></result>
            <result property="name" column="sname"></result>
            <result property="tid" column="tid"></result>
        </collection>
    </resultMap>
Nested processing by query
    <!--Nested processing by query-->
    <select id="getTeaacher2" resultMap="TeacherStudent2">
        select * from mybatis.teacher where id = #{tid}
    </select>

    <resultMap id="TeacherStudent2" type="Teacher">
        <collection property="students" javaType="ArrayList" ofType="Student" select="getStudentByTeacherId" column="id">

        </collection>
    </resultMap>

    <select id="getStudentByTeacherId" resultType="Student">
        select * from mybatis.student where tid = #{tid}
    </select>
Summary:
- association - association [many to one]
- Set - collection [one to many]
- javaType & ofType
- javaType is used to specify the type of attribute in the entity class
- ofType is used to specify the pojo type mapped to the List or collection, and the constraint type in the generic type!
Note:
-
Ensure the readability of SQL and make it easy to understand as much as possible
-
Note the problem of attribute name and field name in one to many and many to one
-
If the problem is not good, troubleshoot the error. Logs can be used. Log4j is recommended
11. Dynamic SQL
What is dynamic SQL: dynamic SQL refers to generating different SQL statements according to different conditions
Dynamic SQL is one of the powerful features of MyBatis. If you have used JDBC or other similar frameworks, you should be able to understand how painful it is to splice SQL statements according to different conditions. For example, when splicing, make sure you can't forget to add the necessary spaces and remove the comma of the last column name in the list. Using dynamic SQL, you can completely get rid of this pain.
dynamic SQL Elements may feel deja vu. stay MyBatis In previous releases, it took time to understand a large number of elements. With powerful OGNL Expression for, MyBatis 3 Most of the previous elements have been replaced, and the element types have been greatly simplified. Now there are fewer element types to learn than half of the original ones.
   	if
	choose (when, otherwise)
	trim (where, set)
	foreach
Build environment
CREATE TABLE `blog`(
`id` VARCHAR(50) NOT NULL COMMENT Blog id,
`title` VARCHAR(100) NOT NULL COMMENT Blog title,
`author` VARCHAR(30) NOT NULL COMMENT Blogger,
`create_time` DATETIME NOT NULL COMMENT Creation time,
`views` INT(30) NOT NULL COMMENT Views
)ENGINE=INNODB DEFAULT CHARSET=utf8
Create a basic project
- Guide Package
- Write configuration file
- Writing entity classes
- Write Mapper interface and Mapper.XML corresponding to entity class XML file
IF
    <select id="queryBlogIf" parameterType="map" resultType="Blog">
        select * from mybatis.blog where 1=1
        <if test="title != null">
            and title = #{title}
        </if>
        <if test="author != null">
            and author = #{author}
        </if>
    </select>
choose(where.set)
Similar to switch case: only one item will be spliced.
    <select id="queryBlogChoose" resultType="Blog" parameterType="map">
-- //when: equivalent to the case in switch case,otherwise equivalent to default. Only the first item shall be spliced;
        select * from mybatis.blog
        <where>
            <choose>
                <when test="title!=null">
                    title = #{title}
                </when>
                <when test="author!=null">
                    author = #{author}
                </when>
                <otherwise>
                    and views = #{views}
                </otherwise>
            </choose>
        </where>
    </select>
trim(where,set)
where: prevent problems in splicing strings; (the first splicing keyword can be omitted)
<select id="queryBlogIf" parameterType="map" resultType="Blog">
    select * from mybatis.blog
    <where>
    <if test="title != null">
        and title = #{title}
    </if>
    <if test="author != null">
        and author = #{author}
    </if>
    </where>
</select>
set:
<update id="updateBlog" parameterType="map">
    update mybatis.blog
    <set>
        <if test="title !=null">
            title = #{title}
        </if>
        <if test="author !=null">
            author = #{author}
        </if>
    </set>
    where id = #{id}
</update>
The so-called dynamic SQL is still an SQL statement in essence, but we can execute a logical code at the SQL level
if where set choose when
SQL fragment:
Sometimes, we may extract some functions for easy use
1. Use SQL tags to extract common parts
<sql id="if_title_author">
        <if test="title != null">
            and title = #{title}
        </if>
        <if test="author != null">
            and author = #{author}
        </if>
    </sql>
2. Use the include tag reference where necessary
 	<select id="queryBlogIf" parameterType="map" resultType="Blog">
        select * from mybatis.blog
        <where>
            <include refid="if_title_author"></include>
        </where>
    </select>
matters needing attention:
1. It is best to define SQL fragments based on forms!
2. Do not have a where tag
Foreach:
Another common use scenario of dynamic SQL is to traverse the collection (especially when constructing IN conditional statements). For example:
<select id="selectPostIn" resultType="domain.blog.Post">
  SELECT *
  FROM POST P
  WHERE ID in
  <foreach item="item" index="index" collection="list"
      open="(" separator="," close=")">
        #{item}
  </foreach>
</select>
The foreach element is very powerful. It allows you to specify a collection and declare the collection items and index variables that can be used in the element body. It also allows you to specify the separators between the beginning and end strings and the iteration of collection items. This element will not add redundant separators by mistake. See how smart it is!
Tip: you can pass any iteratable object (such as List, Set, etc.), Map object or array object as a Set parameter to foreach. When using an iteratable object or array, index is the sequence number of the current iteration, and the value of item is the element obtained in this iteration. When using a Map object (or a collection of Map.Entry objects), index is the key and item is the value.
So far, we have completed the discussion related to XML configuration and mapping files. The next chapter will explore the Java API in detail so that you can make full use of the mapping configuration you have created.
[the external chain image transfer fails. The source station may have an anti-theft chain mechanism. It is recommended to save the image and upload it directly (img-2egwsfxm-1629597023320) (C: / users / 16337 / appdata / roaming / typora / typora user images / image-20210817214121363. PNG)]
    <!--
    select * from mybatis.blog where 1=1 and (id=1 or id = 2 or id = 3)
    We are now passing on a universal message map,this map There can be a collection in!
    -->
    <select id="queryBlogForeach" parameterType="map" resultType="Blog">
        select * from mybatis.blog
        <where>
            <foreach collection="ids" item="id" open="and (" close=")" separator="or">
                id = #{id}
            </foreach>
        </where>
    </select>
Dynamic SQL is splicing SQL statements. We just need to ensure the correctness of SQL and arrange and combine according to the format of SQL
Recommendations:
- Now write the complete SQL in Mysql. In the corresponding modification, it can become our common dynamic SQL implementation
12. Cache (understand)
1. Introduction
Query: connect to the database and consume resources!
    The result of a query will be temporarily stored in a place that can be directly accessed!-->Memory: caching

    When we query the same data again, we directly use the cache instead of the database
[the external chain image transfer fails. The source station may have an anti-theft chain mechanism. It is recommended to save the image and upload it directly (img-ldhgtcyd-1629597023321) (C: / users / 16337 / appdata / roaming / typora user images / image-20210817215818989. PNG)]
2.Mybatis cache
- Mybatis contains a very powerful query caching feature, which can easily customize and configure the cache, and the cache can greatly improve the query efficiency.
- Two levels of cache are defined by default in the Mybatis system: one set cache and two-level cache
- By default. Only L1 cache is on. (SqlSession level cache, also known as local cache)
- L2 cache needs to be manually enabled and configured. It is based on namespace level cache
- In order to improve scalability, Mybatis defines the Cache interface Cache. We can customize the L2 Cache by implementing the Cache interface
3. L1 cache
- L1 cache is also called local cache
- The data queried during the same session with the database will be placed in the local cache.
- In the future, if you need to obtain the same data, you can get it directly from the cache. There is no need to query the database;
Test:
-
Open log
-
The test queries the same record twice in a SqlSession
-
View log output:
-
[the external chain image transfer fails. The source station may have an anti-theft chain mechanism. It is recommended to save the image and upload it directly (img-nb6tfnfk-1629597023322) (C: / users / 16337 / appdata / roaming / typora user images / image-20210818090835086. PNG)]
-
Cache invalidation:
-
Query different things
-
Adding, deleting and modifying may change the original data, so the cache must be refreshed.
-
Query different mapper xml
-
Manual cache cleanup
[the external chain image transfer fails. The source station may have an anti-theft chain mechanism. It is recommended to save the image and upload it directly (img-v81huwlw-1629597023323) (C: / users / 16337 / appdata / roaming / typora / typora user images / image-20210818092104783. PNG)]
-
Summary:
The L1 cache is enabled by default and is only valid for one SqlSession, that is, the interval from getting the connection to closing the connection!
4. L2 cache
-
Headphone cache is also called global cache. The scope of L1 cache is too low, so L2 cache is born.
-
Based on the namespace level cache, a namespace corresponds to a L2 cache;
-
Working mechanism
- When a session queries a piece of data, the data will be placed in the first level cache of the current session
-
If the current session is closed, the L1 cache corresponding to the session is gone; But what we want is that the session is closed and the data in the L1 cache is saved to the L2 cache;
- The new session query information can get the content from the L2 cache;
-
The data investigated by different mapper s will be placed in their corresponding cache (map);
Steps:
-
Enable global cache: configure in the core configuration file;
<setting name="cacheEnables" value="true"/>
-
Turn on in Mapper where you want to use L2 cache
 <!--At present Mapper.xml Using L2 cache in-->
 <cache/>
You can also customize parameters:
<cache eviction="FIFO" flushInterval="60000" readOnly="true" size="512"/> -
Test: problem: we need to serialize the entity class! Otherwise, an error will be reported!
[the external chain image transfer fails. The source station may have an anti-theft chain mechanism. It is recommended to save the image and upload it directly (img-wjrrorus-1629597023324) (C: / users / 16337 / appdata / roaming / typora user images / image-20210818104709874. PNG)]
Summary:
- As long as the L2 cache is enabled, it is useful in the same Mapper
- All data will be put in the first level cache first;
- Only when the session is committed or closed will it be committed to the L2 cache.
5. Cache principle
[the external chain image transfer fails. The source station may have an anti-theft chain mechanism. It is recommended to save the image and upload it directly (IMG rikkpylz-1629597023325) (C: / users / 16337 / appdata / roaming / typora user images / image-20210818105542912. PNG)]
proxy pattern
Why learn agent mode? Because this is the bottom layer of spring AOP (spring AOP and spring MVC)
Classification of agent mode:
- Static proxy
- Dynamic agent
[the external chain image transfer fails. The source station may have an anti-theft chain mechanism. It is recommended to save the image and upload it directly (img-6rqvbrvm-1629597023326) (C: / users / 16337 / appdata / roaming / typora user images / image-20210818153604064. PNG)]
1. Static agent:
Role analysis:
- Abstract role: it is usually solved by using interfaces or abstract classes
- Real role: the role represented
- Agent role: represent the real role. After representing the real role, we usually do some ancillary operations
- Customer: the person who accesses the proxy object!
Code steps:
-
Interface
//Rent a house public interface Rent { public void rent(); } -
Real role
//landlord or landlady public class Host implements Rent{ public void rent(){ System.out.println("The landlord wants to rent the house!"); } } -
delegable role
public class Proxy { private Host host; public Proxy() { } public Proxy(Host host) { this.host = host; } public void rent(){ host.rent(); seeHouse(); hetong(); fare(); } //House viewing public void seeHouse(){ System.out.println("The agent will show you the house!"); } //sign a contract public void hetong(){ System.out.println("The intermediary will take you to sign the contract!"); } //House viewing public void fare(){ System.out.println("Charge intermediary fee!"); } } -
Client access agent role
public class Client {
    public static void main(String[] args) {
        //The landlord wants to rent a house
        Host host = new Host();
        //Agents and intermediaries help the landlord rent a house, but what? Agent roles generally have some subsidiary operations
        Proxy proxy = new Proxy();

        //You don't have to face the landlord, just find an intermediary to rent a house!
        proxy.rent();
    }
}
Benefits of agent mode:
- It can make the operation of real characters more pure! Don't pay attention to some public business
- Public is to hand over the role of agent to realize the division of business!
- When the public business is expanded, it is convenient for centralized management
Disadvantages:
- A real role will produce an agent introduction; The amount of code will double and the development efficiency will be low.
Learn about Aop
[the external chain image transfer fails. The source station may have an anti-theft chain mechanism. It is recommended to save the image and upload it directly (img-jkic72b9-1629597023326) (C: / users / 16337 / appdata / roaming / typora / typora user images / image-20210818163802395. PNG)]
2. Dynamic agent
- Dynamic agents have the same role as static agents
- The agent class of dynamic agent is dynamically generated, which is not written directly by us!
- Dynamic agents are divided into two categories: interface based dynamic agents and class based dynamic agents
- Interface based JDK dynamic agent
- Class based: cglib
- java bytecode implementation: javasist
Two classes need to be understood: Proxy: Proxy, InvocationHandler: calling handler
Benefits of dynamic agents:
- It can make the operation of real characters more pure! Don't pay attention to some public business
- Public is to hand over the role of agent to realize the division of business!
- When the public business is expanded, it is convenient for centralized management
- A dynamic agent is an interface, which generally corresponds to a type of business
Integrate Mybatis
Steps:
1. Import relevant jar packages
- junit
- mybatis
- mysql database
- spring related
- aop weaving
- mybatis-spring[new]
<!--integration mybatis and Spring Desired bag-->
    <dependencies>
        <dependency>
            <groupId>junit</groupId>
            <artifactId>junit</artifactId>
            <version>4.13.1</version>
        </dependency>
        <dependency>
            <groupId>mysql</groupId>
            <artifactId>mysql-connector-java</artifactId>
            <version>8.0.25</version>
        </dependency>
        <dependency>
            <groupId>org.mybatis</groupId>
            <artifactId>mybatis</artifactId>
            <version>3.5.7</version>
        </dependency>
        <dependency>
            <groupId>org.springframework</groupId>
            <artifactId>spring-webmvc</artifactId>
            <version>5.3.8</version>
        </dependency>
        <!-- Spring If you operate the database, you also need one spring-jdbc-->
        <dependency>
            <groupId>org.springframework</groupId>
            <artifactId>spring-jdbc</artifactId>
            <version>5.3.8</version>
        </dependency>
        <dependency>
            <groupId>org.aspectj</groupId>
            <artifactId>aspectjweaver</artifactId>
            <version>1.9.6</version>
        </dependency>
		<!--integration mybatis and spring My bag-->
        <dependency>
            <groupId>org.mybatis</groupId>
            <artifactId>mybatis-spring</artifactId>
            <version>2.0.6</version>
        </dependency>
        <!--Use notes instead get,set Other methods-->
        <dependency>
            <groupId>org.projectlombok</groupId>
            <artifactId>lombok</artifactId>
            <version>1.18.20</version>
        </dependency>
        <!--Maven Static resource filtering problem-->
    </dependencies>
	<build>
         <resources>
            <resource>
                <directory>src/main/resources</directory>
                <includes>
                    <include>**/*.properties</include>
                    <include>**/*.xml</include>
                </includes>
                <filtering>true</filtering>
            </resource>
            <resource>
                <directory>src/main/java</directory>
                <includes>
                    <include>**/*.properties</include>
                    <include>**/*.xml</include>
                </includes>
                <filtering>true</filtering>
            </resource>
        </resources>
    </build>
2. Prepare configuration file
3. Test
Mybatis-spring
1. Write data source configuration
2.sqlSessionFactory
3.sqlSessionTemplate
4. It is necessary to add an implementation class [] to the interface
5. Inject the implementation class written by yourself into Spring.
6. Test and use!
See D: / back / COM for specific code atguigu_ Mybatis spring in mybatis
UserMpperImpl and the following ApplicationContext XML supporting;
package com.atguigu.mapper;

import com.atguigu.pojo.User;
import org.mybatis.spring.SqlSessionTemplate;
import org.mybatis.spring.support.SqlSessionDaoSupport;

public class UserMapperImpl extends SqlSessionDaoSupport implements UserMapper{

    @Override
    public User getUserById(int n) {
        User user = new User(5,"Wang Jie","123456");

        UserMapper mapper = getSqlSession().getMapper(UserMapper.class);
        mapper.addUser(user);
        mapper.deleteUser(5);
        return mapper.getUserById(1);
    }

    @Override
    public int addUser(User user) {
        return getSqlSession().getMapper(UserMapper.class).addUser(user);
    }

    @Override
    public int deleteUser(int id) {
        return getSqlSession().getMapper(UserMapper.class).deleteUser(5);
    }
}
applicationContext.xml (matched with UserMpperImpl above)
<?xml version="1.0" encoding="UTF-8"?>
<beans xmlns="http://www.springframework.org/schema/beans"
       xmlns:xsi="http://www.w3.org/2001/XMLSchema-instance"
       xmlns:aop="http://www.springframework.org/schema/aop"
       xsi:schemaLocation="http://www.springframework.org/schema/beans http://www.springframework.org/schema/beans/spring-beans.xsd
                           http://www.springframework.org/schema/aop http://www.springframework.org/schema/aop/spring-aop.xsd">


    <import resource="spring_dao.xml"></import>
    <bean id="userMapper" class="com.atguigu.mapper.UserMapperImpl">
        <property name="sqlSessionFactory" ref="sqlSessionFactory"></property>
    </bean>

</beans>
mybatis-config.xml
<?xml version="1.0" encoding="UTF-8" ?>
<!DOCTYPE configuration
        PUBLIC "-//mybatis.org//DTD Config 3.0//EN"
        "http://mybatis.org/dtd/mybatis-3-config.dtd">
<!--configuration Core profile-->
<configuration>

    <typeAliases>
        <typeAlias type="com.atguigu.pojo.User" alias="User"></typeAlias>
    </typeAliases>


</configuration>
A more comprehensive spring Dao XML (including transactions)
<?xml version="1.0" encoding="UTF-8"?>
<beans xmlns="http://www.springframework.org/schema/beans"
xmlns:xsi="http://www.w3.org/2001/XMLSchema-instance"
xmlns:aop="http://www.springframework.org/schema/aop"
xmlns:tx="http://www.springframework.org/schema/tx"
xsi:schemaLocation="http://www.springframework.org/schema/beans http://www.springframework.org/schema/beans/spring-beans.xsd
http://www.springframework.org/schema/aop http://www.springframework.org/schema/aop/spring-aop.xsd
http://www.springframework.org/schema/tx http://www.springframework.org/schema/tx/spring-tx.xsd">
<!--DataSource:use Spring Replace with a new data source Mybatis Configuration of c3p0 dbcp druid
We use it here Spring Provided JDBC: org.springframework.jdbc.datasource
-->
<bean id="dataSource" class="org.springframework.jdbc.datasource.DriverManagerDataSource">
<property name="driverClassName" value="com.mysql.cj.jdbc.Driver"></property>
<property name="url" value="jdbc:mysql://localhost:3306/mybatis?useSSL=true&useUnicode=true&characterEncoding=UTF-8"></property>
<property name="username" value="root"></property>
<property name="password" value="123456"></property>
</bean>
<!--sqlSessionFactory-->
<bean id="sqlSessionFactory" class="org.mybatis.spring.SqlSessionFactoryBean">
<property name="dataSource" ref="dataSource"></property>
<!--binding Mybatis Configuration file for-->
<property name="configLocation" value="classpath:mybatis-config.xml"></property>
<property name="mapperLocations" value="classpath:com/atguigu/mapper/*.xml"></property>
</bean>
<!-- SqlSessionTemplate:That's what we use sqlSession-->
<bean id="sqlSession" class="org.mybatis.spring.SqlSessionTemplate">
<!--Only constructor injection can be used sqlSessionFactory. Because it doesn't set method-->
<constructor-arg index="0" ref="sqlSessionFactory"></constructor-arg>
</bean>
<!--Configure declarative transactions-->
<bean id="transactionManager" class="org.springframework.jdbc.datasource.DataSourceTransactionManager">
<property name="dataSource" ref="dataSource"></property>
</bean>
<!--combination Aop Implement transaction weaving-->
<!--Configure transaction notifications-->
<tx:advice id="txAdvice" transaction-manager="transactionManager">
<!--Configure transactions for those methods-->
<!--To configure the propagation properties of a transaction: new propagation=-->
<tx:attributes>
<!--Add method to-->
<tx:method name="add" propagation="REQUIRED"/>
<!--Delete method for-->
<tx:method name="delete" propagation="REQUIRED"/>
<!--Change method for-->
<tx:method name="update" propagation="REQUIRED"/>
<!--Query method-->
<tx:method name="query" propagation="REQUIRED"/>
<!--For all methods, just write this one-->
<tx:method name="*" propagation="REQUIRED"/>
</tx:attributes>
</tx:advice>
<!--Configure transaction entry-->
<aop:config>
<aop:pointcut id="txPointCut" expression="execution(* com.atguigu.mapper.*.*(..))"/>
<aop:advisor advice-ref="txAdvice" pointcut-ref="txPointCut"></aop:advisor>
</aop:config>
</beans>
Declarative transaction
1. Retrospective services
- Treat a group of business as a business; Either all succeed or all fail!
- Transaction is very important in project development. It involves data consistency and cannot be careless
- Ensure integrity and consistency
Transaction SCID policy:
- Atomicity
- uniformity
- Isolation
- Multiple businesses may operate on the same resource. Prevent data corruption
- persistence
- Once the transaction is committed, no matter what happens to the system, the results will not be affected and will be written to the memory persistently!
Transaction management in spring
- Declarative transaction: Aop
- Programming transaction: it is necessary to manage the transaction in the code
reflection:
Why transactions are needed?
- If transactions are not configured, there may be inconsistent data submission;
- If we do not configure declarative transactions in Spring, we need to manually configure transactions in the code.
- Transaction is very important in the development of the project. The consistency and integrity of data should not be sloppy!
 <!--Configure declarative transactions-->
    <bean id="transactionManager" class="org.springframework.jdbc.datasource.DataSourceTransactionManager">
        <property name="dataSource" ref="dataSource"></property>
    </bean>
    <!--combination Aop Implement transaction weaving-->
    <!--Configure transaction notifications-->
    <tx:advice id="txAdvice" transaction-manager="transactionManager">
        <!--Configure transactions for those methods-->
        <!--To configure the propagation properties of a transaction: new propagation=-->
        <tx:attributes>
            <!--Add method to-->
            <tx:method name="add" propagation="REQUIRED"/>
            <!--Delete method for-->
            <tx:method name="delete" propagation="REQUIRED"/>
            <!--Change method for-->
            <tx:method name="update" propagation="REQUIRED"/>
            <!--Query method-->
            <tx:method name="query" propagation="REQUIRED"/>
            <!--For all methods, just write this one-->
            <tx:method name="*" propagation="REQUIRED"/>
        </tx:attributes>
    </tx:advice>

    <!--Configure transaction entry-->
    <aop:config>
        //This can be used as a template and only needs to be modified: expression="execution(* com.atguigu.mapper. * * (..)" inside 			 The path of the.
        <aop:pointcut id="txPointCut" expression="execution(* com.atguigu.mapper.*.*(..))"/>
        <aop:advisor advice-ref="txAdvice" pointcut-ref="txPointCut"></aop:advisor>
    </aop:config>
Annotation and reflection
Annotation
What is annotation
Annotations are for people, and annotations are for machines
Role of annotations
- Not the program itself, but the program can be explained
- Can be read by other programs (e.g. compiler)
Format of annotation
@Annotation name
Where Annotation is used
package,class,method,field
Built in annotation
@Override override
@deprecated means not recommended
@suppressWarning() positive pressure annotation
Meta annotation
effect
Responsible for interpreting other notes
Standard notes (four)
@target is used to describe the scope of use of annotations (that is, where the described annotations can be used)
@retention indicates the level at which the annotation information needs to be saved, which is used to describe the annotation life cycle.
@Document indicates that the annotation will be included in the javadoc
@inherited indicates that the subclass can inherit the annotation in the parent class.
Custom annotations can have parameters
Parameter type + parameter name ();
Parameter type + parameter name () default value;
//Define an annotation
public class Test03{
    //Annotations can display assignments. If there is no default value, we must assign a value to the annotation
    @MyAnnotation2(age=18,name="ha-ha")
    pulic void test(){}
}

//Target indicates where our annotation can be used
@Target({ElementType.TYPE, ElementType.METHOD})

//Retention indicates where our annotation is still valid
//Runtiome > class > course key points
@Retention(RetentionPolicy.RUNTIME)

//Documented indicates whether our annotations are generated in Javadac
@Documented

//The Inherited subclass can inherit the annotation of the parent class;
@Inherited
@interface MyAnnotation02 {
    //Annotated parameters: parameter type + parameter name ();
    String name() default "";
    int age();
    int id() default -1;     //If the default value is - 1, it means that it does not exist.
}
Name is the parameter name of the annotation, and the default value is followed by default. If we do not set the default value, we must pass the parameter when using the annotation amount
Custom note:
- When you use @ interface to customize annotations, you automatically inherit Java lang.annotation. Annotation interface
analysis:
- @Interface is used to declare an annotation in the following format: public@interface Annotation name {definition content}
- Each of these methods actually declares a configuration parameter.
- The name of the method is the name of the parameter.
- The return value type is the type of the parameter (the return value can only be the basic type, Class, String, enum)
- You can declare the default value of the parameter through default.
- If there is only one parameter member, the general parameter name is value.
- An annotation element must have a value. When defining an annotation element, we often use an empty string with 0 as the default value.
Reflection:
[the external chain image transfer fails. The source station may have an anti-theft chain mechanism. It is recommended to save the image and upload it directly (IMG krgdcwsp-1629597023327) (C: / users / 16337 / appdata / roaming / typora / typora user images / image-20210814211722824. PNG)]
[the external chain image transfer fails. The source station may have an anti-theft chain mechanism. It is recommended to save the image and upload it directly (img-wk6dhkfb-1629597023328) (C: / users / 16337 / appdata / roaming / typora user images / image-20210814211759861. PNG)]
Class loading
The same bytecode file will be loaded only once during operation. The class object obtained in the following three ways is an object.
There are three ways to get class objects:
Class.forName("Full class name");
Class name.class;
object.getClass();
public class Test_01 {
    public static void main(String[] args) throws ClassNotFoundException {
        Person person = new Student();
        System.out.println("This person is:"+person.name);

        //Method 1: obtained by object
        Class c1 = person.getClass();
        System.out.println(c1.hashCode());

        //Method 2: obtained by forname;
        Class c2 = Class.forName("cmd.Student");
        System.out.println(c2.hashCode());

        //Method 3: pass the class name Class get
        Class c3 = Student.class;
        System.out.println(c3.hashCode());
    }
}
class Person{
    public String name;
    public Person() {
    }

    public Person(String name) {
        this.name = name;
    }

    @Override
    public String toString() {
        return "Person{" +
                "name='" + name + '\'' +
                '}';
    }
}
class Student extends Person{
    public Student(){
        this.name="student";
    }
}
The first one is mostly used for configuration files, where the class name is defined in the configuration file. Read the file and load the class;
The second method is mostly used for parameter transfer;
The third method is mostly used for object transfer;
Those classes can have Class objects
-
Class: external class, member (member internal class, static internal class), local internal class, anonymous internal class.
-
interface: interface
-
[]: array
-
enum: Enumeration
-
Annotation: annotation @ interface
-
primitive type: basic data type
-
void
-
Class c1 = Object.class;//class
Class c2 = Comparable.class;//Interface
Class c3 = String[].class;//One bit array
Class c4 = int[][].class;//Two dimensional array
Class c5 = Override.class;//annotation
Class c6 = ElementType.class;//enumeration
Class c7 = Integer.class;//Basic data type
Class c8 = void.class;//void
Class c9 = Class.class;//Class

//As long as the element type is the same as the dimension, it is the same class
int[]a = new int[10];
int[] b = new int[100];
When to initialize a class
Active reference of class
- When the virtual machine starts, first initialize the class where the main method is located
- new an object
- Call static members, (constants other than final) and static methods
- Through Java ang. Reflection package for reflection calls
- When initializing a class, if the parent class is not initialized, initialize its parent class first
Passive reference of class (class initialization will not be raised)
- When accessing a static domain, only the class that actually declares the domain will be initialized.
- For example, when a static variable of a parent class is referenced through a subclass, the subclass will not be initialized
- When a class reference is defined through an array, class initialization is not triggered
- Reference constants do not trigger the initialization of this class (constants are stored in the constant pool of the calling class in the link phase)
Class loader
-
Boot class loader (core loader of java)
- Name: rt.jar root loader
- Location: exists directly under the jre folder
- Feature: unable to get the data written in C + +
- Function: used to load the core class library
- All the basic classes we use are below,
- lang package
- util package
- swing package
- ...
-
Extended loader
-
Name: ext
-
Location: under the ext folder under jre
-
Features: unknown at present (I don't know, not useless)
-
Function: responsible for the jar package under jre/lib/ext directory or - D Java Ext.dirs specifies the directory to wrap jar into the working library
-
obtain:
-
ClassLoader.getSystemClassLoader().getParent();
-
-
-
System loader (user class loader)
-
Name: systemClassLoader (user's classloader)
-
Location: under the current project
-
Features: load the class file of the project
-
Function: responsible for java -classpath or - D Java class. The classes and jar s in the directory referred to in path are packaged into the work, which is the most commonly used loader;
-
obtain:
-
ClassLoader.getSystemClassLoader();
-
-
Get class name
Class a = Class.forName("com.ziop.relfect.User");
User user=new User;
a = user.getclass();
//Get the name of the class
System.out.printin(a.getname());//Get package name + class name
System.out.println(a.getsimplename());//Get class name
Get property name
a.getFields();  // Only public properties can be obtained
a.getDeclaredField("name");    // Gets the specified property
a.getDeclaredFields();   //Get all properties, including private
Acquisition method
a.getMethods();  //All methods that obtain this class and its parent class do not include private
a.getDeclaredMethods();  //Get all methods of this class, including private
a.getMethods("getTest",); //The second parameter and its subsequent parameters are used to judge the overloaded method
a.setDeclaredMethods("setTest",String.class);
Get constructor
a.getConstructors();
a.getDeclaredConstructors(); // ditto
a.getDeclaredConstructors(String.class,int.class); // Gets the specified parameterized construct
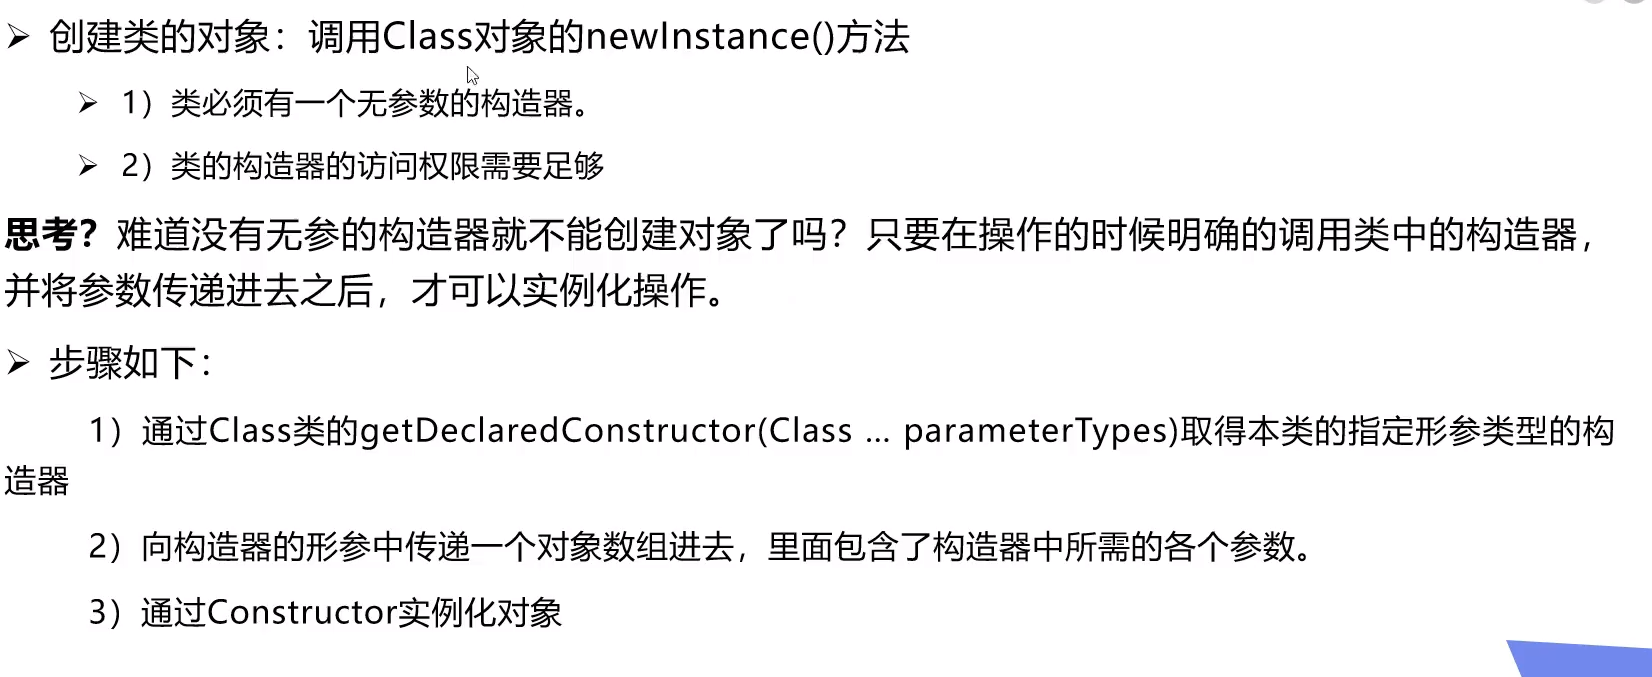
Create objects dynamically
//Create an object without a parameter constructor
Class a = Class.forName("com.ziop.relfect.User");
User user  = (User)a.newInstance();
// Create objects with parameters
Constructor constructor  =  a.getDeclaredConstructors(String.class,int.class); // Gets the specified parameterized construct
User user2 = (User)constructor.newInstance("ziop",2021,20);
//Call normal methods through reflection
User user3  = (User)a.newInstance();
	//Get a common method
Method setName = a.setDeclaredMethods("setTest",String.class);
setName.invoke(user3,"ziop");   //invoke: activate function
//Operation properties by reflection
User user4  = (User)a.newInstance();
Field name = a.getFeclaredField("name");
	//If the property is private, an error will occur in the direct setting, indicating that it cannot be accessed. It can be changed after closing the security detection of the program
name.setAccessible(true);  // Set security detection off
name.set(user4,"ziop")
Turning off security detection can improve execution efficiency (but it is not recommended)
name.setAccessible(true); // Set security detection off
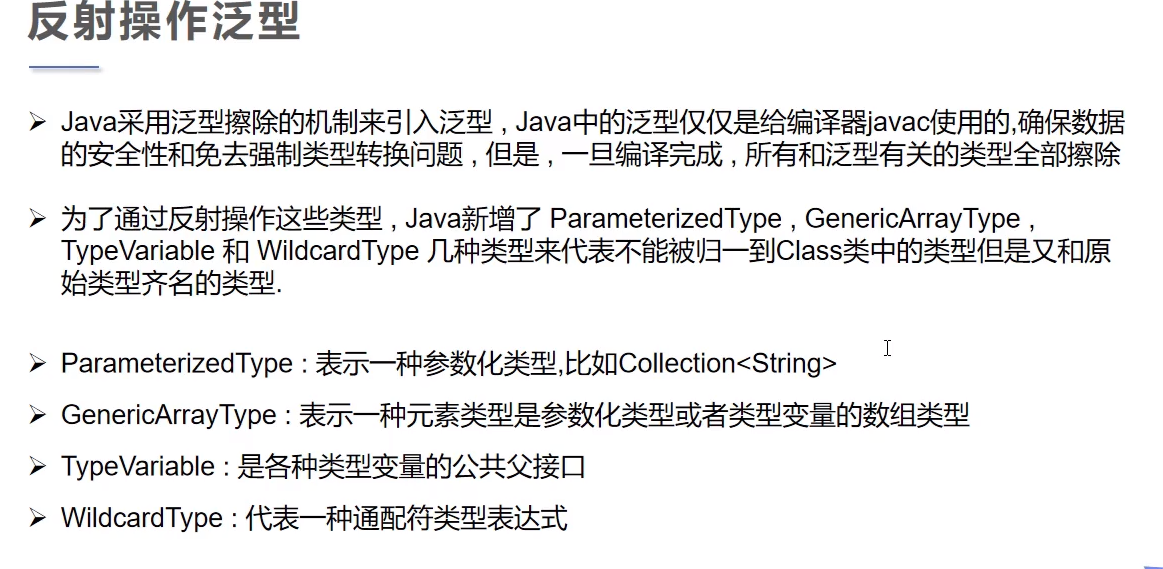
Get generic type
method.getGenericParamaterTypes(); Get parameter type

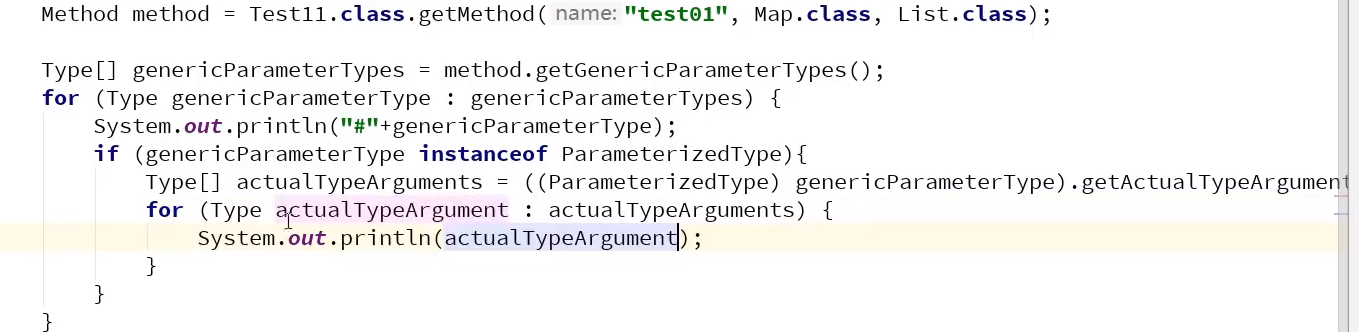
If you want to get the type in the generic type, you need to judge whether it belongs to a parameterized type. If so, extract it

method.getgenericReturnType(); //Gets the generic type of the return value
Reflection operation annotation
Class a = Class.forName("com.ziop.relfect.User");
a.getAnnotations();   //Get all comments
Ziop ziop =  (Ziop)a.getAnnotations(ziop.class)  // Gets the specified annotation
String value = ziop.value();   // Gets the value of the specified annotation. Value is a field in the ziop annotation
Device;
-
obtain:
-
ClassLoader.getSystemClassLoader();
-
Get class name
Class a = Class.forName("com.ziop.relfect.User");
User user=new User;
a = user.getclass();
//Get the name of the class
System.out.printin(a.getname());//Get package name + class name
System.out.println(a.getsimplename());//Get class name
Get property name
a.getFields();  // Only public properties can be obtained
a.getDeclaredField("name");    // Gets the specified property
a.getDeclaredFields();   //Get all properties, including private
Acquisition method
a.getMethods();  //All methods that obtain this class and its parent class do not include private
a.getDeclaredMethods();  //Get all methods of this class, including private
a.getMethods("getTest",); //The second parameter and its subsequent parameters are used to judge the overloaded method
a.setDeclaredMethods("setTest",String.class);
Get constructor
a.getConstructors();
a.getDeclaredConstructors(); // ditto
a.getDeclaredConstructors(String.class,int.class); // Gets the specified parameterized construct
Create objects dynamically
//Create an object without a parameter constructor
Class a = Class.forName("com.ziop.relfect.User");
User user  = (User)a.newInstance();
// Create objects with parameters
Constructor constructor  =  a.getDeclaredConstructors(String.class,int.class); // Gets the specified parameterized construct
User user2 = (User)constructor.newInstance("ziop",2021,20);
//Call normal methods through reflection
User user3  = (User)a.newInstance();
	//Get a common method
Method setName = a.setDeclaredMethods("setTest",String.class);
setName.invoke(user3,"ziop");   //invoke: activate function
//Operation properties by reflection
User user4  = (User)a.newInstance();
Field name = a.getFeclaredField("name");
	//If the property is private, an error will occur in the direct setting, indicating that it cannot be accessed. It can be changed after closing the security detection of the program
name.setAccessible(true);  // Set security detection off
name.set(user4,"ziop")
[external chain picture transferring... (img-Gx6W2TuP-1629597023330)]
Turning off security detection can improve execution efficiency (but it is not recommended)
name.setAccessible(true); // Set security detection off
[external chain picture transferring... (img-rsZOKDQU-1629597023330)]
Get generic type
method.getGenericParamaterTypes(); Get parameter type
[external chain picture transferring... (img-6CXbVtt6-1629597023331)]
If you want to get the type in the generic type, you need to judge whether it belongs to a parameterized type. If so, extract it
[external chain picture transferring... (img-dJ5L5Qp2-1629597023332)]
[external chain picture transferring... (img-mRd8aTEW-1629597023333)]
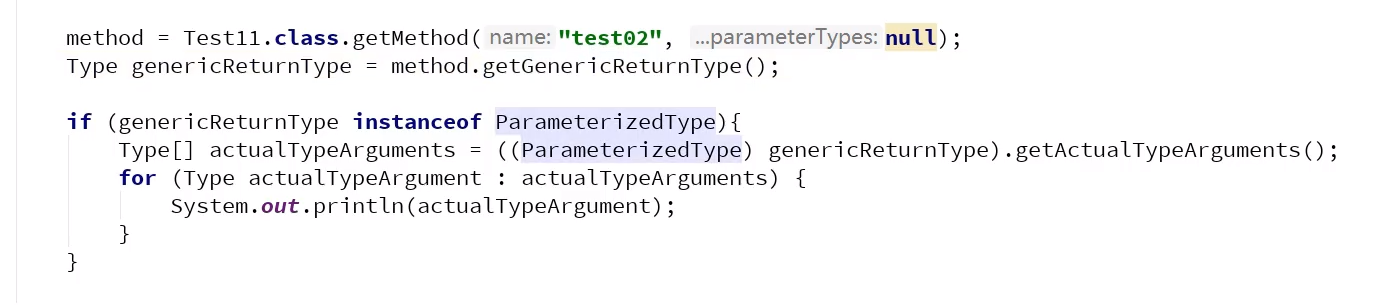
method.getgenericReturnType(); //Gets the generic type of the return value
[external chain picture transferring... (IMG kokqhjhj-1629597023333)]
Reflection operation annotation
Class a = Class.forName("com.ziop.relfect.User");
a.getAnnotations();   //Get all comments
Ziop ziop =  (Ziop)a.getAnnotations(ziop.class)  // Gets the specified annotation
String value = ziop.value();   // Gets the value of the specified annotation. Value is a field in the ziop annotation