1, Foreword
- The landmark details page view has been created. We need to provide a way for users to view the complete landmark list and view the details of each landmark. For the creation of landmark details page view, please refer to my blog: SwiftUI's in-depth analysis of how to create and combine views.
- This paper will analyze how to create a view that can display any landmark information, and dynamically generate a scrollable list. Users can click the list item to view the details of the landmark; When optimizing the view display, you can use the Xcode canvas to render preview views under multiple different device sizes.
2, Sample data
- The information displayed by the user-defined view is directly written in the code. How to transfer the user-defined view to the sample data for display:
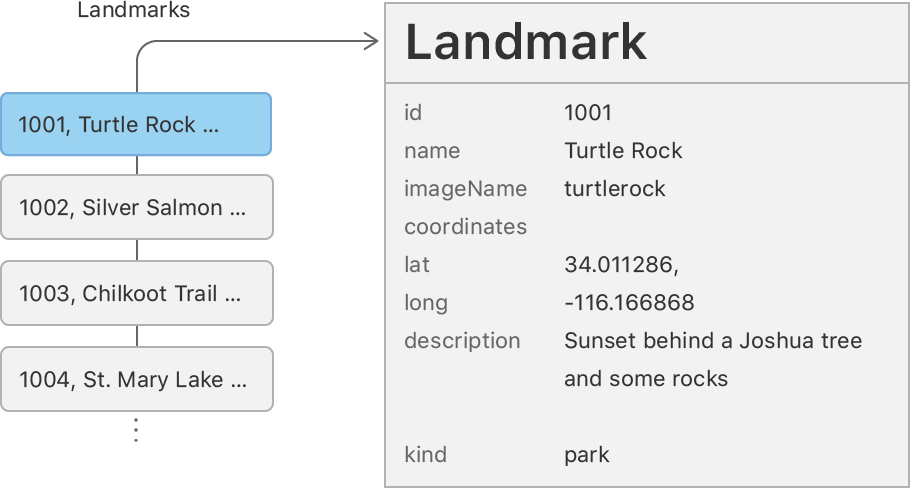
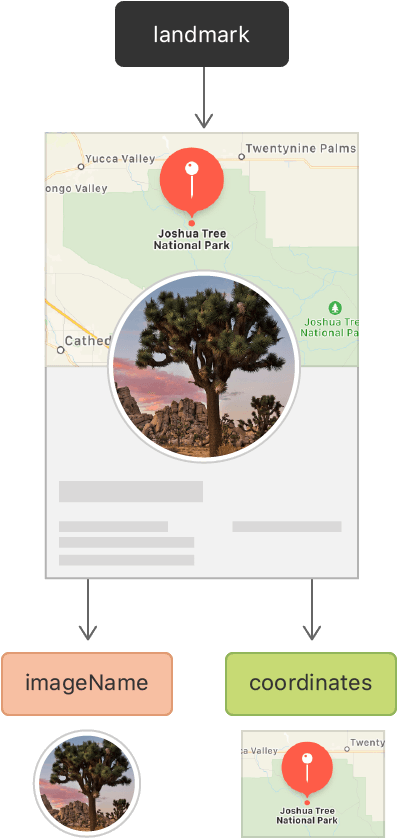
- Models - > landmark Swift file, which declares the structured name of the information required to display a landmark in the application, and imports landmarkdata JSON file to generate a landmark information array:
import SwiftUI
import CoreLocation

struct Landmark: Hashable, Codable, Identifiable {
    var id: Int
    var name: String
    fileprivate var imageName: String
    fileprivate var coordinates: Coordinates
    var state: String
    var park: String
    var category: Category

    var locationCoordinate: CLLocationCoordinate2D {
        CLLocationCoordinate2D(
            latitude: coordinates.latitude,
            longitude: coordinates.longitude)
    }

    enum Category: String, CaseIterable, Codable, Hashable {
        case featured = "Featured"
        case lakes    = "Lakes"
        case rivers   = "Rivers"
    }
}

extension Landmark {
    var image: Image {
        ImageStore.shared.image(name: imageName)
    }
}

struct Coordinates: Hashable, Codable {
    var latitude: Double
    var longitude: Double
}
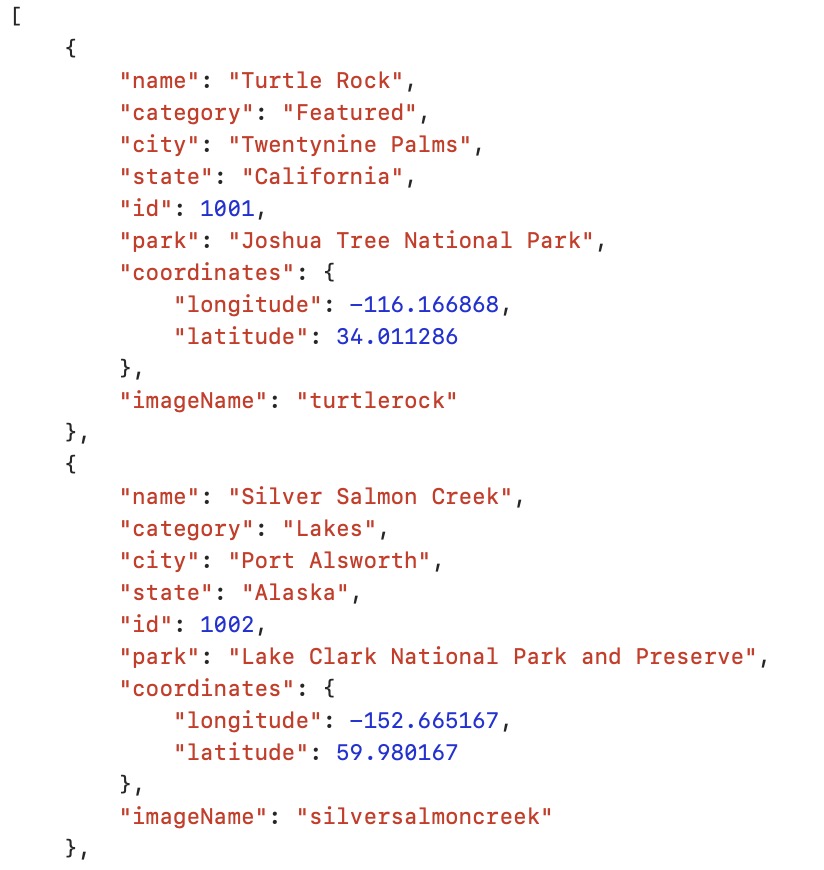
- Select resources - > landmarkdata JSON, the sample data file is as follows:
3, Create row view
- The first view created in this article is the row view used to display each landmark. The row view stores the landmark related information in an attribute. A row can represent a landmark, and these rows will be combined into a list later:
- Create a named landmark row SwiftUI view of swift;
- If the preview view does not appear, you can select menu editor - > canvas, open the canvas, and click Resume to preview, or use the shortcut Command+Option+Enter to call up the screen, and then use the shortcut Command+Option+P to start the preview mode;
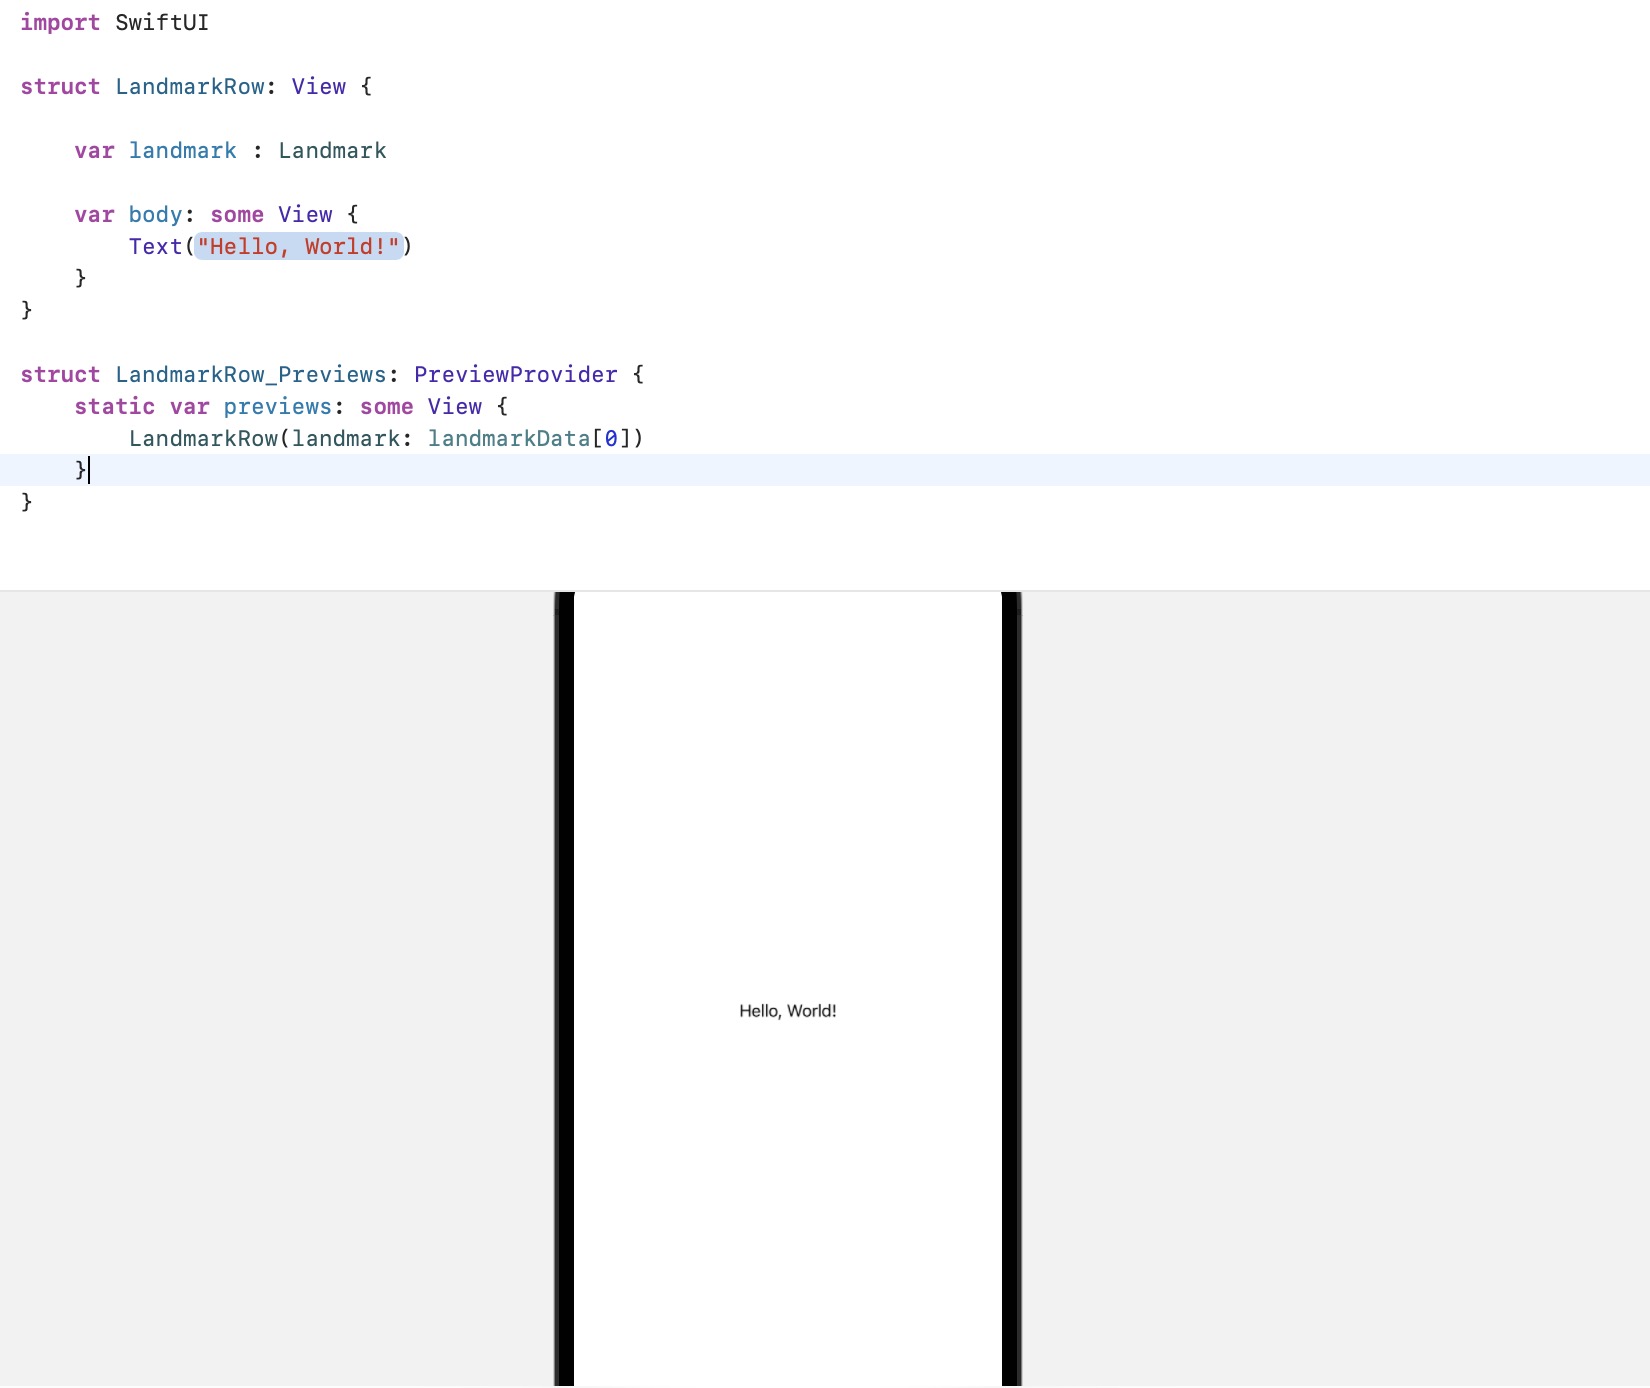
- Add the landmark attribute as a storage attribute of the landmark row view. After adding the landmark attribute, the preview view may stop working, because there needs to be a landmark instance when the LandmarkRow view is initialized. To repair the preview view, you need to modify the Preview Provider;
- At landmark row_ The static property of previews passes the landmarkparameter to the LandmarkRow initializer in previews. This parameter uses the first element of the landmarkData array. The preview view currently displays Hello, World;
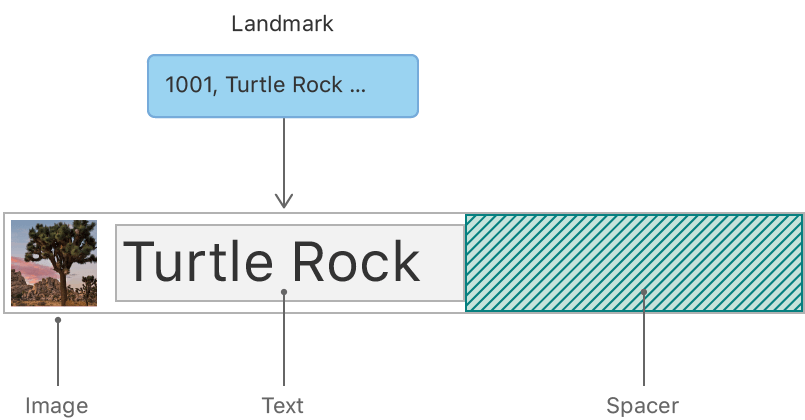
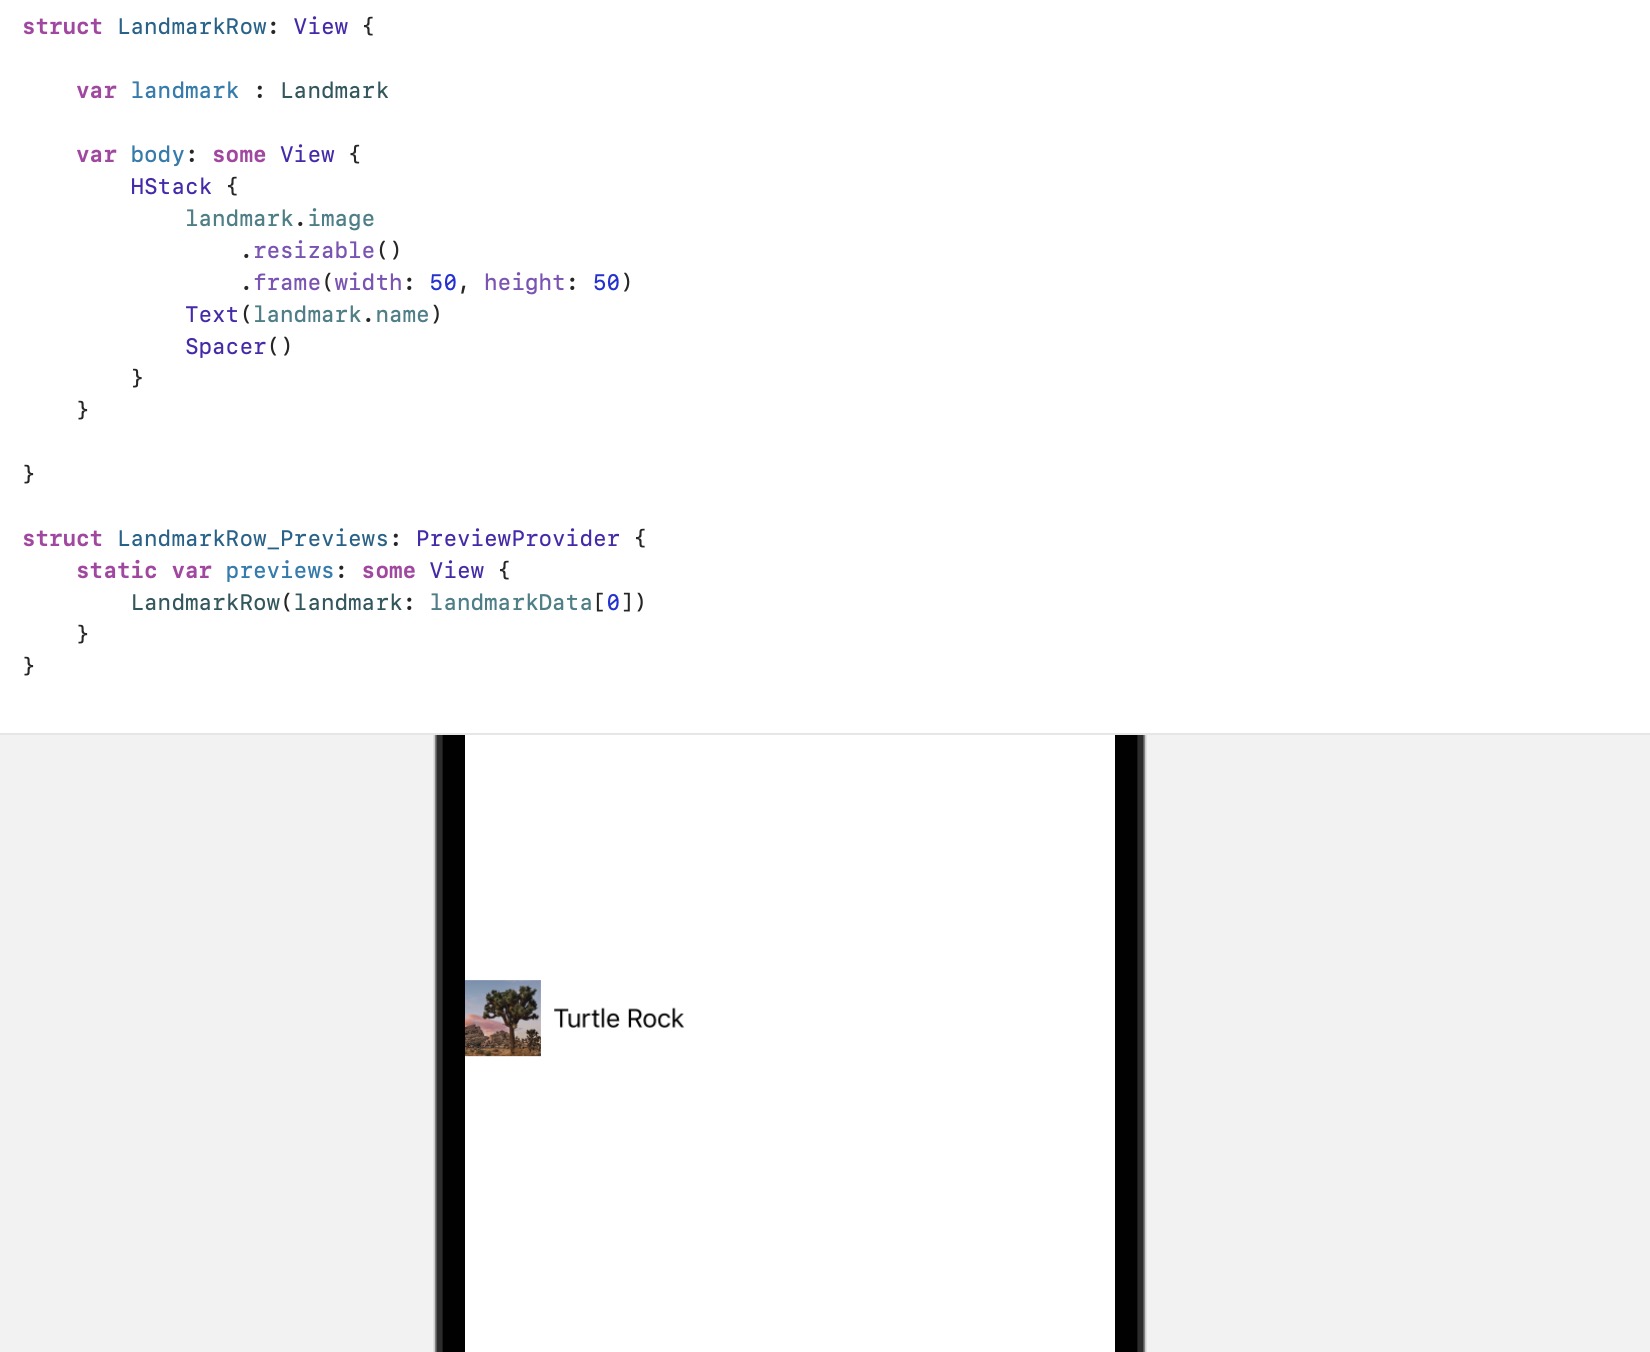
- Embed a Text in an hstag, modify the Text to use the name field of the landmark property, add a picture view in front of the Text view, and add a Spacer view behind the Text view:
struct LandmarkRow: View {

    var landmark : Landmark

    var body: some View {
        HStack {
            landmark.image
                .resizable()
                .frame(width: 50, height: 50)
            Text(landmark.name)
            Spacer()
        }
    }
}

struct LandmarkRow_Previews: PreviewProvider {
    static var previews: some View {
        LandmarkRow(landmark: landmarkData[0])
    }
}
- The effects are as follows:
4, Custom line Preview
- Xcode's canvas will automatically identify the types that follow the PreviewProvider protocol in the current code editor, render them and display them on the screen; A preview provider returns one or more views that can be configured with different sizes and device models. You can customize the scene in which the view returned from the preview provider is rendered:
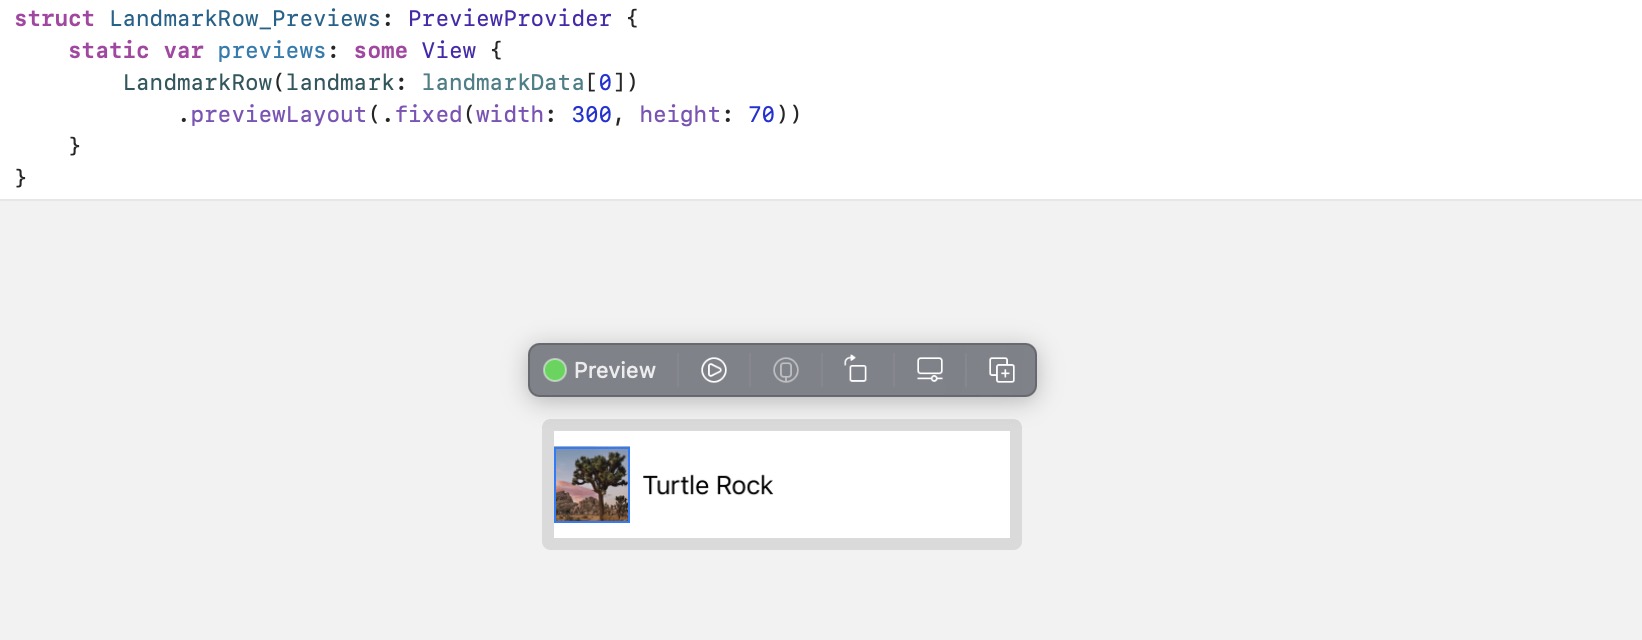
- At landmark row_ In previews, update the landmark parameter to the second element of the landmarkData array, and the preview view will refresh immediately to reflect the rendering of the second element:
struct LandmarkRow_Previews: PreviewProvider {
    static var previews: some View {
        LandmarkRow(landmark: landmarkData[1])
            .previewLayout(.fixed(width: 300, height: 70))
    }
}

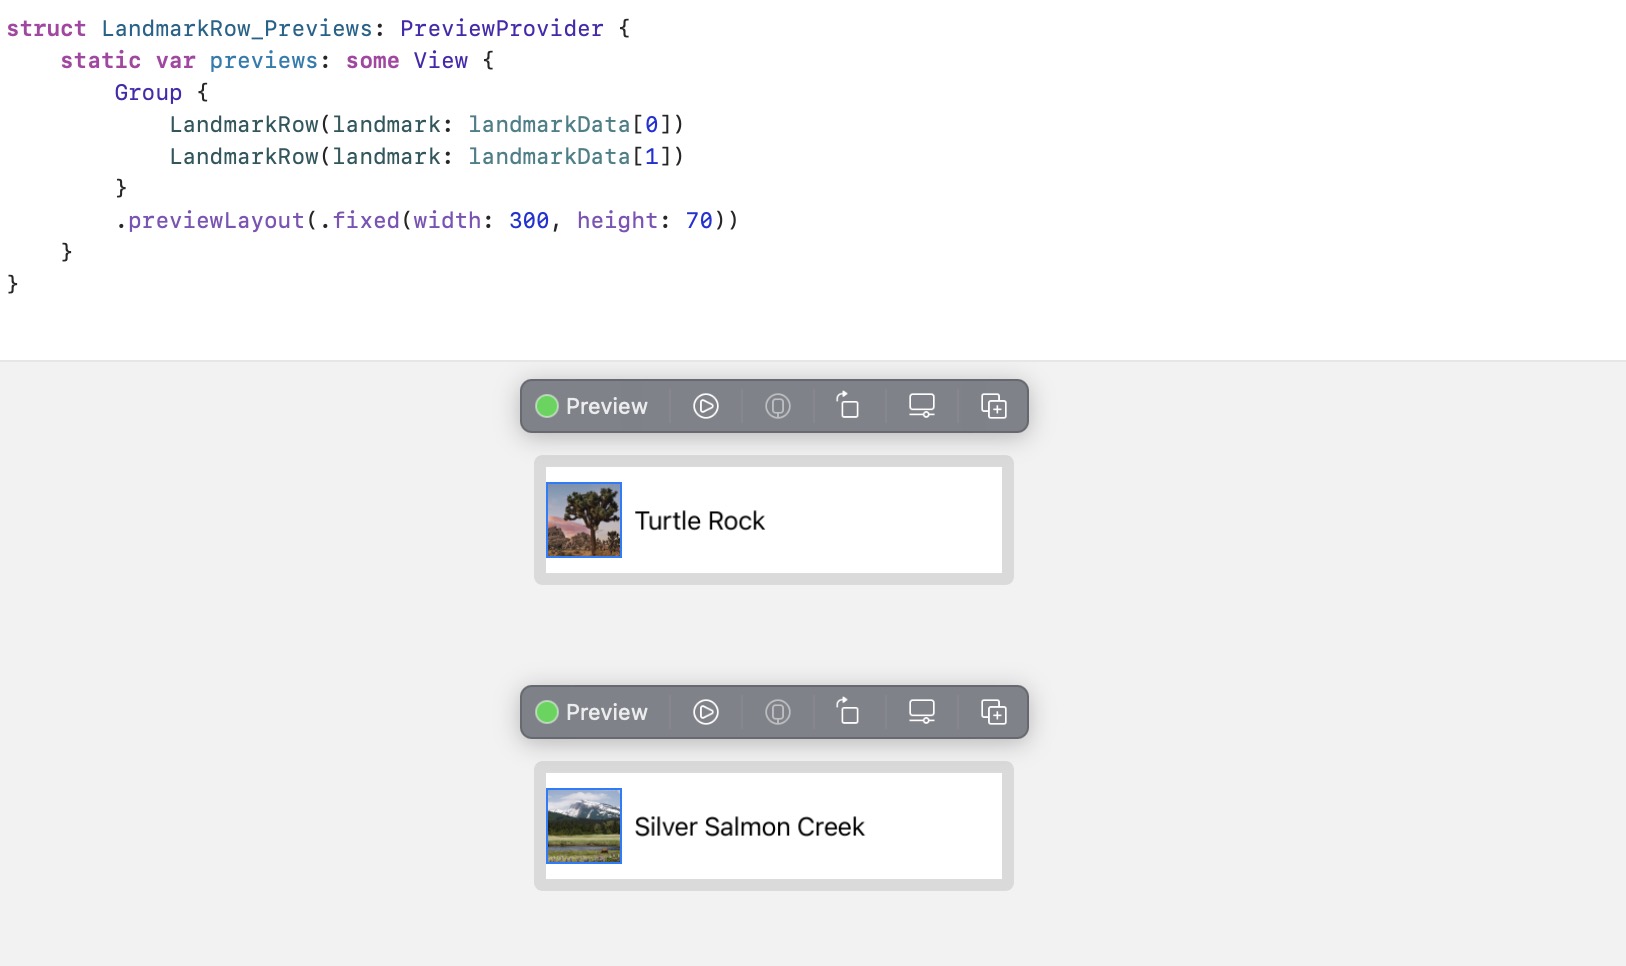
- Using previewLayout(_ 😃 Modifier sets the size of a row view displayed in the list. You can use the Group method to return preview views in multiple different scenes:
- Wrap the preview row view in the group and add the previous first row view. Group is a container that can organize the view content. Xcode will treat each sub view in the group as a separate preview view in the canvas:
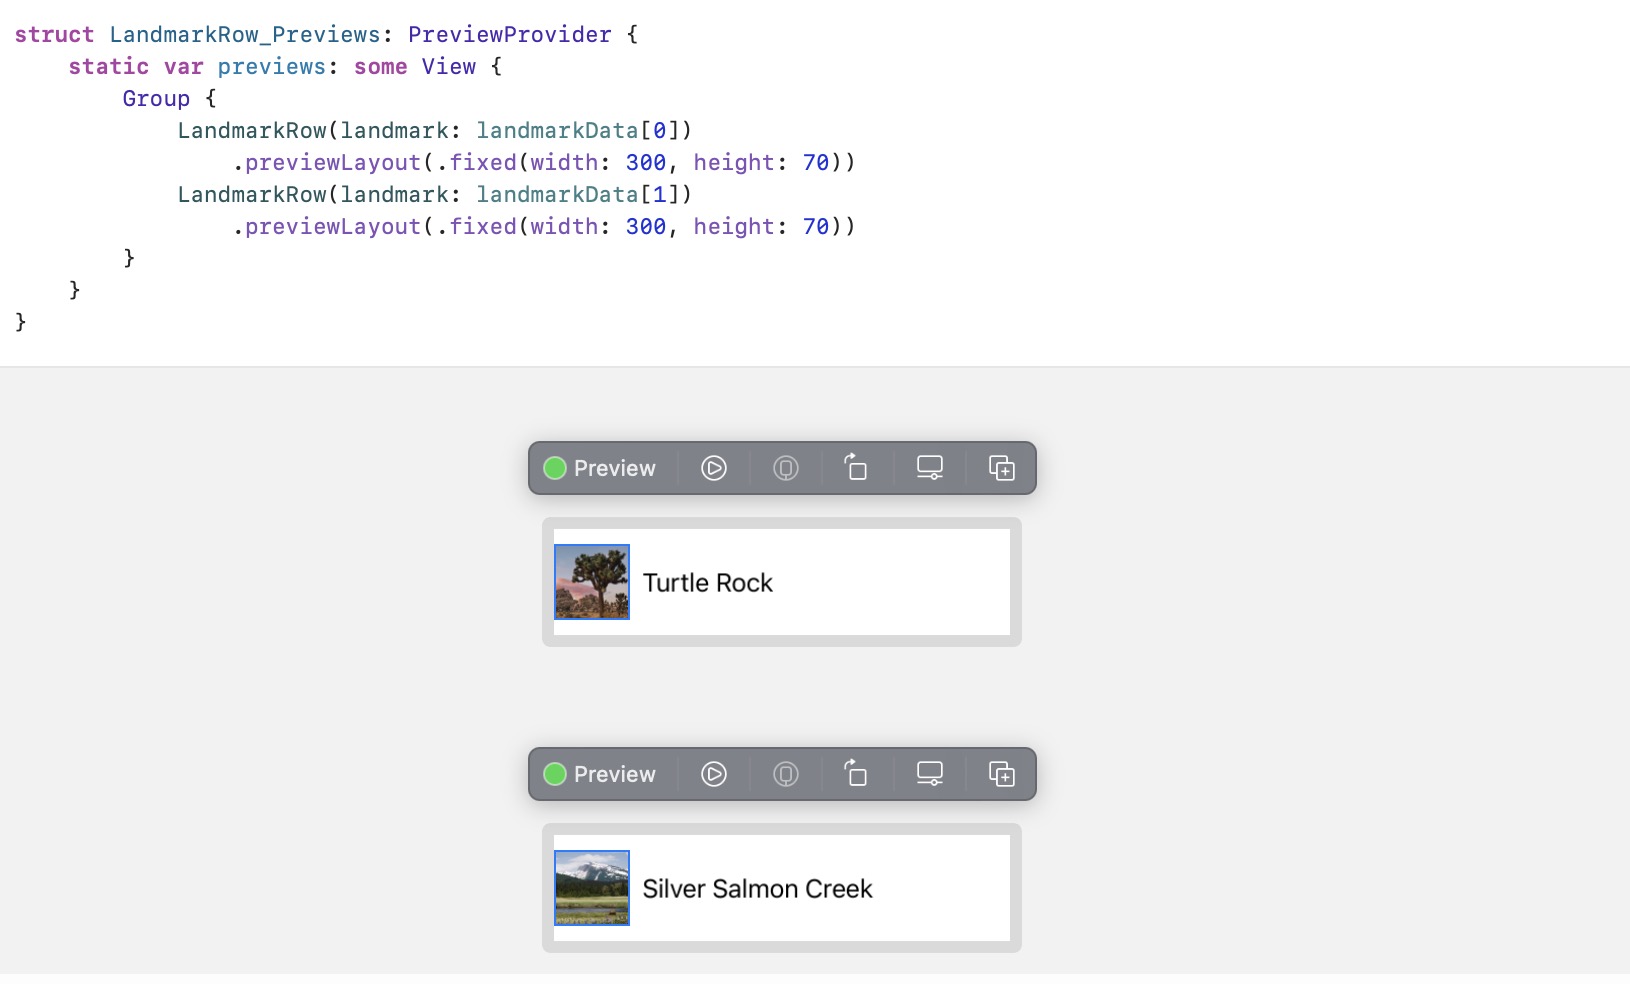
- To simplify the code, you can use previewLayout(_ 😃 This modifier is applied to the outer Group. Each sub view of the Group will inherit the configuration of its own environment. Modifying the preview provider will only affect the performance of the preview canvas and will not affect the actual application:
5, Create landmark list
- SwiftUI list type can be used to display platform related list views. The elements of the list can be static, similar to sub views within the stack, dynamically generated views, or mixed dynamic and Static Views:

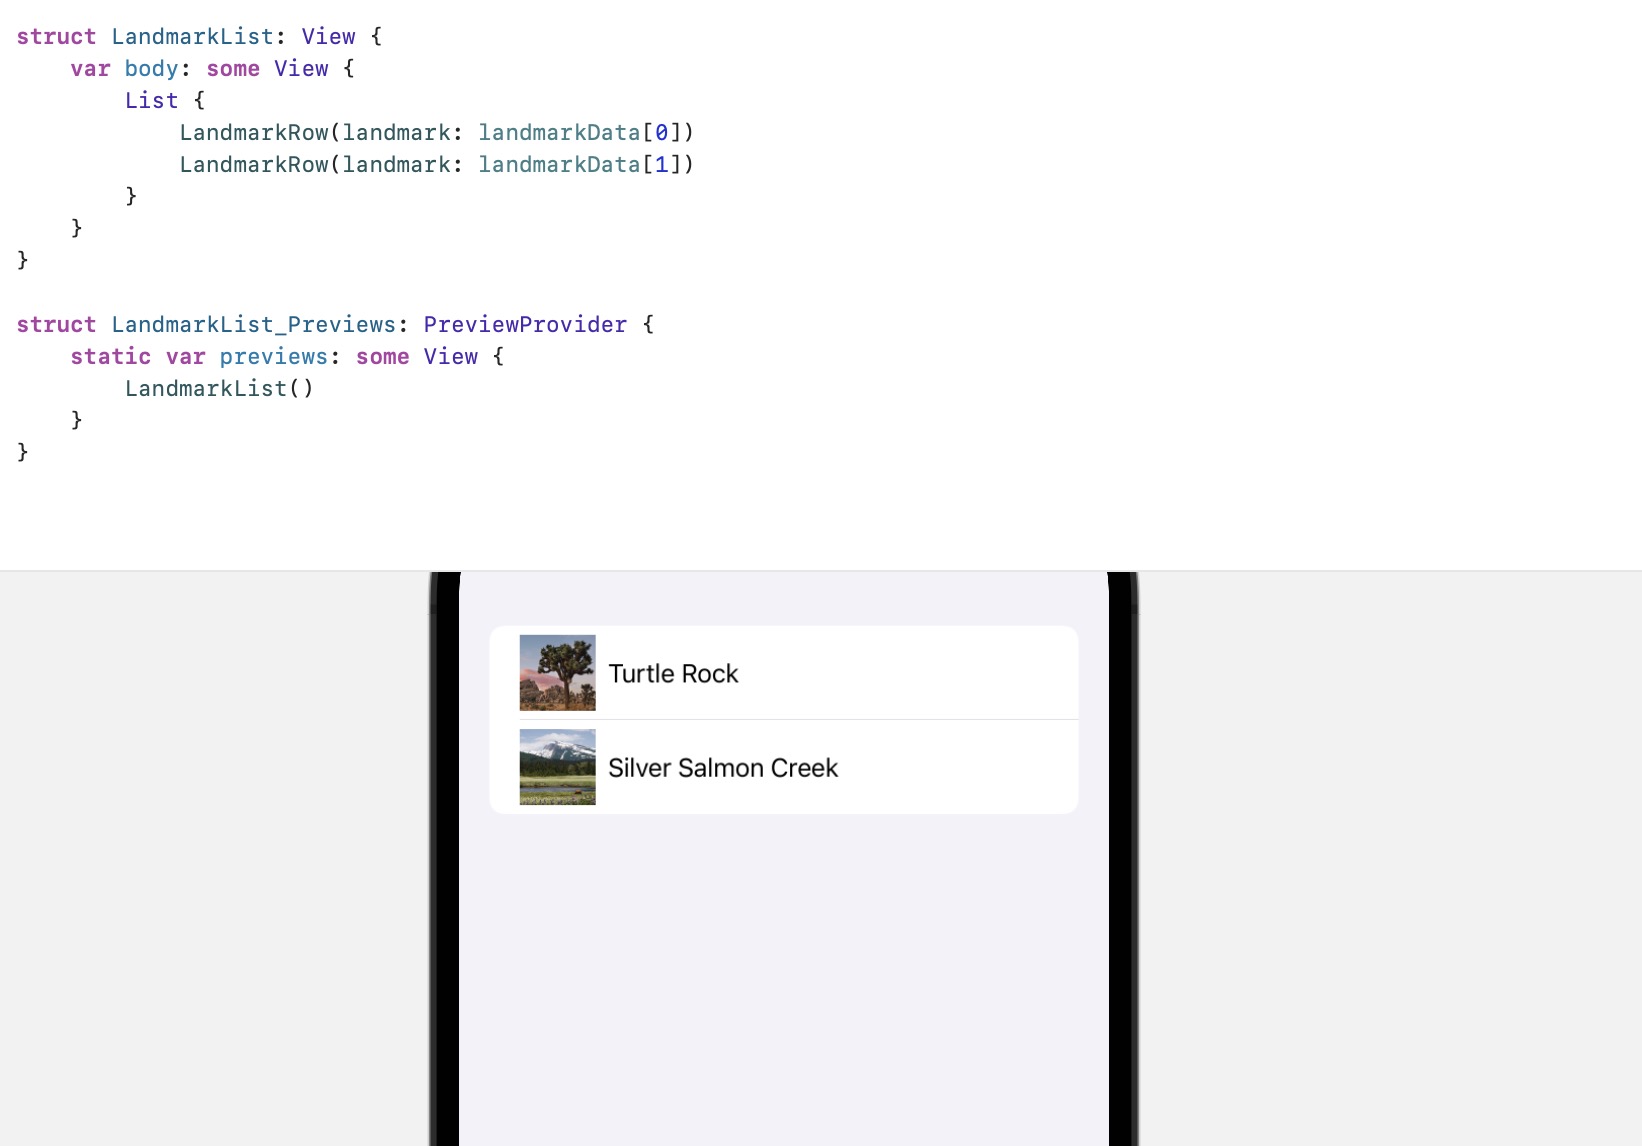
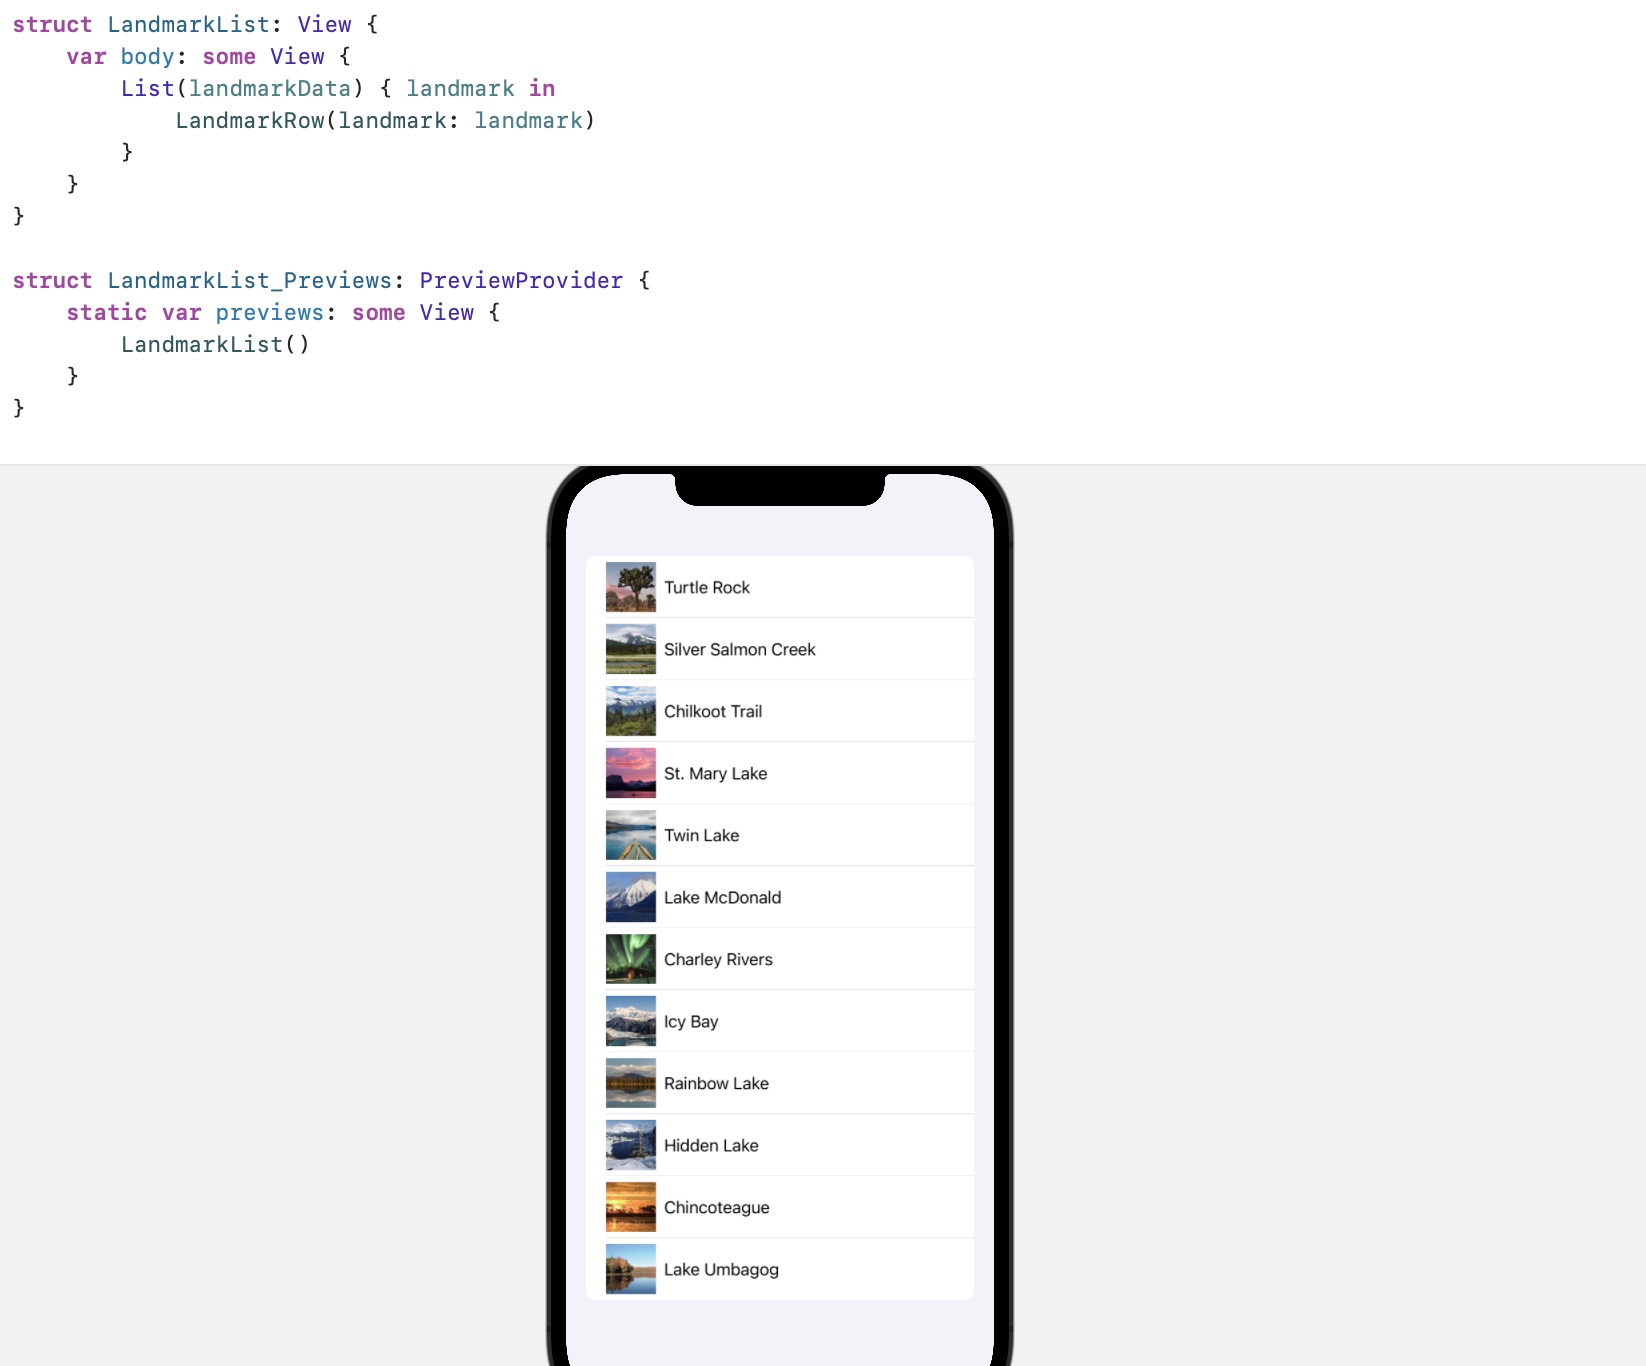
- Create a SwiftUI view named landmark List Swift, replace the Text created by default with List, and take the first two LandmarkRow instances as sub elements of the List. Two landmarks will be displayed in the preview view in the form of List:
6, Create dynamic list
- In addition to listing each element in the list separately, the list can also be generated dynamically from a collection:
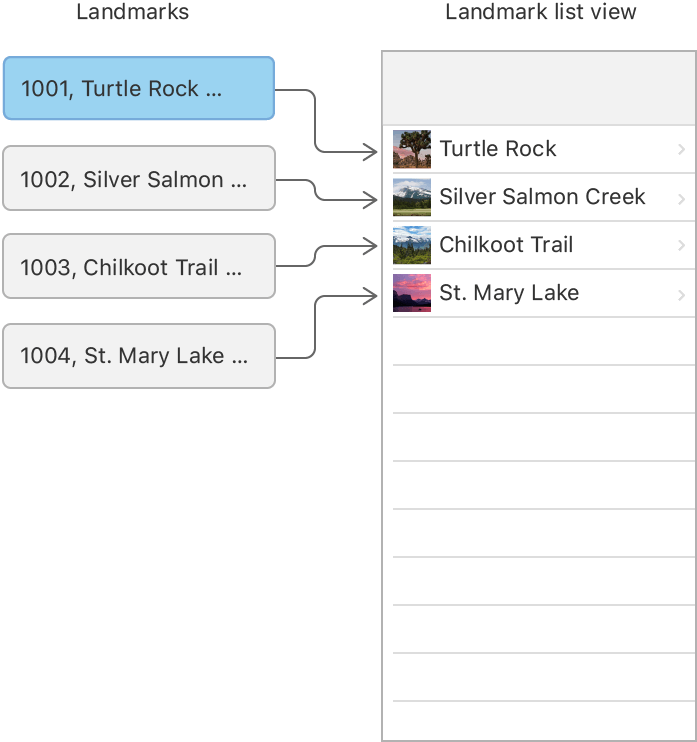
- When creating a list, you can pass in a collection data and a closure. The closure will return a view for each data element, which is the row view of the list.
- Remove two statically specified row views from the list and transfer landmarkData data to the list initializer. The list should be used with identifiable data types. There are two methods to make the data become identifiable data types:
-
- Pass in a keypath to specify which field in the data is used to uniquely identify the data element;
-
- Let the data follow the Identifiable protocol.
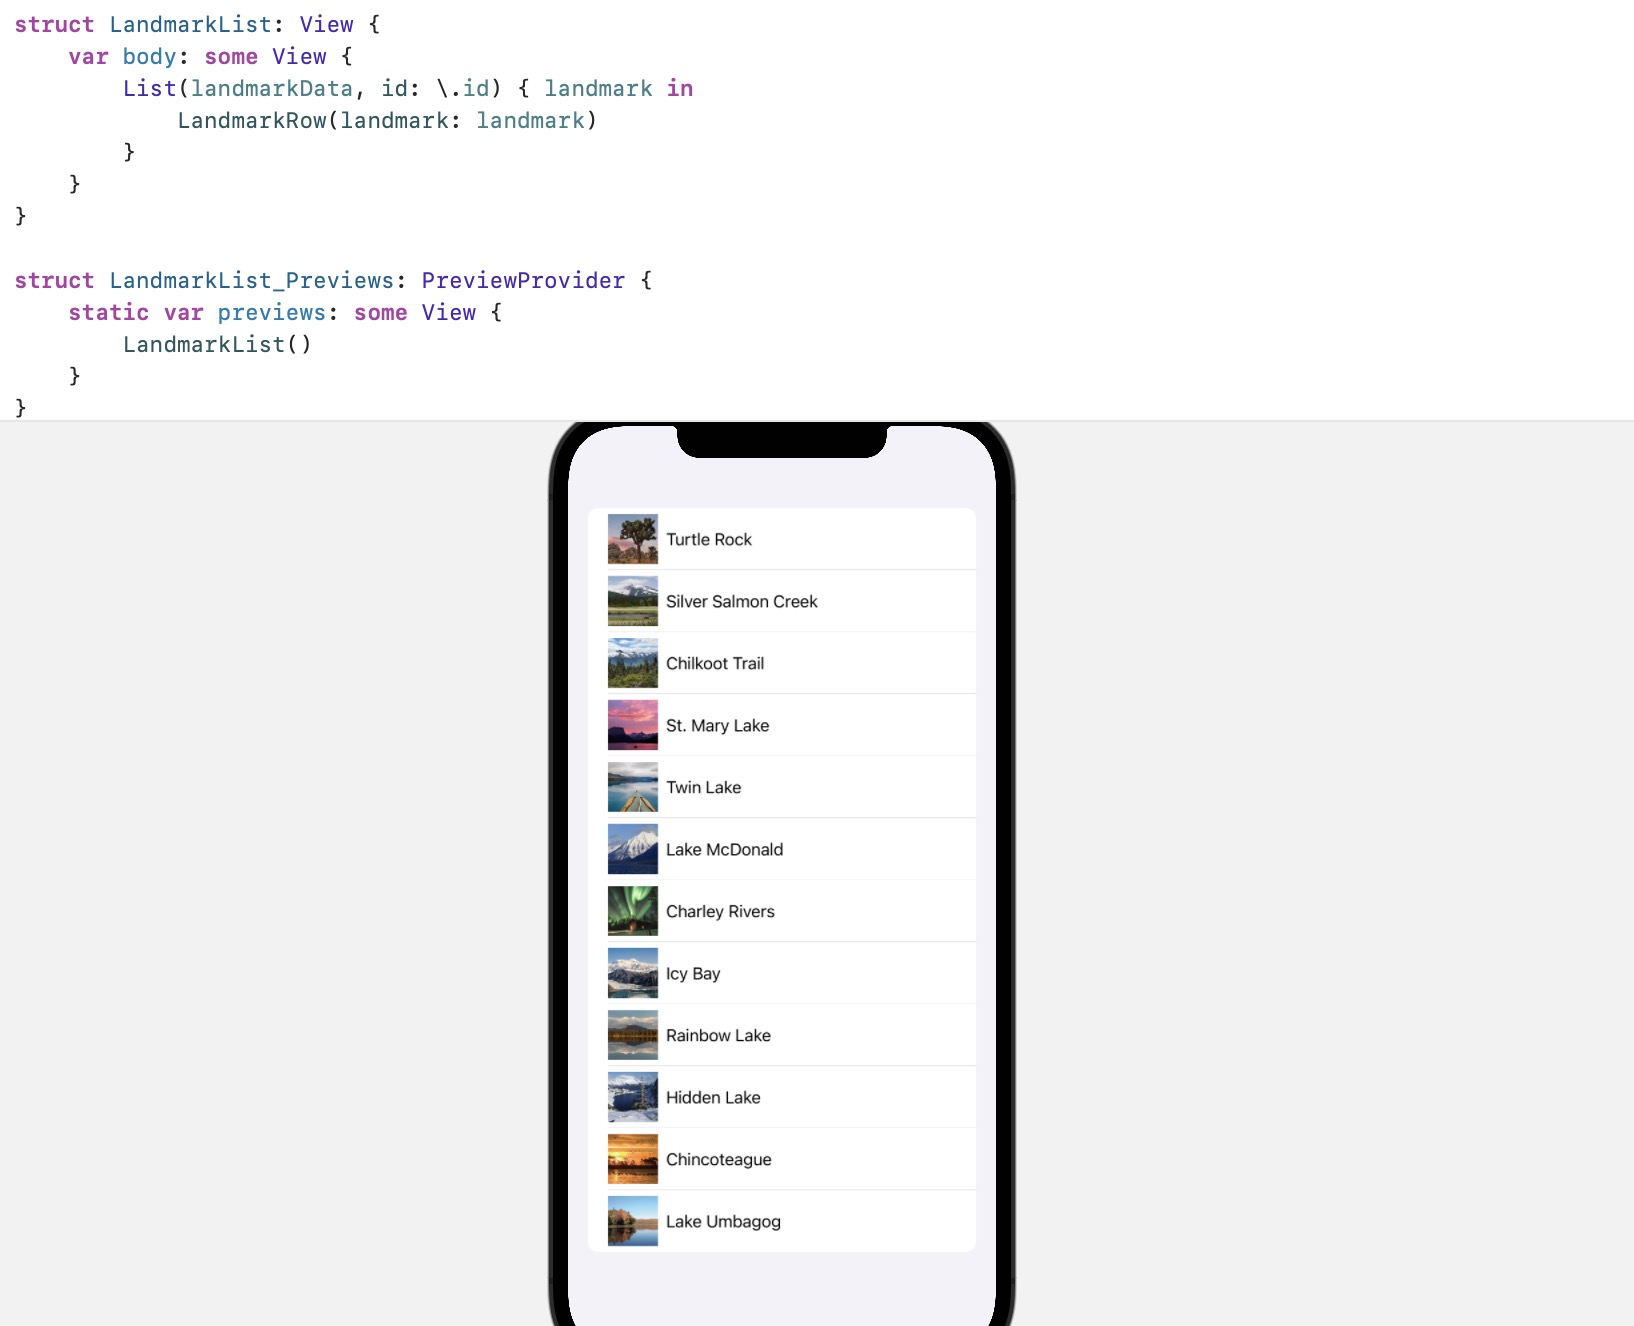
- A landmark row view is returned in the closure. The List initializer specifies the data set landmarkData and the unique identifier keypath: ID, and the List will be generated dynamically, as shown in the following figure:
- Switch to the file Landmark Swfit declares that the Landmark type follows the Identifiable protocol. Because the Landmark type has defined the id attribute, which just meets the Identifiable protocol, there is no need to add other codes:

- Now switch back to the file landmarklist Swift, remove keypath ID, because the elements of the landmarkData data data set have followed the Identifiable protocol, they can be used directly in the list initializer without manually indicating the unique identifier of the data:
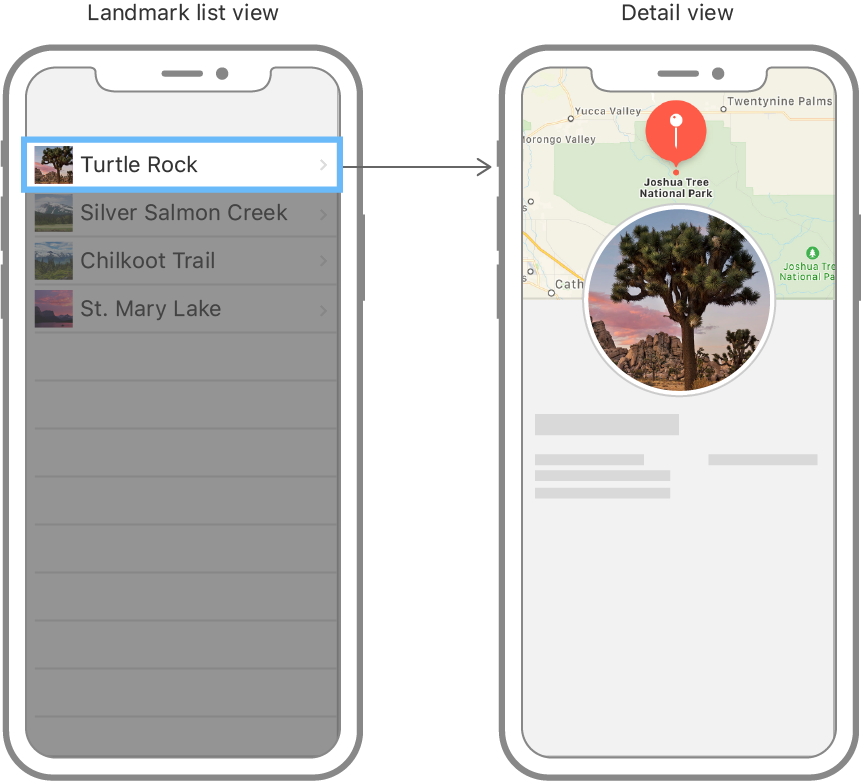
7, Set page navigation from list page to details page
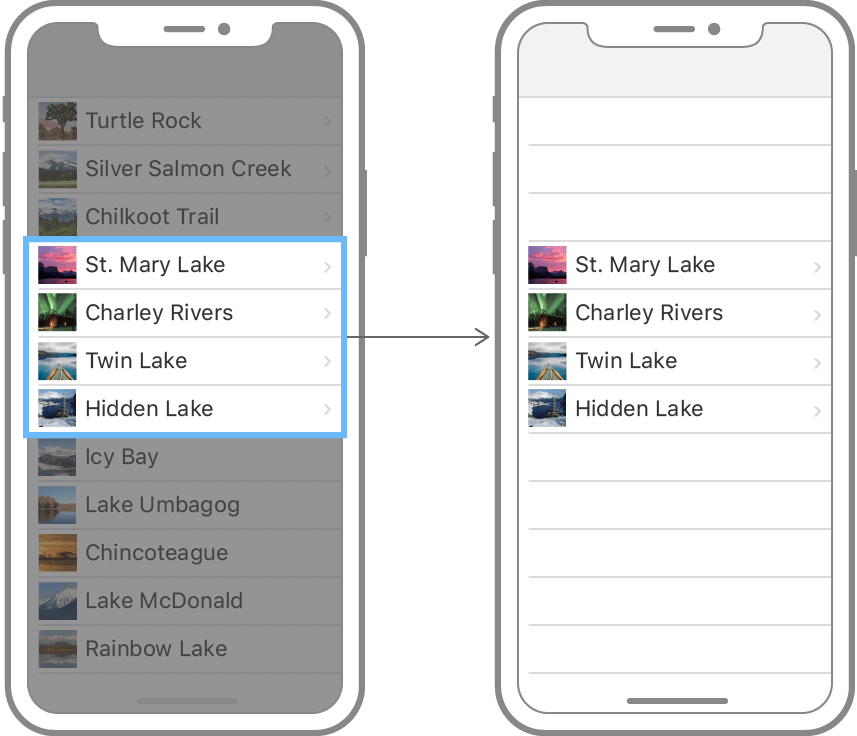
- The landmark list can be rendered and displayed normally, but the elements in the list do not respond after clicking, and the landmark details page cannot be jumped; Now you need to add navigation capability to the list, nest the list view into the NavigationView view, and then nest each row view of the list into the NavigationLink view to establish a jump from the landmark list view to the landmark details page:
- Nest the dynamically generated list view into a NavigationView:
struct LandmarkList: View {

    var body: some View {
        NavigationView {
            List(landmarkData) { landmark in
                LandmarkRow(landmark: landmark)
            }
        }
    }
}
- Call navigationBarTitle(_ 😃 Modifier sets the navigation bar title when the landmark list is displayed:
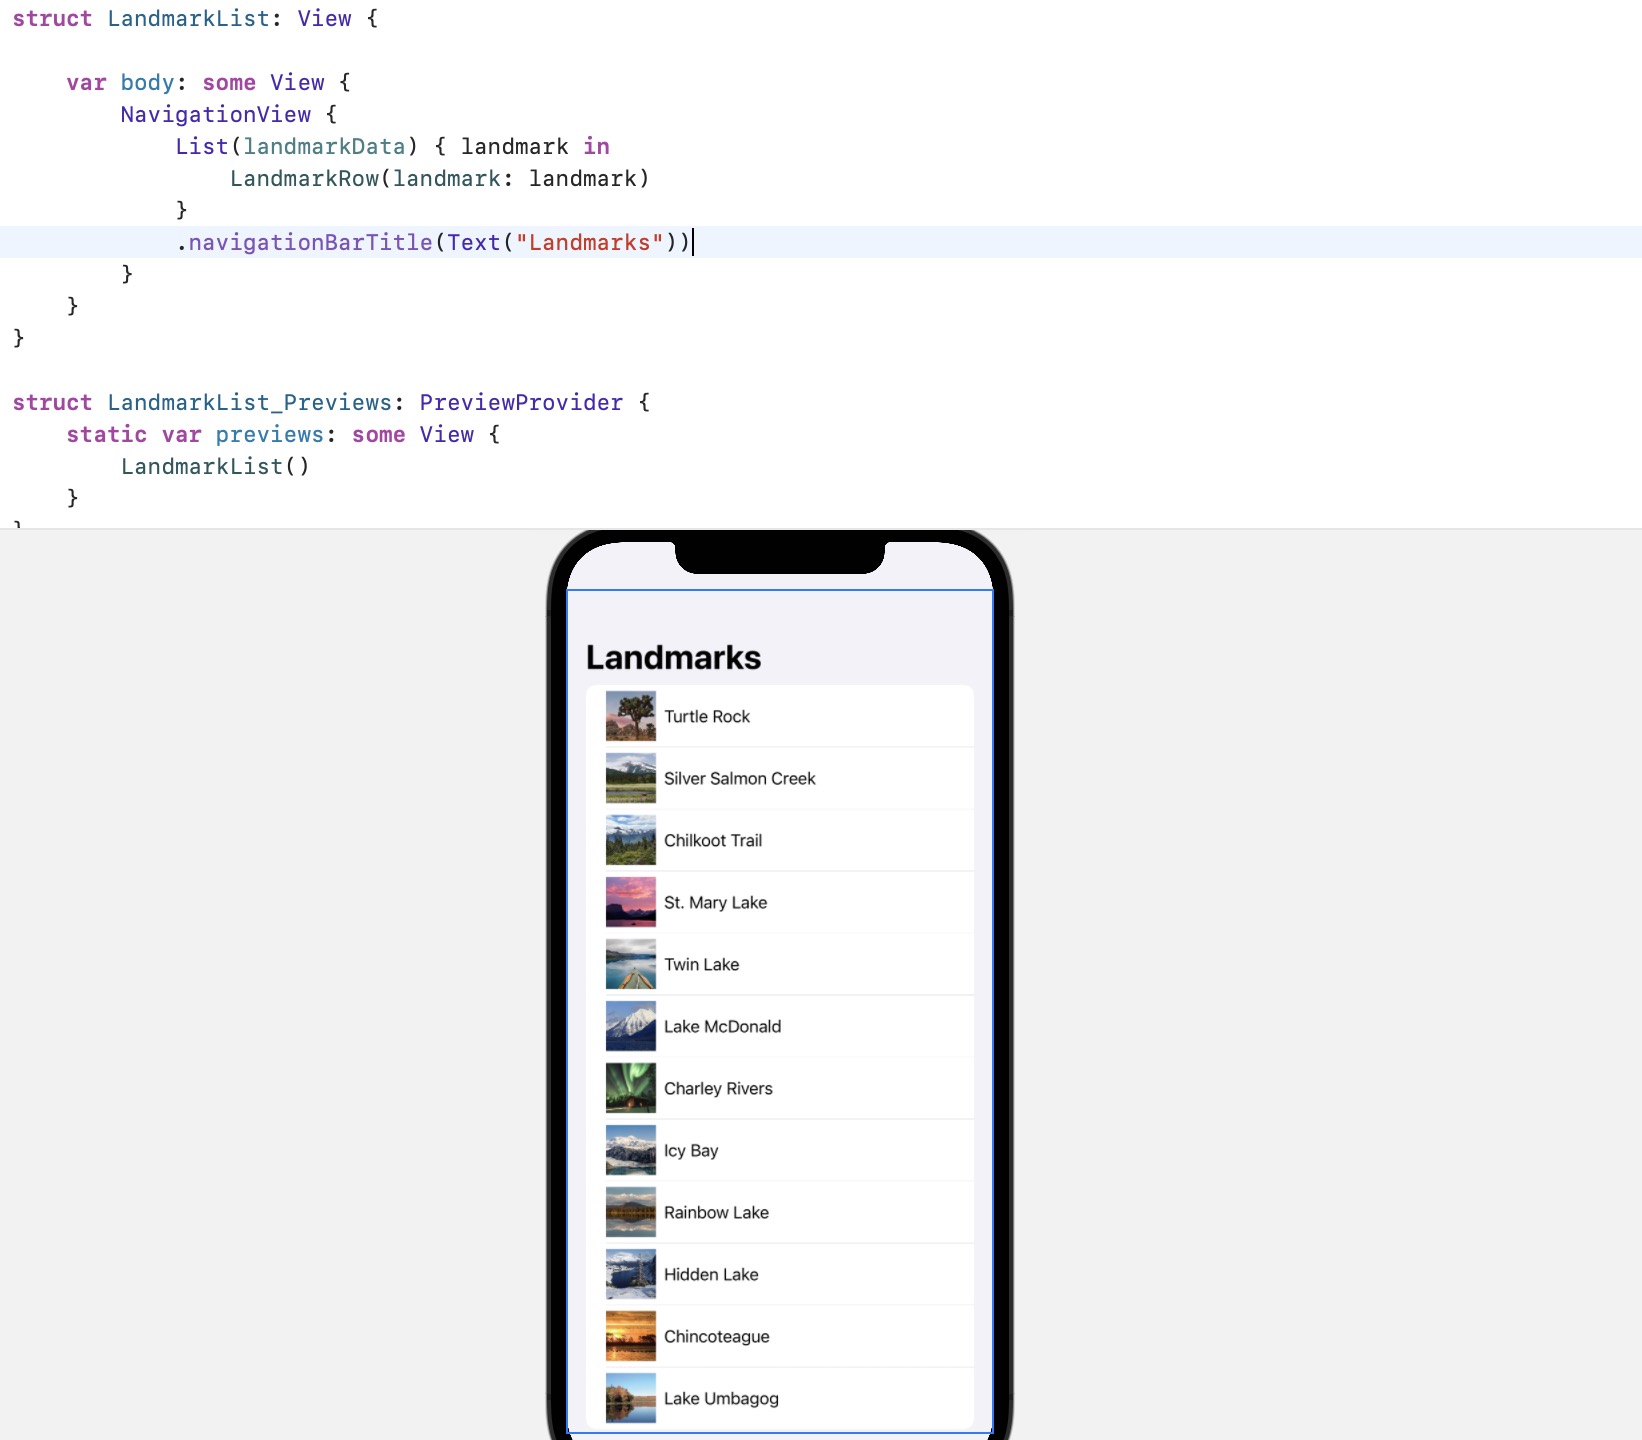
- In the closure of the list, wrap each row element in the NavigationLink and return, and specify the ContentView view as the target view:
struct LandmarkList: View {

    var body: some View {
        NavigationView {
            List(landmarkData) { landmark in
                NavigationLink(destination: ContentView()) {
                    LandmarkRow(landmark: landmark)
                }
            }
            .navigationBarTitle(Text("Landmarks"))
        }
    }
}
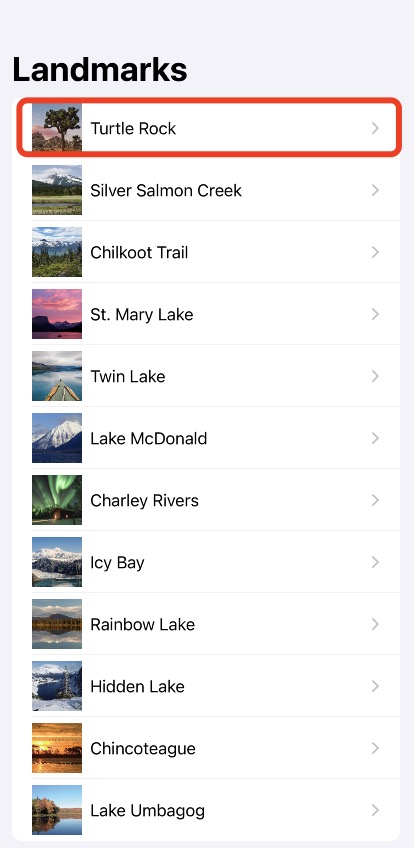
- When switching to the real-time preview mode, you can directly click any line of the landmark list, and now you can jump to the landmark details page:
8, Child view incoming data
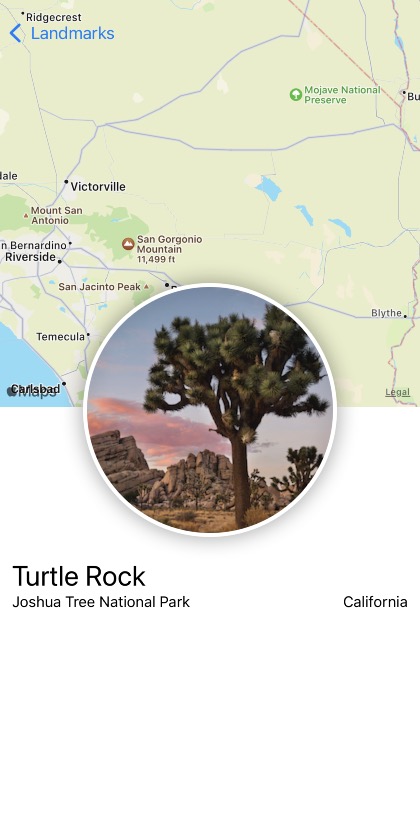
- At present, the ContentView view still uses dead data for display. Like the landmark row view, the ContentView view and its internal sub views also need to pass in landmark data and use it for actual display. Starting from the sub views (CircleImage and MapView) of ContentView, they need to be transformed into presentation using the incoming data instead of dead data presentation in the layout code:
- In circleimage In the swift file, add a storage attribute named image, which is a common mode in building SwiftUI views. It often wraps or encapsulates some attribute modifiers:
struct CircleImage: View {

    var image : Image
    var body: some View {
        image
            .clipShape(Circle())
            .overlay(
                Circle().stroke(Color.white, lineWidth: 4))
            .shadow(radius: 10)
    }
}
- Update the preview structure of CirleImage and pass in the picture of Turtle Rock for preview:
struct CircleImage_Previews: PreviewProvider {
    static var previews: some View {
        CircleImage(image: Image("turtlerock"))
    }
}
- In MapView Add a coordinate attribute to swift and use this attribute to replace the written latitude and longitude coordinates:
struct MapView: UIViewRepresentable {

    var coordinate : CLLocationCoordinate2D

    func makeUIView(context: Context) -> MKMapView {
        MKMapView(frame: .zero)
    }

    func updateUIView(_ uiView: MKMapView, context: Context) {
        let span = MKCoordinateSpan(latitudeDelta: 0.02, longitudeDelta: 0.02)
        let region = MKCoordinateRegion(center: coordinate, span: span)
        uiView.setRegion(region, animated: true)
    }
}
- Update the preview structure of MapView and pass in the longitude and latitude data of each landmark:
struct MapView_Previews: PreviewProvider {
    static var previews: some View {
        MapView(coordinate: landmarkData[0].locationCoordinate)
    }
}
- In ContentView Add the landmark attribute in swift, update the content view preview structure, pass in the data of the first landmark, and pass in the data of the corresponding sub view:
struct ContentView: View {

    var landmark : Landmark

    var body: some View {
        VStack {
            MapView(coordinate: landmark.locationCoordinate)
                .edgesIgnoringSafeArea(.top)
                .frame(height: 300)

            CircleImage(image: landmark.image)
                .offset(x: 0, y: -130)
                .padding(.bottom, -130)

            VStack(alignment: .leading) {
                Text(landmark.name)
                    .font(.title)
                HStack(alignment: .top) {
                    Text(landmark.park)
                        .font(.subheadline)
                    Spacer()
                    Text(landmark.state)
                        .font(.subheadline)
                }
            }
            .padding()
            Spacer()
        }
    }
}

struct ContentView_Previews: PreviewProvider {
    static var previews: some View {
        ContentView(landmark: landmarkData[0])
    }
}
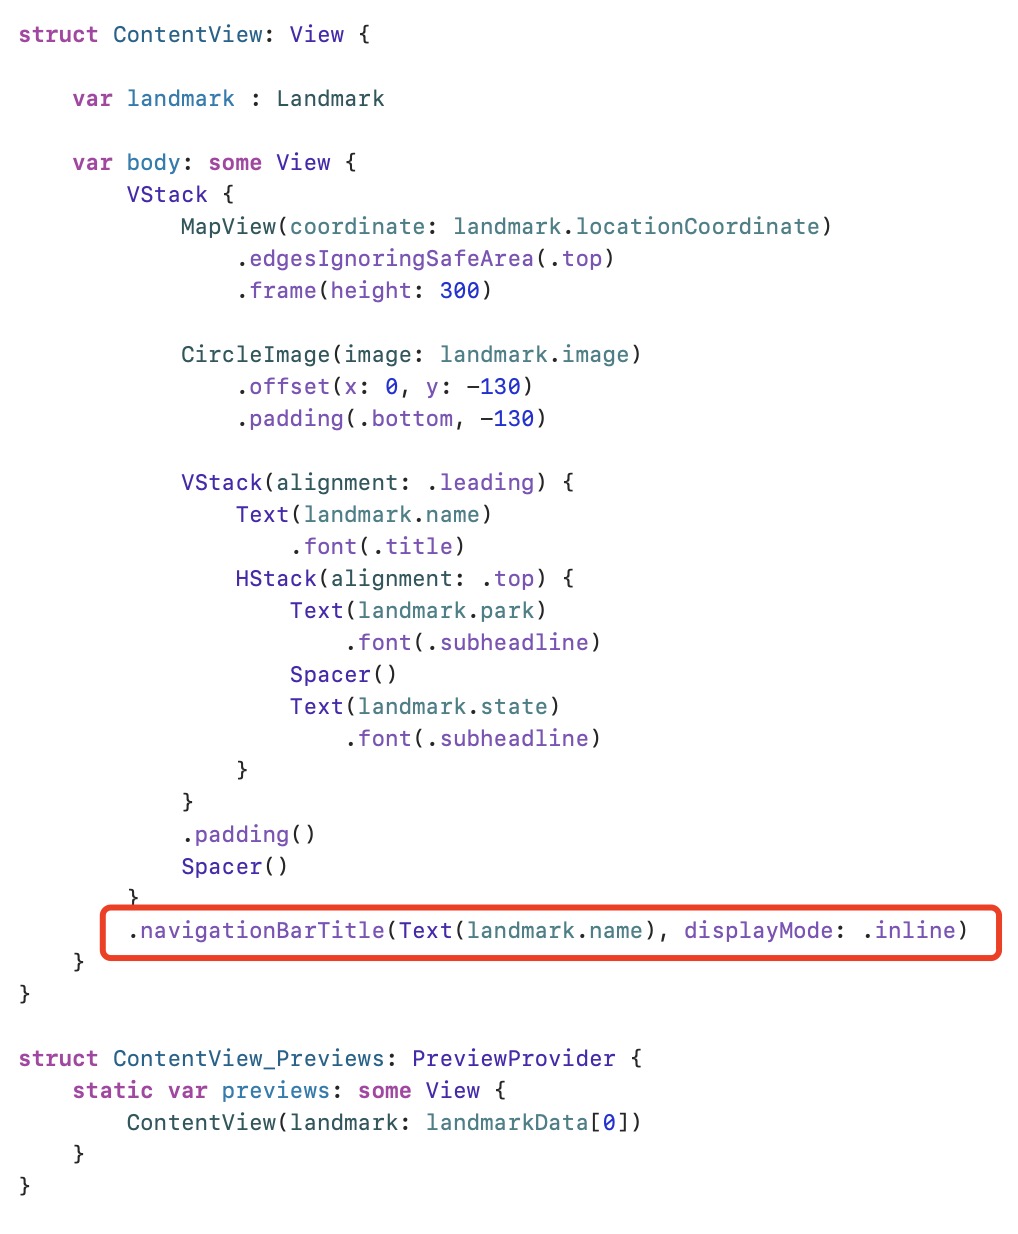
- Finally, call the navigationBarTitle (displayMode::) modifier to set a heading on the navigation bar when displaying the landmark details page.
- At the App portal, buildinglistsapp In the Main function of swift class, change the root view to landmark list:
@main
struct BuildingListsApp: App {
    var body: some Scene {
        WindowGroup {
            LandmarkList()
        }
    }
}
- In the landmark list In swift, transfer the landmark data of the current row to the landmark details page ContentView:
struct LandmarkList: View {

    var body: some View {
        NavigationView {
            List(landmarkData) { landmark in
                NavigationLink(destination: ContentView(landmark: landmark)) {
                    LandmarkRow(landmark: landmark)
                }
            }
            .navigationBarTitle(Text("Landmarks"))
        }
    }
}

struct LandmarkList_Previews: PreviewProvider {
    static var previews: some View {
        LandmarkList()
    }
}
- Switch to the real-time preview mode to check whether it is normal to jump from the corresponding row of the landmark list page to the corresponding landmark detail page:
9, Dynamically generate preview view
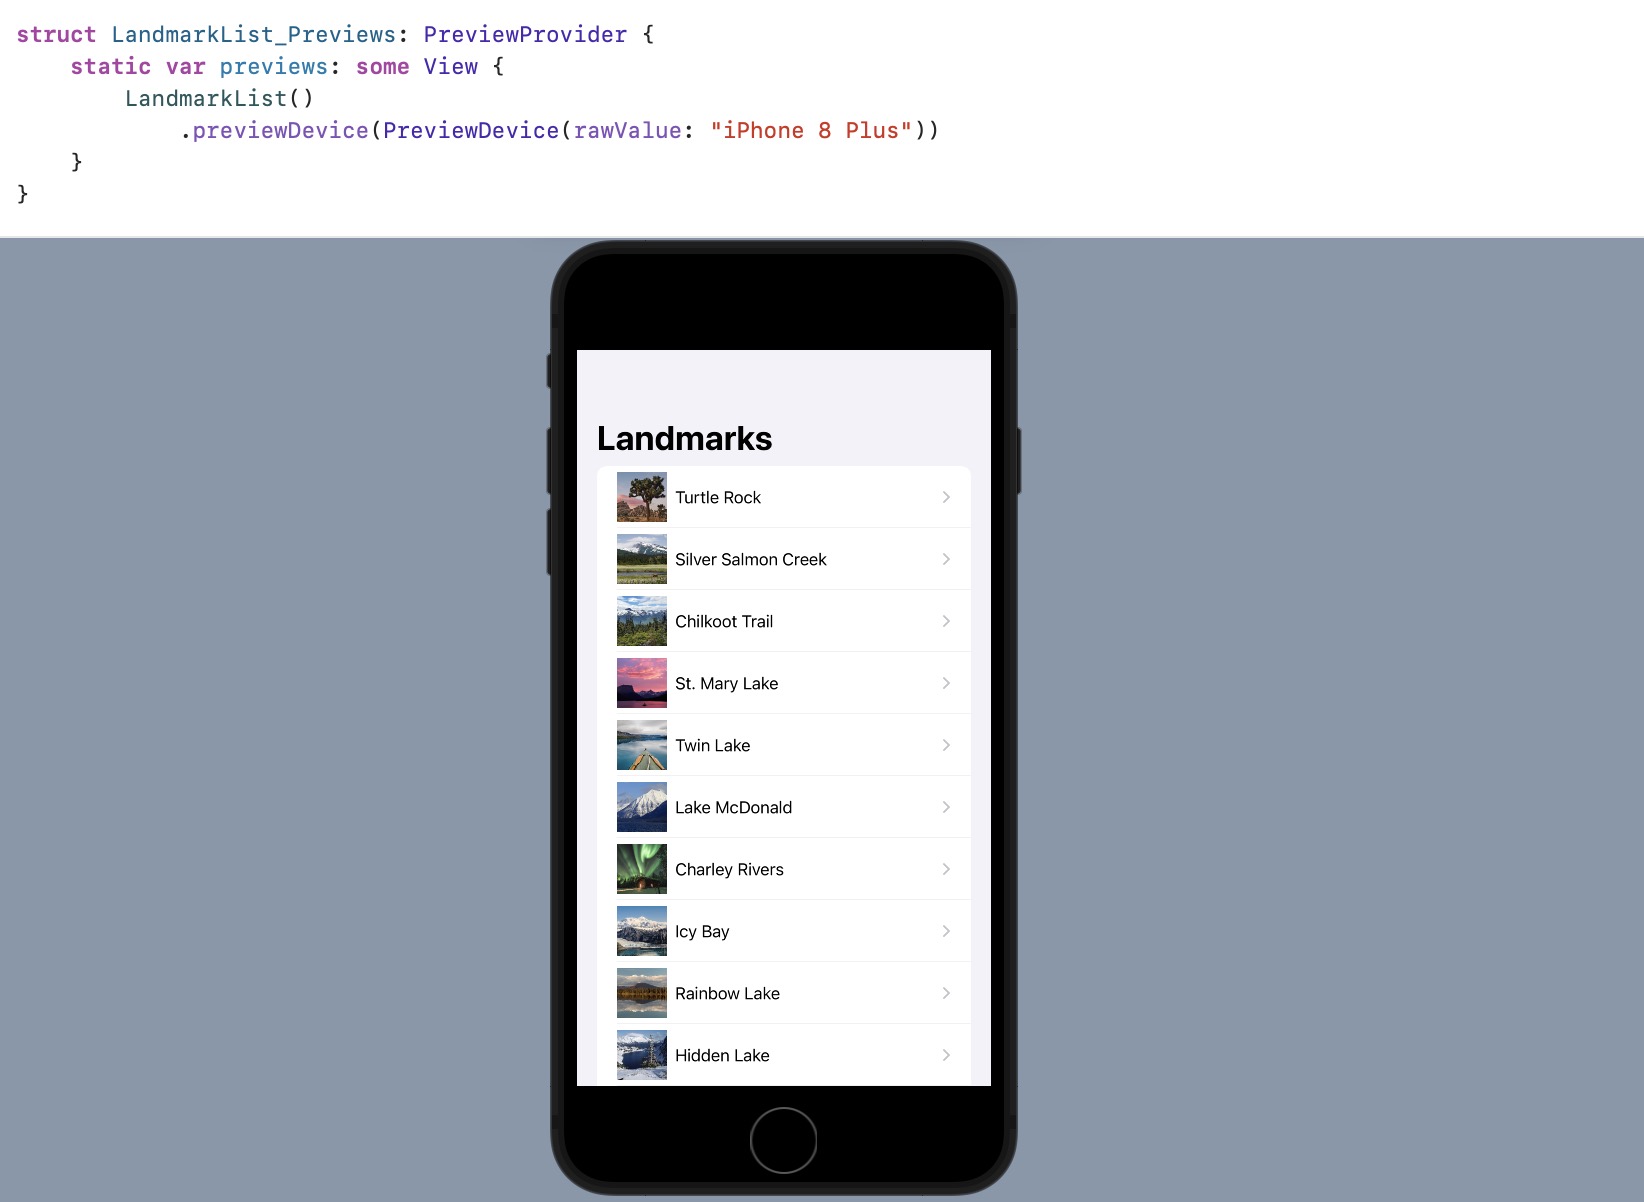
- Next, different preview views will be displayed on devices of different sizes. By default, the preview view will select the device size selected by the current Scheme for rendering. You can use previewDevice(_ 😃 Modifier to change the device of the preview view:
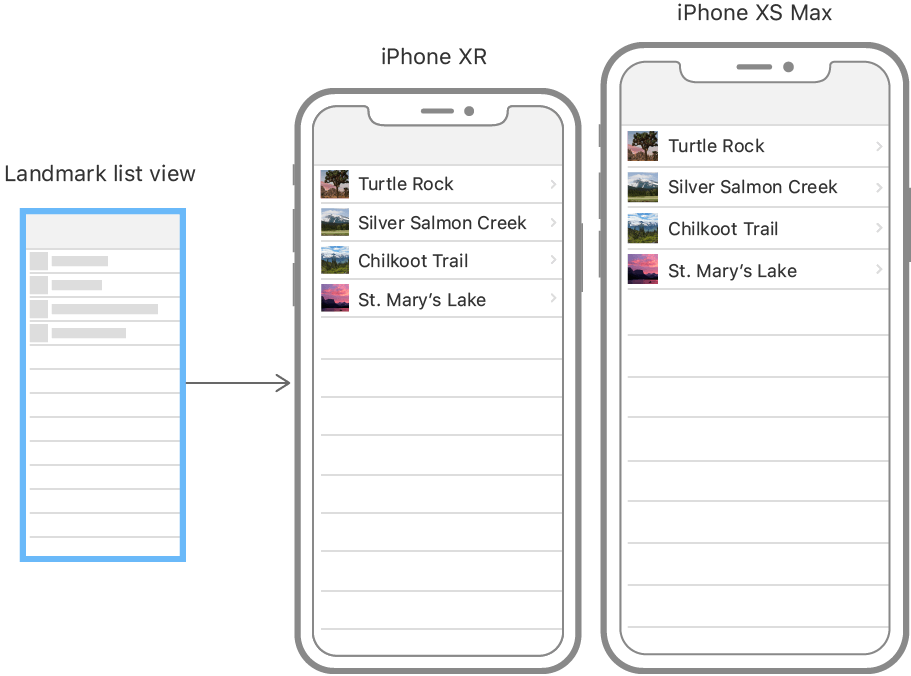
- Change the current preview list to render on iPhone 8 Plus devices. You can use the device name on the Xcode Scheme menu to specify the rendering device:
- In the preview view of the list, you can also nest the landmark list into the ForEach instance and use the device array name as the data. The ForEach operation works on set type data. Just as the list uses set type data, ForEach can be used in any scenario used by subviews, such as stack, list, group, etc. When the element data is a simple value type (such as string type), you can use self is identified as a keypath:
struct LandmarkList_Previews: PreviewProvider {
    static var previews: some View {
        ForEach(["iPhone 8 Plus", "iPhone 11 Pro Max"], id: \.self) { deviceName in
            LandmarkList()
                .previewDevice(PreviewDevice(rawValue: deviceName))
        }
    }
}
- Use the previewDisplayName(:) modifier to add device labels to the preview view. You can set several more devices on the canvas for preview and compare the display of views under different devices.